How to Build a Marketo Email Template: mktoText, mktoImg, Modules and Variables (Free Template Included)
How to turn HTML into a Marketo Email 2.0 template: editable mktoText and mktoImg elements, a container of modules editors can add and reorder, variables for colors and buttons, and the tokens every email needs.
 Rupak NepaliPublished Nov 12, 2026
In Marketo Engage, a well-built email template saves hours every week. Marketers pick it, add the modules they need, change the words and images, and send, without asking a developer and without breaking the layout. A badly built one gets copied, hacked and patched until every email looks slightly different.
This guide shows how to build a good one with Marketo’s Email 2.0 template syntax: editable elements, a container of modules, and variables. It walks through a free, modular newsletter template you can download and import.
The building blocks
An Email 2.0 template is HTML with special classes and attributes. Every editable element needs three things: a Marketo class, a unique id, and an mktoName (the label editors see).
| Element | What editors can do | Syntax |
|---|---|---|
| Editable text | Edit rich text: words, bold, links, lists | <div class="mktoText" id="intro" mktoName="Intro"> |
| Editable image | Swap the image, its link and alt text | <img class="mktoImg" id="heroImg" mktoName="Hero image" src="..."> |
| Container | Holds the modules | <table class="mktoContainer" id="mainContainer"> |
| Module | Add, duplicate, reorder and delete whole sections | <tr class="mktoModule" id="articleModule" mktoName="Article"> |
| Variable | Change a value (color, text, on/off) in the right-hand panel | <meta class="mktoColor" id="accentColor" mktoName="Accent color" default="#2f6fed"> |
Anything without these classes is locked. That’s how the template protects the design: editors can change content, not structure.
The template we’ll build
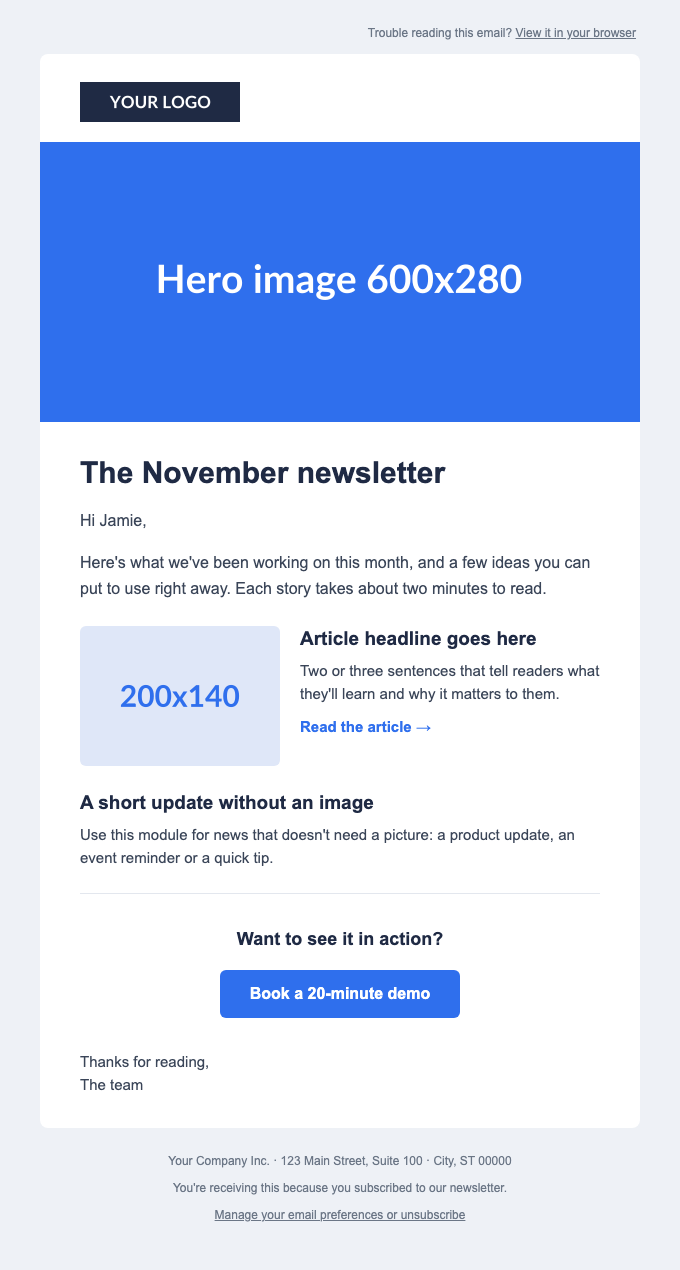
It’s a 600-pixel, table-based layout that works in Outlook on Windows, stacks into one column on phones, and has dark-mode colors. You can download it along with an event invitation template, then follow along. Import steps are in 2 Free Marketo Email Templates.
Step 1: Editable text and images
Wrap each piece of text editors should change in a div with the mktoText class. Put the font and color on the div itself, so editors type into a block that’s already styled:
<div class="mktoText text" id="intro" mktoName="Intro"
     style="font-family:Arial,Helvetica,sans-serif;font-size:16px;line-height:26px;color:#3a4558;">
  <p style="margin:0 0 16px;">Hi {{lead.First Name:default=there}},</p>
  <p style="margin:0;">Here's what we've been working on this month...</p>
</div>
For images, add mktoImg to the img tag. Keep the width and height attributes, because Outlook ignores CSS sizes:
<img class="mktoImg fluid" id="heroImg" mktoName="Hero image"
     src="https://placehold.co/600x280/2f6fed/ffffff/png?text=Hero+image+600x280"
     width="600" height="280" alt=""
     style="display:block;width:600px;max-width:100%;height:auto;">
Every id must be unique in the template. Use names that describe the element (heroImg, articleText) rather than text1, text2. Marketo uses the IDs to keep content when you update the template later.
Step 2: A container of modules
Modules are what make Email 2.0 templates flexible. Each module is a reusable section. In the editor, marketers can add any module from the list, duplicate it, move it up or down, or delete it. One template can produce a short announcement, a five-story newsletter or anything between.
The rules are strict, and Marketo rejects the template if you break them:
- Modules must sit inside an element with the
mktoContainerclass. - If the container is a
table(ortbody,thead,tfoot), the modules must betrrows. If the container is atd, the modules must betables. - Every module needs a unique
idand anmktoName.
The newsletter’s card is the container, and each row is a module:
<table role="presentation" width="600" class="container bg-card mktoContainer" id="mainContainer"
style="width:600px;max-width:600px;background:#ffffff;border-radius:8px;">
<tr class="mktoModule" id="articleModule" mktoName="Article: image left">
<td class="px" style="padding:0 40px 24px;">
<table role="presentation" width="100%">
<tr>
<td class="stack stack-pad" width="200" valign="top" style="width:200px;padding-right:20px;">
<img class="mktoImg fluid" id="articleImg" mktoName="Article image" src="..." width="200" height="140" alt="">
</td>
<td class="stack" valign="top">
<div class="mktoText text" id="articleText" mktoName="Article text">
<h2>Article headline goes here</h2>
<p>Two or three sentences...</p>
<p><a href="https://www.example.com/blog/article">Read the article →</a></p>
</div>
</td>
</tr>
</table>
</td>
</tr>
<!-- more modules: Logo, Hero image, Headline and intro, Article: text only, Divider, Call to action, Sign-off -->
</table>When an editor duplicates a module, Marketo gives the elements inside it new IDs automatically, so you only need unique IDs in the template itself.
Two optional module attributes are worth knowing. mktoAddByDefault="false" keeps a module in the list but leaves it out of new emails created from the template, which suits occasional sections such as an event banner. mktoActive="false" hides a module from the list altogether, which is how you retire an old module without breaking the emails that already use it.
Keep the footer outside the container. Then nobody can delete it, which matters because it holds your address and unsubscribe link.
Step 3: Variables for colors and buttons
Variables let editors change values without touching HTML. You define them as meta tags in the <head>, and use them anywhere in the template as ${id}:
<meta class="mktoColor" id="accentColor" mktoName="Accent color (buttons, links)" default="#2f6fed">
<meta class="mktoColor" id="headingColor" mktoName="Heading color" default="#1f2a44">
<meta class="mktoColor" id="pageColor" mktoName="Page background" default="#eef1f6">
<meta class="mktoString" id="ctaLabel" mktoName="Button text" default="Book a 20-minute demo">
<meta class="mktoString" id="ctaLink" mktoName="Button link" default="https://www.example.com/demo">
The button then reads its color, text and link from them:
<td align="center" bgcolor="${accentColor}" style="border-radius:6px;background:${accentColor};">
  <a href="${ctaLink}" style="display:inline-block;padding:14px 30px;...;color:#ffffff;text-decoration:none;">${ctaLabel}</a>
</td>
This is the safest way to make a button editable. A button inside rich text gets restyled by accident; a button driven by variables can only change in the ways you allow. The other variable types are mktoBoolean (on/off, for showing or hiding something), mktoNumber, mktoList (a dropdown of options) and mktoHTML.
Variables are global by default: changing the accent color changes it everywhere. Add mktoModuleScope="true" to a variable to give each module its own value, for example a different button per CTA module.
Step 4: Tokens
Tokens insert data when the email is sent. The newsletter uses three:
| Token | What it inserts |
|---|---|
{{lead.First Name:default=there}} | The person’s first name, or “there” if it’s empty |
{{system.viewAsWebpageLink}} | A link to the web version of the email |
{{system.unsubscribeLink}} | A link to your unsubscribe page |
The :default= part matters: without it, a lead with no first name gets “Hi ,”. Our Marketo tokens cheat sheet covers lead, program and system tokens, and Velocity email scripts for anything more complex.
If an email doesn’t contain an unsubscribe link, Marketo adds its default unsubscribe footer to marketing emails automatically. Including {{system.unsubscribeLink}} in your own footer replaces that default, so the footer matches your design. Point your unsubscribe page at a preference center if you have one, so people can drop one list instead of all of them.
Step 5: Test and approve
- Paste and save. In Design Studio, create the template and paste the code. Marketo checks the template when you save or approve it. If it complains, look first for a duplicate
id, a module outside the container, or a module that’s the wrong element type for its container. - Preview it as an email. Create a test email from the template. Try every module: add, duplicate, reorder, delete. Change each variable and check the result.
- Send samples to Gmail, Outlook on Windows and an iPhone. Use a lead with a first name and one without.
- Check the text version. Marketo generates one; read it once to make sure it makes sense.
- Approve the template. Only approved templates can be used for new emails, and when you change an approved template, Marketo lets you push the changes to emails that use it.
Common problems
| Problem | Cause and fix |
|---|---|
| The template won’t validate | Duplicate IDs, a missing mktoName, or a module that isn’t a direct row of its table container |
| Modules can’t be added or moved | The modules aren’t inside an element with the mktoContainer class |
A variable shows as ${accentColor} in the email | The variable’s meta tag is missing, or its id doesn’t match exactly (it’s case-sensitive) |
| “Hi ,” in sent emails | The token has no :default= value |
| Two unsubscribe footers | The template’s unsubscribe link doesn’t use {{system.unsubscribeLink}}, so Marketo adds its own as well |
Next in this series: two free, import-ready Marketo email templates, then landing pages with a guided landing page template. If you also use Pardot, see the Pardot version of this guide: How to Build an Editable Pardot Email Template.

Author of four Opencart book.
The recent are Opencart 4 developer book and Opencart 4 user manual