Opencart 3 theme free, download and documentation

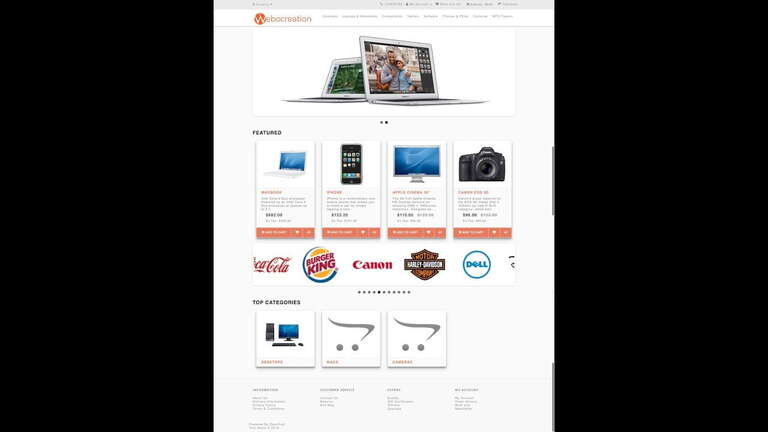
We just started to create OpenCart 3 themes for free and keep on adding our modules which are also free. This post has OpenCart 3 theme for free, download and documentation is added to customize template CSS, and video tutorial so that you can install the OpenCart 3 theme easily.

Opencart 3 theme for free

How to install the OpenCart 3 theme?

  • Click to Download NepalBuddha theme
  • Extract it, enter into the folder “webocreation-master” and upload the folders to the respective folder, you can see the theme folder at catalog/view/theme which is named as “NepalBuddhaOpencartThemeFree
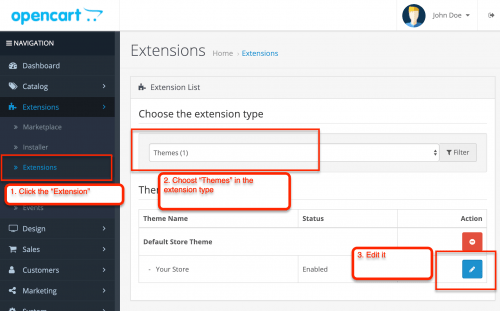
  • Go to admin >> Extensions >> Choose “Themes” in extension types and then edit the store
opencart theme free
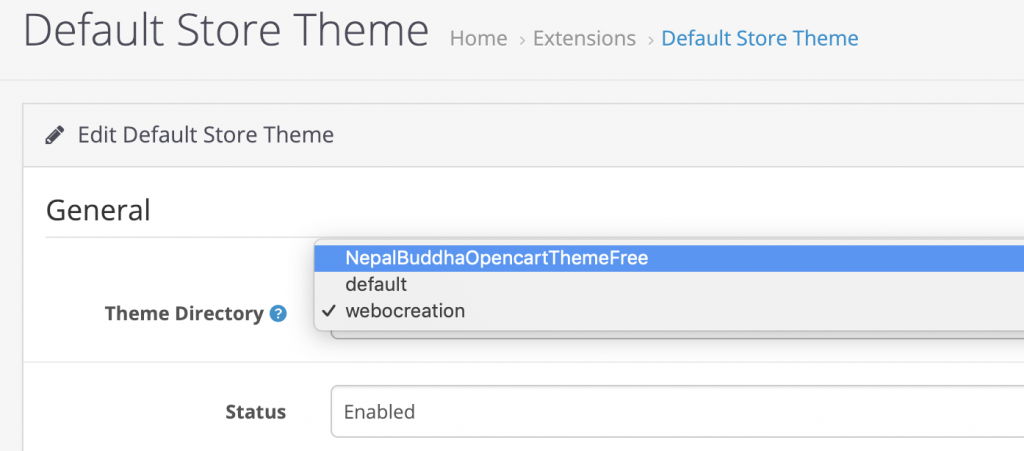
  • Then, in “Theme Directory” choose “NepalBuddhaOpencartThemeFree”
opencart theme free directory selection
  • Click save and you will see the success message.
  • Go to the frontend and you will see the changes.

Let’s see a demo at the following URL:

See Demo of OpenCart 3 free theme

Following modules are directly integrated into the theme above:

You can change your template CSS at catalog>>view>>theme>>NepalBuddhaOpencartThemeFree>> stylesheet >> webocreation-style.css

You can see updates at Github:

Following are the setup documentation for the theme:

Please provide us with your ideas and requirement and we try to integrate into the theme as much as possible and make it free to use.

Install, configure, uninstall, remove OpenCart module video tutorial guide

In this opencart tutorial, we will show how to upload, install, configure, uninstall, delete and remove opencart 3 modules or extensions with which it became base for programmers to start making a custom module or theme.

Uploading a module in OpenCart

OpenCart is a module-based system that allows us to extend functionalities with an unlimited module instance system. What unlimited module instance system means is we can show many modules of one module on the same page and on many different pages. Let’s take an example of Banner module, we can show multiple banners in multiple places of one page and in other pages also.

To upload a module I will show you two ways, one through FTP and another through Admin panel which also needs FTP enabled. I am using OpenCart 3.0.2.0, a similar way for 2.2.

[slideshare id=126787901&doc=7-installingopencartmodule2-181226215806]

First, let’s install through FTP

Another way is through the Admin Panel:

Login into store administration panel and go to Extensions >> Extension installer.

module-installer

Now click on the upload button, a popup will show where you select zip file which ends with *.ocmod.zip or XML file which ends with *.ocmod.xml. Then click Ok. If you got a success message then files are uploaded properly.

module-upload-success

Now go to Extension >> Modifications, then click the clear button near the refresh button and check the Log tab.

If you see any errors then you have to solve them before clicking refresh. Some error may be like below:

2016-09-09 3:05:26 - MOD: Modification Default
FILE: system/engine/action.php
REGEX: ~(require|include)(_once)?\(([^)]+)~
FILE: system/engine/loader.php
REGEX: ~(require|include)(_once)?\(([^)]+)~
FILE: system/library/config.php\
REGEX: ~(require|include)(_once)?\(([^)]+)~
FILE: system/library/language.php
REGEX: ~(require|include)(_once)?\(([^)]+)~
FILE: system/library/template/php.php
REGEX: ~(require|include)(_once)?\(([^)]+)~
FILE: system/library/template/tiwg.php
REGEX: ~(require|include)(_once)?\(([^)]+)~
MOD: Newsticker
FILE: admin/controller/common/column_left.php
CODE: if ($this->user->hasPermission('access', 'design/layout')) {
FILE: admin/language/en-gb/common/column_left.php
CODE: $_['text_affiliate']
CODE: if ($this->user->hasPermission('access', 'design/layout')) {
NOT FOUND - OPERATIONS ABORTED!
----------------------------------------------------------------

If you don’t see any error then click refresh.

refresh-button

Whenever you enable/disable or delete a modification you need to click the refresh button to rebuild your modification cache!

If you click refresh and see error then you have to delete folder inside system\storage\modification, don’t delete index.html, then check the log again and solve it before you click refresh. If errors keep on showing then better not to use the module or hire experts.

Another way is Uploading XML file at system/ folder

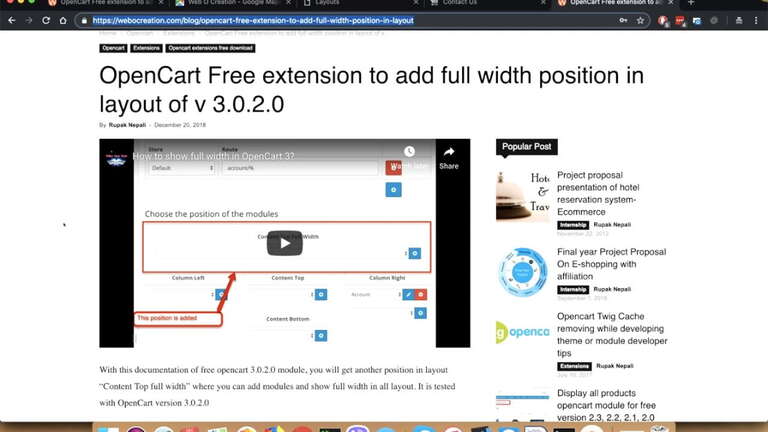
You can directly upload the XML file in the system/ folder as well. Some modules like https://webocreation.com/opencart-free-extension-to-add-full-width-position-in-layout 

Sometime you may get the following errors while uploading module:

FTP needs to be enabled in the settings:

Your FTP is not enabled at your store, see this post on how to enable FTP in Opencart.

Invalid file type! :

You uploaded incorrect files and folders. Check whether the file name or zip ends with .ocmod.zip or ocmod.xml

While uploading the module if any files get overridden then it will show like below:

fileoverriden

Be sure you did not overridden your core files.

Could not connect as yoursitename.com:21

It means that it is unable to connect to your FTP. Check your FTP username, password, and port.

For an OCMOD file to be uploaded the file, the file extension must be either *.ocmod.zip or ocmod.xml. I think this is done to prevent uploading non OCMOD files from the store admin.

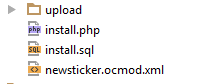
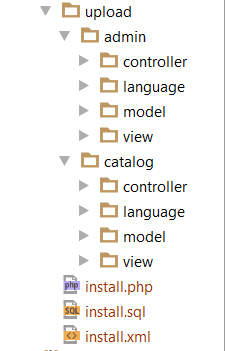
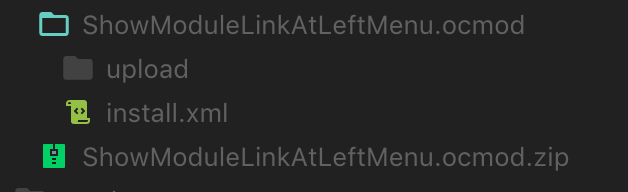
The file structure of OCMOD compressed zip ocmod.zip files may look like below but can differ as per the functionalities of the module:

ocmod_file_structure
  • Upload folder (All files under this directory will be uploaded to the directory of your OpenCart installation)
  • SQL (Database queries to add any create, drop, insert and update queries)
  • PHP (If the modification requires any custom PHP code then it needs to be placed here)
  • XML (The XML modification files which have a similar structure to VQMOD but have some changes)

Another file that we can upload is XML file then make sure it ends with NAME.ocmod.xml.

After installing the module and following the above steps, if you did not see any changes then you need to check the error logs of Ocmod at system/storage/logs

The modification requires a unique ID code!:

It means you have to open your .ocmod.xml file and change the text to unique text which is inside <code></code>

module-installer

The final step of the installation process is to apply the changes we have just made. In order to do so, go to Extensions -> Modifications and click the Refresh sign at the upper right corner of the page.

Installing a module:

Installing a module in OpenCart 2.x using the Extension installer is easy and intuitive. Go to Administration >> Extensions >> Modules in below OpenCart 2.3 but in above OpenCart 2.3 go to Administration >> Extensions then in the dropdown filter of “Choose the extension type”, select “Module”, you will see list of modules.

modue-filteration

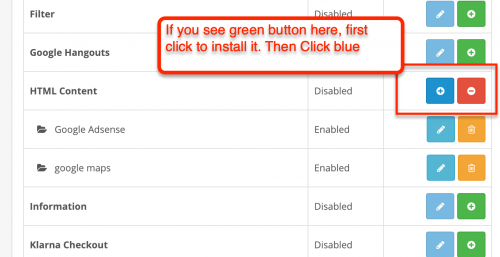
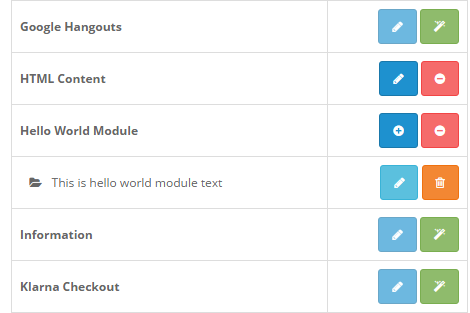
Now you can install the module by clicking, Green + sign to install, red – sign to uninstall and red delete sign to delete, blue +  sign to add another instance of the module and blue pencil sign to edit the module.

module-install-uninstall

Uninstalling a module

Uninstalling is the easiest task that I have ever done. Go to Extensions >> Choose Modules, find the module that you want to uninstall in the Modules list and click on the uninstall red minus button. Then go to Extensions >> Modifications, click on the Uninstall button of the module that you want to uninstall and click Refresh sign. You are set and your module gets uninstalled.

Remove a module

First, uninstall the module then you have to delete every file that you upload when you install the module to remove a module.

Admin Controller file to make hello world module – OpenCart Module Development

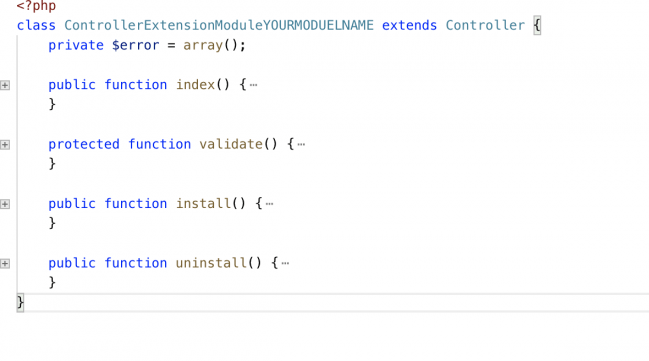
OpenCart identifies existing modules automatically, simply by reading the admin/controller/extension/module folder. Any modules existing in this folder will automatically be shown on the Modules listing page, and on the User Permissions page. Let’s start to create our hello world module by creating the file at the admin/controller/extension/module and named it helloworld.php. Then follow the following steps:

Create a class named ControllerExtensionModuleHelloWorld

Every module name should start with ControllerExtensionModule in OpenCart.
Use camel case style, avoid using special characters, URL path will be “extension/module/modulename” in our HelloWorld case it will be “extension/module/helloworld”.

Extends it with base class Controller

class ControllerExtensionModuleHelloWorld extends Controller {}

Create a public function named index

public function index(){}

This will load every time when we open the helloworld module
Opencart provides a Response class a simple PHP representation of an HTTP response message. This allows your applications to use an object-oriented interface to construct the response that needs to be returned to the client.

$this->response->setOutput($this->load->view('extension/module/helloworld', $data));

This loads the view helloworld.tpl from admin\view\template\extension\module\helloworld.tpl pass data from controller to view.

How to pass header, footer and column left section for helloworld module?

$data['header'] = $this->load->controller('common/header');
$data['column_left'] = $this->load->controller('common/column_left');
$data['footer'] = $this->load->controller('common/footer');

How to pass language data to view section?

The controller file is the place where we can load the language files to convert text into variables to be utilized in the template file. We can load the language file as below:

$this->load->language('extension/module/helloworld');

It means that the language file named helloworld.php is at admin/language/ACTIVE_LANGUAGE_FOLDER/extension/module

Then setup into the data variable as:

$data['view_variable'] = $this->language->get('language_variable');

Now if you see the echo the heading_title at view file admin\view\template\extension\module\helloworld.tpl then you will see the output as following images.

Admin Controller file to make hello world module – OpenCart Module Development

  • In the view section:
    //adding breadcrumbs
    $data['breadcrumbs'] = array();
    $data['breadcrumbs'][] = array(
    'text' => $this->language->get('text_home'),
    'href' => $this->url->link('common/dashboard', 'token=' . $this->session->data['token'], true)
    );
    $data['breadcrumbs'][] = array(
    'text' => $this->language->get('text_extension'),
    'href' => $this->url->link('extension/extension', 'token=' . $this->session->data['token'] . '&type=module', true)
    );
    $data['breadcrumbs'][] = array(
    'text' => $this->language->get('heading_title'),
    'href' => $this->url->link('extension/module/helloworld', 'token=' . $this->session->data['token'], true)
    );
  • In the view section:
    <ul class="breadcrumb">
    <?php foreach ($breadcrumbs as $breadcrumb) { ?>
    <li><a href="<?php echo $breadcrumb['href']; ?>"><?php echo $breadcrumb['text']; ?></a></li>
    <?php } ?>
    </ul>

How to add save and cancel button?

  • In the controller:
    if (!isset($this->request->get['module_id'])) {
    $data['action'] = $this->url->link('extension/module/helloworld', 'token=' . $this->session->data['token'], true);
    } else {
    $data['action'] = $this->url->link('extension/module/helloworld', 'token=' . $this->session->data['token'] . '&module_id=' . $this->request->get['module_id'], true);
    }
    
    $data['cancel'] = $this->url->link('extension/extension', 'token=' . $this->session->data['token'] . '&type=module', true);
  • In the view section:
    <div class="pull-right">
        <button type="submit" form="form-html" data-toggle="tooltip" title="<?php echo $button_save; ?>" class="btn btn-primary"><i class="fa fa-save"></i></button>
        <a href="<?php echo $cancel; ?>" data-toggle="tooltip" title="<?php echo $button_cancel; ?>" class="btn btn-default"><i class="fa fa-reply"></i></a>
    </div>
    

Setting up the data variable value to pass to the view section:

if (isset($this->request->post['helloworld_text'])) {   
 $data['helloworld_text'] = $this->request->post['helloworld_text'];
} elseif (!empty($module_info)) {    
$data['helloworld_text'] = $module_info['helloworld_text'];
} else {    
$data['helloworld_text'] = '';
}

Get the Submitted value of form in the controller:

  • Check whether the form is submitted or not $this->request->server[‘REQUEST_METHOD’] == ‘POST’
  • Get the submitted value of form in the controller: $this->request->post[‘name’]
  • Get the URL value:
    $this->request->get['module_id']

Get the modules values:

 if (isset($this->request->get['module_id']) && ($this->request->server['REQUEST_METHOD'] != 'POST')) {
            $module_info = $this->model_extension_module->getModule($this->request->get['module_id']);
 }

Validating the input type:

protected function validate() {
        if (!$this->user->hasPermission('modify', 'extension/module/helloworld')) {
            $this->error['warning'] = $this->language->get('error_permission');
        }
        if ((utf8_strlen($this->request->post['name']) < 3) || (utf8_strlen($this->request->post['name']) > 64)) {
            $this->error['name'] = $this->language->get('error_name');
        }
        return !$this->error;
    }

Permission Management

  • In the controller section:
    In the index function
if (isset($this->error['warning'])) {
    $data['error_warning'] = $this->error['warning'];
} else {
    $data['error_warning'] = '';
}

In the validate function

if (!$this->user->hasPermission('modify', 'extension/module/helloworld')) {
    $this->error['warning'] = $this->language->get('error_permission');
}

In the view section:

<?php if ($error_warning) { ?>
<div class="alert alert-danger"><i class="fa fa-exclamation-circle"></i> <?php echo $error_warning; ?>
    <button type="button" class="close" data-dismiss="alert">&times;</button>
</div>

The full code is below:

<?php

/**
 * Created by PhpStorm.
 * User: rnepali
 * Date: 10/1/2016
 * Time: 6:20 PM
 */
class ControllerExtensionModuleHelloWorld extends Controller {

    public function index(){
        //load the language file
        $this->load->language('extension/module/helloworld');
        //pass language file data to view
        $data['heading_title'] = $this->language->get('heading_title');
        $data['text_edit'] = $this->language->get('text_edit');
        $data['text_enabled'] = $this->language->get('text_enabled');
        $data['text_disabled'] = $this->language->get('text_disabled');
        $data['entry_name'] = $this->language->get('entry_name');
        $data['entry_title'] = $this->language->get('entry_title');
        $data['entry_status'] = $this->language->get('entry_status');
        $data['button_save'] = $this->language->get('button_save');
        $data['button_cancel'] = $this->language->get('button_cancel');

        if (isset($this->error['warning'])) {
            $data['error_warning'] = $this->error['warning'];
        } else {
            $data['error_warning'] = '';
        }

		if (isset($this->error['error_name'])) {
            $data['error_name'] = $this->error['error_name'];
        } else {
            $data['error_name'] = '';
        }

        $this->load->model('extension/module');
        if (($this->request->server['REQUEST_METHOD'] == 'POST') && $this->validate()) {

            if (!isset($this->request->get['module_id'])) {
                $this->model_extension_module->addModule('helloworld', $this->request->post);
            } else {
                $this->model_extension_module->editModule($this->request->get['module_id'], $this->request->post);
            }

            $this->session->data['success'] = $this->language->get('text_success');

            $this->response->redirect($this->url->link('extension/extension', 'token=' . $this->session->data['token'] . '&type=module', true));
        }


        //adding breadcrumbs
        $data['breadcrumbs'] = array();
        $data['breadcrumbs'][] = array(
            'text' => $this->language->get('text_home'),
            'href' => $this->url->link('common/dashboard', 'token=' . $this->session->data['token'], true)
        );
        $data['breadcrumbs'][] = array(
            'text' => $this->language->get('text_extension'),
            'href' => $this->url->link('extension/extension', 'token=' . $this->session->data['token'] . '&type=module', true)
        );
        $data['breadcrumbs'][] = array(
            'text' => $this->language->get('heading_title'),
            'href' => $this->url->link('extension/module/helloworld', 'token=' . $this->session->data['token'], true)
        );
        
        if (isset($this->request->get['module_id']) && ($this->request->server['REQUEST_METHOD'] != 'POST')) {
            $module_info = $this->model_extension_module->getModule($this->request->get['module_id']);
        }

        if (isset($this->request->post['name'])) {
            $data['name'] = $this->request->post['name'];
        } elseif (!empty($module_info)) {
            $data['name'] = $module_info['name'];
        } else {
            $data['name'] = '';
        }

        if (isset($this->request->post['status'])) {
            $data['status'] = $this->request->post['status'];
        } elseif (!empty($module_info)) {
            $data['status'] = $module_info['status'];
        } else {
            $data['status'] = '';
        }
        
        if (!isset($this->request->get['module_id'])) {
            $data['action'] = $this->url->link('extension/module/helloworld', 'token=' . $this->session->data['token'], true);
        } else {
            $data['action'] = $this->url->link('extension/module/helloworld', 'token=' . $this->session->data['token'] . '&module_id=' . $this->request->get['module_id'], true);
        }

        $data['cancel'] = $this->url->link('extension/extension', 'token=' . $this->session->data['token'] . '&type=module', true);

        $data['header'] = $this->load->controller('common/header');
        $data['column_left'] = $this->load->controller('common/column_left');
        $data['footer'] = $this->load->controller('common/footer');

        $this->response->setOutput($this->load->view('extension/module/helloworld', $data));
    }

    protected function validate() {
        if (!$this->user->hasPermission('modify', 'extension/module/helloworld')) {
            $this->error['warning'] = $this->language->get('error_permission');
        }
        if ((utf8_strlen($this->request->post['name']) < 3) || (utf8_strlen($this->request->post['name']) > 64)) {
            $this->error['name'] = $this->language->get('error_name');
        }
        return !$this->error;
    }

}
thanking_you

Fatal error: Cannot redeclare Loader::__get() in system\storage\modification\system\engine\loader.php

Fatal error: Cannot redeclare Loader::__get() in system\storage\modification\system\engine\loader.php

Go to YOUR_INSTALLED_FOLDER/system\storage\modification then delete all files and folder except index.html

Then refresh the front end, hope it works.

Then again install your ocmod.xml again.

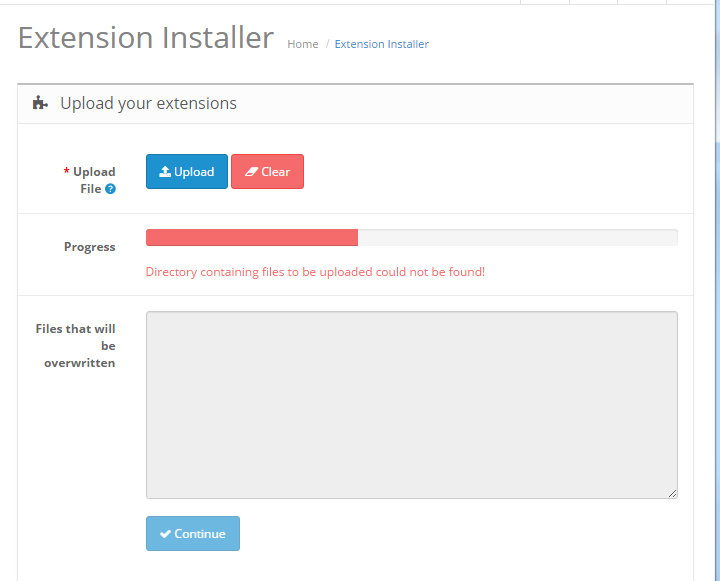
The directory containing files to be uploaded could not be found: OpenCart error

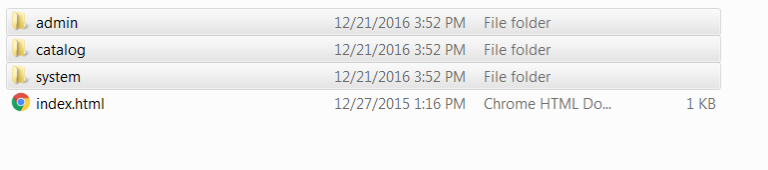
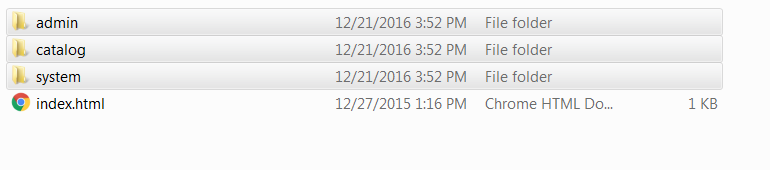
If you have come up with OpenCart error “Directory containing files to be uploaded could not be found” then it means you are uploading extensions. It means you are missing upload/ folder. Extract the files and create the upload/ folder then zip it again and upload that folder.

Following are the OCMOD file and folder structure

ocmod-file-and-folder-structure

Hope it helps to solve your issues. You can see OpenCart error: Modification requires a unique ID code!

Show demo how our Advanced featured OpenCart 3 module works

With features of the featured module of OpenCart our Advanced featured OpenCart module will contain following features:

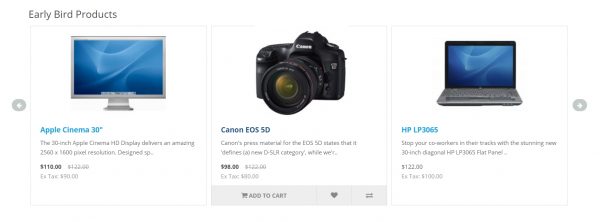
  • The module name is shown in the Title, instead of just “Featured” in the default featured module. With this, you can change and enter any wording you like. In ours let’s say “Early Bird Products”
  • Products scrolls showing some slider effects.
  • At loading, it shows the only image, title, and price but on hover over it shows the “Add to cart”,  “Wishlist” and “Compare” buttons.
  • It also changes the default image to another additional image.
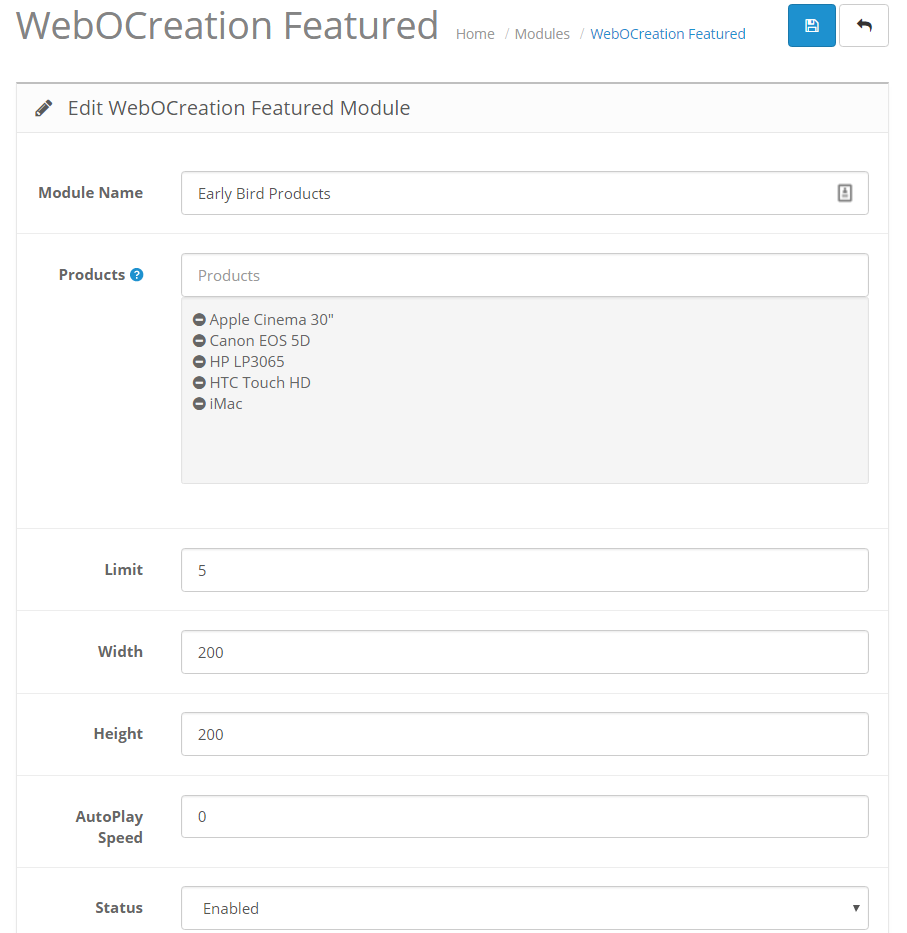
  • You can customize the speed of scrolling. If you entered zero then it will not scroll, to see hidden products need to click on the arrows.

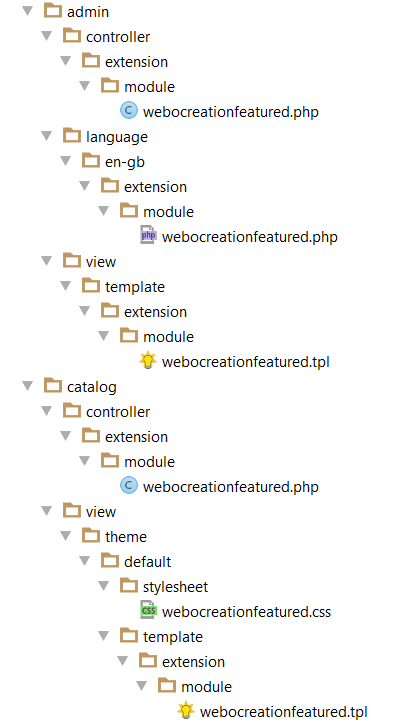
Files and folders contained in the Advanced Featured Module:

Files and folders of Advanced featured module

Download Advanced Featured Module

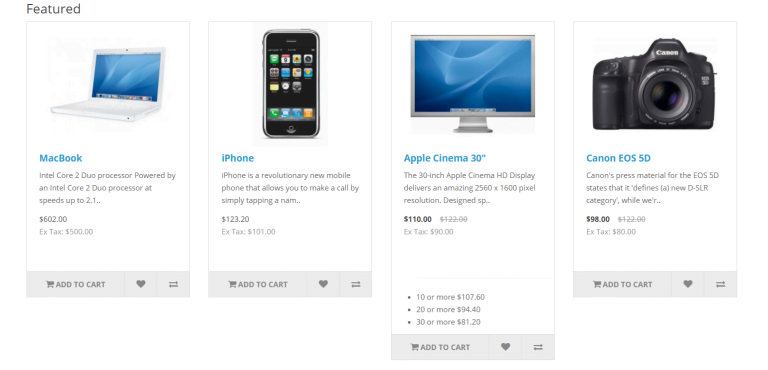
The front end will look like below image:

Early bird products opencart module

Back end settings will look like below image:

Advanced featured opencart module

All of its codes are defined in the following links:

Install, configure, uninstall, remove OpenCart module tutorial

Customize layouts and positions to show different modules in opencart

The workflow of the Hello world module

Backend Hello world module Opencart

Frontend Hello world module Opencart

Configure and show how default featured module works Opencart 3

Single Instance Opencart module VS multi-instance Opencart module

Single Instance module, Form creation, validation, and submission to the database

Single instance module frontend login module, Opencart 3 documentation [post]

Multi-instance slider testimonials module, Opencart 3 development tutorial [post]

Multi-instance testimonial free, Opencart 3 module development tutorial [post]

We hope this opencart tutorial helps you understand the featured module flow. Let us know if you have any questions or suggestions, please subscribe to our YouTube Channel for Opencart video tutorials. You can also find us on Twitter and Facebook.

Opencart OCMOD documentation

Hi me Rupak Nepali again, today I am going to cover OpenCart OCMOD documentation and tutorial for the developer and show how to start coding in OCMOD to change the files and extend functionalities. How are OCMOD code flows described here?

OCMOD is a system that allows store owners to be able to modify their store by uploading a compressed file that contains XML, SQL, and PHP files. If an OCMOD is developed correctly it can modify how a user’s OpenCart stores without changing any of the core files, This means that if a modification is removed none of the original OpenCart files need to be restored or fixed.
OCMOD is based on Qphoria’s VqMOD system.

Opencart 4 OCMOD

Opencart 3 install uninstall method in OCMOD

module install database

The detailed documentation of OCMOD for the developer is at  https://github.com/opencart/opencart/wiki/Modification-System  

Both have the same functionalities, you have to install VqMOD in OpenCart 3 and OpenCart 2 but OCMOD is by default in OpenCart 3 and you can easily upload from the admin sections.

The main feature differences for the programmers are:

Both OCMOD and VqMOD have:
Replace, Before, After, Regex, Offset, Limit, ignore if, error
Missing in OCMOD which had in VqMOD are:
Attributes top, bottom, before, after

The file and folder structure to create OCMOD in OpenCart 3 are like below:

file structure of OCMOD
  • The File structure of OCMOD compressed zip ocmod.zip files may look like below but can differ as per the functionalities of the module
  • For an OCMOD file to be uploaded the file extension must be either .ocmod.zip or .ocmod.xml.

File Structure

  • Example file structure for OCMOD compressed files.
  • upload
  • install.sql 
  • install.php 
  • install.xml

upload

  • All files under this directory will be uploaded to the directory of your OpenCart installation.

install.sql

  • Add any create, drop, insert, and update SQL queries here. Make sure each query ends with the following;

install.php

  • If the modification requires any custom PHP code.

install.xml

Demo to install the OCMOD

show module link at left menu

Let’s see XML example of the module install.xml 

<?xml version="1.0" encoding="utf-8"?>
<modification>
<name>Show Module Link At Left Menu</name>
<version>3.0</version>
<author>Rupak Nepali</author>
<link>https://webocreation.com</link>
<code>webocreation_show_module_link_at_left_menu</code>
<description>Show module link at left menu</description>
<file path="admin/controller/common/column_left.php">
<operation>
<search><![CDATA[ if ($this->user->hasPermission('access', 'marketplace/extension')) { ]]></search>
<add position="after"><![CDATA[
$marketplace[] = array(
'name'   => "Modules",
'href' => $this->url->link('marketplace/extension&type=module', 'user_token=' . $this->session->data['user_token'], true),
'children' => array()
);
]]></add>
</operation>
</file>
</modification>

Tags

You can set multiple file locations by spiting up the file locations using commas. The modification system uses the PHP function glob.

Direct file path.

<file path="admin/controller/common/column_left.php">

Using braces allows for selecting multiple files and not having to repeat the code operation multiple times.

<file path="system/engine/action.php|system/engine/loader.php|system/library/config.php|system/library/language.php">

also allows braces

<file path="system/{engine,library}/{action,loader,config,language}*.php">

Please note that all file paths must start with either admin, catalog or system. You can also use a wildcard to search for multiple directories and files.

Search

Search code

Allowed Attributes

  • trim=”(true|false)”
  • regex=”(true|false)”
  • index=”(number)”

Example:

<?xml version="1.0" encoding="utf-8"?>
<modification>
    <name>Modification Default</name>
    <version>1.0</version>
    <author>OpenCart Ltd</author>
    <link>http://www.opencart.com</link>
    <code>webocreation_mod_1</code>
    <file path="catalog/controller/common/home.php">
        <operation>
            <search trim="true|false" index="1"><![CDATA[
            $data['column_left'] = $this->load->controller('common/column_left');
            ]]></search>
            <add position="replace" offset="1"><![CDATA[
            test123
            ]]></add>
        </operation>
    </file>  
</modification>

Add

The code to replace the search with.

Allowed Attributes

  • trim=”(true|false)”
  • position=”(replace|before|after)”
  • offset=”(number)”

(note position can not be used if regex is set to true in the search attribute).

Example

<?xml version="1.0" encoding="utf-8"?>
<modification>
    <name>Modification Default</name>
    <version>1.0</version>
    <author>OpenCart Ltd</author>
    <code>webocreation_modification_default</code>
    <link>http://www.opencart.com</link>
    <file path="catalog/controller/common/home.php">
        <operation>
            <search trim="true|false"><![CDATA[
            $data['column_left'] = $this->load->controller('common/column_left');
            ]]></search>
            <add position="replace|before|after" trim="true|false" offset="2"><![CDATA[
            test123
            ]]></add>
        </operation>
    </file>  
</modification>
Regex

Allowed Attributes

  • limit=”(number)”

Example:

<?xml version="1.0" encoding="utf-8"?>
<modification>
    <name>Regex Example</name>
    <version>1.0</version>
    <author>OpenCart Ltd</author>
    <code>webocreation_regexexample</code>
    <link>http://www.opencart.com</link>
    <file path="system/{engine,library}/{action,loader,config,language}*.php">
        <operation>
            <search regex="true" limit="1"><![CDATA[
            ~(require|include)(_once)?\(([^)]+)~
            ]]></search>
            <add><![CDATA[
            $1$2(modification($3)
            ]]></add>
        </operation>
    </file>
</modification>

If you use a regex you can not use attributes position, trim or offset as these are handled by the regular expression code you write. The limit attribute is still available.

If, for example, you want to change the 3rd ‘foo’ to ‘bar’ on the following line:

lorem ifoopsum foo lor foor ipsum foo dolor foo
^1      ^2      ^3         ^4        ^5

Run:

s/\(.\{-}\zsfoo\)\{3}/bar/

Result:

lorem ifoopsum foo lor barr ipsum foo dolor foo
^1      ^2      ^3=bar     ^4        ^5

Let us know if you have any more ideas.

Show discounts at featured module OpenCart 2.3 for free

Opencart tip and trick to show discounts at featured products module in Opencart 2.3 for free, download and install and it will show discounts at the featured module.
Click to Download Ocmod file to show discounts at featured module

Go to catalog\language\en-gb\extension\module\featured.php Add following code:

$_['text_discount']   = ' or more ';

Go to catalog\controller\extension\module\featured.php Find the following lines of code:

$data['heading_title'] = $this->language->get('heading_title');

Add the following lines of code:

$data['text_discount'] = $this->language->get('text_discount');

Find the following lines of code:

foreach ($products as $product_id) {
   $product_info = $this->model_catalog_product->getProduct($product_id);

Add the following lines of code:

$discounts = $this->model_catalog_product->getProductDiscounts($product_id);

            $product_info['discounts'] = array();

            foreach ($discounts as $discount) {
                $product_info['discounts'][] = array(
                    'quantity' => $discount['quantity'],
                    'price'    => $this->currency->format($this->tax->calculate($discount['price'], $product_info['tax_class_id'], $this->config->get('config_tax')), $this->session->data['currency'])
                );
            }

Find the following lines of code:

$data['products'][] = array(
                    'product_id' => $product_info['product_id'],

Just below it, add the following lines of code:

'discounts'=>$product_info['discounts'],

Now go to catalog\view\theme\YOUR_ACTIVE_THEME\template\extension\module\featured.tpl

Find the following lines of code:

 <div class="button-group">
            <button type="button" onclick="cart.add('<?php echo $product['product_id']; ?>');">

Add above it or where ever you want to show but need to inside the product array:

<?php if ($product['discounts']) { ?>
        <ul>
            <hr>
            <?php foreach ($product['discounts'] as $discount) { ?>
            <li><?php echo $discount['quantity']; ?><?php echo $text_discount; ?><?php echo $discount['price']; ?></li>
            <?php } ?>
        </ul>
        <?php } ?>

Admin Template file to make hello world – OpenCart Module Development

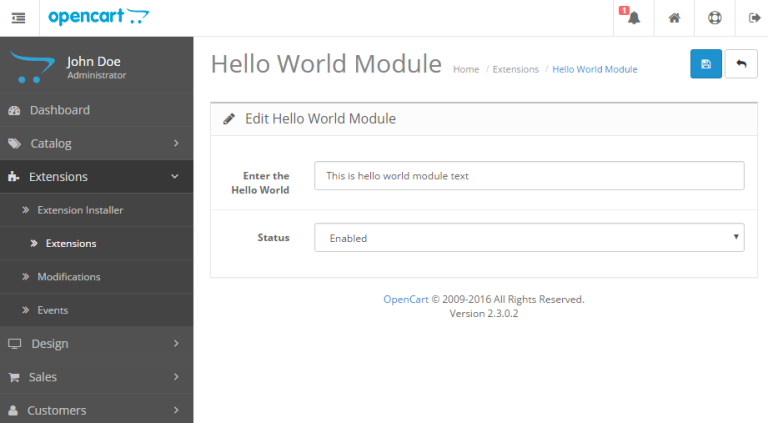
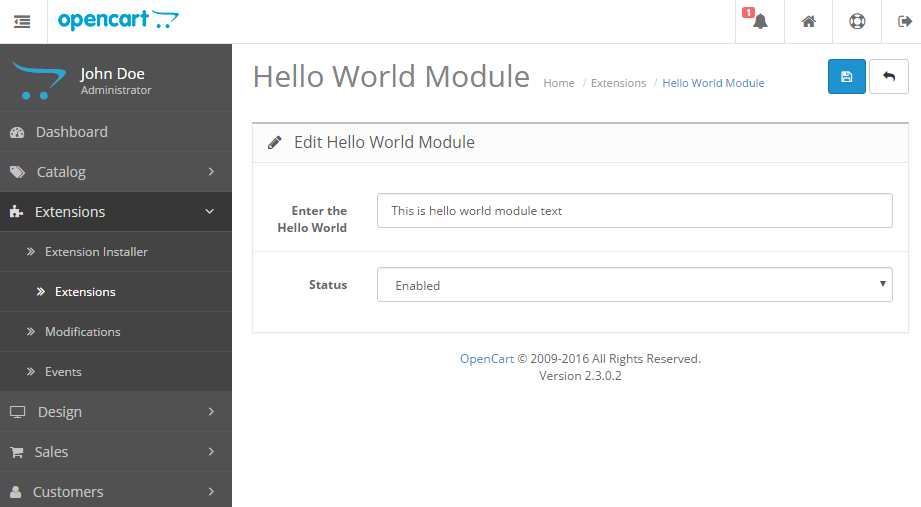
Now let’s develop the Admin Template file to make the hello world module. Go to admin/view/template/extension/module/ folder and make HelloWorld.tpl.
helloworld module listing in module page
helloworld module form

The following are full codes of template file which will be in HelloWorld.tpl at

<?php echo $header; ?><?php echo $column_left; ?>
<div id="content">
    <div class="page-header">
        <div class="container-fluid">
            <div class="pull-right">
                <button type="submit" form="form-html" data-toggle="tooltip" title="<?php echo $button_save; ?>" class="btn btn-primary"><i class="fa fa-save"></i></button>
                <a href="<?php echo $cancel; ?>" data-toggle="tooltip" title="<?php echo $button_cancel; ?>" class="btn btn-default"><i class="fa fa-reply"></i></a>
            </div>
            <h1><?php echo $heading_title; ?></h1>
            <ul class="breadcrumb">
                <?php foreach ($breadcrumbs as $breadcrumb) { ?>
                <li><a href="<?php echo $breadcrumb['href']; ?>"><?php echo $breadcrumb['text']; ?></a></li>
                <?php } ?>
            </ul>
        </div>
    </div>

    <div class="container-fluid">
        <?php if ($error_warning) { ?>
        <div class="alert alert-danger"><i class="fa fa-exclamation-circle"></i> <?php echo $error_warning; ?>
            <button type="button" class="close" data-dismiss="alert">&times;</button>
        </div>
        <?php } ?>
        <div class="panel panel-default">
            <div class="panel-heading">
                <h3 class="panel-title"><i class="fa fa-pencil"></i> <?php echo $text_edit; ?></h3>
            </div>
            <div class="panel-body">
                <form action="<?php echo $action; ?>" method="post" enctype="multipart/form-data" id="form-html" class="form-horizontal">
                    <div class="form-group">
                        <label class="col-sm-2 control-label" for="input-name"><?php echo $entry_name; ?></label>
                        <div class="col-sm-10">
                            <input type="text" name="name" value="<?php echo $name; ?>" placeholder="<?php echo $entry_name; ?>" id="input-name" class="form-control" />
                            <?php if ($error_name) { ?>
                            <div class="text-danger"><?php echo $error_name; ?></div>
                            <?php } ?>
                        </div>
                    </div>
                    <div class="form-group">
                        <label class="col-sm-2 control-label" for="input-status"><?php echo $entry_status; ?></label>
                        <div class="col-sm-10">
                            <select name="status" id="input-status" class="form-control">
                                <?php if ($status) { ?>
                                <option value="1" selected="selected"><?php echo $text_enabled; ?></option>
                                <option value="0"><?php echo $text_disabled; ?></option>
                                <?php } else { ?>
                                <option value="1"><?php echo $text_enabled; ?></option>
                                <option value="0" selected="selected"><?php echo $text_disabled; ?></option>
                                <?php } ?>
                            </select>
                        </div>
                    </div>
                </form>
            </div>
        </div>
    </div>
<?php echo $footer; ?>

In the controller, we have assigned variables to data objects to pass to the view section.

News Ticker Opencart Module for free Opencart 2

Opencart News Ticker is the module for Opencart version 2 which shows lines as the ticker and we have made this as the module so we can show wherever module can be shown. Click for Newsticker OpenCart 3 version

DOWNLOAD:

INSTALLATION:

If your FTP is enabled from the admin section:

  1. Upload the NewsTicker.ocmod.zip from Extensions >> Extension Installer
  2. All will be set.

If FTP is not set then follow the following steps:

  1. Download the module
  2. Extract the zip file or Unzip the downloaded file.
  3. Upload the catalog and admin folder which is inside “NewsTicker.ocmod/upload” folder to your server respective folder
  4. Upload the files inside the “upload” folder to your OpenCart root folder.
  5. Now login to admin section then go to Extensions >> Extension Installer >> where you upload the newsticker.ocmod.xml
  6. After successful installation, go to Extensions>> Modification and click the log tab and see if some errors are showing, if the error shows then you have to solve it first.
  7. If no error click the refresh button
  8. You are all set.
  9. Enjoy the free module.
If you see the module listed then you are set, now install the module.
Newsticker module listing

Another with the installation of newsticker.ocmod.xml you will see “NewsTicker” on the left menu.

newsticker module at left menu

If you see these two things then you have installed your files and folder properly.  Now time to configure the module.
First, we install the module, install the database, then insert data of newsticker, then add the module and insert data to the module and configure at layouts to show an information page.

Install the NewsTicker Module:

Go to Extensions >> Extensions >> Choose Modules in Extension Type >> In NewsTicker Module click Install button. Then click the edit button.

DATABASE INSTALLATION:

database table missing

At the start of the module edit, you will see the following instruction to install the Database.

It will run the following query at your database:

<?php 
    class ModelNewstickerInstall extends Model {
        public function addExtensionTables() {
            $this->db->query("CREATE TABLE IF NOT EXISTS ". DB_PREFIX . "newsticker(
            `newsticker_id` int(11) NOT NULL,
            `name` varchar(64) NOT NULL,
            `status` tinyint(1) NOT NULL,
            PRIMARY KEY (`newsticker_id`)
            ) ENGINE=InnoDB DEFAULT CHARSET=utf8 AUTO_INCREMENT=1");

            $this->db->query("CREATE TABLE " . DB_PREFIX . "newsticker_description(
            `newsticker_description_id` int(11) NOT NULL,
              `newsticker_id` int(11) NOT NULL,
              `language_id` int(11) NOT NULL,
              `name` varchar(255) NOT NULL,
              `message` varchar(255) NOT NULL,
              `position` int(3) NOT NULL DEFAULT '0',
              PRIMARY KEY (`newsticker_description_id`)
            ) ENGINE=InnoDB DEFAULT CHARSET=utf8 AUTO_INCREMENT=1");

            $this->db->query("ALTER TABLE " . DB_PREFIX . "newsticker
            MODIFY `newsticker_id` int(11) NOT NULL AUTO_INCREMENT, AUTO_INCREMENT=1");
            $this->db->query("ALTER TABLE " . DB_PREFIX . "newsticker_description
            MODIFY `newsticker_description_id` int(11) NOT NULL AUTO_INCREMENT, AUTO_INCREMENT=1");

        }
    }
?>

When you clicked the Install Database then your database table is installed.

Now when you go to Extensions >> Extensions >> Choose Modules in Extension Type >> In NewsTicker Module click Edit button. Then you will see like below:

newsticker list instruction

Click on the “here”. It will take you to place to insert the newsticker. We made like this so that we can add many news-tickers to different places as needed.

adding newsticker list

Now click on the add button.

inserting newsticker list

By filling the above form click save.

Configuration of the NewsTicker Module:

Now again go to Extensions >> Extensions >> Choose Modules in Extension Type >> In NewsTicker Module click Edit button

newsticker module configuration

Configuring layout of NewsTicker to show at Information Page:

Go to Design >> Layouts >> Edit Information from the list >>

layout section newsticker module

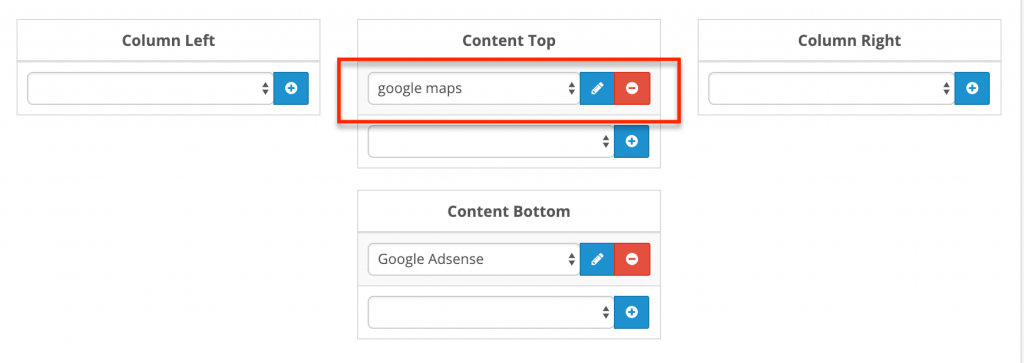
Click the add button at the Content Top layout, then choose “Information Page News Ticker” from the dropdown. Then click Save.

Front end or Presentation section to see the NewsTicker Module. Go to About us page of Information pages. Then you will see as follows:

newsticker opencart module free

You are set to show NewsTicker at the information page. Likewise, you can show different layout and position on different pages.

FEATURES:

  • Displays news ticker on any page and position.
  • All features that modules need to have.
  • Sentences or news can be inserted from the admin section.
  • Compatible with all major browsers (Firefox, IE8, Safari, Chrome, and Opera).
  • Tested with the Opencart version 2.3.0.1 only with the default theme.
  • Easy installation I think.
  • OCMOD / vQmod support

DEMO:

https://webocreation.com/nepalbuddha/

HOW TO INSERT THE NEWS or SENTENCE

Go to Admin >> Design >> NewsTicker and you can insert or edit the existing one. Click plus button to insert the new line you want to show at the NewsTicker module.

Permission Denied!

You do not have permission to access this page, please refer to your system administrator.

Go to the System >> Users >> User Groups and edit the Top Administrator and then check as in the figure:

permission for news ticker module of opencart

It means we have to give permission to the catalog/newsticker.

Code of OcMod of NewsTicker Module:

<?xml version="1.0" encoding="utf-8"?>
<modification>
    <name>Newsticker</name>
    <version>1.0</version>
    <author>WebOCreation</author>
    <link>https://webocreation.com</link>
    <code>webocreation_newsticker_1_1</code>
    <file path="admin/controller/common/column_left.php">
        <operation>
            <search><![CDATA[
            if ($this->user->hasPermission('access', 'design/layout')) {
            ]]></search>
            <add position="before"><![CDATA[
            if ($this->user->hasPermission('access', 'design/newsticker')) {
				$design[] = array(
					'name'	   => $this->language->get('text_newsticker'),
					'href'     => $this->url->link('design/newsticker', 'token=' . $this->session->data['token'], true),
					'children' => array()
				);
			}
            ]]></add>
        </operation>
    </file>
    <file path="admin/language/*/common/column_left.php">
        <operation>
            <search><![CDATA[
            $_['text_affiliate']
            ]]></search>
            <add position="before"><![CDATA[
            $_['text_newsticker']='NewsTicker';
            ]]></add>
        </operation>
    </file>
</modification>

COPYRIGHT:

This module code is the intellectual property of the designers involved in its creation. As an Opensource code you are entitled to use it freely and modify it if you wish but please keep the credits intact.

All jquery is used from the following contributor:
http://www.jquerynewsticker.com/

Enjoy!

For questions, errors, suggestions, and requests you can mail me at webocreation.com@gmail.com. You can follow at my twitter account @rupaknpl and subscribe to YouTube user OpencartTutorials.

Search terms:

scroll text module in opencart, show text at the top on opencart, jquery web ticker module for opencart, jquery marquee module in opencart, jquery scroller module for opencart,