OpenCart 3 Library Global objects Methods – OpenCart video training

Hey everyone! Rupak Nepali again. In our last video, we talked about “How to create database table?“, Today we are talking about “OpenCart Library Predefined Objects’ Methods”.

An object has functions associated with it that are known as the object’s methods. Here we show predefined objects that OpenCart provided for which you don’t need to create or initialize the objects, you can use it directly. So better to know them so that it helps in achieving DRY which means Don’t Repeat Yourself.

Don’t write code unless you should. Write code only what you need, if you missed these predefined objects’ methods then you may repeat codes.

Opencart has many predefined objects’ methods that can be called in Controller and Model.  Like in the admin section we can see predefined objects like config, log, event, load, request, response, DB, session, cache, URL, language, open-bay, document, customer, currency, tax, weight, length, cart, encryption, model_setting_event, the user.

Let see an example of a database object:
The database object of OpenCart is $this->db, which has the following methods. All SQL queries are run from $this->db->query method which looks like below. For Select, replace, delete, update we use it like this in OpenCart and this returns three properties:

  • Database Object of Opencart is
    $this->db
  • Methods are:
    $this->db->escape($value) – mysql_real_escape_string() on the value passed
    $this->db->countAffected() – rows affected by an UPDATE query
    $this->db->getLastId() – last auto increment id same as mysql_insert_id()
    $this->db->connected() – Pings a server connection, or tries to reconnect if the connection has gone down
  • $this->db->query($sql)
  • All SQL queries are run from $this->db->query method which looks like:

    $query = $this->db->query(“SELECT * FROM ” . DB_PREFIX . “category WHERE
    $this->db->query(“REPLACE INTO `” . DB_PREFIX . category_path` SET …);
    $this->db->query(“INSERT INTO `” . DB_PREFIX . category_path` SET …);
    $this->db->query(“DELETE FROM ” . DB_PREFIX . “category WHERE …);
    $this->db->query(“UPDATE ” . DB_PREFIX . “category SET image = …);

  • $this->db->query method returns three properties:
    $result->num_rows = $query->num_rows; – gets the number of rows in a results
    $result->row = isset($data[0]) ? $data[0] : array(); – get the first row data
      $result->rows = $data; – get an array of row results

$this reference in the controller:

Go to admin/controller/extension/module account.php and var_dump the $this,

echo “<pre>”;
var_dump($this);
echo “</pre>”;
exit();

$this is a reference to the calling object, usually the object to which the method belongs. You can see the protected modifier registry which has config, log, event, load, request, response, etc.

Now let’s take config object:

echo “<pre>”;
$class_methods = get_class_methods($this->config);
print_r($class_methods);
echo “</pre>”;

Now you can see the list of method that you can use in your config object.

Let’s see the parameters that you can use in the get and set methods:
echo
“<pre>”;
var_dump($this->config);
echo “</pre>”;
exit();

Now let’s say we want the site URL then we can easily get it as:

print_r($this->config->get(‘site_url’));
exit();

In this way, you can keep on using other objects and methods that OpenCart provide.

Let’s take another example of the customer predefined object methods provided by OpenCart.

For that we can see at system/library/cart/customer.php:

You can see the namespace Cart which is like a directory, in OpenCart 3 Customer is now under “Cart” namespace. Customer object is instantiated as:

$customer = new Cart\Customer($this->registry);

So, in Customer class there are private properties and public methods login, logout, islogged, getId, getFirstName, getLastName, getGroupId, getEmail, getTelephone, getNewsletter, getAddressId, getBalance and getRewardPoints.

These public methods are available in the Controller and Model class of modules which I already showed for config object and it’s similar for other objects as well.

You can see the login method of customer object is used in catalog/controller/account/login.php,

You can see the $this->customer->login validate() method

 Like this, we use the predefined method wherever we need it.

This login method is used to provide the authentication for customer section of OpenCart. Customer session is activated for customer_id, first name, last name, customer_group_id, email, telephone, newsletter and address_id is assigned.

If you check the customer object without login all value assigned are null,

echo “<pre>”;
var_dump($this->customer);
echo “</pre>”;

 once you logged in values, you can see these values.

Now in code you can get those values through public methods provided by customer object to get the first name we have getFirstName method:

echo “<pre>”;
print_r($this->customer->getFirstName());
echo “</pre>”;

If you are confused of how to get the class methods name then PHP have get_class_method function:

echo “<pre>”;
$class_methods = get_class_methods($this->config);
print_r($class_methods);
echo “</pre>”;

With this logout method is used to unset the customer session and assign empty valued.

isLogged method of customer object is used to check whether customer_id is active or not

getId to get the customer_id

getFirstName method is used to return active customer first name

getLastName method is used to return active customer last name.

getEmail is used to return active customer email

getTelephone returns active customer telephone number.

Similarly, the customer object has the following other public methods:

getnewsletter

getAdddressId

getBalance

getRewardPoints

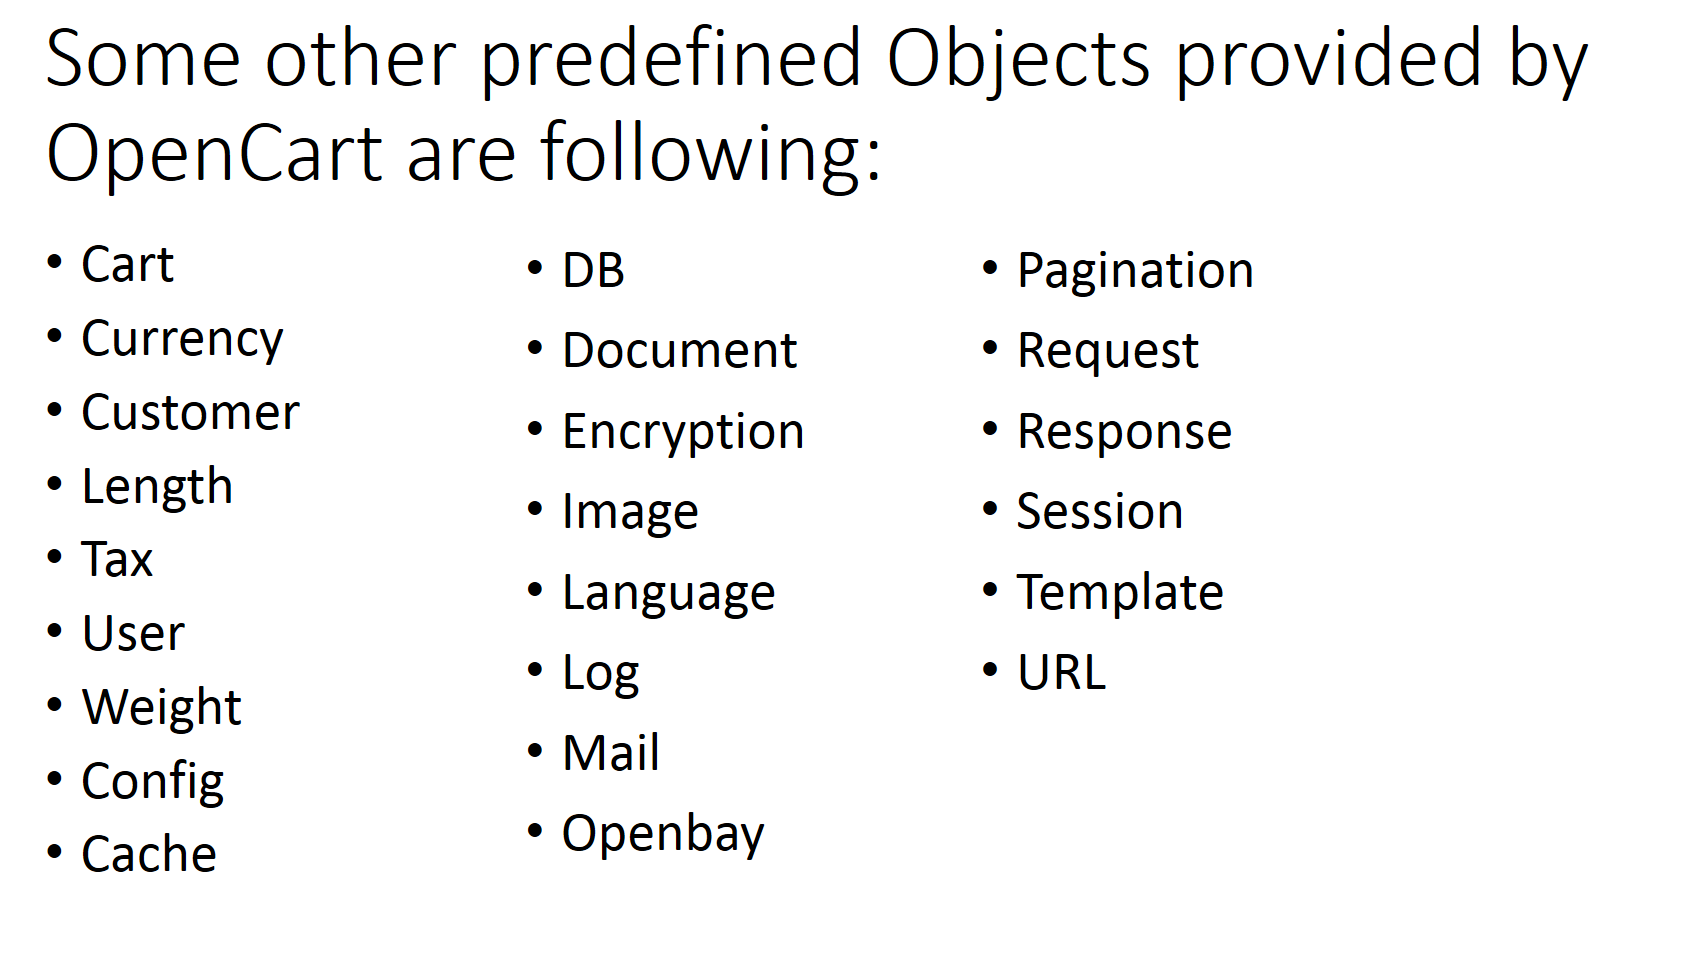
Some other predefined objects provided by OpenCart are the following:

Pre defined objects in Opencart

Cart, you can see the system/library/cart/cart.php where you can see the public methods that can be accessed from your modules. You can see here getProducts method, add method, remove method and so on.

Namespace in OpenCart

  • A namespace is like a directory and by adding ‘namespace’, Affiliate is now under ‘Cart’.
  • To use ‘Affiliate’, we call or instantiate as new Cart\Affiliate()
  • Adding a ‘namespace’ to a class is like organizing files from one directory into a bunch of sub-directories.
  • The use statement lets us call class by a nickname.

Affiliate

  • $this->affiliate->login($email, $password);
    You can find code used at catalog/controller/affiliate/login.php validate() method.
    Affiliate login script at system/library/cart/affiliate.php is used to provide the authentication for the Affiliate section of OpenCart. Affiliate session is activated for affiliate_id, firstname, lastname, email, telephone, fax, and code.
  • $this->affiliate->logout()
    You can find the code used at catalog/controller/affiliate/logout.php index() method.
    Affiliate logout script at system/library/cart/affiliate.php  is used to unset the affiliate session and assign empty value to affiliate_id, firstname, lastname, email, telephone, and fax of Affiliate. By this Affiliate is logged out.
  • $this->affiliate->isLogged()
    You can find the code used at catalog/controller/affiliate/account.php index() method.
    Affiliate isLogged script at system/library/cart/affiliate.php is used to check whether affiliate_id is active or not.
  • $this->affiliate->getId()
    You can find code used at catalog/model/affiliate/affiliate.php editAffiliate($data) method.
    Affiliate getId script at system/library/cart/affiliate.php  is used to return active affiliate_id.
  • $this->affiliate->getFirstName()
    You can find code used at catalog/controller/affiliate/login.php index() method.
    Affiliate getFirstName script at system/library/cart/affiliate.php is used to return active affiliate first name.
  • $this->affiliate->getLastName()
    You can find code used at catalog/controller/affiliate/login.php index() method.
    Affiliate getLastName script at system/library/cart/affiliate.php  is used to return active affiliate last name.
  • $this->affiliate->getEmail()
    You can find code used at catalog/controller/affiliate/edit.php validate() method.
    Affiliate getEmail script at system/library/cart/affiliate.php is used to return active affiliate email.
  • $this->affiliate->getTelephone()
    Not used in OpenCart but you can use it J.
    Affiliate getTelephone script at system/library/cart/affiliate.php  is used to return active affiliate Telephone number.
  • $this->affiliate->getCode()
    You can find code used at catalog/controller/affiliate/tracking.php index() method.
    Affiliate getCode script at system/library/cart/affiliate.php is used to return active affiliate tracking code which is used to track referrals.
  • $this->affiliate->getFax()
    Not used in OpenCart but you can use it J.
    Affiliate getFax script at system/library/cart/affiliate.php  is used to return the active affiliate Fax number.

Other Global Methods

  • Cart
  • Currency
  • Customer
  • Length
  • Tax
  • User
  • Weight
  • Config
  • DB
  • Document
  • Encryption
  • Image
  • Language
  • Log
  • Mail
  • Openbay
  • Pagination
  • Request
  • Response
  • Session
  • Template
  • URL

For Detail, the description read “OpenCart Theme and Module Development” book

OpenCart theme and module development

https://www.packtpub.com/web-development/opencart-theming

So, you get where to see the OpenCart library predefined objects’ methods which we can use in our Model and controller classes. Keep digging.

So, for a detailed description of predefined methods of OpenCart read the “OpenCart Theme and module development” book.

Like this, we completed our fifth video “OpenCart library Predefined Objects’ Methods”, in our next video we will show “OpenCart Code flow. Request and response in OpenCart”. Keep on tuning.

As always please don’t forget to post your questions or comments so that I can add extra topics or things that I need to develop which will help to develop the quality of videos series. You can follow at my twitter account @rupaknpl and subscribe to our youtube channel Opencart tutorials. Similarly, keep on visiting my personal blog where you will find lots of free modules.

See you in the next video and happy learning and thanks for watching videos.

Exploring the code of default Featured Module

To explore the code of defualt featured module, let’s start with listing what files are used by the Featured module:

Admin folder files:

Catalog folder files:

How to know which files are used by module?

Always look to the URL. For Featured module, go to Admin >> Extensions >> Extensions >> Choose “Modules” from the dropdown. Then find the “Featured” and then click the blue Add button (if the module is already installed nor you have to install the module and click the blue button). You will see URL like below:

http://localhost/opencart2302/admin/index.php?route=extension/module/featured&token=LMEWZBoKMxfr1D7s2dhYe5niRfOAz0Ak

See the value of route, here route=extension/module/featured, as this is in admin so your token value may be different.

While seeing for the files always start from the route, the route gives you the controller file and inside the controller, we can find the language file, model file, and template file.

Now as per the route value go to admin folder >> controller folder >> extension folder >> module folder >> and find featured.php file.

In this way, you can find the controller file, controller file end with .php extension. From controller file you can find the language file used by that controller with lines of code as

$this->load->language('extension/module/featured');

It means that admin >> language >> LANGUAGE folder >> extension folder >> module folder  >> featured.php

Like that you can find the language file, language file ends with .php extension.

To find the view file find code that start with $this->response->setOutput. In the featured module it is like below:

$this->response->setOutput($this->load->view('extension/module/featured', $data));

It means that admin >> view >> extension folder >> module folder >> featured.tpl

Like this way you can find the view file, view files end with .tpl extension.

Things to consider while creating database Model Data OpenCart Guide

Hi everyone, Namaste, Me Rupak Nepali. In our third video, we describe OpenCart files and folders and told you that the next video will be of OpenCart code flow but while making the PowerPoint we feel like first, we need to know about the database and global methods of OpenCart then it will be easier to understand the OpenCart code flow. So, in this video, we will go through the OpenCart database.

Things to consider while creating database OpenCart Guide

  • OpenCart supports multistore
  • It supports multi-language
  • Multiple Layouts
  • oc_ is a database prefix
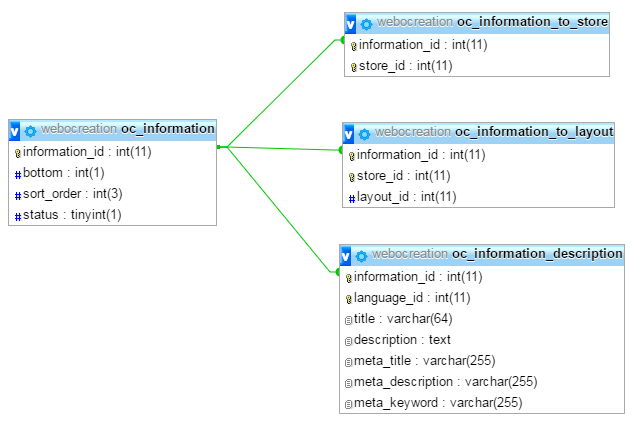
  • If you are creating the table then better to make 4 tables, one which will contain language-specific contents here oc_information_description, another is non-language specific oc_information and another which joins with the store, and the last one which joins to the layout.
database schema creation OpenCart

Create custom table schema in OpenCart:

If you are going to create a custom table in OpenCart then you have to think of four tables. One table contains non-language-specific data like in the above image oc_information, another table is language-specific in the above image oc_information_description, another table shows the relationship between store and data in the above image oc_information_to_store and the last one which shows the relationship between layout and data.

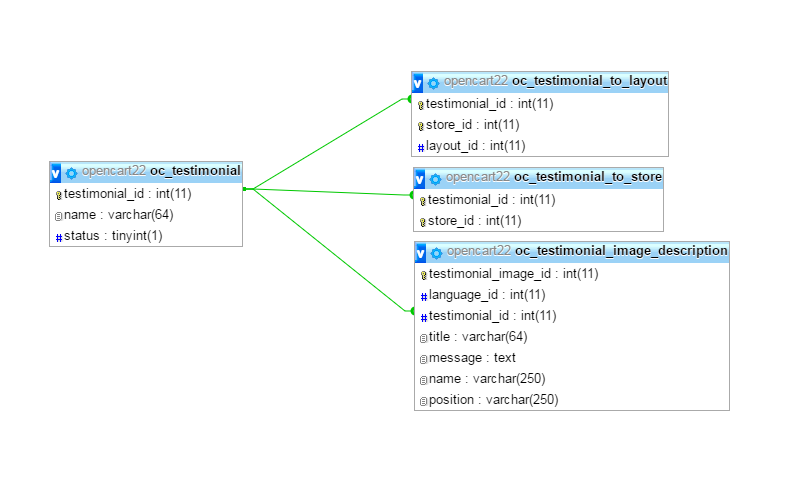
So if I want to create a custom table that contains testimonials then my table schema will be like in the image:

custom table schema for Testimonial

Code example:

  • Create a model file:
    admin>>model>>catalog>>information.php
  • Create a class as per the folder and file structure:
    class ModelCatalogInformation extends Model
  • Create a Method inside the class:public function addInformation($data)
  • In Controller, first, load the model then call the method:
    $this->load->model(‘catalog/information’);
    $this->model_catalog_information->addInformation($this->request->post);

Download the full Opencart Database Schema by clicking the PDF below:

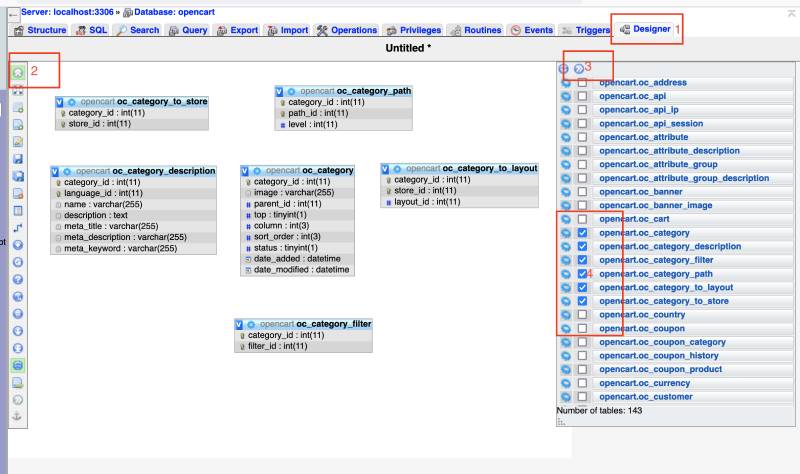
How to show relationships and only some databases in PHPmyadmin?

PHPmyadmin Tables relationship

So, by making the database table we completed our fourth video, we hope you liked it. As always please don’t forget to post your questions or comments so that I can add extra topics or things that I need to develop which will help to create the quality of the video series. You can follow me at my Twitter account @rupaknpl and subscribe to our youtube channel Opencart Tutorials. Similarly, keep on visiting my personal blog https://webocreation.com where you will find lots of free modules.

The next video will see “OpenCart Library Global Objects’ Methods“. So, see you in the following video, and happy learning, and thanks for watching the videos.

Describing files and folder of OpenCart Framework

File and folder structure of Opencart

Describing files and folders and OpenCart Framework
Hi everyone, Namaste. Namaste is the word used in our Country Nepal to greet someone. Me Rupak Nepali. In our second video, we install OpenCart, and is now up and running at our custom URL “webocreation.loc”. Today in our third video we are going to describe files and folders of the OpenCart framework.

The first thing we do is look through the files and folders structure.

Admin section files and folders are in the admin/ folder. It has controller/ language/ model/ and view/ folder, if you are developing for admin sections then these are the folders you are going to touch.

catalog/ folder holds all frontend presentation style files and folders.

We will discuss in detail these folders when we will start making the hello world module.

The image/ folder contains cache/, catalog/ and payment/ folder with no_image.png and placeholder.png files. Placeholders and no images are used if there are no images found. For example, let’s go to the category page.

You see this is the placeholder image.

no image placeholder Opencart

The catalog/ folder inside the image/ folder contains the main images that we upload either from the backend or frontend. Like category images, product images, images inserted from the text area, etc.

The cache/ folder inside the image/ folder contains resized images of the main images. For example, in the demo/ demo folder, we have iPhone6.jpg which is the main image. But while showing in the category page or on the product page its size is resized. All these images are stored in the cache folder. We can see at cache/ folder demo, then banners see the name iPhone6-1140*380.jpg which is resized the image for the banner at the home page.

In this way, images are handled in the image/ folder.

Install/ folder contains an opencart.sql file which creates tables on the specified database and inserts demo data. Other files have codes that facilitate to installation OpenCart.

The system/ folder is the base where the OpenCart framework is defined. It contains config/, engine/, helper/, library/ and storage/ folders. We will provide details of these folders in the next video with the code flow.

.htaccess.txt is a configuration file used on web servers running the Apache Web Server software where you rename the htaccess.txt to .htaccess. Mostly we use this for the SEO URL redirects in OpenCart

Other is the config.php file where constant is defined and is different as per installation.

index.php where we can find what version of OpenCart are we using and the start of our application.

The last one is the php.ini file, which is the configuration file for running applications. It is used to control variables, magic_quotes_gpc, register_globals, default_charset, memory_limit, max_execution_time, and many other. Shared hosting does not provide these facilities to change it but if you are hosting in Private servers then you can set to use them.

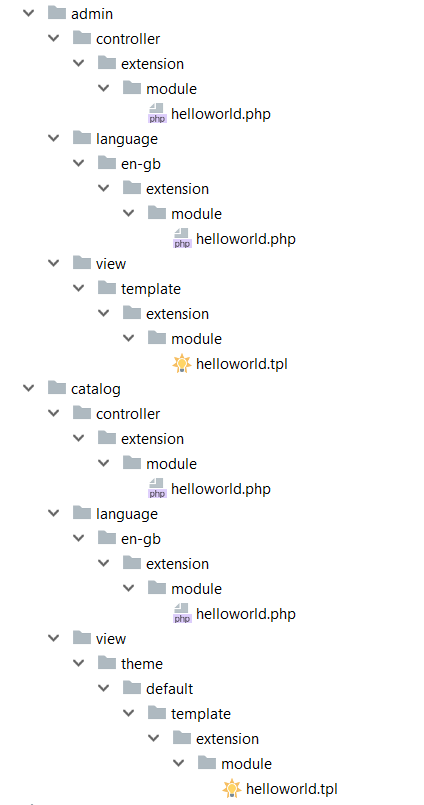
The following image shows how our files of the module are placed in OpenCart:

Files and folders of hello world module

So, our third video is completed, hope you liked it. As always please don’t forget to post your questions or comments so that I can add extra topics or things that I need to develop which will help me to develop the quality of the videos series. You can follow me at my Twitter account @rupaknpl and subscribe to our youtube channel Opencart tutorials. Similarly, keep on visiting my personal blog https://webocreation.com where you will find lots of free modules.

In the next video, we will show you the OpenCart Framework code flow. So, don’t miss it as if you understand this flow then you can start coding without seeing other videos. So, see you in the next video, and happy learning, and thanks for watching and liking my videos.

Installing the OpenCart and creating the custom URL virtual host Xampp: OpenCart Module Development Video Tutorial

Hi everyone! Me Rupak Nepali. I am very excited about the first video success – “Introduction and Table of Contents – OpenCart Development” and now this is the second video. In which I will install OpenCart 3.0.2.0 locally and set up a custom URL to work locally.

To begin the installation process, first, download OpenCart. Let’s go to OpenCart.com and download it. Now let’s go to D: /xampp/htdocs folder as I have installed Xampp at D: / folder.

Now create a folder, we are going to create webocreation/ folder where we extract the zip folder we downloaded. Then go to upload/ folder and copy all files and folder and paste to the webocreation/ folder.

Now let’s create a database. Go to localhost/phpmyadmin, create a database named “webocreation”.

Now first let’s create custom URL to work locally:

Steps to create custom URL to work locally:

  • Open up the Xampp control panel and stop Apache (Ensure that you don’t have it running as a service.
  • Navigate to D:/xampp/apache/conf/extra or wherever you installed Xampp
  • Open up your text editor with administrative privileges and open up httpd-vhosts.conf found in the D:/xampp/apache/conf/extra folder
  • At the very bottom of the file paste the following (check if it exists there already)
NameVirtualHost *:80
<VirtualHost *:80>
DocumentRoot "D: /xampp/htdocs"
ServerName localhost
</VirtualHost>
  • Without that line of code, you will lose access to your default htdocs/ For eg: http://localhost/ will be inaccessible.
  • Now write the virtual host code here for our webocreation folder:
<VirtualHost *:80>
DocumentRoot "D: /xampp/htdocs/webocreation"
ServerName webocreation.dev
ServerAlias www.webocreation.dev
<Directory "D: /xampp/htdocs/webocreation">
Order allow,deny
Allow from all
</Directory>
</VirtualHost>
  • Now we head over to our Windows Hosts File, to edit the HOSTS. The file will be located at C: /Windows/System32/drivers/etc/hosts, where hosts are the file.
127.0.0.1             localhost
  • look for the line above, and enter your site mimicking the layout
127.0.0.1             localhost
127.0.0.1             webocreation.dev
  • Change this to the domain name you choose earlier
  • Change it to reflect the lines above (if you have problems saving it meant you didn’t have your text editor running in admin mode.
  • Restart Apache and test to make sure it is working.

Now go to the URL webocreation.dev. Here we go our custom URL is activated, now we are installing OpenCart.

Let’s agree with the License Agreement by clicking the continue button. If you see any red highlights then we are having some issues. See here our config.php file is missing. Similarly, you may see other errors then you have to solve them. One could curl disabled which you have to enable from php.ini

In ours let’s create the config.php file at root/ folder and admin/ folder. Reload it. Once all issues are solved then click the continue button. The next screen prompts you for information about the database you’ll be using and asks for the database username and password field. We already created “webocreation” database, with a root username and a blank password.

Now let’s enter username and password for the administration. I am creating a very hard password which I recommend not to use in your installation. All this is because of laziness and I don’t need the installation to be secure; accepting the easiness, in this case, is fine. In a production OpenCart installation, be sure that you have a unique username and password for both the administrator and the database for security reasons.

Provide your email mine is webocreation.com@gmail.com, then click continue button.

Your installation is complete.

Now don’t forget to delete the install folder, I see in most clients programmer just rename the install/ folder and by-passing error message but there will be security holes remained in that folder so the hacker can find it easily and exploit your database so strongly recommended to delete the install/ folder after installation is complete.

Now you can view the front end, login to the administration section and insert categories, product and set up shipping and payment gateway and your online store is ready to take the order.

So I am at the end of the second video, I hope you liked it. Please, please don’t forget to post your questions or comments so that I can add extra topics or things that I need to develop which will help me to develop the quality of videos series. You can follow at my twitter account @rupaknpl and subscribe to our youtube channel “onlinegyannepal”. Similarly, visit my personal blog https://webocreation.com.

In the next video, I will be describing files and folder and OpenCart Framework. So, see you in the next video and happy learning and thanks for bearing me for 8 mins.

Configure and show how default featured module works Opencart 3

To configure and show default featured module you need to login to the Admin dashboard, then follow the following steps:

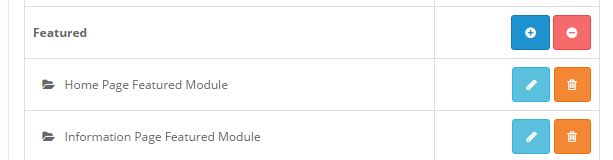
  1. Admin >> Extensions (Left Menu) >> Extensions >> Choose ‘Modules’ from the select box.
  2. It will list modules
  3. Find the Featured Module
  4. Then check ff the Featured module is already installed or not, if not installed then click on the green install button, or you can start by clicking on the blue edit button in order to
    configure the featured product.
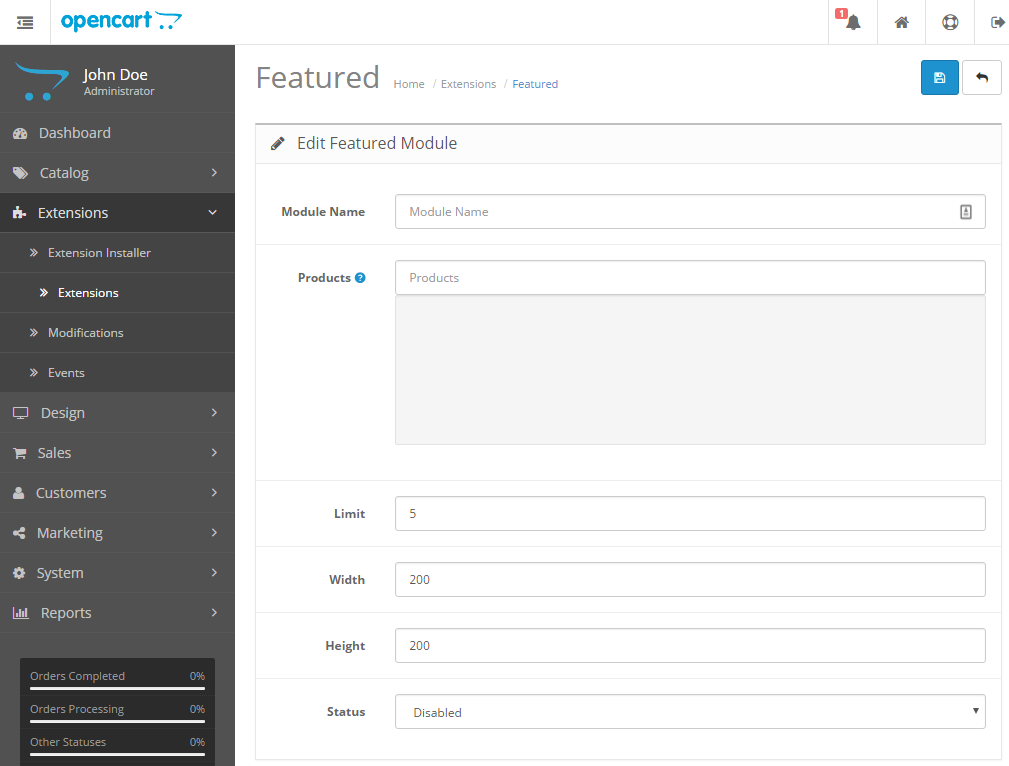
  5. On clicking the blue edit button of the Featured product, you will see as the following image:
  6. Enter the Module Name.
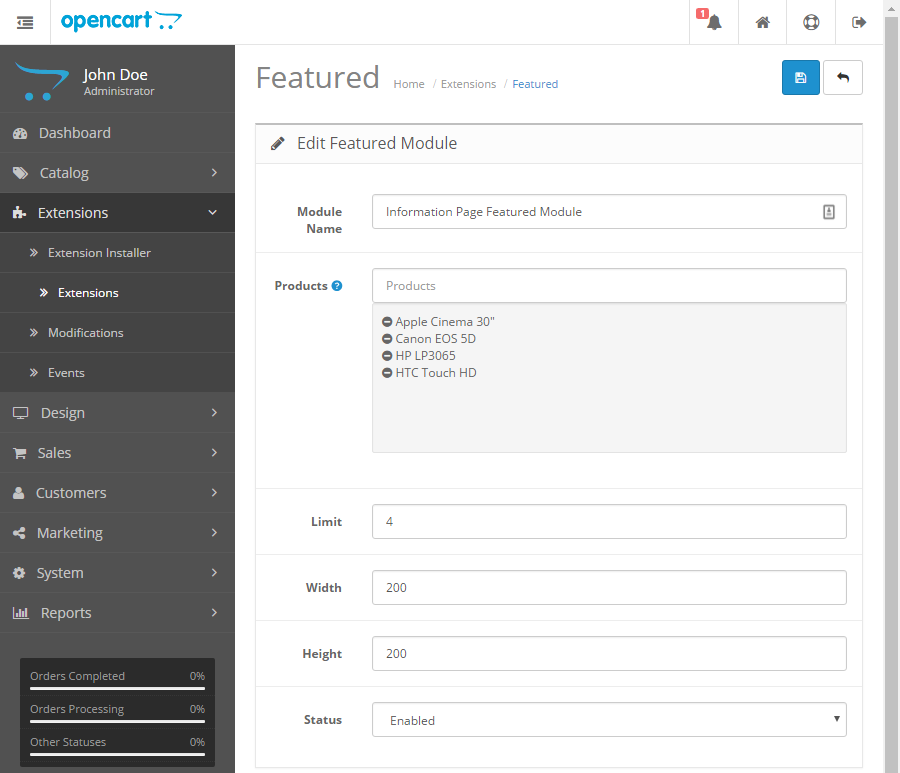
  7. Now, start typing the name of the product in the Products field. It is autocompleted and pops up a list of the names of products that match with the words of the typed product name.
  8. Select the products you want to display in the featured products.
  9. Now, to add another product, just start typing again and choose the right product.
  10. Like this, you can make a list of featured products.
  11. If you don’t want a product on the featured list, then click on the black minus sign to the left of the product, and the product will be removed from the list.
  12. Limit: Number of products to show in front.
  13. Width: Width for the product’s image.
  14. Height: Height for the product’s image.
  15. Status: Shows at the frontend only if it is enabled.
  16. Now click the blue Save button at the top right.
  17. By the above steps, we install and configure the Featured module. Now to show at the front we have to work out on the layout.
  18. Let’s say we want to show the module in Information pages.
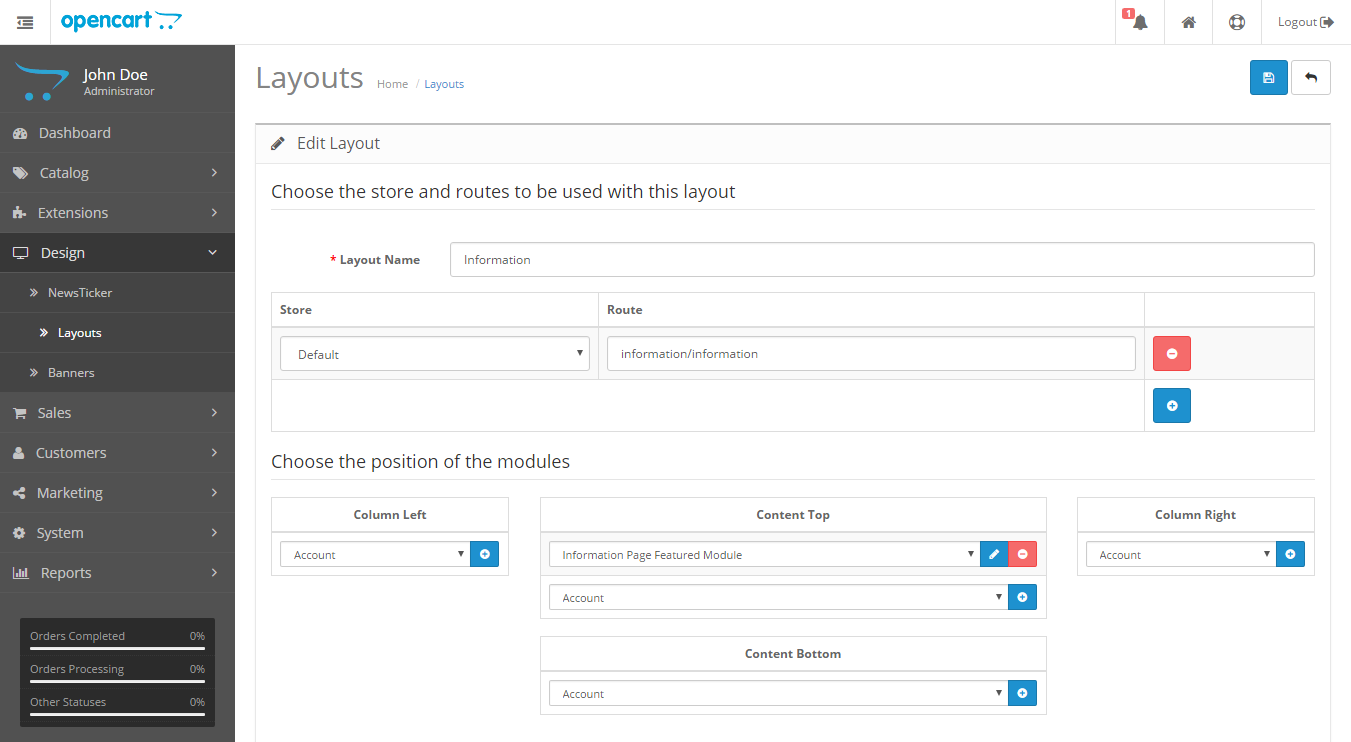
  19. For that go to the Admin >> Design >> Layout
  20. From the list of the layout edit the Information
  21. Then in the Content Top section click the plus blue button and select the Information Page Featured Module.
  22. Then click save button
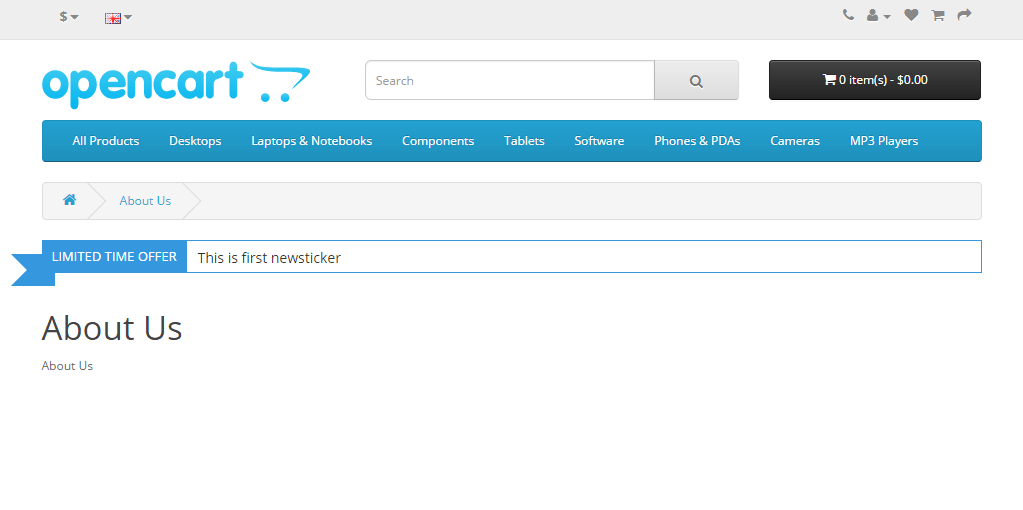
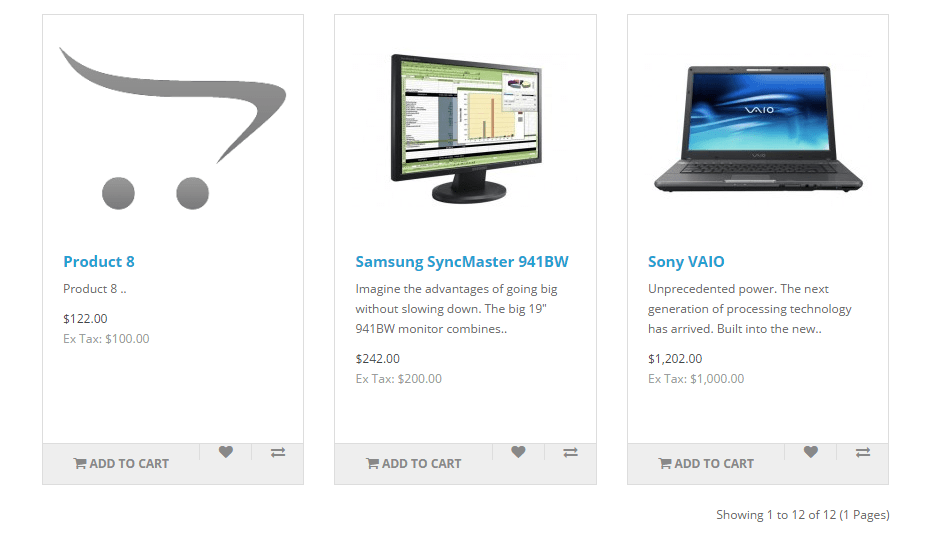
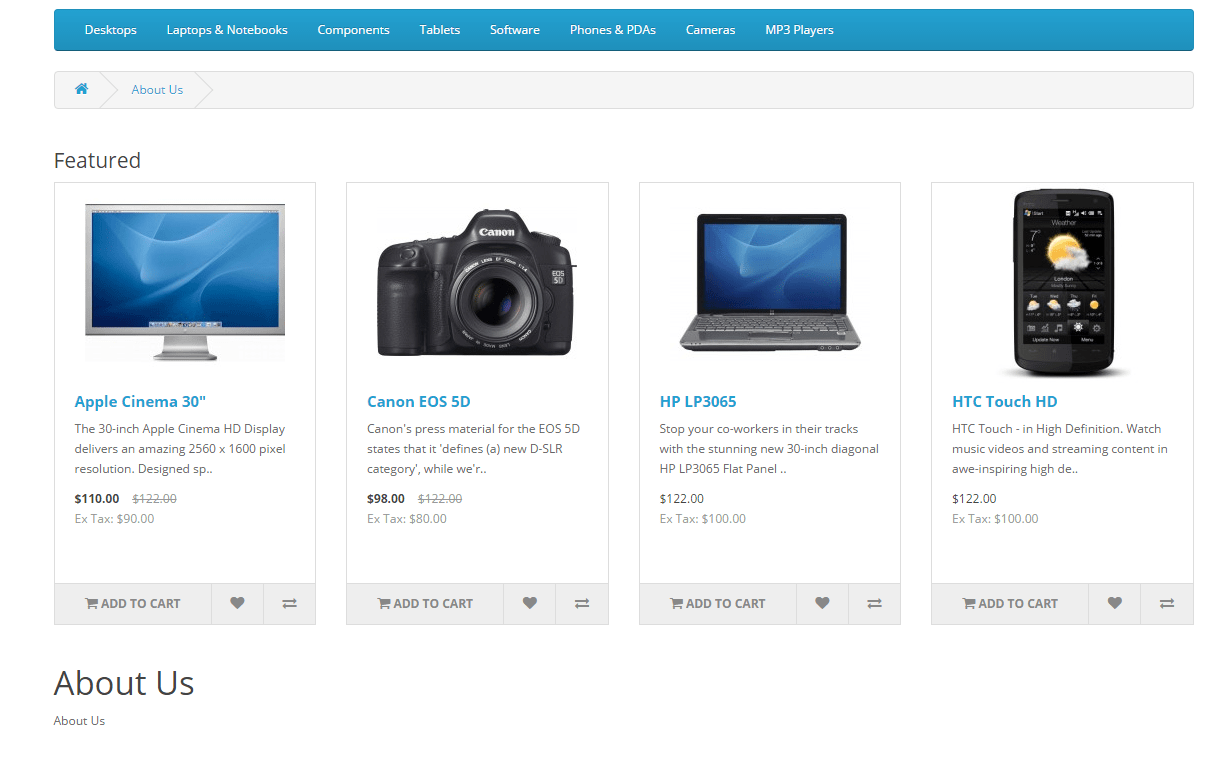
  23. Now go to the front page and go to about us page, you will see like as in the below image

Like this way, you can install, configure and show the featured module at the presentation layer.

Enjoy!

For questions, errors, suggestions, and request you can mail me at webocreation.com@gmail.com. You can follow at my twitter account @rupaknpl and subscribe to YouTube user OpencartTutorial.

OpenCart error : Modification requires a unique ID code!

While installing the OpenCart module if you found OpenCart error: Modification requires a unique ID code! then it means that either you are missing <code>ModuleUniqueName</code> or there is a conflict with another module unique name.

If you are missing <code> code

If you are missing <code> means, while writing ocmod.xml file you missed to write <code>ModuleUniqueName</code> which we missed most.

Open your “*.ocmod.xml” file of your module you are installing then add following lines inside modification schema:

<code>Module Unique Name</code>

Like in our list all opencart module all.install.ocmod.xml contains <code>List_all_Products</code>:

<?xml version="1.0" encoding="utf-8"?>
<modification>
    <name>List Out All Products OpenCart 2.3 OCmod</name>
    <version>1.0</version>
    <author>Rupak Nepali, Webocreation.com</author>
    <code>List_all_Products</code>
    <link>https://webocreation.com</link>
    <file path="catalog/view/theme/*/template/common/header.tpl">
        <operation>
            <search><![CDATA[
            <ul class="nav navbar-nav">
            ]]></search>
            <add position="After"><![CDATA[
            <li><a href="index.php?route=product/allproduct">All Products</a></li>
            ]]></add>
        </operation>
    </file>
</modification>

If there conflict with another module unique name

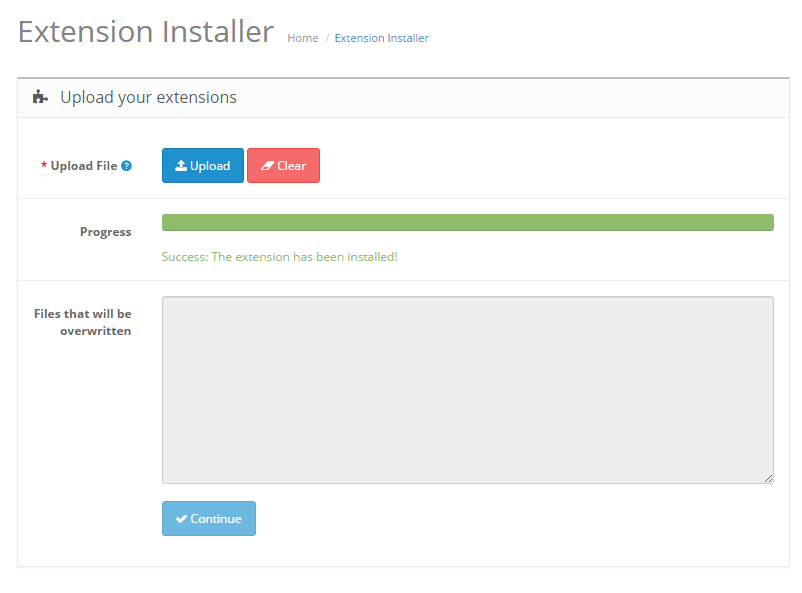
Then rename the name within <code>ModuleUniqueName</code> and install it again you will see following:

openart successfull installation of ocmod module

Similar issues can be The directory containing files to be uploaded could not be found: OpenCart error

Happy successful module installation, you can let me know if you found any issues then we can solve. If you like to read more about the Ocmod then read OCMOD Modification System opencart 2.3

Fatal error: Cannot use EllisLab\ExpressionEngine\Library\Parser\Conditional\Token\Bool as Bool because ‘Bool’ is a special class

Fatal error: Cannot use EllisLab\ExpressionEngine\Library\Parser\Conditional\Token\Bool as Bool because ‘Bool’ is a special class

When you update your PHP version and you can see the above issue while working in the Expression Engine. I just commented out the following at core\EllisLab\ExpressionEngine\Library\Parser\Conditional\Lexer.php the boolean and string annotations:

use EllisLab\ExpressionEngine\Library\Parser\Conditional\Token\Token;
//use EllisLab\ExpressionEngine\Library\Parser\Conditional\Token\Bool;
use EllisLab\ExpressionEngine\Library\Parser\Conditional\Token\Comment;
use EllisLab\ExpressionEngine\Library\Parser\Conditional\Token\Number;
use EllisLab\ExpressionEngine\Library\Parser\Conditional\Token\Operator;
use EllisLab\ExpressionEngine\Library\Parser\Conditional\Token\Other;
//use EllisLab\ExpressionEngine\Library\Parser\Conditional\Token\String;
use EllisLab\ExpressionEngine\Library\Parser\Conditional\Token\Tag;
use EllisLab\ExpressionEngine\Library\Parser\Conditional\Token\Variable;

and following on the same file the bool part and the string part

switch ($type)
{
    //case 'BOOL':	 $obj = new Bool($lexeme);
    //	break;
    case 'COMMENT':	 $obj = new Comment($lexeme);
        break;
    case 'NUMBER':	 $obj = new Number($lexeme);
        break;
    case 'OPERATOR': $obj = new Operator($lexeme);
        break;
    case 'OTHER':	 $obj = new Other($lexeme);
        break;
    //case 'STRING':	 $obj = new String($lexeme);
    //	break;
    case 'TAG':		 $obj = new Tag($lexeme);
        break;
    case 'VARIABLE': $obj = new Variable($lexeme);
        break;
    default:
        $obj = new Token($type, $lexeme);
}

I disable the string part also because I get the following issues as well:
Fatal error: Cannot use EllisLab\ExpressionEngine\Library\Parser\Conditional\Token\String as String because ‘String’ is a special class name

Then I commented out following \core\EllisLab\ExpressionEngine\Library\Parser\Conditional\Parser.php

//use EllisLab\ExpressionEngine\Library\Parser\Conditional\Token\Bool;

With these two file changes above error is removed but I have not gone too deep issues inside it, make changes in your own risk 🙂

Drupal error white user page, the design is showing in the index page, database contents are not showing in eCommerce website

0

While working with one of the eCommerce websites I came up with a drupal error that shows a blank white page when I try to go to admin or /user but design and CSS are showing, only database contents are not showing.

I searched many things but not able to find a solution and solve them simply by clearing caches. I thought to clear the cache but I am not able to log in and not able to go to link /admin/config/development/performance.

Thus I found following code to flush all caches. I kept following code in \sites\all\themes\theme_name\templates\page.tpl.php and hard refresh by performing crtl+F5

<?php
  require_once DRUPAL_ROOT . '/includes/bootstrap.inc';
  drupal_bootstrap(DRUPAL_BOOTSTRAP_FULL);
  drupal_flush_all_caches();
?>

Then, boooom my pages are back with contents, now started working normally 🙂

Thanks for the drupal_flush_all_caches method 🙂

Fatal error: Uncaught Error: Call to undefined function _system_default_theme_features() in D:\xampp7\htdocs\..\includes\theme.inc on line 1430( ! ) Error: Call to undefined function _system_default_theme_features() in D:\xampp7\htdocs\..\includes\theme.inc on line 1430Call Stack#TimeMemoryFunctionLocation10.08306089760_drupal_exception_handler( )…\bootstrap.inc:020.08306090232_drupal_log_error( )…\bootstrap.inc:236530.08306091904theme( )…\errors.inc:24540.08606224864template_preprocess_maintenance_page( )…\theme.inc:112550.08606224896theme_get_setting( )…\theme.inc:2796

Add following line to D:\xampp\apache\conf\httpd.conf if your website keeps on showing “Connection Errors”

<IfModule mpm_winnt_module>
   ThreadStackSize 8388608
</IfModule>

Error encountered after disabling the cache in Drupal

Following is the error encounter after disabling the cache in Drupal
The website encountered an unexpected error. Please try again later.
Symfony\Component\DependencyInjection\Exception\ServiceNotFoundException: You have requested a non-existent service “cache.backend.null”. Did you mean one of these: “cache.backend.apcu”, “cache.backend.php”, “cache.backend.memory”? in Drupal\Component\DependencyInjection\Container->get() (line 161 of core\lib\Drupal\Component\DependencyInjection\Container.php).

Drupal\Component\DependencyInjection\Container->get('cache.backend.null')
Drupal\Core\Cache\CacheFactory->get('render')
call_user_func_array(Array, Array)
Drupal\Component\DependencyInjection\Container->createService(Array, 'cache.render')
Drupal\Component\DependencyInjection\Container->get('cache.render', 1)
Drupal\Component\DependencyInjection\Container->resolveServicesAndParameters(Object)
Drupal\Component\DependencyInjection\Container->createService(Array, 'http_middleware.page_cache')
Drupal\Component\DependencyInjection\Container->get('http_middleware.page_cache', 1)
Drupal\Component\DependencyInjection\Container->resolveServicesAndParameters(Object)
Drupal\Component\DependencyInjection\Container->createService(Array, 'http_middleware.reverse_proxy')
Drupal\Component\DependencyInjection\Container->get('http_middleware.reverse_proxy', 1)
Drupal\Component\DependencyInjection\Container->resolveServicesAndParameters(Object)
Drupal\Component\DependencyInjection\Container->createService(Array, 'http_middleware.negotiation')
Drupal\Component\DependencyInjection\Container->get('http_middleware.negotiation', 1)
Drupal\Component\DependencyInjection\Container->resolveServicesAndParameters(Object)
Drupal\Component\DependencyInjection\Container->createService(Array, 'http_kernel')
Drupal\Component\DependencyInjection\Container->get('http_kernel')
Drupal\Core\DrupalKernel->getHttpKernel()
Drupal\Core\DrupalKernel->handle(Object)

Solution:

Run http://www.example.com/rebuild.php then reload and it works again. Researching why is this. Please let me know if found anything.