

Payment Gateway Provided By TechProcess Solutions Ltd help

8

This post is for the developer of a payment gateway provided by TechProcess Solutions Ltp and can be helpful for the development of modules for Opencart

Checksum Document for PHP

Transaction Detail Checksum Facility
On Payment Gateway
Provided By TechProcess Solutions Ltd

TPSL has a checksum facility for providing security at transaction time. This is one of the types of integration we have. In this type of integration, TPSL will provide API to the merchant, which they have to deploy at their end. A checksum value will be generated using this API. Please find the below mentioned detailed process below.

Process for Checksum

1. The merchant has to deploy the API given by TPSL at their end.
2. All the necessary request parameters will be sent to this API.
3. This API will generate a checksum value.
4. At the request time, this checksum value will come to TPSL’s end with the request parameter as per Annexure 01.
5. When the request reaches TPSL’s side TPSL will once again generate the checksum value using the request parameter received from the Merchant.
6. If the value of the checksum matches at both ends, then the transaction will be forwarded to the respective bank.
7. Once TPSL receives the response from the bank, TPSL generates a checksum value with the response parameter that will be sent to the merchant.
8. Once TPSL sends the response to the merchant along with the checksum value, the merchant will generate a checksum using the response parameter received from TPSL.
9. If the checksum value matches at the merchant side using API then that transaction will return as a Transaction Success. After that check the auth status as per annexure 03:If, auth status=0300 is for a successful transaction or auth status=0399 is for failed transactions
10. If checksum mismatches, that transaction will be considered a Failed/Fraud transaction.

Learn about: Free invoice generator online

Technical Process Flow:

01. The merchant has to share the request URL (From which the transaction request will come) with TPSL.TPSL will configure the same at the TPSL end and validate transaction time for security purposes.
02. The merchant can hit the below URL for Transaction Processing

Testing: https://www.tekprocess.co.in/PaymentGateway/TransactionRequest.jsp?msg=”+strMsg

Live:
https://www.tpsl-india.in/PaymentGateway/TransactionRequest.jsp?msg=”+strMsg

Pre-requisites:

1. PHP 5 or greater
2. cUrl

Step 1: Files and Directory Verification

1.1. Please make sure a total of 5 files are provided to you. (Request.php, getcheck.php,
1.2. Response.php, keystoretekp.pem, and MerchantDetails.properties)
1.3. Make sure these files are placed under the same directory except MerchantDetails.properties.
1.4. It is not compulsory to place files under the directory provided by Techprocess.
1.5. Please ensure the following values are available inside the MerchantDetails.properties file.
1.5.1. BillerId= [Represent the Merchant ID provided by TPSL.]
1.5.2. ResponseUrl= [Represent the Response URL of the merchant.]
1.5.3. CRN= [Currency.]
1.5.4. CheckSumKey= [Unique key provided by TPSL.]
1.5.5. CheckSumGenUrl= [URL provided by TPSL.]
1.5.6. TPSLUrl= [TPSL Payment gateway URL.]

Step 2: Implementation

2.1. Make sure the MerchantDetails.properties file is not accessible from the browser.
2.2. For testing, the default URL will be present for “TPSLUrl=” in the MerchantDetails.properties file.
2.3. You can change this URL once you get the new URL from TPSL for Live Transactions.
2.4. Change the following in MerchantDetails.properties with the details TPSL has provided.
2.5. Make sure there are any spaces at the beginning and the end of each value of
2.6. MerchantDetails.properties. Follow Screen:1

Screen: 1

2.7. Copy Request.php, getcheck.php, Response.php, and keystoretekp.pem to the desired directory.
2.8. Open getcheck.php and change the Property file path to the path where you have placed your property file. Make a similar change in Response.php

Follow Screen:2.

Screen: 2

2.9. Now, look for “curl_setopt($ch,
CURLOPT_REFERER,’http://www.yourdomain.com/filename.php’);”
line and change the URL to where your getcheck.php and Response.php file is placed. Make sure you replace the filename.php with the respective file names. e.g.

For getcheck.php:
curl_setopt($ch, CURLOPT_REFERER,’http://www.yourdomain.com/getcheck.php’);

For response.php:
curl_setopt($ch, CURLOPT_REFERER,’http://www.yourdomain.com/Response.php’);

3. Step 3: Important things to remember.
3.1 Do not modify “keystoretekp” file.
3.2 Do not modify any code in any of the files.
3.3 To get response values, you can check the “Response.php” file. Do not bypass any of the procedures from the “Response.php” file.
3.4 Under response.php you will get the following array once the transaction is done.

[0] => T1234 [Biller Id]
[1] => 1 [Transaction ID]
[2] => 00
[3] => NA
[4] => 1 [Amount]
[5] => 470 [Bank code]
[6] => NA
[7] => NA
[8] => INR
[9] => NA
[10] => NA
[11] => NA
[12] => NA
[13] => 18-07-2011 10:12:18 [Timestamp]
[14] => 0399 [Could be 0300/0399] 0300: Success transaction. 0399: Failed transaction.
[15] => NA
[16] => 1 [Market code]
[17] => 1 [Account Number]
[18] => NA
[19] => NA
[20] => NA
[21] => NA
[22] => NA
[23] => NA
[24] => NA
[25] => 292697030925

3.4 Please remember integration will be handled in two ways.
a) Test server transaction.
b) Live server transaction.
For both types, you need to perform configuration in the same files/fields which are provided to you.

Request.php: Do not require any kind of configuration.
getcheck.php: Configuration required.
Response.php: Configuration required.
MerchantDetails.properties: Configuration required.
Keystoretekp.pem: Do not require any kind of configuration.

Configuration Required in Files Revised for both types

getcheck.php:
i. Set the property file path.
ii. Set curl_opt REFERER path to your domain name.
iii. Set curl_opt CURLOPT_CAINFO path to the certificate that is provided to you. Please note Test and Live certificates are different.

Response.php:
iv. Set the property file path.
v. Set curl_opt REFERER path to your domain name.
vi. Set curl_opt CURLOPT_CAINFO path to the certificate which is provided to you. Please note Test and Live certificates are different.

MerchantDetails.properties:
vii. Change BillerID to the one provided to you.
viii. Change Responseurl to the one where your Response.php file is located.
ix. Change CheckSumKey to the one that is provided to you.
x. Change CheckSumGenUrl when the Live URL is provided to you.
xi. Change TPSLUrl when the Live URL is provided to you.

For more details related to Request and Response please refer to Annexure.

Annexure 01: Checksum Request Parameter (From Merchant to TPSL)

Parameter
Sample Value Size Type Description
Transaction Id 1234556 8 (string) Mandatory MERCHANT unique reference number
Market Code 1234 10 (String) Mandatory Extra information from the merchant for product details with alphanumeric plus _
Account No 123-334444 OR
1 200 (String) Mandatory It will be the account number of customers provided by MERCHANT or if MERCHANT don’t want to pass account no then they need to pass the constant value as 1.
Payment Amount 500.00 8 Mandatory It will be the transaction amount
Bank Code 300 5 (String) Mandatory It will be a bank Code as per Annexure 08.
Property file path D:\TechProcess\Property\MerchantDetails_T1199.properties 150 (String) Mandatory Merchant needs to pass the complete or relative path of the property file residing in the system.

Annexure 02: Checksum Response Parameter (From TPSL to Merchant)

Parameter Sample Value Size Type Description
MERCHANT ID L123 6 Character MERCHANT id provided by TPSL to MERCHANT.
CustomerID 9871234567 20 varchars MERCHANT unique transaction id.
TxnreferenceNo NA NA NA TPSL unique transaction ID
BankReferenceNo NA NA NA Banks unique transaction ID.
TxnAmount 700 15 Varchar Transaction Amount provided by MERCHANT (SRC AMT field in TPSL system).
BankID 300 3 Numeric Bank Id provided by TPSL.
BankMERCHANTID NA NA NA It will be the MERCHANT id of MERCHANT provided by the bank (provided by the bank). For the rest banks, it will be “NA”.
TxnType NA NA NA This will be “NA” always.
Currency Name INR 3 Varchar This will be “INR” always.
Item Code NA NA NA This will be “NA” always.
Security Type NA NA NA This will be “NA” always.
Security ID NA NA NA This will be “NA” always.
Security Password NA NA NA This will be “NA” always.
TxnDate Date 20 Date Format DD-MM-YYYY HH:MM: SS Time and date at which TPSL sends the response. Format is
DD-MM-YYYY HH:MM: SS
Auth Status Refer to Annexure 03
Settlement Type NA NA NA This will be “NA” always.
AdditionalInfo1 7072006 20 Varchar This will be the market code.
AdditionalInfo2 102-102976395 100 Varchar This will be the account number.
AdditionalInfo3 NA NA Date This will be “NA” always.
AdditionalInfo4 NA NA Varchar This will be “NA” always.
AdditionalInfo5 NA NA Varchar This will be “NA” always.
AdditionalInfo6 NA NA Varchar This will be “NA” always.
AdditionalInfo7 NA NA Varchar This will be “NA” always.
ErrorStatus NA NA NA This will be “NA” always
Error Description NA or 000 100 NA or Varchar This will be either “NA” or respective error messages.
CheckSum 123456789 50 Varchar This will be a unique checksum number as per logic.

Note: The checksum that is generated is 12 digit number.

Annexure 03:

AUTHSTATUS Status Reason Proposed Transaction
“0300” Success Successful Transaction
“0399” Invalid Authentication at Bank Cancel Transaction

Test Account

BillerId=T1234
ResponseUrl=http://www.yourdomain.com/Response.php
CRN=INR
CheckSumKey=1234567890ABCDEFG
CheckSumGenUrl=https://www.tekprocess.co.in/PaymentGateway/CheckSumRequest
TPSLUrl=https://www.tekprocess.co.in/PaymentGateway/TransactionRequest.jsp

integration of the TechProcess payment gateway, Indian payment gateway integration, tech process test account, live account of tech process

If you are looking for API knowledge of the Opencart then watch the following video:
Referential Integrity

0

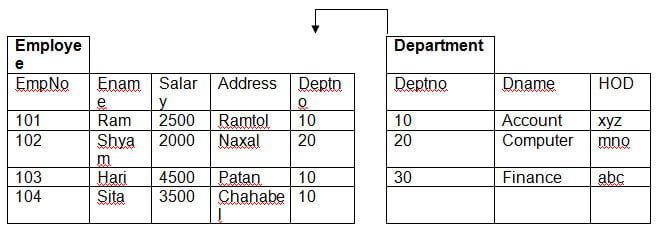
To establish a “parent-child” or a “master-detail” relationship between two tables having a common column, we make use of referential integrity constraints. To implement this, we should define the column in the parent table as a primary key and the same column in the child table as a foreign key referring to the corresponding parent entry.

A value that appears in one relation for a given set of attributes also appears for a certain group of attributes in another relation. This condition is called referential integrity.

It is a rule that maintains consistency among the rows of two relations. The rule states that if there is a foreign key in one relation, either each foreign key value must match a primary key value in another relation.

database-integrity
database-integrity

Create table Department

( Denptno number(2),

Dname varchar2(20),

HOD varchar2(10),

Constraint pk_deptno Primary Key(Deptno));

Create table Employee

( EmpNo number(3),

Ename varchar2(20),

Salary number(5),

Address varchar2(20),

Deptno number(2),

Constraint pk_empno Primay Key(EmpNo)

Constraint fk_deptno Foreign Key (Deptno) References Department(Deptno));

There may be a tuple tr in r(say Department Table) that does not join with any tuple in s (say Employee Table). Such tuples are called dangling tuples. Depending on the entity set or relationship set being modeled, dangling tuples may or may not be acceptable. Here as shown in the example above record of deptid 30 is exist whose corresponding employee record does not exist so that tuple is called dangling tuples. Dangling tuples in a relation are permitted where the primary key existed but dangling tupes into the foreign key columns contains does not permit.

Database modifications can cause violations of referential integrity. While performing database modification; referential-integrity constraint rules should not be violated.

Insert:-

If a tuple t2 is inserted into r2, the system must ensure that there must be a tuple t1 in r1.

This means that if you enter an employee record into the Employee table then his/her department must have existed in the Department table under which he/she is working.

i.e. we can enter employee records who are working under departments 10,20 or 30 but not 40 cause this is not present in the Department table.

Delete:-

If a tuple t1 is deleted from r1, the system must compute the set of tuples in r2 that reference t1.

If this set is not empty, either the delete command is rejected as an error, or the tuples that reference t1 must themselves be deleted. The latter solution may lead to cascading deletions, since tuples may reference tuples that reference t1, and so on.

In short; you can’t delete any department from the Department table till you delete all the employees from the Employee table working under that department. But here we can use on delete cascade macro for performing this task.

Update:-

We must consider two cases for the update: updates to the referencing relation (r2), and updates to the referenced relation (r1).

  • If a tuple t2 is updated in relation r2, and the update modifies values for the foreign key, then a test similar to the insert case is made.
  • If a tuple t1 is updated in r1, and the update modifies values for the primary key, then a test similar to the delete case is made.

SQL Syntax:

Create a table Employee (foreign key (Deptno) references Department(Deptno) on delete cascade on update cascade);

Foreign Key can be specified as part of the SQL create table statement by using the foreign key clause. (ie. SQL DDL statements). By default, a foreign key references the primary key attributes of the referenced table. SQL also supports a version of the references clause where a list of attributes of the referenced relation can be specified explicitly. Ie. We can simply write
Foreign key (Deptno) references Department);

When a referential integrity constraint is violated, the normal procedure is to reject the action that caused the violation, However, a foreign key clause can specify that if a delete or update action on the referenced relation violates the constraint, then, instead of rejecting the action, the system must take steps to change the tuple in the referencing relation to restoring the constraint.

Because of the clause on delete cascade associated with the foreign-key declaration, if a delete of a tuple in any Department table results in this referential-integrity constraint being violated, the system does not reject the delete. Instead, the delete “cascades to the Employee relation, deleting the tuple that refers to the Department that was deleted. Similarly, the system does not reject an update to a field referenced by the constraint if it violates it.

Referential Integrity (example from BOOK)

(referential-integrity constraints or sub-set dependencies)

A value that appears in one relation for a given set of attributes also appears for a certain set of attributes in another relation. This condition is called referential integrity.

create table customer

( customer_name char(20),

customer_street char(30),

customer_city char(30),

primary key (customer_name));

create table branch

( branch_name char(15),

branch_city char(30),

assets numeric(16,2),

primary key (branch_name),

check (assets>=0));

create table account

( account_number char(10),

branch_name char(15),

balance numeric(12,2),

primary key (account_number),

foreign key (branch_name) references the branch,

check (balance >=0));

create table depositor

( customer_name char(20),

account_number char(20),

 primary key (customer_name, account_number),

foreign key (customer_name) references the customer,

foreign key (account_name) references account);

Foreign keys can be specified as part of the SQL create table statement by using the foreign key clause. We illustrate foreign-key declarations by using the SQL DDL definition of part of our database (as shown above in SQL statements).

The definition of the account table has a declaration of a foreign key (branch_name) referencing the branch. This foreign-key declaration specifies that for each account tuple, the branch name specified in the tuple must exist in the branch relation.

By default, in SQL a foreign key references the primary key attributes of the referenced table. SQL also supports a version of the references clause where a list of attributes of the referenced relation can be specified explicitly.

Branch_name char(15) references the branch

When a referential integrity constraint is violated, the normal procedure is to reject the action that caused the violation. However, a foreign key  clause can specify that if a delete or update action on the referenced relation violates the constraint, then, instead of rejecting the action, the system must take steps to change the tuple in the referencing relation to restore the constraint. Consider this definition of an integrity constraint on the relation account

Assertions

An assertion is a predicate expressing a condition that we wish the database to always satisfy. Domain constraints and referential integrity constraints are special forms of assertions. We have paid substantial attention to these forms of assertion because they are easily tested and apply to a wide range of database applications. However, there are many constraints that we cannot express by using only these special forms. Two examples of such constraints are:

  • The sum of all loan amounts for each branch must be less than the sum of all account balances at the branch.
  • Every loan has at least one customer who maintains an account with a minimum balance of Rs. 1000.

An assertion in SQL takes the form

create assertion <assertion-name> check <predicate>

When an assertion is created, the system tests it for validity. If the assertion is valid, then any future modification to the database is allowed only if it does not cause that assertion to be violated. This testing may introduce a significant amount of overhead if complex assertions have been made.

Domain Constraints

0

(the principle behind attribute domains is similar to that behind typing of variables in programming languages.)

We have seen that a domain of possible values must be associated with every attribute. We know a no of standard domain types and data and time types defined in SQL. Declaring an attribute to be of a particular domain acts as a constraint on the values that it can take. The system tests them easily whenever a new data item is entered into the database.

A domain is a set of values that may be assigned to an attribute. A domain definition usually consists of the following components: domain name, meaning, data type , size(or length), and allowable values or allowable range.

As we know that every attribute must have a specific domain (in general data types) that accepts the associated values of its own kind. We know a number of standard domain types, such as integer types, character types, and date/time types defined in SQL. Declaring an attribute to be of a particular domain acts as a constraint on the values that it can take. Domain constraints are the most elementary form of integrity constraint. The system tests them easily whenever a new data item is entered into the database.

It is possible for several attributes to have the same domain. For example, the attributes customer-name and employee-name might have the same domain. At the implementation level, both customer names and branch names are character strings.

The create domain clause can be used to define new domains.

create domain <domain-name> <constraints-types>

For example, the statements

create domain dollars number(12,2);

create domain pounds number(10,2);

Here, these statements define the domains dollars and pounds to be decimal numbers with a total of 12 digits and 10 digits respectively, two of which are placed after the decimal point. An attempt to assign a value of type dollars to a variable of type pounds would result in a syntax error, although both are of the same numeric type.

The check clause in SQL permits domains to be restricted in powerful ways that most programming language-type systems do not permit. Specifically, the check clause permits the schema designer to specify a predicate (selection condition) that must be satisfied by any value assigned to a variable whose type is the domain.

For example, a check clause can ensure that an hourly wage domain allows only values greater than a specified values.

create domain hourly wage numeric(5,2)

constraint wage-value-test check(value>=4.00)

The domain hourly wage has a constraint that ensures that the hourly wage is greater than 4.00. the clause constraint wage-value-test is optional and is used to give the name wage-value-test to the constraint. The name is used to indicate which constraint an update violated.

The check clause can also be used to restrict a domain not to contain any null values.

create domain account char(10)

constraint account-no-null-test check(value not null)

Another example: here the domain can be restricted to contain only a specified set of values by using the in the clause.

create domain accounType char(10)

constraint account-type-test check(value in(Checking, Saving))

Integrity Constraints

0

(The rules that should not be violated while performing an operation on the database)

Integrity constraints ensure that changes made to the database by authorized users do not result in a loss of data consistency. Thus, integrity constraints guard against accidental damage to the database.

Simple Constraints are Key Constraints and forms of Relationships Constraints.

The relational data model includes several types of constraints, or business rules, whose purpose is to facilitate maintaining the accuracy and integrity of data in the database. The major types of integrity constraints are domain constraints, entity integrity, and referential integrity.

Integrity Constraint:

Database designers can specify integrity constraints that are enforced by the DBMS. A constraint is a rule that cannot be violated by database users (ie. Also called a business rule).

(controlling data integrity)

For many DBMS data, integrity constraints ( ie. Control on the possible value a field can assume) can be built into the physical structures of the fields. The data type enforces one form of data integrity control. Since it may limit the type of data (for eg:- numeric or character, data type) and length of a field value. Some typical integrity constraints control that a DBMS may support are:-

Default Value:- A default is a value a field will assume unless a user enters an explicit value. For an instance of that field. Assigning a default value to a field can reduce a data entry time since the entry of a value can be skipped and it can also help to reduce data entry errors for that most common value.

Range Control:- A range control limits the set of permitted values, a field may assume. The range may be a numeric lower to upper bound or a set of specific values. Range control must be used with caution since the limits of the range may change over time.

NULL value control:- Each primary key must have an integrity control that prohibits null value. Any other required fields may also have invalid value control placed on them if that is the policy of the organization.

Referential Integrity:- Referential Integrity on a field is a form of range control in which the value of that field must exist as the value in some field in another row of the same or different table. ie. The range of legitimate values comes from the dynamic contents of the field in a database table, not from the pre-specified setup values.

An integrity constraint is that the value of an attribute in one relation depends on the value of a primary key in the same or another relation.