How to Implement Facebook (Meta) Pixel Tracking in OpenCart 4: Complete eCommerce Conversion Tracking Guide
 Rupak NepaliPublished Sep 29, 2026
If you are running an OpenCart 4 store and advertising products through Facebook or Instagram, implementing Meta Pixel tracking is an important step toward understanding customer behavior and measuring advertising performance. Meta Pixel, formerly known as Facebook Pixel, is a JavaScript-based tracking tool that helps eCommerce businesses measure website activity, build advertising audiences, and report conversions from Meta advertising campaigns.
For example, when a customer visits a product page, adds an item to the cart, or completes an order, your OpenCart store can send corresponding events to Meta. With properly configured tracking, you can monitor the customer journey:
eCommerce Conversion Funnel
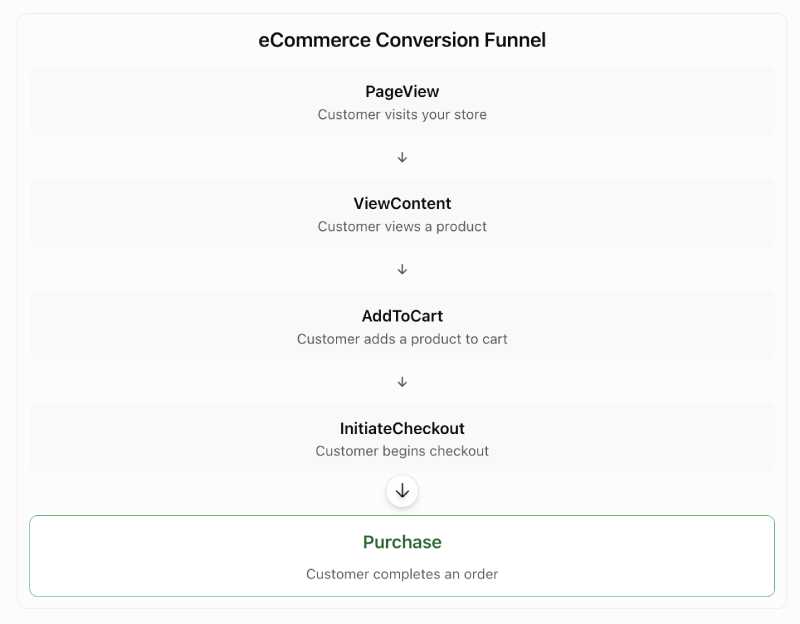
This guide explains how to implement these events in OpenCart 4 using PHP, Twig templates, JavaScript, and AJAX.
We will also cover common implementation challenges, including duplicate Pixel IDs, AJAX-based cart functionality, custom checkout themes, currency formatting, and event verification.
1. What Is Meta Pixel?
Meta Pixel is a tracking tool installed on your website to measure visitor interactions.
It helps store owners:
- Measure conversions from Facebook and Instagram advertising campaigns.
- Understand which products visitors view.
- Track Add to Cart and checkout activity.
- Measure completed purchases.
- Create custom audiences for remarketing.
- Analyze customer behavior across the shopping funnel.
- Optimize advertising campaigns using conversion events.
For an OpenCart store, the most relevant standard events are:
| Meta Event | Description | OpenCart Trigger |
|---|---|---|
| PageView | Visitor loads a page | Every page |
| ViewContent | Visitor views a product | Product detail page |
| AddToCart | Product added to cart | Successful cart AJAX response |
| InitiateCheckout | Customer begins checkout | Checkout page load |
| Purchase | Order successfully completed | Order success page |
These events provide a foundation for measuring the customer journey from initial website visit to completed purchase.
2. Create a Meta Pixel
Before implementing tracking in OpenCart, create or identify your Meta Pixel.
- Log in to Meta Business Suite.
- Open Events Manager.
- Select Connect Data Sources.
- Choose Web.
- Select Meta Pixel.
- Enter a name for your Pixel.
- Complete the setup process.
- Copy your Pixel ID.
Your Pixel ID is a numeric identifier associated with your tracking configuration.
For this tutorial, we will use the following example:
1732760744480178Replace this example with your own Pixel ID throughout the implementation.
Important: Use the same Pixel ID consistently across all tracking events. Avoid installing multiple copies of the same Pixel through different OpenCart modules or theme settings.
3. Install the Base Meta Pixel Code in OpenCart 4
You can use the Opencart Analytic module explained in article below:
Install Analytics module in Opencart 4
Another is by adding in the code directly. The base Pixel code initializes tracking and automatically records PageView events. You can add it through an appropriate theme custom-code setting, an existing analytics integration, or your theme’s header template. If you are adding it manually, locate the active header Twig template.
A typical OpenCart theme location is:
catalog/view/template/common/header.twigA custom theme may use a different directory.
Add the following code before the closing </head> tag:
<!-- Meta Pixel Code -->
<script>
!function(f,b,e,v,n,t,s)
{if(f.fbq)return;n=f.fbq=function(){n.callMethod?
n.callMethod.apply(n,arguments):n.queue.push(arguments)};
if(!f._fbq)f._fbq=n;n.push=n;n.loaded=!0;n.version='2.0';
n.queue=[];t=b.createElement(e);t.async=!0;
t.src=v;s=b.getElementsByTagName(e)[0];
s.parentNode.insertBefore(t,s)}(window, document,'script',
'https://connect.facebook.net/en_US/fbevents.js');
fbq('init', '1732760744480178');
fbq('track', 'PageView');
</script>
<noscript><img height="1" width="1" style="display:none"
src="https://www.facebook.com/tr?id=1732760744480178&ev=PageView&noscript=1"
/></noscript>
<!-- End Meta Pixel Code -->
Verify PageView
Open your store in Chrome.
- Press F12 to open Developer Tools.
- Select the Network tab.
- Filter requests using
facebook.com/tr. - Refresh the page.
- Look for a request containing
ev=PageView.
If the request appears, the base Pixel is sending PageView events.
4. Implement ViewContent Tracking for Product Pages
The ViewContent event tracks when a visitor views a product.
This is particularly useful for product remarketing and understanding which products attract customer interest.
Step 1: Prepare product information in the controller
Open your active product controller.
For the standard OpenCart product route, this is generally:
catalog/controller/product/product.phpAfter retrieving the product information, prepare the tracking data.
$data['meta_pixel_product'] = array(
    'content_ids' => array(
        (string)$product_info['product_id']
    ),
    'content_name' => $product_info['name'],
    'content_type' => 'product',
    'value' => (float)$product_info['price'],
    'currency' => strtoupper(
        $this->session->data['currency']
    )
);
Ensure that $product_info refers to the actual product data available in your controller.
If your store uses special prices, tax-inclusive pricing, or currency conversion, calculate the value consistently with your storefront pricing rules.
Step 2: Add the event to the product template
Open the active product Twig template.
Typical location:
catalog/view/template/product/product.twigAdd the following script to the product page:
<script>
document.addEventListener('DOMContentLoaded', function() {
    var product = {{ meta_pixel_product|json_encode|raw }};
    if (typeof fbq !== 'undefined') {
        fbq('trackSingle', '1732760744480178', 'ViewContent', {
            content_ids: product.content_ids,
            content_name: product.content_name,
            content_type: product.content_type,
            value: product.value,
            currency: product.currency
        });
    }
});
</script>
The trackSingle method targets the specified Pixel ID rather than broadcasting the event to every initialized Pixel.
Note: Confirm the active controller and template before modifying them. Some commercial OpenCart themes replace standard controllers or templates through event hooks.
5. Implement AddToCart Tracking in OpenCart 4
AddToCart tracking is one of the most important eCommerce events because many OpenCart stores add products through AJAX without reloading the page.
A conventional page-load tracking script will not reliably detect these actions.
The recommended approach is:
- Add product information to the cart AJAX response.
- Read that information in the JavaScript success callback.
- Trigger the Meta AddToCart event after the cart operation succeeds.
Step 1: Modify the cart controller
Open:
catalog/controller/checkout/cart.phpLocate the add() method.
After successfully adding the product to the cart, include tracking information in the JSON response.
Example:
$json['ecommerce'] = array(
    'product_id' => $product_info['product_id'],
    'name'       => $product_info['name'],
    'price'      => (float)$price,
    'quantity'   => (int)$quantity,
    'currency'   => strtoupper(
        $this->session->data['currency']
    )
);
The $price variable should represent the correct numeric product price.
For example, if your store supports special prices and tax calculations, use the appropriate calculated value rather than a formatted HTML price string.
In OpenCart, a currency formatting call with the appropriate raw-output arguments can return a numeric value:
$price = $this->currency->format(
    $this->tax->calculate(
        $product_info['price'],
        $product_info['tax_class_id'],
        $this->config->get('config_tax')
    ),
    $this->session->data['currency'],
    '',
    false
);
Adjust the calculation to account for special pricing where applicable.
Step 2: Add tracking to the AJAX success callback
Find the JavaScript responsible for adding products to the cart.
A common OpenCart implementation uses:
cart.add(product_id);Inside the successful AJAX response callback, add:
if (json['ecommerce']) {
    var ecommerce = json['ecommerce'];
    if (typeof fbq !== 'undefined') {
        fbq('trackSingle', '1732760744480178', 'AddToCart', {
            content_type: 'product',
            content_ids: [
                String(ecommerce.product_id)
            ],
            content_name: ecommerce.name,
            value: ecommerce.price,
            currency: ecommerce.currency
        });
    }
}
This sends the event only after the cart controller returns a successful response containing the product information.
Important: Check every Add to Cart entry point
Commercial themes often implement separate Add to Cart handlers for different parts of the storefront.
For example:
| Location | Possible Implementation |
|---|---|
| Category page | Shared cart JavaScript |
| Product detail page | Product template JavaScript |
| Quick View modal | Separate modal handler |
| Featured products | Theme-specific handler |
| Search results | Shared or custom handler |
If multiple handlers independently submit AJAX requests, each must be covered by your tracking implementation.
Otherwise, AddToCart events may be recorded from product pages but missed from Quick View or category listings.
Avoid adding the same tracking code to both a shared callback and a page-specific callback if both execute for one cart action. This can result in duplicate events.
6. Implement InitiateCheckout Tracking
The InitiateCheckout event indicates that a customer has entered the checkout process.
In OpenCart, checkout buttons generally navigate to the checkout page rather than executing an AJAX request.
Therefore, tracking the checkout page load is often more reliable than attaching an event to individual checkout buttons.
Step 1: Prepare cart information in the checkout controller
Open the active checkout controller.
Depending on your theme, this may be:
catalog/controller/checkout/checkout.phpRetrieve the cart products:
$products = $this->cart->getProducts();
$content_ids = array();
$num_items = 0;
$value = 0;
foreach ($products as $product) {
    $content_ids[] = (string)$product['product_id'];
    $num_items += (int)$product['quantity'];
    $value += (float)$product['total'];
}

$data['ecommerce_json'] = json_encode(array(
    'content_ids' => $content_ids,
    'num_items'   => $num_items,
    'value'       => $value,
    'currency'    => strtoupper(
        $this->session->data['currency']
    )
));
For production implementations, ensure the total follows your chosen tax, discount, and currency calculation rules.
Step 2: Add the tracking script to checkout.twig
Open the active checkout template.
Typical location:
catalog/view/template/checkout/checkout.twigAdd the following script:
<script>
document.addEventListener('DOMContentLoaded', function() {
    var ecommerce = {{ ecommerce_json|raw }};
    if (typeof fbq !== 'undefined') {
        fbq('trackSingle', '1732760744480178', 'InitiateCheckout', {
            content_type: 'product',
            content_ids: ecommerce.content_ids,
            num_items: ecommerce.num_items,
            value: ecommerce.value,
            currency: ecommerce.currency
        });
    }
});
</script>
Custom checkout theme considerations
Some OpenCart themes replace the standard checkout controller with a custom controller.
For example, a theme may use a controller under:
catalog/controller/extension/The exact path depends on the theme and its architecture.
When a custom checkout controller is active, modifying the standard checkout controller may have no effect.
Check your theme’s event registrations and confirm which controller and Twig template actually render the checkout page.
7. Implement Purchase Tracking
Purchase tracking records completed orders.
This event is particularly important for measuring advertising revenue and purchase conversions.
A typical OpenCart implementation places the tracking script on the order success page.
The standard template is:
catalog/view/template/common/success.twigThe controller commonly responsible for the page is:
catalog/controller/checkout/success.phpExample Purchase event
{% if orderactive == 'active' %}
<script>
if (typeof fbq !== 'undefined') {
    fbq('trackSingle', '1732760744480178', 'Purchase', {
        value: {{ carttotal }},
        currency: '{{ currency }}'
    });
}
</script>
{% endif %}
The variables shown are illustrative. Your controller must provide the appropriate order total, currency, and order-state condition.
Important Purchase tracking considerations
1. Prevent duplicate purchases
The Purchase event should not fire again when a customer refreshes the success page.
Use a reliable order-completion condition or an order-specific event-deduplication mechanism.
2. Use the correct currency
Avoid hardcoding USD if your OpenCart store supports multiple currencies.
The event currency should match the currency associated with the reported purchase value.
3. Use the correct order total
Decide whether your conversion value includes tax, shipping, discounts, or other adjustments, and apply that rule consistently.
4. Avoid duplicate Pixel events
If another analytics module already sends Purchase events, ensure that your custom implementation does not send the same conversion again.
For high-volume stores, consider server-side conversion tracking with event IDs and deduplication.
8. Why Use trackSingle Instead of track?
Meta provides different methods for sending standard events.
The two relevant methods are:
fbq('track', 'AddToCart', {...});and:
fbq('trackSingle', '1732760744480178', 'AddToCart', {...});The first method sends the event to initialized Pixel instances.
The second explicitly targets one Pixel ID.
This distinction matters when a store has multiple Pixel IDs installed through different modules, analytics settings, or theme custom-code fields.
For example, a store might accidentally initialize:
- Pixel A from the theme header.
- Pixel B from an analytics integration.
- Pixel C from a previous marketing agency’s code.
Using track can send the event to multiple initialized Pixels, potentially inflating conversion counts across different advertising accounts.
Using trackSingle helps ensure that your custom event targets the intended Pixel.
However, it does not replace the need to remove unwanted Pixel initialization code.
9. Avoid Duplicate Meta Pixel Installation
OpenCart stores may have tracking code configured in multiple locations.
Review the following:
- Theme custom header code.
- OpenCart analytics settings.
- Facebook Business Extension.
- Third-party marketing extensions.
- Google Tag Manager.
- Custom JavaScript files.
If the same Pixel is initialized more than once, events can be duplicated.
For example, if the base Pixel is installed manually and another module initializes the same Pixel, PageView counts may be inflated.
Keep one clearly managed base Pixel installation and coordinate event tracking with any existing extensions.
10. Test Meta Pixel Events
After implementing the events, verify that they are actually being sent.
Method 1: Browser Developer Tools
Open Chrome Developer Tools.
Select the Network tab and filter:
facebook.com/trTrigger the relevant action:
| Action | Expected Event |
|---|---|
| Load homepage | PageView |
| Open product page | ViewContent |
| Add product to cart | AddToCart |
| Open checkout | InitiateCheckout |
| Complete test order | Purchase |
Inspect the request parameters to confirm that the event contains the correct value, currency, and product identifiers.
Method 2: Meta Ads Data Advisor Chrome Extension
Meta Ads Data Advisor Chrome Extension
Meta Ads Data Advisor, formerly known as Meta Pixel Helper, can help you inspect Meta Pixel activity and troubleshoot event implementation.Install from Chrome Web Store
This extension is particularly useful when developing or troubleshooting an OpenCart 4 implementation because you can perform an action on the store and check whether the corresponding event is firing.
For example:
| OpenCart Action | Expected Meta Event |
|---|---|
| Open any page | PageView |
| Open a product | ViewContent |
| Add a product to cart | AddToCart |
| Open checkout | InitiateCheckout |
| Complete an order | Purchase |
How to test OpenCart 4 events
- Install Meta Ads Data Advisor in Google Chrome.
- Open your OpenCart store.
- Click the Meta Ads Data Advisor extension icon.
- Open a product page and check whether
ViewContentis detected. - Click Add to Cart and check whether
AddToCartappears. - Go to checkout and check for
InitiateCheckout. - Complete a test order and check for
Purchase. - Inspect the event details and available parameters.
This makes it easy to answer a very important question during development:
Is the Meta event actually firing when the customer performs the action?
For example, if AddToCart does not appear after clicking Add to Cart, investigate the browser-side implementation, such as the AJAX callback or JavaScript event handler.
Similarly, if InitiateCheckout appears but Purchase does not, focus your investigation on the checkout success page and Purchase implementation.
Checking for duplicate Pixels
Meta Ads Data Advisor is also useful for identifying unexpected Pixel installations.
If your OpenCart store is supposed to use one Pixel but the extension detects multiple Pixel IDs, check:
- OpenCart Analytics settings.
- Theme custom JavaScript/header code.
- Meta/Facebook extensions.
- Google Tag Manager.
- Third-party marketing extensions.
- Custom theme files.
This is particularly important because multiple Pixel implementations can result in duplicate events and inaccurate conversion reporting.
Important: Browser diagnostics help verify client-side activity. Use Meta Events Manager → Test Events as well to confirm that events are reaching Meta. Browser-side diagnostics alone do not verify server-side Conversions API delivery or event deduplication.
Method 3: Meta Events Manager
Open Meta Events Manager:
https://business.facebook.com/events_manager2
Select your Pixel and open the Test Events tab.
Perform test actions on your store and verify that events arrive with the expected parameters.
The Overview tab provides aggregated event activity, while Diagnostics can identify event-quality issues.
Common testing issue: Ad blockers
If no requests appear in the Network tab, check whether your browser is blocking:
connect.facebook.netPrivacy extensions and ad blockers may prevent the Pixel script from loading.
Test using a browser profile with extensions disabled before assuming the implementation is broken.
11. Common OpenCart 4 Facebook Pixel Tracking Problems
Problem 1: AddToCart does not fire
Possible cause: The store adds products through AJAX, but tracking is attached only to page loads.
Solution: Add the tracking call to the successful AJAX response callback.
Problem 2: Checkout event does not fire
Possible cause: The theme replaces the standard checkout controller or template.
Solution: Identify the active controller and template through the theme’s event configuration.
Problem 3: Purchase events are duplicated
Possible cause: Multiple Pixel IDs or multiple tracking integrations are active.
Solution: Review the base Pixel installation, analytics settings, and marketing extensions.
Problem 4: Revenue is reported incorrectly
Possible cause: The event uses a formatted price string, incorrect currency, or inconsistent tax calculations.
Solution: Send numeric values and the correct ISO currency code.
Problem 5: JavaScript changes disappear after clearing the cache
Possible cause: The edited file is generated by the theme’s asset compilation system.
Solution: Modify the original JavaScript source file and regenerate the compiled assets.
Do not assume that a generated main.js file is the source of truth.
Problem 6: Product tracking works on one page but not another
Possible cause: The theme has independent handlers for category pages, product pages, and Quick View modals.
Solution: Audit all Add to Cart entry points and avoid overlapping event listeners.
12. Recommended Meta Pixel Event Parameters
For a product-based OpenCart store, the following parameters are useful:
| Parameter | Example | Purpose |
|---|---|---|
| content_type | product | Identifies the content type |
| content_ids | [“982”] | Identifies the product |
| content_name | Blue T-Shirt | Product name |
| value | 29.99 | Numeric value |
| currency | USD | Currency code |
| quantity | 2 | Quantity added to cart |
| num_items | 3 | Total number of cart items |
Ensure that product identifiers match the identifiers used in your Meta product catalog if you use catalog-based advertising.
For multi-currency stores, use the appropriate currency for the reported value.
13. Final Implementation Checklist
Before deploying Meta Pixel tracking to production, review the following checklist.
- Create or identify the correct Meta Pixel.
- Install the base Pixel code.
- Verify PageView events.
- Implement ViewContent on product pages.
- Implement AddToCart tracking in AJAX callbacks.
- Verify category, product, and Quick View cart handlers.
- Implement InitiateCheckout on the active checkout page.
- Implement Purchase tracking on the order success page.
- Confirm the correct currency and numeric values.
- Remove obsolete Pixel IDs.
- Check for duplicate tracking from extensions.
- Clear generated theme asset caches where necessary.
- Test events using Meta Ads Data Advisor.
- Verify events in Events Manager.
- Review Diagnostics after deployment.
Conclusion
Implementing Meta Pixel tracking in OpenCart 4 requires more than inserting a JavaScript snippet into the website header.
A reliable implementation must account for OpenCart’s PHP controllers, Twig templates, AJAX-based cart operations, checkout customization, and existing analytics integrations.
By tracking PageView, ViewContent, AddToCart, InitiateCheckout, and Purchase events consistently, store owners can build a clearer picture of their eCommerce conversion funnel and measure advertising activity more effectively.
For stores using custom themes, always verify the active controller, template, and JavaScript handler before making changes. This helps prevent missing events, duplicate conversions, and tracking issues after theme updates.
Need help implementing Meta Pixel tracking in your OpenCart store? Webocreation provides OpenCart development, customization, integration, and eCommerce optimization services. Visit Webocreation to explore our OpenCart development services.

Author of four Opencart book.
The recent are Opencart 4 developer book and Opencart 4 user manual