

In this Opencart 3 tutorial we are showing how to create Opencart 3 custom modules or extensions, this tutorial is for the developer and to add the custom functionalities in the Opencart. Check our hello world workflow.
- Before you start, watch the following videos tutorial
- Describing files and folder structure of Opencart With this you will get knowledge of how files and folders are structured in Opencart
- OpenCart 3 Library Global objects Methods With this video tutorial you will get where you can find the existing methods and functions to use while writing the code.
- Then go through the Code flow, Request & response, and MVCL pattern in OpenCart, by which you will know how MVCL works for modules and extension creations.
- At last, go to Install, configure, uninstall, remove the OpenCart module video tutorial guide then you will be ready to start your module development.
- Basic twig templating and bootstrap CSS knowledge
- Then start to work in the admin folder for module management
For Opencart 2 follow this post: How to create the controller for the Opencart custom module?
For Opencart 3, it is similar to Opencart 2 with some changes in the view section, which we are showing below.- To create the Controller in OpenCart 3, we need to understand at least four methods (index, install, validate and uninstall)
- To create the language file in OpenCart 3, we need to understand how to create variable and how we can load it in the controller and how it automatically get variable access to view.
- To create the view in Opencart 3, we need to know twig templating.
- Then start to work in the catalog for module show in front or presentation
- It also needed three files language, controller and view
- Before starting, things to consider while creating the modules are as per Daniel are:
- You are not allowed to modify any core DB tables. If you need to store any data for your extension you need to create a new table and use joins. But you can insert it into the setting table as the configuration are added to it
- You are not allowed to overwrite any files.
- All files are only allowed to be written in extension folders, except templates which of course go under the template folder.
- All extension should have an admin page that allows configuration
- Extensions are now prefixed by their category. so paypal_status would become payment_paypal_status
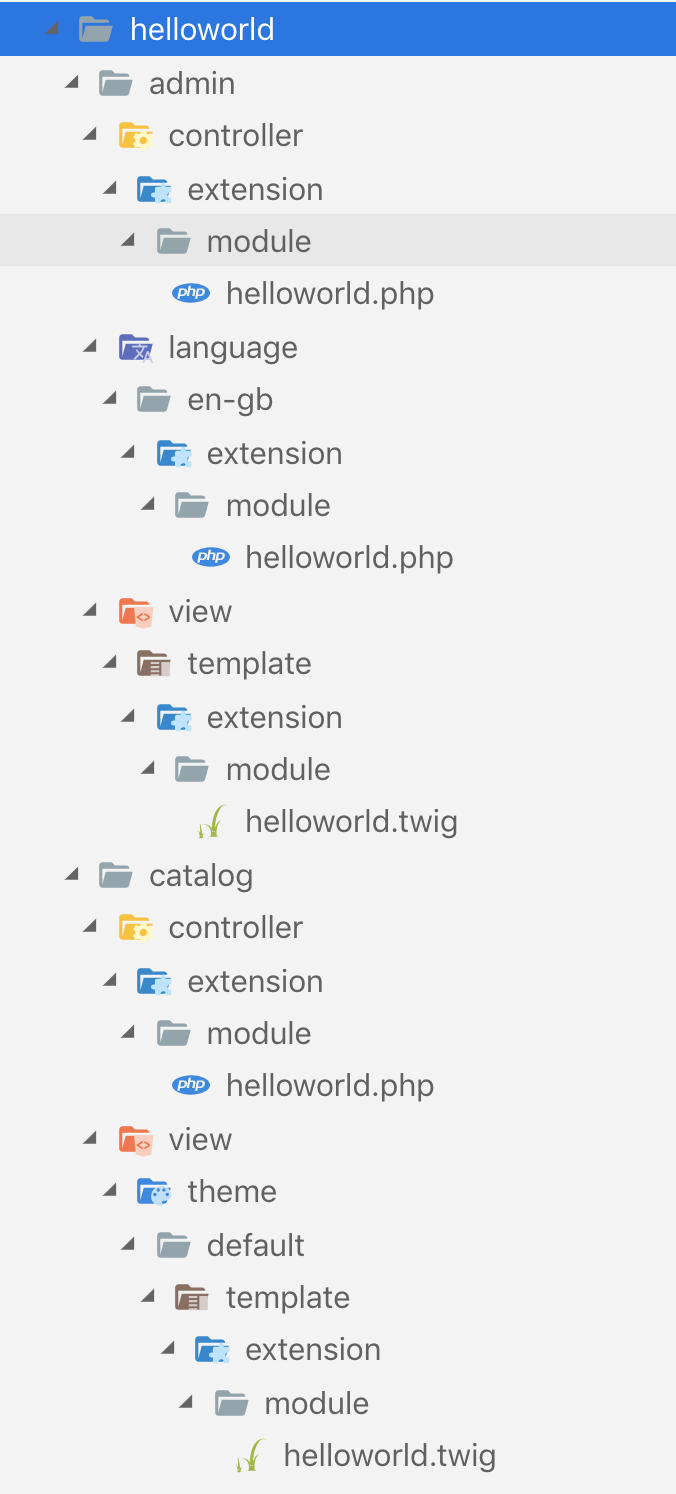
- Here is the files and folders structure of Hello World module
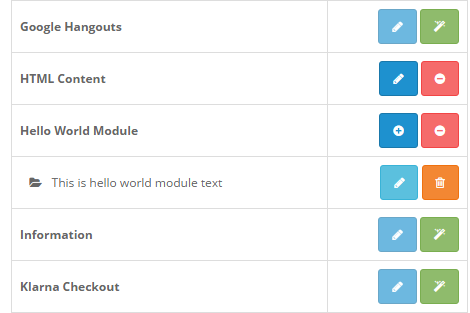
OpenCart identifies existing modules automatically, simply by reading the admin/controller/extension/module folder. Any modules existing in this folder will automatically be shown on the Modules listing page, and on the User Permissions page.
More detail for Opencart 2 are at https://webocreation.com/admin-controller-file-make-hello-world-module-opencart-module-development/
Let’s start with Admin Controller
The file to create is helloworld.php and it should be inside admin/controller/extensions/module/ and start with the following boilerplate code:
<?php
class ControllerExtensionModuleHelloworld extends Controller
{
	private $error = array();
	public function index()
	{ }
	protected function validate()
	{ }
	public function install()
	{ }
	public function uninstall()
	{ }
}
In OpenCart, Every class name of the module should start with ControllerExtensionModule, here in the hello world module, our folder structure is controller >> extension >> module >> helloworld.php so the class name is ControllerExtensionModuleHelloworld then extends the class with the base class controller. Better to have all the four methods index() will run when the controller is loaded or someone clicks the edit button, validate() checks for the admin access and other data validation, install() method runs when we click the install button on the module list page, and uninstall() method runs when we click the uninstall button.
private $error = array();
$error is just a private array which will hold the values if some error occurs, we assign error if users don’t have access, or submitted data are not valid.
Installation method:
This method is called when someone clicks the install + button
public function install()
{
	$this->load->model('setting/setting');
	$this->model_setting_setting->editSetting('module_helloworld', ['module_helloworld_status' => 1]);
}
Here we load the setting model, you can see the editSetting() method at controller >> model >> setting >> setting.php. When the install button is clicked then it deletes all the settings it had with the same code and installs the all values again. While passing the values don’t forget to include the extension in front of the name. Like here our extension is module and name is HelloWorld so it becomes module_helloworld and the same for the variables you are going to save, we are saving the status so module_helloworld_status which need to pass as an array. Let see the setting database table, and you will see how values are stored.

The convention is to add module_ or payment_ or shipping_ or report_ or dashboard_ etc as per your extensions type so it is supported in the cloud base as well.
After installation, we click the edit blue button, which calls the index method whose full code is below which we will describe afterward:
public function index()
{
	$this->load->language('extension/module/helloworld');
	$this->document->setTitle($this->language->get('heading_title'));
	$this->load->model('setting/module');
	if (($this->request->server['REQUEST_METHOD'] == 'POST') && $this->validate()) {
		if (!isset($this->request->get['module_id'])) {
			$this->model_setting_module->addModule('helloworld', $this->request->post);
		} else {
			$this->model_setting_module->editModule($this->request->get['module_id'], $this->request->post);
		}
		$this->session->data['success'] = $this->language->get('text_success');
		$this->response->redirect($this->url->link('marketplace/extension', 'user_token=' . $this->session->data['user_token'] . '&type=module', true));
	}
	if (isset($this->error['warning'])) {
		$data['error_warning'] = $this->error['warning'];
	} else {
		$data['error_warning'] = '';
	}
	if (isset($this->error['name'])) {
		$data['error_name'] = $this->error['name'];
	} else {
		$data['error_name'] = '';
	}
	$data['breadcrumbs'] = array();
	$data['breadcrumbs'][] = array(
		'text' => $this->language->get('text_home'),
		'href' => $this->url->link('common/dashboard', 'user_token=' . $this->session->data['user_token'], true)
	);
	$data['breadcrumbs'][] = array(
		'text' => $this->language->get('text_extension'),
		'href' => $this->url->link('marketplace/extension', 'user_token=' . $this->session->data['user_token'] . '&type=module', true)
	);
	if (!isset($this->request->get['module_id'])) {
		$data['breadcrumbs'][] = array(
			'text' => $this->language->get('heading_title'),
			'href' => $this->url->link('extension/module/helloworld', 'user_token=' . $this->session->data['user_token'], true)
		);
	} else {
		$data['breadcrumbs'][] = array(
			'text' => $this->language->get('heading_title'),
			'href' => $this->url->link('extension/module/helloworld', 'user_token=' . $this->session->data['user_token'] . '&module_id=' . $this->request->get['module_id'], true)
		);
	}
	if (!isset($this->request->get['module_id'])) {
		$data['action'] = $this->url->link('extension/module/helloworld', 'user_token=' . $this->session->data['user_token'], true);
	} else {
		$data['action'] = $this->url->link('extension/module/helloworld', 'user_token=' . $this->session->data['user_token'] . '&module_id=' . $this->request->get['module_id'], true);
	}
	$data['cancel'] = $this->url->link('marketplace/extension', 'user_token=' . $this->session->data['user_token'] . '&type=module', true);
	if (isset($this->request->get['module_id']) && ($this->request->server['REQUEST_METHOD'] != 'POST')) {
		$module_info = $this->model_setting_module->getModule($this->request->get['module_id']);
	}
	if (isset($this->request->post['name'])) {
		$data['name'] = $this->request->post['name'];
	} elseif (!empty($module_info)) {
		$data['name'] = $module_info['name'];
	} else {
		$data['name'] = '';
	}
	$this->load->model('localisation/language');
	$data['languages'] = $this->model_localisation_language->getLanguages();
	if (isset($this->request->post['status'])) {
		$data['status'] = $this->request->post['status'];
	} elseif (!empty($module_info)) {
		$data['status'] = $module_info['status'];
	} else {
		$data['status'] = '';
	}
	$data['header'] = $this->load->controller('common/header');
	$data['column_left'] = $this->load->controller('common/column_left');
	$data['footer'] = $this->load->controller('common/footer');
	$this->response->setOutput($this->load->view('extension/module/helloworld', $data));
}
Let start understand in detail:
$this->load->language('extension/module/helloworld');This is to load the language file admin >> language >> en-gb (or active language) >> extension >> module >> helloworld.php. Let’s create the language file and add some variables needed:
<?php
// Heading
$_['heading_title']     = 'Hello World Content';
// Text
$_['text_extension']    = 'Extensions';
$_['text_success']      = 'Success: You have modified Hello World Content module!';
$_['text_edit']         = 'Edit Hello World Content Module';
// Entry
$_['entry_name']        = 'Module Name';
$_['entry_title']       = 'Heading Title';
$_['entry_status']      = 'Status';
// Error
$_['error_permission']  = 'Warning: You do not have permission to modify Hello World Content module!';
$_['error_name']        = 'Module Name must be between 3 and 64 characters!';
Now to get access to heading_title in the controller we do like below:
$this->language->get('heading_title')To assign that heading_title as Title of the page we pass the $this->document->setTitle, click to know all of the objects’ methods of opencart
$this->document->setTitle($this->language->get('heading_title'));Below is the code of how we define the breadcrumbs array and assign in the data variable and pass it to view.
$data['breadcrumbs'] = array();
$data['breadcrumbs'][] = array(
	'text' => $this->language->get('text_home'),
	'href' => $this->url->link('common/dashboard', 'user_token=' . $this->session->data['user_token'], true)
);
$data['breadcrumbs'][] = array(
	'text' => $this->language->get('text_extension'),
	'href' => $this->url->link('marketplace/extension', 'user_token=' . $this->session->data['user_token'] . '&type=module', true)
);
if (!isset($this->request->get['module_id'])) {
	$data['breadcrumbs'][] = array(
		'text' => $this->language->get('heading_title'),
		'href' => $this->url->link('extension/module/helloworld', 'user_token=' . $this->session->data['user_token'], true)
	);
} else {
	$data['breadcrumbs'][] = array(
		'text' => $this->language->get('heading_title'),
		'href' => $this->url->link('extension/module/helloworld', 'user_token=' . $this->session->data['user_token'] . '&module_id=' . $this->request->get['module_id'], true)
	);
}
In the code above we use $this->language->get(‘text_home’) so you may got confused how we got text_home variable although we don’t define in admin >> language >> en-gb >> extension >> module >> helloworld.php, so the trick is we can get access to all variables of admin >> language >> en-gb >> en-gb.php we don’t need to load like other language file. So the breadcrumb here is to create the breadcrumbs array then assign the Home and dashboard URL, then added another link Extension and URL to module page. Then we check if the module is an edited or a new module and show the title and link of respective modules.
Now let’s move to another part of the code, the below part of the code is to create the action URL when someone submits or save the form. Here it checks if it is an active module or not and if it is an active module then it passes module_id in the URL
if (!isset($this->request->get['module_id'])) {
	$data['action'] = $this->url->link('extension/module/helloworld', 'user_token=' . $this->session->data['user_token'], true);
} else {
	$data['action'] = $this->url->link('extension/module/helloworld', 'user_token=' . $this->session->data['user_token'] . '&module_id=' . $this->request->get['module_id'], true);
}
In OpenCart module setting mostly, they have to save button and cancel button so below is the link when someone is redirected when they click the cancel button.
$data['cancel'] = $this->url->link('marketplace/extension', 'user_token=' . $this->session->data['user_token'] . '&type=module', true);The below code is to check if the module exists and if then get the available module information of that module.
if (isset($this->request->get['module_id']) && ($this->request->server['REQUEST_METHOD'] != 'POST')) {
	$module_info = $this->model_setting_module->getModule($this->request->get['module_id']);
}
The below code is to set the data of the fields to pass to the view. Here we check if the module name is set or module description and the status like below if nothing is set then we assign the empty.
if (isset($this->request->post['name'])) {
	$data['name'] = $this->request->post['name'];
} elseif (!empty($module_info)) {
	$data['name'] = $module_info['name'];
} else {
	$data['name'] = '';
}

if (isset($this->request->post['module_description'])) {
	$data['module_description'] = $this->request->post['module_description'];
} elseif (!empty($module_info)) {
	$data['module_description'] = $module_info['module_description'];
} else {
	$data['module_description'] = array();
}

if (isset($this->request->post['status'])) {
	$data['status'] = $this->request->post['status'];
} elseif (!empty($module_info)) {
	$data['status'] = $module_info['status'];
} else {
	$data['status'] = '';
}
This below code is to pass the languages to the view, as OpenCart supports multi-language so we are showing you how module_description and status can be set as per the language.
$this->load->model('localisation/language');
$data['languages'] = $this->model_localisation_language->getLanguages();
The below are the data to pass the header, column left and the footer to the view.
$data['header'] = $this->load->controller('common/header');
$data['column_left'] = $this->load->controller('common/column_left');
$data['footer'] = $this->load->controller('common/footer');
The below code is to set the response output to view.
$this->response->setOutput($this->load->view('extension/module/helloworld', $data));When someone saves the module then following code run and save the module data in an oc_module table in the JSON format.
$this->load->model('setting/module');
if (($this->request->server['REQUEST_METHOD'] == 'POST') && $this->validate()) {
	if (!isset($this->request->get['module_id'])) {
		$this->model_setting_module->addModule('helloworld', $this->request->post);
	} else {
		$this->model_setting_module->editModule($this->request->get['module_id'], $this->request->post);
	}
	$this->session->data['success'] = $this->language->get('text_success');
	$this->response->redirect($this->url->link('marketplace/extension', 'user_token=' . $this->session->data['user_token'] . '&type=module', true));
}
When someone submits the form it validates the data with the validate() method as we call it in index() method like $this->validate(), in validate method we mostly check for the permission and define any other validation needed.
protected function validate()
{
	if (!$this->user->hasPermission('modify', 'extension/module/helloworld')) {
		$this->error['warning'] = $this->language->get('error_permission');
	}

	if ((utf8_strlen($this->request->post['name']) < 3) || (utf8_strlen($this->request->post['name']) > 64)) {
		$this->error['name'] = $this->language->get('error_name');
	}

	return !$this->error;
}
Now the last part of the controller is the uninstall method, it uninstalls and removes all the data when someone clicks the uninstall red button.
public function uninstall()
{
	$this->load->model('setting/setting');
	$this->model_setting_setting->deleteSetting('module_helloworld');
}
Now our last part of admin View or presentation part, as opencart started to use the twig templating so here is the full code of the view part:
{{ header }}{{ column_left }}
<div id="content">
  <div class="page-header">
    <div class="container-fluid">
      <div class="pull-right">
        <button type="submit" form="form-module" data-toggle="tooltip" title="{{ button_save }}" class="btn btn-primary"><i class="fa fa-save"></i></button>
        <a href="{{ cancel }}" data-toggle="tooltip" title="{{ button_cancel }}" class="btn btn-default"><i class="fa fa-reply"></i></a></div>
      <h1>{{ heading_title }}</h1>
      <ul class="breadcrumb">
        {% for breadcrumb in breadcrumbs %}
        <li><a href="{{ breadcrumb.href }}">{{ breadcrumb.text }}</a></li>
        {% endfor %}
      </ul>
    </div>
  </div>
  <div class="container-fluid">
    {% if error_warning %}
    <div class="alert alert-danger alert-dismissible"><i class="fa fa-exclamation-circle"></i> {{ error_warning }}
      <button type="button" class="close" data-dismiss="alert">×</button>
    </div>
    {% endif %}
    <div class="panel panel-default">
      <div class="panel-heading">
        <h3 class="panel-title"><i class="fa fa-pencil"></i> {{ text_edit }}</h3>
      </div>
      <div class="panel-body">
        <form action="{{ action }}" method="post" enctype="multipart/form-data" id="form-module" class="form-horizontal">
          <div class="form-group">
            <label class="col-sm-2 control-label" for="input-name">{{ entry_name }}</label>
            <div class="col-sm-10">
              <input type="text" name="name" value="{{ name }}" placeholder="{{ entry_name }}" id="input-name" class="form-control" />
              {% if error_name %}
              <div class="text-danger">{{ error_name }}</div>
              {% endif %}
            </div>
          </div>
          <div class="tab-pane">
            <ul class="nav nav-tabs" id="language">
              {% for language in languages %}
              <li><a href="#language{{ language.language_id }}" data-toggle="tab"><img src="language/{{ language.code }}/{{ language.code }}.png" title="{{ language.name }}" /> {{ language.name }}</a></li>
              {% endfor %}
            </ul>
            <div class="tab-content">
              {% for language in languages %}
              <div class="tab-pane" id="language{{ language.language_id }}">
                <div class="form-group">
                  <label class="col-sm-2 control-label" for="input-title{{ language.language_id }}">{{ entry_title }}</label>
                  <div class="col-sm-10">
                    <input type="text" name="module_description[{{ language.language_id }}][title]" placeholder="{{ entry_title }}" id="input-heading{{ language.language_id }}" value="{{ module_description[language.language_id] ? module_description[language.language_id].title }}" class="form-control" />
                  </div>
                </div>
              </div>
              {% endfor %}
            </div>
          </div>
          <div class="form-group">
            <label class="col-sm-2 control-label" for="input-status">{{ entry_status }}</label>
            <div class="col-sm-10">
              <select name="status" id="input-status" class="form-control">
                {% if status %}
                <option value="1" selected="selected">{{ text_enabled }}</option>
                <option value="0">{{ text_disabled }}</option>
                {% else %}
                <option value="1">{{ text_enabled }}</option>
                <option value="0" selected="selected">{{ text_disabled }}</option>
                {% endif %}
              </select>
            </div>
          </div>
        </form>
      </div>
    </div>
  </div>

  <script type="text/javascript"><!--
$('#language a:first').tab('show');
//--></script></div>
{{ footer }}
Here is the output of the view:

The variable we passed from the controller can be accessible in template file which we can show easily with {{variable_name}}, so we can show header, column left and footer like below:
{{ header }}{{ column_left }}{{ footer }}
All other codes are simple in the view part only thing little complicate is the language for loop section and how we add form field name which will be saved in the database. Here heading title and status are language-specific.
Now the front end part so let’s start to create a file in catalog/ folder, go to catalog >> controller >> extension >> module and create helloworld.php and paste the following code:
<?php
class ControllerExtensionModuleHelloworld extends Controller
{
	public function index($setting)
	{
		if (isset($setting['name'][$this->config->get('config_language_id')])) {
			$data['html'] = html_entity_decode($setting['module_description'][$this->config->get('config_language_id')]['title'], ENT_QUOTES, 'UTF-8');
			return $this->load->view('extension/module/helloworld', $data);
		}
	}
}
Mostly same conventions to follow as for the admin controller as we define above, here we need to pass the $setting in the index method and all values and data of module is available for your in $setting, if you are confused just do the print_r($setting) and you will get all the details data of the module. Here we check if the module is active and just show the title that we entered in the backend.
View section is also pretty simple in the frontend. Go to catalog >> view >> theme >> default >> template >> extension >> module >> helloworld.twig and enter the code below:
<div>
  {% if html %}
      <h2>{{ html }}</h2>
  {% endif %}
</div>
It check if the html is not empty and if not empty then show the html content.
Now all of our code is ready, now you can show it in your desired layout as per requirement. If you are confused about how to install the module and set the configuration then this video helps.
Comment below or let us know if you have any questions or suggestions.
please create module and upload to github so that people can test it too
Hi Syed, you can download the module from above download button. Right now no plan for the github. But we will think about it.
Thanks
Thank you.
Bro in the last section instead of helloworld.php it will be helloworld.twig right??
view >> theme >> default >> template >> extension >> module >> helloworld.php
Yes, you are correct. Updated the content
HI i have tried every thing that you have done in the video. i did manage to make and install the module .left column header and footer are showing but when i type some thing in twig file its not showing
If you are adding code directly on the twig file then need to clear the cache, can you please check by clearing the cache?
Hi, I have followed all the steps that you performed in Opencart hello world module (back end). I have successfully created a module and installed it. but when I press the edit button nothing is showing please help me. I want to become an Opencart developer.
Thanks
Hi Faroogh,
Please check the code after you perform the POST action, in your controller, it is like below:
if (($this->request->server[‘REQUEST_METHOD’] == ‘POST’) && $this->validate()) { }
The code inside it are for saving data in database.
hello sir i did all what you said and i was able to install it and edit it but when i am trying to click on save or cancel button it redirecets me back to the login page i dont know where did i make mistake if you please help me,
thank you very much sir!!!
My guess, Check the $data[‘action’] code in the admin controller, the user_token is not assigned correctly.
if (!isset($this->request->get[‘module_id’])) {
$data[‘action’] = $this->url->link(‘extension/module/helloworld’, ‘user_token=’ . $this->session->data[‘user_token’], true);
} else {
$data[‘action’] = $this->url->link(‘extension/module/helloworld’, ‘user_token=’ . $this->session->data[‘user_token’] . ‘&module_id=’ . $this->request->get[‘module_id’], true);
}
This
completely replaces $data[‘points’] = $product_info[‘points’] in the file instead of placing the code AFTER it.
So if you had points – you don’t any more with this extension. OC 3.0.3.6
Left this on the wrong page
This
completely replaces $data[‘points’] = $product_info[‘points’] in the file instead of placing the code AFTER it.
So if you had points – you don’t any more with this extension. OC 3.0.3.6
Left this on the wrong page
Thank you for this guide. After scouring through the net and several blogs, this one proved to be the most helpful. Kudos! 🙂 I could build my first OpenCart module without having any prior knowledge about it.
This blog post says:
$this->load->language(‘extension/module/helloworld’);
But your Opencart Code snippets adds this code:
$this->load->language(‘module/helloworld’);
Which is correct?
Very helpful but unfortunately also very incomplete. Parts of the code are explained that are not in the actual code provided.
Nice instruction for developers on OpenCart
Where are the initial values for “name” and “module_description” set in $module_info?
Help me understand some opencart module development
Yep… Incomplete tutorial. My module showed up in the extension list. I cleared Modifications cache. And get error when i try to edit it. It is also listed as disabled. I cant even find the table that stores these values. but that is not a tutorial issue.
Hi Mike,
Can you please let us know what error you are getting? This will help us to improve it.