Home Blog Page 16

Laravel Vs. Symfony: Checkout right PHP framework for your project

Are you planning to do build a website or a platform for your business? If yes, then you can choose a PHP framework when beginning a new PHP project so that the code is well-structured, maintainable, and reusable. With the PHP framework, expanding your app over time is simple. 

Several PHP framework solutions are available on the market, including Laravel and Symfony. The hardest part of developing an application in its early stages is picking an appropriate framework. In general, businesses select a PHP framework depending on their comfort levels, experience, popularity of the framework, etc. 

In the past, Symfony was constantly brought up when people discussed the finest PHP framework. However, it has been observed that PHP Laravel has rapidly gained popularity over the past couple of years. To do your project, you need to hire a Laravel developer who is an expert in the PHP framework. In that case, which PHP framework is appropriate for your project? Here look at the fundamentals of these two frameworks before analyzing this:

Laravel Vs. Symfony: Overview

Laravel

An open-source framework with model view controller architecture is called Laravel. It generates a web application by merging already existing components from several frameworks. With the help of a PHP Laravel developer, it is feasible to separate the code for business logic and the code for displays. Laravel is quicker at fixing bugs and makes it easy to change the appearance.

Laravel supports third-party tools as well, making the process of creating high-quality websites simpler and quicker. Additionally, it helps correct the most important security problems in web applications, including SQL injection, cross-site scripting, and cross-site request forgery. It is simple to test web applications by automating code testing with PHPUnit.

Symfony

An open-source PHP project is called Symfony. Additionally, MVC architecture is used, which facilitates the creation of scalable web applications. Further, the MVC methodology ensures that your project has a logical structure. The building blocks of web development projects are the reusable and decoupled PHP libraries that make up Symfony. You can carry out common tasks with these components without writing a lot of code. By mapping an application’s operations and activities on the back-end website, Symfony profiler, one of the best tools for tracking behavior, enables developers to follow the behavior of any application.

Laravel vs. Symfony: Popularity

The Laravel PHP framework is much more popular than the Symfony PHP framework. This framework is used to create more than 1 million websites on the internet. Also, only approximately 15,000 websites use the Symfony PHP framework. The best option is if the popular PHP framework is appropriate for your project. This is because a large developer community will be available to assist you at all times.

Laravel vs. Symfony: Speed

PHP Symfony uses various techniques to maintain and manage the speed of the application actively. For instance, developers can control the speed of a particular feature or an entire application by deleting features that are not necessary for the core operation or by improving the code. There are no unique features in the PHP Laravel Framework that help to maintain speed. It primarily provides a suitable version management capability, facilitating future application migration.

Laravel vs. Symfony: Security

Symfony has a strong security system, but it might be challenging to set up. It has a good authorization system and supports a number of different authentication techniques. In most cases, basic security mechanisms are sufficient, while Laravel takes a more direct approach. To get perfect security, you can hire expert Laravel developers for a direct approach to safety.

Laravel vs. Symfony: Learning curve

The learning curve for Laravel is relatively easy. Developers have a variety of ways to learn about this framework, such as through tutorials, videos, and documentation. So, you need to hire a Laravel developer who is aware of the learning ways. It is more challenging to learn Symfony than Laravel. Although there is documentation, there are fewer tutorials or community help than with Laravel.

Key features of Laravel:

  • Authentication

One of the essential aspects of a web project is authentication. Due to the built-in authentication system in the Laravel PHP framework, authentication is quick and simple. To successfully execute your web app, you must hire dedicated Laravel developers to set up models and controllers.

  • Effective ORM (Object Relational Mapping)

Developers can search the database table using a simple PHP syntax due to the built-in ORM in the Laravel framework. You do not need to create any SQL code. The ease with which this framework can be integrated with Laravel is its best feature.

  • MVC architecture support

MVC-based apps are developed using Laravel’s MVC architecture. A model can have numerous views with this PHP framework, facilitating faster development. There is no code duplication since Laravel divides the code for business logic from the code for presentation logic.

  • Command-Line interface for Artisan

One of Laravel’s great features is this. The repetitive programming duties are handled by Artisan, a command-line tool incorporated into Laravel. The skeleton code, data structure, and data migration can be developed using these command lines. In this way, this system facilitates database management. Web designers can also write their commands using Artisan.

Key features of Symfony

  • Structured MVC

Symfony, the most popular framework, uses MVC, which is perfect for scalable and organized web development apps. By separating the business and presentation layers, this design enables a faster development process. Users can implement new features without spending additional time or effort.

  • Reliability

In terms of dependability, Symfony has performed better when compared to other frameworks. Because of this, Symfony is the framework of choice for most web developers when building high-performance online applications.

  • Powerful debugging

Debugging is simple with Symfony’s powerful and expandable debugging toolbar. Every new line of code must be tested using this toolbar to guarantee the reliable operation of an application.

  • Extensibility

Developers using Symfony can reuse bundles because everything adds functionality and is a bundle. There is no need to alter the Symfony framework because only the bundle may be customized to your specific project needs.

Final Thoughts

As listed above, both Laravel and Symfony are feature-rich frameworks that may be used for various web development tasks. But when it comes to developing web applications quickly, Laravel is, without a doubt, the most excellent option. However, Symfony beats Laravel when it comes to creating complex and sophisticated web applications.

How will Web3 and NFTs impact eCommerce?

Do you see it? There is a rapid change occurring on the Internet. You may have heard that anonymous cryptocurrency founders are turning conventional money ideas, and teenagers are selling “digital assets” for millions of dollars. 

You might think you hear a foreign language when you hear cryptocurrency, blockchain, Web3, and non-fungible tokens (NFTs). But, these expressions may change the course of e-commerce in the future.

Digital innovations like cryptocurrency, blockchain, Web3, and NFTs give customers novel ways to communicate, transact, and build relationships; they may also have far-reaching effects on how consumers interact with brands.

The third generation of the Internet, or Web3, places privacy and security under the control of its users. Non-fungible tokens (NFTs) are digital tokens used to prove ownership of a specific good or service. When used in tandem, these two innovations may well change the face of online shopping forever.

What is Web3 – The Next Generation of Internet

Web3 may be the future wave, but it has already altered the online shopping landscape. To enhance the user experience, industry leaders like Shopify are adopting NFTs. Currently, it has a “token gated” commerce program that rewards fans and VIPs. Those who hold NFTs are eligible for various perks and discounts that aren’t available to the general public.

Flipkart has also made the transition to Web3. The newly formed Flipkart Labs is investigating practical applications of metaverse technology.

For the most part, Web3 consists of these three parts or innovations:

Blockchain: Blockchain is a distributed public ledger that can be used to verify ownership without exposing the user’s personal information to third parties. Before the advent of blockchain technology, establishing rights was done through centralized database ledgers. Blockchain technology links together “chunks” of data in a linear fashion to verify ownership without relying on a central database.

Cryptocurrencies: Cryptocurrencies, or “Crypto” for short, are digital currencies that use the blockchain to record transactions. In addition to increasing the safety of online transactions and purchases, this also decentralizes the ownership of monetary assets.

NFTs: Non-fungible tokens (NFTs) are digital “receipts” in a blockchain system. They are the ledgers that keep track of who owns what digital assets.

What role will Web 3.0 and new financial technologies play in the future of eCommerce?

Web 3.0 will have far-reaching effects on the entire e-commerce industry. The reason for this is that it will facilitate communication between buyers and sellers. This has many benefits, but the two most important are increased transaction security and increased privacy for buyers and sellers.

In Web 3.0, the asset will function as a fourth party in every transaction. Using a non-fungible token (NFT) identifier, this asset will be kept on a blockchain (like Ethereum). This eliminates the need for a middleman by allowing the buyer and the seller to communicate directly.

Potential use cases of blockchain-based NFTS in the eCommerce Industry

Monitoring product information over time

NFT technology is one way to hasten digital sales and provide previously impossible lifetime product data tracking.

NFTs may be able to promote unique products by using blockchain-based alternatives to software development kits (SKUs). It’s possible that this could also pave the way for a system of equitable profit distribution, which would be especially helpful for up-and-coming businesses in the e-commerce sector.

Products create anticipatory interest before their release

Before releasing a new product, almost every company is concerned with building anticipation for it. NFT tokens can be used to build anticipation for a new product’s release and exposure for the merchant, all while attracting a dedicated following of early adopters.

Rewarding NFT activity can drive research and development

Motivating consumers to participate in the discovery phase of a brand’s creation is invaluable for gaining insight into consumers’ pain points and desired features. This means that NFTs can be used as an incentive for customers to participate in activities like surveys and beta tests. Owning NFTs may provide holders with exclusive voting rights in the brand’s product development roadmap, early access to product releases, and even a cut of the company’s profits.

Promote Individualized purchasing activities

Retailers could also provide augmented reality (AR) customization options to aid customers in pondering the potential of NFTs. Take sneakers as an example; like any other eCommerce product, they can be represented virtually by simply taking a picture of the physical piece, allowing people to view them from the comfort of their homes as holographic projections and gain a unique, individual experience and perspective on sneakers.

Methods of increasing customer devotion to a brand through social interactions

CRM 3.0 (Customer Relationship Management) is also part of Web 3. It has a social component that allows businesses to incorporate customer interactions and dialogues from social networking sites into the CRM process.

Read more: Final year college projects ideas

Ecommerce NFT examples to learn from

Who is demonstrating the efficacy of these new tools in the e-commerce sector? And how can you apply those lessons to your own company?

  • The Hundreds
  • BreakingT
  • RTFKT
  • Asics & Adidas
  • Liquid Death
  • MeUndies
  • Gucci
  • Dolce&Gabbana
  • BIGFACE
  • Crypto Packaged Goods

What advantages does Web3 have for eCommerce platforms?

Unlike their legacy counterparts, blockchain-based marketplaces offer significantly higher levels of security for their users. They can keep users’ information and privacy safe using cutting-edge techniques like encryption and decentralized storage.

Using Web3 solutions, online stores are made more user-friendly and open to more people. Users have easy access to secure sign-in options. They can shop without the hassle of lengthy sign-up processes either. Alternatively, they can submit digital signatures generated by their Web3 wallets.

Cryptocurrency-based payment methods can be integrated into Web3 e-commerce platforms. As a result, there is much less resistance, and the shopping process is streamlined.

Web3 encourages user-driven retail ecosystems where shoppers have a real voice in the direction of the service. They can have a voice in how companies like Starbucks and Uber make decisions for their products and services.

How can Businesses start preparing for this change now?

As a first step, businesses can adopt decentralized applications to prepare for the coming shift (dApps). DApps are apps that can be used on a blockchain network like Ethereum. DApps have many potential uses, including data storage, asset management, and transaction processing.

Now is the time for businesses to start using dApps to be ahead of the competition when Web 3.0 and NFTs become commonplace. This will also provide a safe environment for companies to test cutting-edge technologies and determine how best to incorporate them into their operations and end-user experiences.

Conclusion

Because of the increased privacy and reliability that Web 3.0 and NFTs provide, they may prove to be a game-changer in online commerce. Now is the time for businesses to use decentralized applications to prepare for this shift (dApps). dApps are apps that can be used on a blockchain network like Ethereum. dApps have many potential uses, including data storage, asset management, and transaction processing. As Web 3.0 and NFTs gain traction, businesses that have already begun using dApps will be in a prime position to take advantage of them. Moreover, it will provide a safe environment for companies to test out cutting-edge technologies and learn how to incorporate them into their operations to enhance their offerings. 

The latest generation of eCommerce applications can be created with the help of web3 eCommerce website development. Because of its user-friendliness, dependability, and scalability, it is the ideal environment to develop decentralized applications. Businesses can benefit from Web 3.0 and NFTs with experts’ assistance.

Generate Add to Calendar links for emails, and ICS files from URL parameters or a form with dynamic content

We were working with an email marketing client who was sending an event signup email to prospects and that needed to include dynamic links and content by passing the URL and the prospects’ emails. We tested multiple third-party add calendar event tools but they don’t provide support for dynamic content passing in the email link and creating the Add to Calendar links.

The calendar code will be something like the below:

<div style="margin: 0px 0px 10px0px; text-align: center; font-size: 0px">
    <a href="http://www.google.com/calendar/event?action=TEMPLATE&dates=20221005T130000/20221005T134500&ctz=America/New_York&text=this%20is%20summary&location=Online&details=This%20is%20description" title="Google" target="_blank" style="display: inline">
        <img src="https://img.icons8.com/color/344/google-logo.png" alt="Google" style="width: 45px; display: inline; padding: 40px" width="45" border="0" />
    </a>
    <a href="https://calendar.yahoo.com/?v=60&view=d&type=20&TITLE=this%20is%20summary&ST=20221005T100000&ET=20221005T104500&DESC=This%20is%20description&in_loc=Online" title="Yahoo" target="_blank" style="display: inline">
        <img src="https://cdn-icons-png.flaticon.com/512/3128/3128296.png" alt="Yahoo" style="width: 45px; display: inline; padding: 40px" width="45" border="0" />
    </a>
    <a href="https://webocreation.com/ics-file-creation-as-per-url-parameter?date_start=2017-1-16%209:00AM&date_end=2017-1-16%2010:00AM&location=%27Online%27&description=%27This%20is%20description%27&summary=%27this%20is%20summary%27&url=%27https://webocreation.com%27" title="Apple" target="_blank" style="display: inline">
        <img src="https://img.icons8.com/ios-filled/344/mac-os.png" alt="Apple"  style="width: 45px; display: inline; padding: 40px" width="45" border="0" />
    </a>
    <a href="https://webocreation.com/ics-file-creation-as-per-url-parameter?date_start=2017-1-16%209:00AM&date_end=2017-1-16%2010:00AM&location=%27Online%27&description=%27This%20is%20description%27&summary=%27this%20is%20summary%27&url=%27https://webocreation.com%27" title="Outlook" target="_blank" style="display: inline">
        <img src="https://img.icons8.com/fluency/344/microsoft-outlook-2019.png" alt="Outlook" style="width: 45px; display: inline; padding: 40px" width="45" border="0" />
    </a>
</div>

The output in the email will be like the below:

Add to email icons for add to calendar

Create an ICS file with dynamic content from the form – outlook, apple email

ICS file is used for email service providers like Outlook, Apple, and others. You can create and download the ICS file from the URL parameter or create an ICS file from a form. To create an ICS file from a form click the link below and enter the details:

Create an ICS file from URL parameters

Following are the URL parameters that you can use and create the ICS file which downloads automatically.

The main URL is:

ICS file creation as per URL parameter

date_start=2017-1-16 9:00AM
date_end=2017-1-16 10:00AM
location=’Online’
description=’This is the description’
summary=’this is summary’
url=”‘https://webocreation.com’

You can download the ICS file directly from the URL and the ICS file is downloaded. One example link is like below:

https://webocreation.com/ics-file-creation-as-per-url-parameter?date_start=2017-1-16 9:00AM&date_end=2017-1-16 10:00AM&location=’Online’&description=’This is description’&summary=’this is summary’&url=’https://webocreation.com’

Gmail/Google Calendar – Add to the Calendar link

For google calendar, you can create a link like below:

http://www.google.com/calendar/event?action=TEMPLATE&dates=20221005T130000/20221005T134500&ctz=America/New_York&text=this%20is%20summary&location=Online&details=This%20is%20description

http://www.google.com/calendar/event?action=TEMPLATE& 
dates=20221005T130000/20221005T134500& 
ctz=America/New_York& 
text=TITLE-OF-EVENT& 
location=Online& 
details=DESCRIPTION-OF-EVENT

Yahoo email Calendar – Add to the Calendar link

For the Yahoo calendar, you can create a link like below:

https://calendar.yahoo.com/?v=60&view=d&type=20&TITLE=this%20is%20summary&ST=20221005T100000&ET=20221005T104500&DESC=This%20is%20description&in_loc=Online

https://calendar.yahoo.com/?v=60& 
view=d& 
type=20& 
TITLE=this%20is%20summary& 
ST=20221005T100000& 
ET=20221005T104500& 
DESC=This%20is%20description& 
in_loc=Online

As you have a direct URL to create an ICS file, directly send values to google and yahoo, so you can pass any dynamic content on those URLs and set up your event content as per your need.

How to pass the dynamic URL from Marketo of event24 to the Add to Calendar buttons?

You can pass the event24 link in the email with the values of the lead email like below:

<div style="margin: 0px 0px 10px0px; text-align: center; font-size: 0px">
    <a href="http://www.google.com/calendar/event?action=TEMPLATE&dates=20221005T130000/20221005T134500&ctz=America/New_York&text=this%20is%20summary&location=Online&details=This%20is%20description<br><br>https%3A%2F%2Fevent.on24.com%2Fwcc%2Fr%2F395%6CF66C316A16920533CB26475D6%3Fmode%3Dlogin%26email%3D{{lead.Email Address:default=edit me}}"
        title="Google" target="_blank" style="display: inline">
        <img src="https://img.icons8.com/color/344/google-logo.png" alt="Google"
            style="width: 45px; display: inline; padding: 40px" width="45" border="0" />
    </a>
    <a href="https://calendar.yahoo.com/?v=60&view=d&type=20&TITLE=this%20is%20summary&ST=20221005T100000&ET=20221005T104500&DESC=his%20is%20description<br><br>https%3A%2F%2Fevent.on24.com%2Fwcc%2Fr%2F395%6CF66C316A16920533CB26475D6%3Fmode%3Dlogin%26email%3D{{lead.Email Address:default=edit me}}&in_loc=Online"
        title="Yahoo" target="_blank" style="display: inline">
        <img src="https://cdn-icons-png.flaticon.com/512/3128/3128296.png" alt="Yahoo"
            style="width: 45px; display: inline; padding: 40px" width="45" border="0" />
    </a>
    <a href="https://webocreation.com/ics-file-creation-as-per-url-parameter?date_start=2017-1-16%209:00AM&date_end=2017-1-16%2010:00AM&location=%27Online%27&description=%27his%20is%20description<br><br>https%3A%2F%2Fevent.on24.com%2Fwcc%2Fr%2F395%6CF66C316A16920533CB26475D6%3Fmode%3Dlogin%26email%3D{{lead.Email Address:default=edit me}}%27&summary=%27this%20is%20summary%27&url=%27https://webocreation.com%27"
        title="Apple" target="_blank" style="display: inline">
        <img src="https://img.icons8.com/ios-filled/344/mac-os.png" alt="Apple"
            style="width: 45px; display: inline; padding: 40px" width="45" border="0" />
    </a>
    <a href="https://webocreation.com/ics-file-creation-as-per-url-parameter?date_start=2017-1-16%209:00AM&date_end=2017-1-16%2010:00AM&location=%27Online%27&description=%27his%20is%20description<br><br>https%3A%2F%2Fevent.on24.com%2Fwcc%2Fr%2F395%6CF66C316A16920533CB26475D6%3Fmode%3Dlogin%26email%3D{{lead.Email Address:default=edit me}}%27&summary=%27this%20is%20summary%27&url=%27https://webocreation.com%27"
        title="Outlook" target="_blank" style="display: inline">
        <img src="https://img.icons8.com/fluency/344/microsoft-outlook-2019.png" alt="Outlook"
            style="width: 45px; display: inline; padding: 40px" width="45" border="0" />
    </a>
</div>

In this way, you can add “Add to Calendar” links to Gmail, Yahoo, Apple, and Outlook and pass the dynamic content to the calendar links. Please email us at webocretion.com@gmail.com if needed any support or help. You can look for more tips and tricks at Salesforce, Marketo, and Pardot. Let us know if you have questions or concerns so that we can help you out. Till then please subscribe to our YouTube Channel and like us on Twitter and Facebook.

Chrome browser extensions that we use as a developer for efficiency

As web developers, we use the following 17 chrome browser extensions that make our development and testing easy, efficient, and save lots of time.

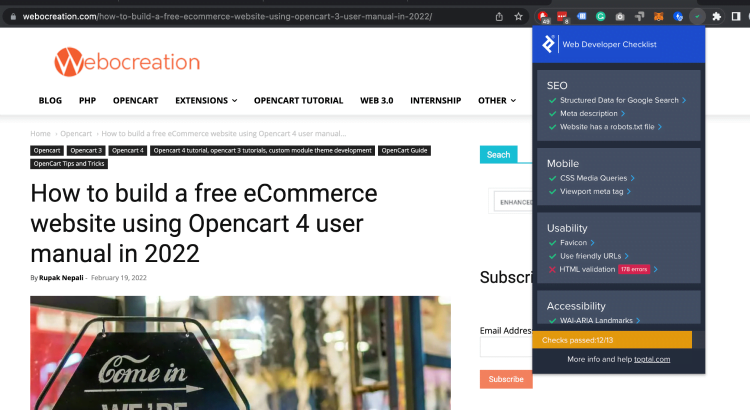
Web Developer Checklist

You can analyze the web page for violations of best practices. This extension helps web developers easily discover problem areas in websites. Once you installed it, you can click the extension icon and it gives you a list of practices of SEO, Mobile, Usability, Accessibility, Social media, and performance, which helps you easily identify the problem and fix them.

Web Developer Checklist

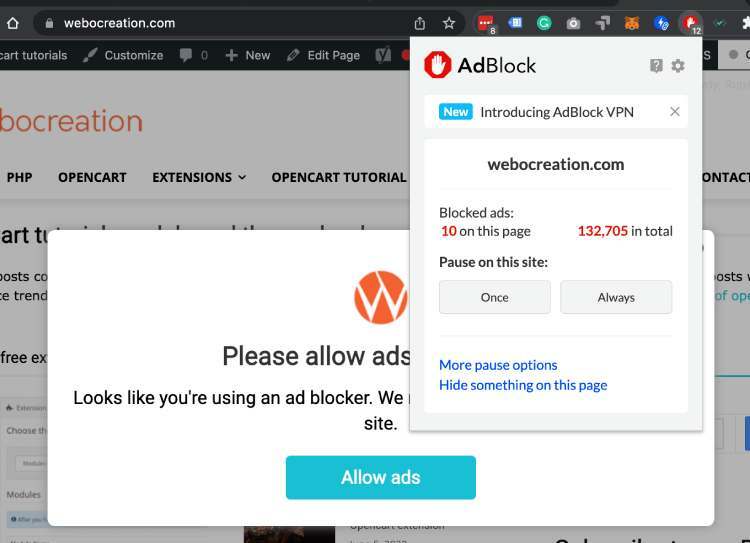
AdBlock — best ad blocker

Block ads and pop-ups on YouTube, Facebook, Twitch, and your favorite websites. AdBlock is the best ad blocker with over 60 million users, and one of the most popular Chrome extensions with over 350 million downloads!

Adblock website

Scribe – Documentation, SOPs & Screenshots

Extension for screen recording that immediately converts any procedure into a tutorial. All you have to do is click “record” and go through the process you want to share. Scribe monitors your clicks and keystrokes to instantly create your guide. Answer questions, build SOPs, and train teammates FAST.

Scribe Docmentation

AMP Validator

The AMP validator checks the current page to see if it’s an AMP page, then runs it through the AMP validator and reports if the page passes (green) or fails (red). ) via the extension icon.

GoFullPage – Full Page Screen Capture

Take a full screenshot of your current and trusted page without asking for additional permissions! The easiest way to take a screenshot of an entire page in your current browser window. Click on the extension’s icon (or press Alt + Shift + P), see the extension capture every part of the page, and be taken to a new tab of your screenshot where you can download it as an image or PDF or even just drag it to the desktop.

Bardeen – automate workflows with one click

Stop wasting time with manual copy-pasting! It’s a no-code workflow automation app that replaces your repetitive tasks with a single shortcut. One-click automation for your repetitive tasks Stops wasting time with manual copy-pasting! Bardeen is a no-code workflow automation app that replaces your repetitive tasks with a single shortcut. Connect your favorite web apps and build custom automation in minutes.

Google Optimize

The Optimize extension allows you to test and customize your website with Google Optimize. Create a better website experience with Optimize. Once downloaded, use our visual editor to edit anything on your site (text, images, layouts, and more), then preview these new experiences and how they will look on different devices before launching your site test.

Page Analytics (by Google)

The Chrome Page Analytics extension lets you see how your customers interact with your web pages, including what they click and don’t click. Use this information to optimize your website presentation, improve user experience, and increase conversions.

Tag Assistant Legacy (by Google)

Tag Assistant helps troubleshoot the installation of various Google tags such as Google Analytics, Google Tag Manager, and more. Tag Assistant helps you check if various Google tags are installed correctly on your page. Simply navigate to any page and Tag Assistant will tell you which tags exist, report any errors found, and suggest improvements you can make to your implementation. Most Google tags are checked, including Google Analytics, Adwords conversion tracking, and Google Tag Manager.

Selectext – Copy text from videos!

Copy any on-screen text directly from videos with Selectext.

LastPass: Free Password Manager

LastPass, an award-winning password manager, saves your passwords and gives you secure access from any computer and mobile device. LastPass puts you in control of your online life, making it easy to protect and secure vital information so you can access it anytime, anywhere. Save all passwords, addresses, credit cards, etc. into your secure vault and LastPass will automatically fill in your information as you need it.

Postman Interceptor

Submit requests sent through the Chrome Postman app. Postman Interceptor helps you send requests using browser cookies through the Postman application. It can also send headers that are normally limited by Chrome but are essential for testing APIs. Interceptors make this process painless. It is now possible to achieve what previously required a proxy without any additional installation or configuration steps.

Read more: 15 extensions of VS Code for PHP developer

Print Friendly & PDF

Print Friendly and PDF any Webpage Save Paper and Ink When You Print Print Friendly removes ads, navigation, and junk before your print. Pages are optimized for the ultimate print reading experience.

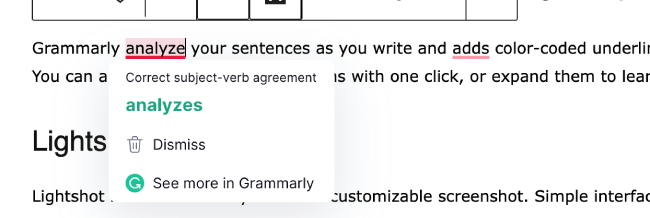
Grammarly: Grammar Checker and Writing App

Grammarly analyzes your sentences as you write and adds color-coded underlines to words and sentences so you can improve your writing. You can apply Grammarly’s suggestions with one click, or expand them to learn more.

grammarly

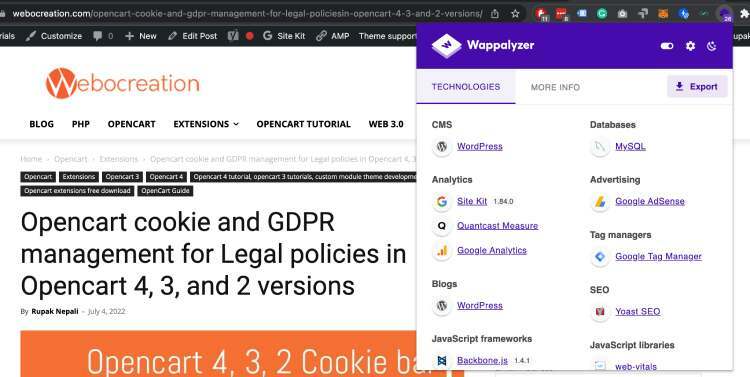
Wappalyzer – Technology profiler

Identify web technologies Wappalyzer is a technology profiler that shows you what websites are built with. Find out what CMS a website is using, as well as any framework, eCommerce platform, JavaScript libraries, and many more.

Technology Profile

RSS Feed Reader

Best RSS feed reader extension for Chrome.

  • See instantly when new posts are added to any of your RSS and Atom feeds
  • Easily subscribe to new RSS/Atom feeds by clicking the browser icon
  • Manage your streams intuitively
  • Right-clicking the pop-up menu in the context menu allows you to mark everything as read, reload the stream, and other convenient shortcuts
  • Export your streams so you can import them to another computer and/or keep them as backups to keep them safe
  • Customize your feed by choosing how many posts to show or change the title

JSON Viewer

Validate and view JSON documents JSONView port for Chrome.

JSON View

These chrome browser extensions may help you as well. Please. let us know if you have any other extensions that had helped you with your development, need any support, or find any issues. Please subscribe to our YouTube Channel for Opencart video tutorials and get many other Opencart free modules. You can also find us on Twitter and Facebook

Guide to Launch an Ecommerce Business on Web3 Platform

With the latest version of Web 3.0, which is open, safe, and decentralized, technology will change everything. Since more than ten years ago, the most prominent players in e-commerce have gotten stronger.

Many people have been doing their shopping online, since the pandemic in 2020. The rise has broken all previous growth records of these eCommerce platforms.

How to Create a Virtual E-Commerce Platform on Web3

With Web3’s changes, a lot has changed, and soon the consumer will be in charge, not the big e-commerce platforms. Now is the best time to find new opportunities, since this change is just beginning. One of these changes is the growth of Web3 eCommerce platform development. Decentralized online shops can now be set up quickly for Web3 fans. This guide will explain how to set up a Web3 store. By the end of the compass, readers will be able to set up their own eCommerce platforms and know what features those platforms will have. So, let’s get started.

Online Shopping Platform With Web3 

There are currently two methods for creating an online store. The e-commerce platform must first be entirely coded from scratch, including its backend, internal page, and intelligent contracts. The second demonstrates how to use templates to quickly and more effectively duplicate an already exciting platform using a code editor. However, because the template might not have the features someone wants to add to their Web3 eCommerce platform, the second method is less flexible.

The first approach, however, is more adaptable and feels more natural. The project can be built however the user wants. The manual will emphasize the first and second methods of doing things in order to develop a special solution and will simplify the difficult parts.

Here are the things you need to know before you start the process.

  • Set up an online shopping site.
  • Create a page on the website.
  • Start a server.
  • Putting in place the back end
  • Set up a site where people can shop online.

But because it involves the blockchain and, consequently, smart contracts, the final step of the project will be trickier than the others. It is a web3 platform as a result. In this case, choosing a venue like the Moralis would be wise. It is one of the effective tools that makes it simple to index the blockchain and combine the events of intelligent contracts to create a web3 store. But the last step has one more part: adding the payments. Coders can set the prices however they want, depending on their e-commerce platform.

Here are a few things you need to do to make an online store on Web3. The Amazon clone store is used as an example in the guide. But you can use the free copies you can find on sites like GitHub. The company that makes Web3 may have to research to find a good clone code, but it will be worth it. When discussing price, it will be helpful to look at what features web3 will add to an online store.

Features of Web3 eCommerce Store and how it’s different from other eCommerce Stores

Since cryptocurrencies and the blockchain are becoming more popular and important, this could be a feature of an e-commerce store.

Give the Consumers Back Their Ownership

Web3 is about finding and building communities and making people feel like they own the things they use. In the Web3 world, smart storytelling and a focus on customer value will be used in eCommerce, and all of this will be turned into a meaningful community where experience can grow.

You could lose the loyalty of your customers if you don’t understand how important community is and how it shows up as correct brand alignment. However, eCommerce and Web3 will help brands learn more about their buyer personas. But it will be important not to “oversell” in a place where people are very aware of these techniques.

Decentralized Transactions and Network 

Online transactions and their options will only improve in the future. People making new ways to do e-commerce can think about how flexible they want their solutions to be with the help of a Web3 development company. As blockchain changes this digital frontier, e-commerce will become more flexible enough to keep up with the capabilities and standards of the industry.

Network companies will also think about decentralized finance applications and other possible solutions that work for them and their goals, in addition to how to make a Web3 eCommerce store. These changes will be made with the end user in mind. Businesses will pay more attention to how customers look at, produce, and interact with their credit card companies, banks, favorite online stores, and cloud-based work file-sharing systems. Users always build digital muscle memory, which brands can use to make the web3 experience for their customers more familiar and valuable.

Reevaluate and Improve the Customers’ Experiences.

Brands moved away from physical stores and toward online sales in many ways. This made the physical experience less important and changed how brands and customers interact with each other. In the same way, some brands later opened physical stores to keep in touch with their customers. Web3 adds a new level of depth and dimension to every interaction. Web3 e-commerce stores can figure out which interactions are important to their missions and how they want their future experiences to go.

Change The Old Functions In The Funnel Tunnel

The way people shop has changed because of e-commerce, and the technology behind it is improving. But as e-commerce solutions become more decentralized, there are more chances to change how they are made so that e-commerce platforms can be very different in the future.

Users want technology to do more than just its primary job. They want meaningful relationships, brands that stand out, and experiences that stick with them. As web3 e-commerce moves forward, brands can show off and give customers next-level e-commerce experiences. So, brands can change how people think and behave.

Transparency

How a company acts is just as important as what it sells or does. Even though people have high expectations, only 38% think that brands’ positive actions make a difference or reflect their core beliefs. The centralized system doesn’t have transparency, but web3 adds it to e-commerce.

Strategic thinking comes into play when considering how to make a Web3 eCommerce platform for big and small businesses. But if brands were open, they could make considerable money. To create an experience that fits their goals, fashion brands, in particular, will have to weigh profits against ethical practices.

Getting Used to New Payment Methods

Web3 allows new ways to pay to be used in e-commerce, an exciting chance for it to grow and change. To support the next wave of Web3, designers must be at the forefront of making new strategies that move franchises forward in a planned way. Brands will have a place to work that is more than just a logo when they use Web3. Every time someone interacts with a brand, whether by entering a password, making a sale, or using a virtual assistant, it shows what it stands for.

To do well in e-commerce, a brand must adopt the new payment methods at the most open and decentralized level. But they will affect how online stores accept payments, changing how e-commerce works for good.

Wrapping Up

As was said at the beginning of the guide, it has gone over some easy steps that anyone can use to build their web3-powered e-commerce platform like Amazon’s. But fans of Web3 should feel free to try out other clones since there are a lot of different codes out there. A few simple steps are needed to make something. These steps make the project’s basic structure and product pages. Then, a database is used to put everything together to create a full-fledged e-commerce store.

The Web3 online stores are just the beginning of what is possible. This line has a lot of other spots that haven’t been looked into yet. The next step in making the guide was to look at some things that a Web3 e-commerce store could have, like a new design, ways to pay, and being open.

Someone in the e-commerce business should also build a Web3 eCommerce platform because it has these features. As more people use web3 e-commerce, centralized e-commerce will soon break down.

Web3 is more than just a phrase this year. You can now use decentralized apps for money, art and collectibles, games, and technology on the Ethereum network. With Web3, it will be the end users, not the companies that hold the data now, who will make sure the information is correct.

Web3 in gaming is a decentralized process in which no central authority over any part of a gaming ecosystem or platform exists. This includes who owns gaming assets and makes decisions in all gaming-related areas. Get in touch with the best web3 development company in the United States if you need help launching your eCommerce business.
Laravel With React JS | The Perfect Combination for Futuristic Development

Laravel has matured into a versatile framework with a wide variety of features for developing responsive web apps. However, the framework hasn’t yet abandoned its reliance on conventional methods. Using Vue or React with a Laravel project is still doable and requires little effort.

To ensure that both Laravel developers and React.js developers can confidently go on with the project, we will step through the process of bootstrapping a new Laravel project and integrating React with it in this post.

A New Project’s Bootstrapping and Dependency Setup

So, let’s get started by creating a new Laravel project on your local device. The bootstrapping technique you use is up to you.

Laravel new guide-to-laravel-and-react

At this point, you may launch the project in your preferred integrated development environment (IDE) or text editor.  Let’s go ahead and install all these prerequisites now that you know what they are:

NPM Setup

To ensure that everything is working properly when the installation is complete, use the following command.

dev npm run

Following the execution of the npm run dev command, Laravel Mix generates the files public/js/app.js and public/css/app.css from the resources/js/app.js and resources/css/app.css, respectively.

Setting Up React and Creating Your First Component

Let’s dive in and start integrating React into the mix to see how Laravel and React.js work together. There are two new JavaScript libraries that need to be included first. You may think of them as the react and react-dom libraries. Simply run this command to accomplish your goal:

npm install --save-dev react react-dom

Those libraries will be set up and made available for use throughout development. Since you will be combining all of your JavaScript into a single file and including it with your Blade templates, it is necessary to install these dependencies as a development prerequisite.

First, copy and paste the following into a brand new file named resources/js/components/HelloReact.js:

// resources/js/components/HelloReact.js
import React from 'react';
import ReactDOM from 'react-dom';
export default function HelloReact() {
    return (
        <h1>Hello React!</h1>
    );
}
if (document.getElementById('hello-react')) {
    ReactDOM.render(<HelloReact />, document.getElementById('hello-react'));
}

You can use this React component to print “Hello React!” on the page by attaching it to an element with the id “hello-react.” Adding this to your application’s JavaScript code bundle will make it accessible throughout. To make the necessary changes, open the resources/js/app.js file and insert the new code below.

// resoureces/js/app.js
require('./bootstrap');
// React Components
require('./components/HelloReact')

So, that’s the whole thing. Incorporating the React component into the application’s JavaScript code bundle is as simple as requiring it in this file. Blade templates will need to be recompiled before using the revised code.

You’ve transitioned from writing plain old JavaScript to developing code that makes use of React. To have the React component compiled correctly, you’ll need to adjust the Laravel Mix setup. Webpack.mix.js may be found at the root of the project; open it and make the necessary changes to the code as shown below.

// webpack.mix.js
const mix = require('laravel-mix');
mix.js('resources/js/app.js', 'public/js')
    .react()
    .postCss('resources/css/app.css', 'public/css', [
        //
    ]);

In its default state, the response() method is not invoked from the configuration file. A call to this method will cause Laravel Mix to download the babel-preset-react plugin, which is needed for the compilation of React components.

Simply re-run npm run dev after making changes to Laravel Mix’s setup. It’s important to remember that now isn’t the moment for the compilation to take place. Instead, Laravel Mix will detect the absence of required libraries and replace them automatically. In order to ensure success, retry executing the npm run dev command.

You’ll need to have a blade template ready now that the part is complete. Access the welcome.blade.php file located in resources/views and make the following changes:

<!DOCTYPE html>
<html lang="en">
<head>
    <meta charset="UTF-8">
    <meta name="viewport" content="width=device-width, initial-scale=1.0">
    <meta http-equiv="X-UA-Compatible" content="ie=edge">
    <title>Laravel React</title>
    <script src="{{ asset('js/app.js') }}" defer></script>
</head>
<body>
    <div id="hello-react"></div>
</body>
</html>

Make sure the script is executed either after the closing body tag or just before it. Make that the ID you provide in the render() method of your React component corresponds to the ID of the element.

Execute PHP artisan serve to launch the local development server, and then go to http://localhost:8000. with the aid of the web browser of your choice. These are the kind of results you should get:

hello react js laravel

If there is a complete lack of output, look in the browser’s console for any problems. Find the problem, fix it, and try again.

Creating a Counter Component Using React Hooks

Okay, let’s use the state hook to create a contrasting part. Make sure the following is saved in a file called Counter.js in the resources/js folder:

// resources/js/components/Counter.js
import React, { useState } from "react";
import ReactDOM from 'react-dom';
export default function Counter() {
  // Set the initial count state to zero, 0
  const [count, setCount] = useState(0);
  // Create handleIncrement event handler
  const handleIncrement = () => {
    setCount(prevCount => prevCount + 1);
  };
  // Create handleDecrement event handler
  const handleDecrement = () => {
    setCount(prevCount => prevCount - 1);
  };
  return (
    <div>
        <button onClick={handleDecrement}>-</button>
        <span> {count} </span>
        <button onClick={handleIncrement}>+</button>
    </div>
  );
}
if (document.getElementById('counter')) {
    ReactDOM.render(<Counter />, document.getElementById('counter'));
}
if (document.getElementById('counter')) {
    ReactDOM.render(<Counter />, document.getElementById('counter'));
}

To use the file, open resources/js/app.js and require it as you would any other file. If you’re tired of constantly using npm run dev, you can save yourself some time by using the npm run watch command instead. This command will keep a check on your files and trigger a compilation whenever they’re modified.

To finish, reopen the resources/views/welcome.blade.php file and make the following changes:

<!DOCTYPE html>
<html lang="en">
<head>
    <meta charset="UTF-8">
    <meta name="viewport" content="width=device-width, initial-scale=1.0">
    <meta http-equiv="X-UA-Compatible" content="ie=edge">
    <title>Laravel React</title>
    <script src="{{ asset('js/app.js') }}" defer></script>
</head>
<body>
    <div id="hello-react"></div>
    <div id="counter"></div>
</body>
</html>

If the webpage is still open in your browser, a refresh will reveal the following:

hello react with laravel

You can watch the number alter as you try incrementing and decrementing it. You have the same freedom here as you would with any other standard React component. You may even create custom class features.

Communicating With the Back-End

You have only done front-end work up to this point in the article. Here we’ll demonstrate how you may connect your React components to the Laravel backend.

Launch your favorite text editor and go to the routes/web.php file to make the necessary changes:

<?php
// routes/web.php
use Illuminate\Http\Request;
use Illuminate\Support\Facades\Route;
Route::get('/', function () {
    return view('welcome');
});
Route::post('count', function (Request $request) {
    return response()->json([
        'message' => $request->message,
    ]);
});

The front end may send a string with the name message to this straightforward route, and it will return the string to the sender.

To make these changes, open the Counter.js file under resources and replace its existing content with the following:

// resources/js/Counter.js
import axios from "axios";
import React, { useState } from "react";
import ReactDOM from 'react-dom';

export default function Counter() {
  // Set the initial count state to zero, 0
  const [count, setCount] = useState(0);

  // Create handleIncrement event handler
  const handleIncrement = () => {
    setCount(prevCount => prevCount + 1);
    notifyServer();
  };

  // Create handleDecrement event handler
  const handleDecrement = () => {
    setCount(prevCount => prevCount - 1);
    notifyServer();
  };
// Notifies the server about the change
  const notifyServer = () => {
      axios.post('/count', {
          message: 'Counter Updated!',
      })
  }
  return (
    <div>
        <button onClick={handleDecrement}>-</button>
        <span> {count} </span>
        <button onClick={handleIncrement}>+</button>
    </div>
  );
}
if (document.getElementById('counter')) {
    ReactDOM.render(<Counter />, document.getElementById('counter'));
}

The notifyServer() method sends a message to the /count API endpoint. The handleDecrement() and handleIncrement() methods must include a call to this method. Rebuild the resources and try again. Now, before you hit the up or down arrows, make sure the Network tab is active in your browser. Now, when you hit the up or down arrow, the following POST request will appear: 

server api laravel

The server has processed the request and sent back a reply. This method of communicating with the server is universal. You should be able to connect to any of the web routes since the Axios library takes care of the CSRF token by including the XSRF-TOKEN cookie in each request.  

Alternatively, you might utilize API routes, albeit doing so would need a stateless authentication mechanism. In my view, working using web routes is the way to go when incorporating React components into blade templates. It will save you a lot of time and effort while still letting you do almost all of the same actions available through the API’s routed mechanisms.

Vendor Extraction 

The last point is the extraction of value from vendors, and this concludes the paper. However, long-term caching becomes more complicated when you combine your application-specific JavaScript code with the React framework. If you make even a little modification to your code, the browser will re-download the vendor library (in this case, React), even though it hasn’t changed.

Extracting the vendor library code to a new file is one approach to fixing this problem. Simply edit the webpack.mix.js file as shown below.

// webpack.mix.js
const mix = require('laravel-mix');
mix.js('resources/js/app.js', 'public/js')
    .react()
    .extract(['react'])
    .postCss('resources/css/app.css', 'public/css', [
        //
    ]);

With only one call to extract(), you may generate three distinct JavaScript files that include all of the vendor libraries in the array. Here are some of them:

  • public/js/manifest.js: Time of execution for Webpack manifests
  • public/js/vendor.js: That of your suppliers’ library collections
  • public/js/app.js: This is the code for your application

Access the welcome.blade.php file located in resources/views and make the following changes:

<!DOCTYPE html>
<html lang="en">
<head>
    <meta charset="UTF-8">
    <meta name="viewport" content="width=device-width, initial-scale=1.0">
    <meta http-equiv="X-UA-Compatible" content="ie=edge">
    <title>Laravel React</title>
</head>
<body>
    <div id="hello-react"></div>
    <div id="counter"></div>

    <script src="{{ asset('js/manifest.js') }}"></script>
    <script src="{{ asset('js/vendor.js') }}"></script>
    <script src="{{ asset('js/app.js') }}"></script>
</body>
</html>

Conclusion 

The scripts were simply placed at the end of the file so that they would run immediately rather than being delayed. The files must be loaded in this specific sequence.  After the vendor script, you should place any JavaScript scripts that are exclusive to your application. There will never be a second copy of the manifest. When you refresh the page, you shouldn’t notice any differences in the results. In case you are trying to experiment with this combination for your project, you can get a lot of Laravel programmers for hire in the market.

Host Opencart in google cloud for free for one year, DNS, SSL, Cloudflare, SSH

This Opencart tutorial shows how to easily host Opencart in Google cloud for free for one year, set up Cloudflare, SSH to run shell scripts and commands, install an SSL certificate and redirect all non-HTTP to HTTPS URL.

Step 1: Set up Google Cloud Platform at cloud.google.com using a free Google account or Gmail account.

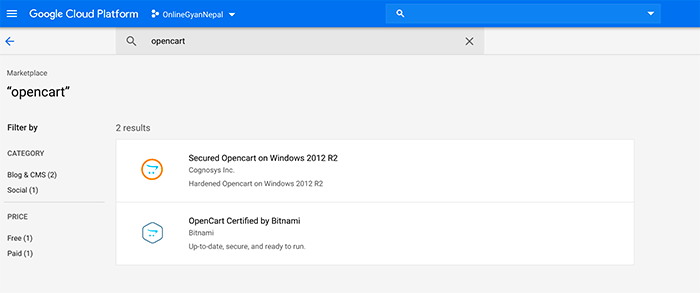
Step 2: Click on the Navigational Menu icon >> Marketplace >> Search for Solutions >> Type Opencart

Search Opencart in Google Cloud

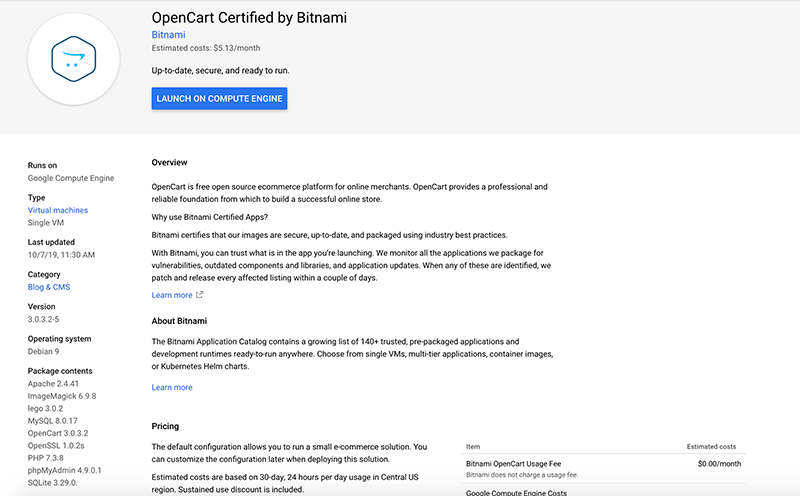
Step 3: Select the “OpenCart Certified by Bitnami”, this Google Compute Engine package contents Apache 2.4.41, ImageMagick 6.9.8, lego 3.0.2, MySQL 8.0.17, OpenCart 3.0.3.2, OpenSSL 1.0.2s, PHP 7.3.8, phpMyAdmin 4.9.0.1, and SQLite 3.29.0.

Opencart Certified by Bitnami in GCP

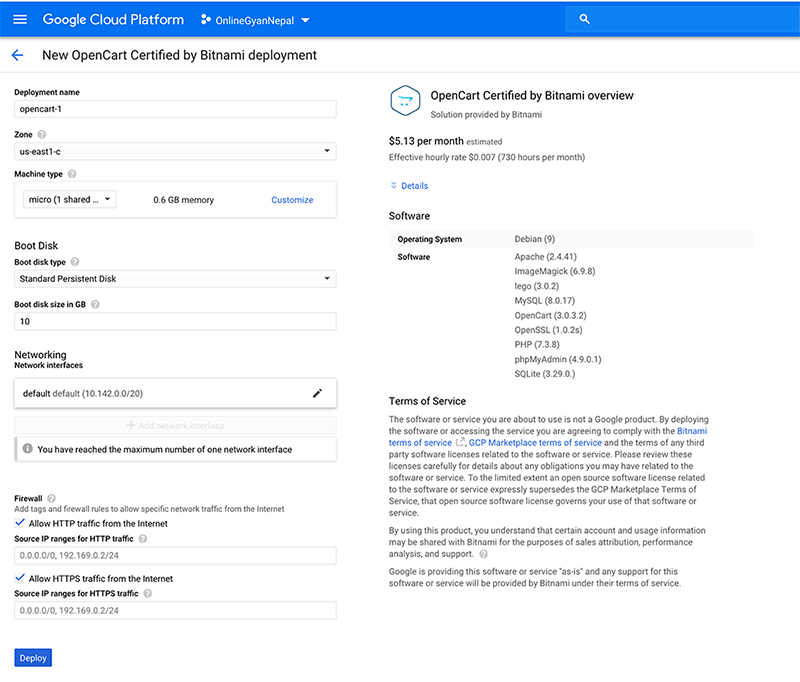
Step 4: Click “Launch on Compute Engine”. While creating be sure to use the following for the free account
1. Compute Engine Oregon: us-west1 or Iowa: us-central1 or South Carolina: us-east1
2. Machine Type: micro (1 shared vCPU) f1-micro
Get more details at https://cloud.google.com/free/docs/gcp-free-tier
Select both HTTP and HTTPS traffic and by selecting as in the image, click Deploy.

Opencart Deployment in Google Cloud platform

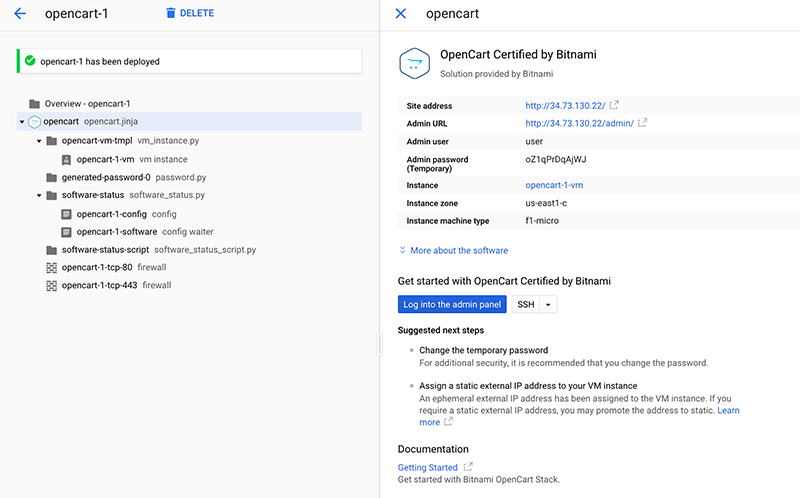
Lots of scripts run, it creates a virtual machine instance, creating a password, setting config for opencart, setting up a firewall, and so on thus it takes some minutes for the opencart deployment and you will get the Site address, Admin URL, Admin user, and Admin password.

Opencart certified by bitnami

Now you can access the website from the site address http://34.73.130.22 for our above example and the admin section is http://34.73.130.22/admin/. Some of the suggested steps to change the temporary password, for that, go to System >> Users >> Users >> Edit user and change the password.

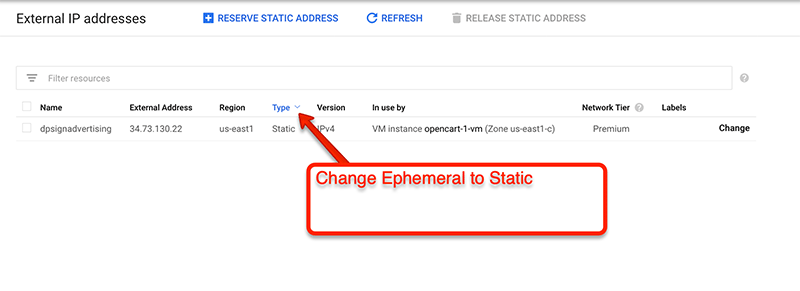
Step 5: Next suggested step is to assign a static external IP address to your VM instance, for that click on the Navigational Menu icon >> VPC network >> External IP addresses >> In the Type Column select the Static and give some name, with this Static IP address is created, now it will not change so we can set up the domain name to point to the website.

Opencart Static IP GCP

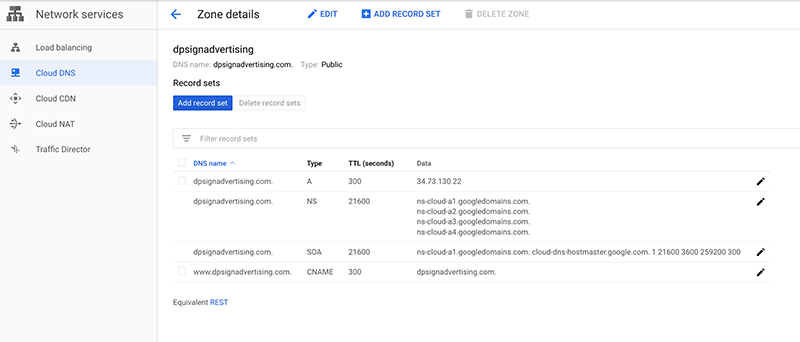
Step 6: Now time to set up a Domain Name to point to the google cloud DNS. For that click to Navigational Menu icon, >> Network Services >> Cloud DNS, this enabled the DNS API then create Zone, choose Zone type as Public, Zone name any, DNS name: use your domain name, DNSSEC you can use Off or On, then click create.

With the above steps, we have NS records. Now let’s add the A record. Click the Add record set button and then in DNS Name leave it blank, and in the Resource Record Type choose A and enter the Static IP that we get above in IPv4 Address (for us it is 34.73.130.22) then click create. Let’s add another record set for the www, click the Add record set button and then in DNS Name type www, and in the Resource Record Type choose CNAME and enter the non-www URL for the canonical name. Then click create.

Cloud DNS in GCP for Opencart

You can see the lists of the above records as in the image. Now we use the NS record to link the domain name to our website. There are four NS records for us these are the following NS:

ns-cloud-a1.googledomains.com
ns-cloud-a2.googledomains.com
ns-cloud-a3.googledomains.com
ns-cloud-a4.googledomains.com

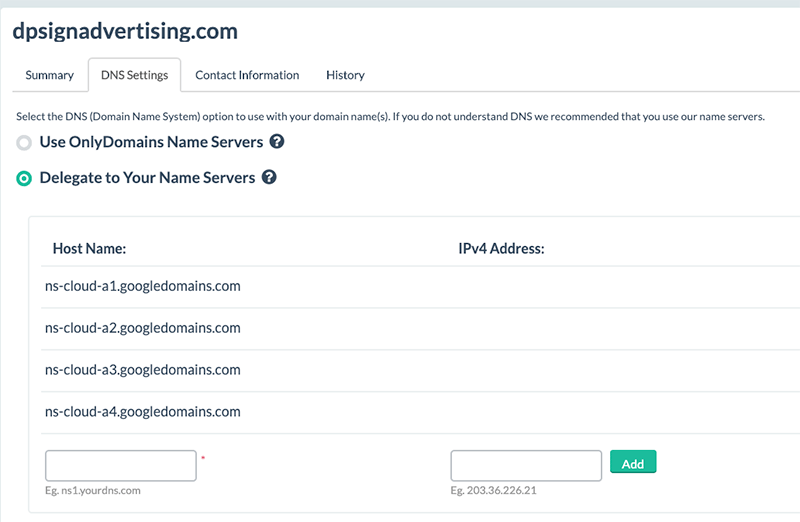
Step 7: Go to the domain name provider and change or add the NS records and delegate to Google Cloud servers. We use onlydomains.com for domain name registration so it looks like below:

Delegate google cloud nameservers

After some minutes the site in the Google Cloud is shown, sometimes it may take up to 24hours as well.

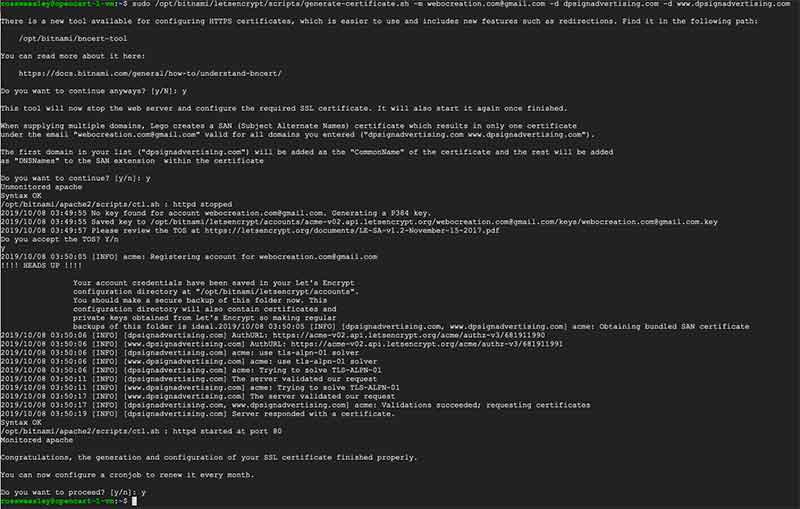
Step 8: Now let’s add an SSL Certificate and set up an SSL Certificate for the website. Go to Menu Navigation icon >> Compute Engine >> VM instances >> then click SSH and shell script window is opened and run following shell script, be sure to change to your email and to your domain name and click Y for all 🙂

sudo /opt/bitnami/letsencrypt/scripts/generate-certificate.sh -m webocreation.com@gmail.com -d dpsignadvertising.com -d www.dpsignadvertising.com
shell script to create and install ssl in google cloud for Opencart

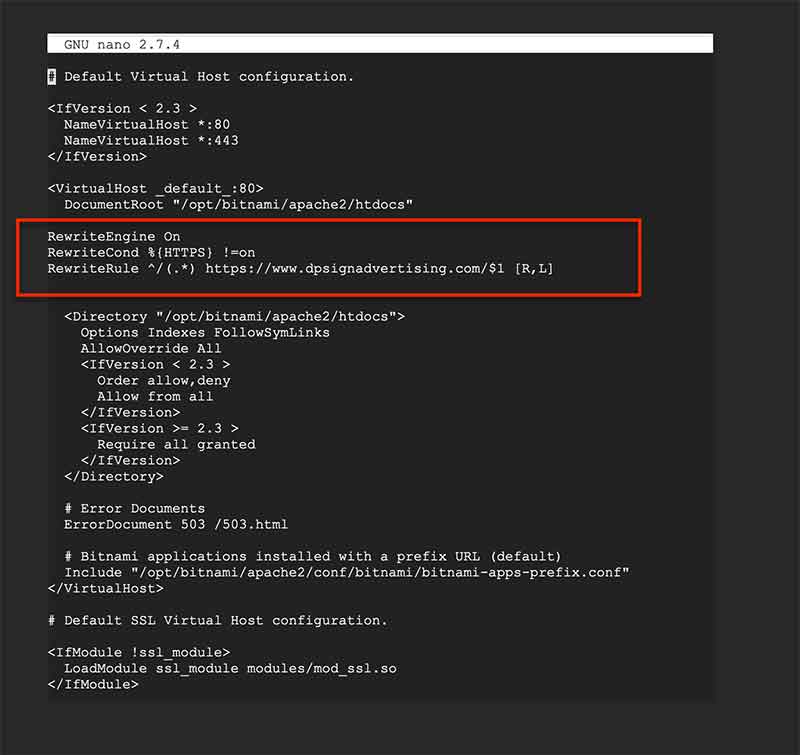
Now redirect all HTTP to HTTPS for that let’s edit the virtual host file. Use the following script:

sudo nano /opt/bitnami/apache2/conf/bitnami/bitnami.conf

It will open the file, then paste the following code in it.

RewriteEngine On 
RewriteCond %{HTTPS} !=on 
RewriteRule ^/(.*) https://www.dpsignadvertising.com/$1 [R,L]

It looks like below:

rewriteengine on for Opencart

Now restart apache by the following command:

sudo /opt/bitnami/ctlscript.sh restart apache

With these steps, SSL certificates are created and all non-HTTPS are redirected to HTTPS URL.

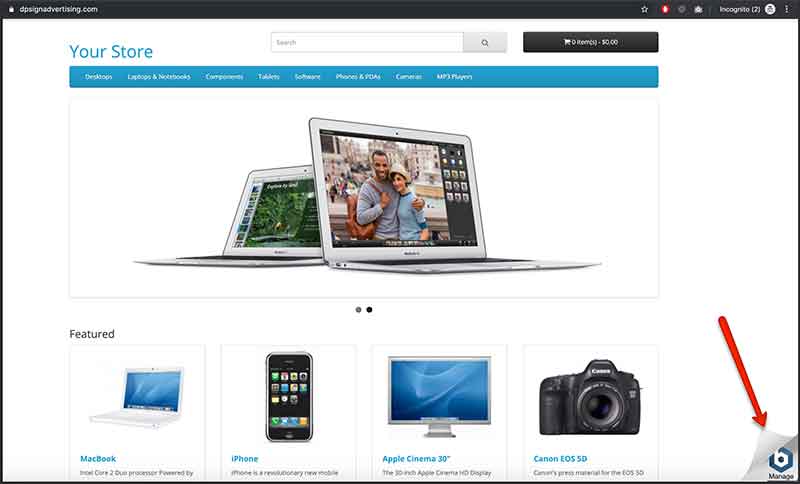
Step 9: We see the Bitnami Banner Ad at the bottom right corner, let’s remove it.

Bitnami banner remove from GCP

Run the following command in SSH

sudo /opt/bitnami/apps/opencart/bnconfig --disable_banner 1
sudo /opt/bitnami/ctlscript.sh restart apache

With these commands, the Bitnami Banner Ad is removed.

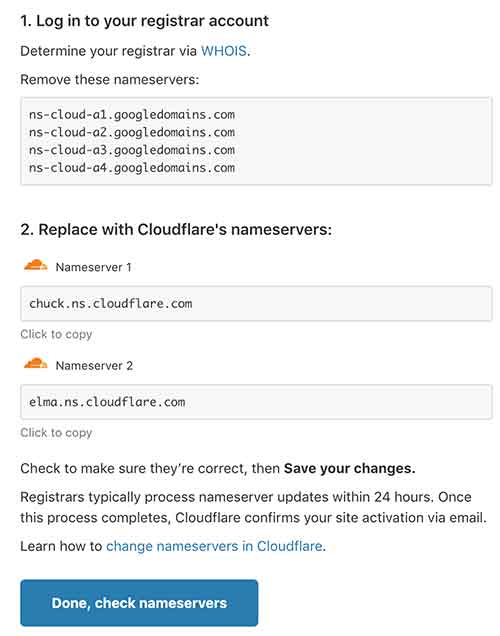
Step 10: Let’s add the Cloudflare CDN for the Opencart website to increase performance using a CDN (Content Delivery Network). Go to cloudflare.com and signup for a new account and then add the website URL and click continue and you will get new Cloudflare’s nameservers like:

opencart cloudflare setup

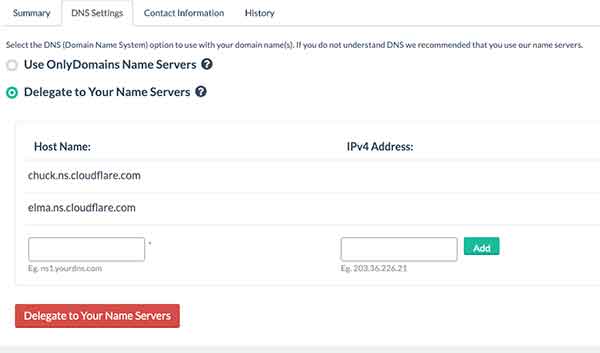
Now again need to go to the domain registrar and need to delegate to Cloudflare nameservers and remove the google cloud servers. For us it looks like below:

change the NS in domain registrar

With these changes, Cloudflare will start protecting our site. Sometimes it may take up to 24hrs, but Cloudflare will notify once it is active

Cloudflare Opencart

In this way, you can easily host the Opencart website in Google Cloud Platform, setup the DNS and your website URL in google cloud DNS, log in with SSH, create an SSL certificate, install it and redirect all to HTTPS, and configure the Cloudflare for the website for better performance. Hope you liked this post, let us know if you have any questions or suggestions, please subscribe to our YouTube Channel for Opencart video tutorials. You can also find us on Twitter and Facebook. Enjoy!

Others:

Opencart 4 demo site, new features, admin changes, frontend changes, and code

We are working to get the details of the Opencart 4, set up a demo for Opencart 4, and analyze its features and functionalities both in the admin section and the frontend section. Some of the addition is – PHP 8.1+ Compatible – a New event-based extension system – Startup page – CRON job page – GDPR – Product variants. You can now choose to use create a new product variant based on a master product and link the stock quantities – Cookie accepts the policy – Admin notification system – OpenCart can now send you updates and news information directly to your OpenCart admin – Autoloader class – Telephone field now optional – Additional admin security, renaming admin folder, install directory, moving storage folder.

Work on progress content.

Opencart 4 Demo

You can check the Opencart 4 Demo by clicking this link. You can use the demo as a username and demo as a password to look into the administration section. Click here for the admin section.

Code size:

Opencart 4.0.0.0 – 35 MB – the zip size is doubled 🙂

Opencart 3.0.3.8 – 17.2 MB

For installation of Opencart 4 

Following PHP settings are required:

PHP version 8.0+, Register Globals: Off, Magic Quotes GPC: Off, File Uploads: On, Session Auto Start: Off

Following PHP extensions are required:

Database, GD, cURL, OpenSSL, ZLIB, ZIP

The following two files need to be writable while installation

Config.php and admin/config.php

| is used in the URL to represent the methods. Like

?route=design/banner|form&user_token=

Check the |form, now pipe | is used before function, previously it used to be / for all

Installation process:

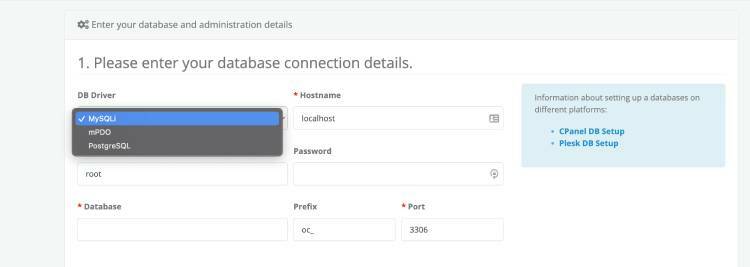
Same as 3, only noticeable design changes, other looks similar. Three DB drivers are supported on the installation: MySQLi, mPDO, and PostgreSQL.

Opencart 4 DB drivers

Design changes on the Pages

Home Page and Category Page

The structure has not changed on the home page. The height of the product looks adjustable as per content. The brand or manufacturer sliders are sliding to the next frame rather than each brand.

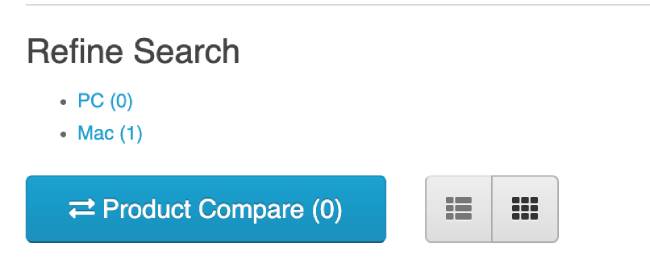
On the category page, design-wise only the Product Compare button is changed.

Product compare

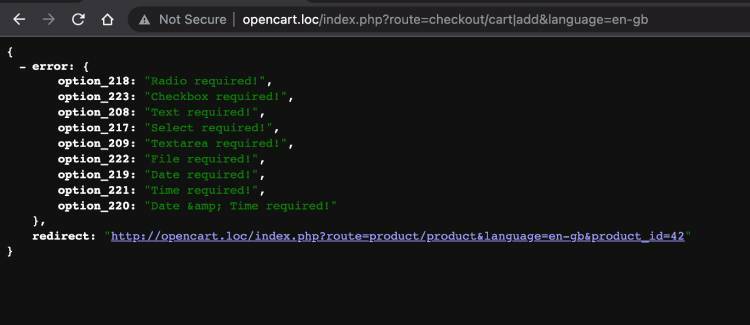
When we clicked the Add to Cart icon of products on the category page, it is redirected to JSON data, so looks like some improvement or the next version is coming soon. Or, maybe we are missing some configuration on our local environment. We will do some research and inform you guys.

Add to cart issues

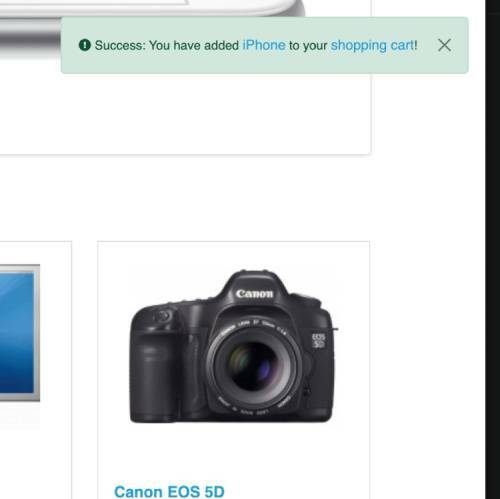
Once it is successful it shows a popup like the below:

success message

Product Page

Wishlist and Compare buttons are moved in the middle after the discount section

On selecting/choosing the options and clicking the “Add to Cart” button, you will see a popup of a success message, it is so smooth.
Product page add to cart

The social shares (like, tweets, etc) are removed.

Add to cart button changes

Add to cart button word is removed from each product grid and when clicked on the add to cart icon it popups the success message, previously it used to show at the top.

Cart page

Some design changes and the main change is Totals are now showing just below the Shopping cart, on previous one it used to show near the checkout button.

shopping cart page opencart 4

Checkout Page

The big change is on the Checkout Page, now it is one-page checkout, this is the most awaited feature as we used to buy modules for in the previous version to do the one-page checkout. So, did a great job by the Opencart team.

Checkout page Opencart 4

But looks like needs to improve a lot to make it fully functional. Whenever we tried to select the Region in the checkout steps, it is showing the following errors.

Checkout issues chain code
Uncaught ReferenceError: chain is not defined
    at HTMLSelectElement.<anonymous> (index.php?route=checkout/checkout&language=en-gb:599:5)
    at HTMLSelectElement.dispatch (jquery-3.6.0.min.js:2:43064)
    at HTMLSelectElement.v.handle (jquery-3.6.0.min.js:2:41048)
    at Object.trigger (jquery-3.6.0.min.js:2:71515)
    at HTMLSelectElement.<anonymous> (jquery-3.6.0.min.js:2:72110)
    at Function.each (jquery-3.6.0.min.js:2:3003)
    at S.fn.init.each (jquery-3.6.0.min.js:2:1481)
    at S.fn.init.trigger (jquery-3.6.0.min.js:2:72086)
    at index.php?route=checkout/checkout&language=en-gb:630:2

If we click the “Continue” button in the middle of the process also it is redirecting to the home page, so looks like there are lots of work to be done here.

Admin Section

We can say some improvements on security for the normal users also. It identifies that there is an install directory and asks to delete it.

opencart 4 security improvement

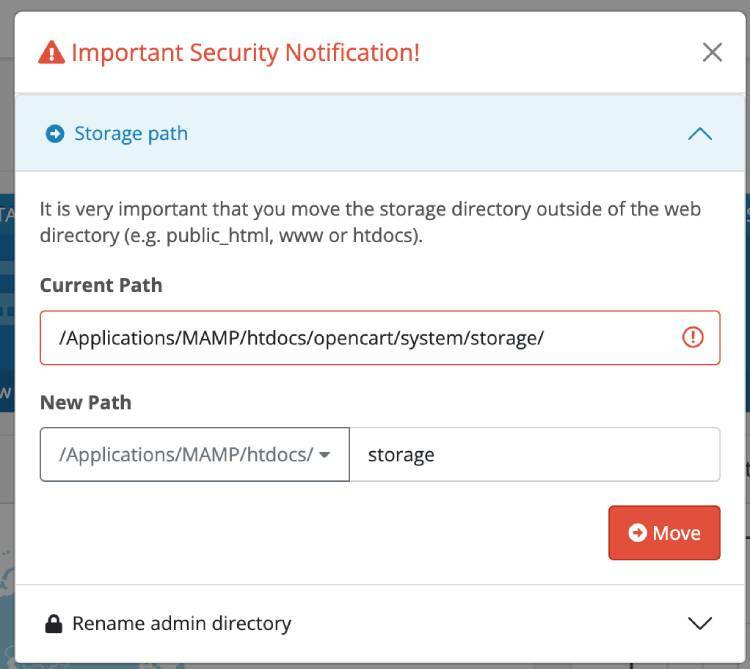
Then, ask to change the Storage path also to a more secure path

opencart storage change

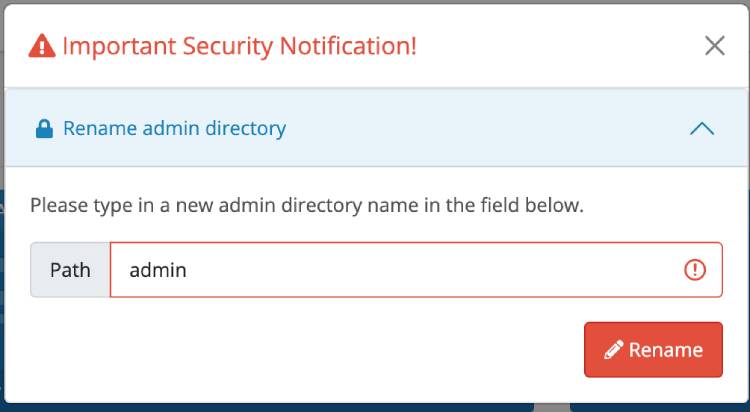
After that, it asks to “Rename admin directory”

Admin Folder rename

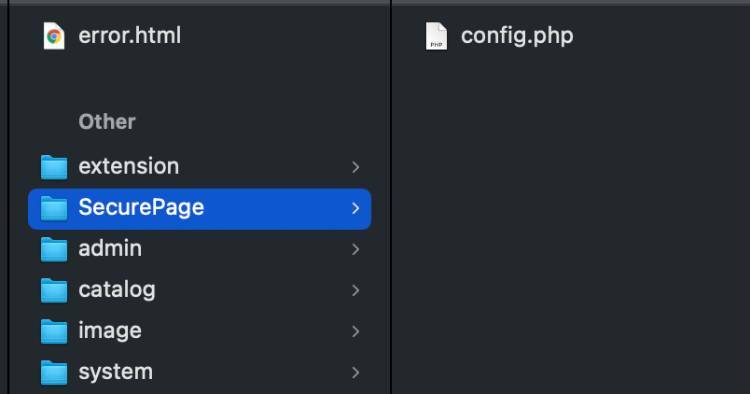
We tried multiple ways to rename it but we are not able to rename it. While checking the folder, we saw the renamed folder with only config.php, so maybe this improvement is also coming. Here we tried to rename it to “SecurePage”.

Admin folder rename

Checking the console log, it is showing a Syntax error like below, so some improvements will be coming soon.

SyntaxError: Unexpected token < in JSON at position 0 OK<b>Warning</b>: file(/Applications/MAMP/htdocs/opencart/supersec/config.php): Failed to open stream: No such file or directory in <b>/Applications/MAMP/htdocs/opencart/admin/controller/common/security.php</b> on line <b>292</b><b>Warning</b>: foreach() argument must be of type array|object, bool given in <b>/Applications/MAMP/htdocs/opencart/admin/controller/common/security.php</b> on line <b>294</b>{“redirect”:”http:\/\/opencart.loc\/\/supersec\/index.php?route=common\/security|delete&user_token=334b0bdb74d0cf8f4badafe6fa32555a”}

We are not able to rename the folder for now, as we like to explore more so we cancel it and keep on checking the left menu items.

Categories:

Now SEO URL is a required field and it checks whether is unique or not, others are just some design changes

Products

You can now Add Variant

Please note because this is a variant product you must override the master product data. Otherwise, the data will get replaced with the master product data when saved. It did one better than the other carts. The other carts only produce variants with options. With the Opencart version, you can change everything including name, description, etc.

Subscription Plan

 The Subscription Plan is added as a Recurring Profile

Settings

  • Currency Rate Engine is added, so we believe it will remove the hassles to keep on changing the exchange rate of the currencies, very very helpful for multi-currencies shop/stores
  • Timezone setting is also added, now we can set the timezone directly from the admin

CKeditor changes

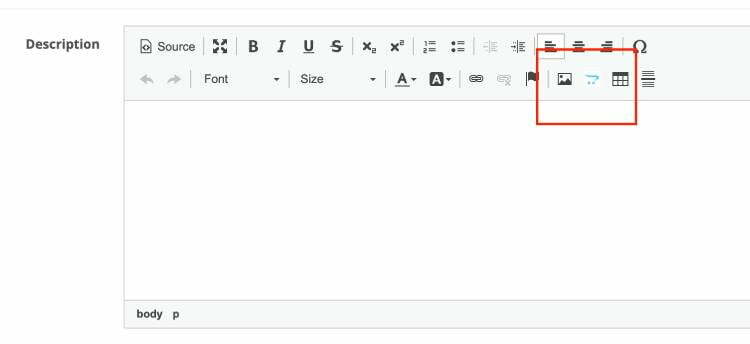
Now you can add the images that you uploaded to the Opencart. Click the Opencart icon and add images that you uploaded in the Opencart admin.

ck editor changes

Corn Jobs

The corn Job section is added in the admin.

Code folder structure changed

The folder structure is changed. The extensions folder is at the root level.

The extension of both the admin and catalog folder will remain in the extension folder.

Folder Structure change in Opencart 4

Code and framework used and changed

It started using Bootstrap 5, the most popular framework for building responsive, mobile-first sites, a new event-based extension system, a CRON job page, Product variants, Cookie accept the policy, an admin notification system, a reports system, a system to download and add core extensions directly to the extension pages and many more.

Likewise using the latest jQuery version 3.6+.

Using Font Awesome Free 5.15.4

Looking at common.js

  • Chain ajax calls
  • Autocomplete
  • Upload
  • Forms submission code
  • Cookies policy
  • Terms and conditions agreed on code
  • Product grid – list or grid view 
  • Menu dropdown
  • Search input in the header
  • Currency change
  • Tooltip functionalities
  • Get URL parameters – did not see it is used anywhere but looks like a good start

For now, better don’t install Opencart 4.0 for your production website better wait for a stable release. There are a lot of changes in the module files and folder structures so if you are using a lot of external modules then wait for those plugin releases as well, as Opencart 3 or 2 version module does not support Opencart 4 as Opencart 4 doesn’t use OCMOD any more.

These are just our first glance of the Opencart 4, we are working on improving this and creating better developer and user-focused content for Opencart 4, so keep in touch with us on our Twitter account @rupaknpl and subscribe to our youtube channel Opencart tutorials. Similarly, keep on visiting my personal blog where you will find lots of free modules and in our next post we will come up with code changes in Opencart 4.

Opencart news ticker module free download – Opencart version 3.0.3.1

Newsticker is the Opencart free module that shows lines as the ticker and we can show wherever module can be shown, this is a free Opencart extension which a title/link scroller that creates nice titles showcase. Click here for Opencart 2 version

INSTALLATION:

  1. Download the module
  2. Extract the zip file or Unzip the downloaded file.
  3. Upload the admin, catalog and system folders which are inside “newsticker-opencart-3-free-module.ocmod_/” folder to your server respective folder
  4. Upload the files and folder to your OpenCart root folder.
  5. After successful upload, go to Extensions>> Modification and click the log tab and see if some errors are showing if the error shows then you have to solve it first.
  6. If no error click the refresh button
  7. You are all set.
  8. Enjoy the free module.

If you see the module listed then you are set, now install the module.

newsticker module listing

Another with the installation of newsticker.ocmod.xml you will see “NewsTicker” on the left menu.

newsticker module at left menu

If you see these two things then you have installed your files and folder properly.  Now time to configure the module.

First, we install the module, install the database, then insert data of newsticker, then add the module and insert data to the module and configure at layouts to show an information page.

Install the NewsTicker Module:

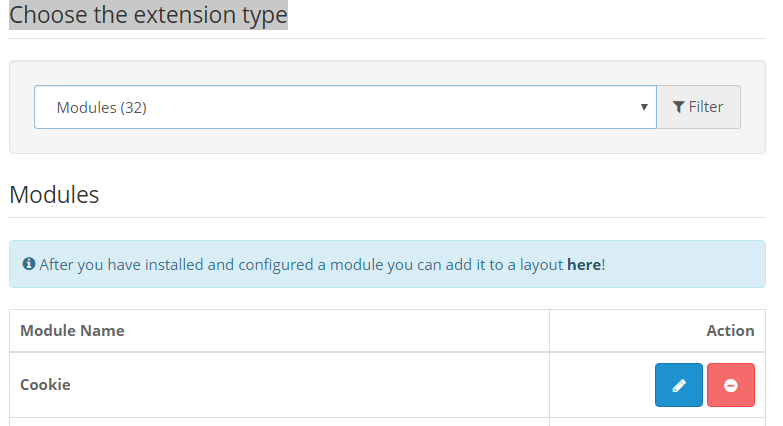
Go to Extensions >> Extensions >> Choose Modules in Extension Type >> In NewsTicker Module click Install button. Then click the edit button.

Database Installation:

database table missing

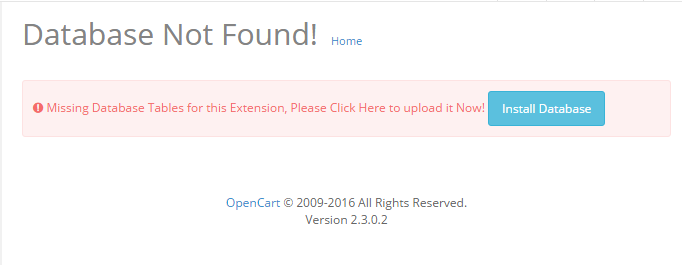
At the start of the module edit, you will see the following instruction to install the Database.

When you clicked the Install Database then your database table is installed.

Now when you go to Extensions >> Extensions >> Choose Modules in Extension Type >> In NewsTicker Module click Edit button. Then you will see like below:

newsticker list instruction

Click on the “here”. It will take you to a place to insert the news ticker. We made it like this so that we can add many news tickers to different places as needed.

adding newsticker list

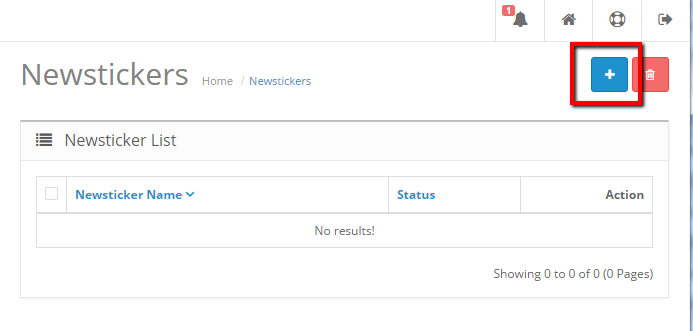
Now click on the add button.

inserting-newsticker-list

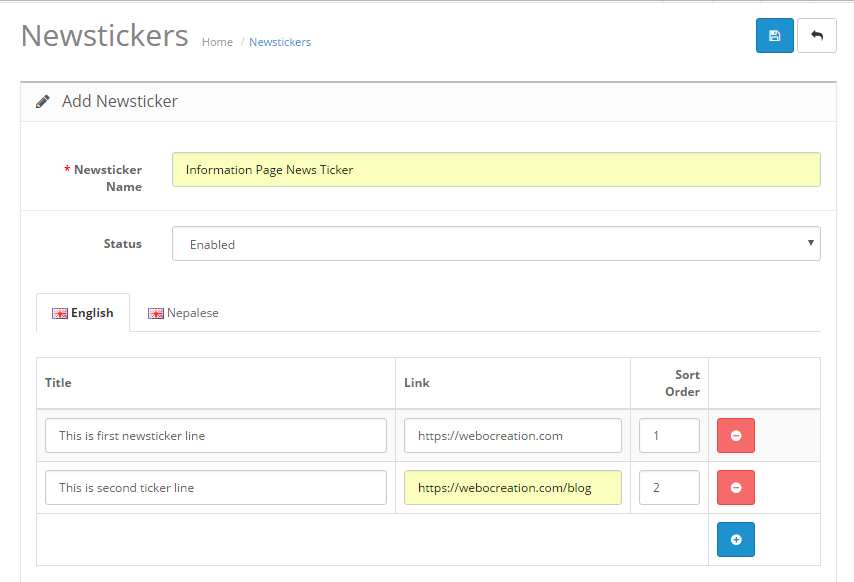
By filling out the above form click save.

Configuration of the NewsTicker Module:

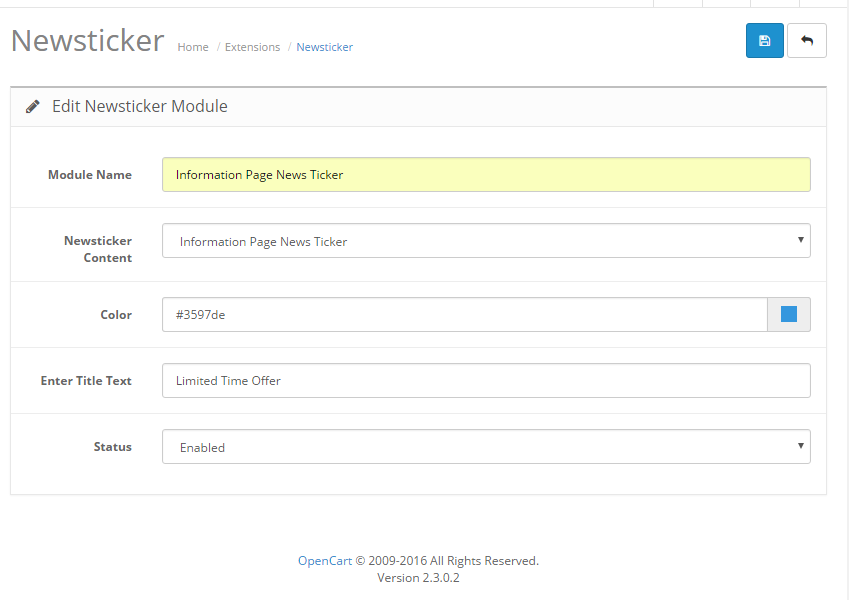
Now again go to Extensions >> Extensions >> Choose Modules in Extension Type >> In NewsTicker Module click Edit button

newsticker module configuration

Configuring layout of NewsTicker to show at Information Page:

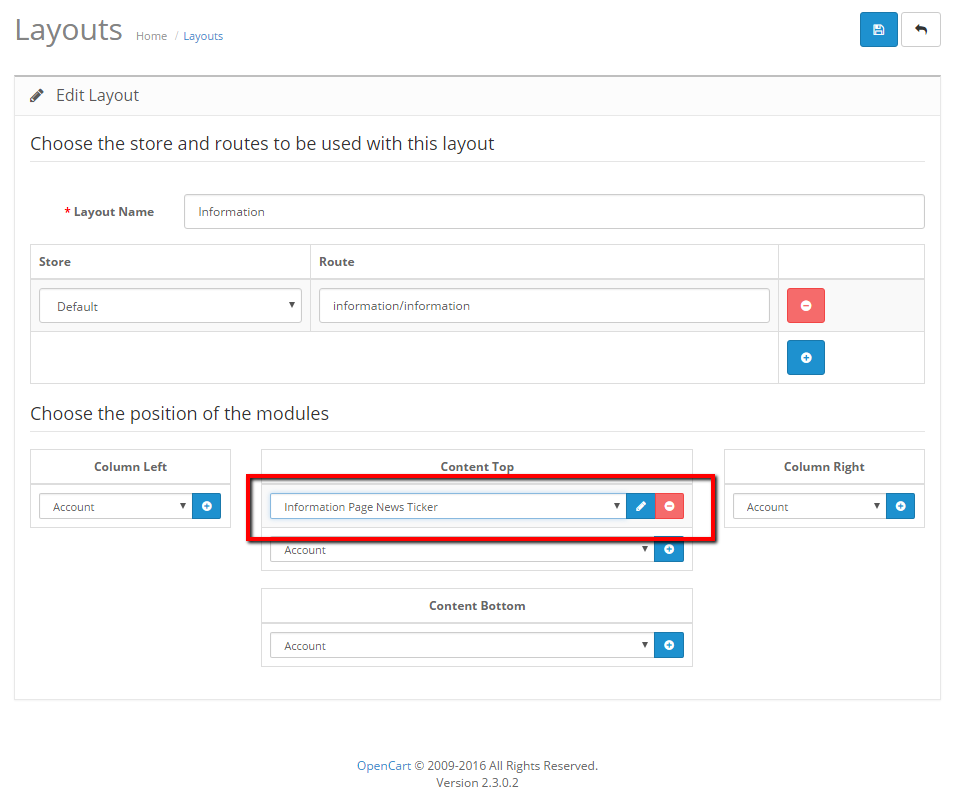
Go to Design >> Layouts >> Edit Information from the list >>

layout section newsticker module

Click the add button at the Content Top layout, then choose “Information Page News Ticker” from the dropdown. Then click Save.

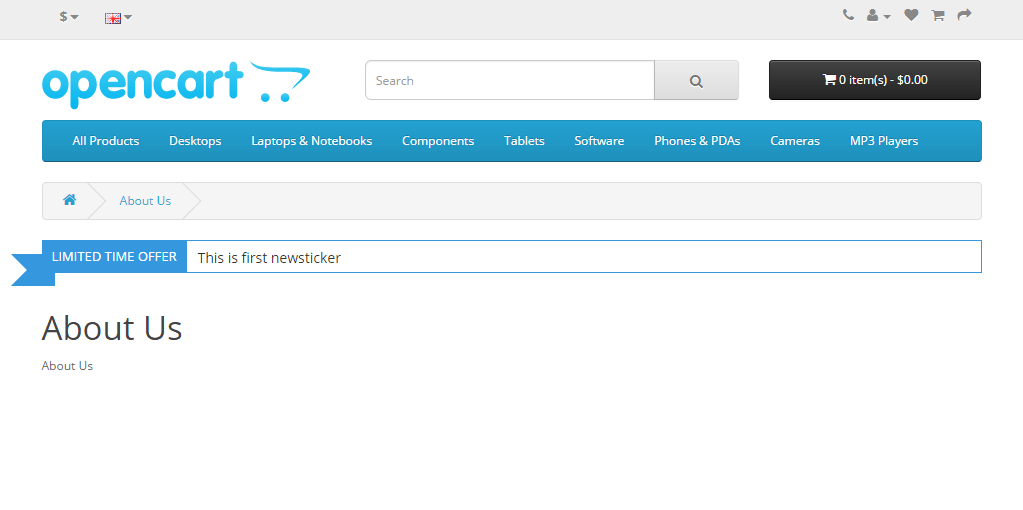
Front end or Presentation section to see the NewsTicker Module. Go to About us page of Information pages. Then you will see as follows:

newsticker opencart module free

You are set to show NewsTicker on the information page. Likewise, you can show different layouts and positions on different pages.

FEATURES:

  • Displays news ticker on any page and position.
  • All features that modules need to have.
  • Sentences or news can be inserted from the admin section.
  • Compatible with all major browsers (Firefox, IE8, Safari, Chrome, and Opera).
  • Tested with the Opencart version 2.3.0.1 only with the default theme.
  • Easy installation I think.
  • OCOMD / vQmod support

Demo:

https://webocreation.com/nepalbuddha/

How to insert the news or sentence?

Go to Admin >> Design >> NewsTicker and you can insert or edit the existing one. Click plus button to insert the new line you want to show at the NewsTicker module.

Permission Denied!

You do not have permission to access this page, please refer to your system administrator.

Go to the System >> Users >> User Groups and edit the Top Administrator and then check both design/newsticker and extension/module/newsticker in both Access Permission and Modify Permission:

Permission Denied!

Then you are set.

Enjoy the free OpenCart modules!

Search terms:

scroll text module in opencart, show text at the top on opencart, jquery web ticker module for opencart, jquery marquee module in opencart, jquery scroller module for opencart,

Cookie bar for OpenCart Store Free Module for Version 2.3.0.2 and 3.0.3.8

OpenCart cookiefy module is another free module from webocreation.com where it will show the cookie bar when the site loads for the first time and if selected yes, then it will not show, if selected none or no then it keeps on showing. As the EU Cookie law states, site owners have to inform visitors about their usage of cookies. It was created to save and protect the privacy of site visitors. I have tested this module only for 2.3.0.2 and 3.0.3.8

Steps to install “Cookiefy” Opencart module for free:

  • Download the module
    Download OpenCart Version 2.3.0.2 Cookiefy Module
    Download Opencart Version 3.0.3.8 Cookiefy Module

    For Opencart 2
  • Extract the zip file.
  • Upload the admin folder which is inside the “Upload” folder to your server “admin” folder

    Opencart 3
  • Now login to admin section then go to Extensions>> Extensions >> Choose the extension type >> Modules >> Then install the Cookie Module
    Cookie in Opencart
  • After installation, edit the Cookie Module and then enter your preferences:
  • Save it.
  • Go to Extensions >> Extension Installer >> where you upload the cookiefy.install.ocmod.xml if you see any error then see how to solve the Ocmod installation error.
  • After successful installation, go to Extensions>> Modification and click the log tab and see if some errors are showing, if the error shows then you have to solve it first.
  • If no error click the refresh button
  • You are all set.
  • If you have multiple languages then you have to translate the admin/language/en-gb/extension/module/cookie.php and place it into admin/language/YOURLANGUAGEFOLDER/extension/module
  • Enjoy the free module.

If you want to add the link to the cookie text then use some <a href=”YourLink”>Text</a>

Opencart Cookie

That output is as below:

Cookie bar in Opencart

Benefits of using jquery.cookiefy

  • Simple to understand.
  • Easy to customize.
  • Lightweight: just 4 kb in total.
  • Create and customize your EU cookie law warning in just a few minutes.

What is jquery.cookiefy?

If you are using cookies on your website, you have to inform them about your usage of cookies. jquery.cookiefy helps you fulfill the restrictions of the new EU cookie law. You only have to adust the predefined parameters to your custom needs.
All JavaScript credits go to https://kmarryo.github.io/jquery.cookiefy/

Try it, let me your experience and your suggestions to improve it. Hope you liked this post, let us know if you have any questions or suggestions, please subscribe to our YouTube Channel for Opencart video tutorials and get more Opencart free extensions. You can also find us on Twitter and Facebook. Enjoy!

Copy active URL to the clipboard in 2022 using the clipboard, without execCommand

Simple JavaScript functionality OnClick event to copy a current link by clicking the image or icon and show the tooltips message saying “Link copied”.

As the document.execCommand(‘copy’); is depreciated, its replacement is navigator.clipboard.writeText, so you can copy the current URL to clipboard with following JavaScript:

navigator.clipboard.writeText(window.location.href);

How to show the message “Link Copied” after the click?

The simple JavaScript code to show the Link Copied message after the click is:

navigator.clipboard.writeText(window.location.href);this.insertAdjacentHTML('afterend', '<div class=linktooltips-container>Link copied</div>');setTimeout(() => { document.querySelectorAll('.linktooltips-container').forEach(el => el.remove()); }, 3000);
Link Copied

How do you copy a URL on a button click?

Full code with HTML CSS and JavaScript for copying the URL on a button click is something like below, here we use SVG icon as the button:

<style>
   .copylink-containter{
       position: absolute;
       top: 50vh;
       padding: 20px;
       z-index: 999999999;
   }
   .linktooltips-container{
       background-color: #030303;
       color: #ffffff;
       padding: 5px 30px;
       border-radius: 10px;
 
   }
</style>
<div class="copylink-containter">
   <a onclick="navigator.clipboard.writeText(window.location.href);this.insertAdjacentHTML('afterend', '<div class=linktooltips-container>Link copied</div>');setTimeout(() => { document.querySelectorAll('.linktooltips-container').forEach(el => el.remove()); }, 3000);" target="_blank">
       <svg width="20" height="20" xmlns="http://www.w3.org/2000/svg" viewBox="0 0 640 512"><path d="M172.5 131.1C228.1 75.51 320.5 75.51 376.1 131.1C426.1 181.1 433.5 260.8 392.4 318.3L391.3 319.9C381 334.2 361 337.6 346.7 327.3C332.3 317 328.9 297 339.2 282.7L340.3 281.1C363.2 249 359.6 205.1 331.7 177.2C300.3 145.8 249.2 145.8 217.7 177.2L105.5 289.5C73.99 320.1 73.99 372 105.5 403.5C133.3 431.4 177.3 435 209.3 412.1L210.9 410.1C225.3 400.7 245.3 404 255.5 418.4C265.8 432.8 262.5 452.8 248.1 463.1L246.5 464.2C188.1 505.3 110.2 498.7 60.21 448.8C3.741 392.3 3.741 300.7 60.21 244.3L172.5 131.1zM467.5 380C411 436.5 319.5 436.5 263 380C213 330 206.5 251.2 247.6 193.7L248.7 192.1C258.1 177.8 278.1 174.4 293.3 184.7C307.7 194.1 311.1 214.1 300.8 229.3L299.7 230.9C276.8 262.1 280.4 306.9 308.3 334.8C339.7 366.2 390.8 366.2 422.3 334.8L534.5 222.5C566 191 566 139.1 534.5 108.5C506.7 80.63 462.7 76.99 430.7 99.9L429.1 101C414.7 111.3 394.7 107.1 384.5 93.58C374.2 79.2 377.5 59.21 391.9 48.94L393.5 47.82C451 6.731 529.8 13.25 579.8 63.24C636.3 119.7 636.3 211.3 579.8 267.7L467.5 380z"/></svg>
   </a>
</div>

In this way, you can copy the active URL on click, as well as please post your questions or comments, or any other easy way that you guys are using. You can follow us at our Twitter account @rupaknpl Facebook page @Webocreation. Subscribe to our YouTube channel for Opencart tutorials, and click to see other eCommerce tips and tricks.

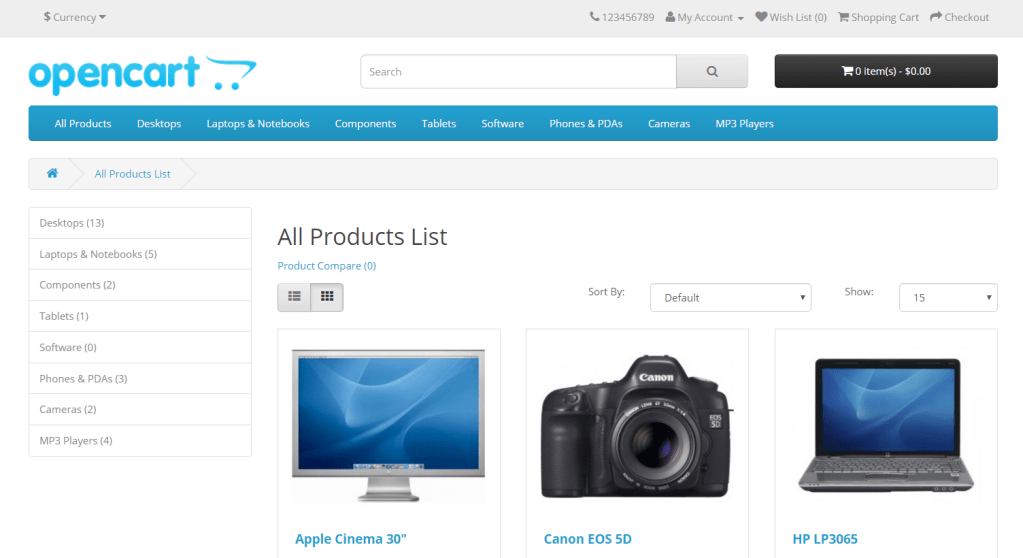
Display all products opencart module for free version 3.0, 3.0.1.1, 3.0.1.2,3.0.1.3

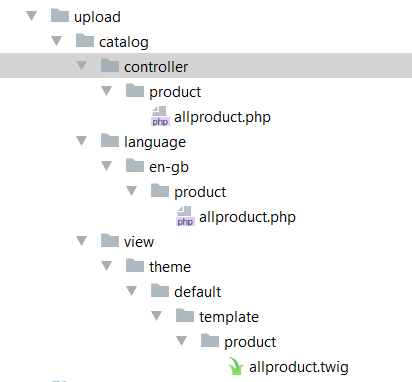
This free Opencart 3.0 module provides the ability to display all products on a page. Download the module, install it, and you will see All Products link in the category top menu at the end.

Steps to install “All Products Show in One Page” opencart 3.0, 3.0.1.1, 3.0.1.2, 3.0.1.3 module free:

Show all products Opencart free module

The folder structure of display all products free OpenCart module:

Files and folders of Show all Products module

To show the “Show All Products” menu and link it to the all products page from the top of the frontend category menu, we set up an Ocmod file (install.xml):

<?xml version="1.0" encoding="utf-8"?>
<modification>
    <name>All Product Show</name>
    <version>3.0</version>
    <author>Rupak Nepali</author>
    <link>https://webocreation.com</link>
    <code>webocreation_all_products_show</code>
    <description>Show all Products in a Page frontend</description>
    <file path="catalog/view/theme/*/template/common/menu.twig">
        <operation>
            <search><![CDATA[{% for category in categories %}]]></search>
            <add position="before"><![CDATA[
                <li><a href="{{ allproductsurl }}">{{ text_heading_title }}</a></li>
            ]]></add>
        </operation>
    </file>
    <file path="catalog/controller/common/menu.php">
        <operation>
            <search><![CDATA[$data['categories'] = array();]]></search>
            <add position="before"><![CDATA[
                $data['allproductsurl']=$this->url->link('product/allproduct');
                $this->load->language('product/allproduct');
                $data['text_heading_title']=$this->language->get('text_heading_title');
            ]]></add>
        </operation>
    </file>
</modification>

Controller of Show all products free module catalog\controller\product\allproduct.php

<?php
class ControllerProductAllproduct extends Controller
{
  public function index()
  {
    $this->load->language('product/allproduct');
    $this->load->model('catalog/product');
    $this->load->model('tool/image');
    if (isset($this->request->get['filter'])) {
      $filter = $this->request->get['filter'];
    } else {
      $filter = '';
    }
    if (isset($this->request->get['sort'])) {
      $sort = $this->request->get['sort'];
    } else {
      $sort = 'p.sort_order';
    }
    if (isset($this->request->get['order'])) {
      $order = $this->request->get['order'];
    } else {
      $order = 'ASC';
    }
    if (isset($this->request->get['page'])) {
      $page = $this->request->get['page'];
    } else {
      $page = 1;
    }
    if (isset($this->request->get['limit'])) {
      $limit = (int) $this->request->get['limit'];
    } else {
      $limit = $this->config->get('theme_' . $this->config->get('config_theme') . '_product_limit');
    }
    $data['breadcrumbs'] = array();
    $data['breadcrumbs'][] = array(
      'text' => $this->language->get('text_home'),
      'href' => $this->url->link('common/home')
    );
    $this->document->setTitle($this->language->get('text_title'));
    $this->document->setDescription($this->language->get('text_description'));
    $this->document->setKeywords($this->language->get('text_keywords'));
    $data['heading_title'] = $this->language->get('text_heading_title');
    $data['text_compare'] = sprintf($this->language->get('text_compare'), (isset($this->session->data['compare']) ? count($this->session->data['compare']) : 0));
    // Set the last allproduct breadcrumb
    $data['breadcrumbs'][] = array(
      'text' => 'Show All Products',
      'href' => $this->url->link('product/allproduct')
    );
    $data['compare'] = $this->url->link('product/compare');
    $url = '';
    if (isset($this->request->get['filter'])) {
      $url .= '&filter=' . $this->request->get['filter'];
    }
    if (isset($this->request->get['sort'])) {
      $url .= '&sort=' . $this->request->get['sort'];
    }
    if (isset($this->request->get['order'])) {
      $url .= '&order=' . $this->request->get['order'];
    }
    if (isset($this->request->get['limit'])) {
      $url .= '&limit=' . $this->request->get['limit'];
    }
    $data['products'] = array();
    $filter_data = array(
      'filter_filter'      => $filter,
      'sort'               => $sort,
      'order'              => $order,
      'start'              => ($page - 1) * $limit,
      'limit'              => $limit
    );
    $product_total = $this->model_catalog_product->getTotalProducts($filter_data);
    $results = $this->model_catalog_product->getProducts($filter_data);
    foreach ($results as $result) {
      if ($result['image']) {
        $image = $this->model_tool_image->resize($result['image'], $this->config->get('theme_' . $this->config->get('config_theme') . '_image_product_width'), $this->config->get('theme_' . $this->config->get('config_theme') . '_image_product_height'));
      } else {
        $image = $this->model_tool_image->resize('placeholder.png', $this->config->get('theme_' . $this->config->get('config_theme') . '_image_product_width'), $this->config->get('theme_' . $this->config->get('config_theme') . '_image_product_height'));
      }
      if ($this->customer->isLogged() || !$this->config->get('config_customer_price')) {
        $price = $this->currency->format($this->tax->calculate($result['price'], $result['tax_class_id'], $this->config->get('config_tax')), $this->session->data['currency']);
      } else {
        $price = false;
      }
      if ((float) $result['special']) {
        $special = $this->currency->format($this->tax->calculate($result['special'], $result['tax_class_id'], $this->config->get('config_tax')), $this->session->data['currency']);
      } else {
        $special = false;
      }
      if ($this->config->get('config_tax')) {
        $tax = $this->currency->format((float) $result['special'] ? $result['special'] : $result['price'], $this->session->data['currency']);
      } else {
        $tax = false;
      }
      if ($this->config->get('config_review_status')) {
        $rating = (int) $result['rating'];
      } else {
        $rating = false;
      }
      $data['products'][] = array(
        'product_id'  => $result['product_id'],
        'thumb'       => $image,
        'name'        => $result['name'],
        'description' => utf8_substr(trim(strip_tags(html_entity_decode($result['description'], ENT_QUOTES, 'UTF-8'))), 0, $this->config->get('theme_' . $this->config->get('config_theme') . '_product_description_length')) . '..',
        'price'       => $price,
        'special'     => $special,
        'tax'         => $tax,
        'minimum'     => $result['minimum'] > 0 ? $result['minimum'] : 1,
        'rating'      => $result['rating'],
        'href'        => $this->url->link('product/product', '&product_id=' . $result['product_id'] . $url)
      );
    }
    $url = '';
    if (isset($this->request->get['filter'])) {
      $url .= '&filter=' . $this->request->get['filter'];
    }
    if (isset($this->request->get['limit'])) {
      $url .= '&limit=' . $this->request->get['limit'];
    }
    $data['sorts'] = array();
    $data['sorts'][] = array(
      'text'  => $this->language->get('text_default'),
      'value' => 'p.sort_order-ASC',
      'href'  => $this->url->link('product/allproduct',  '&sort=p.sort_order&order=ASC' . $url)
    );
    $data['sorts'][] = array(
      'text'  => $this->language->get('text_name_asc'),
      'value' => 'pd.name-ASC',
      'href'  => $this->url->link('product/allproduct',  '&sort=pd.name&order=ASC' . $url)
    );
    $data['sorts'][] = array(
      'text'  => $this->language->get('text_name_desc'),
      'value' => 'pd.name-DESC',
      'href'  => $this->url->link('product/allproduct',  '&sort=pd.name&order=DESC' . $url)
    );
    $data['sorts'][] = array(
      'text'  => $this->language->get('text_price_asc'),
      'value' => 'p.price-ASC',
      'href'  => $this->url->link('product/allproduct',  '&sort=p.price&order=ASC' . $url)
    );
    $data['sorts'][] = array(
      'text'  => $this->language->get('text_price_desc'),
      'value' => 'p.price-DESC',
      'href'  => $this->url->link('product/allproduct',  '&sort=p.price&order=DESC' . $url)
    );
    if ($this->config->get('config_review_status')) {
      $data['sorts'][] = array(
        'text'  => $this->language->get('text_rating_desc'),
        'value' => 'rating-DESC',
        'href'  => $this->url->link('product/allproduct',  '&sort=rating&order=DESC' . $url)
      );
      $data['sorts'][] = array(
        'text'  => $this->language->get('text_rating_asc'),
        'value' => 'rating-ASC',
        'href'  => $this->url->link('product/allproduct',  '&sort=rating&order=ASC' . $url)
      );
    }
    $data['sorts'][] = array(
      'text'  => $this->language->get('text_model_asc'),
      'value' => 'p.model-ASC',
      'href'  => $this->url->link('product/allproduct',  '&sort=p.model&order=ASC' . $url)
    );
    $data['sorts'][] = array(
      'text'  => $this->language->get('text_model_desc'),
      'value' => 'p.model-DESC',
      'href'  => $this->url->link('product/allproduct',  '&sort=p.model&order=DESC' . $url)
    );
    $url = '';
    if (isset($this->request->get['filter'])) {
      $url .= '&filter=' . $this->request->get['filter'];
    }
    if (isset($this->request->get['sort'])) {
      $url .= '&sort=' . $this->request->get['sort'];
    }
    if (isset($this->request->get['order'])) {
      $url .= '&order=' . $this->request->get['order'];
    }
    $data['limits'] = array();
    $limits = array_unique(array($this->config->get('theme_' . $this->config->get('config_theme') . '_product_limit'), 25, 50, 75, 100));
    sort($limits);
    foreach ($limits as $value) {
      $data['limits'][] = array(
        'text'  => $value,
        'value' => $value,
        'href'  => $this->url->link('product/allproduct',  $url . '&limit=' . $value)
      );
    }
    $url = '';
    if (isset($this->request->get['filter'])) {
      $url .= '&filter=' . $this->request->get['filter'];
    }
    if (isset($this->request->get['sort'])) {
      $url .= '&sort=' . $this->request->get['sort'];
    }
    if (isset($this->request->get['order'])) {
      $url .= '&order=' . $this->request->get['order'];
    }
    if (isset($this->request->get['limit'])) {
      $url .= '&limit=' . $this->request->get['limit'];
    }
    $pagination = new Pagination();
    $pagination->total = $product_total;
    $pagination->page = $page;
    $pagination->limit = $limit;
    $pagination->url = $this->url->link('product/allproduct',  $url . '&page={page}');
    $data['pagination'] = $pagination->render();
    $data['results'] = sprintf($this->language->get('text_pagination'), ($product_total) ? (($page - 1) * $limit) + 1 : 0, ((($page - 1) * $limit) > ($product_total - $limit)) ? $product_total : ((($page - 1) * $limit) + $limit), $product_total, ceil($product_total / $limit));
    // http://googlewebmastercentral.blogspot.com/2011/09/pagination-with-relnext-and-relprev.html
    if ($page == 1) {
      $this->document->addLink($this->url->link('product/allproduct'), 'canonical');
    } else {
      $this->document->addLink($this->url->link('product/allproduct', '&page=' . $page), 'canonical');
    }
    if ($page > 1) {
      $this->document->addLink($this->url->link('product/allproduct', (($page - 2) ? '&page=' . ($page - 1) : '')), 'prev');
    }
    if ($limit && ceil($product_total / $limit) > $page) {
      $this->document->addLink($this->url->link('product/allproduct', '&page=' . ($page + 1)), 'next');
    }
    $data['sort'] = $sort;
    $data['order'] = $order;
    $data['limit'] = $limit;
    $data['continue'] = $this->url->link('common/home');
    $data['column_left'] = $this->load->controller('common/column_left');
    $data['column_right'] = $this->load->controller('common/column_right');
    $data['content_top'] = $this->load->controller('common/content_top');
    $data['content_bottom'] = $this->load->controller('common/content_bottom');
    $data['footer'] = $this->load->controller('common/footer');
    $data['header'] = $this->load->controller('common/header');
    $this->response->setOutput($this->load->view('product/allproduct', $data));
  }
}

Language file of the show all products module OpenCart version 3.0.*.*. If you want to change text or words then you can change here.

<?php
// Text
$_['text_refine']       = 'Refine Search';
$_['text_product']      = 'Products';
$_['text_error']        = 'Category not found!';
$_['text_empty']        = 'There are no products to list in this category.';
$_['text_quantity']     = 'Qty:';
$_['text_manufacturer'] = 'Brand:';
$_['text_model']        = 'Product Code:';
$_['text_points']       = 'Reward Points:';
$_['text_price']        = 'Price:';
$_['text_tax']          = 'Ex Tax:';
$_['text_compare']      = 'Product Compare (%s)';
$_['text_sort']         = 'Sort By:';
$_['text_default']      = 'Default';
$_['text_name_asc']     = 'Name (A - Z)';
$_['text_name_desc']    = 'Name (Z - A)';
$_['text_price_asc']    = 'Price (Low > High)';
$_['text_price_desc']   = 'Price (High > Low)';
$_['text_rating_asc']   = 'Rating (Lowest)';
$_['text_rating_desc']  = 'Rating (Highest)';
$_['text_model_asc']    = 'Model (A - Z)';
$_['text_model_desc']   = 'Model (Z - A)';
$_['text_limit']        = 'Show:';
$_['text_title']        = 'Show All Products';
$_['text_description']  = 'Show All Products';
$_['text_keywords']     = 'Show All Products';
$_['text_heading_title']= 'Show All Products';

View file of show all products module OpenCart version 3.0 catalog\view\theme\default\template\product\allproduct.twig

{{ header }}
<div id="product-category" class="container">
  <ul class="breadcrumb">
    {% for breadcrumb in breadcrumbs %}
    <li><a href="{{ breadcrumb.href }}">{{ breadcrumb.text }}</a></li>
    {% endfor %}
  </ul>
  <div class="row">{{ column_left }}
    {% if column_left and column_right %}
    {% set class = 'col-sm-6' %}
    {% elseif column_left or column_right %}
    {% set class = 'col-sm-9' %}
    {% else %}
    {% set class = 'col-sm-12' %}
    {% endif %}
    <div id="content" class="{{ class }}">{{ content_top }}
      <h2>{{ heading_title }}</h2>
      {% if thumb or description %}
      <div class="row"> {% if thumb %}
        <div class="col-sm-2"><img src="{{ thumb }}" alt="{{ heading_title }}" title="{{ heading_title }}" class="img-thumbnail" /></div>
        {% endif %}
        {% if description %}
        <div class="col-sm-10">{{ description }}</div>
        {% endif %} </div>
      <hr>
      {% endif %}
      {% if categories %}
      <h3>{{ text_refine }}</h3>
      {% if categories|length <= 5 %}
      <div class="row">
        <div class="col-sm-3">
          <ul>
            {% for category in categories %}
            <li><a href="{{ category.href }}">{{ category.name }}</a></li>
            {% endfor %}
          </ul>
        </div>
      </div>
      {% else %}
      <div class="row"> {% for category in categories|batch((categories|length / 4)|round(1, 'ceil')) %}
        <div class="col-sm-3">
          <ul>
            {% for category in categories %}
            <li><a href="{{ category.href }}">{{ category.name }}</a></li>
            {% endfor %}
          </ul>
        </div>
        {% endfor %} </div>
      <br />
      {% endif %}
      {% endif %}
      {% if products %}
      <div class="row">
        <div class="col-md-2 col-sm-6 hidden-xs">
          <div class="btn-group btn-group-sm">
            <button type="button" id="list-view" class="btn btn-default" data-toggle="tooltip" title="{{ button_list }}"><i class="fa fa-th-list"></i></button>
            <button type="button" id="grid-view" class="btn btn-default" data-toggle="tooltip" title="{{ button_grid }}"><i class="fa fa-th"></i></button>
          </div>
        </div>
        <div class="col-md-3 col-sm-6">
          <div class="form-group"><a href="{{ compare }}" id="compare-total" class="btn btn-link">{{ text_compare }}</a></div>
        </div>
        <div class="col-md-4 col-xs-6">
          <div class="form-group input-group input-group-sm">
            <label class="input-group-addon" for="input-sort">{{ text_sort }}</label>
            <select id="input-sort" class="form-control" onchange="location = this.value;">
              {% for sorts in sorts %}
              {% if sorts.value == '%s-%s'|format(sort, order) %}
              <option value="{{ sorts.href }}" selected="selected">{{ sorts.text }}</option>
              {% else %}
              <option value="{{ sorts.href }}">{{ sorts.text }}</option>
              {% endif %}
              {% endfor %}
            </select>
          </div>
        </div>
        <div class="col-md-3 col-xs-6">
          <div class="form-group input-group input-group-sm">
            <label class="input-group-addon" for="input-limit">{{ text_limit }}</label>
            <select id="input-limit" class="form-control" onchange="location = this.value;">
              {% for limits in limits %}
              {% if limits.value == limit %}
              <option value="{{ limits.href }}" selected="selected">{{ limits.text }}</option>
              {% else %}
              <option value="{{ limits.href }}">{{ limits.text }}</option>
              {% endif %}
              {% endfor %}
            </select>
          </div>
        </div>
      </div>
      <div class="row"> {% for product in products %}
        <div class="product-layout product-list col-xs-12">
          <div class="product-thumb">
            <div class="image"><a href="{{ product.href }}"><img src="{{ product.thumb }}" alt="{{ product.name }}" title="{{ product.name }}" class="img-responsive" /></a></div>
            <div>
              <div class="caption">
                <h4><a href="{{ product.href }}">{{ product.name }}</a></h4>
                <p>{{ product.description }}</p>
                {% if product.price %}
                <p class="price"> {% if not product.special %}
                  {{ product.price }}
                  {% else %} <span class="price-new">{{ product.special }}</span> <span class="price-old">{{ product.price }}</span> {% endif %}
                  {% if product.tax %} <span class="price-tax">{{ text_tax }} {{ product.tax }}</span> {% endif %} </p>
                {% endif %}
                {% if product.rating %}
                <div class="rating"> {% for i in 1..5 %}
                  {% if product.rating < i %} <span class="fa fa-stack"><i class="fa fa-star-o fa-stack-2x"></i></span> {% else %} <span class="fa fa-stack"><i class="fa fa-star fa-stack-2x"></i><i class="fa fa-star-o fa-stack-2x"></i></span>{% endif %}
                  {% endfor %} </div>
                {% endif %} </div>
              <div class="button-group">
                <button type="button" onclick="cart.add('{{ product.product_id }}', '{{ product.minimum }}');"><i class="fa fa-shopping-cart"></i> <span class="hidden-xs hidden-sm hidden-md">{{ button_cart }}</span></button>
                <button type="button" data-toggle="tooltip" title="{{ button_wishlist }}" onclick="wishlist.add('{{ product.product_id }}');"><i class="fa fa-heart"></i></button>
                <button type="button" data-toggle="tooltip" title="{{ button_compare }}" onclick="compare.add('{{ product.product_id }}');"><i class="fa fa-exchange"></i></button>
              </div>
            </div>
          </div>
        </div>
        {% endfor %} </div>
      <div class="row">
        <div class="col-sm-6 text-left">{{ pagination }}</div>
        <div class="col-sm-6 text-right">{{ results }}</div>
      </div>
      {% endif %}
      {% if not categories and not products %}
      <p>{{ text_empty }}</p>
      <div class="buttons">
        <div class="pull-right"><a href="{{ continue }}" class="btn btn-primary">{{ button_continue }}</a></div>
      </div>
      {% endif %}
      {{ content_bottom }}</div>
    {{ column_right }}</div>
</div>
{{ footer }} 


In this way, we create an Opencart 3 testimonial module’s frontend and show the setting that we entered in the multi-instance module admin section. Similarly, we make a slider of the testimonial module. Hope you liked this post, let us know if you have any questions or suggestions, please subscribe to our YouTube Channel for Opencart video tutorials. You can also find us on Twitter and Facebook. Enjoy!

Applying Artificial Intelligence in IoT and Wearable Devices

Over the past years, the world has steadily embraced wearables—from hearing aids to smartwatches. However, the rise in the use of AI assistants and the development of the Internet of Things (IoT) has fueled the market expansion of wearables today. While it has been a part of our daily lives, the application of AI in IoT and wearable devices are now being utilized by many to launch or improve their businesses, ushering in a new commercial and consumer technology era. Adopting and investing in these technologies will enable consumers, companies, economies, and industries to use their capabilities and gain competitive advantages. 

What is Artificial Intelligence? 

One of the most popular technological advancements is artificial intelligence, or AI, which has proven applications in many sectors. It’s a technology that operates more quickly while simulating human intellect. Consider the famous artificial intelligence systems like Apple’s Siri or Amazon’s Alexa. Due to this invention, there were many technological advances in various industries, including healthcare and finance. That’s why it’s a big step when AI is employed in the Internet of Things and wearable technology. 

Why Do IoT and Wearable Devices Need Artificial Intelligence?

IoT enables devices to communicate with one another and act on these discoveries. These devices are only as valuable as the information they offer. The data must be gathered, saved, processed, and analyzed to be helpful for decision-making.

Because of this, organizations face a dilemma. They need help to effectively process and use the data for practical decision-making and insights. Hence, a rising need for artificial intelligence to come up with rapid, real-time decisions just like a human being. Without rapid data processing, lags may affect the performance and speed of these technologies, not to mention the dangers in emergencies.

What Are the Applications of Artificial Intelligence in IoT and Wearable Devices?

The usability and benefits of wearable technologies span a wide range. Each AI wearable device functions differently depending on the area they fall under, such as fitness, health, or entertainment. 

Contrary to most beliefs, wearable devices have already been introduced into various situations. The most widely used wearable technology applications across many industries are as follows:

Sports and Fitness

Recently, the sports and fitness industries have merged with the tech world. These days, biosensors are a standard feature in AI-enabled Bluetooth fitness trackers. These biosensors can pick up motion, touch, proximity, elevation, and heart rate. 

Developing smart headphones with an AI-based personal trainer, which directs the training process by providing real-time tracking details of cycling, running, and other exercises is another example of how AI is utilized in the sports and fitness business. As a result, body-mounted AI wearable devices can successfully give their customers comprehensive fitness statistics by using voice assistants and in-the-moment insights.
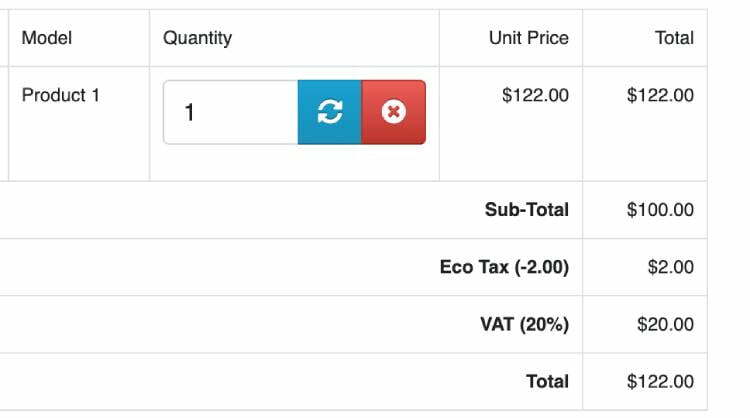
Healthcare 

The healthcare industry has already undergone a digital transformation that has improved and increased the functionality of wearable AI analytics that provide patient health statistics and real-time insights, inference, diagnosis, and reports. 

The Internet of Things, an AI-driven healthcare IT system, is now connected to medical apps and equipment. Patients can now take preventative healthcare steps at home by keeping track of their health information thanks to AI and wearable technology in healthcare. 

The Internet of Things (IoT) artificial intelligence wearable intimately links all the data with real-time health monitoring sensors that provide timely reports and display various health factors that assist the patients in making quick judgments and taking the necessary actions to keep themselves well. 

Retail

Wearable monitoring devices with artificial intelligence are also evolving in the retail sector. Consumer retail, particularly the garment industry, is already producing products using wearable technology’s cutting-edge capabilities. Mobile apps are now synchronized with AI-driven wearable clothing like hand gloves, jackets, etc., to ensure the user’s or wearer’s safety. This fashion innovation, sometimes called smart clothing, has made its breakthrough recently. 

Gaming

Mobile gaming will continue to be a thriving industry for the foreseeable future. It might be primarily a result of the introduction of wearable artificial intelligence in its sector. The industry is heading toward a hedonist user experience, from creating AR and VR-enabled games to real-time audio and visual trackers with AI capabilities. Gaming devices have seen a rise in user engagement thanks to AI-enhanced wearables.

Many people have expressed interest in AI-powered gaming due to the introduction of various VR devices. Since the target audience wants an interrupted AI-driven experience, wearable technology and gaming are frequently used symbiotically linearly.

Smart Homes

Artificial intelligence makes smart houses a reality. These homes leverage AI through linked sensors, appliances, and lighting to gather data for analysis. Additionally, with the help of AI, these gadgets can improve how you live your life by offering you utilities and other services that can make your existence more efficient. 

Today’s market has a wide variety of smart appliances; some of the more well-known ones are refrigerators, air conditioners, and lighting. For instance, smart refrigerators can help you save money and reduce carbon emissions. Depending on the type of food it contains, they alter the temperature. Other refrigerators with AI capabilities might even read recipes so you can stock up on the right things during your subsequent supermarket run. You’ll have a lot of choices for smart technology while creating your smart home. 

The Challenges Associated With Incorporating AI in Wearable Devices

Although the development of AI may have simplified processes and solved several issues, there are also some drawbacks. Let’s look at them:

Battery Life

Maintaining the battery life was one of the main areas of difficulty throughout the entire AI project management cycle while developing and evaluating wearable fitness devices. The batteries in AI wearables frequently run out considerably sooner than desired because they have far less computing power than smartphones. 

Privacy

A significant amount of data is required to apply wearable artificial intelligence properly. For instance, some AIs, such as those that use wearable cameras for facial recognition, are security-sensitive. That’s why maintaining privacy as the primary priority, in this case, is crucial. 

What Is the Future of Wearable Devices?

The future of wearable devices is promising. Smartwatches won’t be the only wearables available; several other industries will also investigate wearable AI technology. What to anticipate from wearable technology in the future is as follows:

Energy harvesting: The use of wearable technologies extends battery life. It can be annoying to wear a smartwatch that must always be charged. In the future, such devices will have a function or energy that transforms solar energy or body heat into raw electricity. 

Identification and authentication: Most apps demand two-factor authentication. However, wearable machine-learning technology will eventually have authentication capabilities. Users can access such apps with basic biometrics and other less complicated features. A few entrepreneurs also consider smart tattoo technology, which can scan identity information as it transfers.

Final Thoughts

Getting caught up in the sensors, hardware, and communication protocols of wearable devices and the Internet of Things is simple. Still, the essential differentiator of your solution will be the helpful intelligence it extracts from data.

Take the time to learn AI fundamentals and discover the truth. You will then be prepared to create a defendable business strategy armed with a potent arsenal. You can then build a more valuable company that will outperform competitors. 

The Next Frontier of Technology: Metaverse Development

Technology has been rapidly advancing over the years, and the latest development set to revolutionize the tech industry is the Metaverse. A metaverse is a virtual space where people can interact with a computer-generated environment in real time. This article will discuss the Metaverse, its potential impact on technology, and how it is being developed.

What is a Metaverse?

A metaverse is a mutual virtual shared space created by converging virtual reality (VR) and augmented reality (AR) technologies. It is a digital universe where users can interact with others and the environment. The metaverse concept was first introduced in Neal Stephenson’s novel, “Snow Crash,” and has been popularized by virtual worlds such as Second Life and Minecraft.

The Metaverse is not just a video game or a simulation but a platform for social interactions, commerce, and entertainment. It allows users to have a persistent online identity and to engage with others in a virtual space. In the Metaverse, users can create and customize their virtual avatars, build and own virtual assets, and participate in various activities such as gaming, shopping, and socializing with Metaverse consulting services.

Section 1: Potential Impact of Metaverse Development on Technology

The Metaverse is set to significantly impact technology as it is a new platform for innovation and growth. Here are some potential effects that metaverse development could have on technology:

  1. Augmented Reality (AR) and Virtual Reality (VR) Development: The Metaverse combines AR and VR technologies, and its outcome could lead to new advances in these areas. With the Metaverse, developers can create more immersive and interactive environments where users can experience a seamless blend of virtual and physical worlds.
  2. Blockchain and Cryptocurrency Development: The Metaverse is a platform for development. Users can buy, sell, and trade virtual assets using cryptocurrency, and the blockchain can be used to secure transactions and prevent fraud.
  3. Artificial Intelligence (AI) Development: The Metaverse also presents new opportunities for AI development. With AI, developers can create smarter virtual environments to interact with users and provide personalized experiences.
  4. Gaming and Entertainment: The Metaverse is already being used as a platform for gaming and entertainment, and its development could lead to new gaming and entertainment experiences. With the Metaverse, developers can create more immersive and social gaming experiences where players can interact with each other in a virtual space.
  5. E-Commerce Development: The Metaverse is also a platform for e-commerce development. Users can use it to buy and sell virtual goods and services, and e-commerce platforms can use the Metaverse to create more immersive and interactive shopping experiences.

How is the Metaverse Being Developed?

Several companies and organizations are leading the development of the Metaverse. 

Some of the key players in metaverse development include:

  1. Facebook: Facebook is one of the leading companies in metaverse development. It has recently announced its plans to create a metaverse platform where users can interact with each other in virtual environments.
  2. Epic Games: Epic Games is the company behind the popular game Fortnite. It has also announced its plans to create a metaverse platform where users can create and share content.
  3. Roblox: Roblox is a popular gaming platform used to create virtual worlds. It is also working on its metaverse platforms for using virtual environments.
  4. Decentraland: Decentraland is a blockchain-based virtual world where users can buy, sell, and build virtual world real estate. It uses a decentralized system to govern its operations and relies on the Ethereum blockchain for its transactions.
  5. Second Life: Second Life is one of the oldest virtual worlds, created in 2003. It has gone through many changes over the years and has evolved into a platform that allows users to create and interact with each other in a virtual world.

These companies and organizations are working towards creating a seamless metaverse experience for users. They use advanced technologies such as blockchain, virtual and augmented reality, and artificial intelligence to develop the Metaverse. They are also exploring new ways to monetize the Metaverse, such as selling virtual world real estate and goods.

Section 2: Metaverse and eCommerce

The concept of the Metaverse has been around for a while. Still, it has recently gained more attention due to technological advancements and the growing interest in virtual reality. The convergence of physical and virtual reality created the Metaverse. It is a space where anyone can interact with others and digital objects more immersively. The Metaverse has the future to revolutionize many industries, and one of the areas where it could have a significant impact is eCommerce.

In this section, we will explore the potential of the Metaverse in eCommerce.

  • Virtual Shopping

Virtual shopping is one of the most obvious applications of the Metaverse in eCommerce. In the Metaverse, users can browse virtual stores and buy products more immersive and engagingly than on traditional eCommerce platforms. Users can interact with products in 3D and get a more accurate sense of their size, shape, and texture.

  • Personalization

The Metaverse also offers new opportunities for personalization in eCommerce. Creating a shopping experience tailored to the individual user is possible in a virtual environment. For example, users could be shown products that match their preferences based on their previous purchases or browsing history. This could lead to higher conversion rates and increased customer loyalty.

  • Social Shopping

Social shopping is another area where the Metaverse could significantly impact eCommerce. In the Metaverse, users can use the opportunity to go for virtual shopping online and share their shopping experiences. This could lead to new opportunities for social commerce, where users can buy products based on recommendations from friends and influencers.

  • Augmented Reality

Augmented reality (AR) is another technology that can enhance the eCommerce experience in the Metaverse. AR allows users to see digital objects in the real world, which could be used to create virtual showrooms or product demonstrations. For example, users could see how a piece of furniture would look in their home before they buy it.

  • New Business Models

Finally, the Metaverse could also lead to new business models in eCommerce. For example, virtual stores could charge for access or offer in-world advertising opportunities with Metaverse consulting services. Additionally, eCommerce companies could create virtual products that can only be sold in the Metaverse, creating new revenue streams.

Section 3: Challenges and Opportunities

The development of the Metaverse, the virtual world seamlessly integrated with the physical world, is one of our most exciting technological frontiers. Like any emerging technology, metaverse development presents challenges and opportunities for businesses and individuals. 

Section 3: In this section, we’ll look at some of these challenges and opportunities.

Here are the Challenges:

  1. Technical Complexity: Developing a metaverse requires high technical expertise and infrastructure. Creating a fully-realized, immersive virtual world accessible to users worldwide requires a robust technological backbone. Building and maintaining this infrastructure can be both time-consuming and costly.
  2. Interoperability: One of the core tenets of the Metaverse is interoperability, or the ability for different virtual worlds to connect and interact seamlessly. Achieving this level of interoperability can be challenging, as other virtual worlds may be built on different platforms or using different programming languages.
  3. Security: As with any online environment, the Metaverse presents potential security risks. Developers must ensure that user data is protected and that users are safe from hacking, scams, and other malicious activity.
  4. Ethical Concerns: The Metaverse is a new frontier regarding ethical concerns, such as privacy, identity, and free speech. Developers must navigate these complex issues to create a virtual world that is both safe and open.

Here are the Opportunities:

  1. New Business Models: The Metaverse presents exciting opportunities for new business models, such as the virtual world in real estate, virtual goods, and virtual experiences. Companies that quickly adapt to these new opportunities can gain a good advantage over their competitors.
  2. Global Access: The Metaverse allows businesses and individuals to reach a global audience easily. This opens up new markets and opportunities that were previously inaccessible.
  3. Enhanced User Experience: The Metaverse offers immersion and interactivity unmatched by any other technology. This improved user experience can lead to increased engagement and loyalty.
  4. Innovation: The Metaverse is a hotbed of innovation, with developers constantly pushing the boundaries of what is possible. This creates opportunities for businesses to develop new technologies and solutions to revolutionize their industries.

Conclusion:

The challenges and opportunities presented by metaverse development are numerous and complex. However, with the right approach and mindset, businesses and individuals can capitalize on the opportunities and overcome the challenges. By investing in the right technology and infrastructure, staying abreast of the latest developments, and remaining attuned to ethical concerns, businesses can create a safe and innovative metaverse that offers exciting new possibilities for growth and growth success.

FAQs

Q: What are some examples of Metaverse platforms?

A: Some examples of Metaverse platforms include Second Life, VRChat, Roblox, and Decentraland. These platforms allow users to create avatars, interact with other users, and explore virtual environments.

Q: What technologies are involved in Metaverse Development?

A: Metaverse Development requires various technologies, including virtual reality, augmented reality, blockchain, and artificial intelligence. These technologies work mutually to create a seamless and immersive experience for users.

Q: Will the Metaverse be easily accessible to everyone?

A: Accessibility is a concern for many developers working on the Metaverse. While the technology is still developing, efforts are underway to ensure that the Metaverse is accessible to people with disabilities and also those who do not have access to the latest technology.

Q: Will the Metaverse be safe?

A: Safety and security are important considerations for the Metaverse. Developers are working to create safe and more secure virtual environments that protect user privacy and prevent cyberbullying and harassment.

Q: Will the Metaverse replace the real world?

A: While the Metaverse may offer new and exciting opportunities for entertainment, socializing, and commerce, it’s unlikely to replace the real world. However, it may change how we interact and offer new possibilities for working, playing, and learning.

Q: When can we expect to see Metaverse technology become mainstream?

A: It’s difficult to predict when Metaverse technology will become mainstream, as it is still a relatively new concept. However, there is already significant interest and investment in this area, and we will likely see more Metaverse platforms and applications emerging in the coming years.

The benefits of accepting cryptocurrency payments for eCommerce businesses

The way we work and live is completely changing due to the technologies and innovations the human mind has created over the past few years. We can now use AI and machine learning tools like ChatGPT and Chat Sonic to help in business processes such as writing product information and translating content. There are also chatbots now that can help provide better customer experiences. 

This is even more evident with the ever-growing popularity of cryptocurrencies. Many businesses are even starting to accept it as a form of online payment. In this blog, we’ll be discussing the benefits of accepting crypto payments for e-commerce businesses. 

What is Cryptocurrency? 

Before we dive into the whys, let us first define cryptocurrency. These are digital assets designed to work as a medium of exchange that use cryptography to secure their transactions and control the creation of additional units. 

You might already be familiar with the most popular cryptocurrency, Bitcoin, but there are also many other types of cryptocurrency available, each with its own unique uses. There’s Ethereum, Tether, Binance Coin, Tron, and many others. 

Why should eCommerce businesses accept cryptocurrency payments? 

Cryptocurrency payments offer a variety of benefits for e-commerce businesses that integrate them into their systems. Here are just a few:

  1. Lower Transaction Fees 

One of the biggest benefits of accepting crypto payments is that they usually come with lower transaction fees compared to traditional payment methods. Methods like PayPal and credit cards often come with transaction fees that can eat into a business’s profits. Crypto transactions, on the other hand, usually have lower transaction fees, allowing e-commerce businesses to save money on each transaction. 

  1. Faster Transaction Speeds 

Another advantage of accepting crypto payments is that they can be processed faster than traditional payment methods. Transactions with traditional payment methods can take several hours or even days to complete, whereas crypto transactions can be processed in a matter of minutes. This means that e-commerce businesses can receive their payments faster, which can help improve their cash flow. 

  1. Global Reach 

Cryptocurrency payments can be made from anywhere in the world, making it an ideal payment method for e-commerce businesses that want to expand their customer base globally. Traditional payment methods can sometimes be restricted by geographic boundaries, but cryptocurrency payments are not bound by such restrictions. This means that e-commerce businesses can reach customers all over the world, regardless of where they are located. 

  1. Increased Security 

Cryptocurrency transactions are secured by cryptography, which makes them more secure than traditional payment methods like credit cards. These methods can be subject to fraud and chargebacks, which can be costly for e-commerce businesses. Crypto payments, on the other hand, are more difficult to hack, making them more secure for both the e-commerce business and the customer. 

  1. Brand Differentiation 

Accepting crypto payments can help e-commerce businesses stand out from their competitors. By offering a unique and innovative payment method, e-commerce businesses can differentiate themselves from others in the industry. This can help attract new customers and build brand loyalty among existing customers, increasing sales in the long run. 

How can eCommerce businesses accept crypto payments? 

Now that we’ve covered some of the benefits of accepting crypto payments, let’s take a look at how e-commerce businesses can start accepting them. 

  1. Use a Payment Processor 

If you want to start accepting cryptocurrency payments, one of the best ways you can do this is to use a payment processor that supports crypto payments. This might sound complicated, but the good news is that there are many options available to you that provide excellent customer services, such as Coinbase Commerce and BitPay. 

  1. Integrate Crypto Payments into Your E-commerce Platform

Another way you can go about this is to integrate cryptocurrency payments into your e-commerce platform. This can be done by working with a developer or using a pre-built plugin that supports crypto payments. 

  1. Offer Discounts for Crypto Payments 

E-commerce businesses like yours can also incentivize customers to pay with cryptocurrency by offering discounts to those who choose to use this payment method. This can encourage customers to try out the crypto payment option and also help your business save money on transaction fees. 

  1. Use a Crypto Exchange 

Lastly, you can look into using a crypto exchange to accept crypto payments. A crypto exchange allows businesses like yours to convert their crypto payments into traditional currency, which can then be deposited into their bank account. This can be an attractive option for businesses that want to receive payments in their local currency. 

Grow your eCommerce business by accepting crypto payments 

Cryptocurrency is becoming an increasingly popular payment method for e-commerce businesses—and there’s a really good reason for it. With all the benefits it presents, accepting crypto payments can definitely be a smart move for businesses looking to stay ahead of the curve and offer their customers more flexibility and convenience when it comes to making online purchases. By embracing this new technology, businesses can position themselves as leaders in their industry and attract a loyal customer base that values innovation and forward-thinking solutions. 
For more insightful stories on business and technology, check out Webocreation’s Blog today!

How to sustain in the rapidly evolving eCommerce market, Crypto, Web3.0, AI, and AR?

Maintaining environmental regulations, compliance, standards, and recycling & reselling, pressure to optimize processes and operations, supply chains, excellent reports that support decisions are key to sustain in the rapidly evolving eCommerce market. But, with the latest technologies change, and the introduction of a distributed system and cloud-based system, the introduction of Crypto, web 3.0 AI and AR, etc is becoming hard to sustain in simple ways as the world has revolutionized eCommerce in many ways. The introduction of Cryptocurrency, Artificial Intelligence, Augmented Reality and Web3.0 has really created a huge impact on eCommerce. Knowing these terms thoroughly in order to get the eCommerce business niche strengthened and to outperform competitors.

Let’s analyze these advanced technologies step by step: 

What is Cryptocurrency?

cryptocurrency

Cryptocurrency is a kind of digital payment. It is a direct payment method between buyers and consumers in exchange for their goods. Likewise, it is a kind of variable asset than fixed value like money. There is no central power like banks and other government institutions to control crypto in their hands, rather they are decentralized automated systems of many computers.

Cryptocurrency uses DLT- Distributed Ledger Technology which controls all the transactions. This system created a linear change of the users and transactions. Minute details are saved safely.

How cryptocurrency can benefit your eCommerce business?

Given the digital transformation of the current era, cryptocurrency is inevitable for eCommerce. You will get the following benefits if you allow your online store with cryptocurrencies:

  • Quick Transactions

This will allow your customers to get quick access to your market products. Unlike traditional market trading, it is time-saving for customers. You will get maximum flow of customers by creating an opportunity for ease of business. It is also a less complex and direct payment method.
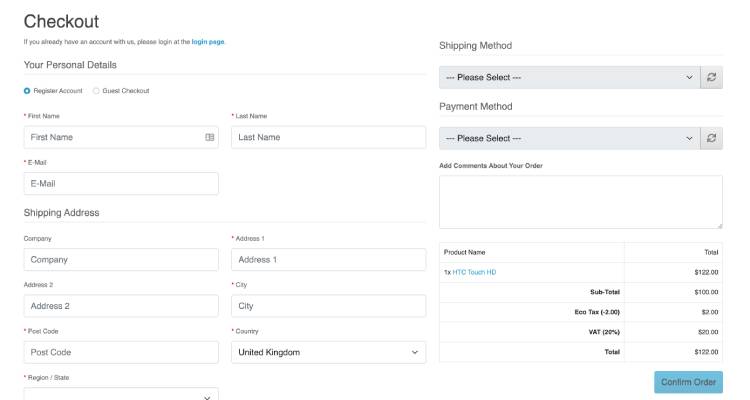
  • Security Proof and identification

There is complex encryption in cryptocurrencies and data is stored in the blockchain which gives an identification of the creators and owners. This gives maximum security to your online customers as well as your eCommerce products. They lessen the risk of online fraud.

  • Broad Market Exposure

Cryptocurrencies are expanding throughout the world. They generate maximum traffic towards your eCommerce industry. You can triple your sales within seconds if you are linked with the crypto world. They are simpler, cheaper, and faster.

How Web3.0 can benefit your eCommerce business?

Web3.0 is the latest breakthrough in the online industry. It is the fastest, widest, easiest and cheapest mode through which customers can buy things online. 

Learn more: How e-Commerce will be affected by Web 3.0 and blockchain?

This fast digital world may benefit your eCommerce in the following ways:

  • User Friendly

Web3.0 allows internet users to hunt their market products in an easy way. It let customers know what are their interest-based market products and what types are available. It personalizes eCommerce shopping moods. Likewise, it gives enhanced internet options for eCommerce users.

Web2.0 becomes the source of generating millions of integrated businesses. Like cryptocurrency, it also worked in integration. This inter-linked data system lets you know about your target market audiences. Within no time, you are connected to thousands of eCommerce businesses around.

How AI will help you in boosting up your eCommerce

Robot AI

Artificial Intelligence has also brought a revolution to the field of eCommerce. Like crypto and web3.0, it is also one of the necessary parts of our eCommerce. It gives you the following plus points

  • 24/7 Improved Service

As a human, it becomes difficult for us to be active 24/7. We get exhausted. We need more employees as a solution for this problem. But thanks to AI, we have automatic mailing and messaging systems. These systems allow your customers to know that you are in or out. It saves our time to a great extent. Also, it saves our financial problems too.

AI has no parallel regarding its search procedure. It has let your business opt for smart searches. Your customers will have many options in the search bars whether they want to search from their voice, picture, or words.

Along with smart search, AI provides better resolutions of the market products. It also gives the option for a 3D view. Thus customers get no worry after having these smart AI tools.

How augmented reality (AR) will transform your eCommerce business model?

AR VR

With the enhancement of technology, eCommerce businesses are thriving today – more than ever before. According to eMarketer, 45% of retail businesses changed their business module into eCommerce. The report suggests that the unprecedented advancement in technology and Artificial Intelligence is the sole reason for it.

Augmented Reality (AR) allows customers to virtually try on and try off products from the comfort of their homes. Can you believe my last online purchase was through AR? I was looking for a red t-shirt and a retailer had the option to select their t-shirts and try them on – while sitting on the couch. So, I tried it on and it turned out to be the best fit for me. Guess what? I purchased the t-shirt!

This is how AR is transforming online shopping. It gives your customers:

So, if your business module has not introduced the AR shopping experience, today is high time to reassess your marketing strategies. Introduce AR to your business and see its magic.

The Bottom Line

Summarizing all the features of AI, web3.0, Augmented Reality, and crypto, it is plain that your eCommerce’s growth completely depends on these amazing newly digitalized techs. You must link and upgrade your eCommerce business with them. Missing out on either of them may cause you to lag behind in the competition. 

That is why, it is crucial as an eCommerce business – to reassess marketing strategies and see if your business model is missing any of these modern-day technologies. If that is a yes, today is the high time to introduce them in your marketing strategies and to leave behind your competitors in the eCommerce marketplace. Please let us know if you have any questions or suggestions, please subscribe to our YouTube Channel and look for other free Opencart extensions. You can also find us on Twitter and Facebook.

View in the browser of an email is directing people to the wrong links – Pardot

One of our clients requested us to check why their “View in the browser” link is not directing to the wrong links in the email of the Pardot. They told us that recently a member of their team sent out an email that works perfectly, however when you “view in browser” via the “click here” link at the top of the email the images stop directing people to the correct pages and default to their domain home page. The actual text links still work fine just the image links for them were not working.

Solutions

When we checked their email HTML we saw that their “View in the browser” is not linked correctly. They have appended the https:// with {{View_Online}}. It was like <strong>&lt;a href=”https://{{View_Online}}” target=”_blank”></strong>. So, make sure that while using the merge tag of view_online or adding code there are no extra codes for the href link. It should be something like the below:

<a href="{{View_Online}}" target="_blank">View in the browser</a>

In this way, we helped solve their view in the browser issue of the Pardot. Please let us know if you have any issues with Pardot email or Pardot landing pages or any kind of Pardot projects, you can email us at webocreation.com@gmail.com. Hope you liked this tutorial, please subscribe to our YouTube Channel and read more about Salesforce, Pardot, Marketo, and Hubspot. You can also find us on Twitter and Facebook.

Add Voice search for input box of form search – Opencart eCommerce – free extension

With the rise of Artificial Intelligence and Voice recognition, we can add the voice search directly into the form input field and perform the functionalities like searching, entering data, etc. Here we will show HTML code and then provide the Opencart free module.

How to add voice search for input form?

Following are codes that will provide you with the voice for the input field.

Voice form field
<style>
    .speech {
        float: left;
        border: 1px solid #ccc;
        border-radius: 10px 0px 0px 10px;
        box-shadow: inset 0 1px 1px rgb(0 0 0 / 8%);
        border-right: 0px;
        align-items: center;
        display: flex;
        height: 40px;
        padding: 0px 10px;
    }

    .speech img {
        width: 20px;
        position: relative;
        margin: auto;
    }

    #search .input-lg {
        height: 42px;
        line-height: 20px;
        padding: 0 10px;
        border-radius: 0px;
        border: 1px solid #ccc;
        box-shadow: inset 0 1px 1px rgb(0 0 0 / 8%);
        border-left-width: 0px;
    }

    .btn {
        height: 42px;
        border: 1px solid #ccc;
        padding: 0px 10px;
        border-radius: 0px 10px 10px 0px;
    }
</style>
<script>
    function startDictation() {
        if (window.hasOwnProperty('webkitSpeechRecognition')) {
            var recognition = new webkitSpeechRecognition();

            recognition.continuous = false;
            recognition.interimResults = false;

            recognition.lang = 'en-US';
            recognition.start();

            recognition.onresult = function (e) {
                document.getElementsByClassName('form-control')[0].value = e.results[0][0].transcript;
                recognition.stop();
                document.getElementsByClassName('btn-default')[0].submit();
            };

            recognition.onerror = function (e) {
                recognition.stop();
            };
        }
    }
</script>
<form>
<div style="display:inline-flex">
    <div class="speech">
        <img onclick="startDictation()"
            src="https://webocreation.com/wp-content/uploads/2022/02/voice-icons.png" />
    </div>
    <div id="search" class="input-group">
        <input type="text" name="search" value="" placeholder="Search" class="form-control input-lg" />
    </div>
    <div class="input-group-btn">
        <button type="button" class="btn ">GO</button>
    </div>
</div>
</form>

We have implemented the above code and made an Opencart free extension. Download and install the Opencart extension.

Once you download and install this opencart extension, then you will see the mic icon in your search input box.

Voice search input field

Once, you click on the mic icon, you will be prompted to give permission for the microphone by the browser.

microphone permission for the voice search by browser

Once, you click “Allow”, now it is ready to use and you can start speaking and it will show the text in the search input field. When we see the red dot in the browser then we can say the browser is listening. Here is an example, we speak “iPhone” and the input field is filled with “iPhone”

Voice recognition ready to use

Final Code in the Search file

The final code at the catalog/view/theme/default/template/common/search.twig will be like below:

<div id="search" class="input-group">
  <style>
        .speech {
            width: 15%;
            float: left;
            border: 1px solid #ccc;
            border-radius: 10px 0px 0px 10px;
            box-shadow: inset 0 1px 1px rgb(0 0 0 / 8%);
            border-right: 0px;
            align-items: center;
            display: flex;
            height: 40px;
        }
        .speech img {
            width: 20px;
            position: relative;
            margin: auto;
        }
        #search .input-lg {
            height: 40px;
            line-height: 20px;
            padding: 0 10px;
            border-left-width: 0px;
            border-radius: 0px;
            width:85%;
        }
    </style>
    <script>
        function startDictation() {
            if (window.hasOwnProperty('webkitSpeechRecognition')) {
                var recognition = new webkitSpeechRecognition();
                recognition.continuous = false;
                recognition.interimResults = false;
                recognition.lang = 'en-US';
                recognition.start();
                recognition.onresult = function (e) {
                    document.getElementsByClassName('form-control')[0].value = e.results[0][0].transcript;
                    recognition.stop();
                    document.getElementsByClassName('btn-default')[0].submit();
                };
                recognition.onerror = function (e) {
                    recognition.stop();
                };
            }
        }
    </script>
    <div class="speech">
        <img onclick="startDictation()"
            src="https://webocreation.com/wp-content/uploads/2022/02/voice-icons.png" />
    </div>
    <input type="text" name="search" value="{{ search }}" placeholder="{{ text_search }}" class="form-control input-lg" />
   <span class="input-group-btn">
     <button type="button" class="btn btn-default btn-lg"><i class="fa fa-search"></i></button>
   </span>
</div>

Some of the issues are:

  • All browsers do not support Voice recognition, even Firefox doesnot support it.
  • If the user doesnot allow the microphone then you cannot use the voice search
  • We have developed this Opencart extension based on Opencart default code so all theme may not support it.

Hope this module will help you improve your web and user experience. Let us know if you need any customization or have any questions or suggestions, please subscribe to our YouTube Channel and look for other free Opencart extensions. You can also find us on Twitter and Facebook.

How e-Commerce will be affected by Web 3.0 and blockchain?

Web 3 is the evolution of communication, Crypto for currency, DeFi for finance, NFTs for art and metaverse for internet. Web 3.0 is projected to have a massive influence on businesses and customers as well as how businesses market and sell their products and run their operations and probably how customers buy products and preserve their data and identity. The fundamental transition in Web 3.0 is from information-centric to knowledge-centric. Ecommerce, often known as electronic commerce, refers to transactions that take place through the internet. Ecommerce occurs whenever individuals or businesses buy or sell items or services through the internet.

Web 3.0

Web 1.0, 2.0, and 3.0 are the different versions of the web. And each edition has its own set of features. Web 2.0 is superior to Web 1.0, while Web 3.0 is even more sophisticated than Web 2.0. Since web 3.0 is evolution of communication and uses blockchain to store all the credentials that would be more secured data won’t get hacked or anonymously accessed as each and every piece of data is stored in blocks. This thing affects to eCommerce site in some positive way.

Here are some facts that cause e-Commerce to grow exponentially by web 3.0 and blockchain:

Flow of eCommerce in Web 3.0:

eCommerce flow web 3.0
Photo by XR Expo/unsplash.com

Let’s say you want to buy a sound system for your living room, you wear AR/VR and go to the Metaverse where you can create your own room model with NFT or use a Room scanner which will create your unique room, then you will search for the sound system that you can add in your room, get one to test in your room test it by adjusting the volume, etc if you don’t like it test another, once you liked it, you pay for the sound system with your Crypto and your sound system will be delivered to the home through the drone. Then, a log with setup in the blockchain that you are the one who owns this product, and you know from the blockchain that you have bought the authentic one as you can see who manufactured it. All of these are possible with web 3.0.

The above is just a use case that may happen as all of these technologies is new yet, so can advance to lots of things.

Read more: Proven Tips to Promote Your NFT Collections

Influence of web 3.0 in e-Commerce

Over the internet, quality material really matters. It was web 1.0 that let you know your market product client. Then through web 2.0, you are able to hunt whatever sort of market products. Finally, it is web3.0 that allows you to contextualize your existing knowledge according to your user’s needs. Web 3.0 unlike web 1.0 and web 2.0, not only connects information but data. It also transforms data into information. Web 3.0 systematically looks for what e-commerce clients search for. Web3.0 sophisticates search engines by highlighting the needed themes and various updated search facilities.

Further, web 3.0 is helping its e-commerce community by providing limitless data of Cloud, allowing personal ideas for third parties, and providing a protocol for data connection. Web 3.0 also allows customization of web content for its e-commerce community. Clients can customize anytime anywhere their business-related content with a highly developed web 3.0 data blockchain.

Business Model Strategies

Strategic thinking has been introduced for e-businesses. Growing technological development especially web3.0 has sophisticated business models for e-commerce. Business model strategy is as same as architecture.

Business Model Strategies
Image by August / Pexels

Hawkins says that “business model can be seen as the architecture of a business”.

Mr. Chung says “business model is an evaluation of various bodies of commerce like products, resources, clients, and activities”.

Web3.0 facilitates their e-commerce partners for a better business model strategy.

  1. Having access to customers data for e-business purposes
  2. Making strong Customers-Client chains
  3. Developing high positions for all its e-commerce partners
  4. Customizing customers choices
  5. Customizing clients choices

Licenses and Subscription

Web 3.0 is very unique in its performance. It allows its partners to perform from various places. For this purpose, web 3.0 provides licenses for its clients. Though the license is paid one it is reliable.

You can use data inside the application still without cost. Only the data that is used outside will be charged.

The licensing strategy for web 3.0 users will let its client modify their market product. Clients can increase or decrease their market products according to demands and supply.

Subscriptions are alternative forms of license. Subscriptions facilitate web 3.0 e-commerce clients to choose options at their own convenience.

This helps clients sell their products directly. One-time sales can transform into recurring ones.

Subscriptions have the following plus points for e-commerce clients and customers

  1. Limited times offer
  2. Choice based subscriptions
  3. Easily handled by both clients and customers
  4. Automatic renewals
  5. Clear guidelines for every subscription

Providing Premium Services

This business model provides free basic services for its eCommerce clients. On using the free services, clients can swing themselves to the purchased version. 

Providing Premium Services
Image by Gustavo / Pexels

Clients after using the free version, switch to paid ones. This is the reason, clients recommend web 3.0 premium services to others as well. Premium services provide satisfaction to all startup makers online. Also, it strengthens trust between buyer and user.

See More: Phases in products selling life cycle of eCommerce in 2022 for start-up business

Advertisements

Advertising your business is the first most need. You can boost up your e-commerce based market products by advertising them on various social media platforms.

Web 3.0 acts as charging for such advertisements in e-business. It produces humongous revenue from such advertisements.

Web 3.0 allows the ads to work in a dynamic way due to the shuffle in the behavior of customers. It allows users to let you know about their market brands while you are surfing randomly on social media sites. 

Web 3.0 is going to affect e-commerce from all perspectives. Web 3.0 provides different strategic ideas which can boost e-commerce in no time. Among these strategies, you can license your startup. You can use a subscription strategy for your market product online. Web 3.0 also allows you to advertise your e-business. You can either use premium services too. All these eCommerce strategies are provided by sophisticated web 3.0. Therefore web 3.0 has a magnificent effect on all sorts of eCommerce.
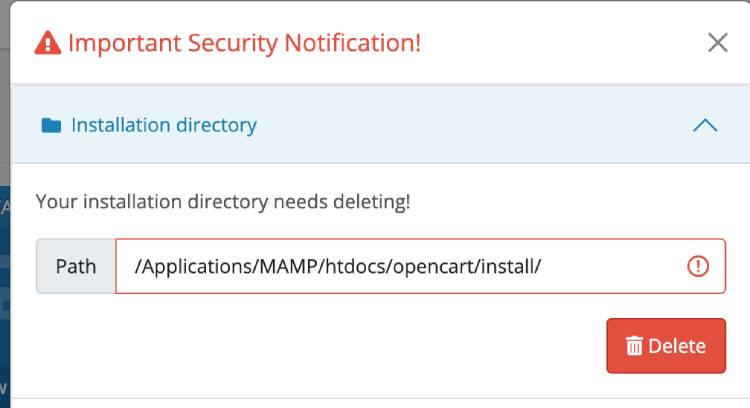
Let us know if you have any other startup guides to thrive or have any questions or suggestions, please subscribe to our YouTube Channel and look for other free Opencart extensions. You can also find us on Twitter and Facebook.
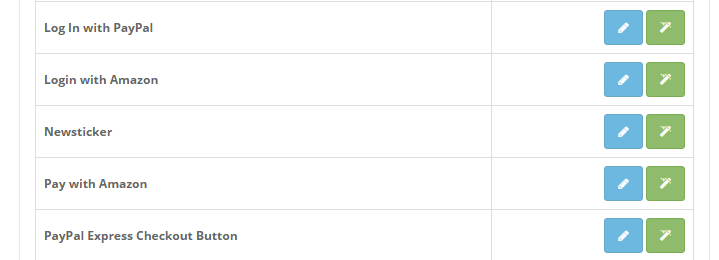
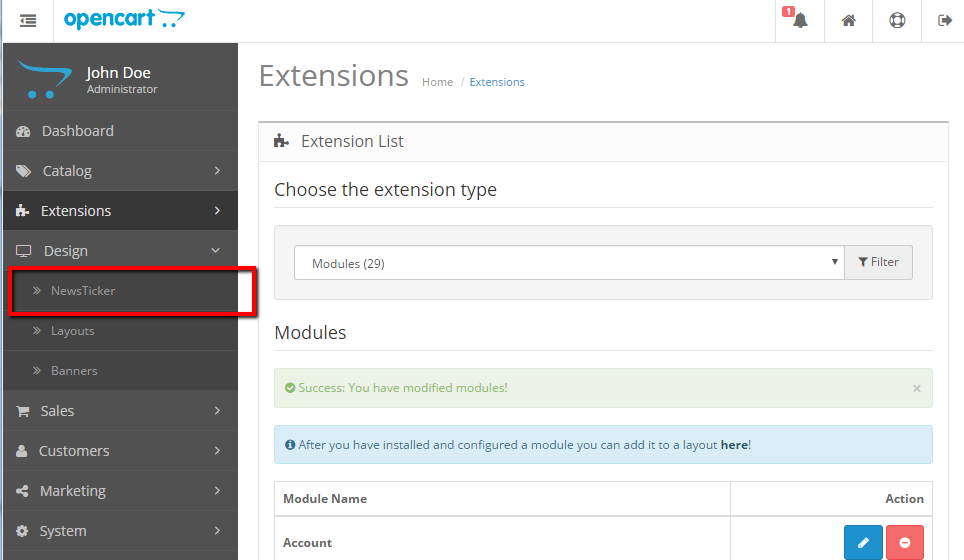
Auto Addition of Product by clicking in link which will redirect clicker directly to checkout page – Free Opencart Module

Opencart free extension which auto-add product by clicking in the link which will then redirect clicker directly to the checkout page. This can be useful when you are promoting products in email or other social platforms or blogs, so when they click they are directly sent to the checkout page so it acts as a buy now button on the product page. This can be used for one product which you need to redirect directly to the checkout page. This module provide functionalities to add products to the shopping cart from query string URL parameters.

Download:

Installation:

  • Download the extension by clicking above download button
  • You will get a zip file named “linkclick-checkout-2022.ocmod.zip”
  • Go to the Opencart admin >> Extensions >> Installer >> Upload this zip file
  • Then, Navigate to Extensions >> Modifications >> Clear the cache.
  • The module is ready to use.

Documentation:

Once, you installed the extension, now you can use the link or URL like below:

http://yourwebsite.com/index.php?route=checkout/buttonclickcheckout/add&product_id=58&options=246_71-247_72&quantity=2

where,

product_id=58, 58 is the product id

quantity=2, number of quantities to pass, the default value is 1. If you want to add only one quantity then no need to pass but if you want to add more quantity when clicked then you need to send quantity value as well.

options=246_71-247_72, as the product can have multiple options and option values, so it is separated by _ and -. If you don’t have options then you don’t need to pass it as it is optional. If you have options then it is quite tricky.

If your option is Size (id=246) having option value Small (id=71) and another option is Color (id=247) having option value black.

Need to take care of dashes and underscores, dashes separate between option and underscore separate between option and option value.

See more: Combined Checkout steps, shipping and payment addresses, and methods on Opencart

Use case: Are you doing email marketing then this will be very useful?

This will be very useful for email marketing. You create an audience and build your list to send your email, now you started to make a beautiful design for email and manage great content and subject line. Create a CTA.  Your call(s) to action is one of the most important pieces of content in your email. Outside of getting your subscribers to open your email (via a compelling subject line), your next goal is to get your subscribers to click on your content. 

E-mail is opened and the email reader is eager to click your CTA but where do you want to direct the click. Taking OpenCart into consideration it only gives the product detail page, category page, the home page, etc but it does not provide links that directly add the product to the cart and directly take them to the checkout page. So this module provides you with a link that directly adds products into the cart and redirects them to the checkout page which will lead to an increase in the conversion rate.

 Hope this module will help you. Let us know if you need any customization or have any questions or suggestions, please subscribe to our YouTube Channel and look for other free Opencart extensions. You can also find us on Twitter and Facebook.