As we move into the heart of summer, July offers countless opportunities for e-commerce brands to connect with customers through timely campaigns, themed product launches, and fun social media content. From patriotic promotions around Independence Day to playful celebrations like World Emoji Day, there’s a lot to work with.
This July 2025 E-Commerce Marketing Calendar will help your online store plan marketing content, increase engagement, and boost sales throughout the month.
Launch a playful campaign, share funny memes or bloopers
July 4
Independence Day (USA)
Patriotism & Freedom
Host a “Red, White & You” sale, feature U.S.-made products
July 6
International Kissing Day
Romance & Connection
Offer couple bundles or “Buy 1, Gift 1” promotions
July 7
World Chocolate Day
Sweet Treats
Partner with chocolate brands or run dessert-themed bundles
July 15
Give Something Away Day
Generosity & Loyalty
Run giveaways, freebies, or surprise rewards for purchases
July 17
World Emoji Day
Fun & Modern Communication
Use emojis in campaigns, launch an emoji-themed product line
July 20
Moon Day
Exploration & Imagination
Feature space/sci-fi themed products or discounts
July 24
International Self-Care Day
Wellness & Mindfulness
Promote spa kits, self-care bundles, or meditation apps
July 30
International Friendship Day
Bonds & Togetherness
BOGO deals, referral discounts, or a “Tag Your Friend” contest
All July
National Ice Cream Month (USA)
Summer Treats & Indulgence
Run a weekly ice cream-themed flash sale
All July
Summer Sales Season
Heat & Deals
Launch your mid-year clearance or site-wide seasonal sale
🗓️ Weekly Social Media Strategy for July
Week 1 (July 1–7)
Theme: Humor + Patriotism
Post Ideas:
July 1: Post a joke poll or a funny customer review
July 4: Share behind-the-scenes of your red-white-blue packaging
Week 2 (July 8–14)
Theme: Sweetness & Love
Post Ideas:
Run a “sweetest review” contest for a free product
Promote bundles for couples or friends
Week 3 (July 15–21)
Theme: Community + Creativity
Post Ideas:
Giveaway alert with Give Something Away Day
Emoji guessing game or quiz for World Emoji Day
Week 4 (July 22–31)
Theme: Self-care + Connection
Post Ideas:
Host a #SelfCareSunday series
Share user-generated content of friends using your products
🛒 Quick Campaign Ideas for Online Retailers
Flash Sales: Tie a 24-hour sale to quirky holidays (like World Chocolate Day).
UGC Contests: Encourage users to share themed content (e.g., emoji makeup looks).
Bundles: Create July-specific product bundles like “Summer Essentials” or “Friends Forever Kits.”
Referral Bonuses: Use International Friendship Day to drive referrals.
Email Campaigns: Send themed newsletters every week tied to the upcoming holiday.
💡 Pro Tips to Maximize July Promotions
Use countdown timers on your site for key holiday sales.
Collaborate with micro-influencers for themed unboxing or testimonial videos.
Leverage hashtags like #July4thSale, #WorldEmojiDay, #SelfCareSunday.
Refresh your homepage banner and hero section to match weekly themes.
📌 Final Thoughts
July is a high-energy month filled with opportunities for brands to connect with customers. Whether it’s sharing laughs on International Joke Day or celebrating love on Kissing Day, tailoring your campaigns to these holidays will make your brand feel timely, relevant, and fun.
June marks the halfway point of the year—a golden opportunity for e-commerce businesses to evaluate their goals and ramp up marketing efforts before the holiday surge begins. Whether you’re targeting summer shoppers, hosting mid-year sales, or riding the wave of fun, niche holidays, June offers a packed calendar of marketing potential.
In this blog, we’ve compiled a detailed marketing calendar for June 2025, complete with holiday highlights, campaign ideas, and social media inspiration. Use this as your strategic blueprint to drive engagement, conversions, and customer loyalty all month long.
Why Seasonal and Holiday Marketing Matters
Holiday-based marketing is proven to boost visibility, customer engagement, and sales. According to the National Retail Federation, themed promotions tied to national days or seasonal moments lead to higher social interaction and conversion rates.
By aligning your promotions and campaigns with specific holidays, you create relevance, and relevance drives results.
Key E-Commerce Holidays in June 2025
Here’s a day-by-day breakdown of notable holidays and observances that can be used to fuel your June marketing campaigns.
June 1 – Global Day of Parents
Idea: Run a campaign celebrating parents, offering discounts on family-related products.
June 5 – World Environment Day
Idea: Highlight sustainable products or donate a portion of proceeds to an environmental cause.
June 8 – National Best Friends Day
Idea: Offer “Buy One, Gift One” deals. Encourage followers to tag their best friends for giveaways.
June 14 – Flag Day (USA)
Idea: Promote patriotic-themed products or U.S.-made collections.
June 16 – Father’s Day (USA)
Idea: This is a big one! Feature gift guides, flash sales, and last-minute gift delivery options.
June 16 – National Love a Tree Day
Idea: Promote eco-friendly products or plant a tree for every purchase made.
June 18 – International Picnic Day
Idea: Bundle outdoor items or picnic sets for summer outings.
June 20 – Summer Solstice (First Day of Summer)
Idea: Launch your summer product line or a “Hello Summer” promotion.
June 21 – National Selfie Day
Idea: Run a selfie contest where customers show off your products for a chance to win.
June 21 – International Yoga Day
Idea: Promote wellness and fitness-related products with influencer tie-ins.
June 29 – Camera Day
Idea: Feature photo-related gear or apps, or run a UGC (user-generated content) photo contest.
June 30 – Social Media Day
Idea: Encourage user content, shout out loyal followers, or run social-only exclusive promotions.
Weekly Themes & Marketing Ideas
You can also group promotions thematically by week:
Week 1: Family & Appreciation Week – Celebrate parents, friendship, and community.
Week 2: Eco & Outdoor Week – Focus on sustainability and outdoor summer experiences.
Week 3: Father’s Day Week – Push gift ideas, flash sales, and bundles.
Promote yoga gear or run influencer wellness takeovers
June 29
Camera Day
Photography & Creativity
Run UGC photo contests or promote camera accessories
June 30
Social Media Day
Digital Community & Influence
Share user-generated content; run platform-exclusive promos
June (Any)
Pride Month
Inclusivity & Celebration
Highlight inclusive products, collaborate with LGBTQ+ creators
Final Thoughts
Marketing around key dates doesn’t have to be overwhelming, especially when you plan ahead. With June’s fun mix of national holidays, global observances, and seasonal milestones, your e-commerce store has countless opportunities to boost engagement and revenue.
Stay consistent, stay creative, and watch your store grow this summer.
May kicks off the unofficial start of summer in many regions and brings with it a host of unique marketing opportunities for online stores. From globally recognized days to niche observances, May offers a wide variety of e-commerce holiday moments that brands can use to drive conversions, connect with their audience, and clear seasonal inventory.
In this post, we’ll walk through the most important e-commerce holidays in May and offer marketing ideas to help you make the most of each one.
May might not have Black Friday-level buzz, but it’s rich with opportunity. From meaningful celebrations like Mother’s Day to pop culture events like Star Wars Day, May gives your e-commerce business the chance to sell smart, build brand loyalty, and have some fun with your audience.
Discover the detailed internship experience at a top bank, including hands-on tasks, financial analysis, and key lessons learned. Read this comprehensive report to explore valuable insights into the banking sector and the skills gained during the internship.
Internship Report Name: [Your Name] Position: Investment Banking Analyst Intern Institution: BankName Duration: [Start Date – End Date] Date of Submission: [Date]
2. Executive Summary
During the summer of 2024, I had the incredible opportunity to intern at BankName as an Investment Banking Analyst Intern in the [specific team, e.g., Mergers & Acquisitions] division. This report provides an in-depth account of my responsibilities, the skills I developed, the challenges I encountered, and the key takeaways from my experience. My role involved working closely with senior analysts to conduct market research, develop financial models, and assist in preparing client presentations. I gained valuable insights into the intricacies of investment banking, improved my analytical and technical skills, and learned the importance of teamwork and communication in a high-stakes environment.
This report aims to document my learning journey, highlighting how the internship has prepared me for future roles in finance and investment banking. It also provides recommendations for future participants to enhance the internship experience.
3. Introduction
BankName, founded in 1869, is one of the world’s leading investment banks, known for its involvement in mergers and acquisitions, securities underwriting, and asset management. The firm operates in a highly competitive environment, providing financial advisory services to a diverse range of clients, including corporations, financial institutions, governments, and individuals.
Interning at BankName is a highly sought-after opportunity, given the firm’s reputation for excellence, its challenging work environment, and the vast learning opportunities it provides. The internship program is designed to offer a hands-on experience that helps interns develop critical skills, gain exposure to the firm’s operations, and understand the complexities of global financial markets.
As an intern in the [specific division], I was excited to contribute to real-world projects and gain practical insights into the field of investment banking. My primary role was to support the team in conducting market research, building financial models, and preparing presentations for client meetings. Throughout the internship, I was able to apply theoretical knowledge from my academic background to practical scenarios, enhancing my understanding of the industry and its demands.
4. Objectives of the Internship
Personal Objectives:
To gain hands-on experience in investment banking and understand the day-to-day operations of a leading financial institution.
To enhance my financial analysis and modeling skills by working on real-world projects.
To learn from experienced professionals and build a network within the industry.
To develop a deeper understanding of the financial markets and the factors influencing investment decisions.
Company Objectives:
To provide interns with a realistic view of the financial industry and the responsibilities of an analyst.
To identify and nurture talent for potential future recruitment into the firm.
To leverage the fresh perspectives and analytical skills of interns to support ongoing projects and client engagements.
The internship at BankName was structured to meet these objectives by offering a mix of training sessions, hands-on work assignments, and regular feedback from mentors. The company’s commitment to intern development was evident in the support provided by my supervisors and the resources available for learning and growth.
5. Main Responsibilities and Tasks
My role as an intern in the Investment Banking division involved a variety of tasks that exposed me to different aspects of the business. Below are detailed descriptions of my main responsibilities:
Market Research and Analysis: One of my primary tasks was conducting market research to support ongoing projects. This involved analyzing industry trends, monitoring competitor activities, and assessing market conditions that could impact investment decisions. I utilized various financial databases, including Bloomberg and Thomson Reuters, to gather data on companies, industries, and market movements.
For instance, I was involved in researching the technology sector for a potential M&A deal. My research focused on identifying key market players, evaluating their financial performance, and assessing potential synergies with our client’s business. This task required attention to detail, critical thinking, and the ability to synthesize large amounts of data into concise, actionable insights.
Financial Modeling: Financial modeling was a core component of my internship, allowing me to apply my academic knowledge of finance in a practical setting. I assisted in building models that included Discounted Cash Flow (DCF) analysis, Comparable Company Analysis, and precedent transactions. These models were essential in determining the valuation of companies involved in potential deals.
One of the most challenging yet rewarding aspects of my internship was working on a DCF model for a client in the healthcare sector. The model required inputs such as revenue projections, cost analysis, and discount rates to estimate the company’s intrinsic value. Through this exercise, I learned the importance of making accurate assumptions and understanding the variables that drive a company’s value. My supervisor provided guidance throughout the process, helping me refine my modeling skills and develop a more sophisticated approach to financial analysis.
Client Presentations and Pitch Books: Preparing materials for client presentations was another significant aspect of my role. I helped create pitch books, which are comprehensive documents that provide clients with strategic recommendations, market analysis, and financial projections. The preparation of these documents involved synthesizing data, creating charts and graphs, and writing narrative sections that explained the analysis.
I was tasked with preparing a section of a pitch book for a potential IPO. My contribution included analyzing the competitive landscape and drafting a market overview. This experience taught me the importance of clarity and precision in communication, as these materials are critical in persuading clients and supporting their decision-making processes.
Team Collaboration and Support: Throughout my internship, I worked closely with other analysts, associates, and senior bankers. Team collaboration was essential, especially during tight deadlines when multiple projects were running simultaneously. I learned to be proactive in seeking feedback, asking questions, and offering support to my colleagues.
One memorable experience was working on a cross-border M&A deal that involved coordinating with teams from different regions. The project required effective communication, as we had to manage time zone differences and ensure that all team members were aligned on key deliverables. This experience highlighted the importance of teamwork, flexibility, and adaptability in a fast-paced environment.
6. Skills Developed
The internship at BankName provided an invaluable opportunity to develop a wide range of skills that are essential in the field of investment banking. Below are the key skills I developed during my time at the firm:
Analytical Skills: The nature of my work required a strong ability to analyze complex data sets and extract meaningful insights. Whether it was evaluating financial statements, conducting market research, or performing valuation analyses, I honed my analytical skills and learned to approach problems with a critical mindset. My ability to assess data and draw accurate conclusions improved significantly, enhancing my overall effectiveness as an analyst.
Technical Proficiency: My technical skills, particularly in financial modeling and data analysis, were significantly enhanced during the internship. I gained advanced proficiency in Microsoft Excel, learning how to build robust financial models that incorporated various valuation techniques. Additionally, I became familiar with Bloomberg Terminal, a powerful tool for market data and analysis, which allowed me to access real-time information and perform detailed financial research.
Communication Skills: Effective communication is a crucial skill in investment banking, where the ability to convey complex information clearly and concisely is essential. Through preparing pitch books, drafting reports, and participating in meetings, I improved my written and verbal communication skills. I learned to tailor my messaging to different audiences, whether it was presenting data to clients or discussing technical details with my team.
Time Management and Multitasking: The fast-paced nature of the internship required me to manage multiple tasks simultaneously and prioritize my work effectively. I often juggled various responsibilities, from completing urgent research assignments to assisting in client presentations. This experience taught me to be organized, set realistic deadlines, and remain focused under pressure.
Problem-Solving and Adaptability: Working in a dynamic environment like BankName meant that challenges were a regular part of the job. I developed problem-solving skills by addressing unexpected issues, such as data discrepancies in financial models or tight turnaround times for client requests. My ability to adapt to changing circumstances improved, allowing me to remain calm and resourceful in demanding situations.
7. Challenges Faced
Time Pressure and Deadlines: One of the biggest challenges I faced was managing the high-pressure environment and tight deadlines that are characteristic of investment banking. Balancing multiple projects with overlapping deadlines was a constant test of my time management skills. To overcome this challenge, I developed a prioritization strategy that involved breaking tasks into smaller, manageable parts and setting daily goals. I also learned to communicate effectively with my supervisors to ensure that expectations were aligned and that I could deliver high-quality work on time.
Technical Learning Curve: Adapting to the technical demands of the internship, particularly in financial modeling, was initially daunting. While I had a theoretical understanding of financial analysis from my academic background, applying these concepts in real-world scenarios required a deeper level of expertise. To address this challenge, I invested time in self-study, attended training sessions provided by the firm, and sought guidance from my mentors. This proactive approach helped me gradually build confidence in my technical abilities.
Complexity of Financial Markets: Navigating the complexity of financial markets and understanding the factors that influence investment decisions were challenging aspects of my internship. The fast-paced nature of the markets meant that conditions could change rapidly, impacting valuations and strategic recommendations. I overcame this challenge by staying informed through daily market updates, reading industry reports, and engaging in discussions with my colleagues. This continuous learning process helped me develop a more nuanced understanding of the market dynamics at play.
Team Dynamics and Communication: Working in a team environment with professionals from diverse backgrounds was both a rewarding and challenging experience. Effective communication was crucial, especially when collaborating on projects that required input from multiple team members. At times, differing perspectives and approaches led to conflicts or misunderstandings. I learned the importance of active listening, open communication, and seeking common ground to ensure that the team worked cohesively toward our shared goals.
8. Key Learnings and Takeaways
Understanding the Investment Banking Process: One of the most valuable aspects of my internship was gaining a comprehensive understanding of the investment banking process, from initial client engagement to deal execution. I learned about the different stages of mergers and acquisitions, the importance of due diligence, and the critical role that financial analysis plays in decision-making. This holistic view of the industry provided me with a solid foundation for my future career aspirations.
Attention to Detail: Attention to detail is crucial in investment banking, where even minor errors can have significant consequences. My internship reinforced the importance of accuracy and thoroughness in every task, whether it was inputting data into a financial model or reviewing the content of a client presentation. I developed a habit of double-checking my work and seeking feedback from colleagues to ensure that I consistently met the firm’s high standards.
The Value of Mentorship and Networking: Building relationships with colleagues and seeking mentorship were key elements of my internship experience. I benefited greatly from the guidance of my supervisors, who provided constructive feedback and shared their expertise. Networking with professionals from different teams also gave me valuable insights into various career paths within the firm. These interactions helped me understand the importance of cultivating a professional network that can support my growth and development.
Resilience and Adaptability: The dynamic nature of investment banking requires resilience and the ability to adapt to rapidly changing circumstances. My internship taught me to embrace challenges as learning opportunities and to remain flexible in the face of uncertainty. Whether it was dealing with last-minute changes to a client presentation or adjusting to new information in a financial model, I learned to approach problems with a positive attitude and a solutions-oriented mindset.
9. Conclusion
My internship at BankName was a transformative experience that provided me with a deep understanding of the financial industry and the skills needed to succeed in investment banking. The opportunity to work on real-world projects, learn from experienced professionals, and contribute to high-stakes financial decisions was invaluable. The lessons I learned during my time at BankName have not only enhanced my technical and analytical skills but have also shaped my professional outlook and career aspirations.
I am grateful for the guidance and support I received from my colleagues, who were instrumental in my development as an intern. The internship has solidified my interest in pursuing a career in investment banking, and I am excited to apply the knowledge and skills I have gained in future roles.
10. Recommendations
Structured Feedback Sessions: To enhance the internship experience, I recommend implementing more structured feedback sessions throughout the program. Regular feedback would help interns understand their performance, identify areas for improvement, and make the most of their learning opportunities.
Expanded Technical Training: Offering additional technical training sessions, particularly on financial modeling and market analysis tools, would help interns build a stronger foundation and reduce the initial learning curve. Providing access to online resources and workshops could further support skill development.
Increased Cross-Team Collaboration: Encouraging more cross-team collaboration would give interns broader exposure to different areas of the firm and allow them to learn from a diverse range of professionals. This could be facilitated through rotational assignments or joint projects that involve multiple teams.
This report captures a comprehensive reflection of my internship experience at BankName, highlighting the skills, challenges, and insights gained throughout my journey.
Every year on May the 4th, fans around the galaxy unite to celebrate the iconic Star Wars franchise. For e-commerce brands, it’s more than just a pop-culture holiday — it’s a golden opportunity to engage audiences, drive sales, and strengthen your brand identity through themed marketing.
Whether you sell apparel, digital products, gadgets, or even handmade crafts, a well-executed Star Wars Day campaign can turn casual browsers into loyal customers. Here’s how to channel the Force into your e-commerce strategy this May the 4th.
🛒 1. Create Limited-Time Galactic Offers
Launch exclusive May the 4th deals that feel as rare as a Kyber crystal. Whether it’s 20% off Star Wars-themed items or “Buy 1, Get 1 Lightsaber Free” (real or metaphorical), the key is to create urgency.
Ideas:
“May the 4th Be With Your Wallet” sale banner
Time-limited discount codes like FORCE20 or YODA15
Mystery box bundles of themed or best-selling products
🎨 2. Design a Star Wars-Themed Landing Page
Transform your site’s homepage into a galaxy far, far away — literally. A themed landing page builds excitement and reinforces your campaign. Use recognizable visuals like hyperspace, droids, or Jedi robes to delight fans.
Tools to use:
Canva or Figma for design
Page builders like Elementor, Webflow, or Shopify themes
Bonus Tip: Add Easter eggs like animated lightsabers or scrolling star fields for an extra wow factor.
📲 3. Run Galactic Social Media Contests
Harness the power of user-generated content by launching a Star Wars-themed contest or giveaway. This not only expands your reach but also fuels engagement across platforms.
Examples:
“Post your best cosplay and tag us to win!”
“Caption this Jedi meme for a gift card.”
“Which side are you on — Jedi or Sith? Vote and share!”
Use hashtags like #MayThe4th, #StarWarsDay, and your brand-specific tag to boost discoverability.
Use AI tools to personalize product recommendations based on customer behavior during the campaign. This makes your May 4th shoppers feel like you’re reading their mind — Jedi-style.
Examples:
Smart recommendations using tools like Clerk.io or Rebuy
AI-generated product descriptions for themed items
Chatbots themed like droids (e.g., “Ask BB-8”)
💌 5. Send Jedi-Worthy Email Campaigns
Create email flows that capture the hype and urgency of May the 4th. Your subject lines should feel like transmissions from the Resistance:
“🚀 The Force Is Strong With These Deals”
“Your Jedi Discount Awaits…”
“Don’t Let These Offers Go to the Dark Side!”
Use countdown timers, dynamic content, and personalized product picks to drive clicks and conversions.
📦 6. Feature Star Wars-Compatible Products
Even if you don’t sell officially licensed merchandise, you can highlight products that fit the aesthetic. Think:
Space-themed tech gadgets
Glow-in-the-dark accessories
Minimalist prints or toys with sci-fi flair
Productivity tools marketed for “Jedi focus”
Use clever copy to make the connection fun and thematic.
🤝 7. Partner With Influencers in the Star Wars Niche
Work with creators who already have the audience you want. Whether they’re TikTok toy reviewers or Instagram cosplayers, partnering with influencers can lend authenticity and help your campaign go viral.
Provide affiliate links or trackable discount codes for a win-win setup.
💬 Final Thoughts: Don’t Just Sell — Celebrate
Star Wars Day is about community, nostalgia, and creativity. Your campaign should feel like a celebration, not just a transaction. When you lean into the fandom, your audience will feel it, and that connection can build long-lasting customer loyalty.
So this May the 4th, aim higher than just another sale — launch an intergalactic e-commerce experience.
PayPal is at the forefront of a significant shift in digital commerce: agentic commerce. This emerging field leverages AI agents to autonomously handle transactions, manage workflows, and enhance customer experiences. To empower developers and merchants in this new era, PayPal has embraced the Model Context Protocol (MCP), an open standard designed to streamline the integration of AI with various services.
What is Agentic Commerce?
Agentic commerce utilizes AI agents to act on behalf of customers or businesses. These agents can manage a variety of tasks, including:
Processing payments
Tracking shipments
Managing invoices
Automating inventory management
Resolving disputes
The Role of the Model Context Protocol (MCP)
MCP, developed by Anthropic, provides a standardized way for AI agents to access data sources and third-party services like PayPal. This eliminates the need for complex, custom integrations, making it easier for developers to build AI-driven commerce experiences.
PayPal’s Implementation and Tools
PayPal has released several tools to facilitate agentic commerce, including:
PayPal Agent Toolkit: This toolkit offers modular, reusable components that allow developers to integrate PayPal’s functionalities into AI agent workflows. It provides access to APIs for payments, invoices, shipment tracking, and more.
Remote MCP Server: PayPal offers a remote MCP server, enabling developers to connect to PayPal’s services from any MCP client. This allows for seamless integration and continuity across different devices.
Benefits for Developers and Merchants
PayPal’s adoption of MCP and its agentic commerce tools offers numerous advantages:
Simplified Integration: Developers can easily incorporate PayPal’s capabilities into AI agents without extensive custom coding.
Enhanced Efficiency: AI agents can automate tasks, freeing up merchants to focus on growth and customer relationships.
Personalized Experiences: Merchants can create AI-powered shopping experiences tailored to individual customer needs.
Improved Security: PayPal’s established security measures and merchant verification processes ensure safe and trustworthy agent transactions.
Examples of Agentic Commerce in Action
An AI assistant automatically generates and sends invoices to clients based on simple natural language prompts.
A shopping companion uses AI to provide personalized product recommendations and manage the entire purchase process.
AI agents handle order management, payment processing, and shipment tracking for online businesses.
The user asks the MCP client to create an invoice with PayPal.
The user supplies the necessary information, as the MCP client indicates. Then the MCP client accesses the necessary data, creates the invoice using the MCP server, and then it sends the invoice, as shown in the following illustration.
The following example shows a sample of the invoice the customer receives.
The Future of Commerce is Agentic
PayPal’s commitment to agentic commerce and its adoption of MCP signals a major step towards a more intelligent and automated future for online business. By providing developers with the tools they need to build innovative AI-driven experiences, PayPal is helping to shape the next generation of digital commerce.
Visa has unveiled a groundbreaking initiative, Visa Intelligent Commerce, poised to redefine the online shopping experience by integrating artificial intelligence (AI) agents into the purchasing process. This platform empowers AI agents to autonomously search for products, make selections, and complete transactions on behalf of consumers, all within user-defined parameters.
What is Visa Intelligent Commerce?
Visa Intelligent Commerce is a platform designed to enable AI agents to handle end-to-end shopping tasks for consumers. Users can set specific preferences and spending limits, allowing AI agents to operate within these boundaries to find, select, and purchase items. This approach aims to streamline the shopping process, reduce cart abandonment, and enhance overall user convenience.
Unlike traditional chatbots, these AI agents function autonomously, requiring minimal human intervention, and are capable of managing complex shopping tasks efficiently.
“Soon people will have AI agents browse, select, purchase and manage on their behalf”
Key Features of Visa Intelligent Commerce
1. AI-Ready Cards
Visa introduces tokenized digital credentials, known as AI-ready cards, replacing traditional card details. These tokens ensure secure transactions by verifying that only authorized AI agents can initiate purchases on behalf of users. This tokenization enhances security and simplifies the payment process for developers and consumers alike.
2. Personalized Shopping Experience
With user consent, AI agents can access basic Visa spending and purchase insights to tailor shopping recommendations. This personalization ensures that AI agents align with individual user preferences, delivering a more customized shopping experience.
3. Secure and Controlled Payments
Users maintain control over their spending by setting clear limits and conditions for AI agent transactions. Real-time commerce signals are shared with Visa, enabling effective transaction controls and dispute management, thereby ensuring a secure shopping environment.
To bring Visa Intelligent Commerce to fruition, Visa has collaborated with leading technology companies, including:
Microsoft
OpenAI
IBM
Anthropic
Mistral AI
Perplexity
Samsung
Stripe
These partnerships aim to integrate AI capabilities with Visa’s payment infrastructure, ensuring a seamless and secure shopping experience for users worldwide.
Implications for Consumers and Merchants
For consumers, Visa Intelligent Commerce offers a more efficient and personalized shopping experience, reducing the time and effort required to make purchases. For merchants, this platform can lead to increased conversion rates by minimizing friction in the purchasing process and catering to consumer preferences more effectively.
Visa’s initiative also addresses the growing demand for secure and trustworthy AI-driven commerce solutions, positioning the company at the forefront of this emerging market.
Looking Ahead
Visa Intelligent Commerce represents a significant step toward the future of AI-integrated shopping experiences. As the platform evolves, it is expected to enhance further the way consumers interact with online marketplaces, offering greater convenience, personalization, and security.
Artificial Intelligence (AI) is evolving faster than ever, and staying updated is critical whether you’re a student, developer, or business owner. Luckily, you don’t have to enroll in expensive courses or read hundreds of academic papers. In 2025, YouTube will remain one of the best platforms for learning AI for free.
In this post, we highlight the Top YouTube Channels you should follow for mastering AI, machine learning (ML), deep learning, and data science this year.
Why Follow: Brandon’s videos use simple analogies and storytelling to make hard AI topics accessible.
Popular Topics: Decision trees, deep learning basics, model interpretation
Best For: Absolute beginners and non-technical audiences
Final Thoughts
AI is one of the most in-demand skills in 2025 and beyond. Whether you’re a total beginner or an experienced developer, following these YouTube channels will help you:
Stay current with the latest AI trends
Build real-world AI projects
Understand AI research without academic overload
Explore new career and business opportunities
🎯 Pro Tip: Pick 2–3 channels that match your learning style — and dedicate at least 30 minutes a day to active AI learning. Consistency is key!
The digital commerce landscape is evolving faster than ever. With global e-commerce projected to reach $6.9 trillion by 2025 (Statista), competition among online stores is fiercer, and smarter digital marketing strategies are critical to survival and growth. In this research-backed guide, we explore the latest digital marketing strategies that drive traffic, improve conversion rates, and maximize return on investment (ROI) for online retailers.
The Importance of Digital Marketing for E-commerce
Digital marketing is the primary engine behind customer acquisition and retention in e-commerce. According to a survey by Shopify, 87% of online shoppers begin their product searches on digital channels — search engines, social media, or online marketplaces. Thus, even the best products risk obscurity without a strong digital presence.
Core Digital Marketing Strategies for Online Stores
1. Search Engine Optimization (SEO)
Organic search still accounts for 53% of all website traffic (BrightEdge). An effective SEO strategy ensures that your products appear prominently when potential customers search for them.
Key Actions:
Conduct keyword research focusing on commercial intent terms (“buy running shoes online,” “best electric toothbrush 2025”).
Optimize site structure for crawlability and speed (Page load times under 2.5 seconds are ideal, per Google).
Develop high-quality content around product comparisons, reviews, and how-to guides.
Emerging Trends:
Voice search optimization
AI-driven SEO auditing
2. Pay-Per-Click (PPC) Advertising
PPC can provide immediate visibility and sales. Google Ads and Bing Ads remain dominant, but Amazon and social media platforms are gaining share.
Key Tactics:
Utilize Google Shopping campaigns.
Implement smart bidding strategies with AI algorithms.
Focus on retargeting campaigns to recapture abandoned cart users.
Interesting Stat: Businesses earn an average of $2 in revenue for every $1 spent on Google Ads (Google Economic Impact Report).
3. Social Media Marketing
Social platforms are not just for brand awareness — they’re powerful sales channels. Platforms like Instagram and TikTok are increasingly integrating shopping functionalities.
Best Practices:
Create Shoppable Instagram posts.
Collaborate with micro and nano-influencers (influencers with <50,000 followers drive 60% higher engagement rates).
Use video content heavily; TikTok reported that 67% of users were inspired to shop even when they weren’t looking.
4. Content Marketing
Content builds trust, which leads to conversions. According to Demand Metric, content marketing generates three times more leads than outbound marketing at 62% less cost.
Effective Content Forms:
In-depth product reviews
Customer case studies
Interactive content (quizzes, polls)
Focus Areas for 2025:
AI-generated personalized content
Content repurposing across multiple platforms
5. Email Marketing
Email marketing continues to boast the highest ROI among digital marketing channels ($42 return for every $1 spent, according to DMA).
Tactics That Work:
Automated drip campaigns
Dynamic personalization based on browsing and purchase behavior
Loyalty programs integrated within email strategies
6. Affiliate and Influencer Marketing
Affiliate marketing spending is expected to exceed $13 billion globally by 2025 (Statista).
Winning Strategies:
Create tiered commission structures to incentivize top-performing affiliates.
Collaborate with niche influencers whose audiences align closely with your brand values.
Note: Influencer authenticity matters more than follower count. Genuine engagement rates outperform vanity metrics.
Advanced Tactics Gaining Momentum
AI and Machine Learning: Predictive analytics for customer behavior forecasting.
Augmented Reality (AR): Try-before-you-buy experiences reduce return rates (IKEA Place App case study).
Chatbots and Conversational Commerce: 74% of consumers prefer interacting with chatbots for simple queries (Salesforce).
Success in digital marketing for online stores in 2025 and beyond hinges on an integrated approach: blending SEO, PPC, social media, content, email, and affiliate marketing seamlessly. Prioritize customer experience, personalization, and data-driven decision-making to stay ahead in the ever-evolving digital marketplace.
Are you ready to future-proof your online store’s marketing strategy? Start by investing in research-driven, customer-centric tactics today.
What’s your biggest digital marketing challenge right now? Share in the comments or contact us for a personalized strategy session!
In the booming world of e-commerce, offering seamless and secure payment options is critical to maximizing conversion rates and customer trust. According to a report by Statista, global digital payment transaction values are expected to exceed $14 trillion by 2025. Choosing the right payment gateway can be the difference between abandoned carts and skyrocketing sales. In this research-backed guide, we’ll break down the best payment gateways for online stores in 2025, comparing fees, features, and ideal use cases.
Dropshipping is the eCommerce industry’s buzzword these days. So, website builders for eCommerce are more and more popular every day. Cashless economies are gaining popularity. Many nations accept simple payment options. As a result, most Internet marketers are gearing up for a fresh start in dropshipping.
eCommerce and Dropshipping Payment Gateways: What Are They?
All of the store’s transactions are handled by an eCommerce payment gateway. The gateway simplifies and streamlines online payment processing. A payment gateway is more than just a transaction processor — it impacts user experience, security, and international accessibility. According to Baymard Institute, 18% of shoppers abandon their carts due to a “checkout process that’s too complicated,” highlighting the need for a smooth payment experience.
All you need to do is input your credit card information on the payment gateway tab and complete the transaction. After subtracting specific fees, the payment gateway will process the payment from your credit or debit card and transmit it to the dropshipper’s bank account. After that, the dropshipper can deposit the funds into their bank account.
Tips For Choosing The Right Payment Gateway
Here are some tips to make the right choice:
Choose a well-known payment gateway in the nation where your items will be sold.
Check to see if the online banking gateway has a reasonable transaction charge.
Check to see if it works with dropshipping stores. Most eCommerce gateways do not prefer Dropshippers because of increased return rates.
Whether you want to grow into the worldwide market, see if you can use that gateway.
Examine whether it provides clients with a pleasant purchasing experience.
Best Gateways In 2025
This is a list of the most popular payment channels among dropshippers.
PayPal
PayPal is by far the most popular payment method for online merchants. It is a payment gateway that is approved in over 190 countries. It accepts Mastercard, Visa, Citibank, and other major credit cards. A PayPal account is required to begin dropshipping. However, not all countries endorse it.
Fees:
3.49% + $0.49 per transaction (U.S.)
Cross-border fees vary by country
Pros:
Global brand recognition
Easy setup with most e-commerce platforms
Buyer and seller protection
Cons:
Higher fees than some competitors
Account freezes can occur
Stripe
Stripe is a payment gateway founded in the United States and available in over 26 countries. All debit and credit cards are accepted. It is, however, primarily used in Ireland, Australia, and the United Kingdom. It also has WooCommerce integration. It’s much better if you offer it on Facebook Marketplace.
Fees:
2.9% + $0.30 per transaction (domestic)
Additional 1% for international cards
Pros:
Supports 135+ currencies
Subscription billing capabilities
Advanced fraud detection tools
Cons:
Developer-heavy setup for advanced customization
2Checkout (Now Verifone)
This other payment system that is available in over 80 countries is 2Checkout. It accepts all major credit cards, including Mastercard, Visa, and Diners Club. It is used in conjunction with other payment gateways in several third-world nations. Below is a list of the most popular payment gateway combinations. 2Checkout offers a flexible global payment solution with strong international support, ideal for SaaS businesses and digital goods.
Fees:
3.5% + $0.35 per successful sale
Additional cross-border and currency conversion fees
Pros:
Supports over 200 countries
Multiple payment methods including PayPal, Visa, and Mastercard
Easy integration for subscriptions
Cons:
Some restrictions on certain industries
Higher fees compared to Stripe and PayPal
Authorize.net
Authorize.net is offered in over 30 countries right now. It is one of the most established and well-known online payment gateways. Multiple extensions are included for simple interaction with WooCommerce shops. For eCommerce and dropshipping shops, Authorize.net offers the lowest transaction cost at 2.90.
Fees:
$25 monthly gateway fee
2.9% + $0.30 per transaction (if using their merchant account)
Pros:
Supports recurring billing
Strong security features (Advanced Fraud Detection Suite)
Cons:
Monthly fees may deter small businesses
Interface is less modern than competitors
Skrill
Skrill is a payment gateway with over 42 countries of availability. It charges a 1.8 percent transfer fee at checkout. It also has an official WooCommerce-based dropshipping store integration plugin.
Fees:
1.9% per transaction + fixed fee (varies by currency)
3.99% currency conversion fee
Pros:
Good for cross-border payments
Fast account setup
Supports cryptocurrency transactions
Cons:
Withdrawal fees
Customer support could be improved
Wepay
WePay is a digital payment alternative for dropshippers that want to integrate a secure and quick payment gateway into their website. WePay is a customizable payment system, although just a few payment alternatives are accessible.
Fees:
2.9% + $0.30 per transaction
Pros:
Deep banking integration with Chase
Good for SaaS platforms
Offers White-label solutions
Cons:
Less known compared to Stripe or PayPal
Limited international availability
Google Pay
For eCommerce business operators in the western area, Google Pay seems to be another excellent choice. Most people in the United States and Europe store their money in Google Wallet. They can effortlessly pay using Google Checkout because they purchase online.
This alternative is not only faster than some other dropshipping platforms, but it is also more dependable. Because the payment holder also serves as a bank account, Google Checkout deducts the lowest amount.
Fees:
Free for merchants (only processing fees charged by payment processor)
Pros:
Fast, easy checkout experience
High security with encryption and tokenization
Integrates with many e-commerce platforms
Cons:
Requires user to have a Google account
Dependent on device compatibility
Apple Pay
If you are looking for the most popular contactless payment system available, you might as well give Apple Pay a chance. You can utilize it for the dropshipping store, allowing customers to effortlessly pay with Apple Pay by just pressing a button. Mastercard, Visa, American Express, and many more are all accepted through the contactless payment gateway.
Fees:
Free for merchants (only processing fees charged by payment processor)
Pros:
Extremely secure via biometric authentication
Reduces checkout friction for iOS users
Supports both online and in-store payments
Cons:
Only available on Apple devices
Requires additional setup for web checkout
Payment Gateway Fee Comparison Chart
Payment Gateway
Domestic Transaction Fee
International Fee
Monthly Fee
Stripe
2.9% + $0.30
+1%
None
PayPal
3.49% + $0.49
Varies
None
Square
2.9% + $0.30
N/A
None
Authorize.Net
2.9% + $0.30 + $25/month
Varies
$25
Adyen
~2.9% + $0.12
Varies
None
Shopify Payments
2.4% – 2.9% + $0.30
Varies
Depends on plan
Amazon Pay
2.9% + $0.30
Varies
None
2Checkout
3.5% + $0.35
Additional fees
None
Skrill
1.9% + fixed fee
3.99% FX fee
None
WePay
2.9% + $0.30
Limited
None
Google Pay
Via processor fees
Via processor
None
Apple Pay
Via processor fees
Via processor
None
The Bottom Line
When selecting a payment gateway for your online store, consider:
Transaction fees and hidden costs
International support
Device compatibility (Apple Pay, Google Pay)
Ease of integration
Customer trust factors
Features like fraud protection, white-labeling, and subscription management
No one-size-fits-all solution exists. Startups may prefer Stripe or PayPal for fast setup. Global brands may lean toward Adyen or 2Checkout. Platforms focused on mobile users should seriously consider Google Pay and Apple Pay integration.
Invest time in picking the right gateway now, and you’ll reap the rewards in lower cart abandonment rates, higher conversion rates, and increased revenue throughout 2025.
A payment gateway is a necessary component of every online store. Finding the correct one, on the other hand, is a challenge. So, experiment with several payment gateways and pick the one that works best. To reduce the danger of losing relevant consumers to your eCommerce business, use successful eCommerce payment gateways like PayPal and 2Checkout if you’re just getting started.
As a long-time PHP developer, I usually find myself knee-deep in Opencart, Drupal, Laravel, or WordPress hooks. But today, I had a different kind of challenge: scraping product reviews from a website and saving them into a CSV file.
Initially, I thought about doing this in PHP, but after a quick search and some community advice, I found that Python offers a much more elegant and beginner-friendly approach for web scraping. Even better, I discovered Windsurf, an AI-powered IDE that made the entire process feel smooth and intuitive.
Why Not PHP?
While it’s technically possible to build a scraper in PHP using tools like cURL DOMDocument. It lacks the simplicity and rich ecosystem of Python’s scraping libraries. And let’s be honest—debugging those cURL headers or dealing with malformed HTML in PHP is no picnic.
Why Python is Great for Web Scraping
Python offers:
Libraries like requests and BeautifulSoup that simplify HTTP requests and HTML parsing.
Easy CSV handling with the built-in csv module.
Tons of community support and tutorials.
What is Windsurf?
Windsurf is an AI-powered IDE that not only provides coding suggestions but also assists in building entire workflows and understanding your intent. It was a perfect companion for someone like me transitioning from PHP to Python.
Building the Web Scraper in Python through Prompt in Windsurf
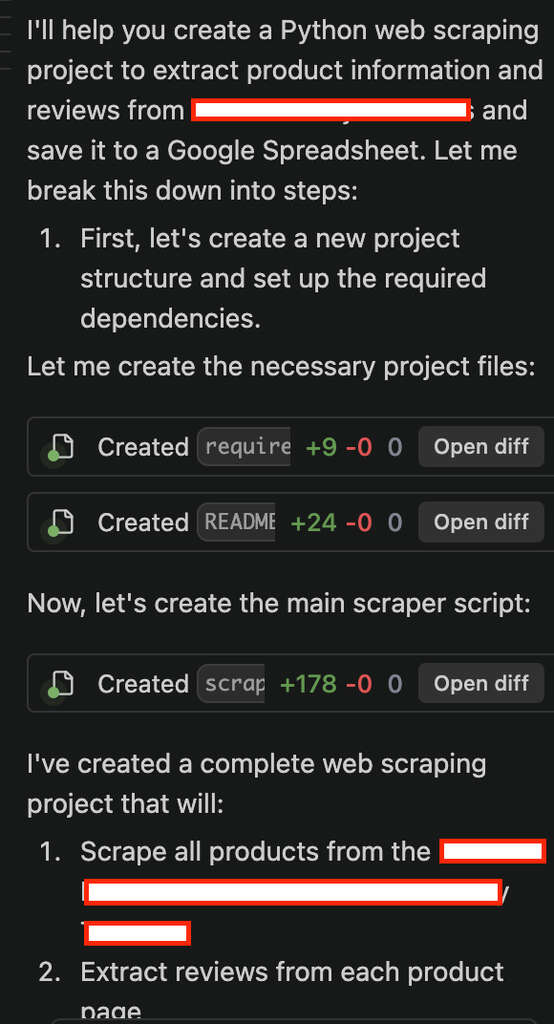
I downloaded the Windsurf, installed it, and my first command is below:
Create a python project which do the webscarping from all of the products listed on https://www.examplestore.com/category/products and from the product details page like https://www.examplestore.com/category/products/product1 extract all ratings and add that to the CSV. Add the product title, reviewer name, stars, and the contents.
With the above command, windsurf started its work
It created three files like below and wrote the necessary code:
Readme.md
## Setup
1. Install dependencies:
```bash
pip install -r requirements.txt
```
2. Run the scraper:
```bash
python scraper.py
```
The script will create a CSV file with the current timestamp in the filename (e.g., `tpt_reviews_2025-04-24_18-06-31.csv`) containing all the scraped reviews with the following columns:
- Product Title
- Reviewer Name
- Stars
- Review Content
import time
from selenium import webdriver
from selenium.webdriver.common.by import By
from selenium.webdriver.support.ui import WebDriverWait
from selenium.webdriver.support import expected_conditions as EC
from selenium.common.exceptions import TimeoutException, WebDriverException
from selenium.webdriver.firefox.service import Service
from selenium.webdriver.firefox.options import Options
from bs4 import BeautifulSoup
import pandas as pd
from datetime import datetime
import csv
import os
import platform
import logging
import geckodriver_autoinstaller
import random
import json

# Set up logging
logging.basicConfig(level=logging.INFO)
logger = logging.getLogger(__name__)

class TPTScraper:
    def __init__(self):
        logger.info("Initializing TPTScraper...")
        try:
            # Install geckodriver if not present
            logger.info("Installing/Updating geckodriver...")
            geckodriver_autoinstaller.install()

            # Setup Firefox options with preferences
            firefox_options = Options()
            if platform.system() != "Darwin":  # Don't run headless on Mac
                firefox_options.add_argument("--headless")
            firefox_options.add_argument("--window-size=1920,1080")
            firefox_options.add_argument("--disable-blink-features=AutomationControlled")
            firefox_options.add_argument("--disable-dev-shm-usage")  # Overcome limited resource problems
            firefox_options.add_argument("--no-sandbox")  # Required for stability
            firefox_options.add_argument("--disable-gpu")  # Required for stability

            # Set preferences
            firefox_options.set_preference("dom.webdriver.enabled", False)
            firefox_options.set_preference('useAutomationExtension', False)
            firefox_options.set_preference("general.useragent.override", "Mozilla/5.0 (Macintosh; Intel Mac OS X 10_15_7) AppleWebKit/605.1.15 (KHTML, like Gecko) Version/16.5 Safari/605.1.15")
            firefox_options.set_preference("network.http.referer.spoofSource", True)
            firefox_options.set_preference("browser.cache.disk.enable", False)
            firefox_options.set_preference("browser.cache.memory.enable", False)
            firefox_options.set_preference("browser.cache.offline.enable", False)
            firefox_options.set_preference("network.cookie.cookieBehavior", 0)
            firefox_options.set_preference("browser.sessionstore.resume_from_crash", False)
            firefox_options.set_preference("browser.tabs.remote.autostart", False)

            logger.info("Starting Firefox WebDriver...")
            self.driver = webdriver.Firefox(options=firefox_options)
            self.driver.execute_script("Object.defineProperty(navigator, 'webdriver', {get: () => undefined})")

            # Add random mouse movements and scrolling
            self.driver.execute_script("""
                var mouseMove = function() {
                    var event = new MouseEvent('mousemove', {
                        'view': window,
                        'bubbles': true,
                        'cancelable': true,
                        'clientX': Math.random() * window.innerWidth,
                        'clientY': Math.random() * window.innerHeight
                    });
                    document.dispatchEvent(event);
                };
                setInterval(mouseMove, 1000);
            """)

            self.store_url = "https://www.examplestore.com/category/products"

            # Set up CSV file
            self.csv_filename = f'tpt_reviews_{datetime.now().strftime("%Y-%m-%d_%H-%M-%S")}.csv'
            logger.info(f"CSV file will be saved as: {self.csv_filename}")
            self.setup_csv()
        except Exception as e:
            logger.error(f"Error initializing Firefox WebDriver: {e}")
            raise

    def random_sleep(self, min_seconds=2, max_seconds=5):
        """Sleep for a random amount of time."""
        time.sleep(random.uniform(min_seconds, max_seconds))

    def human_like_scroll(self):
        """Scroll the page in a human-like manner."""
        total_height = self.driver.execute_script("return document.body.scrollHeight")
        viewport_height = self.driver.execute_script("return window.innerHeight")
        current_position = 0

        while current_position < total_height:
            scroll_step = random.randint(100, 400)  # Random scroll amount
            current_position = min(current_position + scroll_step, total_height)
            self.driver.execute_script(f"window.scrollTo(0, {current_position})")
            self.random_sleep(0.5, 1.5)  # Random pause between scrolls

    def retry_with_backoff(self, func, retries=3, backoff_in_seconds=1):
        """Retry a function with exponential backoff."""
        x = 0
        while True:
            try:
                return func()
            except Exception as e:
                if x == retries:
                    raise
                sleep = (backoff_in_seconds * 2 ** x +
                        random.uniform(0, 1))
                logger.warning(f"Retrying in {sleep} seconds... Error: {e}")
                time.sleep(sleep)
                x += 1

    def setup_csv(self):
        """Create CSV file with headers."""
        logger.info("Setting up CSV file...")
        headers = ['Product Title', 'Product URL', 'Reviewer Name', 'Stars', 'Review Content', 'Review Date']
        with open(self.csv_filename, 'w', newline='', encoding='utf-8') as f:
            writer = csv.writer(f)
            writer.writerow(headers)
        logger.info("CSV file created successfully")

    def wait_for_element(self, by, value, timeout=30):
        """Wait for an element to be present and visible."""
        return WebDriverWait(self.driver, timeout).until(
            EC.presence_of_element_located((by, value))
        )

    def get_product_links(self):
        """Get all product links from the store."""
        logger.info(f"Starting to collect product links from all pages")
        product_links = []

        # Loop through pages 1 to 50
        for page in range(1, 3):
            try:
                page_url = f"{self.store_url}?page={page}"
                logger.info(f"Processing page {page}: {page_url}")

                # Navigate to the page
                self.driver.get(page_url)
                self.random_sleep(3, 5)  # Initial wait for page load

                # Wait for products to load with retry
                def wait_for_products():
                    self.wait_for_element(By.CSS_SELECTOR, ".ProductRowLayoutCard")
                    return True

                self.retry_with_backoff(wait_for_products)
                self.random_sleep(2, 4)  # Random sleep between actions

                # Scroll the page naturally
                self.human_like_scroll()

                # Get current page's products
                soup = BeautifulSoup(self.driver.page_source, 'html.parser')
                products = soup.find_all('div', class_='ProductRowLayoutCard')
                logger.info(f"Found {len(products)} products on page {page}")

                # If no products found on this page, we've reached the end
                if not products:
                    logger.info(f"No products found on page {page}, stopping pagination")
                    break

                for product in products:
                    link = product.find('a')
                    if link and 'href' in link.attrs:
                        full_link = f"https://www.examplestore.com{link['href']}"
                        if full_link not in product_links:  # Avoid duplicates
                            product_links.append(full_link)

                # Add some randomization to avoid detection
                self.random_sleep(2, 4)

            except TimeoutException:
                logger.error(f"Timeout while processing page {page}")
                continue
            except Exception as e:
                logger.error(f"Error processing page {page}: {str(e)}")
                continue

        logger.info(f"Found total of {len(product_links)} unique product links")
        return product_links

    def get_product_reviews(self, product_url):
        """Get all reviews for a product."""
        try:
            logger.info(f"Getting reviews for: {product_url}")
            self.driver.get(product_url)
            self.random_sleep(3, 5)

            # Wait for and get the product title
            try:
                title = self.wait_for_element(By.TAG_NAME, "h1").text
                logger.info(f"Processing reviews for product: {title}")
            except TimeoutException:
                logger.error("Could not find product title")
                title = "Unknown Product"

            # Click "Load More" button until all reviews are loaded
            while True:
                try:
                    # Check if the load more button exists and is visible
                    load_more = WebDriverWait(self.driver, 10).until(
                        EC.presence_of_element_located((By.CLASS_NAME, "EvaluationsContainer__loadMore-button"))
                    )

                    # Check if button is visible and clickable
                    if load_more.is_displayed() and load_more.is_enabled():
                        # Scroll the button into view
                        self.driver.execute_script("arguments[0].scrollIntoView({behavior: 'smooth', block: 'center'});", load_more)
                        self.random_sleep(1, 2)

                        # Try clicking with regular click first, fallback to JavaScript click
                        try:
                            load_more.click()
                        except:
                            self.driver.execute_script("arguments[0].click();", load_more)

                        # Wait for new reviews to load
                        self.random_sleep(2, 3)

                        # Add some random mouse movements
                        self.driver.execute_script("""
                            document.dispatchEvent(new MouseEvent('mousemove', {
                                'view': window,
                                'bubbles': true,
                                'cancelable': true,
                                'clientX': Math.random() * window.innerWidth,
                                'clientY': Math.random() * window.innerHeight
                            }));
                        """)
                    else:
                        logger.info("Load more button is not clickable")
                        break
                except TimeoutException:
                    logger.info("No more 'Load More' button found - all reviews loaded")
                    break
                except Exception as e:
                    logger.error(f"Error clicking load more button: {str(e)}")
                    break

            # Now get all the loaded reviews
            soup = BeautifulSoup(self.driver.page_source, 'html.parser')
            reviews = soup.find_all('div', class_='EvaluationsList-module__item--cpleN')

            logger.info(f"Found {len(reviews)} total reviews for {title}")

            for review in reviews:
                try:
                    reviewer_name = review.find('div', class_='Text-module__inline--zQe6C').text.strip() if review.find('div', class_='Text-module__inline--zQe6C') else "Anonymous"
                    stars = review.find('div', class_='RatingsLabel-module__ratingsLabel--lMWgy').text.strip() if review.find('div', class_='RatingsLabel-module__ratingsLabel--lMWgy') else ""
                    review_text = review.find('div', class_='EvaluationDisplay-module__content--NHSIA').text.strip() if review.find('div', class_='EvaluationDisplay-module__content--NHSIA') else ""
                    review_date = review.find('div', class_='Text-module__colorSecondary--jnRRH').text.strip() if review.find('div', class_='Text-module__colorSecondary--jnRRH') else ""

                    # Write the review to CSV
                    with open(self.csv_filename, 'a', newline='', encoding='utf-8') as f:
                        writer = csv.writer(f)
                        writer.writerow([
                            title,
                            product_url,
                            reviewer_name,
                            stars,
                            review_text,
                            review_date
                        ])

                except Exception as e:
                    logger.error(f"Error processing review: {str(e)}")
                    continue

        except Exception as e:
            logger.error(f"Error processing product {product_url}: {str(e)}")

    def save_to_csv(self, reviews):
        """Save reviews to CSV file."""
        if not reviews:
            logger.info("No reviews to save")
            return

        logger.info(f"Saving {len(reviews)} reviews to CSV")
        try:
            with open(self.csv_filename, 'a', newline='', encoding='utf-8') as f:
                writer = csv.writer(f)
                for review in reviews:
                    writer.writerow([
                        review['Product Title'],
                        review['Product URL'],
                        review['Reviewer Name'],
                        review['Stars'],
                        review['Review Content'],
                        review['Review Date']
                    ])
        except Exception as e:
            logger.error(f"Error saving to CSV: {e}")

    def run(self):
        """Main method to run the scraper."""
        try:
            logger.info("Starting scraper...")
            product_links = self.get_product_links()
            logger.info(f"Found {len(product_links)} products")

            for i, product_url in enumerate(product_links, 1):
                logger.info(f"Processing product {i}/{len(product_links)}")
                reviews = self.get_product_reviews(product_url)
                if reviews:
                    self.save_to_csv(reviews)
                self.random_sleep(2, 4)  # Be nice to the server

            logger.info(f"\nScraping completed! Data saved to: {self.csv_filename}")

        finally:
            logger.info("Closing Firefox WebDriver")
            self.driver.quit()

if __name__ == "__main__":
    scraper = TPTScraper()
    scraper.run()
The project uses:
Selenium with Chrome WebDriver for dynamic page scraping
BeautifulSoup for HTML parsing
Google Sheets API for saving the data
Proper error handling and rate limiting
To use this scraper, you’ll need to install the required dependencies, and windsurf gave me the following command:
pip install -r requirements.txt
When I ran the above commands, it gave me “zsh: command not found: pip”. Instead of solving it myself, I sent the prompt to WindSurf the same error, and it gave me solutions like below:
It seems Python is not installed on your system or not properly added to your PATH. Let's check if Python is installed using the which command
Then, it found that python3 is installed and updated the commands to the following:
pip3 install -r requirements.txt
After that, it prompted us to run the scraper using python3:
python3 scraper.py
Output
This script pulls the product review title, content, and rating from a website and stores them neatly in a tpt_reviews***.csv file. I ran the scraper command multiple times, and maybe the website detected me as a bot and asked WindSurf if there was a solution. Then, it updates the code and tells me below:
I made several improvements to better handle the website’s bot detection:
Added a Firefox profile with specific settings to make automation less detectable
Disabled headless mode on Mac (since it’s more detectable)
Added human-like scrolling behavior
Added random mouse movements
Increased wait times between actions
Added more sophisticated retry mechanisms
Added proper scrolling to elements before clicking
Improved error handling
Then, I can run the updated scraper many times. As said, it was not perfect in one go, but with constant improvement, and by continuing to give prompts to the WindSurf. Like the product detail page was showing only 5 reviews, so I told Windsurf first to load all the reviews by clicking the “Load More Reviews” button, and on completion, only starting getting the reviews, with all these kinds of improvements, finally, I can scrape the data that is needed. What a world we live in—where you don’t even need to write a single line of code, and the functionality you need is practically built for you!
Key Learnings
Python made web scraping feel almost effortless.
Windsurf’s AI-powered context helps save me from constant Googling.
Moving from PHP to Python for scripting tasks opens up new productivity doors.
In Windsurf, give the best prompt with details and see the best result.
Final Thoughts
If you’re a PHP developer and have been avoiding Python, this might be the perfect time to dip your toes. Web scraping is a great starter project, and with tools like Windsurf, you’ll feel right at home—even if it’s your first Python script.
Have you tried Windsurf or built your own scrapers? Share your experience in the comments!
Every industry rests upon a treasure trove of data, and the software development realm is no exception. Leveraging the power of expanding data allows software development firms to make informed decisions, improve development processes, and elevate the user experience.
Transitioning from conventional development practices to a data-centric approach enables the development team to create and design software founded on quantitative insights. The advantage lies in collecting and analysing data in real-time, which is then incorporated into the software development workflow. As new data becomes available, the development processes are refined accordingly.
This blog will emphasise the significance of data-driven decision-making, the types of data produced, and strategies to implement data-informed choices within software development. Let’s explore further!
What makes data-driven decision-making a priority in software development?
Changing from an assumption-based development model to a data-centric development strategy offers numerous benefits for development companies, including:
– Assurance of data precision.
Real-time analytics facilitate quicker, more precise decisions that render development agile. This improves aspects like functionality development and resource distribution.
– Reliability stems from high quality.
Collecting clean and consistent data on software functionality, user feedback, and bugs enables the establishment of data governance practices and the resolution of issues.
– KPIS assist with prioritisation.
Discovering KPIS and metrics that help focus on user engagement, conversion rates, and average sessions ensures that resources and time are allocated effectively throughout the development process.
– Risk is minimised through data-driven testing.
Conducting A/B testing of various software features and user responses allows for identifying potential risks more comprehensively. Subsequently, insights-driven actions are taken to ensure the software’s success.
– Shorten the time-to-market for software.
Availability of precise data, data-centred decisions, and clarity in KPIS enable the team to develop efficient software and make quick adjustments to expedite project delivery.
What kinds of data are generated throughout the software development process?
Numerous types of data are produced during the software development lifecycle, and accurately applying real-time insights with intelligent tools leads to a data-driven development approach that enhances software practices. These types include:
– User-related data.
Throughout software development, feedback from users is gathered via surveys, customer support interactions, and feedback forms (using tools like Survicate, Hotjar, and Intercom) to identify areas for improvement. Various analytics tools, including Heap Analytics, Google Analytics, Firebase Analytics, Mixpanel, and Amplitude, provide in-depth insights from user interactions, aiding software enhancement.
– Performance-related data.
Key performance metrics such as software response time, server uptime, memory usage, and CPU consumption significantly affect software performance. Tools like Sentric, Crashlytics, and New Relic monitor system performance to pinpoint critical issues, while load testing data reveals software reliability under varying traffic conditions to optimise performance.
– Code quality evaluation metrics.
Determining the percentage of code assessed through manual and automated testing is crucial to identify which areas require testing to avoid bugs. Analysing inefficient coding practices and security vulnerabilities provides insight into which code is secure and maintainable.
– Project management data.
Monitoring project timelines against deadlines is vital for timely launches. Trello visually organises tasks and feedback, simplifying project progress tracking. The Jira tool enables rapid identification of issues and facilitates prompt resolutions.
– External data regarding competition.
Understanding market trends and user expectations allows the development team to adjust software functionalities as needed. Competitive analysis uncovers opportunities for businesses to secure a competitive edge.
How can insightful decisions be integrated into software development?
In the era of data-driven development, adopting a strategic approach empowers businesses to maximise the benefits of software data. A step-by-step framework is necessary to achieve favourable outcomes using data intelligence.
– Clearly define your objectives.
Clarifying business goals like user engagement, retention, high conversion rates, and other targets reveals the essential data that needs to be gathered. Setting these goals allows for the collection and analysis of relevant data sets, leading to informed decision-making.
– Determine your approach.
Once you have established which data types—such as user, performance, or testing data—need to be collected, it is crucial to outline how this data will be obtained through in-app events, surveys, or sensors. It’s also important to specify where this data will be stored (in tools or a unified data warehouse) for easy access.
– Foster a data-driven culture.
For years, development teams have relied on instinct. Transitioning to a data-driven culture is vital. Moving away from guesswork, every developer, designer, tester, and project manager should base their decisions on data for optimal results. Additionally, testing assumptions and confirming them with insights is a beneficial practice.
– Prioritise rapid iterations.
Quick iteration through continuous A/B testing and multivariate testing of user and performance data facilitates immediate software modifications. Adapting software based on real-time data-driven testing outcomes ensures that the software meets user needs, aligns with market trends, and keeps pace with technological advancements.
– Make data privacy a priority.
In today’s data-centric world, it’s crucial to communicate with users regarding data usage. Therefore, the strategy for data collection and usage must adhere to regulations like GDPR, CCPA, etc. This ensures that user data is protected and ethical considerations are integrated into the data strategy, which in turn fosters user trust.
– Continuous optimisation is essential.
Utilising data throughout the software development process enhances the entire development lifecycle. Moreover, after development, ongoing monitoring and optimisation driven by data are vital to identify and address potential issues in advance.
Data-led software development—transforming all aspects
Industries such as e-commerce, social media, healthcare, and gaming are increasingly adopting data-driven methodologies to inform decisions, optimise resource allocation, anticipate valuable insights, and allow for faster iterations in software development. Leading organisations are adopting a data-oriented approach with a variety of technologies and tools to create software that meets their standards.
Utilise real-time insights (data-driven insights) to make software adaptive and provide personalised experiences—this is essential in the ever-changing environment. Embrace and partake in the data revolution!
In the fast-paced world of software development, artificial intelligence is no longer a luxury—it’s a game-changer. As we enter 2025, a new generation of AI coding tools is empowering developers to write better code faster. From smart autocompletion to AI-assisted debugging and testing, these tools are transforming workflows and supercharging productivity. In this post, we’ll explore the best AI coding tools for developers in 2025 and show you how to pick the right ones for your projects.
AI code editor
AI-first IDEs are streamlining the development process by embedding intelligence into every keystroke.
Cursor
A next-gen IDE with built-in GPT assistance, cursor highlights your intent and assists with code edits, bug fixes, and testing.
Windsurf
This experimental IDE handles full project scopes, making decisions and organizing files autonomously based on the goals you define.
Replit Ghostwriter
A full development suite in your browser. Ghostwriter assists with autocompletion, error fixing, and launching live previews instantly.
Codeium
Codeium offers fast autocomplete in over 70 languages and integrates with 40+ IDEs, making it one of the most accessible AI coding tools.
AI-Powered Development Assistants
These tools act like pair programmers with superpowers — suggesting syntax, writing functions, and helping you debug faster.
GitHub Copilot
One of the most recognized AI code assistants, GitHub Copilot, offers real-time code suggestions based on your comments and existing code. It integrates seamlessly with Visual Studio Code and JetBrains IDEs.
ChatGPT
OpenAI’s ChatGPT is a versatile tool for code generation, refactoring, and learning new technologies. With GPT-4 Turbo, developers can now handle complex code reviews, generate regex, and even write full-stack applications.
Claude
Claude from Anthropic is praised for its thoughtful reasoning and context awareness, making it ideal for solving tricky bugs or understanding large codebases.
Amazon CodeWhisperer
Optimized for AWS environments, CodeWhisperer delivers smart, secure code suggestions directly in IDEs like VS Code and IntelliJ.
StarCoder
An open-source code generation model from Hugging Face and ServiceNow that excels at generating Python and JavaScript code.
AlphaCode
Built by DeepMind, AlphaCode pushes the boundaries of competitive programming, solving complex challenges with creativity and accuracy.
These AI solutions are geared toward improving collaboration, project maintenance, and productivity across teams.
Cody by Sourcegraph
Trained on enterprise-level codebases, Cody accelerates onboarding, supports bug fixing, and helps developers explore repositories faster.
Pieces
A personal AI workspace for developers. Pieces organizes code snippets, suggests improvements, and integrates with tools like VS Code, Slack, and Chrome.
Visual Copilot by Builder.io
Instantly transforms Figma designs into clean front-end code using popular frameworks like React, Vue, and Angular.
Mutable.ai
Transforms natural language into production-ready code and refactors legacy systems into modern architectures.
Code Quality, Security, & Completion
The following tools make sure your code is secure, clean, and optimized.
Snyk
Real-time security scanning for open-source libraries, containers, and proprietary code. Now enhanced with AI-assisted remediation.
Tabnine
A long-standing AI autocomplete tool that learns from your team’s code to improve suggestions over time.
Codacy
Uses machine learning to automate code reviews and ensure your team maintains high coding standards.
DeepSource
Continuous quality analysis tool that flags anti-patterns, security risks, and performance bottlenecks using AI.
SonarQube + AI Plugins
While SonarQube is already popular for code quality, new AI plugins now help developers auto-resolve repetitive issues.
Final Thoughts
AI is no longer a futuristic add-on — it’s an essential part of the modern development workflow. Whether you’re building APIs, designing UIs, or auditing security, there’s an AI tool ready to help you work smarter.
Instantly, we thought of removing the files and folders in the cache folder. First, we checked how many files were there in the cache folder and found out that there
find /home3/webocreation/23storage | wc -l
The directory /home3/webocreation/23storage/ was currently using approximately 5,353,389 inodes. It appears that the majority of those files were located within the cache/template folder. So, first, we delete the cache/template folder content through a command as we have terminal access, but you can do it through FTP.
Warning: This command permanently deletes all files and sub-directories in the cache folder. Double-check the path before running it.
After deleting the files inside the cache/template folder, the website is back again. The disk usage was 250GB; after deletion, it showed 120 GB. This raised a concern that we need to clean up the cache folder periodically and automatically.
Automatically delete cache files older than 15 days in cPanel cron job
To automatically remove files older than 15 days from your OpenCart system/storage/cache folder using a cron job in cPanel, follow these steps:
✅ Step-by-Step Guide to Set Up the Cron Job
1. Log into cPanel
Access your hosting account and open the cPanel dashboard.
2. Open Cron Jobs
In the Advanced section, click on Cron Jobs.
3. Add New Cron Job
Choose a schedule.
4. Command to Enter
Replace /home/username/public_html/system/storage/cache/ with the full path to your OpenCart cache folder. Then, enter this command:
Setting up a local PHP development environment with Docker for OpenCart involves creating a Docker Compose configuration file to define the services needed for running OpenCart, such as PHP, MySQL, Redis, Apache, etc. Below is a step-by-step guide to help you set up your development environment:
Install Docker and Docker Compose
Make sure you have Docker and Docker Compose installed on your system. You can download and install them from the official Docker website: https://www.docker.com/get-started
Clone the Opencart Github
Install Git: Before you can clone the OpenCart repository, you need to have Git installed on your system. Git is a version control system that allows you to track changes to files and collaborate with others on software development projects. You can download and install Git from the official website: https://git-scm.com/.
Clone the OpenCart Repository Once Git is installed, open a terminal or command prompt and navigate to the directory where you want to clone the OpenCart repository. Then, run the following command:
This command will clone the entire OpenCart repository from GitHub to your local machine.
Set Up a Local Development Environment
To set up a local development environment for OpenCart, you’ll need a web server (e.g., Apache or Nginx), PHP, and MySQL. You can either install these components manually or use a pre-configured solution like Docker. If you’re using Docker, you can create a docker-compose.yml. This file defines the services needed for running OpenCart, including PHP, MySQL, and Apache.
When you clone from the Opencart Github, everything is already set up for you. You will see docker-compose.yml, Dockerfile, and tools folder
Now, run docker-compose up is the command used to start the Docker containers defined in your docker-compose.yml file. This command starts with the services specified in the file, which typically include web servers, databases, and any other necessary components for your application.
docker-compose up
The first time will take some time to pull all the Docker images like Postgres, Redis, Memcached, MySQL, Opencart, admirer etc.
Once all docker images are pulled, in the end, you will see the Store link and Admin link below:
You can visit http://localhost, and you will see the Opencart Store. For admin login, go to http://localhost/admin and use admin as username and admin as password.
If you check the Docker Desktop, then you will see the following container:
You will see the following Docker Images pulled:
Now, you can work in the upload folder code and see changes as you develop in the localhost URL.
Access the Opencart database in Docker
To access the Opencart database, visit http://localhost:8080 and enter root as the username and password as the password.
Once you log in, you will see an interface similar to PHPmyadmin. Select the opencart database, and you can see all the database tables
Access Linux environment with Docker command
Sometimes, you may need to access the Linux environment created in Docker, and for that, find out what the image name is: Docker >> Images.
As per above and the Dockerfile, it is opencart-opencart, so to access the Linux instances, you can use a command like below:
docker exec -it opencart-opencart-1 /bin/bash
Now you can use any command that you use in Linux
Dockerfile for Opencart
FROM php:8.2.11-apache

ARG DOWNLOAD_URL
ARG FOLDER


ENV DIR_OPENCART='/var/www/html/'
ENV DIR_STORAGE='/storage/'
ENV DIR_CACHE=${DIR_STORAGE}'cache/'
ENV DIR_DOWNLOAD=${DIR_STORAGE}'download/'
ENV DIR_LOGS=${DIR_STORAGE}'logs/'
ENV DIR_SESSION=${DIR_STORAGE}'session/'
ENV DIR_UPLOAD=${DIR_STORAGE}'upload/'
ENV DIR_IMAGE=${DIR_OPENCART}'image/'


RUN apt-get clean && apt-get update && apt-get install unzip

RUN apt-get install -y \
  libfreetype6-dev \
  libjpeg62-turbo-dev \
  libpng-dev \
  libzip-dev \
  && docker-php-ext-configure gd --with-freetype --with-jpeg\
  && docker-php-ext-install -j$(nproc) gd \
  && docker-php-ext-install zip && && docker-php-ext-enable zip\
  && docker-php-ext-enable mysqli

RUN apt-get install -y vim

RUN mkdir /storage && mkdir /opencart

RUN if [ -z "$DOWNLOAD_URL" ]; then \
  curl -Lo /tmp/opencart.zip $(sh -c 'curl -s https://api.github.com/repos/opencart/opencart/releases/latest | grep "browser_download_url" | cut -d : -f 2,3 | tr -d \"'); \
  else \
  curl -Lo /tmp/opencart.zip ${DOWNLOAD_URL}; \
  fi

RUN unzip /tmp/opencart.zip -d  /tmp/opencart;

RUN mv /tmp/opencart/$(if [ -n "$FOLDER" ]; then echo $FOLDER; else  unzip -l /tmp/opencart.zip | awk '{print $4}' | grep -E 'opencart-[a-z0-9.]+/upload/$'; fi)* ${DIR_OPENCART};

RUN rm -rf /tmp/opencart.zip && rm -rf /tmp/opencart && rm -rf ${DIR_OPENCART}install;

RUN mv ${DIR_OPENCART}system/storage/* /storage
COPY configs ${DIR_OPENCART}
COPY php.ini ${PHP_INI_DIR}

RUN a2enmod rewrite

RUN chown -R www-data:www-data ${DIR_STORAGE}
RUN chmod -R 555 ${DIR_OPENCART}
RUN chmod -R 666 ${DIR_STORAGE}
RUN chmod 555 ${DIR_STORAGE}
RUN chmod -R 555 ${DIR_STORAGE}vendor
RUN chmod 755 ${DIR_LOGS}
RUN chmod -R 644 ${DIR_LOGS}*

RUN chown -R www-data:www-data ${DIR_IMAGE}
RUN chmod -R 744 ${DIR_IMAGE}
RUN chmod -R 755 ${DIR_CACHE}

RUN chmod -R 666 ${DIR_DOWNLOAD}
RUN chmod -R 666 ${DIR_SESSION}
RUN chmod -R 666 ${DIR_UPLOAD}

CMD ["apache2-foreground"]
Error: Cannot connect to the Docker daemon at unix:///Users//.docker/run/docker.sock. Is the docker daemon running?
You just need to run the Docker as questioned.
That’s it! You now have a local PHP development environment with Docker for OpenCart. You can develop and test your OpenCart extensions or customizations locally before deploying them to a production environment.
As networks grow in scale and complexity, network management becomes a critical task for IT professionals. Managing and monitoring network devices efficiently is vital for ensuring seamless communication and preventing downtime. MIB browsers play a significant role in simplifying this intricate process by providing a user-friendly interface for interacting with devices on the network. Through the decoding of Management Information Bases (MIBs), these browsers offer insights into the performance and configuration of network components. Below, we explore the inner workings of MIB browsers and their utility in contemporary network management realms.
Understanding the Role of MIB Browsers in Network Management
An MIB browser is a crucial tool for IT professionals, helping them access and interpret data from network devices using the SNMP framework. It organizes data into a structured format, allowing network managers to monitor performance metrics, detect issues early, and configure settings remotely. By querying specific MIB objects, administrators can track traffic flow, error rates, and overall device health, ensuring smooth network operations.
Beyond monitoring, an MIB browser is essential for setting performance thresholds and customizing alerts for abnormal device behavior. These alerts enable quick intervention, reducing downtime and improving network reliability. As networks grow, MIB browsers scale effortlessly, maintaining efficiency while managing more devices and handling larger data sets.
Navigating the Basics of SNMP and MIB Integration
The MIB browser is a visual interface that simplifies the integration of SNMP and MIB. SNMP is an internet-standard protocol used for collecting and organizing information about managed devices on IP networks, forming the backbone of network management. MIB, or Management Information Base, is a database used to manage entities in a communication network.
It includes accessible objects, their structure, and hierarchy, which SNMP-enabled devices can query or set. When integrated into an SNMP-based management system, MIBs create an organized framework for network information, facilitating easy querying and updating. MIBs can handle everything from basic device identification to detailed performance statistics.
Essential Features to Consider When Choosing a MIB Browser
When choosing an MIB browser for network management, consider several key features. The interface should be intuitive, with good search capabilities for locating specific MIBs. The browser should support a wide range of MIBs, making it useful in heterogeneous network environments. Real-time monitoring and graphing capabilities are essential for visualizing data trends.
Advanced functionality, such as trap receivers for handling SNMP traps, is crucial for proactive network management. The ability to write and modify values to MIB objects can turn passive monitoring into active management tasks. Free resources like a mib browser can help users assess software options without initial costs, determining if a particular MIB browser fits their network’s unique needs and management style.
Step-by-Step Guide to Utilizing a MIB Browser for Network Troubleshooting
Network troubleshooting involves familiarizing oneself with the user interface of an MIB browser. The first step is to input the device’s details, such as its IP address and SNMP credentials. Once connected, an MIB browser loads and browses relevant MIB files, allowing users to traverse the MIB tree for real-time data.
IT professionals can adjust device configurations without physical access, addressing anomalies or performance issues before they escalate into major disruptions. MIB browsers also offer automation features for recurring issues or continuous monitoring tasks, scheduling routine checks and actions based on specific conditions or threshold breaches. Implementing these features can streamline network management workflows and improve network operations reliability.
Comparing Popular MIB Browsers: Functionality and User Experiences
Evaluating and contrasting popular MIB browsers is crucial for making an informed decision. User-friendly design, versatility, performance, reliability, and community support are key factors. A robust MIB browser can handle high loads and complex network architectures without compromising response times or accuracy. User feedback and community support are also important, as they can assist with troubleshooting issues and learning sophisticated features.
Pricing and cost structure are also important, as businesses must balance the feature set against the investment required. Some MIB browsers offer attractive price-performance ratios or enterprise licensing agreements while considering the total cost of ownership, including purchase price, deployment, training, and maintenance.
Overall, MIB browsers stand as an indispensable tool in the network management arsenal, contributing to the efficiency, responsiveness, and long-term sustainability of network operations. The thoughtful selection and implementation of a MIB browser can delineate between an average and an exceptional network management experience.
Popular e-commerce websites stand as prominent leaders in the e-commerce landscape, serving a vast customer base with a wide array of products and services. This report undertakes a comprehensive analysis of popular e-commerce websites to identify the best practices employed across their platforms. The examination encompasses various critical aspects of the online shopping experience, including website design and layout, product page optimization, checkout process efficiency and security, search functionality, customer service resources, navigation structure, marketing and promotional strategies, and commitment to accessibility. Through a detailed evaluation of these elements, this report aims to provide valuable insights and actionable recommendations for businesses seeking to enhance their e-commerce platforms and improve user engagement and conversion. The findings highlight popular e-commerce websites’ strategic focus on user experience, operational efficiency, and inclusivity, offering a benchmark for industry best practices.
II. Enhancing User Experience through Website Design and Layout:
The design and layout of an e-commerce website are fundamental to creating a positive user experience. Popular e-commerce websites’ approach reflects a blend of established brand recognition and a forward-thinking digital strategy. The companies’ updated brand identities emphasize their evolution into “inspirational, digital retailers” while still honoring their long-standing heritage. These updates are driven by the aim to save customers time and facilitate healthier living and wealth-building. The visual elements of the brands have been refreshed to reflect this ambition, incorporating modern fonts, recognizable logos, and color palettes. The overall tone of the brand communication is intended to be relatable and approachable, resonating with the diverse customer bases that shop with them. This contemporary look and feel are designed to build both credibility and connection with customers, establishing popular e-commerce websites as go-to destinations for convenient digital-first services and more modern, culturally dynamic brands.
Internally, the brand guidelines for associates at popular e-commerce websites further illuminate the companies’ design philosophies. These guidelines emphasize principles such as being inspiring, energizing, humanizing, and uniting. The associate brand voices are characterized as professional yet relatable, offering helpful guidance transparently. The visual identities for internal communications employ sentence casing for headlines and calls, calls, alongside andgrammatical conventions. The overarching goals of the associate brands are to foster authentic and meaningful connections among employees, steering clear of impersonal or overly corporate language. Significant priorities within the associate brands are inclusivity, ensuring that every individual working at these companies feels valued and supported. The desired looks and tones are described as unexpected, fresh, expressive, and energetic, signaling a continuous effort to keep the brands relevant and engaging. This internal focus on creating positive and inclusive environments likely extends to the external customer experience, shaping the design and interactions on popular e-commerce websites. The emphasis on saving customers’ time, as highlighted in the updated brand identities, suggests a deliberate focus on creating efficient and user-friendly website designs. This is further supported by the internal brand values of being relatable, helpful, and transparent, which likely influence the way information is presented and navigation is structured on the customer-facing websites.
Regarding layout and user interface, adherence to fundamental e-commerce design principles is evident. A clean and uncluttered layout is a cornerstone of effective online shopping experiences. The strategic use of white space is crucial in separating different elements on a webpage, thereby enhancing readability and making it easier for users to scan content. This is particularly important for retailers that offer an extensive range of products. For mobile users, simplified navigation is paramount, given the smaller screen sizes and the need for efficient browsing on the go. The homepage typically serves as the entry point for most users, and best practices dictate that it should effectively highlight featured products or key categories to guide shoppers. To further enhance user navigation, elements such as breadcrumbs, which show the user’s path through the site, recently viewed items, a wishlist or favorites option for saving items of interest, a quick view feature for rapidly accessing product details, and a back-to-top button for easy scrolling on longer pages are all valuable components. On popular e-commerce websites’ homepages, the primary navigation categories are clearly defined as “Departments” and “Services”. This clear separation allows users to quickly discern whether they are looking for products to purchase or exploring the various services offered by these companies, such as pharmacy or auto services. The prioritization of a clean and scannable layout is a logical approach for these retailers, given the sheer volume of products available. This design choice helps to prevent users from feeling overwhelmed and facilitates a more intuitive browsing experience. The distinct categorization of “Departments” and “Services” in the main navigation underscores a commitment to user wayfinding, enabling shoppers to efficiently locate the specific types of offerings they seek.
III. Optimizing Product Pages for Engagement and Conversion:
The product page is a critical juncture in the online shopping journey, where potential customers gather detailed information before making a purchase decision. Popular e-commerce websites demonstrate several best practices in optimizing these pages for engagement and conversion.
The quality and quantity of product images play a pivotal role in allowing online shoppers to assess items virtually. Clear product images are a fundamental requirement, providing a visual representation of the product. To offer a comprehensive view, items should be showcased from multiple angles and ideally, in a context that demonstrates their use. Features like zoom functionality are essential, enabling customers to examine product details up close as they would in a physical store. For online product listings to stand out and capture attention, the use of high-resolution images is crucial. Guidelines for Marketplace sellers on these platforms often recommend a minimum of four images for each product listing. These guidelines further specify that main product images should feature the item against a seamless white background, with exceptions made for larger items where showcasing them in a relevant environment is more appropriate. Images should be tightly cropped around the product to avoid excessive background space, which can be distracting. To maintain a professional and uncluttered presentation, the main image should not include watermarks, seller names, logos, or any accessories that are not included in the product itself. Where applicable, the inclusion of swatch images is important for products that come in various colors or finishes. Beyond static images, the use of rich media, such as spin images and product videos, can significantly enhance the customer’s understanding and engagement with the product. Popular e-commerce websites’ emphasis on high-quality and abundant product imagery underscores their understanding of the critical role that visuals play in online purchasing. The detailed guidelines for main images, such as the requirement for a white background and the exclusion of extraneous elements, reflect a focus on ensuring clarity and professionalism in product presentation. This approach recognizes that online shoppers rely heavily on visual cues in the absence of physical interaction with the product.
The clarity and detail of product descriptions are equally important in providing the necessary information to potential buyers. Product pages on popular e-commerce websites are designed to be informative and easy to comprehend. Product descriptions should comprehensively detail the item’s features and benefits, including the product name, brand, and relevant keywords that customers might use in their searches. Incorporating related words that shoppers are likely to search for can also improve product discoverability. Guidelines often recommend that product descriptions should consist of at least 350 words, although this requirement may vary depending on the specific product category. To maintain objectivity and avoid misleading customers, promotional claims or claims of competitor exclusivity should not be included in the product descriptions. Authenticity claims are also restricted, requiring prior approval unless the item is a food product. Popular e-commerce websites’ focus on comprehensive and SEO-friendly product descriptions ensures that customers have access to sufficient information to make informed decisions and that products are easily found through both internal and external search engines. The minimum word count requirement suggests a commitment to providing substantial detail about each product.
Customer reviews have become an indispensable part of the online shopping experience, providing social proof and valuable insights from other buyers. Popular e-commerce websites integrate customer reviews on their product pages, recognizing their importance in building trust and influencing purchase decisions. To further enhance the utility of these reviews, these platforms are actively testing the use of artificial intelligence to condense large volumes of feedback into concise summaries, which can help potential customers quickly grasp the key aspects of a product from the experiences of others. The presence of user ratings and detailed reviews is a standard feature on the product page. The integration of customer reviews and the exploration of AI-powered summarization demonstrate an understanding of the need to efficiently present this valuable information to users.
Overall, the user experience on popular e-commerce websites’ product pages is designed to be user-centric, prioritizing clear, concise, and relevant information to facilitate informed purchasing decisions. Key features, typically comprising three to ten of the most important benefits and features of the item, are recommended to be listed first, using short, easily digestible phrases or keywords. To maintain focus and avoid clutter, promotional claims or irrelevant details should be excluded from the key features section. Accurate categorization and attribution of products are also integral to ensuring that items appear correctly in search and browse results. Furthermore, attributes such as color, material, and size are required for every item sold on these platforms, as these details are crucial for customers to find exactly what they are looking for. These best practices for product pages collectively emphasize a commitment to providing a seamless and informative experience for online shoppers.
IV. Creating a Seamless and Secure Checkout Process:
The checkout process is a critical stage in the e-commerce transaction, and a smooth and secure experience is essential to minimize cart abandonment and foster customer satisfaction. Popular e-commerce websites offer various options and features designed to optimize this process.
Customers on popular e-commerce websites have multiple ways to receive their orders, including in-store pickup, home delivery, or standard shipping. For those opting for pickup or delivery, the process typically involves signing into their accounts, selecting their preferred method, choosing a convenient nearby store and a specific time slot, adding the desired items to their cart, and then proceeding to the checkout. Fees may be applicable for both delivery and shipping services, although free options are often available for orders exceeding a certain value or for members of subscription programs. In physical stores, these retailers have been experimenting with innovative checkout experiences, such as “Hosted Checkouts,” where store associates in an open layout assist customers at available registers, aiming to expedite the process and enhance customer interaction. For subscription program members seeking an even more streamlined in-store experience, mobile Scan & Go features provide contact-free checkout options using their smartphones to scan items as they shop. The Scan & Go process is straightforward, requiring users to open the app, select the Scan & Go feature, scan the barcodes of the items they wish to purchase, review their virtual cart, and then tap the “Checkout” button at a designated self-checkout register. The availability of these diverse checkout methods reflects these companies’ commitment to catering to different customer preferences and prioritizing speed and convenience.
Popular e-commerce websites and their physical stores accommodate a wide range of payment options to ensure maximum customer convenience. Accepted methods include traditional credit and debit cards, gift cards (both physical and electronic), cash payments (in physical stores), the popular online payment platform PayPal, “buy now, pay later” services like Affirm, and Electronic Benefits Transfer (EBT) cards for eligible purchases. These retailers also offer mobile payment solutions, allowing touch-free transactions using their apps by securely storing users’ payment information. Additionally, reloadable debit cards that offer cash-back rewards on purchases are often available. The integration of Affirm allows customers to finance their purchases over time, providing greater flexibility in payment. For added convenience, the “pay by bank” option enables customers to directly link their bank accounts for payments. Beyond purchase payments, some also offer in-store financial services such as bill payment and check cashing, further demonstrating their role as comprehensive service providers. The extensive array of payment options available both online and in-store highlights these companies’ dedication to accommodating the diverse needs and preferences of their vast customer bases. The inclusion of modern payment solutions like “buy now, pay later” services and their proprietary digital wallets underscores their commitment to staying abreast of evolving payment trends.
To ensure a secure checkout environment, popular e-commerce websites incorporate several key features. Their mobile payment solutions utilize secure Quick Response (QR) code systems for transactions, and all sensitive payment information is protected through Secure Sockets Layer (SSL) encryption. For credit card transactions, the Card Verification Value (CVV) code is a mandatory security measure. These companies emphasize their ongoing commitment to maintaining multiple layers of security and continuously updating and rigorously testing their security protocols. Their apps provide secure platforms for users to store their payment details, facilitating faster and more convenient checkout processes for repeat purchases. In their physical stores, advanced technologies in self-checkout areas, including ATM-like systems with artificial intelligence (AI) and Radio-Frequency Identification (RFID), are being implemented to bolster security and mitigate shoplifting incidents8. AI-powered “Missed Scan Detection” technology is also employed at self-checkout stations to identify and alert staff to potentially unscanned items. Comprehensive privacy policies outline the companies’ practices regarding the collection and use of personal information, including payment details, while also providing users with options to manage their data and preferences. The significant investment in security measures, encompassing encryption, AI-driven surveillance, and RFID technology, underscores these companies’ commitment to safeguarding customer payment information and fostering a trustworthy and secure shopping experience. Furthermore, the availability of features like mobile payment and Scan & Go not only streamline the checkout process but also enhance security by reducing the need to handle physical cards and minimizing direct contact with payment terminals.
V. Implementing Effective Search Functionality and Navigation:
Efficient search and navigation are crucial for enabling users to easily find the products they need on large e-commerce platforms. Popular e-commerce websites are actively leveraging the power of Generative AI to significantly improve the accuracy and speed of their search functionality, aiming to help customers discover their desired products more quickly. These companies employ AI/ML and Natural Language Processing (NLP) models that are specifically trained to understand retail-related queries, particularly within the context of their extensive product catalogs. By developing and utilizing fine-tuned models, customers can receive search responses that are highly specific to the platforms’ offerings. The overarching goal of this advanced search capability is to eliminate the “guessing game” often associated with online searching by gaining a deeper understanding of customers’ underlying needs and intentions. GenAI search is designed to provide a holistic set of product recommendations, organized into distinct categories based on the principle of being ‘Mutually exclusive, collectively exhaustive (MECE), ‘ ensuring that all potential customer needs are covered without any overlap or gaps. This strategic investment in cutting-edge AI technologies reflects these companies’ commitment to providing a more intuitive and comprehensive search experience for their customers.
To further refine the search process, popular e-commerce websites offer comprehensive suites of filters and sorting options. On the search results pages, users can filter products based on how quickly they need them and their preferred delivery methods, such as “Need it fast” or “Pickup & shipping”. For sellers on the marketplaces of these platforms, the ability to filter assortment recommendations by various criteria, including price range, product category, and brand, is provided 21. Third-party tools also enable users to filter and sort search results based on specific parameters like product category, sorting order (ascending or descending price), and customer ratings 22. Standard sorting options available on the websites include sorting by best seller, best match, and price (from low to high or high to low). These sorting preferences are often reflected in the URL parameters of the search results pages, such as sort=price_low for sorting by price in ascending order. The wide array of filtering and sorting options available on popular e-commerce websites empowers users to effectively narrow down their search results based on their specific requirements and preferences, enhancing their ability to find the most relevant products within the vast inventory.
Beyond search, ease of website navigation is paramount for a positive user experience. Key principles of effective e-commerce navigation include the use of clear and intuitive product categories complemented by a prominent and easily accessible search bar. Popular e-commerce websites incorporate these fundamental elements. Additionally, user-friendly navigation is often enhanced by features such as breadcrumbs, which allow users to trace their navigation path; a section for recently viewed items, providing quick access to previously browsed products; a wishlist or favorites option for saving items for later consideration; a quick view functionality that allows users to preview product details without navigating to the full product page; and a back-to-top button, which simplifies navigation on lengthy pages. For sellers utilizing the seller centers of these platforms, the navigation is structured with expandable and collapsible panels, offering flexibility in viewing options. Icons located in the top corners often provide quick access to essential applications like brand centers and developer portals. For sellers operating in multiple global marketplaces, switching between different accounts is made seamless through flag icons in the top navigation. To further aid in website navigation, sitemaps are often provided, offering structured overviews of the websites’ content and links to various sections. For users of the mobile apps, valuable “Find an item” features, when used within physical stores, display the aisle locations of searched products on store maps. This comprehensive approach to website navigation, encompassing clear categorization, robust search capabilities, and user-friendly features across both desktop and mobile platforms, underscores these companies’ commitment to ensuring that users can easily and efficiently find the information and products they need.
VI. Providing Robust Customer Service Resources:
Comprehensive and easily accessible customer service resources are essential for building trust and ensuring a positive shopping experience. Popular e-commerce websites offer a range of support options for their customers.
These platforms feature comprehensive Help Centers that provide answers to a wide variety of common questions. The Help Centers are structured to allow users to either browse help topics or engage in chat sessions with customer service. The topics covered are extensive, including managing orders, handling returns and refunds, information about various services, details on delivery options, and relevant company policies. In addition to the main Help Centers, specialized help centers for specific services, such as financial services and auto services, are also often available, allowing users to find targeted information related to these areas. Furthermore, dedicated Frequently Asked Questions (FAQ) sections address issues specifically related to certain services, catering to unique regulations and processes involved. The presence of well-organized and comprehensive Help Centers on popular e-commerce websites serves as valuable self-service resources, enabling customers to find answers to their queries quickly and efficiently without needing to contact customer support.
For customers who require direct assistance, popular e-commerce websites provide multiple channels for contact. Primary customer service phone numbers are readily available. Additionally, online chat functions are easily accessible through the Help Centers, offering convenient ways for users to communicate with support agents in real time. Specific contact information for different types of inquiries, including media relations, financial services, investor relations, and supplier communications, is also typically provided. Dedicated customer care numbers are available for specific services. In cases requiring escalation, specific contact numbers for customer escalations are provided. The provision of multiple contact methods ensures that customers can choose the channel that best suits their needs and the urgency of their issue.
Popular e-commerce websites also incorporate live chat and support bot features to enhance their customer service capabilities. The Help Centers prominently feature “Chat with us” options. When initiated, the live chats typically begin with chatbots, which present users with lists of common issues and attempt to provide solutions or guide them to relevant information. If the chatbots are unable to resolve the queries, they offer the option to connect with live customer service agents. This tiered approach, starting with chatbots and offering escalation to human agents, allows these companies to efficiently handle large volumes of customer inquiries, providing immediate responses to common issues while ensuring that more complex problems can be addressed by trained professionals.
VII. Leveraging Marketing and Promotional Strategies:
Marketing and promotional strategies play crucial roles in driving sales and customer engagement for e-commerce platforms. Popular e-commerce websites employ several tactics to attract and retain customers.
These platforms feature dedicated sections that prominently showcase various deals and promotions, including “Flash Deals,” “Today Only,” “Rollback,” and “Clearance”. “Flash Deals” are limited-time offers that often provide significant discounts on selected products. The websites also highlight deals that are available for single days in the “Today Only” section. Products marked with “Rollback” tags indicate temporary price reductions. Additionally, the “Clearance sections offer items at significantly reduced prices. Deals are also strategically organized by product categories, such as electronics and home goods, making it easier for customers to find offers on items they are interested in. Some products featured in the deals sections are also labeled as “Best Seller” or “Sponsored,” indicating their popularity or promotional placement. The active promotion of deals and discounts through these clearly defined sections on popular e-commerce websites is a key strategy for attracting customers and driving sales.
Popular e-commerce websites leverage data and artificial intelligence to offer personalized product recommendations to their users. The companies’ Generative AI search is designed to provide tailored responses and product suggestions based on individual customer search queries and their engagement history with the platforms. Furthermore, the assortment recommendation systems used by sellers on the marketplaces utilize internal and external search data, information on best-selling items, and current trending products to generate personalized item suggestions 21. Personalized recommendations are also recognized as key features of effective e-commerce websites in general. By offering relevant product suggestions based on past behavior and current trends, these platforms aim to enhance the shopping experience, improve product discovery, and ultimately increase sales and customer satisfaction.
While not explicitly detailed in the provided snippets, it is a common and highly effective e-commerce marketing practice to offer incentives for users to sign up for email newsletters or to create accounts. These offers can include exclusive discounts, early access to sales, or other benefits in exchange for providing their email addresses. This allows popular e-commerce websites to build their customer email lists and directly communicate promotions, new product announcements, and personalized offers to their subscribers, fostering customer loyalty and driving repeat purchases.
VIII. Demonstrating Commitment to Accessibility and Inclusivity:
Popular e-commerce websites demonstrate strong commitments to ensuring that their online platforms are accessible to all customers, including individuals with disabilities.
These companies have explicitly stated their commitments to making their websites accessible to all customers, including those with disabilities. Their accessibility efforts are guided by the Web Content Accessibility Guidelines (WCAG) version 2.1, Level AA, which are internationally recognized standards for web accessibility. They actively encourage feedback from users regarding the accessibility of their websites, demonstrating proactive approaches to continuous improvement. To further assist shoppers with disabilities, some are piloting programs that provide free access to visual interpreters (through partnerships with services like Aira) both in their physical stores and on their websites. These services connect customers with sighted interpreters who can provide real-time descriptions of their surroundings, assist with navigation, and read signage or product labels. In their physical locations, sensory-friendly shopping hours have also been introduced, and adaptive products are being expanded to better meet the needs of customers with disabilities. The “Adaptive at [Platform Name]” sections on their websites feature varieties of products catering to different needs, including hearing aids, adaptive clothing, sensory toys, mobility aids, and daily living aids. For customers utilizing healthcare services offered by some of these platforms, language assistance in over 220 languages is provided, along with large print resources, “talking labels,” Braille prescription labels upon request, and arrangements for American Sign Language (ASL) interpreters. Stores are also designed to comply with the Americans with Disabilities Act (ADA), and store associates receive training to assist customers with disabilities upon request. These comprehensive efforts demonstrate these companies’ significant commitment to creating inclusive shopping experiences for all customers.
Popular e-commerce websites provide clear and readily available information about their commitments to accessibility through dedicated accessibility statements on various parts of their online presence. Accessibility statements are available in the investor relations sections of their corporate websites. Similarly, retail sites for specific products like contact lenses also feature accessibility statements outlining aims to comply with WCAG and Section 08 standards. Furthermore, links to main accessibility policies are included in the footer sections of the primary websites. The presence of these easily accessible statements underscores these companies’ transparency and accountability in their ongoing efforts to ensure inclusive online experiences for all users.
IX. Conclusion:
The analysis of popular e-commerce websites reveals sophisticated and customer-centric platforms that incorporate numerous best practices across various aspects of their operations. The companies demonstrate a clear understanding of the importance of seamless and enjoyable online shopping experiences, from initial browsing to post-purchase support. Key takeaways include their commitment to blending brand heritage with modern digital design, their meticulous approaches to product page optimization with high-quality imagery and detailed descriptions, the provision of wide arrays of convenient and secure checkout options, the strategic use of advanced AI to enhance search functionality, the availability of comprehensive customer service resources, the focus on clear and intuitive website navigation, the active implementation of marketing and promotional strategies, and strong commitments to accessibility and inclusivity for all users. These practices collectively contribute to popular e-commerce websites’ positions as leading e-commerce platforms and offer valuable insights for other businesses looking to improve their online presence.
X. Actionable Recommendations:
Based on the identified best practices of popular e-commerce websites, the following actionable recommendations can be considered by other e-commerce platform owners and teams:
Invest in High-Quality Visuals: Prioritize professional, high-resolution product photography that showcases items from multiple angles and in relevant contexts. Implement zoom features to allow customers to examine details closely.
Craft Comprehensive Product Descriptions: Develop detailed and informative product descriptions that highlight key features and benefits, incorporating relevant keywords for search engine optimization. Aim for a substantial word count to provide ample information.
Integrate and Leverage Customer Reviews: Prominently display customer reviews and ratings on product pages. Explore the use of AI-powered tools to summarize and analyze customer feedback for quick insights.
Offer Diverse Checkout and Payment Options: Provide a wide range of checkout methods (e.g., guest checkout, account-based) and payment options, including credit/debit cards, digital wallets, “buy now, pay later” services, and other locally relevant payment methods.
Ensure Robust Security Measures: Implement industry-standard security protocols, such as SSL encryption, and consider advanced technologies like AI-powered fraud detection to protect customer payment information and build trust.
Enhance Search Functionality with Advanced Technologies: Explore the integration of AI and natural language processing to improve the accuracy and intuitiveness of the website’s search capabilities.
Provide Comprehensive Filtering and Sorting: Offer a wide variety of filters (e.g., price, category, brand, size, color) and sorting options (e.g., price, popularity, ratings) on search results pages to help users quickly narrow down their choices.
Optimize Website Navigation: Ensure clear and intuitive website navigation with well-defined product categories, a prominent search bar, breadcrumbs, and mobile-friendly design principles. Consider features like recently viewed items and wishlists5.
Develop Comprehensive Customer Service Resources: Create a detailed Help Center with FAQs covering a wide range of topics. Offer multiple contact channels, including phone, email, and live chat, potentially incorporating chatbot technology for initial support and efficient handling of common queries.
Implement Strategic Marketing and Promotions: Utilize various promotional tactics, such as flash sales, category-specific discounts, and clearance events, to attract customers. Leverage data to offer personalized product recommendations and consider email marketing campaigns for customer engagement.
Prioritize Website Accessibility: Adhere to WCAG guidelines to ensure the website is accessible to users with disabilities. Provide assistive features and information about the company’s commitment to inclusivity through a clear and easily accessible accessibility statement. Consider offering assistive services like visual interpreters.
Table: Summary of Payment Options on Popular E-commerce Websites
Payment Method
Online/In-Store
Key Features/Benefits
Credit Cards
Both
Widely accepted, various rewards programs.
Debit Cards
Both
Direct withdrawal from bank account.
PayPal
Online
A secure online payment platform may offer buyer protection.
Gift Cards
Both
Can be purchased online or in-store, easy to redeem.
Mobile Payment
In-Store
Touch-free payment via the app, secure storage of payment information, and access to e-receipts.
Affirm
Both
“Buy now, pay later” service allows for installment payments.
EBT Cards
Both
Accepted for eligible items, facilitates purchases for SNAP and other benefit recipients.
Pay by Bank
Online
Direct payment from a linked bank account.
Reloadable Debit Cards
Both
Offers cash-back rewards on purchases.
Cash
In-Store
Traditional payment method.
One Cash (via One Pay)
Both
Earn points for every $10 spent, redeemable as cashback with a One Cash account. Requires the One app.
HSA/FSA Cards
Online
Accepted for eligible healthcare items.
Benefit Cards
Online
Accepted for eligible items (e.g., Healthy Benefits, OTC Network).
Refund Credit
Online
Credit was issued for returned items.
Table 2: Popular E-commerce Websites Customer Service Resources
Resource Type
Access Method
Key Features/Information
Help Center
Link on the website (usually in the footer or top navigation)
Comprehensive FAQs covering order management, returns, services, policies, and more. Search functionality and categorize topics for easy navigation.
Phone Support
Typically, a 1-800 number
Direct voice communication with customer service representatives for inquiries and issue resolution.
Online Chat
“Chat with us” button within the Help Center
Real-time text-based communication with customer service agents or chatbots for immediate assistance. Often available 24/7.
Email Support
Typically accessed through contact forms within the Help Center
Allows customers to submit detailed inquiries in writing and receive responses via email. Suitable for non-urgent issues.
Financial Services Help
Dedicated phone numbers
Support for issues related to financial products, including balance inquiries and card management.
Auto Services Help
Typically found within the Auto Services section of the website
Provides information and contact options for inquiries related to auto services.
Local Marketplace Help
Phone numbers often provided
Specific support for issues related to local marketplace orders, including cancellations and delivery issues.
Escalation Line
Specific phone number
Dedicated line for escalating unresolved customer service issues.
Social Media Support
Via Twitter and Facebook
Customers can reach out for quick inquiries and support via direct messages or public posts. Response times may vary.
Ethics Helpline
1-800 number or online form
A confidential channel for reporting ethical concerns or violations.
Accessibility Support
Dedicated phone line
Dedicated phone line for customers experiencing difficulty accessing the website content.
Healthcare Support
Email addresses often provided
Email address for healthcare accessibility questions, concerns, or suggestions.
Investor Relations
Email via website
Contact for shareholder inquiries and financial information.
Suppliers
Contact via buyer/business contact
Specific process for suppliers to contact regarding business matters.
Associate Support
Dedicated phone lines or portals
Resources for associates regarding employment, benefits, and internal platforms.
We start with what is Opencart and end with setting up Opencart’s full-fledged eCommerce store. Are you ready to create your OpenCart store? Whether you’re a beginner just starting your eCommerce journey or a seasoned veteran looking to optimize your online presence, “OpenCart 4: User manual to create a full-fledged eCommerce store” is your comprehensive guide to mastering OpenCart.
OPENCART 4 INSTALLATION, CPANEL, SERVER SETUP, SSL, FTP, EMAIL
Choosing the Right Server Type
Server Requirements for OpenCart
Easy OpenCart Setup on cPanel Hosting via Softaculous
Step 1: Log into cPanel
Step 2: Enable SSL for the domain in cPanel
Step 3: Install OpenCart via Softaculous
Setting Up FTP Access
Configuring Email
Configuring PHP Settings:
SSL certificate setup for URL
Is the SSL certificate required on Opencart?
Which are the pages that you have to make SSL in the eCommerce site?
Server settings for the Encrypts SSL
OPENCART 4 ADMIN SYSTEM SETTINGS
Settings
Users
Localisation
Multiple Store Locations on the Contact Us page of Opencart
Countries and Zones States Regions management
Length and Weight
Currencies management in the Opencart 4 version with auto-update
Language
Stock status management and product availability in Opencart
Order status management in Opencart
Maintenance
Maintenance Mode in Opencart
Backup/Restore in Opencart
Uploads in the Opencart maintenance section
Error Logs in Opencart
Upgrade
OPENCART 4 CATALOG MANAGEMENT
Categories management
Accessing the Admin Panel
Navigate to Categories Management
Creating a New Category
Category Details:
Editing an Existing Category
Deleting a Category
SEO and Best Practices for Categories
Category frontend
Products management
Adding a Product
Copying a Product
Editing a Product
Deleting a Product
Master Product and Variant Product in Opencart
Where do you look if the product is not showing in the front end?
Example URL of product detail page
How Does the Wishlist Work in OpenCart?
How Customers Use the Wishlist in OpenCart
Benefits of the Wishlist Feature in OpenCart
Managing the Wishlist as an Admin
How Does the Compare Products Feature Work in OpenCart?
Subscription Plans
Key Features of Subscription Plans in OpenCart
Setting Up Subscription Plans in OpenCart
Assign Subscription Plans to the Product
Configure Subscription Plan Details
Frontend view of subscription plan
Managing Subscription Plans
Payment Gateway Considerations
Recommended Gateways
Use Cases for Subscription Plans
Benefits of Using Subscription Plans
Limitations of Subscription Plans
Best Practices for Subscription Plans
Filters management
Understanding Filters and Filter Groups
Setting Up Filters and Filter Groups
Using Filters in the Frontend (Store)
Examples of Filters and Filter Groups
Use Cases of Filters in Opencart 4
Attributes management
What are Attributes?
Key Differences Between Options and Attributes
Accessing Attribute Management
Creating an Attribute Group
Creating a New Attribute
Editing an Attribute
Deleting an Attribute
Assigning Attributes to Products
Best Practices for Attribute Management
Options management
Accessing Options Management
Adding a New Option
Editing an Existing Option
Deleting an Option
Assigning Options to Products
Real-World Examples
Best Practices for Options Management
Common Issues and Troubleshooting
Manufacturers management
Adding a New Manufacturer
Editing an Existing Manufacturer
Deleting a Manufacturer
Assigning Manufacturers to Products
Download management
Add/upload the download file.
Add the product and assign the download.
How do you make instant downloads available for digital products?
How will customers order the PDF or digital products?
Things to consider
Reviews management
Why Product Reviews Matter
Product Reviews section
Accessing Reviews Management in OpenCart
Adding a New Review
Editing a Review
Deleting a Review
Enabling and Disabling Reviews
Best Practices for Reviews Management
Troubleshooting Review Issues
Information pages management
Importance of Information Pages
Adding a New Information Page
Editing an Information Page
Deleting an Information Page
Assigning Information Pages to Layouts
Best Practices for Information Pages
Example Use Cases
Additional Considerations
OPENCART 4 DESIGN
What Are Design Layout Overrides?
Why Use Design Layout Overrides?
How to Implement Design Layout Overrides in OpenCart 4
Examples of Layout Overrides
Best Practices for Using Design Layout Overrides
Layouts management
Default Layout in Opencart 4
How do you show different layouts for different pages in Opencart 4?
Common Layout Scenarios
How do you customize the Opencart homepage?
Where can you find modules in Opencart 4?
Theme Editor
Steps to make the theme editor
Banners management
Overview of the Banners Page
Adding a New Banner
Editing an Existing Banner
Deleting a Banner
Assigning Banners to Layouts
Best Practices for Banner Management
Example Use Case
Language Editor
Key Features of the Language Editor
How to Access the Language Editor
How to Use the Language Editor
Use Cases for the Language Editor
Benefits of the Language Editor
When to Use the Language Editor
Best Practices
Upload a new language pack in Opencart 4
Test Your Custom Language
Change the default language of Opencart 4
SEO URL management
What are SEO URLs?
Enabling SEO URLs in OpenCart
Managing SEO URLs
Tips for Optimizing SEO URLs
Common Use Cases for SEO URLs
OPENCART 4 SALES MANAGEMENT
Orders
Order status global setting
Order statuses at Payment gateways
Customer Order Status in Order History
How do reward points work in Opencart?
Returns
Product Returns settings management:
Return Statuses:
Return Actions
Return Reasons
How does a customer submit product returns in Opencart 4?
Store administrator management of product returns
OPENCART 4 CUSTOMER MANAGEMENT
Customer Account Management
Customer Groups
Benefits of Customer Groups
Creating Customer Groups
Editing Customer Groups
Assigning Customers to Groups
Practical Use Cases
Best Practices
Customer Approvals
Why Use Customer Approvals?
Enabling Customer Approvals
Approving or Denying Customers
GDPR
General Data Protection Regulation Request page and setting
Warning: You will lose access to your account!
How do you change the Cookie or GDPR text that you see in the popup?
Custom Fields
Example of the custom field in the registration form
How do you add the custom fields in Opencart?
OPENCART 4 MARKETING MANAGEMENT
Affiliate
How is the affiliate registered in Opencart 4?
How do you activate the affiliate for the already registered customers?
How does the affiliate use the URL on their websites, blogs, or forums?
How is the commission added to the affiliate?
Marketing
Why Use Marketing Tracking?
Setting Up Marketing Tracking in OpenCart 4
Key Differences Between Marketing Tracking and Affiliate Tracking
Monitoring Campaign Performance
Practical Use Cases
Best Practices for Marketing Tracking
Coupons
Why Use Coupons in Your Store?
Accessing Coupon Management
Creating a New Coupon
Editing or Deleting Coupons
Tracking Coupon Performance
Best Practices for Coupon Management
Examples of Coupon Campaigns
Mail
Benefits of Marketing Mail
Accessing the Marketing Mail Feature
Creating a Marketing Mail Campaign
Example Use Cases
Troubleshooting Marketing Mail
OPENCART 4 REPORTS MANAGEMENT
Popular Reports lists
Reports
Customer Transaction Report
Customer Activity Report
Customer Orders Report
Customer Reward Points Report
Customer Searches Report
Tax Report
Shipping Report
Returns Report
Sales Report
Coupon Report
Products Viewed Report
Products Purchased Report
Who’s Online
Statistics
How do you add reports in the admin dashboard of Opencart 4?
OPENCART 4 EXTENSION MANAGEMENT
Marketplace
What is the Extension Marketplace?
Marketplace Categories
Accessing the OpenCart Extension Marketplace
Benefits of Using the OpenCart Marketplace
Installer
Accessing the Installer
Using the Installer
Extensions
Uploading an extension in OpenCart
Installing a module:
Uninstalling a module
Remove a module
Upload of extension with OCMOD
Installation of OCMOD extension
Types of Opencart Extensions
Order Total modules
Captchas
Module
Analytics:
Currency rates:
Other extensions:
Difference between single-instance module and Multi-instance module
Automatically post new Opencart products on social media like Facebook for free.
Some other Automation Tools
Benefits of Auto-Publishing via RSS
Add an Analytics extension in Opencart 4? Third-party JS free Opencart extension
Install the Opencart 4 Analytics extension.
Add conversion code on the success page of Opencart
OpenCart Payment Methods
Types of Payment Methods in OpenCart
Online Payment Gateways
Offline Payment Methods
How to Configure Payment Methods in OpenCart
Best Practices for Payment Methods in OpenCart
OPENCART 4 THEME
Install the Opencart 4 theme.
Activate Opencart 4 theme
Uninstall the Opencart 4 theme.
OPENCART 4 LANGUAGE MANAGEMENT
Upload a new language pack in Opencart 4
Add a new language pack in Opencart 4
Test Your Custom Language
Change the default language of Opencart 4
Override the language texts from the Admin Interface.
OPENCART 4 CMS OR BLOG SYSTEM
Why a Blog System Matters for eCommerce
CMS or Blog setting
Blog CMS Admin section
Topics or Category Management
Articles management (Add, edit, and delete)
Frontend Blog listing page
Article or Blog detail page
Blog module in Opencart
Topics module
Comment section
Managing User Group Permissions for CMS or Blog in OpenCart
Granting Permissions for CMS or Blog
Key Features of the OpenCart Blog System
Benefits of the OpenCart Blog System
OPENCART 4 EVENT SYSTEM
Event Types
Using Opencart Events:
Registering Events:
Using Events for Customization:
List of Events
Language events
Activity events
Statistics events
Theme event
Admin Currency Events
Admin Statistics Events
Translation Event
Admin Language Events
Testing Opencart Events
Challenges
Best Practices while using Opencart Events:
OPENCART 4 API DOCUMENTATION
Create an API username and key.
Opencart user, permissions, user group management, and API users
Authentication and Request Format of Opencart API:
Request
Request Parameters
Opencart 4 API Endpoints
Error Handling
OPENCART 4 MULTI-WEBSITES OR STORE SETUP
Benefits of a Multisite Setup
Prerequisites
Example stores
Step-by-Step Guide to Setting Up Multisite in OpenCart 4
Step 1: Configure Your Domain/Subdomain
Step 2: Add New Stores in OpenCart Admin
Step 3: Configure Store Settings
Step 4: Customize Your Store
Step 5: Assign Products and Categories
Step 6: Test Your Store
OPENCART 4 SEO BEST PRACTICES
Admin Setting section changes for the SEO
SEO-Friendly URLs
Optimize Product and Category Pages
Image Optimization
Internal Linking
Mobile Optimization
Enable the sitemap extension.
Add robots.txt
Canonical URL
Social proof
Schema Markup
Site Speed and Performance
GZIP Compression
Webfont loading
Fix broken links
Add your Business to Google
301 Redirects
SSL certificates
Mobile-first approach
Regular Monitoring and Analysis
OPENCART 4 SPEED OPTIMIZATION
Choose a better hosting provider and a better cache module.
Disable the Category Product Count
Use the image sizes properly.
Use the proper extension for the image:
GZIP compression level
Index the database table
Enable Caching
Minify and Combine CSS & JavaScript
Reduce HTTP Requests
Enable Lazy Loading for Images
Remove Unused Extensions and Modules
Monitor Performance with Tools
OPENCART 4 SECURITY MEASURES
Use good and secure hosting.
Check if the install/ folder is still there.
Proper Security settings in the admin
Use HTTPS/SSL Certificate
Use the latest PHP version.
Use Anti-fraud extension
Error handling setting
Monitor your admin error logs.
Block bad bots
Allowed File extensions and allowed file mime type permissions
Review All Users and User Groups and Grant the Minimum Permissions Necessary
Use a strong username and password.
API security in Opencart
Always use the latest Opencart version, theme, modules, and extensions
Remove unused modules or extensions.
Monitor your server logs.
Use HTTP security headers.
Cross-Site Scripting (XSS)
Database Security and SQL Injections
Denial of Service
Backup
Use Basic Captcha
COMPLETE E-COMMERCE FLOW FROM BROWSING TO CHECKOUT SUCCESS
Homepage: The Entry Point
Category Page: Exploring Products
Product Page: Selecting a Product
Cart Page: Reviewing the Order
Account Login / Sign Up (If Required)
Checkout Page: Finalizing the Order
Success Page: Order Completion
Additional Features Post-Purchase:
PRO TIPS AND TRICKS
Opencart eCommerce Site Launch Checklist for a Successful Start
Opencart 4 error Warning: You do not have permission to modify the default store theme!
Why is shipping not showing in Opencart?
How do you set up free shipping in the Opencart store?
How do you set up a flat shipping rate in the Opencart store?
How do you set up free shipping for orders over $100, and below, will it be $5 flat-rate shipping?
How do you set the shipping rate per item?
How can you set up pick up from the store shipping in the Opencart?
How do you set up a weight-based shipping rate?
What is ‘Zone Shipping’ and how do you set it up?
COMMON ERRORS AND THEIR SOLUTIONS
Blank white pages or 500 internal server error
Headers already sent
Allowed Memory Size Exhausted
Email is not working in Opencart – ways to solve
OpenCart Developer attributes for your customization, and how do you validate the work?
Useful Links
Who is this book for?
This book is tailored for a wide range of individuals looking to harness the power of OpenCart:
Aspiring eCommerce Entrepreneurs: If you’re new to online selling and want a clear, step-by-step guide to setting up your store, this book is perfect for you.
Existing OpenCart Store Owners: If you’re already running an OpenCart store and want to optimize its performance, expand its capabilities, or streamline your workflow, this book provides valuable insights and advanced techniques.
Web Developers and Designers: If you’re a developer or designer looking to build robust and scalable eCommerce solutions for clients, this book will equip you with the knowledge and skills to master OpenCart.
Small Business Owners: If you’re a small business owner looking for a cost-effective and flexible eCommerce platform, this book will help you navigate OpenCart’s features and functionalities.
Anyone Interested in eCommerce: Whether you’re a student, a hobbyist, or simply curious about eCommerce, this book provides a comprehensive overview of OpenCart and its potential.
This book isn’t just a manual; it’s a roadmap to building a thriving online business. It covers everything from the initial installation and configuration to advanced administration techniques and localization strategies.
Here’s what you’ll discover:
Effortless Installation & Setup: Get your store up and running quickly with clear, step-by-step instructions.
Mastering Administration: Learn to manage products, categories, customers, orders, and more with ease.
Unlocking Localization: Expand your reach by setting up multi-language and multi-currency support.
Optimizing Your Store: Discover tips and tricks to improve performance, security, and SEO.
And much more!
Why choose this book?
Comprehensive Coverage: It leaves no stone unturned, providing a complete understanding of OpenCart’s functionalities.
Practical Approach: It focuses on real-world scenarios and provides actionable advice you can implement immediately.
Easy-to-Follow Style: It’s written in a clear and concise manner, making it accessible to readers of all technical backgrounds.
Up-to-Date Information: It covers the latest features and best practices for OpenCart.
Ready to transform your OpenCart store into a powerful selling machine?
Don’t miss out on this invaluable resource. Click here to grab your copy of “OpenCart 4: User manual to create a full-fledged eCommerce store” today and unlock the full potential of your OpenCart store!
Struggling with tax debt can be like facing a stormy sea without a compass, but regaining control of your financial ship doesn’t have to be a solo journey. Understanding the depth and nature of your obligations is a crucial anchor point. By identifying the size, source, and terms of your tax debt, you prepare yourself to chart a course toward solvency. Below, you’ll find actionable strategies to navigate through your tax woes and sail toward calmer financial waters. Keep reading to unlock the secrets of managing and overcoming tax debt burdens.
Understanding Your Tax Debt: The First Step to Financial Recovery
Addressing tax debt starts with understanding what you owe and how it is accumulated. Review your statements carefully, as unpaid taxes, penalties, or interest could be adding to the problem. Responding to IRS notices promptly and verifying the accuracy of your debt can help prevent further complications.
If the debt feels overwhelming, tax relief services can provide expert guidance tailored to your situation. Some people even explore creative solutions like selling assets and turning trash cars for cash, which could be one way to generate funds and ease financial strain.
Navigating IRS Payment Plans: A Viable Option for Managing Tax Burdens
The Internal Revenue Service (IRS) offers installment agreements to help individuals settle their tax debt in smaller, manageable amounts. These plans range from short-term extensions to long-term installment agreements, tailored to different debt levels and ability to pay.
Setting up a payment plan with the IRS can be complex and require negotiation. The expertise of a tax professional can help secure a more favorable plan for your financial situation. It’s crucial to stay compliant with all current and future tax responsibilities while on a payment plan, as new tax liabilities can jeopardize your agreement, leading to possible default and further enforcement actions.
Settling Tax Debt for Less: Exploring Offers in Compromise
An Offer in Compromise (OIC) is a tax debt settlement option that allows individuals to settle their liabilities for less than the full amount owed, provided they meet certain conditions set by the IRS. The IRS assesses eligibility by examining income, expenses, asset equity, and ability to pay, ensuring the offer is in the best interest of both taxpayers and the government.
The process of obtaining and submitting documentation for an OIC is meticulous and not a quick fix. However, if accepted, it can alleviate the burden of heavy tax burden, potentially saving thousands of dollars and providing a fresh financial start.
Professional Guidance: When to Consider a Tax Relief Attorney or CPA
Tax laws and regulations can be complex, making hiring a tax attorney or certified public accountant (CPA) essential. These professionals have a deep understanding of tax code intricacies and can help navigate legal challenges, such as IRS audits or liens.
They can also correct past tax returns and prepare future filings to prevent further debt accumulation. The decision to hire a tax professional depends on the complexity of your situation, but the long-term benefits, such as reduced debt, avoided penalties, and peace of mind, can outweigh the initial investment in professional services.
Staying Tax Debt-Free: Strategies for Future Financial Stability
Maintaining financial stability after overcoming tax debt is crucial. Proactive tax planning and budget management can prevent a resurgence of burdens. Maintaining thorough records and reporting deadlines can protect against future issues. Consulting with a financial planner or tax advisor can help understand tax implications and devise strategies like increasing withholdings or quarterly estimated tax payments.
Understanding how life changes impact tax liabilities is essential. Staying informed about potential tax benefits and obligations during transitions is also crucial. Learning from past experiences and applying that knowledge to future financial behavior is key to long-term stability.
Overall, while facing tax debt can be a challenging episode in anyone’s financial journey, there are clear steps that can lead to resolution and recovery. Whether through payment plans, offers in compromise, or seeking the advice of seasoned professionals, the paths to regaining financial freedom are accessible and achievable. Understanding and acting upon these strategies can transform a tax burden into a lesson in financial resilience and savvy.
You may be thinking about how we can use the OpenAI ChatGPT in your eCommerce business, here we are showing you how you can use or benefit from the OpenAI ChatGPT in your eCommerce business like copywriting, writing product descriptions, titles, emails, social media content, responses, personalized product recommendations, getting products information like popular ones, and many more. ChatGPT is simply a new tool, so it needs to be carefully used and trained on a relevant dataset of questions and responses. You can use it to get ideas and suggestions but creating content as naturally as possible is always good. Let’s start with copywriting.
You can use OpenAI ChatGPT for copywriting. Based on a given prompt or conversation environment, OpenAI’s ChatGPT language model can be used to produce text responses that resemble those of a human. ChatGPT can be used to come up with concepts or content for marketing pieces like product descriptions, blog entries, or email campaigns. A copywriter might give ChatGPT a list of keywords or a broad theme, for instance, and the model might then provide a list of concepts or a draft of the copy based on that input.
Here is one example of how OpenAI ChatGPT gives a response when we ask: “Can you please provide copywriting content for the Buddha statue?”
We were looking for small copywriting content, but ChatGPT gives us multiple paragraphs, so we again ask “Can you please provide short copywriting content for the Buddha statue?”, here is the response:
The more detailed information you give the more exact answer you will get, but take in mind it is still in preview mode.
OpenAI ChatGPT can help you write product descriptions
ChatGPT can be used to generate ideas or rough drafts of product descriptions based on input provided which you can review the output and refine to create a final product description that is clear, compelling, and accurate. Here is one example of how we asked the ChatGPT to provide the product description: “Write a product description of bronze Nepali Buddha statue from Nepal, price $400, 10cm height 10 cm width and 10 cm breadth, materials used bronze” and the response is like below:
Again, ChatGPT is simply a tool for generating text, and it is up to the writer to use their skills and expertise to craft a product description that meets the desired tone and style of your brand.
Every eCommerce uses multiple email touch points for promotions, signup, forgot password emails, vouchers, order confirmation, etc. You can use the ChatGPT by providing information about the purpose of the email, the intended audience, and any relevant context, and the model could generate a list of ideas or a draft email based on that input. Here is one example of how we ask ChatGPT to provide the signup email. We asked ChatGPT “Write a signup success email for webocreation.com an eCommerce website?” and the response is like below:
As you see, it provides you with overall ideas and drafts to start with the content, which you can use as per your requirements.
We cannot be 100% sure but we can get some overall ideas, we asked OpenAI ChatGPT to provide popular kitchen products by asking like “popular products in kitchen appliances” and the result is like below:
Use OpenAI ChatGPT for social media content
We can use OpenAI ChatGPT for social media content. We asked ChatGPT to provide the social media promotion content for our ebook “OpenCart Theme and Module Development” and it provided us the following content:
But, we cannot promote this content on Twitter because of the word limits so we asked ChatGPT to provide us the Twitter promotion text by asking “Write a Twitter social media promotion content for the ebook “OpenCart Theme and Module Development” and here is the response:
For the above Twitter promotion, we need to share in Nepalese and Spanish languages so we asked the ChatGPT to translate it just by typing “Translate it into Nepalese”, here is the result which is not totally good but it provides the starting points:
Personalized products recommendations
You can set up related products as per the personalized product recommendations. We asked ChatGPT to provide us the product recommendations for those ebook “product recommendations who bought the ebook “OpenCart Theme and Module Development”, here is the response:
In conclusion, OpenAI’s ChatGPT is a potent language model with the potential to be applied in a number of eCommerce-related applications and processes. ChatGPT can be used for copywriting, writing product descriptions, titles, emails, social media content, responses, personalized product recommendations, getting product information like popular ones, and many more. However, it is crucial to remember that ChatGPT is merely a tool for producing text responses; it is up to the user to use it carefully which helps your eCommerce business. The ChatGPT gets trained on a relevant dataset of queries and responses in order to reach a high level of accuracy and efficacy but for now, we all need to use it carefully. Are you using ChatGPT, if yes let us know how you are using it and if not check it, it amazes you most of the time.