The Role of AI in E-Commerce Logistics and Fulfillment

You’ve probably heard it in the news. The latest technological craze to take the world by storm comes in the form of artificial intelligence (AI). A cutting-edge technology that is poised to make its impact across all industries, AI is a tool that many organizations must get their hands on. First, let’s get to know all the details about this incredible innovation. 

What Is Artificial Intelligence? 

Artificial intelligence – it’s a buzzword that’s been around for decades, only for its applications to be realized as of late. You may have seen its products all over the Internet. You may have seen entertaining conversations with ChatGPT, an AI-powered chatbot, circulating on social media. Or perhaps you’ve seen some convincing AI-generated images of public figures. 

All of these are possible thanks to the ability of AI to simulate the human brain with the use of human machines. Especially because it uses computer systems, AI processes information at significantly higher speeds than humans do. However, unlike humans, artificial intelligence systems do not think or feel. Instead, they act based on the data provided to them. 

Because of these qualities, it’s easy to see why using artificial intelligence has been on everyone’s radar. And that is exactly what’s happening across various fields from healthcare to finance. But there’s another industry in particular that’s reeling in the benefits of AI: e-commerce. 

What Is the Role of AI in E-Commerce Logistics and Fulfillment?

It’s easy to see how artificial intelligence can be used in e-commerce, especially when it comes to improving the customer experience. AI chatbots can respond to customer concerns 24/7, or AI can even make product recommendations based on the analysis of customer behavior. 

But, did you know that AI also has its role in other areas of e-commerce, such as logistics and fulfillment? Here’s how artificial intelligence has changed the game in these fields:

Predictive Analytics

The power of artificial intelligence lies in its ability to learn from large data sets and make decisions based on them. In the field of e-commerce, AI learns from the historical data of past orders and other data points to forecast demand levels. For many e-commerce businesses, this helps in determining if the inventory is sufficient to fulfill orders. 

Route Optimization

If there’s one thing that every e-commerce business must add to its logistics strategy, it must be route optimization. Why? It’s one of the best ways to cut costs and help save the environment. Artificial intelligence can analyze past delivery routes and optimize them to deliver goods in an efficient manner. The technology takes multiple factors into accounts such as weather patterns and traffic conditions, which are all based on past data. This, in turn, shortens delivery times and reduces your carbon footprint – making it an excellent use case of AI in the e-commerce sector. 

Chatbots

Another weapon that every e-commerce company must add to its arsenal comes in the form of chatbots. Chatbots, like ChatGPT, have been useful to the e-commerce industry. One of their major applications is tracking orders. To increase customer satisfaction, you must be transparent with a customer’s order status, and this can be easily achieved by using chatbots. A key benefit of these virtual assistants is that they are available 24/7. This prevents the need for additional manpower for customer service teams while simultaneously meeting customer expectations. 

Warehouse Management

A crucial element of logistics is warehouse management, which artificial intelligence has changed forever. AI optimizes logistics by taking charge of all the tedious calculations, like predicting the number of pallets required to move in the warehouse each day or forecasting the labor requirement for the handling of the process. As a result, this reduces overhead costs – allowing businesses to allocate their funds to other areas of business growth. 

When one thinks of artificial intelligence, images of robots would conjure in one’s head. And that’s exactly Robots are also being used as a form of artificial intelligence in warehouse management. These machines can scan inventories from a distance and deliver goods much more quickly than humans can, increasing the efficiency of warehouse processes. 

Fraud Detection

Each e-commerce business is required to be PCI-compliant due to the sensitive data provided by customers, which includes cardholder data. To stay compliant, an organization must have the necessary safety measures in place to prevent fraudulent transactions. Thanks to AI, this shouldn’t be much of an issue. 

Artificial intelligence has the ability to analyze previous transaction data and identify any fraudulent patterns. Additionally, AI keeps your walls up by monitoring network traffic and identifying suspicious activity, which prevents the incidence of data breaches. 

In Conclusion 

From predictive analytics to fraud detection, its use cases are plenty. While more is yet to be discovered about this nascent technology, its impacts have already been significant in the e-commerce industry, specifically in the field of logistics and fulfillment. The future is AI, and the future is inevitable. 

5 Best eCommerce Website Builders for Creating Online Stores

eCommerce is breaking new records every year. It reached a value of $13 trillion in 2021, which is more than the economic output of China. If eCommerce were a nation, then its GDP would have been the second-largest in the world.

As an eCommerce website owner, you need a robust store that is up all the time, even when you are sleeping.

Some or all of the following attributes are preferable when selecting an eCommerce website builder:

  • Reliable site architecture
  • Attractive themes
  • Shopping cart
  • A checkout page with a payment gateway
  • Stock management
  • Auto invoice generator
  • Multiple languages and currency
  • Easy to use plugins
  • SEO optimizable product pages

We have done a thorough review of the best eCommerce website builders and present the results in this article.

Five top website builders for eCommerce in 2022

Wix

Wix

Wix has helped create 700,000 shopping websites worldwide. It is one of the leaders in eCommerce website platforms

Unlike Shopify and BigCommerce, Wix is not specialized eCommerce website software. But Wix enjoys huge goodwill due to its reliability, and that helps. 

Wix offers over 50 payment solutions and 500 templates. The basic e-commerce plan starts at $23 and goes all the way to $49 per month.

Pros

  • Supports dropshipping consignments with a delivery tracker.
  • Offers enterprise-level security for a safe shopping experience and prevents theft of personally identifiable information.
  • Unique inventory management software that provides re-order suggestions based on sales.
  • Built-in chatting solution for better customer care experience.
  • Managing a site through a mobile app makes it easier to track your site from anywhere.
  • The email marketing plugin is inbuilt and helps grow leads.
  • Social media marketing through Facebook and Instagram is supported.

Cons

  • Thinly populated app store and inability to employ third-party apps.
  • The themes are not fully customizable and look plain.

Squarespace

squarespace

If there was an award for the most attractive sites, it would go to a Squarespace site.

It’s not only dandy-looking but packs a punch.

Most eCommerce sites built with Squarespace belong to the niche art, clothing line, and photography space with more stress on a few large transactions rather than thousands worth a dollar or three.

Squarespace prices start from $20. The top-tier plan is priced at $49.

Pros

  • Unlimited bandwidth allows thousands of users to visit the website.
  • Multichannel sales integration through Facebook and amazon allows you to double your revenue.
  • No limitation to the number of product pages or hard disk space.
  • Squarespace provides plugins that help with lead generation.
  • Professional email solution powered by Google.
  • Customizable themes that allow HTML and CSS modification.
  • Squarespace sites work perfectly on smart devices.

Cons

  • Very few payment providers (Stripe, Paypal, Apple Pay, and Afterpay) restrict its appeal in the developing world.
  • The least expensive plan levies a 3% transaction fee that eats into profit.

Shopify

shopify

Shopify is synonymous with eCommerce sites. More than a million sites worldwide use Shopify and it has a 10% market share.

Shopify stores have a combined turnover of over $300 billion. The reason for this success is not far to seek. Shopify combines the aesthetics of Squarespace with the ease of Wix and the functionality of WooCommerce.

The basic plan starts at $29. The popular plan is priced at $79 and advanced at $299.

Pros

  • 70 optimizable templates created by renowned web design firms such as Happy Cog and Pixel Union.
  • A Free 256-bit SSL certificate makes it trustworthy and reliable.
  • Better delivery options that can be weight or distance-based.
  • Available in over 50 languages and all major currencies.
  • Accept cryptocurrency, besides conventional payment gateways.
  • Integrates with specialized dropshipping apps like Ordoro.
  • Can target specific customers with discounts and promo offers.

Cons

  • 30-cent transaction fee and ~2.5% revenue sharing across all plans.
  • The lack of a native email hosting service means you have to look for outside vendors.

Weebly

weebly

Weebly is perfect for small and medium-sized online stores. It is currently owned by Square, a well-known name in online payment solutions.

Unlike Wix, the website builder does not have separate plans for websites and online stores.

Anyone can add the eCommerce module and convert the site to an e-commerce store. Weebly is also quite cheap and plans start at $12 for a simple store with a small data bandwidth.

Pros

  • The Weebly editor is brilliant. It makes designing and setting up a store easy and enjoyable.
  • Weebly supports the Square payment gateway, which is one of the most trusted in the world.
  • Has a search engine to search the site for any product or category.
  • Easy to set filters based on cost, color, and other criteria.
  • Weebly has included an automated billing and tax calculation plugin free of cost.
  • The top-tier plan has abandoned cart tracking and email follow-ups.
  • Templates are equipped with built-in lead capture forms.

Cons

  • Not suitable for larger stores with more than a hundred product pages.
  • Cannot be customized adequately for SEO purposes.

BigCommerce

bigcommerce

BigCommerce is listed on NASDAQ and has revenue above $100 million. BigCommerce is not suitable for building small-scale businesses. It is better for established players who are looking to up their game.

BigCommerce pricing plans reflect their philosophy and are limited by revenue. The cheapest is $29 with a $50,000 annual cap. The most expensive is $299 with half a million-dollar cap.

Pros

  • A highly customizable platform that can be updated with new themes in a matter of hours.
  • Includes Akamai Image Manager that compresses high res images for faster loading product pages.
  • Comprehensive dashboard that offers insights into traffic and source.
  • Supports over 65 payment apps such as Square, Stripe, and Amazon Pay.
  • Can integrate with several third-party apps like HubSpot CRM that improve topline.
  • Target different customer groups with bespoke messages and offers.
  • Virtual training is available for owners to help manage sites.

Cons

  • Limits on annual sales are a deterrent for many store owners.
  • The search function is rudimentary and cannot pinpoint product pages.

Which is the best?

We tested several eCommerce website builders extensively and mentioned the five best above.

Is there one that is better than the others? Although all are extremely capable, we opine Shopify is the best eCommerce website.

It is not too expensive and, apart from the bland templates, has too many positives to ignore.

Effective Marketing Tactics for Promoting Your Podcast to a Wider Audience

Podcasting has taken the world by storm, and there’s never been a better time to start your own show or expand your current audience. With millions of podcasts available, attracting listeners can be daunting, especially if you’re new to the game. Don’t worry, though, because we’ve got you covered! 

In this article, we’ll dive into various effective marketing tactics to help you promote your podcast to a wider audience. We’ll cover everything from social media marketing and email campaigns to SEO, influencer marketing, and more. Plus, we’ll provide practical tips to help you implement these strategies effectively.

Social Media Marketing

One of the easiest and most cost-effective ways to promote your podcast is through social media marketing. Platforms like Facebook, Twitter, Instagram, and LinkedIn offer a multitude of ways to connect with potential listeners and build a community around your podcast. 

Here’s how you can harness the power of social media:

  • Create eye-catching graphics and video teasers for each episode to generate interest and encourage shares. Use a free video editor to craft professional-looking teasers without breaking the bank. These tools offer a variety of features that can help you create compelling content that captures your audience’s attention and boosts engagement.
  • Share your podcast episodes consistently across all your social media channels.
  • Increase your content visibility by using relevant hashtags.
  • Engage with your audience by responding to comments and questions, and asking for feedback on your episodes.
  • Consider running targeted ads to reach a larger audience interested in your podcast topic.

Email Marketing

Building an email list is another powerful way to connect with your audience and promote your podcast. By sending regular updates and exclusive content, you can keep your subscribers engaged and encourage them to share your podcast with their network. 

Here are some tips for effective email marketing:

  • Offer an incentive (like a free e-book, resource, or bonus episode) to encourage listeners to sign up for your email list.
  • Send regular updates with new episodes, behind-the-scenes content, and other relevant information.
  • Use attention-grabbing subject lines and preview text to increase open rates.
  • Include social sharing buttons in your emails to make it easy for subscribers to share your podcast with others.
  • Monitor your email analytics to track engagement and adjust your strategy as needed.

SEO for Podcasts

While SEO is often associated with websites and blogs, it’s also important for podcasters. By optimizing your podcast for search engines, you can increase your visibility in search results and attract more listeners. 

Follow these SEO best practices for podcasts:

  • Make sure your podcast title is descriptive and keyword-rich.
  • Write detailed and informative show notes for each episode, including relevant keywords and phrases.
  • Include transcripts of your episodes on your website or blog to boost your site’s SEO.
  • Contact podcast directories like Apple Podcasts, Spotify, and Google Podcasts and ask to be included.
  • Encourage listeners to leave reviews and ratings to improve your podcast’s visibility in search results.

Influencer Marketing and Collaboration

Collaborating with influencers or other podcasters in your niche can be an effective way to expand your audience. By leveraging their existing following, you can introduce your podcast to a new group of potential listeners. Here are some tips for successful influencer marketing and collaboration:

  • Identify influencers or podcasters in your niche who have a similar target audience.
  • Reach out to them with a personalized message, expressing your admiration for their work and suggesting a collaboration or interview.
  • Offer value in exchange for their time, such as promoting their content on your platform or providing a unique angle for an interview.
  • Be sure to tag and mention them in your social media posts and show notes to maximize exposure.
Remember to stay vigilant and be aware of marketing fraud schemes when engaging with influencers to protect your podcast and brand.
Cross-Promotion and Networking

Cross-promotion and networking with other podcasters, content creators, and industry experts can help you reach a larger audience and build valuable relationships within your niche. 

By supporting one another, you can mutually benefit from each other’s audiences and expand your reach. Here’s how to effectively cross-promote and network:

  • Attend industry events, conferences, and meetups to connect with like-minded podcasters and content creators.
  • Join podcasting and content creation communities on social media platforms, such as Facebook groups or Reddit.
  • Reach out to other podcasters for guest appearances, ad swaps, or episode recommendations.
  • Share and promote the work of others in your niche, and they may return the favor.

Don’t forget to check out corporate events for networking opportunities and to learn more about event production and types.

Utilize Traditional Marketing Channels

While digital marketing is essential for podcast promotion, don’t overlook the power of traditional marketing channels, such as print advertising, radio ads, and even billboards. 

These methods can help you reach a wider demographic of potential listeners who may not be as active online. Some ideas for using traditional marketing channels include:

  • Creating eye-catching print ads for local newspapers or magazines.
  • Recording a radio spot to air on relevant stations.
  • Designing billboards or posters to display in high-traffic areas.
  • Sponsoring local events or meetups related to your podcast’s niche.

Read More: Tips and tricks to improve Pardot form select fields with JavaScript

Offer Exclusive Content and Merchandise

Creating exclusive content or merchandise can help you build a dedicated fan base and generate buzz around your podcast. By offering something unique and valuable, you can encourage listeners to share your podcast with others and become loyal supporters. 

Here are a few ideas for exclusive content and merchandise:

  • Record bonus episodes or create a Patreon account for subscribers who support your podcast financially.
  • Design and sell podcast-themed merchandise, such as t-shirts, mugs, or stickers.
  • Offer access to a private community or group for your most dedicated listeners.

Get Creative with Your Promotion

Don’t be afraid to think outside the box when promoting your podcast. From partnering with brands to creating shareable content like healthy snack recipes or hosting live events, there are endless ways to make your podcast stand out from the crowd. 

Some additional creative promotional ideas include:

  • Hosting a live podcast recording or Q&A session.
  • Partnering with a brand for a giveaway or contest.
  • Collaborating with a local business to create a unique product or experience related to your podcast.
  • Creating shareable content that ties into your podcasts, like blog posts, infographics, or videos.

Conclusion

Promoting your podcast to a wider audience may seem like a daunting task, but with the right strategies and a little creativity, you can effectively grow your listenership and make your podcast a success. By using the tips we’ve provided today, you can successfully gain more listeners and build a loyal following. 

Supercharge Your Podcast Growth

Are you ready to take your podcast promotion to the next level? Webocreation Team is here to help!

Our team of experts can assist you in implementing the strategies discussed in this article and more, ensuring that your podcast reaches a wider audience and grows its following. With our expertise, we’ll create a customized plan tailored to your podcast’s unique needs. Don’t miss out on the opportunity to expand your reach and make your podcast a resounding success. Contact Webocreation today to find out how we can help you achieve your podcast growth goals!

The Importance of Payment Gateway Security for E-commerce

Sales from mobile eCommerce (m-commerce) are expected to take up 43.4% of total e-commerce sales in 2023. In other words, almost half of the e-commerce purchases are now done using mobile devices. One major implication of this for e-commerce firms and small businesses is a renewed emphasis on secure payments. After all, convenience alone is not enough for consumers to share their financial information online.

This is where the payment gateway comes in. A payment gateway is the digital equivalent of a point-of-sale (POS) terminal. It enables secure online transactions and simplifies the sales process for the buyer and seller. This technology also manages financial information such as a customer’s name, card number, and CVV code.

This article explains why a secure payment gateway is essential, especially for startups.

Why do businesses need a payment gateway?

As mentioned earlier, a payment gateway is like a virtual POS terminal that powers secure credit card payments, among other methods of online purchasing. More specifically, the payment gateway is responsible for verifying the customer’s bank card details, checking the availability of funds, and allowing the merchant to receive payment. Another important function of the payment gateway is encrypting confidential data from the client in order to anonymize the transfer of the client’s data to the receiver. A secure payment gateway is a great demonstration of using cryptography for improving cybersecurity.

Why is payment gateway security important?

Lightening a merchant’s burdens

Let’s discuss the most obvious benefit of payment gateways first. A payment gateway company handles sensitive banking and credit card information. They take away this responsibility from the merchant. These third-party companies are focused on keeping data confidential and secure. So, they specialize in website security, data encryption, and the like. On the other hand, you, the seller, can focus on providing products and services. Additionally, most of these payment gateway providers are insured. So, they’ll be accountable for any errors in the transactions.

Having more methods of payment collection

Once your secure payment gateway is up and running, clients will trust you with collecting payments using various methods. Not only will you be able to collect payments from different banks and online banks, but you’ll also be able to utilize phone calls and texts. For example, clients can call you with their payment details so that you can bill their card. You may also offer an option for customers to text you and communicate their financial details securely. 

Serving a larger customer base

Since secure payment gateways allow you to collect financial information with no worries, you’ll be able to attract more customers. More specifically, you will appeal to customers that prefer paying for purchases with their credit cards, online banks, or innovative apps like Earned Wage Access. 

Enhancing customer loyalty

In the digital age, nothing can ruin your reputation faster than a cyber-attack or data breach. On the flip side, making sure that your payment gateway is secure is one sure way to earn customers’ and prospects’ trust and, ultimately, their loyalty. 

Read more: 25 website security measures for eCommerce developer

Increasing customer spending

Window shopping is no longer reserved for malls and shopping centers. Nowadays, customers love to browse products online. If a customer happens to visit your store and sees a product they like, they’ll be able to check out and pay for the item if you have a reliable, easy-to-use payment gateway. On the other hand, if you don’t have an established payment gateway, your customer might choose a product that they can buy instantly, and with their preferred payment method.

Enabling recurring billing

If you offer subscription services, it is important to be able to collect payments regularly. A payment gateway is perfect for collecting payments automatically using an auto-debit mechanism. This saves you time and resources, puts money in your account sooner, and makes it easier for customers to manage their accounts.

Improving user experience

A third-party payment gateway can be customized to fit your brand as well as the needs of your customers. It improves user experience by making purchases more convenient. With a payment gateway, shoppers can pay for products instantly and just wait for them to be delivered to their doorstep. Another key benefit of payment gateways is that they save banking information securely. The next time your customer makes a purchase, they won’t need to fill out a form. Every purchase becomes fast and easy.

Boost Your Ecommerce Website’s Security

Security is the name of the game in e-commerce. A reliable payment gateway lightens a startup’s workload, increases its customer base, and improves its customers’ user experience. All of these lead to further benefits such as higher customer loyalty and increased consumer spending.
If you have more questions about securing your payment gateway or growing your e-commerce business, ask the pros at Webocreation.

Build products block for Journal Opencart theme and create custom filter – setting and coding tutorial

In this Opencart Journal theme tutorial, we are showing you how to add or manage the products modules like featured, bestseller, specials, related, from the same category, from the same brand, also bought, recently viewed, most viewed, random, custom, and advanced in pages in Journal theme, then we will show coding tutorial to add another Product rules to show the products as you desired, we will take auctions products as an example.

How to manage products in Journal 3 Opencart theme?

You can show products with multiple filters in Journal 3 theme, like for examples featured products, bestseller products, specials products, related product, products from the same brand, products from the same category, products also bought, products recently viewed, products most viewed, random products, custom rules, and filter, and most advanced filters for the products.

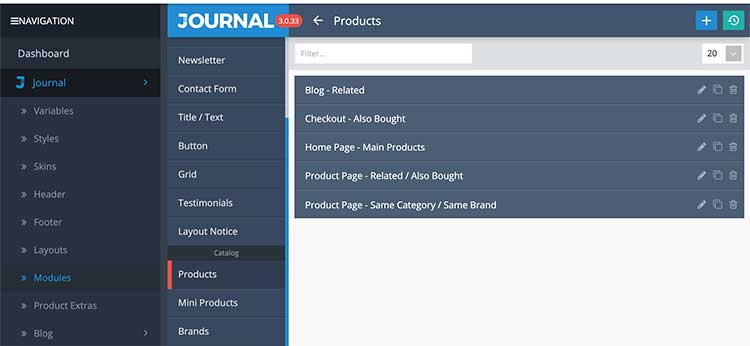
To show the products module, log in to the admin >> Journal >> Modules >> Products >> Then, click the blue + button.

Products module in the Journal theme Opencart
  • General Tab
    • Enter the module Name
    • Select the Status to enabled
    • Schedule the timing, if you want to show always then leave it blank
    • Enter the Image Dimensions or leave it blank for auto sizes
  • Product Data
    • Description limit
    • Products Stat 1
    • Products Stat 2
  • View Options
    • View (Either Grid or List)
    • Product Grid Style and Product List Style
  • Display Options
    • You can display products in Blocks or Tabs or Accordion
    • You can select options for Blocks or Tabs or Accordion
  • Items per row
    • Select the items set at variables
    • Enter the Container gutter as per need
  • Carousel Options
    • Enter the setting for carousel mode
  • Module Styles
    • Enter the background settings
    • Padding and Margin settings
  • Tooltip Style
    • Enter the tooltip style

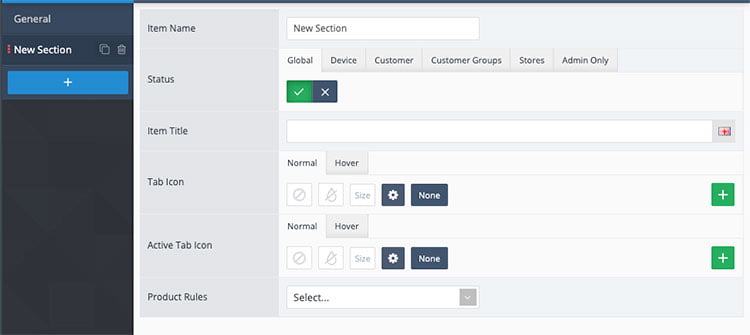
Once, above general settings are entered, click the blue button below General, now you will see the new section:

Opencart Journal theme products setting

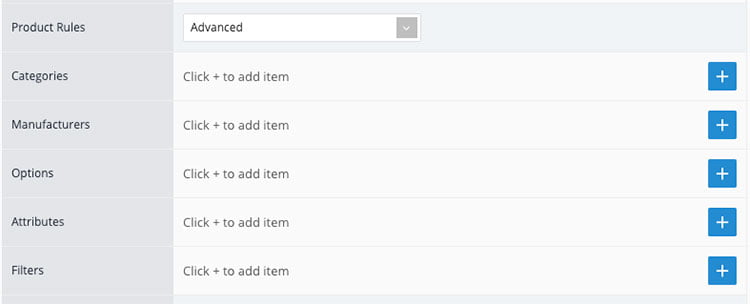
Here you can enter the details as per need. The Product Rules is the products filter to show in the frontend module. In the Products Rules you can see the following options:

  • Latest
  • Specials
  • Bestsellers
  • Related
  • From same category
  • From same brand
  • Also bought
  • Recently viewed
  • Most viewed
  • Random
  • Custom
  • Advanced

Others are self explanatory, let’s see the custom and advanced option.

Custom: When you select the Custom option in Product Rules, then you will see Products field where you can add the any products you want and those products will be shown in the frontend.

Advanced: When you select the Advanced option in Product Rules, then you will see other fields where you can select categories, manufacturers, options, attributes, filters and others options to filtered out the products as per your needs.

Advanced Products filter in Journal theme

With the above settings and Product Rules, you can filter out most of the Products that you want to show in the module. If you have a custom database table where you have the products Ids that you want to show then it is not possible with this Product Rules, for that you need to create the custom Product Rules.

Read: Upgrade Opencart from version 2.3 to 3.0.3.1 and Journal theme 2 to 3?

Coding tutorial to add another Product rules in Journal theme admin

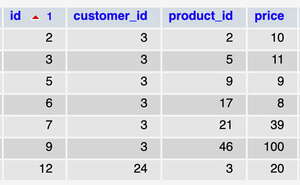
Let’s take an example of multi-vendor where you store products as per the customer id, in such case Journal theme Product Rules cannot filter out those products, thus we need some coding to achieve those Product Rules. Let’s say we have a database table “oc_customer_to_product” and have data like below, now if we want to show products as per customer, here the customer_id 3 will show product_id of 2, 5, 9, 17, 21, 46 and the same for other customers.

Opencart database table

To achieve that open file admin/view/javascript/journal3/dist/main.js and find word “alsobought” and you will see codes like below:

b&&e.createElement(m.a,{value:"all"},"All"),e.createElement(m.a,{value:"latest"},"Latest"),e.createElement(m.a,{value:"special"},"Specials"),e.createElement(m.a,{value:"bestseller"},"Bestsellers"),!b&&e.createElement(m.a,{value:"related"},"Related"),!b&&e.createElement(m.a,{value:"related_category"},"From Same Category"),!b&&e.createElement(m.a,{value:"related_manufacturer"},"From Same Brand"),!b&&e.createElement(m.a,{value:"alsobought"},"Also Bought"),!b&&e.createElement(m.a,{value:"recently_viewed"},"Recently Viewed")

Now add following line of code in between commas

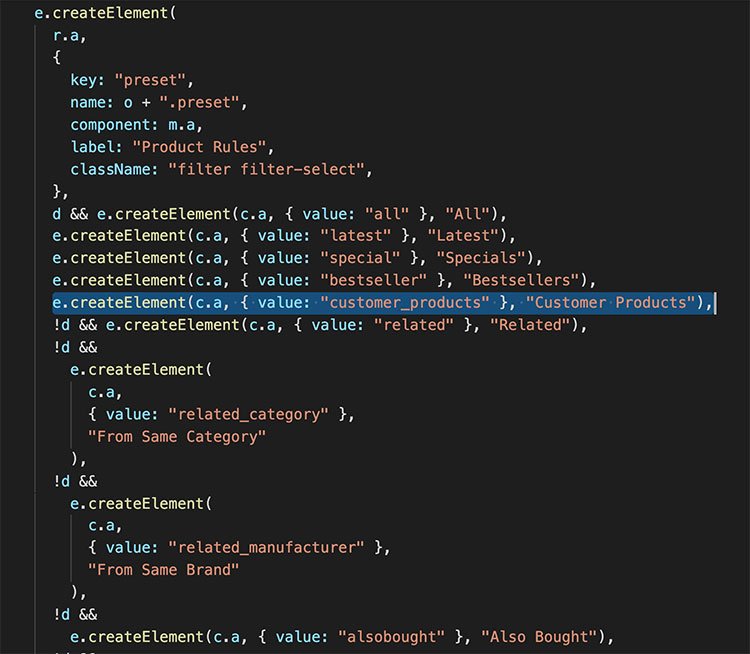
e.createElement(c.a, { value: "customer_products" }, "Customer Products"),

Once you add the above code and if your code is formatted, then it may looks like similar in the image below:

Custom Code in Journal Theme

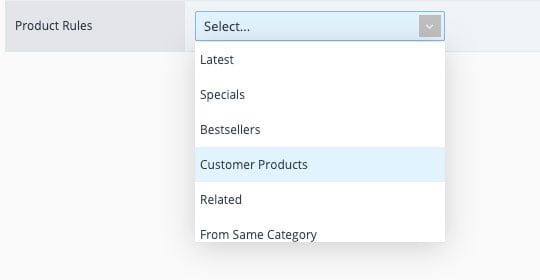
With above lines of code addition, it will show the “Customer Products” option in the Product Rules.

Custom filter in Journal Opencart theme

With this the admin section work is done. Now, let make change for the frontend.

Code to change in the frontend to show custom Product rules in Journal theme

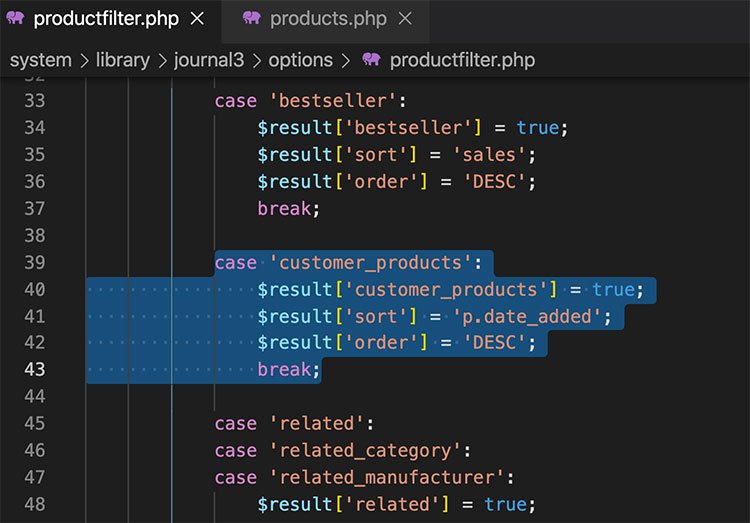
Open system/library/journal3/options/productfilter.php and add following lines of code:

case 'customer_products':
	$result['customer_products'] = true;
	$result['sort'] = 'p.date_added';
	$result['order'] = 'DESC';
	break;
Journal custom code Products

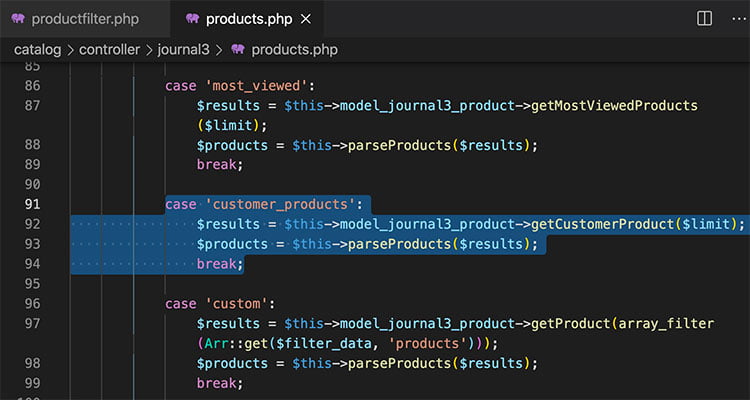
Open catalog/controller/journal3/products.php and add followings lines of code

case 'customer_products':
     $results = $this->model_journal3_product->getCustomerProduct($limit);
     $products = $this->parseProducts($results);
     break;
Journal custom code products

Open catalog/model/journal3/product.php and add following method:

public function getCustomerProduct($limit = 5)
{
	$sql = "
	SELECT
		p.product_id
	FROM `{$this->dbPrefix('product')}` p
	LEFT JOIN `{$this->dbPrefix('product_to_store')}` p2s ON (p.product_id = p2s.product_id)
	LEFT JOIN `{$this->dbPrefix('customer_to_product')}` c2p ON (p.product_id = c2p.product_id)
	WHERE
		p.status = '1'
		AND c2p.customer_id='{$this->dbEscapeInt($this->customer->getId())}'
		AND p.date_available <= NOW()
		AND p2s.store_id = '{$this->dbEscapeInt($this->config->get('config_store_id'))}'";

	if ($this->journal3->settings->get('filterCheckQuantity')) {
		$sql .= ' AND p.quantity > 0';
	}

	$sql .= "
	ORDER BY viewed DESC";

	if ((int) $limit) {
		$sql .= " LIMIT {$this->dbEscapeInt($limit)}";
	}

	$query = $this->db->query($sql);

	return $this->getProduct($query->rows);
}

With these code changes you can now show the custom Journal products block in the frontend.

Show the custom Journal products block in the frontend

Go to admin >> Journal >> Layouts >> Click Account << Click CB in Active positions << Click add module in content bottom << Click Products in the left column of the popup << Then, select “Products as per Customer” << finally click the tick Save button.

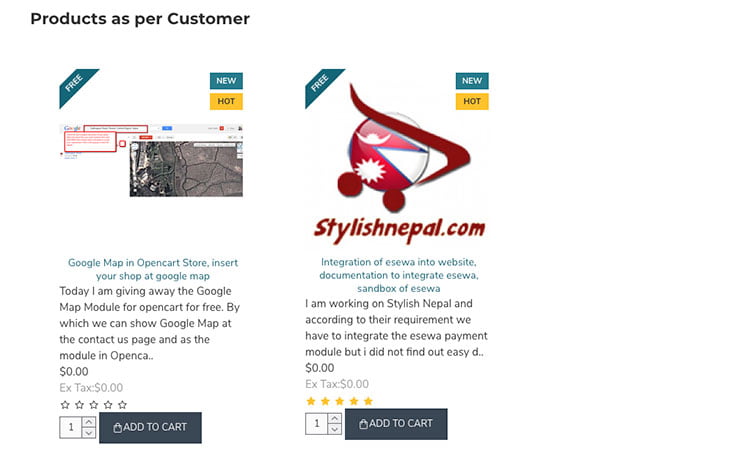
With that settings, the products of that customers will show in the account URLs. One example is

Products as per customer Journal theme

In this way, you can create a products block to show in the Journal theme, and customize the code for Journal theme to make different Product Rule in Product modules. Please post your questions or comments or errors so that we can help you. You can follow us at our twitter account @rupaknpl. Subscribe to our YouTube channel for Opencart tutorials, and click to see all Opencart tutorials.

How does the Store credit of Order total works in Opencart

In this Opencart user manual, we are showing how you can install the store credit extension, add the transaction amount to the customer, and how the customer can use the amount while checkout.

Install the store credit extension

Go to admin >> Extensions >> Extensions >> Choose the Extensions Type >> Order totals >> Then, install the Store Credit.

Order totals credit store

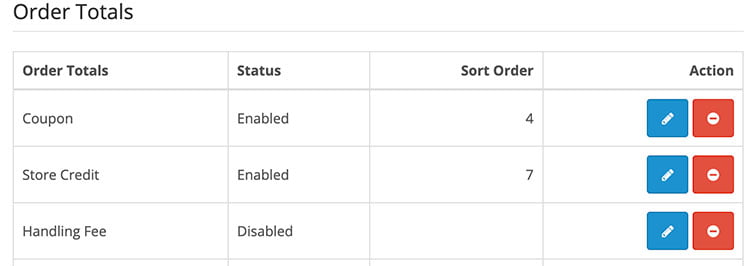
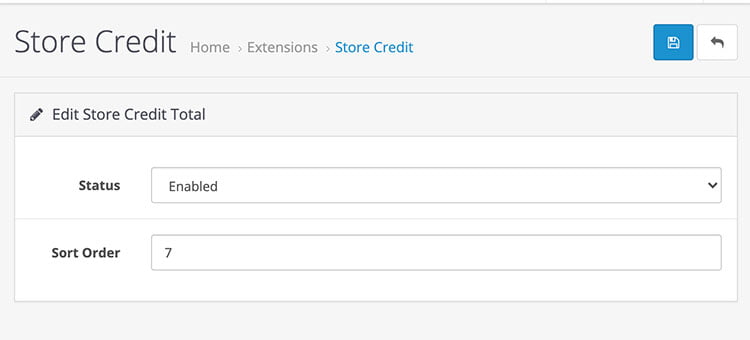
Once you installed the Store Credit then you can edit it and enable it and enter the sort order as you want to show on the cart/checkout page.

Store credit Opencart setting

Click Save and store credit order total extension is installed and configured.

Assign the amount to the customer through transactions

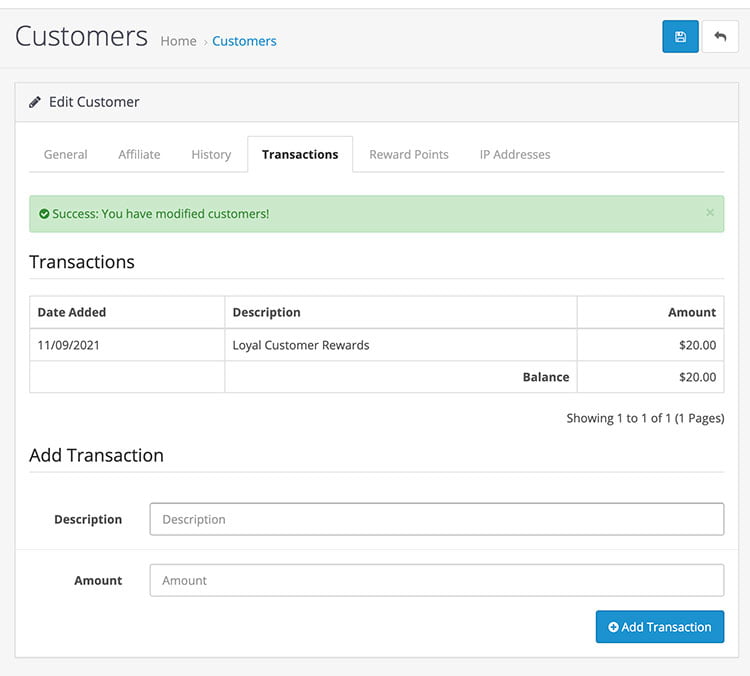
To add or assign an amount to the customer, go to admin >> Customers >> Customers list >> Edit the customer you want to add the amount >> then go to the Transactions tab >> Enter the description and amount you want to add for that customer and the amount is assigned to that customer.

Transactions store credit

How the customer will use the store credit assigned from the transactions?

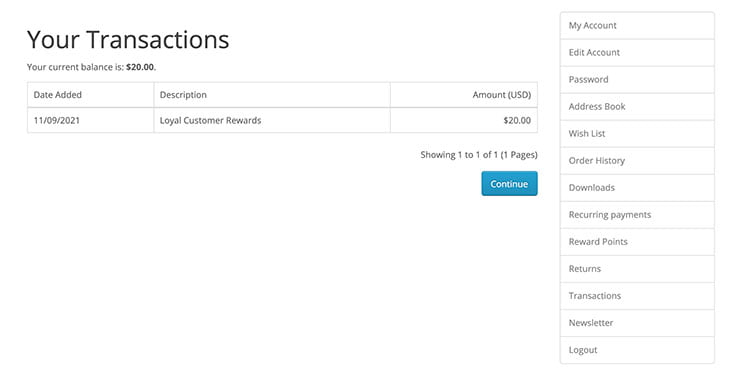
Once the admin assigns or adds the amount from the transactions, then the customer can use that amount to their orders. Customers can view the Store credit amount from the transactions.

Customer Store Credit transactions

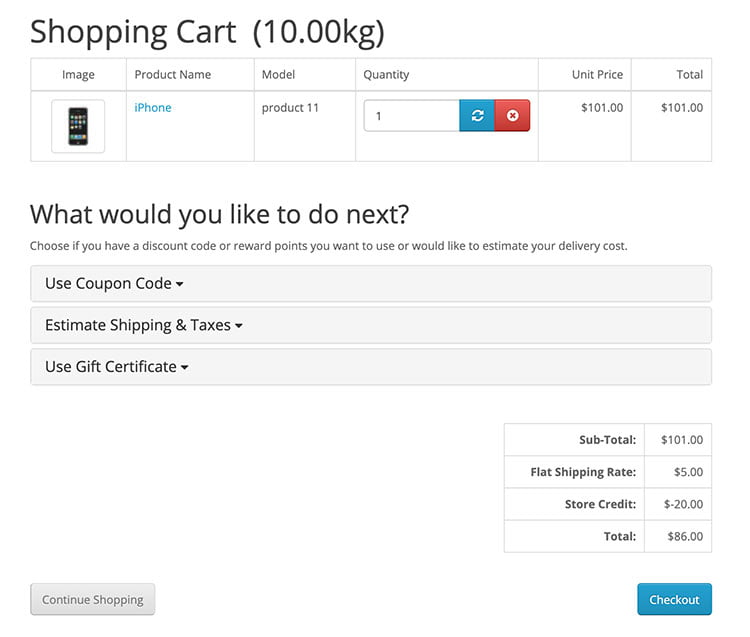
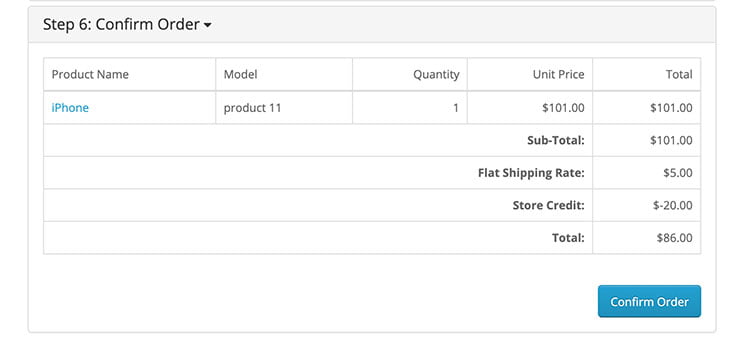
The customer can use these Store credits, which will be automatically decreased from their orders. You can see in the following how it decreased the amount in the shopping cart and confirm checkout page.

store credit shopping cart customers
checkout confirm store credit

In this way, you can set up the Store Credit and customers can use it. As always please don’t forget to post your questions or comments so that we can add extra topics. You can follow us at our Twitter account @rupaknpl and subscribe to our youtube channel Opencart tutorials and click opencart user manual for more docs. Similarly, keep on visiting the blog where you will find lots of free modules.

Edit products directly from the list in the Opencart 3 – editable table widget

In this free Opencart module, we can edit products directly from the product list in the opencart 3, it is using editable table widget javascript, with this you can easily edit the product name, module, price, quantity, and status.

First, download the Opencart 3 free module by clicking the button below:

Download the “EditFromProductsList” module

From the above download, you will get a zip file named “editfromproductslist.ocmod.zip“.

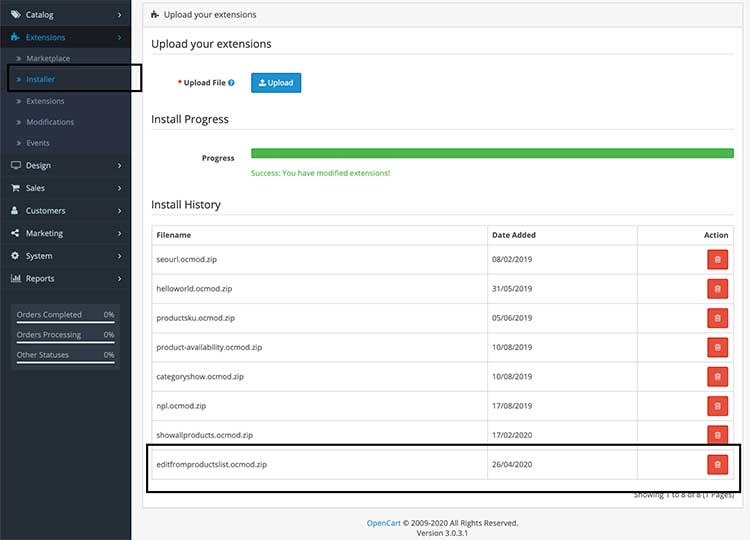
Now login to your admin section >> go to Extensions >> Installer >> Upload the zip file and you will see the editfromproductslist.ocmod.zip in the install history.

installer Opencart

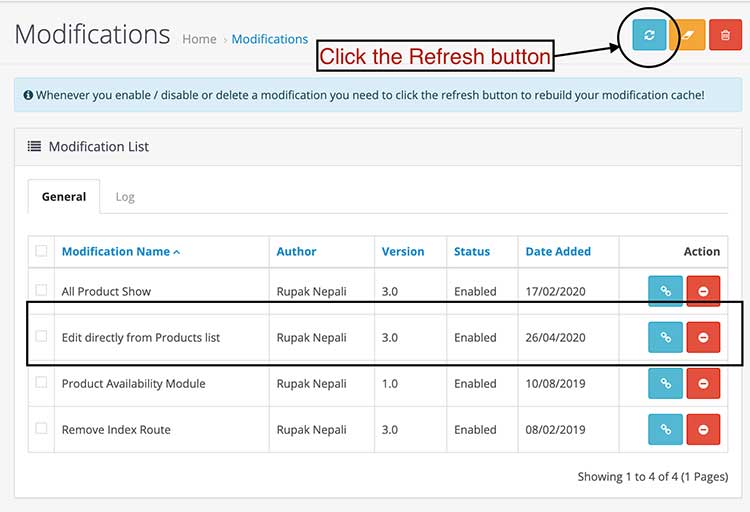
Now, go to admin >> Extensions >> Modifications >> you will see the “Edit directly from Products list” in the list >> Then click the refresh button

Modifications on edit directly from products list

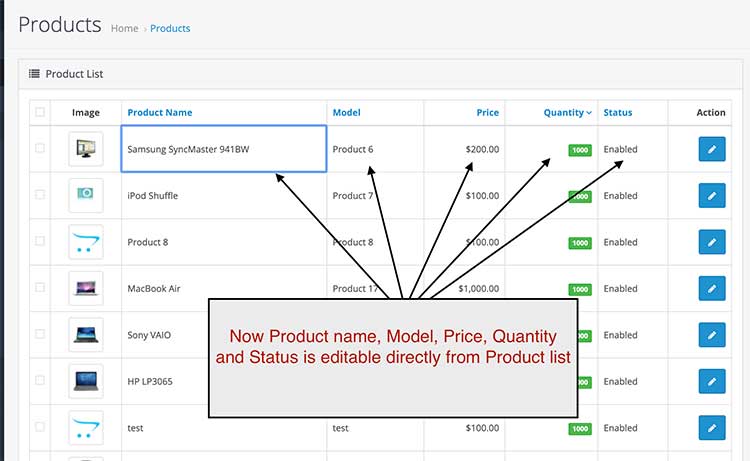
Now go to the admin >> Catalog >> Products, now Product name, Model, Price, Quantity, and Status is editable directly from the product list.

Edit products list Opencart 3

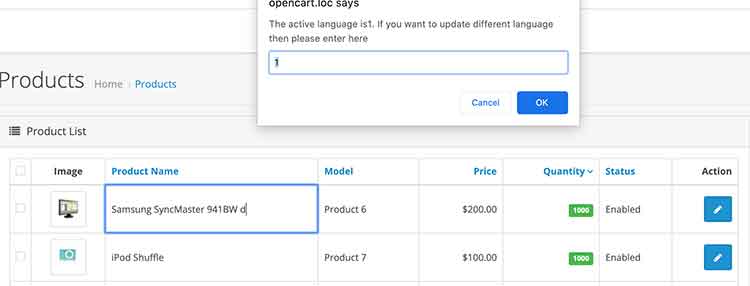
Now edit any of the product names, then it will ask to choose the active language. If you want to update a different language then we need to enter the language id in the prompt box.

Prompt box for selecting the language for product name

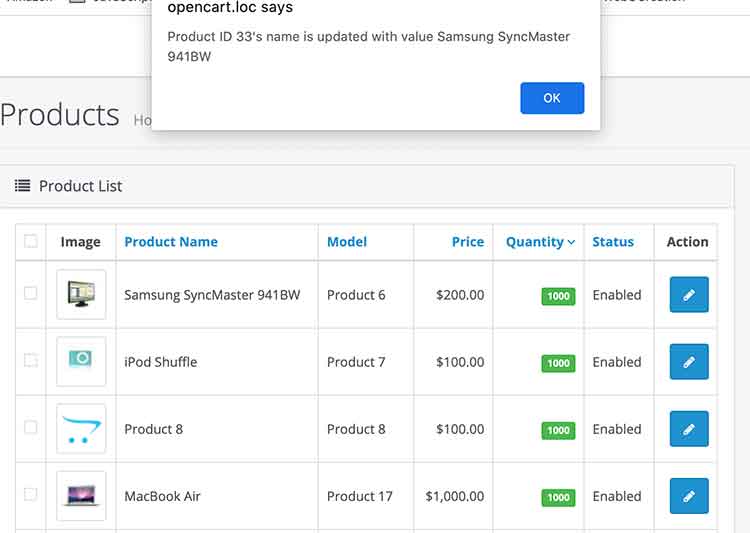
Once you click Ok or enter the language and click Ok, then, the product name is updated and it will show the alert box like below:

Edit product list Opencart

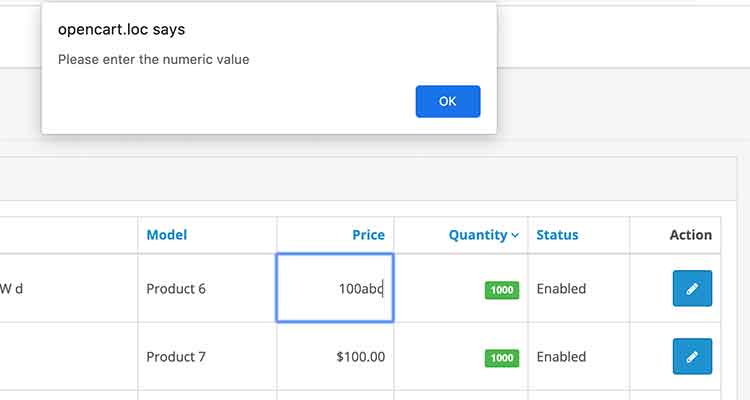
Similarly, you can edit the Model. But for the price you don’t need to enter the $ sign, you just add the number of the price that you want to update. If you enter something other than a number then it will alert is like below:

Only numeric value for price

In the same way, for quantity also you just need to enter the number, if you don’t enter the number it will show an alert like above.

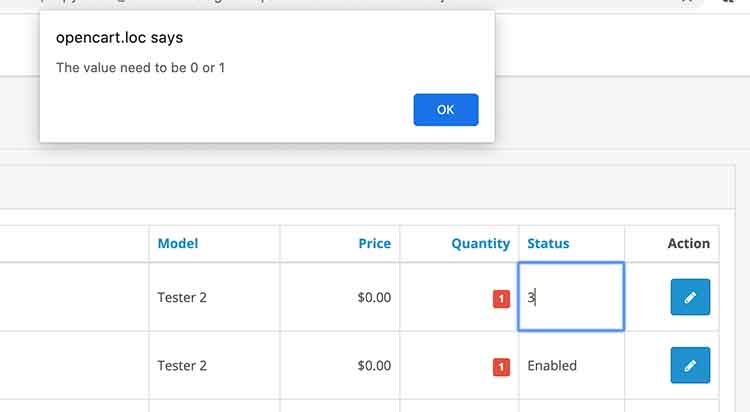
For the status, you need to enter 1 or 0 only. 1 is to enabled and 0 is to disabled. If you don’t enter then it will alert like:

Status change to Opencart

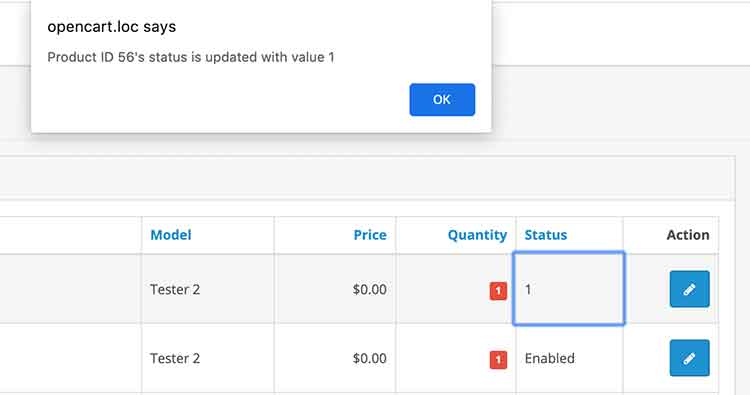
Once you enter the 1 or 0 then it will show a success alert message like below:

Product status update Opencart

In this way, you can easily edit the products’ name, model, price, quantity, and status directly from the product lists.

We are using the editable table Js and the following OCMOD modification:

<?xml version="1.0" encoding="utf-8"?>
<modification>
    <name>Edit directly from Products list</name>
    <version>3.0</version>
    <author>Rupak Nepali</author>
    <link>https://webocreation.com</link>
    <code>webocreation_edit_products_in_admin</code>
    <description>Edit products directly from the list in Opencart 3</description>

    <file path="admin/controller/catalog/product.php">
        <operation>
            <search><![CDATA[public function autocomplete()]]></search>
            <add position="before"><![CDATA[
                public function editableTableUpdate()
                {
                    $updated = "Please edit the right column";
                    $id = explode("___", $_POST['value']['id']);
                    $product_id = $id[1];
                    $columnToUpdate = $id[0];
                    if (in_array($columnToUpdate, array('name', 'model', 'price', 'quantity', 'status'))) {
                        $valueToUpdate = $_POST['value']['value'];
                        $lang = $_POST['value']['lang'];
                        $this->load->model('catalog/product');
                        $updated = $this->model_catalog_product->updateEditableTable($columnToUpdate, $product_id, $valueToUpdate, $lang);
                    }
                    $this->response->addHeader('Content-Type: application/json');
                    $this->response->setOutput(json_encode($updated));
                }
            ]]>
            </add>
        </operation>

        <operation>
            <search><![CDATA[$data['products'] = array();]]></search>
            <add position="before"><![CDATA[
          $data['active_language'] = $this->config->get('config_language_id');    
        ]]>
            </add>
        </operation>
    </file>

    <file path="admin/model/catalog/product.php">
        <operation>
            <search><![CDATA[public function getTotalProductsByLayoutId($layout_id)]]></search>
            <add position="before"><![CDATA[ 
            public function updateEditableTable($columnToUpdate, $product_id, $valueToUpdate, $lang)
            {
                try {
                    if ($columnToUpdate == "name") {
                        $this->db->query("UPDATE " . DB_PREFIX . "product_description SET " . $columnToUpdate . " = '" . $valueToUpdate . "' WHERE product_id = '" . (int) $product_id . "' and language_id = '" . $lang . "'");
                    } else {
                        $this->db->query("UPDATE " . DB_PREFIX . "product SET " . $columnToUpdate . " = '" . $valueToUpdate . "' WHERE product_id = '" . (int) $product_id . "'");
                    }
                    return "Product ID " . $product_id . "'s " . $columnToUpdate . " is updated with value " . $valueToUpdate;

                } catch (ConnectionException $e) {
                    return $e->getMessage();
                } catch (\RuntimeException $e) {
                    return $e->getMessage();
                }
            }
            
            ]]>            </add>
        </operation>
    </file>

    <file path="admin/view/template/catalog/product_list.twig">
        <operation>
            <search><![CDATA[{{ footer }} ]]></search>
            <add position=" "><![CDATA[ 

          <script type="text/javascript" src="view/javascript/jquery/mindmup-editabletable.js"></script>
<script>
            $('#editable').editableTableWidget();
            $('#editable td').on('change', function (evt, newValue) {
              var targetid = evt.target.id;
              if (['', 'name', 'status', 'quantity', 'price'].indexOf(targetid.split('___')[0])) {
              }else{return false;}
              if (targetid.split('___')[0] == 'name') {
                var lang = prompt(
                  'The active language is' +
                    {{active_language}} +
                    '. If you want to update different language then please enter here',
                  {{active_language}}
                );
              }
              if (targetid.split('___')[0] == 'status') {
                var statusenter = 1;
                if (newValue == 0 || newValue == 1) {
                  statusenter = 0;
                }
                if (statusenter) {
                  alert('The value need to be 0 or 1');
                  exit();
                }
              }
              if (targetid.split('___')[0] == 'quantity') {
                if (isNaN(newValue)) {
                  alert('Please enter the numeric value');
                  exit();
                }
              }
              if (targetid.split('___')[0] == 'price') {
                if (isNaN(newValue)) {
                  alert('Please enter the numeric value');
                  exit();
                }
              }
              const postvalue = { id: targetid, value: newValue, lang: {{active_language}} };
              $.post( 'index.php?route=catalog/product/editableTableUpdate&user_token={{ user_token }}',
                { value: postvalue }
              ).done(function (data) {
                alert(data);
              });
            });

            $('#editable td.uneditable').on('change', function (evt, newValue) {
              return false;
            });         
          </script>
            ]]>            </add>
        </operation>

        <operation>
            <search><![CDATA[<td class="text-left">{{ product.status }}]]></search>
            <add position="replace"><![CDATA[<td class="text-left" id="status___{{product.product_id}}">{{ product.status }}]]></add>
        </operation>

        <operation>
            <search><![CDATA[<td class="text-right">{% if product.quantity <= 0 %}]]></search>
            <add position="replace"><![CDATA[<td class="text-right" id="quantity___{{product.product_id}}">{% if product.quantity <= 0 %}]]></add>
        </operation>

        <operation>
            <search><![CDATA[<td class="text-right">{% if product.special %}]]></search>
            <add position="replace"><![CDATA[<td class="text-right" id="price___{{product.product_id}}">{% if product.special %}]]></add>
        </operation>

        <operation>
            <search><![CDATA[<td class="text-left">{{ product.model }}]]></search>
            <add position="replace"><![CDATA[<td class="text-left" id="model___{{product.product_id}}">{{ product.model }}]]></add>
        </operation>

        <operation>
            <search><![CDATA[<td class="text-left">{{ product.name }}]]></search>
            <add position=" "><![CDATA[<td class="text-left" id="name___{{product.product_id}}">{{ product.name }}]]></add>
        </operation>

        <operation>
            <search><![CDATA[<td class="text-center">{% if product.image %}]]></search>
            <add position=" "><![CDATA[<td class="text-center uneditable">{% if product.image %}]]></add>
        </operation>

        <operation>
            <search><![CDATA[<td class="text-center">{% if product.product_id in selected %}]]></search>
            <add position=" "><![CDATA[<td class="text-center uneditable">{% if product.product_id in selected %}]]></add>
        </operation>

        <operation>
            <search><![CDATA[<table class="table table-bordered table-hover">]]></search>
            <add position=" "><![CDATA[<table id="editable" class="table table-bordered table-hover">]]></add>
        </operation>
    </file>
    
</modification>

We hope that this module will help someone who needs to edit the products frequently for the product name, model, price, quantity, and status. Hope you liked these Opencart free modules, let us know if you have any questions or suggestions, please subscribe to our YouTube Channel for Opencart video tutorials and find more free opencart modules here. You can also join us on Twitter and Facebook.

Javascript custom email validation for company email only, Unbounce page

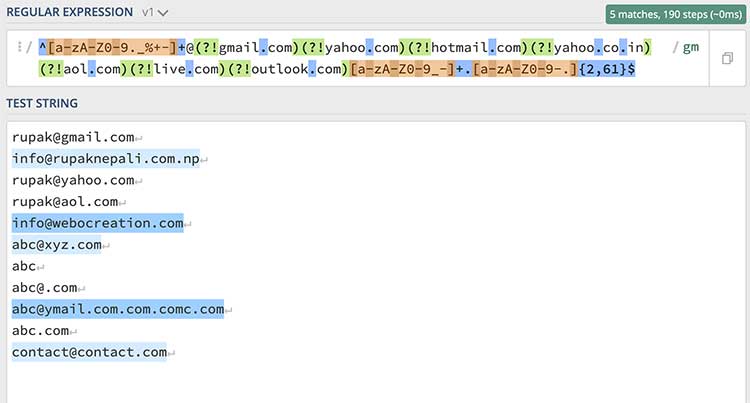
We write a simple Javascript custom email validation that allows only company emails and it was implemented on Unbounce landing pages. We use pattern, oninvalid and onchange attributes. We set regex (^[a-zA-Z0-9.%+-]+@(?!gmail.com)(?!yahoo.com)(?!hotmail.com)(?!yahoo.co.in)(?!aol.com)(?!live.com)(?!outlook.com)[a-zA-Z0-9-]+.[a-zA-Z0-9-.]{2,61}$) to validate the email pattern and set the custom validity message for oninvalid attribute with setCustomValidity() method of the HTMLObjectElement interface sets a custom validity message for the element, and finally onchange attribute we set the setCustomValidity() method to empty.

How to validate the email field to allow only company email?

With HTML5, we can do the email input field validation with pattern, setCustomValidity method easily. If you write the code like below, it will not allow the email that contains gmail.com, yahoo.com, hotmail.com, yahoo.co.in, aol.com, live.com and outlook.com

<input id="Email" name="Email" type="email" required pattern="^[a-zA-Z0-9._%+-]+@(?!gmail.com)(?!yahoo.com)(?!hotmail.com)(?!yahoo.co.in)(?!aol.com)(?!live.com)(?!outlook.com)[a-zA-Z0-9_-]+.[a-zA-Z0-9-.]{2,61}$" oninvalid="setCustomValidity('Please enter business email')" onchange="try{setCustomValidity('')}catch(e){}')">

Similarly, we can add custom Javascript into the Unbounce like below, which will allow only company emails. The Javascript code is like below:

<script>
/* Allow only company emails */
document
  .getElementById("Email")
  .setAttribute(
    "pattern",
    "^[a-zA-Z0-9._%+-]+@(?!gmail.com)(?!yahoo.com)(?!hotmail.com)(?!yahoo.co.in)(?!aol.com)(?!live.com)(?!outlook.com)[a-zA-Z0-9_-]+.[a-zA-Z0-9-.]{2,61}$"
  ).setAttribute(
    "oninvalid",
    "setCustomValidity('Please enter business email')"
  ).setAttribute("onchange", "try{setCustomValidity('')}catch(e){}')");
</script>

** If you email id is different then change the “Email” in the above code.

Read more: Marketo API – export all Forms and their Fields from our Marketo database

Regular expression tested

regular expression

How to add custom JS to the Unbounce page?

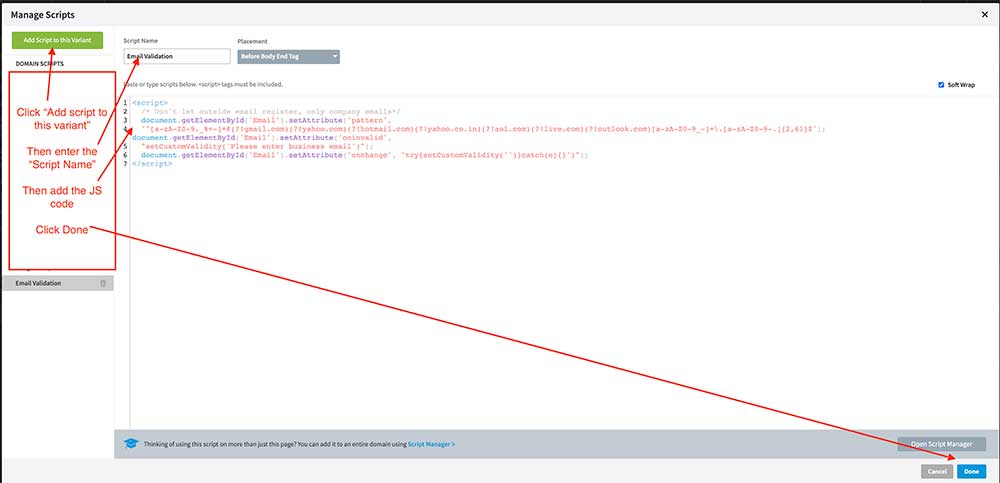
  • Log in to your Unbounce, click your page where you want to add the email validation.
  • Edit the variant of the page
  • Click the JavaScript at the bottom of the page editor
  • Then, you will see a popup where you can add the Javascript like below.
  • Click “Add Script to the Variant”
  • Then enter the “Script Name”
  • Add the above JS code
  • Click Done
Unbounce JS code addition

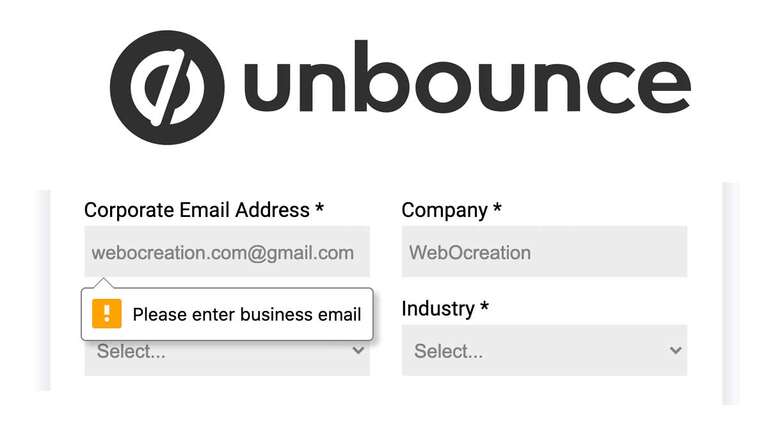
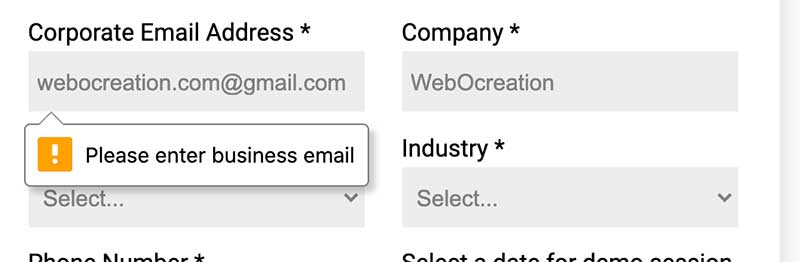
After adding the above code in the Javascript manager of the Unbounce page and you tried to submit gmail email then it shows error like below:

Email Validation code

In this way, you can add custom email validation in form field and similarly on the Unbounce page. Hope you liked this article, please subscribe to our YouTube Channel for Opencart video tutorials. You can also find us on Twitter and Facebook.

API – Get the country code as per your IP addresses for free

We were searching for the free API which gives the country code as per your IP addresses as per our requirement we were looking to show team members as per the Country, defaulting different currency as per the active country, defaulting different language as per the active country, etc. Our research found ip-api.com which is free for non-commercial use, no API key required, easy to integrate, and available in JSON, which fulfilled all our requirements, so we use ip-api.com. As they provide free for non-commercial use so we like to share with you as well.

We use a basic fetch request of Javascript. The following code is to get the country code as per your IP address

var requestOptions = {
  method: 'GET',
  redirect: 'follow'
};
fetch("http://ip-api.com/json/?fields=countryCode", requestOptions)
  .then(response => response.text())
  .then(result => console.log(result))
  .catch(error => console.log('error', error));

A PHP code block can be like this:

<?php
$curl = curl_init();
curl_setopt_array($curl, array(
  CURLOPT_URL => 'http://ip-api.com/json/?fields=countryCode',
  CURLOPT_RETURNTRANSFER => true,
  CURLOPT_ENCODING => '',
  CURLOPT_MAXREDIRS => 10,
  CURLOPT_TIMEOUT => 0,
  CURLOPT_FOLLOWLOCATION => true,
  CURLOPT_HTTP_VERSION => CURL_HTTP_VERSION_1_1,
  CURLOPT_CUSTOMREQUEST => 'GET',
));
$response = curl_exec($curl);
curl_close($curl);
echo $response;

Read more: Opencart API uses and its documentation

Have a look at their documentation of Geolocation API

We can get the following fields from the API:
status, message, continent, continentCode, country, countryCode, region, regionName, city, district, zip, lat, on, timezone, offset, currency, isp, org, as, asname, reverse, mobile, proxy, hosting, query

Their endpoints are limited to 45 HTTP requests per minute from an IP address but they provide a Pro version with more benefits and unlimited HTTP requests.

So, hope this helps for your personal project to get the country code as per IP address and can use it as per your benefits. With this simple and easy API, we are able to show different team members as per country, and similarly, show different currencies and languages as per the country. Let us know if you find any other easy and better solutions.

Show selected categories as featured categories OpenCart module free

We planned to show my top categories at the homepage as featured categories so we planned to make the OpenCart module for free to get this functionality. Let’s say it “Category Featured Show Module”. As we created an OpenCart module so we can enjoy an unlimited module instance system which means we can show the same module in different layouts on the same pages and also on different pages. Please take into consideration that we have created this module for OpenCart version 3.0, 2.0.3.1. and suppose that it will be compatible with above 2.0.2, we are lazy to test them. Please provide feedback if it is not compatible then we can go through the problem.

Let’s start to install Category Featured Show Module.

Check our setting in the image below:

Category featured Opencart module

Now set layout and position for Category Featured Show Module. We are showing the Category Featured Show Module at homepage so follow the same steps as below if you like to show to different layout then choose the respective layout.

  • Go to Admin >> System >> Design >> Layouts.
  • Then click the blue plus button at the bottom which will add another row.
  • Then select “Category Featured > Top Category” at the Module column.
  • Select “Content Top” at Position Column.
  • Enter your desired Sort Order at Sort Order Column.
  • Then click the save button.

Our setting to show at home page is as shown in the image below:

Opencart layouts

Go to the home page and you will see the image below:

Top category show in Opencart module

You can show as many module instances as you like and your heading title is shown as Module Name from admin so it is also customized as needed.

This module has been successfully tested for a standard OpenCart 2.0.3.1.

If you get any problem with the module then let me know by commenting or through the contact form.

Future upgrade: Options to hide and show of category description, name and upload the customized image for the category and different layouts. Likewise, make the module to show products as per the category. Keep on visiting for updates 🙂

Support:

Further help and customized versions: If you need a customized version of this module and any other Opencart help and support then let me know. You can email us at webocreation.com@gmail.com