5 phases in products selling life cycle of eCommerce in 2022 for start up business

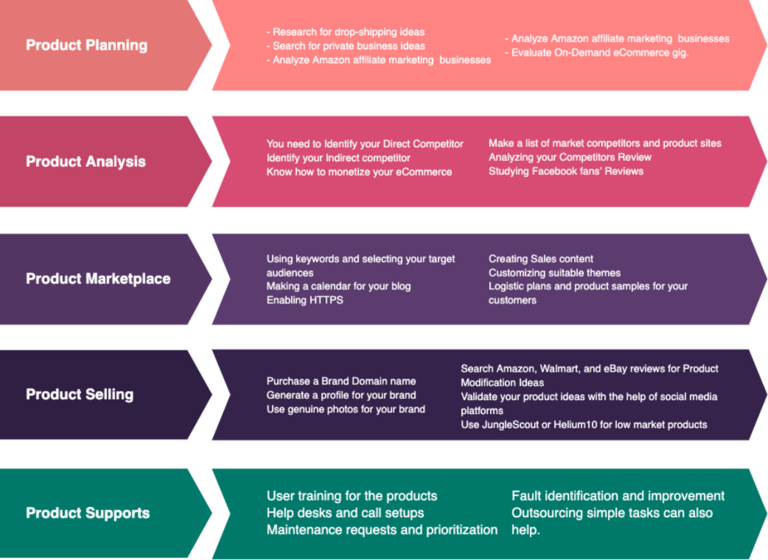
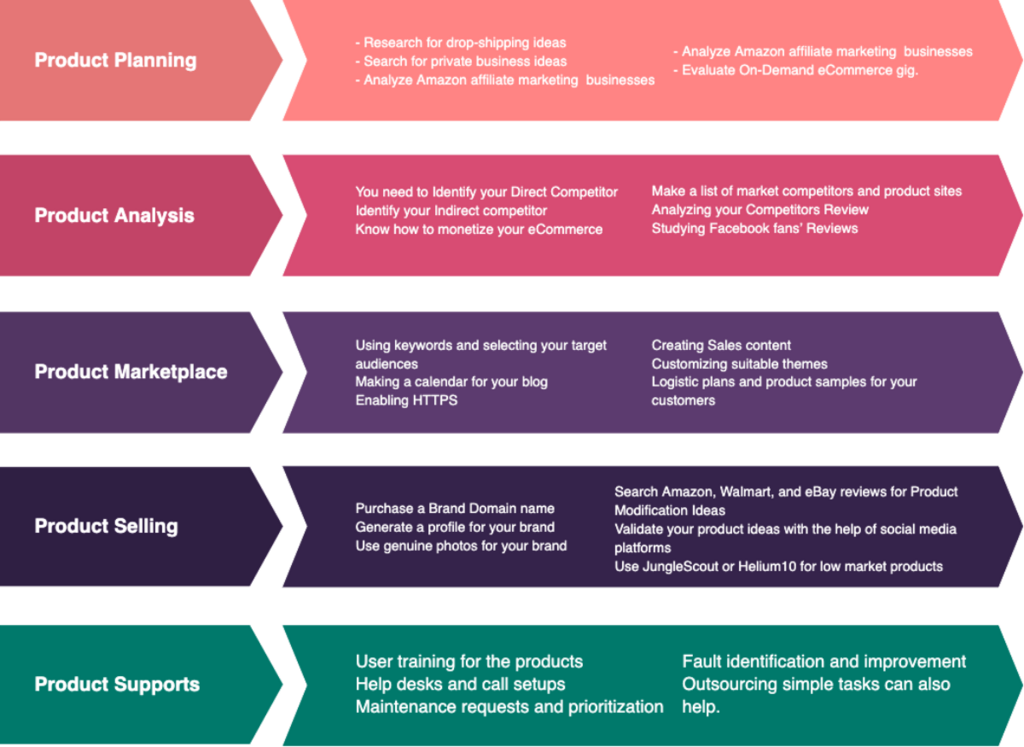
We have come up with 5 phases in the product selling life cycle of eCommerce in 2022 for start-up businesses which include Products Planning, Products Analysis, Products Marketplace, Products Selling, and Product supports. eCommerce is the most profitable business in today’s globalized world. You can get your products sold in just one click. There should be proper ways to conduct your online business. eCommerce demands an organized way of dealing with customers. Do not risk your finance without proper guidelines. Your startup really needs guidance before you enter into the vast eCommerce field. In this blog, we have covered 6 proven eCommerce startup guides that will help you to thrive in 2022 and beyond, which correspond to the product selling life cycle for a startup business:

Products Planning: Properly Research Before You Start

As we all know planned properly is half done. Before you spend your time, money, and energy on any eCommerce niche, you should choose the best business model. You need to learn about various eCommerce ideas. Not every business is right for you. You get hundreds of suggestions while taking startup. You only realize later that the business does not relate to your concern.

That being said, you do not necessarily need to focus on such business ideas of others. Research yourself about eCommerce ideas on the internet. Below are a few eCommerce ideas that will guide you in choosing the best niche for your startup:

  • Do your research on how selling e-products
  • Research for drop-shipping ideas
  • Search for private business ideas
  • Analyze Amazon affiliate marketing  businesses
  • Evaluate On-Demand eCommerce gig.

After having sound knowledge and research of your market product, you need to know your competitors. You need to know the niche of your eCommerce competitors. Do the following things to boost your eCommerce further: 

  • You need to Identify your Direct Competitor
  • Identify your Indirect competitor
  • Know how to monetize your eCommerce 
  • Make a list of market competitors and product sites
  • Analyzing your Competitors Review
  • Studying Facebook fans’ Reviews

Product Marketplace: Functionalize A Proper Website 

Website is very important for your eCommerce startup. It gives your startup professional taste. Keeping in view your business model, you need to do the following things:

  • Using keywords and selecting your target audiences
  • Making a calendar for your blog
  • Enabling HTTPS
  • Creating Sales content
  • Customizing suitable themes
  • Logistic plans and product samples for your customers

Read more: Build a free eCommerce website using Opencart 3 user manual in 2021

Product Marketplace: Make Your eCommerce Business Client-oriented

Your eCommerce should be customer-centered. It should be easily accessible for the customers. There should be no complexities regarding your Market Product at any cost. You should research your competitive brands first. Then you should make your brand different from your market competitors. There should be no similarities with your competitors. The following points will help you out a lot in this regard:

  • Draft your brand logo
  • Purchase a Brand Domain name
  • Generate a profile for your brand
  • Use genuine photos for your brand

Product Selling 1: Search for Target Product Market

You need to look for a trending market idea. It is not necessarily important that the idea must be competing. You can focus on your own niche. You don’t need to choose highly competitive markets. You can select a minor market product for your eCommerce startup. The following options will be handy for your startup:

  • Search best-selling products on Amazon- eBay etc
  • Compare prices of products on different online sites
  • Use Quora to get more ebusiness ideas
  • Search Amazon, Walmart, and eBay reviews for Product Modification Ideas
  • Validate your product ideas with the help of social media platforms
  • Use JungleScout or Helium10 for low market products

Product Selling 2: Email Automation for Your eCommerce Startup:

Automation of Email should be prioritized by you for the eCommerce startup. You might fail your eCommerce plans if you fail to automate a good Email to your startup. The following tips will help you out in this regard: 

  • Email Automation setup for your Market Product
  • Purchasing Welcome Email Automation
  • New customer Email Automation
  • Win Back Email Automation

Read more: Manage, send, apply and design custom Gift Vouchers in Opencart 3

Product Support: Client services

Managing product support involves three main concerns: user expectation, performance, and requirements.

  • User training for the products
  • Help desks and call setups
  • Maintenance requests and prioritization
  • Fault identification and improvement
  • Outsourcing simple tasks can also help.
products selling ideas 2022

Apply these 6 proven eCommerce startup guides to thrive and excel in 2022 and beyond. Let us know if you have any other startup guides to thrive or have any questions or suggestions, please subscribe to our YouTube Channel and look for other free Opencart extensions. You can also find us on Twitter and Facebook.

Opencart Modules to accept cryptocurrencies in eCommerce like Bitcoin, Ethereum, Litecoins, and other

Blockchain and Cryptocurrencies digital currency gaining popularity with decentralization, so we were also looking into ways to accept Cryptocurrencies in Opencart stores and available Opencart modules by which we can accept crypto-like Bitcoin, Ethereum, Litecoins, etc.

Cryptocurrency is the new normal of our time. This is the era where crypto is very likely to be considered a normal currency. Though it has no physical existence – like the normal currencies – it is revolutionizing the digital marketplace. That being said, it is pertinent to have cryptocurrency payment tools in place. In this blog, we have listed down the seven most popular crypto payment gateways for opencart. Let’s go through them step by step:

Bitpay

BitPay is one of the largest cryptocurrency payment tools for OpenCart. It is a powerful, enterprise-grade tool that allows you to accept crypto payments from all over the world. Available both as an app and extension, bitpay support all major HD wallets and major cryptos. These include Ether, Ripper, Litecoin, Bitcoin, Bitcoin Cash, and much more.

Features:

  • Secure and efficient.
  • Provides access to a $1+ trillion crypto market
  • Real-time conversion rate with no price fluctuation.
  • Zero upfront payment for the setup with no hidden chargebacks.
  • Supports all HD and 90+ major wallets.
  • Supports all channels — Reach hundreds of millions of customers in no time.
  • Only 1% transaction fee.
  • Functional in over 300 countries. Virtually meet your customers from across the globe.

Perhaps the greatest advantage of Bitpay is its self-automation feature. That means, you can install the plugin in the online store by following a few easy steps. And customize it. Ultimately, bitpay will do the rest.

Plugin Installation

Download the Opencart ecommerce module of Bitpay for the link below:

Now go to Opencart admin Login >> Extensions >> Extension installer >> Now click on the upload button, a popup will show where you select zip file which ends with *.ocmod.zip. Then click Ok. If you got a success message then files are uploaded properly.  Now go to “Design > Theme Editor > common > header”, add the following tag before </head>:

<script src="https://bitpay.com/bitpay.min.js" type="text/javascript"></script>

Now go to Extensions >> Extensions >> Modifications, then click the clear button near the refresh button and check the Log tab.

If you are still confused about the Opencart module installation then please see the video below:
Uploading Installing Configuring Uninstalling Deleting and Removing Opencart Module

Plugin Configuration

Please follow the following steps for the configuration:

  • Create an API token from your BitPay merchant dashboard:
    Log in to your BitPay merchant account and go to the [API token settings](/dashboard/merchant/api-tokens) Click on the Add new token button: indicate a token label (for instance: OpenCart), make sure “Require Authentication” is unchecked and click on the Add Token button. Copy the token value
  • Log in to your OpenCart admin panel, go to Extensions >> Extenions >> choose Payments as extension type > BitPay checkout:
    Set the Extension Status to enabled
    Environment: select Test or Production, depending on your current setup. Your matching API Token must be setPaste the token value into the appropriate field: Development Token for token copied from the sandbox environment (test.bitpay.com) and Production Token for token copied from the live environment (bitpay.com)
    Checkout Flow: BitPay recommends the Modal option as it keeps the user on your site and show a modal window. To use the Modal option, you will need to configure the bitpay.min.js script as indicated in the installation steps. We also propose a Redirect option as an alternativeClick on the save icon in the upper right hand corner to save the settings. Additional information can be found on the BitPay plugin page on the OpenCart Marketplace.

Crypto.com

Crypto.com is a free platform available in opencart and is trusted by 5 million users. It has no upfront fee and has only a 0.5% settlement fee for payouts. The app allows you to accept cryptocurrencies without any price fluctuation. 

Crypto.com Opencart module

Crypto.com pay offers: 

  • Zero chargebacks.
  • Receive cryptocurrency payments in USD and Euro. 
  • Instant receipt of payment. 
  • Highly secure and industry-protected transaction. 
  • Give your customers surprising cashback and gift cards to keep them loyal to your brand. 

It is pertinent to mention here that Crypto.com accepts all cryptocurrency types. These include Bitcoin, ZCash, Bitcoin Cash, Stellar Lumen (XLM,) Etherium (ETH,) Litecoin (LTC), and Satoshi’s Bitcoin Vision (BSV.)

Apirone Gateway

Apirone Gateway is another option available to accept bitcoin payments on your site. It has both an app and extension that allow it to easily process and accept crypto payments from all over the world. 

Apirone Gateway offers:

  • Secure and thoroughly monitored transactions.
  • An easy and reliable extension to process bitcoin and litecoin payments. 
  • Crypto transactions without signing up or creating an account. 

Nonetheless, Apirone Gateway accepts only Litecoin (LTC) and Bitcoin. If you are looking to accept bitcoin and Litecoin from your customers around the world, you have got our vote for Apirone Gateway.

AURPAY Cryptocurrency Payment Gateway

Aurpay is yet another popular tool for accepting cryptocurrency payments. It is one of the leading crypto payment tools with an advanced set of features. On top of that, Aurpay has the least percentage of fee deduction among its competitors. 

Features that distinct Aurpay from other Crypto Payment Tools:

  • Self-hosted functions – both in the app and extension.
  • Highly secure and encoded transaction.
  • Non-custodial and thoroughly self-hosted.
  • Direct P2P payment. 
  • Supports almost every type of cryptocurrency. 

It is pertinent to mention here that you can install the Aurpay plugin into your online store by following some simple steps. Above all, it also provides direct peer-to-peer (P2P) payment. This means you do not necessarily have to go through any third party to make or receive your crypto payment.

EzDeFi Bitcoin, ETH, Cryptocurrency payment gateway for Opencart

EzDeFi Bitcoin, ETH, Cryptocurrency does not lag behind its competitors in accepting and receiving crypto payments. This crypto payment tool integrates over 2000 cryptocurrencies and provides crypto payment and receipt options. It has no setup or monthly fee. Neither does it have any other hidden charges.

EzDeFi Bitcoin, ETH’s Features:

  • Only 0.1% charge per transaction. This is presumably the least charge among crypto payment tools. 
  • Direct peer-to-peer (P2P) transaction. 
  • Encrypted and highly secure transactions. 
  • No third party or middleman involved. 
  • Real-time conversion rate without any fluctuation in the rates.

You can download the app and install the plugin into your online store through a few simple steps. The setup process does not take more than five minutes. Above all, it supports the scanning option as well. That means you can Scan the QR Code and make the payments in no time.

Read More: How to create a payment module or extension in the Opencart 3? Developer guide

Blockonomics Bitcoin Payments

Blockonomics is an amazing cryptocurrency payment tool for opencart. The most important advantage of Blockonomics is that it gives a detailed list of your checkouts within the extension.

Advantages of Blockonomics:

  • Supports all HD wallets and all fiat currencies.
  • Convenient and pretty easy setup.
  • Zero down payments and no hidden charges. 
  • An auto transaction with high-alert security. 

Plisio

Last, but certainly not the least, is Plisio. Perhaps the sole feature that makes Plisio stand above its competitors is automation. You essentially have to install the plugin in your online store and forget it. It will do the rest on its own. On top of that, it also allows partial payment.

Features of Plisio Crypto Service Tool:

  • Automated through and through.
  • Zero chargebacks and no setup fee. 
  • Easy and convenient extension.
  • Real-time conversion rate.

Needless to say, Plisio is constantly upgrading its features to cope with the advanced demands of cryptocurrency. Rest assured, Plisio is a reliable crypto payment tool to make and receive crypto transactions with real-time conversion rates.

We hope these free Opencart crypto modules help you to dive into the decentralization marketplace. Let us know if you have any other cryptocurrency payment gateway or have any questions or suggestions, please subscribe to our YouTube Channel and look for other free Opencart extensions. You can also find us on Twitter and Facebook.

How to increase eCommerce sales? 13 proven tips and tricks to boost conversions

Setting up an eCommerce store is the first step after that focus needs to be on increasing the sales conversions which leads to becoming a giant eCommerce marketplace. Beautifully designed website, adding items, starting the advertisement, increasing brand awareness, etc. so you got all these in place, but you feel like that you are not making enough sales. Then rises a billion dollars question: How to Increase eCommerce sales? Well, we have put together 15 proven tactics to increase eCommerce sales. 

Always show big numbers for discounts

In most of the big retailers like Amazon, Walmart, Costco, etc. what we have encountered is that they mostly show the big number in terms of discount with percentage or real price. For example: if a product costs $50 and the discount is $25 then they promote a 50% discount instead of saying $25 discount. If a product costs $2500 and the discount is $1250 which is also 50% but they promote a $1250 discount. So, always show big numbers for discounts.

Run Constant Promotions 

Image Source: Unsplash

Last but not the least, running constant promotions. Let’s be honest. Promotions are the most important factor in boosting your eCommerce sales.  It not only promotes your products but also increases your brand awareness in the marketplace as well. Ultimately, it presents your products to a large number of audiences. Which, in turn, results in greater sales. 

These promotions include:

  • Running seasonal sales and promotion.
  • Offering coupons, discounts and gift cards. 
  • Providing special deals. 

Read More: Opencart manual to build a free eCommerce website

Create Brand Awareness

Image source Brand Awareness

One of the most important tactics to boost eCommerce sales is to create brand awareness. “What is known is sold”, goes the old adage. To excel in the eCommerce marketplace, your brand should be popular among end-users. 

It is no secret that brand awareness creates trust, which ultimately generates repeated sales. Above all, it helps in SEO optimization. That is, Google algorithms bring the repeatedly purchased products on top in search engines. 

Read More: 25 SEO best practices for eCommerce

To create brand awareness:

  • Put quality content and high definition & lifestyle pictures.
  • Develop 24/7 available customer service. 
    Quote:
    “It takes 20 years to build a reputation and five minutes to ruin it. If you think about that, you’ll do things differently.”
    – Watten Buffet
  • Market your products on social media. 
  • Consider sponsorships. 
  • Collaborate with your competitors. 
  • Test Google ads and PPC.

Use Email Marketing 

Image Source: Email Marketing

Email marketing is a strong strategy to boost eCommerce sales. It is one of the effective ways to engage with your customers and to keep them updated with new product launches and promotions. 

Experts suggest that 60% of eCommerce sales are generated through email marketing. 

“Focus on growing your list all of the time as newer subscribers are more engaged adding to healthier open rates and ROI.”

KARL MURRAY

To get the most out of email marketing:

  • Create an email list.
  • Personalize the emails based on the customers’ choice and shopping history. 
  • Do not make it sound like Spam.  
  • Use coupons and gift cards. 
  • Make the customers feel that they are an inevitable part of the family. 

Read More: Change the email design in Opencart

Make Your Store Mobile Phone Friendly

Photo by Tranmautritam from Pexels

A recent analysis suggests that 56% of online purchases were made on mobile phones in 2020. This ratio was 38% in 2019. This means online purchases through mobile phone is rapidly growing. 

So, it is inevitable to optimize your eCommerce store for mobile phones. If your store is not mobile phone friendly, you are losing a sheer number of sales. 

View: A custom responsive theme for Opencart

Measuring page load time and session data

The conversion rate is highest at the fastest page load times. Sessions occur at faster page load times where conversion rates are higher. Website conversion rate drop by an average of 4.42% with each additional second of load time between 0-5 seconds. Similarly, 15.3 is the average load time for a mobile page, so the better you have a high chance of Conversions.

Read More: How to speed up Opencart?

Provide a Professional Customer Service

Professional customer service is a hallmark of a successful eCommerce business. Customer service is the only human resource available for online shoppers. If they get friendly service, they will stick to your brand – like forever. 

Excellent customer service helps develop trustability and customer loyalty. A great service, followed by a great product, generates your brand name in the market. 

Good customer service will get you: 

  • Repeated sales & loyal customers. 
  • High ratings – which will ultimately help you in SEO optimization and greater turnovers. 
  • Trustability for new customers. 
  • Referrals and much more. 

A/B testing on eCommerce with Google optimize for free

A B testing eCommerce

Straightforward testing and executing the right variation will assist you with hanging out in your specialty, A/B testing is simpler to do with Google Optimize and it is free, simply need to continue to improve according to the outcome, you can make a basic test like changing the shade of buttons can/may build the transformations.

Read More: How to set up A/B testing for an eCommerce website with Google Optimize?

Socail Media promotion and viral posts/videos

Image Source Social Media

Social media platforms are yet another preferable tools to boost eCommerce sales. Facebook, Twitter, Instagram, and YouTube are simple – yet convenient platforms – to showcase your products to a larger number of audiences.

Remaining constantly active on these social media platforms and developing a friendly interaction with the users develops trustability and loyalty among your customers. People come up with their genuine concerns about your products and services on these platforms. So, it is a worthwhile idea to consider cope their concerns by actively engaging with them.

Social media promotion ideas to implement can be: 

  • Friendly communication and responding to comments and engaging with the users on daily basis.
  • Sharing educational and informational posts.
  • Sharing viral videos to attract new users.
  • Entrusting and social CRM apparatuses.
  • Ensuring 24/7 active monitoring of the social media accounts.
  • Gathering, profile and post-level detailing
  • Running paid ads and PPCs.

Minimize cart abandonment

Photo by James Lee from Pexels

When a customer adds an item to the shopping cart, the website accepts that the given customer will leave the cart and makes a record for it. From that point onward, assuming the customer adds another item or keeps perusing your website. So, adding functionalities to capture abandoned carts and process them by emailing them or providing some more discounts can result in lots of sales, a consumer who abandons a cart have an open rate and click-through rate.

Blogging

Blogging is another great way to attract customers at the top of the funnel. It acts as an awareness as well as attracts the customers. Expound on anything connected with your item or industry. Try not to be reluctant to incorporate even inexactly related subjects. In the article or blog don’t forget to link to your products or add products as related. Blogs can help with SEO as well as the backlink of the products.

National Day Calendar deal

Creating deals on each National day Calendar and promoting products as per the day can be another great idea to increase the sales conversion.

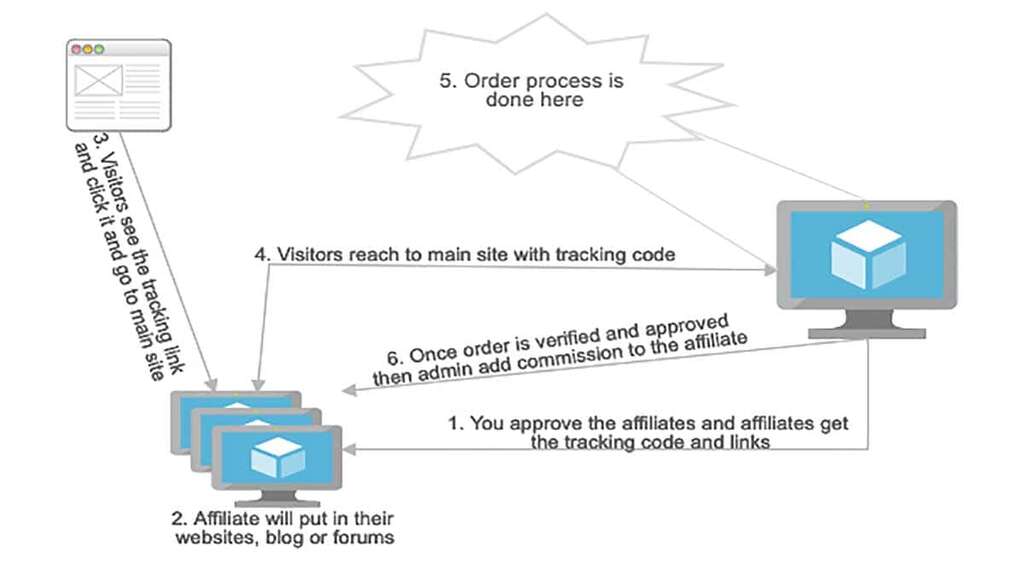
Affiliate, Referral, upsells and cross-sells

Affiliate flow chart

An associate program is a promoting methodology to build deals by expanding the accomplice who will sell items for some commission. Similarly, you can upsell and cross-sell products where possible.

Read more: Affiliate manual in eCommerce Opencart

Ecommerce businesses that lag behind in their offers lag in the marketplace. For example, if you do not provide a reliable offer to your customers, they will switch to someone else. On contrary, successful eCommerce businesses engage their customers with constant promotions and offers. We hope these tips and tricks help you in increasing your conversion rates. Let us know if you have any other ways to increase sales conversion or have any questions or suggestions, please subscribe to our YouTube Channel for other tips and tricks. You can also find us on Twitter and Facebook.

A/B testing on Opencart with Google optimize for free

Simple testing and implementing the right variant will help you to stand out in your niche, A/B testing is easier to do with Google Optimize and it is free, just need to keep on improving as per the result, you can make a simple test like changing the color of buttons can/may increase the conversions.

The web is always evolving and to keep it up with the evolution we keep on running a successful A/B test on eCommerce which is a simple operation carried with the business analytical process. It generates a steep learning curve on optimization which shows the variations. There is a measuring process of the outcomes that sometimes confuse the analyst. Several marketing needs have been in concern for the performance of eCommerce platforms. The process of A/B testing with Google optimize aims to address the difficulties related to the rolling out of the A/B test. The optimization process is very important as it gives the analytic view for the marketing project and works toward improving the conversions and providing the best digital experience and improving every touchpoint in the website and analyzing where we are missing the Conversions.

Read More: Automated Testing and monitoring of Opencart functionalities and sites

How to start AB testing in your Opencart eCommerce site?

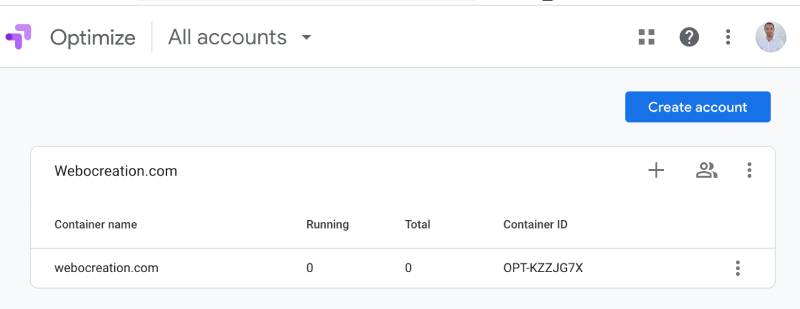
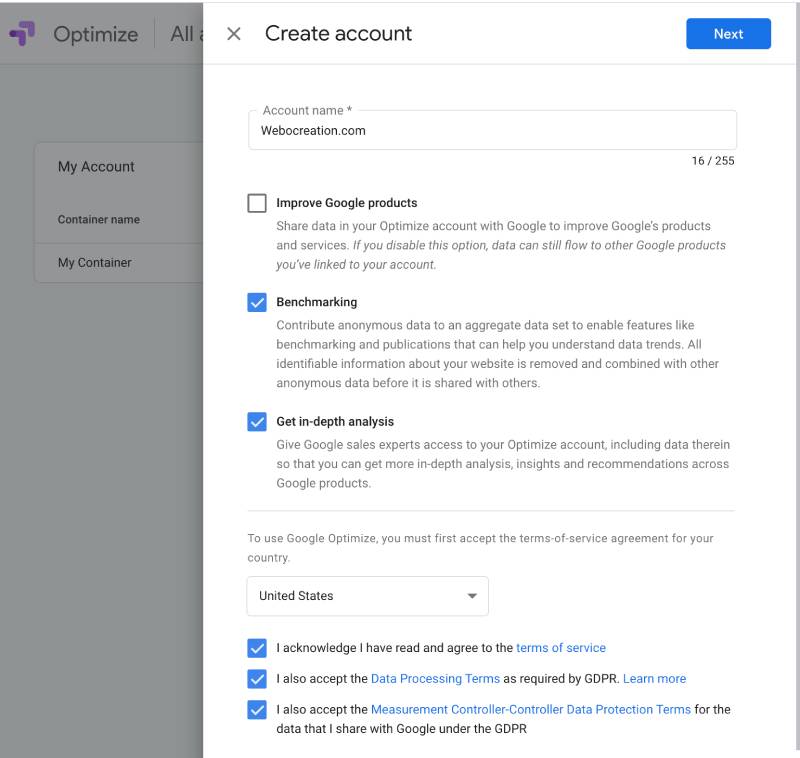
  • Start the your AB testing and optimization by creating the Google Optimize account. Create the account using the same credentials for your Google products like the gmail, analytics or AdWords. Then, you will see a Optimize dashboard
  • Once, you are in the Optimize dashboard you can create a new account for new website or can add container.
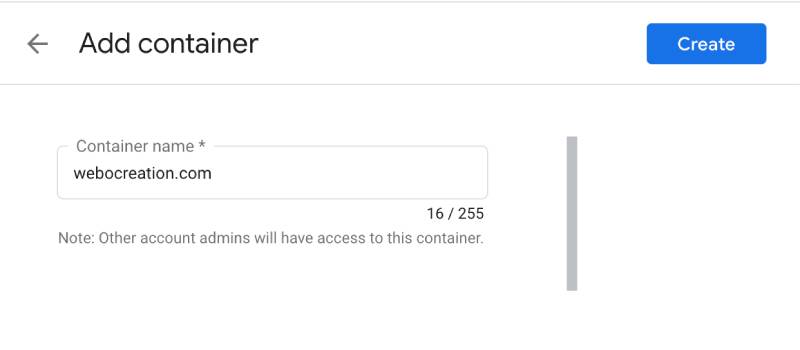
  • Once you create account, in next you can add a container, where you will be insert the website URL
  • After that, you can create the experiment. Click and enter the page to test and select the experiment type.

Five types of experience in the Google Optimize for testing

There are five choices to select from for your experience:

A/B test

Compare two or more variations from the same page. It is a comparison mostly done on a simpler platform because it does not need much. Let’s say you want to test button color and its effect on conversion, then you can set up the experience like below:

Multivariate test

It is advanced testing of multiple variations on the same page. 

Redirect test

It redirects the test page to an alternate position. The easiest test is the redirect test, with an example of testing two landing e pages for Google AdWord traffic. It is a category page versus the best-selling product test. 

Personalization

In this experience, you can personalize your page as per the targeted visitors. You set up targeted visitors and show them different pages and check which one gets more conversions.

Banner Template

With this experience, you can add banner templates like for example add a notification banner to the top of the website and similar popups and check how visitors interact with it and help in conversions.

AB testing which button performs best for conversion in Opencart

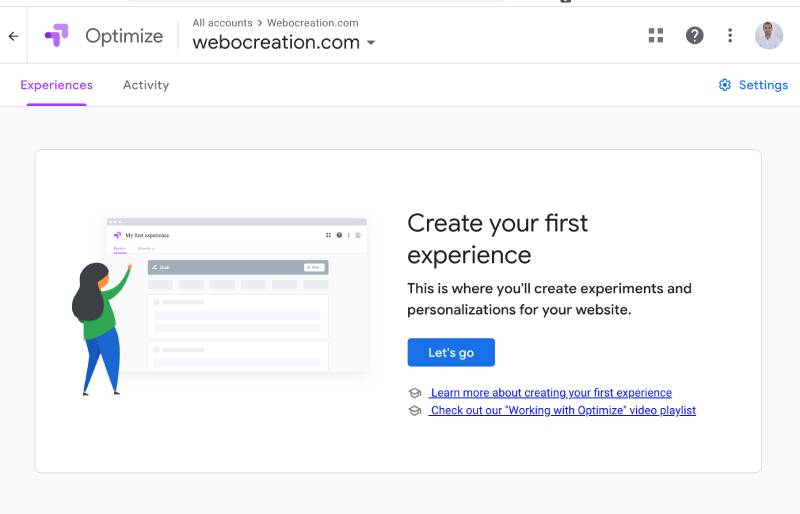
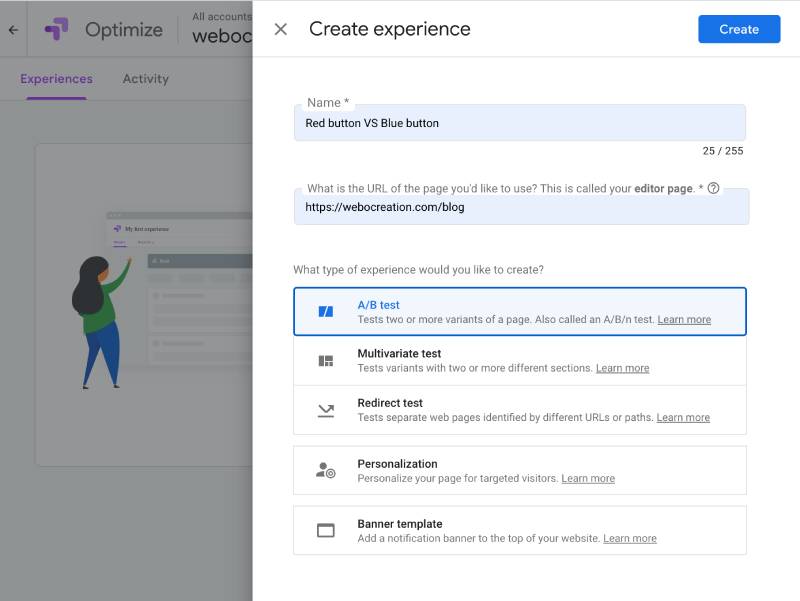
For A/B testing in the Google Optimize, click the container to open it and then click the “Create Experience” button, and then enter the “Name”, Enter the URL where you want to perform the test, and select A/B test. Here in the example, we are performing the test at https://webocreation.com

Create experience for button test

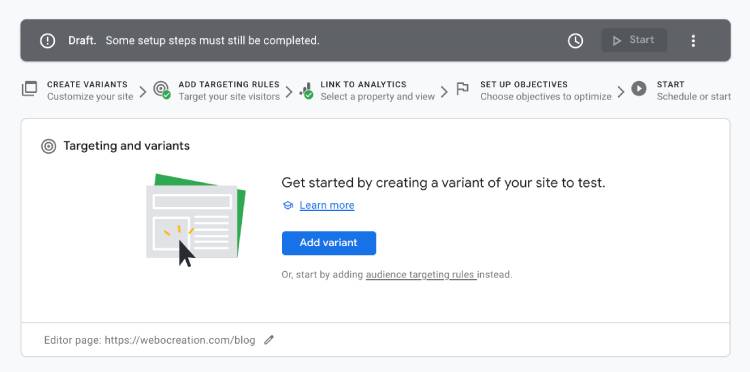
Now click the Create button and on the next page, you can add the variant

add variant, targeting and variants, ab testing

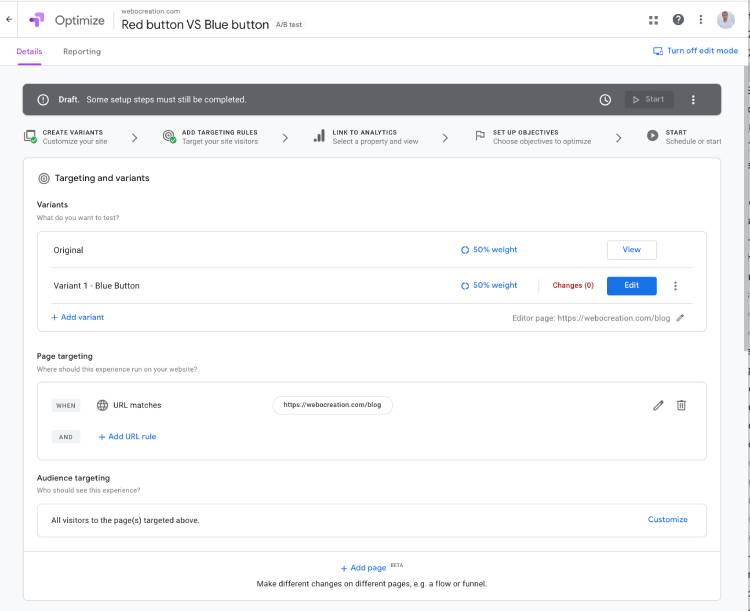
After clicking Add variant button in the Targeting and variants, here the original can be taken as variant A and you can add the new variant that you are going to test. Enter the name of the new variant, like for our example our original website is red in color and the new variant that we are testing is blue, after that, you can see similar to the following example

Create the ab testing for targeting and variants

You can set up multiple variants and for multiple page targeting as well as audience targeting. We are just testing in the blog page and for all audiences so the test is like above.

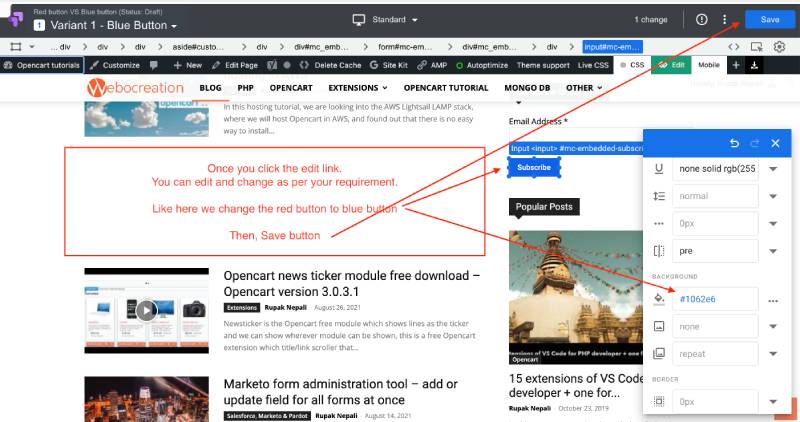
Now, click Edit blue button at the “Variant 1 – Blue Button”, which will open the page where you can make HTML changes like content, button color, etc as per your requirements. Here are changing the button color, an example is like below:

ab testing html chamges

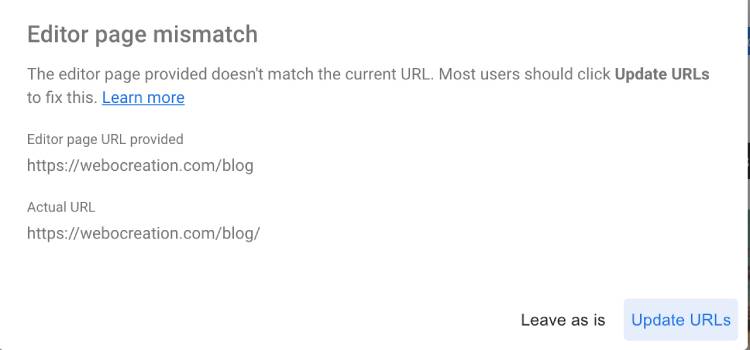
Sometimes if the URL is not matched then Google Optimize suggest changing the URL like below, but if you entered the right URL it will not show:

ab testing url mismatched

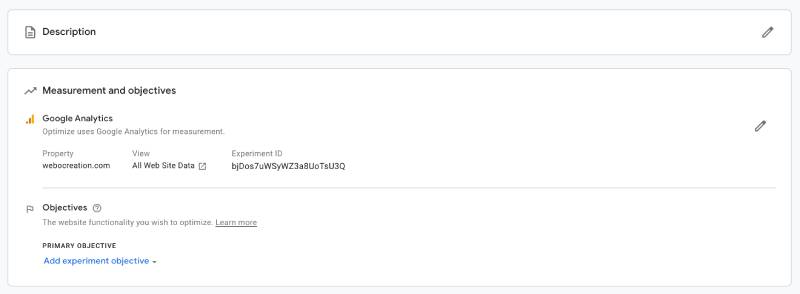
After you save and click done, now you can add the description and the link the Google Analytics if you have not set up Google Analytics for Google Optimize.

AB testing google analytics

Once you link the Google Analytics, you need to add the Objectives, click “Add experiment objective”.

AB testing events setup for Google Analytics

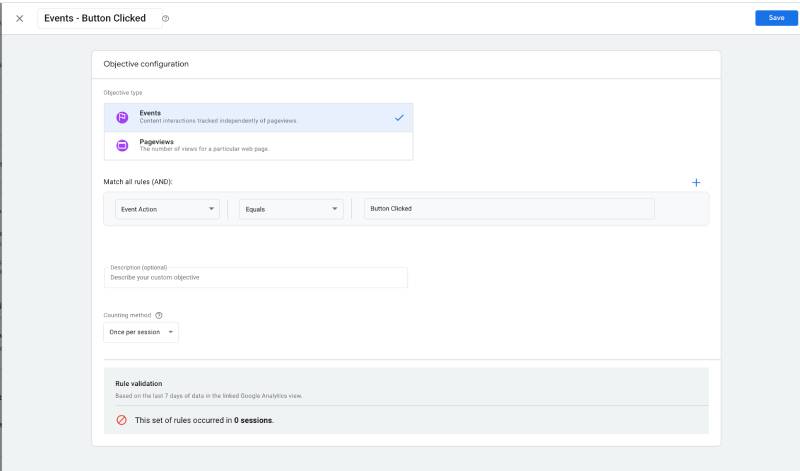
You can choose from the available list or create your custom primary objective. As we are tracking the button click so there are no available events so need to create a custom one. Select the “Create custom”. In the popup, Enter the title, and select the Objective type, in our case we are selecting Events, and select the Event Action, Equals and enter the “Button Clicked”, select the Counting method as Once per session.

Ab testing button click tracking

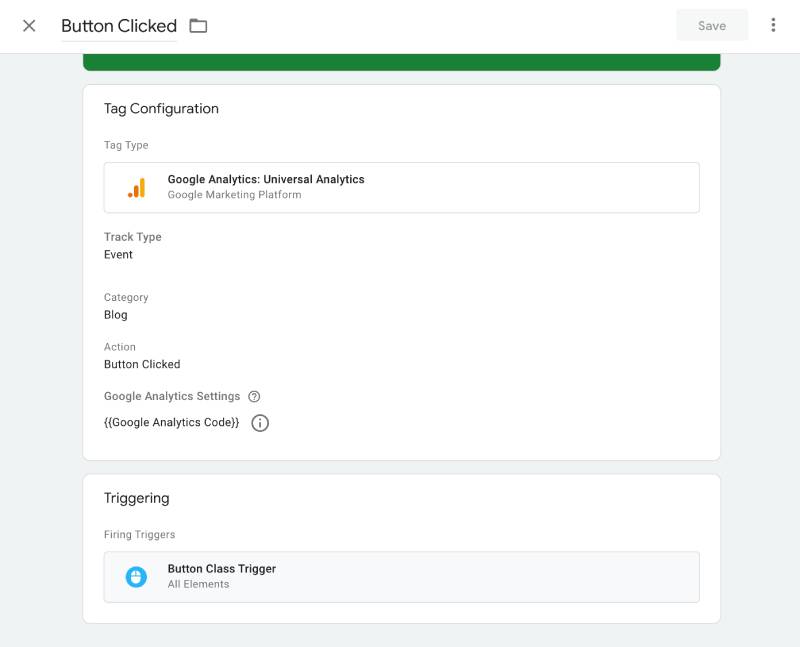
Here you set up the Events, but these events need to be set up in the Google Tag Manager similar to below, which is another big topic which we can cover later but you can check online hot to setup Tags and Triggers in the Google Analytics and set up the events in Google Tag Manager like below so that the Action value is “Button Clicked” which we entered in the Google Optimize objective.

Google Tag Manager event setup for button clicked

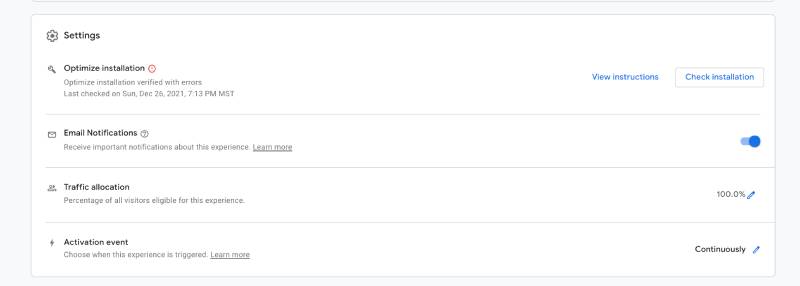
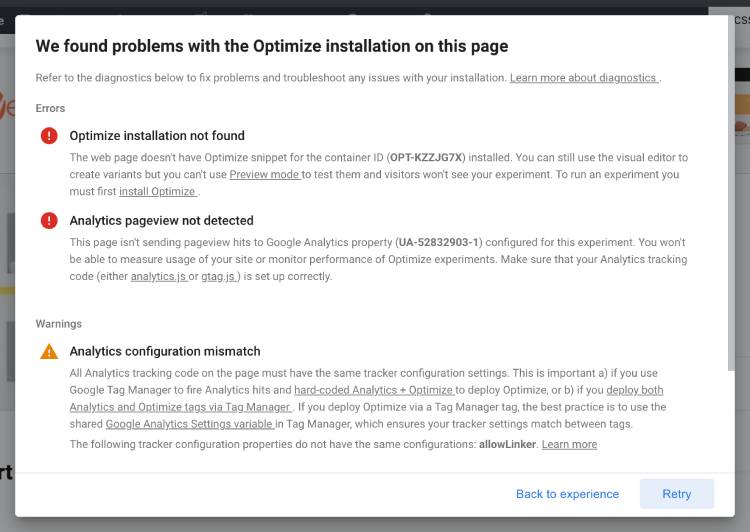
Now, check if all installation is set up properly by clicking the “Check Installation”. It will show if there is an error like optimize code is not added or Google Analytics is not set up properly etc.

Check Installation of Google Optimize

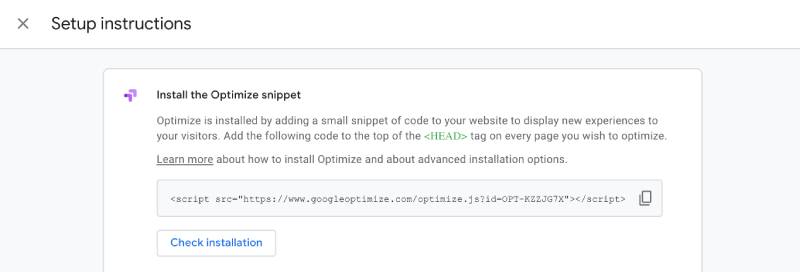
See the “View instructions” where you will find the script tag to add to the Opencart

Google Optimize Javascript Tag

In the Opencart admin >> Extensions >> Extensions >> Select Analytics >> Edit Google Analytics >> Paste the above chode in the Google Analytics code. If you want to learn how to add third-party JS in Opencart then click here. Or, if you have installed the Google Tag Manager then you can add the container Id in the tag and you don’t need to add the above snippet.

Some of the errors popups are like below:

Google Optimize errors

Finally, click the Start button to begin the AB testing in Google Optimize.

Google Optimize Opencart Start

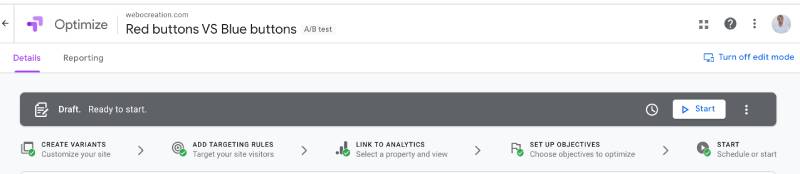
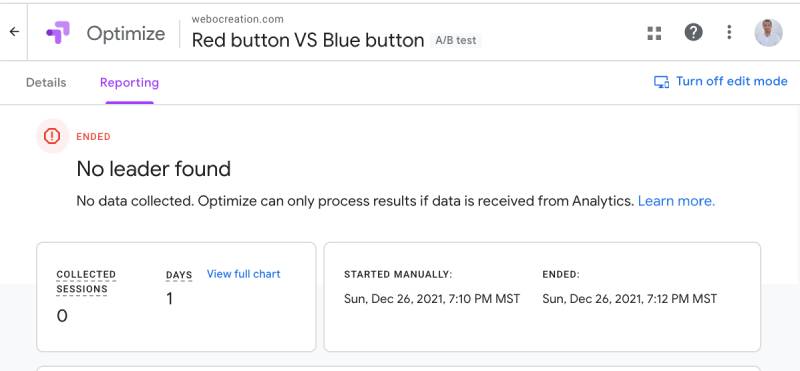
Once it is started then you can wait for some days and check the reporting section where you can get which variant is the leader and make changes in your design. In our case, no leaders were found 🙂

Google Optimize reporting

You can set up the A/B test like above and make changes to optimize the conversion. In our upcoming posts, we will show other types of experience Multivariate test, Redirect test, Personalization, and Banner Template, similarly, we will come up with lists of experiences that you can test to increase your Conversion Rate Optimization(CRO). So keep on visiting our blog, you can follow us at our Twitter account @rupaknpl. Subscribe to our YouTube channel for Opencart tutorials, and click to see all Opencart tutorials.

How to create a custom page in Opencart 3 – Category listing Part 2

In the previous opencart tutorial, we show a basic way to create a custom page in OpenCart 3. Here we are showing you by creating the categories listing custom page in Opencart 3.0.3.2, we create a controller page, language page, model page for the database, and twig page for the view.

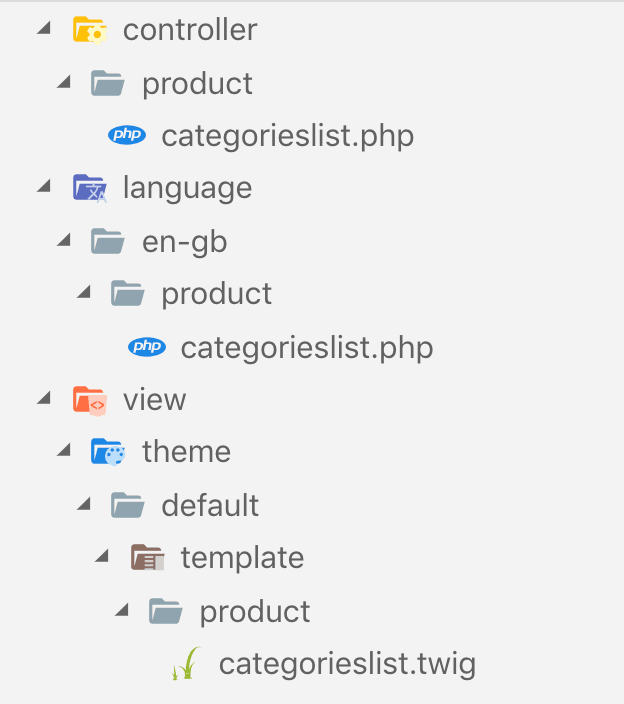
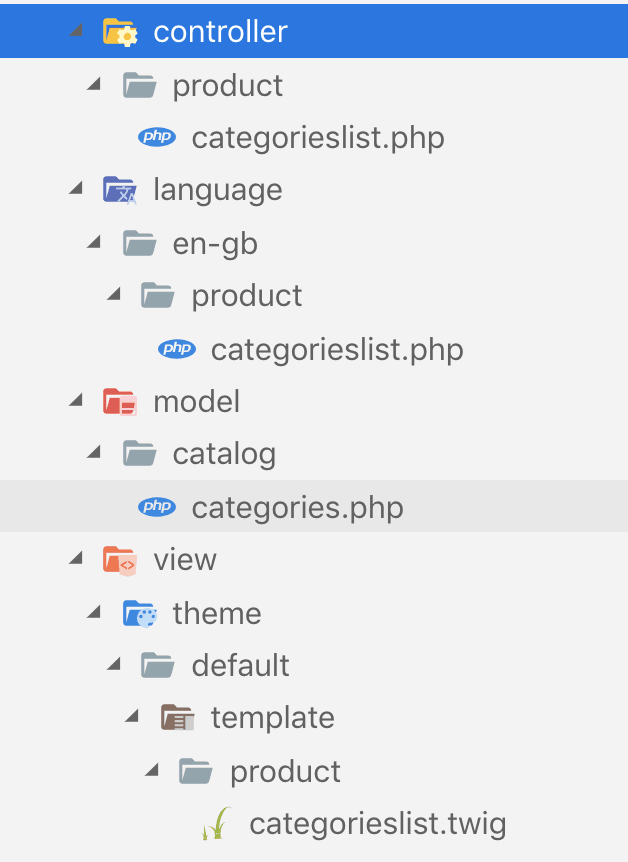
Previously the file and folders structure was like below:

Opencart custom page creation

We will make the changes in the above files and add the model file at model/catalog/categories.php where we will write code for all the database queries. The files and folders hierarchies will become like below:

Opencart custom page

Now let’s start with the language file catalog/language/en-gb/product/categorieslist.php. We will comment most of the line of code and describe what is happening there, you can download all the code below:

Language section

Open /catalog/language/en-gb/product/categorieslist.php

<?php
// Text
$_['title']        = 'All Categories';
$_['meta_title']        = 'All Categories';
$_['meta_description']  = 'All Categories';
$_['meta_keyword']      = 'All Categories';
$_['categories_text']   = 'This is categories list page 2';

In the language file, we set the Text to a variable. For example, $_[‘meta_title’] is a variable and met_title will be accessible in the twig file and we can get the value. Likewise in the controller, we first load the file and then get the values. Here in this file, we define every translatable text that is needed in the view.

Controller section

Now, Open catalog/controller/product/categorieslist.php

<?php
class ControllerProductCategorieslist extends Controller
{
    public function index()
    {
        $this->load->language('product/categorieslist');
        
        $this->document->setTitle($this->language->get('meta_title'));
        $this->document->setDescription($this->language->get('meta_description'));
        $this->document->setKeywords($this->language->get('meta_keyword'));

        $data['breadcrumbs'] = array();
		$data['breadcrumbs'][] = array(
			'text' => $this->language->get('text_home'),
			'href' => $this->url->link('common/home')
        );
        $data['breadcrumbs'][] = array(
			'text' => $this->language->get('title'),
			'href' => $this->url->link('product/categorieslist')
        );
        
        $category_id = 0;
        $data['categories'] = array();
        
        $this->load->model('catalog/category');
        $results = $this->model_catalog_category->getCategories($category_id);

        $this->load->model('tool/image');

        foreach ($results as $result) {
            $categories = $this->imageCategory($result['name'], $result['image'], $result['category_id']);
            $data['categories'][]= $categories;

            $data['subcategories']=$this->model_catalog_category->getCategories($result['category_id']);
            if(!empty($data['subcategories'])){
                foreach($data['subcategories'] as $category){
                    $subcategories = $this->imageCategory($category['name'], $category['image'], $category['category_id']);
                    $data['categories'][]= $subcategories;
                }
            }
        }

        $data['column_left'] = $this->load->controller('common/column_left');
        $data['column_right'] = $this->load->controller('common/column_right');
        $data['content_top'] = $this->load->controller('common/content_top');
        $data['content_bottom'] = $this->load->controller('common/content_bottom');
        $data['footer'] = $this->load->controller('common/footer');
        $data['header'] = $this->load->controller('common/header');

        $this->response->setOutput($this->load->view('product/categorieslist', $data));
    }

Following are the details of the code:

class ControllerProductCategorieslist extends Controller {

While creating the Class name follow the folder structure, as our folder structure is catalog/controller/product/catgorieslist.php so the name of the class is ControllerProductCategorieslist. Do not use – and _. They give Fatal error: Uncaught Error: Class ‘Controllerproductcategorieslist’ not found. Then extends the Opencart base Controller

 public function index() {

Now start creating method, let’s start with the index method, this method is called whenever the main controller ControllerProductCategorieslist is called through route URL. Learn more about OpenCart framework detail and request and response in OpenCart.

$this->load->language('product/categorieslist');

With this line, you can now get the values set in the language file. Here our language file is catalog/language/en-gb/product/categorieslist.php. As the above code in language we set $_[‘meta_title’] =”All Categories”, now we can get that value in controller by $this->language->get(‘meta_title’). In this way, you can get any text set in the language file.

$this->document->setTitle($this->language->get('meta_title'));
$this->document->setDescription($this->language->get('meta_description'));
$this->document->setKeywords($this->language->get('meta_keyword'));

In a document or say webpage you can set and get Title, Description, Keywords, Links, Styles, and Scripts. You can learn more about the Opencart 3 library global objects method in this video. Here you get the text from the language file and set title, description, and keywords of the webpage, these are important for SEO.

$data['breadcrumbs'] = array();
$data['breadcrumbs'][] = array(
    'text' => $this->language->get('text_home'),
    'href' => $this->url->link('common/home')
);
$data['breadcrumbs'][] = array(
    'text' => $this->language->get('title'),
    'href' => $this->url->link('product/categorieslist')
);

This code is set in the breadcrumbs which we will show in the view.

$category_id = 0;
$data['categories'] = array();

We set the category_id to zero to get the top-level categories and assign an empty array to $data[‘categories’].

$this->load->model('catalog/category');
$results = $this->model_catalog_category->getCategories($category_id);

Here we load the catalog/model/catalog/category.php so that we can get access to the method like $this->model_catalog_category->getCategories. You will get the query access and get the query results and assign them in $results.

public function getCategories($parent_id = 0) {
    $query = $this->db->query("SELECT * FROM " . DB_PREFIX . "category c LEFT JOIN " . DB_PREFIX . "category_description cd ON (c.category_id = cd.category_id) LEFT JOIN " . DB_PREFIX . "category_to_store c2s ON (c.category_id = c2s.category_id) WHERE c.parent_id = '" . (int)$parent_id . "' AND cd.language_id = '" . (int)$this->config->get('config_language_id') . "' AND c2s.store_id = '" . (int)$this->config->get('config_store_id') . "'  AND c.status = '1' ORDER BY c.sort_order, LCASE(cd.name)");

    return $query->rows;
}

With this, you can get all the top-level categories.

foreach ($results as $result) {
    if ($result['image']) {
        $image = $this->model_tool_image->resize($result['image'], $this->config->get('theme_' . $this->config->get('config_theme') . '_image_product_width'), $this->config->get('theme_' . $this->config->get('config_theme') . '_image_product_height'));
    } else {
        $image = $this->model_tool_image->resize('placeholder.png', $this->config->get('theme_' . $this->config->get('config_theme') . '_image_product_width'), $this->config->get('theme_' . $this->config->get('config_theme') . '_image_product_height'));
    }
    $data['categories'][] = array(
        'name' => $result['name'] ,
        'href' => $this->url->link('product/category', 'path=' . $result['category_id']),
        'image' => $image,
    );
}

This will assign all the top-level categories to the $data[‘categories’] array. Now, let’s pull the sub-categories as well. The above code will get modified as:

foreach ($results as $result) {
    if ($result['image']) {
        $image = $this->model_tool_image->resize($result['image'], $this->config->get('theme_' . $this->config->get('config_theme') . '_image_product_width'), $this->config->get('theme_' . $this->config->get('config_theme') . '_image_product_height'));
    } else {
        $image = $this->model_tool_image->resize('placeholder.png', $this->config->get('theme_' . $this->config->get('config_theme') . '_image_product_width'), $this->config->get('theme_' . $this->config->get('config_theme') . '_image_product_height'));
    }
    $data['categories'][] = array(
        'name' => $result['name'] ,
        'href' => $this->url->link('product/category', 'path=' . $result['category_id']),
        'image' => $image,
    );

    $data['subcategories']=$this->model_catalog_category->getCategories($result['category_id']);
    if(!empty($data['subcategories'])){
        foreach($data['subcategories'] as $category){
            if ($category['image']) {
                $image = $this->model_tool_image->resize($category['image'], $this->config->get('theme_' . $this->config->get('config_theme') . '_image_product_width'), $this->config->get('theme_' . $this->config->get('config_theme') . '_image_product_height'));
            } else {
                $image = $this->model_tool_image->resize('placeholder.png', $this->config->get('theme_' . $this->config->get('config_theme') . '_image_product_width'), $this->config->get('theme_' . $this->config->get('config_theme') . '_image_product_height'));
            }
            $data['categories'][] = array(
                'name' => $category['name'] ,
                'href' => $this->url->link('product/category', 'path=' . $category['category_id']),
                'image' => $image,
            );
        }
    }
}

This assigns all the categories in the $data[‘categories’]. But there is repeating code so let’s fix like below:

Let’s define one extra method

 public function imageCategory($name, $category_image, $category_id){
    if ($category_image) {
        $image = $this->model_tool_image->resize($category_image, $this->config->get('theme_' . $this->config->get('config_theme') . '_image_product_width'), $this->config->get('theme_' . $this->config->get('config_theme') . '_image_product_height'));
    } else {
        $image = $this->model_tool_image->resize('placeholder.png', $this->config->get('theme_' . $this->config->get('config_theme') . '_image_product_width'), $this->config->get('theme_' . $this->config->get('config_theme') . '_image_product_height'));
    }
    $categories = array(
        'name' => $name ,
        'href' => $this->url->link('product/category', 'path=' . $category_id),
        'image' => $image,
    );
    return $categories;
}

Then we can change the previous for each code to get all categories like below:

foreach ($results as $result) {
    $categories = $this->imageCategory($result['name'], $result['image'], $result['category_id']);
    $data['categories'][]= $categories;

    $data['subcategories']=$this->model_catalog_category->getCategories($result['category_id']);
    if(!empty($data['subcategories'])){
        foreach($data['subcategories'] as $category){
            $subcategories = $this->imageCategory($category['name'], $category['image'], $category['category_id']);
            $data['categories'][]= $subcategories;
        }
    }
}

This removed the repeated code.

Now we call all the controllers to load the layouts:

$data['column_left'] = $this->load->controller('common/column_left');
$data['column_right'] = $this->load->controller('common/column_right');
$data['content_top'] = $this->load->controller('common/content_top');
$data['content_bottom'] = $this->load->controller('common/content_bottom');
$data['footer'] = $this->load->controller('common/footer');
$data['header'] = $this->load->controller('common/header');

Now, in the end, we set output response to the catalog/view/theme/default/template/product/categorieslist.twig and pass the $data variable so we have access to all data in the twig file.

$this->response->setOutput($this->load->view('product/categorieslist', $data));

Template section

Now let’s work in view part, open catalog/view/theme/default/template/product/categorieslist.twig

{{ header }}
{{ column_left }}
{{ column_right }}
{{ content_top}}
{{ content_bottom }}
{{ footer }} 

This will give you all the layout

{{ header }}
{{ column_left }}
{{ column_right }}
<div class="container">
    <ul class="breadcrumb">
        {% for breadcrumb in breadcrumbs %}
            <li><a href="{{ breadcrumb.href }}">{{ breadcrumb.text }}</a></li>
        {% endfor %}
    </ul>
    <div class="col-sm-12">
        {% for category in categories %}
            <div class="col-sm-4 col-xs-12">
                <div class="col-xs-12 text-center">
                    <a href="{{ category.href }}">
                        <img src="{{ category.image }}" alt="{{ category.name }}" title="{{ category.name }}" class="img-responsive" />
                    </a>
                    <h4><a href="{{ category.href }}">{{ category.name }}</a></h4>
                </div>
            </div>
        {% endfor %}
    </div>
</div>
{{ content_top}}
{{ content_bottom }}
{{ footer }} 

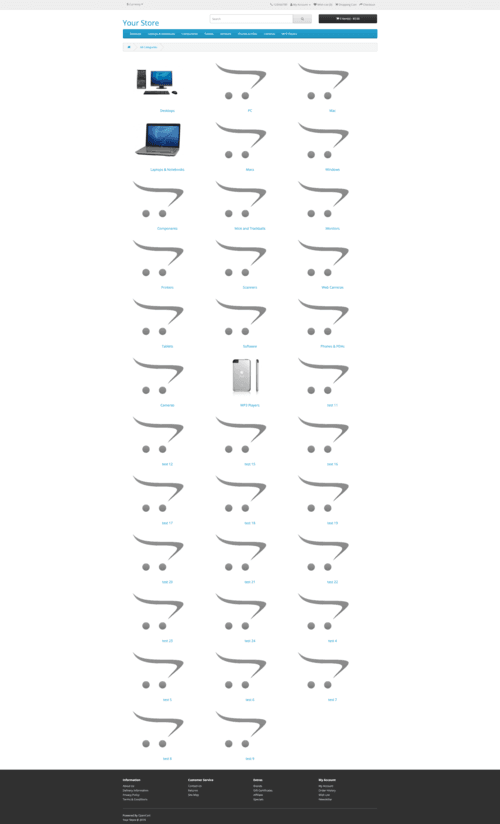
With the above code you will be able to see all the categories listed below:

List out all categories Opencart

You can download the code here:

Let us know if you have any suggestions.

PHP Docs – The easiest way for documenting your PHP Projects with PHPDoc

We were lacking documentation while we develop themes or plugins for the Opencart but found PHPDoc which makes our documenting our PHP projects easily. A good programmer who takes responsibility for communicating with other programmers must support documentation. Whenever we write code we started thinking of 5Ws and write each for better documentation

5Ws for better documentation

What, when, where, how, and why should be answered while creating better documentation. We came up with the following ideas to list in our documentation. It is just our idea, yours can be totally different.

What: Power Statement 

“What” will be a title, which includes Issues Titles, Steps title, new Features Title, functionality title, etc

When and Where: Description

“When and Where” will be included in the description. The description will include:

  • An excerpt that you can write
  • Tools/Websites/Template name/Plugin name
  • Include Ticket links
  • Github code links

Why: Codes and logic implemented

In the “Why” section we add codes and logic

How: Output Test/Reports/Metrics

In the “How” section we add output, test, reports, and metrics.

Example of the PHP project documentation

<?php
/**
 * This is a file Summary.
 *
 * This is a file description
 * @package File
 * @filesource
 */

namespace {

    /**
     * This is the summary of a constant in the global namespace.
     *
     * To check if the description is displayed correctly we *check* if it is handled correctly. And
     * if it shows any [Markdown](http://daringfireball.net) formatting.
     */
    const GLOBAL_CONSTANT_DEFINE_WITH_ROOT_NAMESPACE = 'test';
}

namespace My\Space {

    define('GLOBAL_CONSTANT_DEFINE', 'test');

    /**
     * @package Constant
     */
    define('Namespaced\\GLOBAL_CONSTANT_DEFINE', 'test');

    /**
     * @package Constant\Specific
     */
    const GLOBAL_CONSTANT_CONST = 'test';

    /**
     * @param integer   $param1 Example of a description & with ampersand (&).
     * @param string    $param3
     */
    function globalFunction($param1, \stdClass $param2, $param3 = '')
    {
    }

    /**
     * A reference implementation for a subclass.
     *
     * This subclass's package has a different case than the superclass to test issue #558.
     *
     * @package class
     */
    class SubClass extends SuperClass
    {
        /**
         * @var integer   The first property in a list
         * @var \stdClass $propertyListItem2 The second property in a list
         */
        public $propertyListItem1;

        public $propertyListItem2;
    }

You can use multiple tags listed below which you can use in the comments Docblock:

https://docs.phpdoc.org/3.0/guide/references/phpdoc/tags/index.html

Once you added the comments like above then you can generate the docs by PHPdocs.

Download phpDocumentor.phar

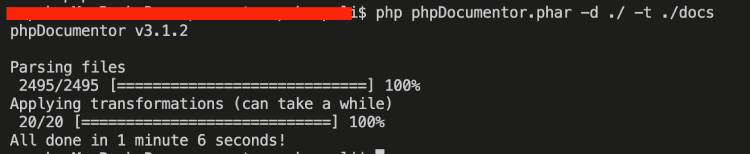
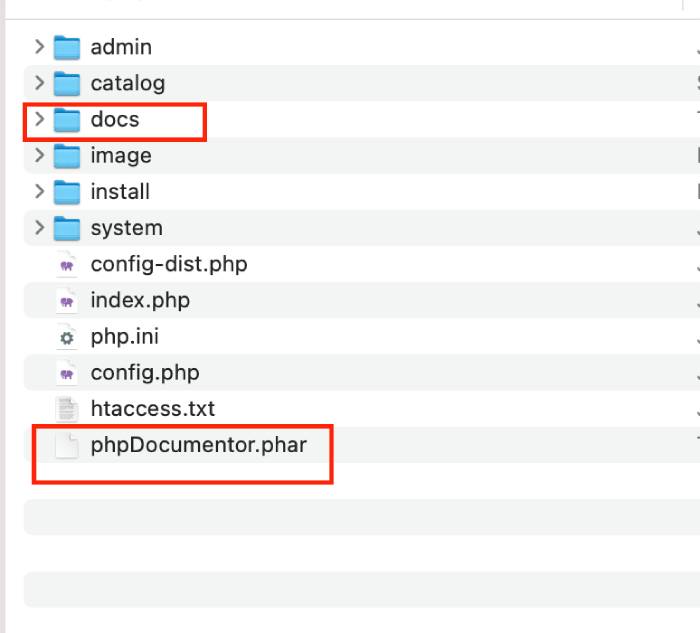
Download https://phpdoc.org/phpDocumentor.phar and move it into your project folder. Then we ran

php phpDocumentor.phar -d ./ -t ./docs
Documentation Terminal Command

After we ran this, we got the docs folder in the project folder.

Documentation folder Opencart developer

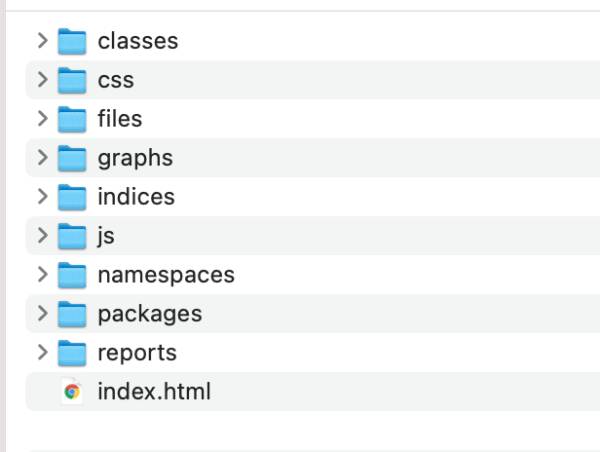
After this go to the docs folder where you see multiple folders like below then open index.html

Docs files and folder

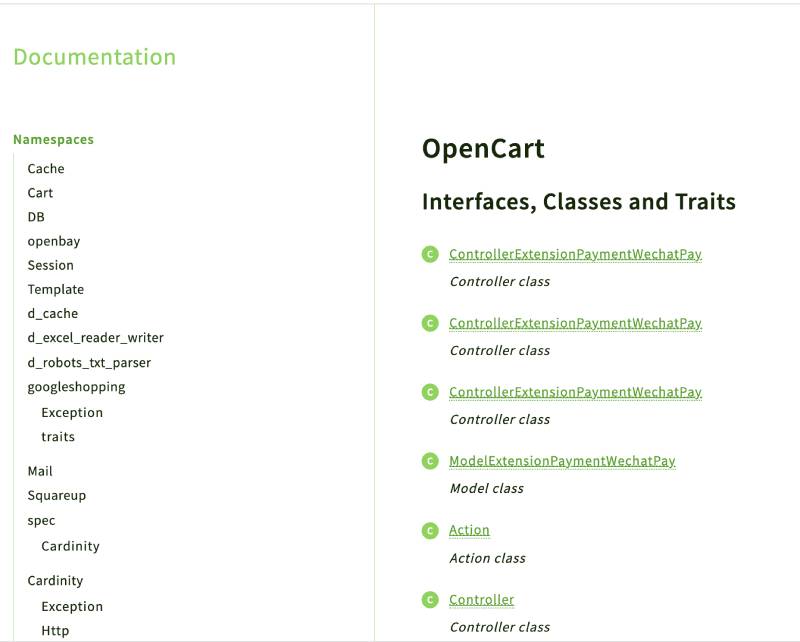
When you open index.html in the browser you will see something like the below:

Developer Documentation Opencart project

With these simple steps and adding comments in the code we are in the process of becoming good developers, you guys also can start making the documentation so easy for developers. Hope you will start documenting your project easily, let us know if you have any questions or suggestions, please subscribe to our YouTube Channel for Opencart video tutorials. You can also find us on Twitter and Facebook. Enjoy!

OpenCart free extension – full-width position in the layout of v 3

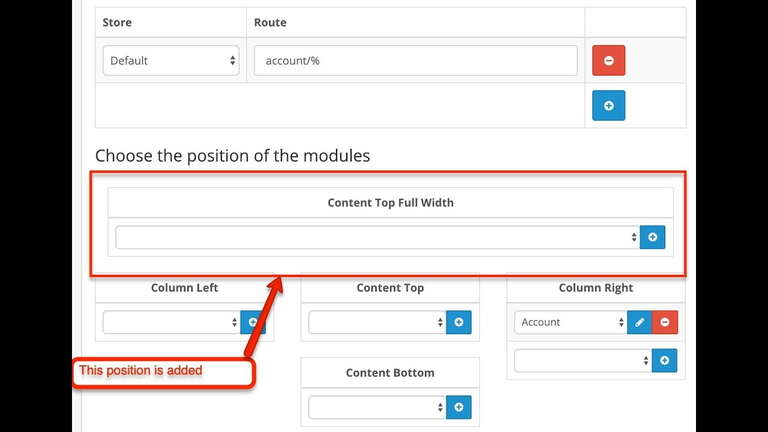
With this documentation of the free opencart 3 module, you will get another position in layout “Content Top full width” where you can add modules and show full width in all layouts. It is tested with OpenCart version 3.0.2.0

The above download will just show Content top full width, download below to show Content Top full width and Content Bottom full width.

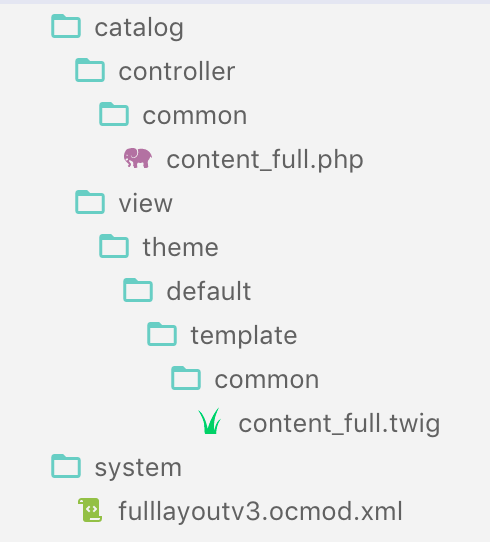
  • Once you download the module, extract the file.
  • Upload the files to the respective folder
files and folders of full content top module
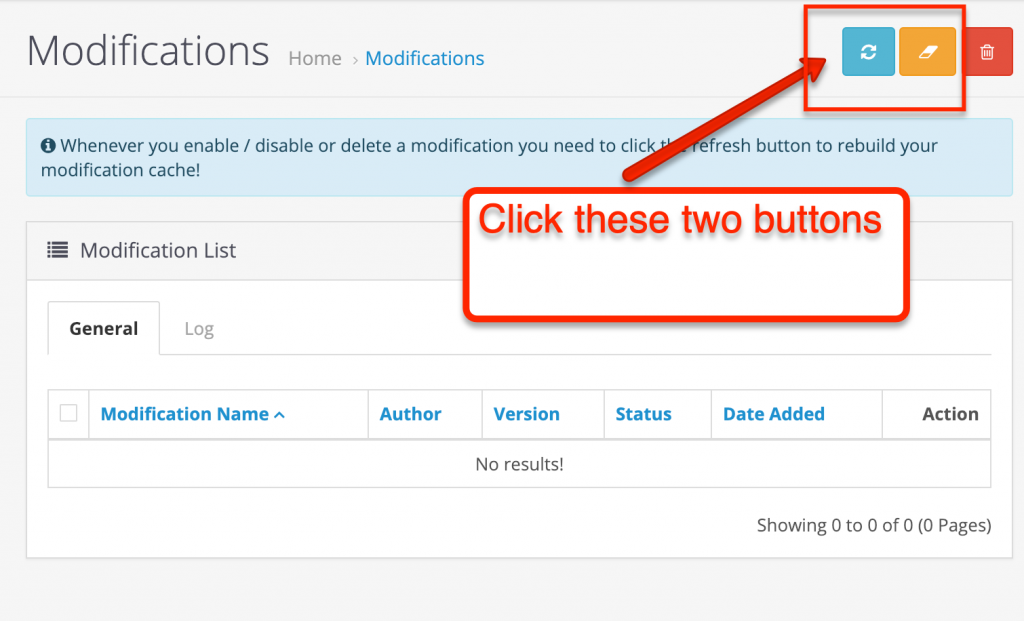
  • Once upload is completed, go to admin >> Extensions >> Modifications
  • Then click the refresh button
modification refresh button
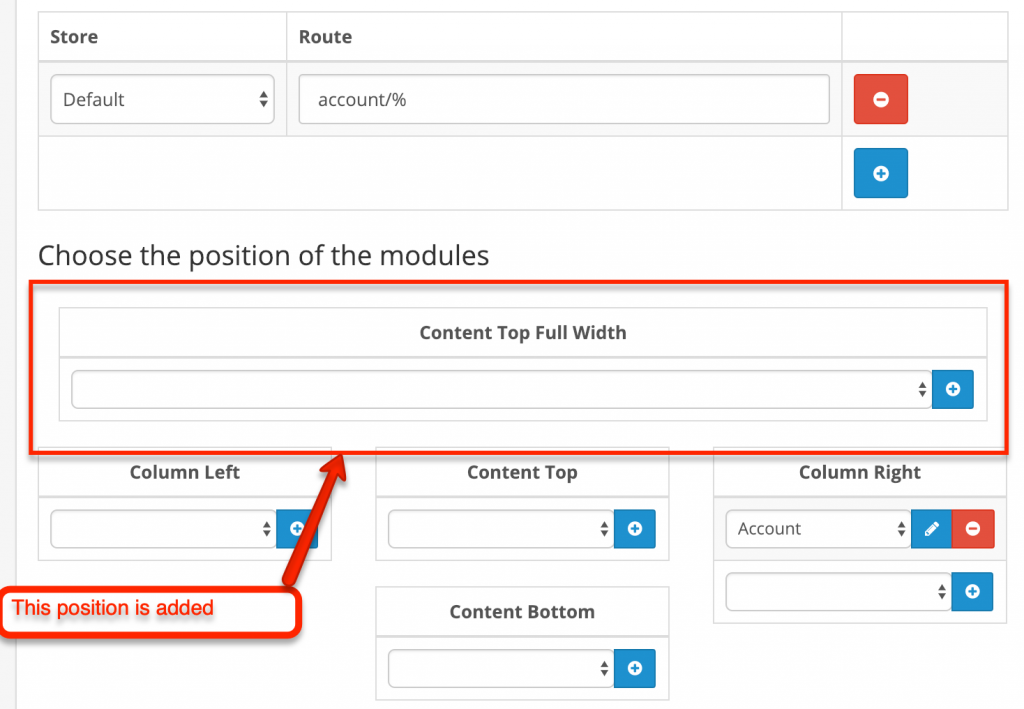
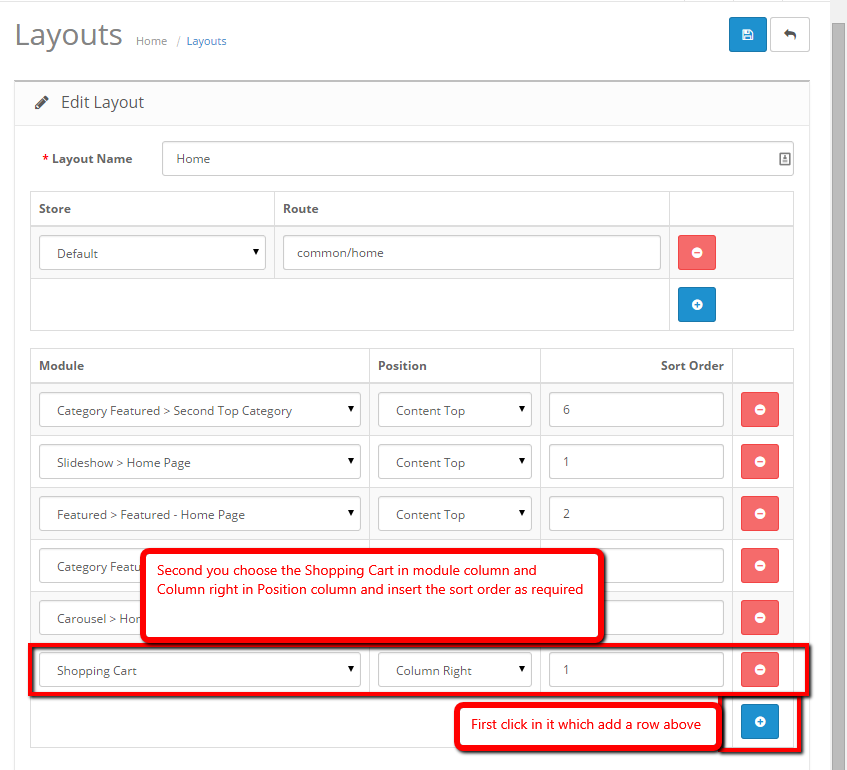
  • Now go to Admin >> Design >> Layouts >> Edit anyone (we are editing the Account)
Layouts in Opencart
  • Click the Add button, which will add the select box on which you can choose the active module. Let’s choose the homepage slider here for testing.
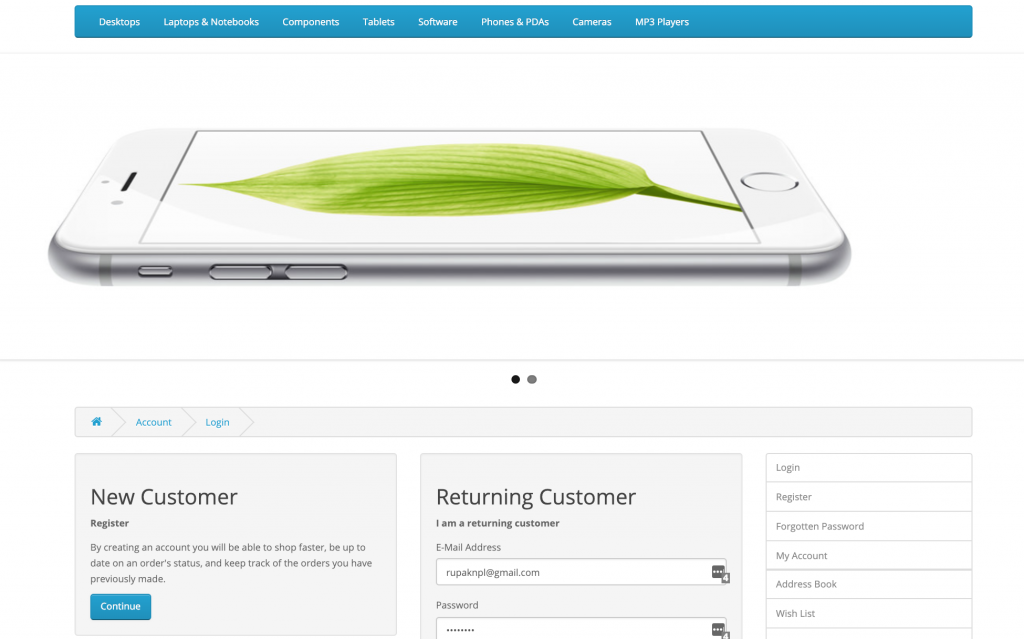
  • Then, let’s check the account page which will be shown like the demo here DEMO theme for full-width module
Full width layout Opencart

In this way, you can show a full-width module in the OpenCart.

There was one request to show the bottom full width also so we created another module.

You can download it and go to Admin >> Extensions >> Installer and upload this downloaded zip. This module is tested only at OpenCart 3.0.3.2, let us know if you got any issues.

See more: Make full-width with simple CSS for Opencart modules

OCMOD used in this extension is

<?xml version="1.0" encoding="utf-8"?>
<modification>
    <name>Full layout added</name>
    <version>3.0</version>
    <author>Rupak Nepali</author>
    <link>https://webocreation.com</link>
    <code>webocreation_full_layout_v7</code>
    <description>Full layout</description>
    <file path="catalog/controller/*/*.php">
        <operation>
            <search><![CDATA[ $data['column_left'] = $this->load->controller('common/column_left'); ]]></search>
            <add position="after"><![CDATA[
                $data['content_full'] = $this->load->controller('common/content_full');
            ]]>            </add>
        </operation>
    </file>
    <file path="catalog/view/theme/*/template/*/*.twig">
        <operation>
            <search><![CDATA[ {{ header }} ]]></search>
            <add position="after"><![CDATA[
                {{ content_full }}
            ]]>            </add>
        </operation>
    </file>

    <file path="admin/language/*/design/layout.php">
        <operation>
            <search><![CDATA[ $_['text_column_right'] ]]></search>
            <add position="before"><![CDATA[ $_['text_content_top_full_width']   = 'Content Top Full Width '; ]]></add>
        </operation>
    </file>

    <file path="admin/view/template/design/layout_form.twig">
        <operation>
            <search><![CDATA[ 
            {% set module_row = 0 %}
             ]]>            </search>
            <add position="after"><![CDATA[ 
                <div class="col-lg-12 col-md-12 col-sm-12">
                    <table
                        id="module-content-full"
                        class="table table-striped table-bordered table-hover"
                    >
                        <thead>
                        <tr>
                            <td class="text-center">{{text_content_top_full_width}}</td>
                        </tr>
                        </thead>
                        <tbody>
                        {% for layout_module in layout_modules %} {% if layout_module.position ==
                        'content_full' %}
                        <tr id="module-row{{ module_row }}">
                            <td class="text-left">
                            <div class="input-group">
                                <select
                                name="layout_module[{{ module_row }}][code]"
                                class="form-control input-sm"
                                >
                                {% for extension in extensions %}
                                <optgroup label="{{ extension.name }}">
                                    {% if not extension.module %} {% if extension.code ==
                                    layout_module.code %}
                                    <option value="{{ extension.code }}" selected="selected">
                                    {{ extension.name }}
                                    </option>
                                    {% else %}
                                    <option value="{{ extension.code }}">
                                    {{ extension.name }}
                                    </option>
                                    {% endif %} {% else %} {% for module in extension.module %} {%
                                    if module.code == layout_module.code %}
                                    <option value="{{ module.code }}" selected="selected">
                                    {{ module.name }}
                                    </option>
                                    {% else %}
                                    <option value="{{ module.code }}">{{ module.name }}</option>
                                    {% endif %} {% endfor %} {% endif %}
                                </optgroup>
                                {% endfor %}
                                </select>
                                <input
                                type="hidden"
                                name="layout_module[{{ module_row }}][position]"
                                value="{{ layout_module.position }}"
                                />
                                <input
                                type="hidden"
                                name="layout_module[{{ module_row }}][sort_order]"
                                value="{{ layout_module.sort_order }}"
                                />
                                <div class="input-group-btn">
                                <a
                                    href="{{ layout_module.edit }}"
                                    type="button"
                                    data-toggle="tooltip"
                                    title="{{ button_edit }}"
                                    target="_blank"
                                    class="btn btn-primary btn-sm"
                                >
                                    <i class="fa fa-pencil"></i>
                                </a>
                                <button
                                    type="button"
                                    onclick="$('#module-row{{ module_row }}').remove();"
                                    data-toggle="tooltip"
                                    title="{{ button_remove }}"
                                    class="btn btn-danger btn-sm"
                                >
                                    <i class="fa fa fa-minus-circle"></i>
                                </button>
                                </div>
                            </div>
                            </td>
                        </tr>
                        {% set module_row = module_row + 1 %} {% endif %} {% endfor %}
                        </tbody>
                        <tfoot>
                        <tr>
                            <td class="text-left">
                            <div class="input-group">
                                <select class="form-control input-sm">
                                <option value=""></option>
                                {% for extension in extensions %}
                                <optgroup label="{{ extension.name }}">
                                    {% if not extension.module %}
                                    <option value="{{ extension.code }}">
                                    {{ extension.name }}
                                    </option>
                                    {% else %} {% for module in extension.module %}
                                    <option value="{{ module.code }}">{{ module.name }}</option>
                                    {% endfor %} {% endif %}
                                </optgroup>
                                {% endfor %}
                                </select>
                                <div class="input-group-btn">
                                <button
                                    type="button"
                                    onclick="addModule('content-full');"
                                    data-toggle="tooltip"
                                    title="{{ button_module_add }}"
                                    class="btn btn-primary btn-sm"
                                >
                                    <i class="fa fa-plus-circle"></i>
                                </button>
                                </div>
                            </div>
                            </td>
                        </tr>
                        </tfoot>
                    </table>
                </div>
             ]]>            
             </add>
        </operation>

        <operation>
            <search><![CDATA[ $('#module-column-left, #module-column-right, #module-content-top, #module-content-bottom').delegate('select[name*=\'code\']', 'change', function() {
    var part = this.value.split('.'); ]]></search>
            <add position="replace"><![CDATA[ 
            $('#module-content-full, #module-column-left, #module-column-right, #module-content-top, #module-content-bottom').delegate('select[name*=\'code\']', 'change', function() {
    var part = this.value.split('.');
             ]]>            </add>
        </operation>

        <operation>
            <search><![CDATA[ $('#module-column-left, #module-column-right, #module-content-top, #module-content-bottom').trigger('change'); ]]></search>
            <add position="replace"><![CDATA[ $('#module-content-full, #module-column-left, #module-column-right, #module-content-top, #module-content-bottom').trigger('change');
             ]]>            </add>
        </operation>
    </file>
</modification>

File to upload at catalog/controller/common/content_full.php has the following code:

<?php
class ControllerCommonContentFull extends Controller {
	public function index() {
		$this->load->model('design/layout');
		if (isset($this->request->get['route'])) {
			$route = (string)$this->request->get['route'];
		} else {
			$route = 'common/home';
		}
		$layout_id = 0;
		if ($route == 'product/category' && isset($this->request->get['path'])) {
			$this->load->model('catalog/category');
			$path = explode('_', (string)$this->request->get['path']);
			$layout_id = $this->model_catalog_category->getCategoryLayoutId(end($path));
		}

		if ($route == 'product/product' && isset($this->request->get['product_id'])) {
			$this->load->model('catalog/product');
			$layout_id = $this->model_catalog_product->getProductLayoutId($this->request->get['product_id']);
		}

		if ($route == 'information/information' && isset($this->request->get['information_id'])) {
	$this->load->model('catalog/information');
			$layout_id = $this->model_catalog_information->getInformationLayoutId($this->request->get['information_id']);
		}
		if (!$layout_id) {
$layout_id = $this->model_design_layout->getLayout($route);
		}
		if (!$layout_id) {
	$layout_id = $this->config->get('config_layout_id');
		}
		$this->load->model('setting/module');
		$data['modules'] = array();
		$modules = $this->model_design_layout->getLayoutModules($layout_id, 'content_full');
		foreach ($modules as $module) {
			$part = explode('.', $module['code']);
			if (isset($part[0]) && $this->config->get('module_' . $part[0] . '_status')) {
				$module_data = $this->load->controller('extension/module/' . $part[0]);
				if ($module_data) {
			$data['modules'][] = $module_data;
				}
			}
			if (isset($part[1])) {
				$setting_info = $this->model_setting_module->getModule($part[1]);

				if ($setting_info && $setting_info['status']) {
					$output = $this->load->controller('extension/module/' . $part[0], $setting_info);

					if ($output) {
			$data['modules'][] = $output;
					}
				}
			}
		}
	return $this->load->view('common/content_full', $data);
	}
}

File to upload catalog/view/theme/default/template/common/content_full.twig has following code:

{% for module in modules %}
{{ module }}
{% endfor %}

In this way, you can show a full-width position in the layout of Opencart version 3.0.2.0. Let us know if need any support. Please subscribe to our YouTube Channel for Opencart video tutorials and get lots of other Opencart free modules. You can also find us on Twitter and Facebook.

Opencart 3 CRUD tutorials, Testimonials add, edit, list and delete in admin

In this Opencart 3 tutorial, we will show you how to code and create a custom page in the admin section to add or create testimonials, this tutorial is part of CRUD functionalities for OpenCart 3. We will create database tables for testimonials, then create form and save data to the database.

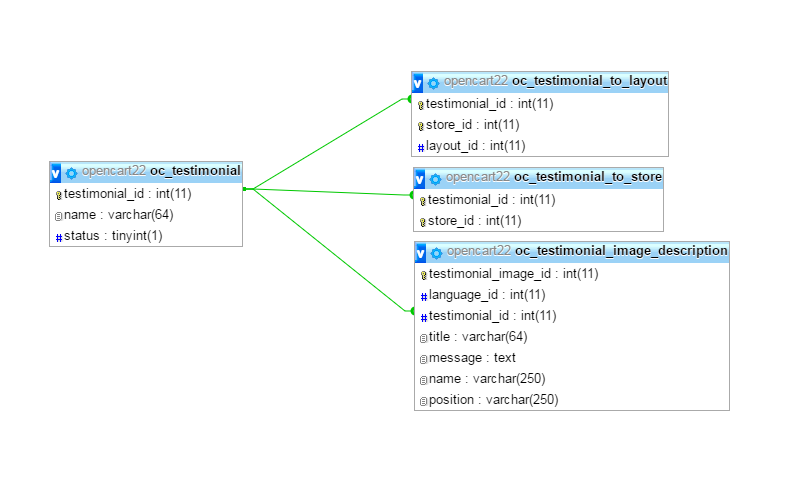
We already showed you in Opencart database defined video, how to create the database tables and how to take consideration of multi-language, multi-store and multi-layout of Opencart 3 while creating the database.

custom table schema for Testimonial

MySQL queries for creating similar database tables as the above diagram is like below:

CREATE TABLE `oc_testimonial` (
  `testimonial_id` int(11) NOT NULL AUTO_INCREMENT,
  `image` varchar(255) DEFAULT NULL,
  `status` tinyint(1) NOT NULL,
  `sort_order` int(11) NOT NULL,
  `date_added` datetime NOT NULL,
  `date_modified` datetime NOT NULL,
  PRIMARY KEY (`testimonial_id`)
) ENGINE=MyISAM DEFAULT CHARSET=utf8 COLLATE=utf8_general_ci;

CREATE TABLE `oc_testimonial_description` (
  `testimonial_id` int(11) NOT NULL,
  `language_id` int(11) NOT NULL,
  `name` varchar(255) NOT NULL,
  `description` text NOT NULL,
  PRIMARY KEY (`testimonial_id`,`language_id`),
  KEY `name` (`name`)
) ENGINE=MyISAM DEFAULT CHARSET=utf8 COLLATE=utf8_general_ci;

CREATE TABLE `oc_testimonial_to_layout` (
  `testimonial_id` int(11) NOT NULL,
  `store_id` int(11) NOT NULL,
  `layout_id` int(11) NOT NULL,
  PRIMARY KEY (`testimonial_id`,`store_id`)
) ENGINE=MyISAM DEFAULT CHARSET=utf8 COLLATE=utf8_general_ci;

CREATE TABLE `oc_testimonial_to_store` (
  `testimonial_id` int(11) NOT NULL,
  `store_id` int(11) NOT NULL,
  PRIMARY KEY (`testimonial_id`,`store_id`)
) ENGINE=MyISAM DEFAULT CHARSET=utf8 COLLATE=utf8_general_ci;

For now, we will directly run the SQL queries in the database but when we start making multi-instance testimonials module we will create from the install method of the module controller.

Let’s see the files and folders structure for our testimonials pages and module. Opencart allows us to create files and folders inside the following so we need to create the files and folder inside them.

// A list of allowed directories to be written to
$allowed = array(
   'admin/controller/extension/',
   'admin/language/',
   'admin/model/extension/',
   'admin/view/image/',
   'admin/view/javascript/',
   'admin/view/stylesheet/',
   'admin/view/template/extension/',
   'catalog/controller/extension/',
   'catalog/language/',
   'catalog/model/extension/',
   'catalog/view/javascript/',
   'catalog/view/theme/',
   'system/config/',
   'system/library/',
   'image/catalog/'
);

For our Testimonials pages and module following are the files that we need to create:

Files and folders of Testimonial module Opencart

In this tutorial, we will create a custom page in admin and create form and save data to the database, so for that following files are needed, we will create other files in upcoming posts.

  • admin/controller/extension/module/testimonialcrud.php
  • admin/language/en-gb/extension/module/testimonailcrud.php
  • admin/model/extension/module/testimonail.php
  • admin/view/template/extension/module/testimonail_form.twig
  • admin/view/template/extension/module/testimonail_list.twig

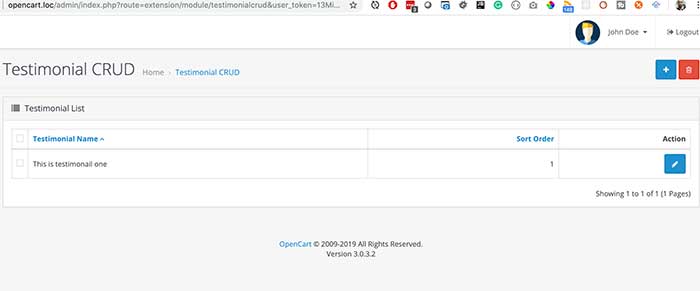
With the above file and folder structure, the URL will be like http://opencart.loc/admin/index.php?route=extension/module/testimonialcrud&user_token=5XdZM31DgqUkg4uEmrInmL3pp7uiaYUr, here the http://opencart.loc is your URL and 5XdZM31DgqUkg4uEmrInmL3pp7uiaYUr is your token id created automatically when logged in the Opencart admin section. The output of the listing pages will be like in the image below:

Testimonial listing page

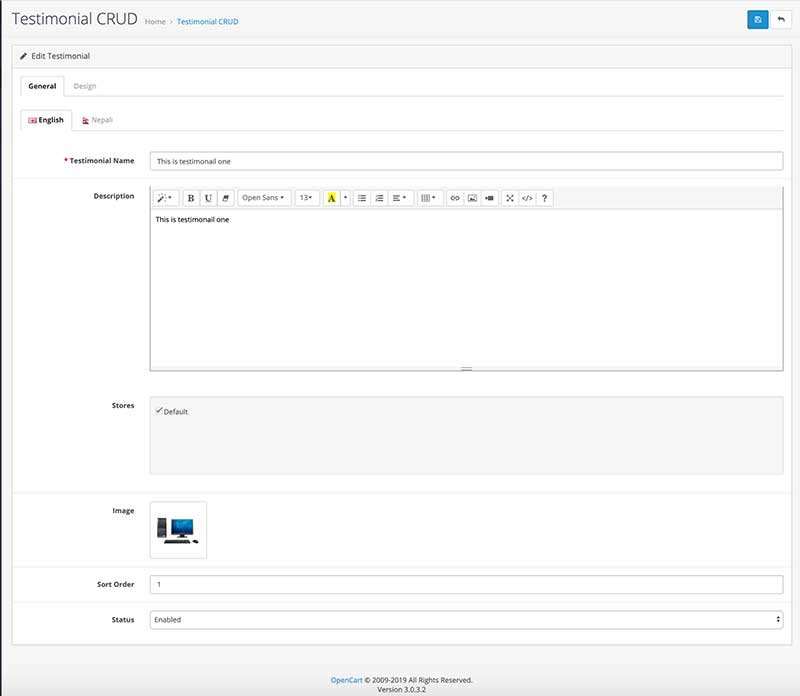
The form output will be like in the image below:

Testimonial form

In admin/controller/extension/module/ create a file called testimonialcrud.php, then paste the following code. As per MVCL Opencart pattern, the code of controller in testimonial CRUD will look like below: (Codes are explained in comments between /*** and ***/). In the controller, there are the following methods:

  • index() – Default method which is called when class ControllerExtensionModuleTestimonialcrud is called. This will list out the testimonials as it calls getList().
  • add() – This method is called when someone clicks the add button on the listing page and the save button on the form. If the add button is clicked then it shows the forms with blank fields. If the save button is clicked on the form then it validates the data and saves data in the database and redirects to the listing page.
  • edit() – Edit method is called when someone clicks the edit button in the listing page of the testimonial which will show the form with the data, and similarly it is called when someone clicks the save button on the form while editing when saved it will validate the form and update the data in the database and redirects to the listing page.
  • delete() – Delete method is called when someone clicks the delete button by selecting the testimonial to delete. Once testimonial/s is/are deleted then it is redirected to the listing page.
  • getList() – This method creates logic to create a listing and pass variables to template twig files where they are manipulated and shown in the table.
  • getForm() – This method creates logic to create a form. When someone clicks the add button then it shows a form with blank fields, if someone clicks the edit button then it shows a form with data of that testimonial.
  • validateForm() – This method is to check whether the user has permission to edit or add the data from the form. In this method, we can validate any form field if needed.
  • validateDelete() – This method is to confirm if it is ok to delete the selected testimonial to delete.

https://github.com/rupaknepali/Opencart-free-modules/blob/master/testimonial-opencart-3/upload/admin/controller/extension/module/testimonialcrud.php

<?php
/*** We create a file named ‘testimonialcrud.php’ in the admin/controller/extension/module/ folder. Since we named the file testimonialcrud.php and put it at admin/controller/extension/module/ folder, the controller class name will be ControllerExtensionModuleTestimonialcrud which inherits the Controller. ***/
class ControllerExtensionModuleTestimonialcrud extends Controller
{
	/*** private error property for this class only which will hold the error message if occurs any. ***/
	private $error = array();
	/*** The index method is default method, it is called whenever the main controller ControllerExtensionModuleTestimonialcrud is called through route URL, like http://opencart.loc/admin/index.php?route=extension/module/testimonialcrud&user_token=5XdZM31DgqUkg4uEmrInmL3pp7uiaYUr.
	 * Here the language file is loaded
	 * Then Document title is set
	 * Then model file is loaded
	 * Then protected method getList is called which list out all the testimonials. Thus default page is the listing page because we called getList in index() method. ***/
	public function index()
	{
		$this->load->language('extension/module/testimonialcrud');
		$this->document->setTitle($this->language->get('heading_title'));
		$this->load->model('extension/module/testimonial');
		$this->getList();
	}
	/*** add() - This method is called when someone clicks the add button in the listing page and the save button on the form. If the add button is clicked then it shows the forms with blank fields. If the save button is clicked on the form then it validates the data and saves data in the database and redirects to the listing page. ***/
	public function add()
	{
		$this->load->language('extension/module/testimonialcrud');
		$this->document->setTitle($this->language->get('heading_title'));
		$this->load->model('extension/module/testimonial');
		/*** This is the section when someone clicks save button while adding the testimonial. It checks if the request method is post and if form is validated. Then it will call the addTestimonial method of model class which save the new testimonial to the database ***/
		if (($this->request->server['REQUEST_METHOD'] == 'POST') && $this->validateForm()) {
			$this->model_extension_module_testimonial->addTestimonial($this->request->post);
			$this->session->data['success'] = $this->language->get('text_success');
			$url = '';
			if (isset($this->request->get['sort'])) {
				$url .= '&sort=' . $this->request->get['sort'];
			}
			if (isset($this->request->get['order'])) {
				$url .= '&order=' . $this->request->get['order'];
			}
			if (isset($this->request->get['page'])) {
				$url .= '&page=' . $this->request->get['page'];
			}
			/*** This line of code is to redirect to the listing page ***/
			$this->response->redirect($this->url->link('extension/module/testimonialcrud', 'user_token=' . $this->session->data['user_token'] . $url, true));
		}
		/*** This is to show the form ***/
		$this->getForm();
	}
	/*** edit() - Edit method is called when someone clicks the edit button in the listing page of the testimonial which will show the form with the data, and similarly it is called when someone clicks the save button on the form while editing, when saved it will validate the form and update the data in the database and redirects to the listing page. ***/
	public function edit()
	{
		$this->load->language('extension/module/testimonialcrud');
		$this->document->setTitle($this->language->get('heading_title'));
		$this->load->model('extension/module/testimonial');
		/*** This is the section when someone clicks edit button and save the testimonial. It checks if the request method is post and if form is validated. Then it will call the editTestimonial method of model class which save the updated testimonial to the database ***/
		if (($this->request->server['REQUEST_METHOD'] == 'POST') && $this->validateForm()) {
			$this->model_extension_module_testimonial->editTestimonial($this->request->get['testimonial_id'], $this->request->post);
			$this->session->data['success'] = $this->language->get('text_success');
			$url = '';
			if (isset($this->request->get['sort'])) {
				$url .= '&sort=' . $this->request->get['sort'];
			}
			if (isset($this->request->get['order'])) {
				$url .= '&order=' . $this->request->get['order'];
			}
			if (isset($this->request->get['page'])) {
				$url .= '&page=' . $this->request->get['page'];
			}
			/*** This line of code is to redirect to the listing page ***/
			$this->response->redirect($this->url->link('extension/module/testimonialcrud', 'user_token=' . $this->session->data['user_token'] . $url, true));
		}
		/*** This is to show the form ***/
		$this->getForm();
	}
	/*** delete() - Delete method is called when someone clicks delete button by selecting the testimonial to delete. Once testimonial/s is/are deleted then it is redirected to the listing page.***/
	public function delete()
	{
		$this->load->language('extension/module/testimonialcrud');
		$this->document->setTitle($this->language->get('heading_title'));
		$this->load->model('extension/module/testimonial');
		/*** This is the section which find which testimonial are selected that need to be deleted. The deleteTestimonial method of the model class is called which remove the testimonial from the database ***/
		if (isset($this->request->post['selected']) && $this->validateDelete()) {
			foreach ($this->request->post['selected'] as $testimonial_id) {
				$this->model_extension_module_testimonial->deleteTestimonial($testimonial_id);
			}
			$this->session->data['success'] = $this->language->get('text_success');
			$url = '';
			if (isset($this->request->get['sort'])) {
				$url .= '&sort=' . $this->request->get['sort'];
			}
			if (isset($this->request->get['order'])) {
				$url .= '&order=' . $this->request->get['order'];
			}
			if (isset($this->request->get['page'])) {
				$url .= '&page=' . $this->request->get['page'];
			}
			$this->response->redirect($this->url->link('extension/module/testimonialcrud', 'user_token=' . $this->session->data['user_token'] . $url, true));
		}
		$this->getList();
	}
	/*** getList() - This method creates logic to create a listing and pass variables to template twig files where they are manipulated and shown in the table.
	the listing page will look like in the image url https://webocreation.com/wp-content/uploads/2019/09/testimonial-listings.jpg  ***/
	protected function getList()
	{
		if (isset($this->request->get['sort'])) {
			$sort = $this->request->get['sort'];
		} else {
			$sort = 'name';
		}
		if (isset($this->request->get['order'])) {
			$order = $this->request->get['order'];
		} else {
			$order = 'ASC';
		}
		if (isset($this->request->get['page'])) {
			$page = $this->request->get['page'];
		} else {
			$page = 1;
		}
		$url = '';
		if (isset($this->request->get['sort'])) {
			$url .= '&sort=' . $this->request->get['sort'];
		}
		if (isset($this->request->get['order'])) {
			$url .= '&order=' . $this->request->get['order'];
		}
		if (isset($this->request->get['page'])) {
			$url .= '&page=' . $this->request->get['page'];
		}
		/*** Breadcrumbs variables set ***/
		$data['breadcrumbs'] = array();
		$data['breadcrumbs'][] = array(
			'text' => $this->language->get('text_home'),
			'href' => $this->url->link('common/dashboard', 'user_token=' . $this->session->data['user_token'], true)
		);
		$data['breadcrumbs'][] = array(
			'text' => $this->language->get('heading_title'),
			'href' => $this->url->link('extension/module/testimonialcrud', 'user_token=' . $this->session->data['user_token'] . $url, true)
		);
		/*** Add and delete button URL setup for the form ***/
		$data['add'] = $this->url->link('extension/module/testimonialcrud/add', 'user_token=' . $this->session->data['user_token'] . $url, true);
		$data['delete'] = $this->url->link('extension/module/testimonialcrud/delete', 'user_token=' . $this->session->data['user_token'] . $url, true);
		/*** testimonials variables is set to empty array, latter we will set the testimonials in it ***/
		$data['testimonials'] = array();
		/*** We set filter_data like below, $sort, $order, $page are assigned in above code, we can get from the URL paramaters or the config values. We pass this array and in model the SQL will be create as per this filter data   ***/
		$filter_data = array(
			'sort'  => $sort,
			'order' => $order,
			'start' => ($page - 1) * $this->config->get('config_limit_admin'),
			'limit' => $this->config->get('config_limit_admin')
		);
		/*** This is to get the total of number of testimonials as this is needed for the pagination ***/
		$testimonialcrud_total = $this->model_extension_module_testimonial->getTotalTestimonials();
		/*** This is to get filtered testimonials ***/
		$results = $this->model_extension_module_testimonial->getTestimonials($filter_data);
		/*** This is how we set data to the testimonials array, we can get many variables in the $results variables so we separate what is needed in template twig file and pass them to it ***/
		foreach ($results as $result) {
			$data['testimonials'][] = array(
				'testimonial_id' => $result['testimonial_id'],
				'name'        => $result['name'],
				'sort_order'  => $result['sort_order'],
				'edit'        => $this->url->link('extension/module/testimonialcrud/edit', 'user_token=' . $this->session->data['user_token'] . '&testimonial_id=' . $result['testimonial_id'] . $url, true),
				'delete'      => $this->url->link('extension/module/testimonialcrud/delete', 'user_token=' . $this->session->data['user_token'] . '&testimonial_id=' . $result['testimonial_id'] . $url, true)
			);
		}
		if (isset($this->error['warning'])) {
			$data['error_warning'] = $this->error['warning'];
		} else {
			$data['error_warning'] = '';
		}
		if (isset($this->session->data['success'])) {
			$data['success'] = $this->session->data['success'];
			unset($this->session->data['success']);
		} else {
			$data['success'] = '';
		}
		if (isset($this->request->post['selected'])) {
			$data['selected'] = (array) $this->request->post['selected'];
		} else {
			$data['selected'] = array();
		}
		$url = '';
		if ($order == 'ASC') {
			$url .= '&order=DESC';
		} else {
			$url .= '&order=ASC';
		}
		if (isset($this->request->get['page'])) {
			$url .= '&page=' . $this->request->get['page'];
		}
		$data['sort_name'] = $this->url->link('extension/module/testimonialcrud', 'user_token=' . $this->session->data['user_token'] . '&sort=name' . $url, true);
		$data['sort_sort_order'] = $this->url->link('extension/module/testimonialcrud', 'user_token=' . $this->session->data['user_token'] . '&sort=sort_order' . $url, true);
		$url = '';
		if (isset($this->request->get['sort'])) {
			$url .= '&sort=' . $this->request->get['sort'];
		}
		if (isset($this->request->get['order'])) {
			$url .= '&order=' . $this->request->get['order'];
		}
		/*** Pagination in Opencart they are self explainatory ***/
		$pagination = new Pagination();
		$pagination->total = $testimonialcrud_total;
		$pagination->page = $page;
		$pagination->limit = $this->config->get('config_limit_admin');
		$pagination->url = $this->url->link('extension/module/testimonialcrud', 'user_token=' . $this->session->data['user_token'] . $url . '&page={page}', true);
		$data['pagination'] = $pagination->render();
		$data['results'] = sprintf($this->language->get('text_pagination'), ($testimonialcrud_total) ? (($page - 1) * $this->config->get('config_limit_admin')) + 1 : 0, ((($page - 1) * $this->config->get('config_limit_admin')) > ($testimonialcrud_total - $this->config->get('config_limit_admin'))) ? $testimonialcrud_total : ((($page - 1) * $this->config->get('config_limit_admin')) + $this->config->get('config_limit_admin')), $testimonialcrud_total, ceil($testimonialcrud_total / $this->config->get('config_limit_admin')));
		$data['sort'] = $sort;
		$data['order'] = $order;
		/*** Pass the header, column_left and footer to the testimonialcrud_list.twig template ***/
		$data['header'] = $this->load->controller('common/header');
		$data['column_left'] = $this->load->controller('common/column_left');
		$data['footer'] = $this->load->controller('common/footer');
		/*** Set the response output ***/
		$this->response->setOutput($this->load->view('extension/module/testimonialcrud_list', $data));
	}
	/*** getForm() - This method creates logic to create a form. When someone clicks the add button then it shows form with blank fields, if someone clicks the edit button then it shows form with data of that testimonial.
	 ***/
	protected function getForm()
	{
		$data['text_form'] = !isset($this->request->get['testimonial_id']) ? $this->language->get('text_add') : $this->language->get('text_edit');
		if (isset($this->error['warning'])) {
			$data['error_warning'] = $this->error['warning'];
		} else {
			$data['error_warning'] = '';
		}
		if (isset($this->error['name'])) {
			$data['error_name'] = $this->error['name'];
		} else {
			$data['error_name'] = array();
		}
		$url = '';
		if (isset($this->request->get['sort'])) {
			$url .= '&sort=' . $this->request->get['sort'];
		}
		if (isset($this->request->get['order'])) {
			$url .= '&order=' . $this->request->get['order'];
		}
		if (isset($this->request->get['page'])) {
			$url .= '&page=' . $this->request->get['page'];
		}
		$data['breadcrumbs'] = array();
		$data['breadcrumbs'][] = array(
			'text' => $this->language->get('text_home'),
			'href' => $this->url->link('common/dashboard', 'user_token=' . $this->session->data['user_token'], true)
		);
		$data['breadcrumbs'][] = array(
			'text' => $this->language->get('heading_title'),
			'href' => $this->url->link('extension/module/testimonialcrud', 'user_token=' . $this->session->data['user_token'] . $url, true)
		);
		/*** This is the code which separate the action of edit or add action, if the URL parameter contains testimonial_id then it is edit else it is add  ***/
		if (!isset($this->request->get['testimonial_id'])) {
			$data['action'] = $this->url->link('extension/module/testimonialcrud/add', 'user_token=' . $this->session->data['user_token'] . $url, true);
		} else {
			$data['action'] = $this->url->link('extension/module/testimonialcrud/edit', 'user_token=' . $this->session->data['user_token'] . '&testimonial_id=' . $this->request->get['testimonial_id'] . $url, true);
		}
		$data['cancel'] = $this->url->link('extension/module/testimonialcrud', 'user_token=' . $this->session->data['user_token'] . $url, true);
		/*** This is the code which pulls the testimonial that we have to edit  ***/
		if (isset($this->request->get['testimonial_id']) && ($this->request->server['REQUEST_METHOD'] != 'POST')) {
			$testimonialcrud_info = $this->model_extension_module_testimonial->getTestimonial($this->request->get['testimonial_id']);
		}
		$data['user_token'] = $this->session->data['user_token'];
		/*** These two line of codes are to pull all active language ***/
		$this->load->model('localisation/language');
		$data['languages'] = $this->model_localisation_language->getLanguages();
		/*** This is the code to check testimonial_description field values, if it empty, or just clicked save button and request method is Post or set the available data in it while editing. We do this for all the fields. ***/
		if (isset($this->request->post['testimonial_description'])) {
			$data['testimonial_description'] = $this->request->post['testimonial_description'];
		} elseif (isset($this->request->get['testimonial_id'])) {
			$data['testimonial_description'] = $this->model_extension_module_testimonial->getTestimonialDescriptions($this->request->get['testimonial_id']);
		} else {
			$data['testimonial_description'] = array();
		}
		/*** This is code is to pull all active stores and set the selected stores. ***/
		$this->load->model('setting/store');
		$data['stores'] = array();
		$data['stores'][] = array(
			'store_id' => 0,
			'name'     => $this->language->get('text_default')
		);
		$stores = $this->model_setting_store->getStores();
		foreach ($stores as $store) {
			$data['stores'][] = array(
				'store_id' => $store['store_id'],
				'name'     => $store['name']
			);
		}
		if (isset($this->request->post['testimonial_store'])) {
			$data['testimonial_store'] = $this->request->post['testimonial_store'];
		} elseif (isset($this->request->get['testimonial_id'])) {
			$data['testimonial_store'] = $this->model_extension_module_testimonial->getTestimonialStores($this->request->get['testimonial_id']);
		} else {
			$data['testimonial_store'] = array(0);
		}
		/*** This is for image field ***/
		if (isset($this->request->post['image'])) {
			$data['image'] = $this->request->post['image'];
		} elseif (!empty($testimonialcrud_info)) {
			$data['image'] = $testimonialcrud_info['image'];
		} else {
			$data['image'] = '';
		}
		$this->load->model('tool/image');
		/*** This is for resizing of image to show thumbnails ***/
		if (isset($this->request->post['image']) && is_file(DIR_IMAGE . $this->request->post['image'])) {
			$data['thumb'] = $this->model_tool_image->resize($this->request->post['image'], 100, 100);
		} elseif (!empty($testimonialcrud_info) && is_file(DIR_IMAGE . $testimonialcrud_info['image'])) {
			$data['thumb'] = $this->model_tool_image->resize($testimonialcrud_info['image'], 100, 100);
		} else {
			$data['thumb'] = $this->model_tool_image->resize('no_image.png', 100, 100);
		}
		$data['placeholder'] = $this->model_tool_image->resize('no_image.png', 100, 100);
		/*** This is for sort order field ***/
		if (isset($this->request->post['sort_order'])) {
			$data['sort_order'] = $this->request->post['sort_order'];
		} elseif (!empty($testimonialcrud_info)) {
			$data['sort_order'] = $testimonialcrud_info['sort_order'];
		} else {
			$data['sort_order'] = 0;
		}
		/*** This is for status field ***/
		if (isset($this->request->post['status'])) {
			$data['status'] = $this->request->post['status'];
		} elseif (!empty($testimonialcrud_info)) {
			$data['status'] = $testimonialcrud_info['status'];
		} else {
			$data['status'] = true;
		}
		/*** This is for layout field ***/
		if (isset($this->request->post['testimonial_layout'])) {
			$data['testimonial_layout'] = $this->request->post['testimonial_layout'];
		} elseif (isset($this->request->get['testimonial_id'])) {
			$data['testimonial_layout'] = $this->model_extension_module_testimonial->getTestimonialLayouts($this->request->get['testimonial_id']);
		} else {
			$data['testimonial_layout'] = array();
		}
		/*** This is to get all layouts ***/
		$this->load->model('design/layout');
		$data['layouts'] = $this->model_design_layout->getLayouts();
		$data['header'] = $this->load->controller('common/header');
		$data['column_left'] = $this->load->controller('common/column_left');
		$data['footer'] = $this->load->controller('common/footer');
		$this->response->setOutput($this->load->view('extension/module/testimonialcrud_form', $data));
	}
	/***
	 * validateForm() - This method is to check whether the user has permission to edit or add the data from the form. In this method, we can validate any form field if needed.
	 ***/
	protected function validateForm()
	{
		/*** This is how we check if the user has permission to modify or not. ***/
		if (!$this->user->hasPermission('modify', 'extension/module/testimonialcrud')) {
			$this->error['warning'] = $this->language->get('error_permission');
		}
		/*** This is to check if the testimonial_description name contiains more than 1 character and less than 255 characters ***/
		foreach ($this->request->post['testimonial_description'] as $language_id => $value) {
			if ((utf8_strlen($value['name']) < 1) || (utf8_strlen($value['name']) > 255)) {
				$this->error['name'][$language_id] = $this->language->get('error_name');
			}
		}
		if ($this->error && !isset($this->error['warning'])) {
			$this->error['warning'] = $this->language->get('error_warning');
		}
		return !$this->error;
	}
	/*** validateDelete() - This method is to check if the user has permission to delete or not ***/
	protected function validateDelete()
	{
		if (!$this->user->hasPermission('modify', 'extension/module/testimonialcrud')) {
			$this->error['warning'] = $this->language->get('error_permission');
		}
		return !$this->error;
	}
}

For language we create testimonailcrud.php file at admin/language/en-gb/extension/module/ and paste the following code. We defined required language variables and assign them the text of that language.

https://github.com/rupaknepali/Opencart-free-modules/blob/master/testimonial-opencart-3/upload/admin/language/en-gb/extension/module/testimonialcrud.php

<?php
// Heading
$_['heading_title']          = 'Testimonial CRUD';
// Text
$_['text_success']           = 'Success: You have modified Testimonial CRUD!';
$_['text_list']              = 'Testimonial List';
$_['text_add']               = 'Add Testimonial';
$_['text_edit']              = 'Edit Testimonial';
$_['text_default']           = 'Default';
$_['text_keyword']           = 'Do not use spaces, instead replace spaces with - and make sure the SEO URL is globally unique.';
// Column
$_['column_name']            = 'Testimonial Name';
$_['column_sort_order']      = 'Sort Order';
$_['column_action']          = 'Action';
// Entry
$_['entry_name']             = 'Testimonial Name';
$_['entry_description']      = 'Description';
$_['entry_meta_title']          = 'Meta Tag Title';
$_['entry_meta_keyword']     = 'Meta Tag Keywords';
$_['entry_meta_description'] = 'Meta Tag Description';
$_['entry_store']            = 'Stores';
$_['entry_keyword']          = 'Keyword';
$_['entry_parent']           = 'Parent';
$_['entry_filter']           = 'Filters';
$_['entry_image']            = 'Image';
$_['entry_top']              = 'Top';
$_['entry_column']           = 'Columns';
$_['entry_sort_order']       = 'Sort Order';
$_['entry_status']           = 'Status';
$_['entry_layout']           = 'Layout Override';
// Help
$_['help_filter']            = '(Autocomplete)';
$_['help_top']               = 'Display in the top menu bar. Only works for the top parent Testimonial CRUD.';
$_['help_column']            = 'Number of columns to use for the bottom 3 Testimonial CRUD. Only works for the top parent Testimonial CRUD.';
// Error
$_['error_warning']          = 'Warning: Please check the form carefully for errors!';
$_['error_permission']       = 'Warning: You do not have permission to modify Testimonial CRUD!';
$_['error_name']             = 'Testimonial Name must be between 1 and 255 characters!';
$_['error_meta_title']       = 'Meta Title must be greater than 1 and less than 255 characters!';
$_['error_keyword']          = 'SEO URL already in use!';
$_['error_unique']           = 'SEO URL must be unique!';
$_['error_parent']           = 'The parent Testimonial you have chosen is a child of the current one!';

For model we create testimonail.php file at admin/model/extension/module/ and add the following lines of code, code is described in comments:

https://github.com/rupaknepali/Opencart-free-modules/blob/master/testimonial-opencart-3/upload/admin/model/extension/module/testimonial.php

<?php
class ModelExtensionModuleTestimonial extends Model
{
	/** addTestimonial method is to add testimonial which is called from controller like $this->model_extension_module_testimonial->addTestimonial($this->request->post);. Data is inserted in the oc_testimonial table, oc_testimonail_description, oc_testimonial_to_store and oc_testimonial_to_layout and cache is cleared for the testimonial variable ***/
	public function addTestimonial($data)
	{
		$this->db->query("INSERT INTO " . DB_PREFIX . "testimonial SET sort_order = '" . (int) $data['sort_order'] . "', status = '" . (int) $data['status'] . "', date_modified = NOW(), date_added = NOW()");
		$testimonial_id = $this->db->getLastId();
		if (isset($data['image'])) {
			$this->db->query("UPDATE " . DB_PREFIX . "testimonial SET image = '" . $this->db->escape($data['image']) . "' WHERE testimonial_id = '" . (int) $testimonial_id . "'");
		}
		//Testimonial Descritpion added
		foreach ($data['testimonial_description'] as $language_id => $value) {
			$this->db->query("INSERT INTO " . DB_PREFIX . "testimonial_description SET testimonial_id = '" . (int) $testimonial_id . "', language_id = '" . (int) $language_id . "', name = '" . $this->db->escape($value['name']) . "', description = '" . $this->db->escape($value['description']) . "'");
		}
		//Set which store to use with this testimonial
		if (isset($data['testimonial_store'])) {
			foreach ($data['testimonial_store'] as $store_id) {
				$this->db->query("INSERT INTO " . DB_PREFIX . "testimonial_to_store SET testimonial_id = '" . (int) $testimonial_id . "', store_id = '" . (int) $store_id . "'");
			}
		}
		// Set which layout to use with this testimonial
		if (isset($data['testimonial_layout'])) {
			foreach ($data['testimonial_layout'] as $store_id => $layout_id) {
				$this->db->query("INSERT INTO " . DB_PREFIX . "testimonial_to_layout SET testimonial_id = '" . (int) $testimonial_id . "', store_id = '" . (int) $store_id . "', layout_id = '" . (int) $layout_id . "'");
			}
		}
		$this->cache->delete('testimonial');
		return $testimonial_id;
	}
	/** editTestimonial method is to update the testimonial which is called from controller like $this->model_extension_module_testimonial->editTestimonial($this->request->post);. Data is updated in the oc_testimonial table, oc_testimonail_description, oc_testimonial_to_store and oc_testimonial_to_layout and cache is cleared for the testimonial variable ***/
	public function editTestimonial($testimonial_id, $data)
	{
		$this->db->query("UPDATE " . DB_PREFIX . "testimonial SET sort_order = '" . (int) $data['sort_order'] . "', status = '" . (int) $data['status'] . "', date_modified = NOW() WHERE testimonial_id = '" . (int) $testimonial_id . "'");
		if (isset($data['image'])) {
			$this->db->query("UPDATE " . DB_PREFIX . "testimonial SET image = '" . $this->db->escape($data['image']) . "' WHERE testimonial_id = '" . (int) $testimonial_id . "'");
		}
		$this->db->query("DELETE FROM " . DB_PREFIX . "testimonial_description WHERE testimonial_id = '" . (int) $testimonial_id . "'");
		foreach ($data['testimonial_description'] as $language_id => $value) {
			$this->db->query("INSERT INTO " . DB_PREFIX . "testimonial_description SET testimonial_id = '" . (int) $testimonial_id . "', language_id = '" . (int) $language_id . "', name = '" . $this->db->escape($value['name']) . "', description = '" . $this->db->escape($value['description']) . "'");
		}
		$this->db->query("DELETE FROM " . DB_PREFIX . "testimonial_to_store WHERE testimonial_id = '" . (int) $testimonial_id . "'");
		if (isset($data['testimonial_store'])) {
			foreach ($data['testimonial_store'] as $store_id) {
				$this->db->query("INSERT INTO " . DB_PREFIX . "testimonial_to_store SET testimonial_id = '" . (int) $testimonial_id . "', store_id = '" . (int) $store_id . "'");
			}
		}
		$this->db->query("DELETE FROM " . DB_PREFIX . "testimonial_to_layout WHERE testimonial_id = '" . (int) $testimonial_id . "'");
		if (isset($data['testimonial_layout'])) {
			foreach ($data['testimonial_layout'] as $store_id => $layout_id) {
				$this->db->query("INSERT INTO " . DB_PREFIX . "testimonial_to_layout SET testimonial_id = '" . (int) $testimonial_id . "', store_id = '" . (int) $store_id . "', layout_id = '" . (int) $layout_id . "'");
			}
		}
		$this->cache->delete('testimonial');
	}
	/** deleteTestimonial method is to delete the testimonial which is called from controller like $this->model_extension_module_testimonial->deleteTestimonial($testimonial_id);. Data is removed from the oc_testimonial table, oc_testimonail_description, oc_testimonial_to_store and oc_testimonial_to_layout and cache is cleared for the testimonial variable ***/
	public function deleteTestimonial($testimonial_id)
	{

		$this->db->query("DELETE FROM " . DB_PREFIX . "testimonial WHERE testimonial_id = '" . (int) $testimonial_id . "'");
		$this->db->query("DELETE FROM " . DB_PREFIX . "testimonial_description WHERE testimonial_id = '" . (int) $testimonial_id . "'");
		$this->db->query("DELETE FROM " . DB_PREFIX . "testimonial_to_store WHERE testimonial_id = '" . (int) $testimonial_id . "'");
		$this->db->query("DELETE FROM " . DB_PREFIX . "testimonial_to_layout WHERE testimonial_id = '" . (int) $testimonial_id . "'");

		$this->cache->delete('testimonial');
	}
	/** getTestimonial method is to retrieve the testimonial which is called from controller like $testimonialcrud_info = $this->model_extension_module_testimonial->getTestimonial($this->request->get['testimonial_id']);. Only one testimonial with that testimonial_id is returned  ***/
	public function getTestimonial($testimonial_id)
	{
		$query = $this->db->query("SELECT DISTINCT * FROM " . DB_PREFIX . "testimonial c LEFT JOIN " . DB_PREFIX . "testimonial_description cd2 ON (c.testimonial_id = cd2.testimonial_id) WHERE c.testimonial_id = '" . (int) $testimonial_id . "' AND cd2.language_id = '" . (int) $this->config->get('config_language_id') . "'");
		return $query->row;
	}
	/** getTestimonials method is to retrieve the testimonials which is called from controller like $results = $this->model_extension_module_testimonial->getTestimonials($filter_data);. $data is the filtering parameter. Multiple testimonials are returned  ***/
	public function getTestimonials($data = array())
	{
		$sql = "SELECT * FROM " . DB_PREFIX . "testimonial c1 LEFT JOIN " . DB_PREFIX . "testimonial_description cd2 ON (c1.testimonial_id = cd2.testimonial_id) WHERE cd2.language_id ='" . (int) $this->config->get('config_language_id') . "'";
		$sort_data = array(
			'name',
			'sort_order'
		);
		if (isset($data['sort']) && in_array($data['sort'], $sort_data)) {
			$sql .= " ORDER BY " . $data['sort'];
		} else {
			$sql .= " ORDER BY sort_order";
		}
		if (isset($data['order']) && ($data['order'] == 'DESC')) {
			$sql .= " DESC";
		} else {
			$sql .= " ASC";
		}
		if (isset($data['start']) || isset($data['limit'])) {
			if ($data['start'] < 0) {
				$data['start'] = 0;
			}
			if ($data['limit'] < 1) {
				$data['limit'] = 20;
			}
			$sql .= " LIMIT " . (int) $data['start'] . "," . (int) $data['limit'];
		}
		$query = $this->db->query($sql);
		return $query->rows;
	}
	/** getTestimonialDescriptions method is to retrieve the testimonials' description as per the language ***/
	public function getTestimonialDescriptions($testimonial_id)
	{
		$testimonial_description_data = array();
		$query = $this->db->query("SELECT * FROM " . DB_PREFIX . "testimonial_description WHERE testimonial_id = '" . (int) $testimonial_id . "'");
		foreach ($query->rows as $result) {
			$testimonial_description_data[$result['language_id']] = array(
				'name'             => $result['name'],
				'description'      => $result['description']
			);
		}
		return $testimonial_description_data;
	}
	/** getTestimonialStores method is to retrieve the testimonials' store of the testimonial***/
	public function getTestimonialStores($testimonial_id)
	{
		$testimonial_store_data = array();
		$query = $this->db->query("SELECT * FROM " . DB_PREFIX . "testimonial_to_store WHERE testimonial_id = '" . (int) $testimonial_id . "'");
		foreach ($query->rows as $result) {
			$testimonial_store_data[] = $result['store_id'];
		}
		return $testimonial_store_data;
	}
	/** getTestimonialLayouts method is to retrieve the testimonials' layout of the testimonial***/
	public function getTestimonialLayouts($testimonial_id)
	{
		$testimonial_layout_data = array();
		$query = $this->db->query("SELECT * FROM " . DB_PREFIX . "testimonial_to_layout WHERE testimonial_id = '" . (int) $testimonial_id . "'");
		foreach ($query->rows as $result) {
			$testimonial_layout_data[$result['store_id']] = $result['layout_id'];
		}
		return $testimonial_layout_data;
	}
	/** getTotalTestimonials method is to count the total number of testimonials ***/
	public function getTotalTestimonials()
	{
		$query = $this->db->query("SELECT COUNT(*) AS total FROM " . DB_PREFIX . "testimonial");
		return $query->row['total'];
	}
	/** getTotalTestimonialsByLayoutId method is to count the total number of testimonials as per layout id ***/
	public function getTotalTestimonialsByLayoutId($layout_id)
	{
		$query = $this->db->query("SELECT COUNT(*) AS total FROM " . DB_PREFIX . "testimonial_to_layout WHERE layout_id = '" . (int) $layout_id . "'");
		return $query->row['total'];
	}
}

For the listing page, we create testimonialcrud_list.twig at admin/view/template/extension/module/ and add the following lines of code, they are self-explanatory, let us know in the comment is you didn’t understand anything.
https://github.com/rupaknepali/Opencart-free-modules/blob/master/testimonial-opencart-3/upload/admin/view/template/extension/module/testimonialcrud_list.twig

{{ header }}{{ column_left }}
<div id="content">
    <div class="page-header">
        <div class="container-fluid">
            <div class="pull-right">
                <a href="{{ add }}" data-toggle="tooltip" title="{{ button_add }}" class="btn btn-primary">
                    <i class="fa fa-plus"></i>
                </a>
                <button type="button" data-toggle="tooltip" title="{{ button_delete }}" class="btn btn-danger" onclick="confirm('{{ text_confirm }}') ? $('#form-testimonial').submit() : false;">
                    <i class="fa fa-trash-o"></i>
                </button>
            </div>
            <h1>{{ heading_title }}</h1>
            <ul class="breadcrumb">
                {% for breadcrumb in breadcrumbs %}
                    <li>
                        <a href="{{ breadcrumb.href }}">{{ breadcrumb.text }}</a>
                    </li>
                {% endfor %}
            </ul>
        </div>
    </div>
    <div class="container-fluid">
        {% if error_warning %}
            <div class="alert alert-danger alert-dismissible">
                <i class="fa fa-exclamation-circle"></i>
                {{ error_warning }}
                <button type="button" class="close" data-dismiss="alert">×</button>
            </div>
        {% endif %}
        {% if success %}
            <div class="alert alert-success alert-dismissible">
                <i class="fa fa-check-circle"></i>
                {{ success }}
                <button type="button" class="close" data-dismiss="alert">×</button>
            </div>
        {% endif %}
        <div class="panel panel-default">
            <div class="panel-heading">
                <h3 class="panel-title">
                    <i class="fa fa-list"></i>
                    {{ text_list }}</h3>
            </div>
            <div class="panel-body">
                <form action="{{ delete }}" method="post" enctype="multipart/form-data" id="form-testimonial">
                    <div class="table-responsive">
                        <table class="table table-bordered table-hover">
                            <thead>
                                <tr>
                                    <td style="width: 1px;" class="text-center"><input type="checkbox" onclick="$('input[name*=\'selected\']').prop('checked', this.checked);"/></td>
                                    <td class="text-left">
                                        {% if sort %}
                                            <a href="{{ sort_name }}" class="{{ order|lower }}">{{ column_name }}</a>
                                        {% else %}
                                            <a href="{{ sort_name }}">{{ column_name }}</a>
                                        {% endif %}
                                    </td>
                                    <td class="text-right">
                                        {% if sort == 'sort_order' %}
                                            <a href="{{ sort_sort_order }}" class="{{ order|lower }}">{{ column_sort_order }}</a>
                                        {% else %}
                                            <a href="{{ sort_sort_order }}">{{ column_sort_order }}</a>
                                        {% endif %}
                                    </td>
                                    <td class="text-right">{{ column_action }}</td>
                                </tr>
                            </thead>
                            <tbody>
                                {% if testimonials %}
                                    {% for testimonial in testimonials %}
                                        <tr>
                                            <td class="text-center">
                                                {% if testimonial.testimonial_id in selected %}
                                                    <input type="checkbox" name="selected[]" value="{{ testimonial.testimonial_id }}" checked="checked"/>
                                                {% else %}
                                                    <input type="checkbox" name="selected[]" value="{{ testimonial.testimonial_id }}"/>
                                                {% endif %}
                                            </td>
                                            <td class="text-left">{{ testimonial.name }}</td>
                                            <td class="text-right">{{ testimonial.sort_order }}</td>
                                            <td class="text-right">
                                                <a href="{{ testimonial.edit }}" data-toggle="tooltip" title="{{ button_edit }}" class="btn btn-primary">
                                                    <i class="fa fa-pencil"></i>
                                                </a>
                                            </td>
                                        </tr>
                                    {% endfor %}
                                {% else %}
                                    <tr>
                                        <td class="text-center" colspan="4">{{ text_no_results }}</td>
                                    </tr>
                                {% endif %}
                            </tbody>
                        </table>
                    </div>
                </form>
                <div class="row">
                    <div class="col-sm-6 text-left">{{ pagination }}</div>
                    <div class="col-sm-6 text-right">{{ results }}</div>
                </div>
            </div>
        </div>
    </div>
</div>
{{ footer }}

For form we create testimonialcrud_form.twig file at admin/view/template/extension/module/ and add following code. Most of the code is self-explanatory, one thing summernote.js is added for the text area WYSIWYG editor.
https://github.com/rupaknepali/Opencart-free-modules/blob/master/testimonial-opencart-3/upload/admin/view/template/extension/module/testimonialcrud_form.twig

{{ header }}{{ column_left }}
<div id="content">
    <div class="page-header">
        <div class="container-fluid">
            <div class="pull-right">
                <button type="submit" form="form-category" data-toggle="tooltip" title="{{ button_save }}" class="btn btn-primary">
                    <i class="fa fa-save"></i>
                </button>
                <a href="{{ cancel }}" data-toggle="tooltip" title="{{ button_cancel }}" class="btn btn-default">
                    <i class="fa fa-reply"></i>
                </a>
            </div>
            <h1>{{ heading_title }}</h1>
            <ul class="breadcrumb">
                {% for breadcrumb in breadcrumbs %}
                    <li>
                        <a href="{{ breadcrumb.href }}">{{ breadcrumb.text }}</a>
                    </li>
                {% endfor %}
            </ul>
        </div>
    </div>
    <div class="container-fluid">
        {% if error_warning %}
            <div class="alert alert-danger alert-dismissible">
                <i class="fa fa-exclamation-circle"></i>
                {{ error_warning }}
                <button type="button" class="close" data-dismiss="alert">×</button>
            </div>
        {% endif %}
        <div class="panel panel-default">
            <div class="panel-heading">
                <h3 class="panel-title">
                    <i class="fa fa-pencil"></i>
                    {{ text_form }}</h3>
            </div>
            <div class="panel-body">
                <form action="{{ action }}" method="post" enctype="multipart/form-data" id="form-category" class="form-horizontal">
                    <ul class="nav nav-tabs">
                        <li class="active">
                            <a href="#tab-general" data-toggle="tab">{{ tab_general }}</a>
                        </li>
                        <li>
                            <a href="#tab-design" data-toggle="tab">{{ tab_design }}</a>
                        </li>
                    </ul>
                    <div class="tab-content">
                        <div class="tab-pane active" id="tab-general">
                            <ul class="nav nav-tabs" id="language">
                                {% for language in languages %}
                                    <li>
                                        <a href="#language{{ language.language_id }}" data-toggle="tab"><img src="language/{{ language.code }}/{{ language.code }}.png" title="{{ language.name }}"/>
                                            {{ language.name }}</a>
                                    </li>
                                {% endfor %}
                            </ul>
                            <div class="tab-content">
                                {% for language in languages %}
                                    <div class="tab-pane" id="language{{ language.language_id }}">
                                        <div class="form-group required">
                                            <label class="col-sm-2 control-label" for="input-name{{ language.language_id }}">{{ entry_name }}</label>
                                            <div class="col-sm-10">
                                                <input type="text" name="testimonial_description[{{ language.language_id }}][name]" value="{{ testimonial_description[language.language_id] ? testimonial_description[language.language_id].name }}" placeholder="{{ entry_name }}" id="input-name{{ language.language_id }}" class="form-control"/>
                                                {% if error_name[language.language_id] %}
                                                    <div class="text-danger">{{ error_name[language.language_id] }}</div>
                                                {% endif %}
                                            </div>
                                        </div>
                                        <div class="form-group">
                                            <label class="col-sm-2 control-label" for="input-description{{ language.language_id }}">{{ entry_description }}</label>
                                            <div class="col-sm-10">
                                                <textarea name="testimonial_description[{{ language.language_id }}][description]" placeholder="{{ entry_description }}" id="input-description{{ language.language_id }}" data-toggle="summernote" data-lang="{{ summernote }}" class="form-control">{{ testimonial_description[language.language_id] ? testimonial_description[language.language_id].description }}</textarea>
                                            </div>
                                        </div>
                                    </div>
                                {% endfor %}
                            </div>
                            <div class="form-group">
                                <label class="col-sm-2 control-label">{{ entry_store }}</label>
                                <div class="col-sm-10">
                                    <div class="well well-sm" style="height: 150px; overflow: auto;">
                                        {% for store in stores %}
                                            <div class="checkbox">
                                                <label>
                                                    {% if store.store_id in testimonial_store %}
                                                        <input type="checkbox" name="testimonial_store[]" value="{{ store.store_id }}" checked="checked"/>
                                                        {{ store.name }}
                                                    {% else %}
                                                        <input type="checkbox" name="testimonial_store[]" value="{{ store.store_id }}"/>
                                                        {{ store.name }}
                                                    {% endif %}
                                                </label>
                                            </div>
                                        {% endfor %}
                                    </div>
                                </div>
                            </div>
                            <div class="form-group">
                                <label class="col-sm-2 control-label">{{ entry_image }}</label>
                                <div class="col-sm-10">
                                    <a href="" id="thumb-image" data-toggle="image" class="img-thumbnail"><img src="{{ thumb }}" alt="" title="" data-placeholder="{{ placeholder }}"/></a>
                                    <input type="hidden" name="image" value="{{ image }}" id="input-image"/>
                                </div>
                            </div>
                            <div class="form-group">
                                <label class="col-sm-2 control-label" for="input-sort-order">{{ entry_sort_order }}</label>
                                <div class="col-sm-10">
                                    <input type="text" name="sort_order" value="{{ sort_order }}" placeholder="{{ entry_sort_order }}" id="input-sort-order" class="form-control"/>
                                </div>
                            </div>
                            <div class="form-group">
                                <label class="col-sm-2 control-label" for="input-status">{{ entry_status }}</label>
                                <div class="col-sm-10">
                                    <select name="status" id="input-status" class="form-control">
                                        {% if status %}
                                            <option value="1" selected="selected">{{ text_enabled }}</option>
                                            <option value="0">{{ text_disabled }}</option>
                                        {% else %}
                                            <option value="1">{{ text_enabled }}</option>
                                            <option value="0" selected="selected">{{ text_disabled }}</option>
                                        {% endif %}
                                    </select>
                                </div>
                            </div>
                        </div>
                        <div class="tab-pane" id="tab-design">
                            <div class="table-responsive">
                                <table class="table table-bordered table-hover">
                                    <thead>
                                        <tr>
                                            <td class="text-left">{{ entry_store }}</td>
                                            <td class="text-left">{{ entry_layout }}</td>
                                        </tr>
                                    </thead>
                                    <tbody>

                                        {% for store in stores %}
                                            <tr>
                                                <td class="text-left">{{ store.name }}</td>
                                                <td class="text-left">
                                                    <select name="testimonial_layout[{{ store.store_id }}]" class="form-control">
                                                        <option value=""></option>
                                                        {% for layout in layouts %}
                                                            {% if testimonial_layout[store.store_id] and testimonial_layout[store.store_id] == layout.layout_id %}
                                                                <option value="{{ layout.layout_id }}" selected="selected">{{ layout.name }}</option>
                                                            {% else %}
                                                                <option value="{{ layout.layout_id }}">{{ layout.name }}</option>
                                                            {% endif %}
                                                        {% endfor %}
                                                    </select>
                                                </td>
                                            </tr>
                                        {% endfor %}
                                    </tbody>
                                </table>
                            </div>
                        </div>
                    </div>
                </form>
            </div>
        </div>
    </div>
    <script type="text/javascript" src="view/javascript/summernote/summernote.js"></script>
    <link href="view/javascript/summernote/summernote.css" rel="stylesheet"/>
    <script type="text/javascript" src="view/javascript/summernote/summernote-image-attributes.js"></script>
    <script type="text/javascript" src="view/javascript/summernote/opencart.js"></script>
    <script
        type="text/javascript">
        <!--
        $( '#language a:first' ).tab( 'show' );
        //
        -->
    </script>
</div>
{{ footer }}

Like this way we create a form in Opencart admin(Create), validate the form, submit the form data to the database, list out the data in a table (Read), edit the data and update it (Update), and perform the delete (Delete), like this, we perform Opencart CRUD functionalities in Opencart. Hope you liked this post, please subscribe to our YouTube Channel for Opencart video tutorials. You can also find us on Twitter and Facebook.
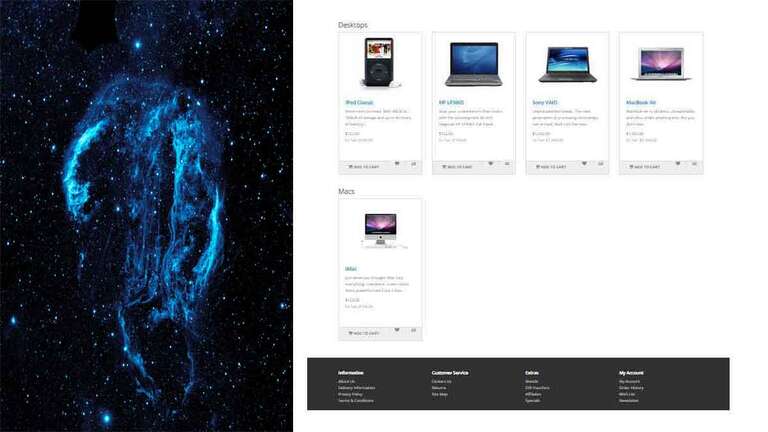
Marketo form administration tool – add or update field for all forms at once

We developed a Marketo form administration tool so that we can update all forms in Marketo or delete fields from all forms in Marketo at once. We need to add extra UTM fields to all Marketo forms, so doing one by one was time-consuming, so we created this web application where we can add the fields directly to all forms in Marketo.

Open the Marketo form administration by clicking the link below:

Login to the form with Marketo Account Id and Marketo API Access token

You will see the form like below and enter the Marketo Account Id and enter the Marketo Access token:

Marketo Account Id and Access Token

How to get the Marketo Account Id/ Munchkin Id?

Log in to Marketo >> Admin tab >> My Account >> Support Information section

Marketo Account Munchkin ID

You can copy the Munchkin ID and enter it into the form.

How to get the Marketo Access Token?

If you have not created the web service API already then you can create it by going to Admin >> Launch Point >> Click New Service >> and enter the details

API service Marketo

Once you created or have already created the service then you can click the View Details link of the API >> Click the “Get Token” button, copy it, and enter into the form.

Get access token Marketo

Form administration to enter details to delete or update the forms

Once you entered the Marketo account id and access token then you will see a form like below where you can enter the details to delete or update the forms. You can choose your options to delete or update the form. Then, enter the Field API Name to remove or update.

Where can you find the “Field API Name”?

Login >> Admin tab >> Field Management >> Search the field >> Click the field and you will get the detail where you can get the Field API Name

Custom field in Marketo to get field API name

Read More:

Delete the form field from all Marketo forms

Enter the form fields like below and click submit and all of your forms will delete the mentioned field.

Form administration to delete or update Marekto form

Once you submitted the form, it reports like below:

Report of form edited in the Marketo

Add field in all forms of Marketo

Enter the form fields like below and click submit and all of your forms will be updated with the mentioned field.

Update forms in Marketo

The reports that will show are like below after updating:

Report all form update

Problems, you can face are below:

– Marketo API calls limits
https://developers.marketo.com/rest-api/marketo-integration-best-practices/ 

– Server CURL calling limits

In this way, you can use the Marketo form administration tool and you can update all forms in Marketo or delete fields from all forms from Marketo. Hope this tool helps you, let us know in the comment below if you have any questions or suggestions, or issues that you see, please subscribe to our YouTube Channel, follow us on Twitter and Facebook. Enjoy!

Opencart eCommerce conversion tracking with Google Analytics 4 and GTM

In this Opencart tutorial, we are going through Opencart eCommerce conversion tracking with Google Analytics 4 (GA4) and google tag manager. First, we will install the google tag manager(GTM) in Opencart, then set up the DataLayer code on the checkout success page, then finalize with showing data in Google Analytics 4 dashboard.
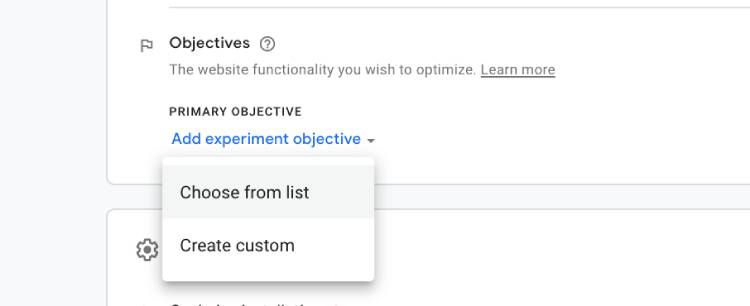
Install the Google Tag Manager (GTM) in Opencart

We hope you already have the gmail account. Following are the steps to install the google tag manager in the Opencart:

  • Log in to the http://tagmanager.google.com (you need a Gmail account for this).
  • Click “Create Account”
  • Enter the details, in the Container name you can add the website URL, and in the “Target platform” select the “Web”, then click the “Create” button.
    Tag manager account
  • It will show you the code like below to add to the opencart website, copy this code.
Install Tag manager

View Video: Add HTML, google analytics, tag manager, third party JS code in Opencart

Add GTM to Opencart

  • Login to your Opencart admin
  • Click Extensions in left menu >> Extensions >> in “Choose the extension type” select “Analytics”
  • Click Install if the “Google Analytics” module is not installed and then edit it, if it is already installed then edit it.
  • Then, paste the Google Tag Manager code in the “Google Analytics Code” field.
  • Finally, click Save blue button
Opencart GTM installation

Connect Google Analytics with GTM

  • Login to https://analytics.google.com/analytics/web/
  • Account setup: If you already have others GA account click “Admin” in the left menu and click “Create Account”, else you will see the Create Account page, where you can enter the Account Name.
    Google Analytics Account name
  • Property setup: An account can contain one or more properties. For eg: webocreation is an Account and under that, we can have webocreation.com and rupaknepali.com.np as properties. So, enter the Property name. Then, click “Show advanced options“. Activate the Universal Analytics property and enter the website URL. Select “Create both a Google Analytics 4 and a Universal Analytics property“. Then click Next.
Property Setup GA
  • About your business: enter the details of your business.
  • Click Create and in the popup choose your country and click accept checkbox and click the “I Accept” button
  • Then, select the data stream to start collecting data, as we are collecting data of website so we select “Web”
    Data Stream Google Analytics
  • Then enter details to set up data stream, enter the website URL and stream name, then click create stream button.
    Web Stream GA 4
  • Now, see the “Tagging instructions” section and click the “Use existing on-page tag”, then click the Google Tag Manager, where you will see the steps for you.
    Google Tag Manager - Connection to Google Analytics
  • Now, let’s go to https://tagmanager.google.com and select the container that you created earlier and do the steps as below
    • Open the Google Tag Manager container that’s implemented on your page.
    • Click Tags > New.
    • Click Tag Configuration and select GA4 Configuration.
    • Enter this Measurement ID: G-C87SJVP2EX. (Your Id will be different)
    • Select to trigger the tag on All Pages (or on the subset of pages you want to measure).
    • Save and publish your tag configuration.

Test whether GA4 is firing from GTM

  • Click the Preview button
    Preview Test GA4
  • Enter your website URL in the popup and click “Connect”
    Connect tag assistant to website
  • If you see “Google Analytics GA4 configuration” in the tag fired list then it means your tags are firing from the website.
    Tags fired GTM GA4
  • Go to google analytics dashboard, then click the Realtime in the left menu, if you see some reports then it means. everything is connected properly with Google Analytics 4 and Google Tag manager.
Google Analytics 4 Dashboard

Set up a custom tag, triggers, and events in GTM for success page for Opencart

Setup tags for Purchase Event

Go to tag manager, click the Tags, click New, enter the tag name as “Purchase Event”, click the “Tag Configuration”, select the “Google Analytics: Universal Analytics”. In the Track type, select the Event. In the Event tracking parameters, enter purchase in the category, and purchase in action. In the Google Analytics Settings, select the GA tracking ID.

Purchase event on the GA

Triggers for the purchase events

Go to tag manager, click the Triggers, click New, enter the name like “Success URL”, click in the “Trigger Configuration”, choose “Page View” on the trigger type. Choose “Some Page Views”, then select “Page Path”, then select “contains” and enter “success”. Finally, click Save

Success tags and trigger for Opencart

With these steps, we are doing a good start, in our next blog posts we will show you how to create custom datalayer code for the checkout success page in Opencart, probably we will provide you the Opencart module and similarly add other custom events for purchase and pass multiple variables like price, product id/name, etc to the google analytics. Then, we finalize by checking GA4 eCommerce tracking. Please let us know if you have issues or concerns and ideas for GA4 and Opencart, we will share our experiences. You can follow my Twitter account @rupaknpl and subscribe to our youtube channel Opencart tutorials. Similarly, keep on visiting my personal blog https://webocreation.com where you will find lots of free modules.

https://developers.google.com/tag-manager/ecommerce-ga4

https://developers.google.com/analytics/devguides/collection/ga4/ecommerce?client_type=gtag

https://support.google.com/analytics/answer/9268036