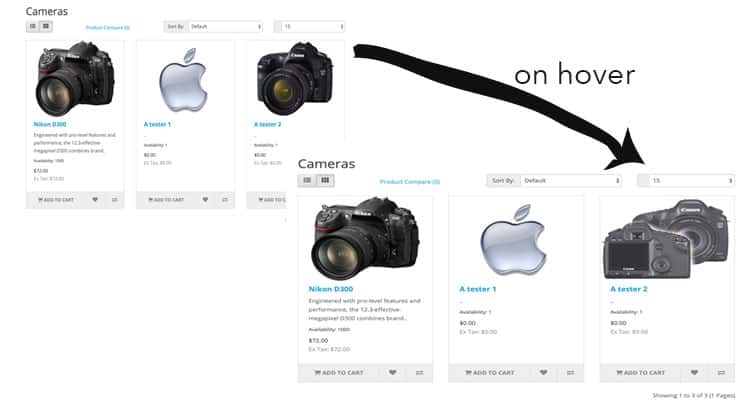
Easily make Full-width with simple CSS for Opencart modules

We saw some posts in Stackoverflow and Opencart forum to make the slideshow module full-width, similarly, the HTML content module full-width and similar posts asking help. Thus, we are showing you a simple way to make full-width with CSS for Opencart.

Make Slideshow full-width

The CSS used is similar to below which calculates the left position and starts from it making it 100% vertical width.

<style>
  .slideshow{
  	left: calc(-1 * (100vw - 100%) / 2);
        width: 100vw;
  	position: relative;
  	padding: 50px 20px;
  }
</style>

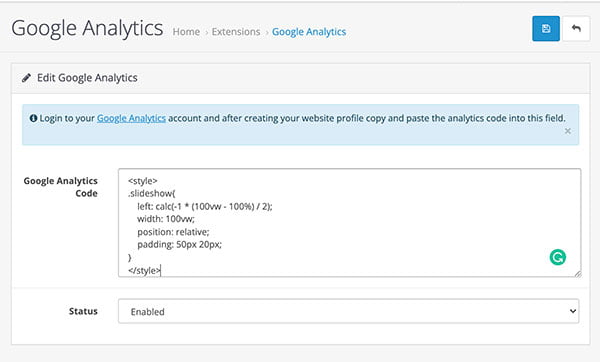
Now let’s start with the slideshow module. As we need to add the above code, so the easy we add it is on the Google Analytics module section. For that, go to admin >> Extensions >> Extensions >> Choose the extension type >> Analytics >> Install the Google Analytics >> Edit it >> Paste the above code in the Google Analytics Code field >> Enabled it >> Then, click the save button.

With this simple CSS code, the slideshow of the Opencart core becomes full-width.

See our free module: OpenCart free extension – full-width position in the layout of v 3.0.2.0

Make HTML content module full width

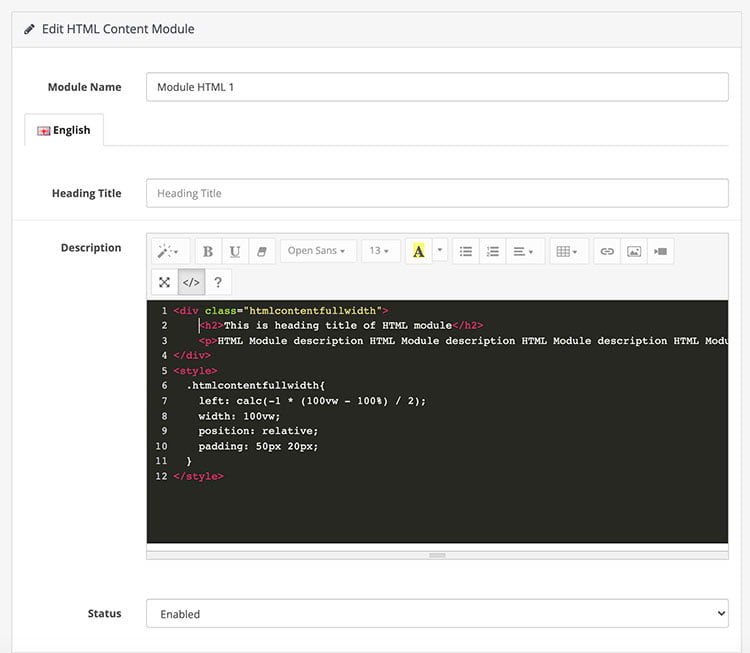
A simple way is to add the title, content, and CSS all in the HTML description like below:

<div class="htmlcontentfullwidth">
	<h2>This is heading title of HTML module</h2>
	<p>
        HTML Module description HTML Module description HTML Module description HTML Module description HTML Module description HTML Module description HTML Module description HTML Module description HTML Module description HTML Module description HTML Module description HTML Module description HTML Module description HTML Module description HTML Module description HTML Module description
    </p>
</div>
<style>
  .htmlcontentfullwidth{
      left: calc(-1 * (100vw - 100%) / 2);
      width: 100vw;
      position: relative;
      padding: 50px 20px;
  }
</style>

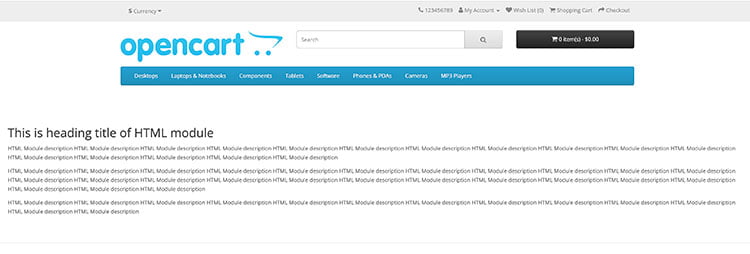
An HTML content module doesn’t have any class or id by default so we implemented it like above. With that the HTML module becomes full width like below:

In this way, you can make a full-width module with a simple CSS in the Opencart version. Let us know if you have any other better ideas and need support to make any modules full-width. Please subscribe to our YouTube Channel for Opencart video tutorials and get lots of other Opencart free modules. You can also find us on Twitter and Facebook.

Opencart 3 development tutorial, multi-instance slider testimonials module

In this Opencart 3 module development tutorial, we are showing you how to create a multi-instance opencart 3 module frontend section and make an autoplay slider of testimonials. In our last two posts, we show how to perform Opencart CRUD functionalities of testimonials, create an admin custom listing page, form, validate it and save in the database, then create the admin section of the multi-instance opencart module now we will use those settings and show the testimonials at the frontend. The testimonial module at the frontend will look like in the image below. It will have a title, image, testimonial title, testimonial description, and sliders with autoplay and pagination.

Testimonial Front End

Let’s start by creating the files and folders in the catalog folders for testimonials module, here are the lists of files and its path:

  • catalog/language/en-gb/extension/module/testimonial.php
  • catalog/controller/extension/module/testimonial.php
  • catalog/model/extension/module/testimonial.php
  • catalog/view/theme/default/template/extension/module/testimonial.twig

Language file code description

We start by creating the language file go to catalog/language/en-gb/extension/module/ and create testimonial.php and paste the following code. We don’t have lots of text needed in the frontend so just adding heading_title.

<?php
// Heading
$_['heading_title'] = 'Latest Testimonails';

Controller file code description

After that, we create the controller file at catalog/controller/extension/module/ and name it testimonial.php, following is the code and the code is described in the comment. You can see one difference for multi-instance and single instance index method, in multi-instance we pass the $setting argument.

<?php

/*** As our file is testimonial.php so Class name is ControllerExtensionModuleTestimonial which extends the Controller base class ***/
class ControllerExtensionModuleTestimonial extends Controller
{
	/*** Index method is called automatically or by default, if no parameters are passed, check this video tutorial for details https://www.youtube.com/watch?v=X6bsMmReT-4 . 
	$setting is the argument of index which contain all details of the module ***/
	public function index($setting)
	{
		/*** Loads the language file catalog/language/en-gb/extension/module/testimonial.php by which the varaibles of the language file are accessible in twig file. ***/
		$this->load->language('extension/module/testimonial');
		/*** This is to load the model file catalog/model/extension/module/testimonial.php by which we can access all the method in ModelExtensionModuleTestimonial. ***/
		$this->load->model('extension/module/testimonial');
		/*** We can add custom CSS and JS as per needed for the controller. These two lines is to add the custom CSS that is needed only for this controller. Good for performance as it loads only when needed. We add these to show the slider effects for the testimonials ***/
		$this->document->addStyle('catalog/view/javascript/jquery/swiper/css/swiper.min.css');
		$this->document->addStyle('catalog/view/javascript/jquery/swiper/css/opencart.css');
		/*** We add this to add custom JS for the slider effects of testimonials ***/
		$this->document->addScript('catalog/view/javascript/jquery/swiper/js/swiper.jquery.js');
		$data['testimonials'] = array();
		/*** Setting array to pass for getTestimonials for filtering the testimonials
		 * $setting['limit'] is the value we get from the database which we added in the testimonial module setting section. Opencart find out for us to use the $setting. ***/
		$filter_data = array(
			'sort'  => 'p.date_added',
			'order' => 'DESC',
			'start' => 0,
			'limit' => $setting['limit']
		);
		/*** This is to call getTestimonials method of class ModelExtensionModuleTestimonial and retrieve the filtered out testimonials ***/		
		$results = $this->model_extension_module_testimonial->getTestimonials($filter_data);
		if ($results) {
			/*** This is to load the model file catalog/model/tool/image.php by which we can access all the method and especially we use resize method for resizing the image. ***/
			$this->load->model('tool/image');
			/*** We loop through the $results and sets testimonials array which is used in the twig or view file ***/
			foreach ($results as $result) {
				if ($result['image']) {
					$image = $this->model_tool_image->resize($result['image'], $setting['width'], $setting['height']);
				} else {
					$image = $this->model_tool_image->resize('placeholder.png', $setting['width'], $setting['height']);
				}

				$data['testimonials'][] = array(
					'testimonial_id'  => $result['testimonial_id'],
					'thumb'       => $image,
					'name'        => $result['name'],
					'description' => html_entity_decode($result['description'], ENT_QUOTES, 'UTF-8')
				);
			}
			/*** This is to load the view catalog/view/theme/default/template/extension/module/testimonial.twig. ***/
			return $this->load->view('extension/module/testimonial', $data);
		}
	}
}

Model file code description

Testimonials are custom data, so we need to create a model file also to retrieve the testimonials from the database. So let go to catalog/model/extension/module/ and create a testimonial.php and paste the following code. The following code is SQL to retrieve the testimonials.

<?php
class ModelExtensionModuleTestimonial extends Model
{
    /** getTestimonials method is to retrieve the testimonials which is called from controller like $results = $this->model_extension_module_testimonial->getTestimonials($filter_data);. $data is the filtering parameter. Multiple testimonials are returned  ***/
    public function getTestimonials($data = array())
    {
        $sql = "SELECT * FROM " . DB_PREFIX . "testimonial c1 LEFT JOIN " . DB_PREFIX . "testimonial_description cd2 ON (c1.testimonial_id = cd2.testimonial_id) WHERE cd2.language_id ='" . (int) $this->config->get('config_language_id') . "'";
        $sort_data = array(
            'name',
            'sort_order'
        );
        if (isset($data['sort']) && in_array($data['sort'], $sort_data)) {
            $sql .= " ORDER BY " . $data['sort'];
        } else {
            $sql .= " ORDER BY sort_order";
        }
        if (isset($data['order']) && ($data['order'] == 'DESC')) {
            $sql .= " DESC";
        } else {
            $sql .= " ASC";
        }
        if (isset($data['start']) || isset($data['limit'])) {
            if ($data['start'] < 0) {
                $data['start'] = 0;
            }
            if ($data['limit'] < 1) {
                $data['limit'] = 20;
            }
            $sql .= " LIMIT " . (int) $data['start'] . "," . (int) $data['limit'];
        }
        $query = $this->db->query($sql);
        return $query->rows;
    }
}

View file or template file code description

At last, the view file or template file, which we create at catalog/view/theme/default/template/extension/module/, we named it testimonial.twig and paste the following code. We are showing the testimonial as a slider so we are using the Opencart default Swiper slider.

<h3>{{ heading_title }}</h3>
<div class="swiper-viewport">
    <div id="carousel{{ module }}" class="swiper-container">
        <div class="swiper-wrapper">
            {% for testimonial in testimonials %}
                <div class="swiper-slide text-center">
                  <div>
                      <div class="image">
                          <img src="{{ testimonial.thumb }}" alt="{{ testimonial.name }}" title="{{ testimonial.name }}" class="img-responsive"/>
                      </div>
                      <div class="caption">
                          <h4>
                              {{ testimonial.name }}
                          </h4>
                          <p>{{ testimonial.description }}</p>
                      </div>
                  </div>
                </div>
            {% endfor %}
        </div>
    </div>
    <div class="swiper-pagination carousel{{ module }}"></div>
    <div class="swiper-pager">
        <div class="swiper-button-next"></div>
        <div class="swiper-button-prev"></div>
    </div>
</div>
<script
    type="text/javascript">
    <!--
    $( '#carousel{{ module }}' ).swiper( {
        mode: 'horizontal',
        slidesPerView: 1,
        pagination: '.carousel{{ module }}',
        paginationClickable: true,
        nextButton: '.swiper-button-next',
        prevButton: '.swiper-button-prev',
        autoplay: 2500,
        loop: true
    } );
    -->
</script>

In this way, we create an Opencart 3 testimonial module’s frontend and show the setting that we entered in the multi-instance module admin section. Similarly, we make a slider of the testimonial module. Hope you liked this post, let us know if you have any questions or suggestions, please subscribe to our YouTube Channel for Opencart video tutorials. You can also find us on Twitter and Facebook. Enjoy!

How to create an off-site payment extension in Opencart 3? Part II of III

In this Opencart tutorial, we go through how to create an off-site payment extension in Opencart 3.0.3.3, in our last tutorial, we show the eCommerce payment flow that happens in Opencart, here we will show how to create the PayPal Standard payment extension, as all 3rd party extensions are removed from the download files, saying it is taking too much time to maintain but these will be uploaded to opencart.com and will be provided in a JSON string to be downloaded on demand.

SEE Difference between Off-site payment extension and On-site payment extension

Here is the step by step guide to integrate PayPal Standard in your website and here are the HTML variables than can be used on form for PayPal Standard.

For OpenCart payment extension, here are the lists of files you need to create, the link is for GitHub page where you can get all the codes, below we are just describing what is important:

Here files are folders in the admin section is to create the setting fields for the payment module, for PayPal Standard seeing the HTML form:

https://developer.paypal.com/docs/paypal-payments-standard/integration-guide/formbasics/#sample-html-code-for-overriding-addresses-stored-with-paypal and https://developer.paypal.com/docs/paypal-payments-standard/ht-test-pps-buttons/#create-test-buttons-in-the-sandbox

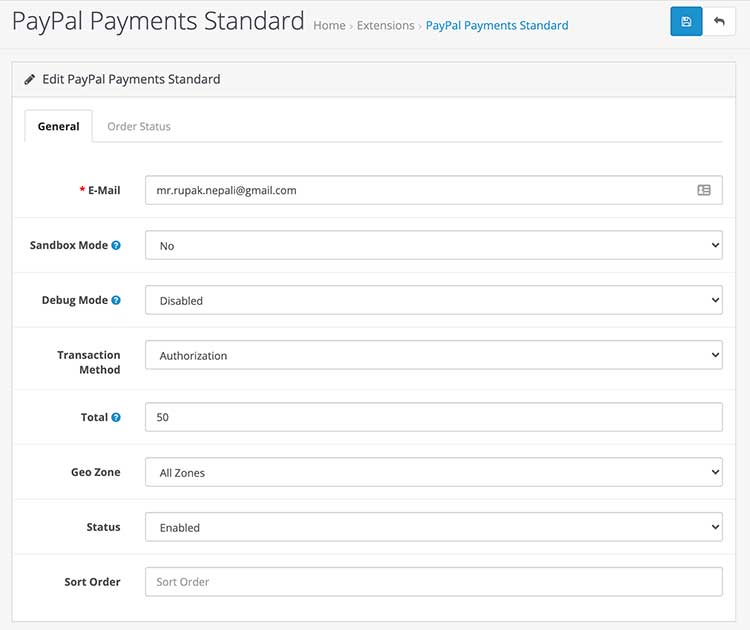
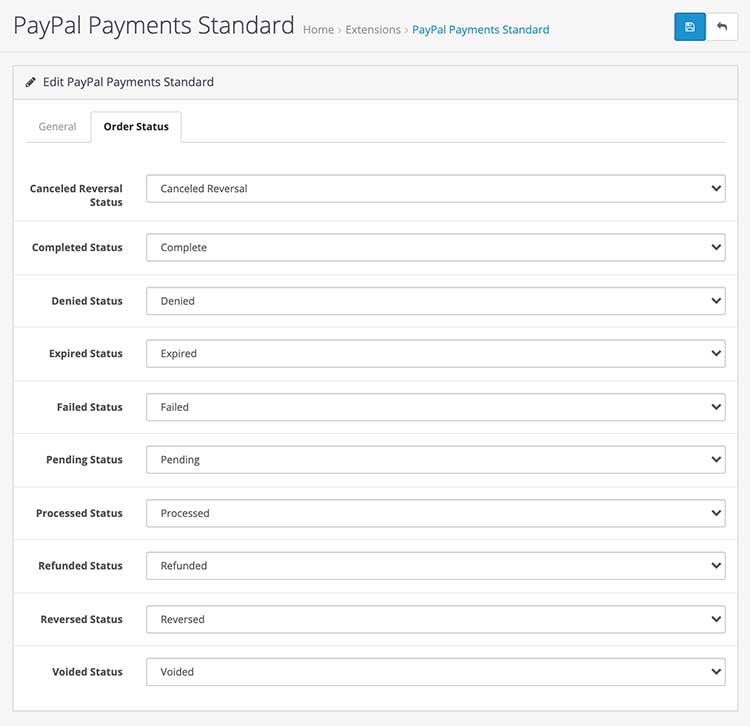
We see the form action URL is different so that field setting is needed in the admin, merchant email or business email is need where the payment is made, transaction method whether it is an Authorization or Sale transactions, Total field, Geo Zone field, Status, Sort Order field and order status fields are needed. You can know which fields are needed by going through the documentation of the Payment method.

So, for PayPal Standard here is the output for the admin section:

Paypal Standard Settings
Paypal Order Status

Let’s start with the admin controller file of Payment extension:

Open admin >> controller >> extension >> payment folder and create the paypal_standard.php, for yours you can name what your payment name is. In the file name _ is not needed, we add it just to differentiate it. Now open the paypal_standard.php and start creating the Controller Class.

As our file name is paypal_standard.php, the class name is ControllerExtensionPaymentPaypalStandard which extends the Controller base class. Although the filename includes _ (underscore), it is not needed for the Class name.

class ControllerExtensionPaymentPaypalStandard extends Controller {

Declaration of the private property ‘error’ so that we can get check if any error occurs in the whole class.

private $error = array();

Create an index method. The index method is called automatically if no parameters are passed, check this video tutorial for details https://www.youtube.com/watch?v=X6bsMmReT-4

public function index() {

Loads the language file by which the variables of language file are accessible in twig files

$this->load->language('extension/payment/paypal_standard');

Set the page or document title with following code:

$this->document->setTitle($this->language->get('heading_title'));

Loads the model admin/model/setting/setting.php so that we can use the methods defined there.

$this->load->model('setting/setting');

This is how we check if the form is submitted. When we submit the form then this block of code also runs. Then it also validates the modified permission and other validation.

if (($this->request->server['REQUEST_METHOD'] == 'POST') && $this->validate()) {

Look at this line of codes, this is the code section which distinguishes from Single Instance to Multi-Instance. If it is a payment extension then it acts as a Single instance module, which will have editSetting function, see the first parameters “payment_paypal_standard”, which need to be unique and it should start with “payment_”, all $_POST values will be saved on the setting database table. Then, it sets the success message in session and then redirects to the payment listing page.

if (($this->request->server['REQUEST_METHOD'] == 'POST') && $this->validate()) {
    $this->model_setting_setting->editSetting('payment_paypal_standard', $this->request->post);
    $this->session->data['success'] = $this->language->get('text_success');
    $this->response->redirect($this->url->link('marketplace/extension', 'user_token=' . $this->session->data['user_token'] . '&type=payment', true));
}

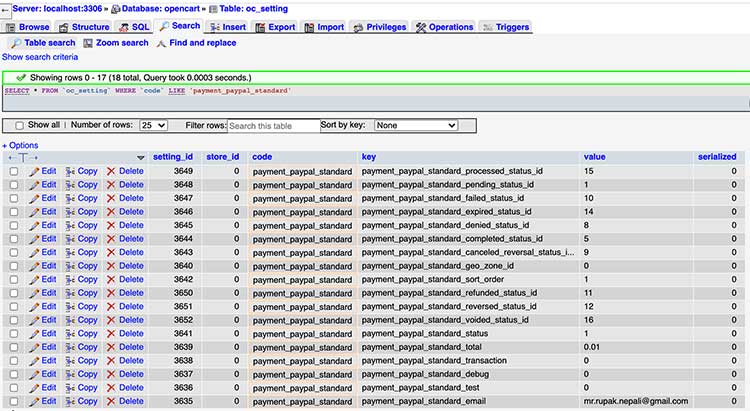
In the database setting table, the code is “payment_paypal_standard” and have the key which is the field name and value is the field value.

Opencart setting database payment paypal standard

The editSetting saves the data to oc_setting database table, see payment_ is important else it will not be saved.
The following code sets the success message in the session.

$this->session->data['success'] = $this->language->get('text_success');

This code is to redirect to the payment extensions listing page.

$this->response->redirect($this->url->link('marketplace/extension', 'user_token=' . $this->session->data['user_token'] . '&type=payment', true));

This is to check if there are any warnings

if (isset($this->error['warning'])) {
$data['error_warning'] = $this->error['warning'];
} else {
$data['error_warning'] = '';
}

Similarly, other fields value error are checked, like for email error it is checked with the following code:

if (isset($this->error['email'])) {
$data['error_email'] = $this->error['email'];
} else {
$data['error_email'] = '';
}

Following are for breadcrumbs

$data['breadcrumbs'] = array();
$data['breadcrumbs'][] = array(
'text' => $this->language->get('text_home'),
'href' => $this->url->link('common/dashboard', 'user_token=' . $this->session->data['user_token'], true)
);
$data['breadcrumbs'][] = array(
'text' => $this->language->get('text_extension'),
'href' => $this->url->link('marketplace/extension', 'user_token=' . $this->session->data['user_token'] . '&type=module', true)
);
$data['breadcrumbs'][] = array(
'text' => $this->language->get('heading_title'),
'href' => $this->url->link('extension/module/login', 'user_token=' . $this->session->data['user_token'], true)
);

Form action URL

$data['action'] = $this->url->link('extension/payment/paypal_standard', 'user_token=' . $this->session->data['user_token'], true);

Form cancel URL

$data['cancel'] = $this->url->link('marketplace/extension', 'user_token=' . $this->session->data['user_token'] . '&type=payment', true);

This is to check what we fill out in the form, whether the email is added. If it is the loading time then it gets the value from the database config value which was stored in the oc_setting database table.

if (isset($this->request->post['payment_paypal_standard_email'])) {
$data['payment_paypal_standard_email'] = $this->request->post['payment_paypal_standard_email'];
} else {
$data['payment_paypal_standard_email'] = $this->config->get('payment_paypal_standard_email');
}

Similarly, other fields are checked, like for fields payment_paypal_standard_test, payment_paypal_standard_transaction, payment_paypal_standard_debug, payment_paypal_standard_total, payment_paypal_standard_canceled_reversal_status_id, payment_paypal_standard_completed_status_id, payment_paypal_standard_denied_status_id, payment_paypal_standard_expired_status_id, payment_paypal_standard_failed_status_id, payment_paypal_standard_pending_status_id, payment_paypal_standard_processed_status_id, payment_paypal_standard_refunded_status_id, payment_paypal_standard_reversed_status_id, payment_paypal_standard_voided_status_id, payment_paypal_standard_status, and payment_paypal_standard_sort_order. You can check those all opencart codes here.

Mostly, we use geo zones for payment extensions so that we can control as per the country or zones. So to pull the geo zones in opencart we use the following code:

$this->load->model('localisation/geo_zone');
$data['geo_zones'] = $this->model_localisation_geo_zone->getGeoZones();

This is how we load the header, column left, and footer and pass to the template file.

$data['header'] = $this->load->controller('common/header');
$data['column_left'] = $this->load->controller('common/column_left');
$data['footer'] = $this->load->controller('common/footer');

This is to set output data variables to the view or twig files and twig file is loaded and HTML rendering is done with it.

$this->response->setOutput($this->load->view('extension/payment/paypal_standard', $data));

In this way the index method is closed.

Now, we see the validate method, this is how validation is done, we check whether the user has permission to modify or not. If you want to validate the form data then you can check it here as well. If there is an error then $this->error[‘warning’] is set and a warning is shown. We check whether the Paypal email is added or not. Similarly, you can check other validation here.

private function validate()
{
if (!$this->user->hasPermission('modify', 'extension/payment/paypal_standard')) {
$this->error['warning'] = $this->language->get('error_permission');
}
if (!$this->request->post['payment_paypal_standard_email']) {
$this->error['email'] = $this->language->get('error_email');
}
return !$this->error;
}

In this way, we write the code in the controller for the payment extension module at admin section.

Now, admin language file of Payment extension:

Let’s work on Language file admin/language/en-gb/extension/payment/paypal_standard.php, let’s define some variables which are needed for the Paypal standard payment extension:
https://github.com/rupaknepali/Opencart-free-modules/blob/master/paypal-standard-opencart-extension/upload/admin/language/en-gb/extension/payment/paypal_standard.php

<?php
// Heading
$_['heading_title']	= 'PayPal Payments Standard';

// Text
$_['text_extension']	= 'Extensions';
$_['text_success']	= 'Success: You have modified PayPal account details!';
$_['text_edit']            = 'Edit PayPal Payments Standard';
$_['text_paypal_standard']= '<a target="_BLANK" href="https://www.paypal.com/uk/mrb/pal=V4T754QB63XXL"><img src="view/image/payment/paypal.png" alt="PayPal Payments Standard" title="PayPal Payments Standard" style="border: 1px solid #EEEEEE;" /></a>';
$_['text_authorization']= 'Authorization';
$_['text_sale']		   = 'Sale'; 

// Entry
$_['entry_email']   = 'E-Mail';
$_['entry_test']	    = 'Sandbox Mode';
$_['entry_transaction'] = 'Transaction Method';
$_['entry_debug']  = 'Debug Mode';
$_['entry_total'].    = 'Total';
$_['entry_canceled_reversal_status'] = 'Canceled Reversal Status';
$_['entry_completed_status']		 = 'Completed Status';
$_['entry_denied_status']			 = 'Denied Status';
$_['entry_expired_status']			 = 'Expired Status';
$_['entry_failed_status']			 = 'Failed Status';
$_['entry_pending_status']			 = 'Pending Status';
$_['entry_processed_status']		 = 'Processed Status';
$_['entry_refunded_status']		 = 'Refunded Status';
$_['entry_reversed_status']		 = 'Reversed Status';
$_['entry_voided_status']			 = 'Voided Status';
$_['entry_geo_zone']				 = 'Geo Zone';
$_['entry_status']				 = 'Status';
$_['entry_sort_order']			 = 'Sort Order';

// Tab
$_['tab_general']			= 'General';
$_['tab_order_status']       		= 'Order Status';

// Help
$_['help_test']	= 'Use the live or testing (sandbox) gateway server to process transactions?';
$_['help_debug'] = 'Logs additional information to the system log';
$_['help_total']	= 'The checkout total the order must reach before this payment method becomes active';

// Error
$_['error_permission']= 'Warning: You do not have permission to modify payment PayPal Payments Standard!';
$_['error_email']  = 'E-Mail required!';

In the above code, you can find the following code:

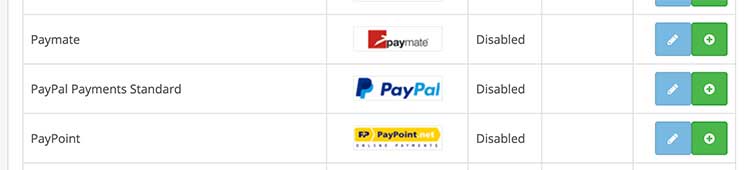
$_['text_paypal_standard']= '<a target="_BLANK" href="https://www.paypal.com/uk/mrb/pal=V4T754QB63XXL"><img src="view/image/payment/paypal.png" alt="PayPal Payments Standard" title="PayPal Payments Standard" style="border: 1px solid #EEEEEE;" /></a>';

This is the code which shows the payment logo at the payment extension listings.

Paypal Payments standard image

Now, admin template file of Payment extension:

Third, open admin/view/template/extension/payment and create paypal_standard.twig. Here we create the form and other layouts. You can see the code here: https://github.com/rupaknepali/Opencart-free-modules/blob/master/paypal-standard-opencart-extension/upload/admin/view/template/extension/payment/paypal_standard.twig

Be sure to start the name with “payment_” for every fields name.

{{ header }}{{ column_left }}
<div id="content">
  <div class="page-header">
    <div class="container-fluid">
      <div class="pull-right">
        <button type="submit" form="form-payment" data-toggle="tooltip" title="{{ button_save }}" class="btn btn-primary"><i class="fa fa-save"></i></button>
        <a href="{{ cancel }}" data-toggle="tooltip" title="{{ button_cancel }}" class="btn btn-default"><i class="fa fa-reply"></i></a></div>
      <h1>{{ heading_title }}</h1>
      <ul class="breadcrumb">
        {% for breadcrumb in breadcrumbs %}
        <li><a href="{{ breadcrumb.href }}">{{ breadcrumb.text }}</a></li>
        {% endfor %}
      </ul>
    </div>
  </div>
  <div class="container-fluid">
    {% if error_warning %}
    <div class="alert alert-danger alert-dismissible"><i class="fa fa-exclamation-circle"></i> {{ error_warning }}
      <button type="button" class="close" data-dismiss="alert">×</button>
    </div>
    {% endif %}
    <div class="panel panel-default">
      <div class="panel-heading">
        <h3 class="panel-title"><i class="fa fa-pencil"></i> {{ text_edit }}</h3>
      </div>
      <div class="panel-body">
        <form action="{{ action }}" method="post" enctype="multipart/form-data" id="form-payment" class="form-horizontal">
          <ul class="nav nav-tabs">
            <li class="active"><a href="#tab-general" data-toggle="tab">{{ tab_general }}</a></li>
            <li><a href="#tab-status" data-toggle="tab">{{ tab_order_status }}</a></li>
          </ul>
          <div class="tab-content">
            <div class="tab-pane active" id="tab-general">
              <div class="form-group required">
                <label class="col-sm-2 control-label" for="entry-email">{{ entry_email }}</label>
                <div class="col-sm-10">
                  <input type="text" name="payment_paypal_standard_email" value="{{ payment_paypal_standard_email }}" placeholder="{{ entry_email }}" id="entry-email" class="form-control"/>
                  {% if error_email %}
                  <div class="text-danger">{{ error_email }}</div>
                  {% endif %}
                </div>
              </div>
              <div class="form-group">
                <label class="col-sm-2 control-label" for="input-live-demo"><span data-toggle="tooltip" title="{{ help_test }}">{{ entry_test }}</span></label>
                <div class="col-sm-10">
                  <select name="payment_paypal_standard_test" id="input-live-demo" class="form-control">
                    {% if payment_paypal_standard_test %}
                    <option value="1" selected="selected">{{ text_yes }}</option>
                    <option value="0">{{ text_no }}</option>
                    {% else %}
                    <option value="1">{{ text_yes }}</option>
                    <option value="0" selected="selected">{{ text_no }}</option>
                    {% endif %}
                  </select>
                </div>
              </div>
              <div class="form-group">
                <label class="col-sm-2 control-label" for="input-debug"><span data-toggle="tooltip" title="{{ help_debug }}">{{ entry_debug }}</span></label>
                <div class="col-sm-10">
                  <select name="payment_paypal_standard_debug" id="input-debug" class="form-control">
                    {% if payment_paypal_standard_debug %}
                    <option value="1" selected="selected">{{ text_enabled }}</option>
                    <option value="0">{{ text_disabled }}</option>
                    {% else %}
                    <option value="1">{{ text_enabled }}</option>
                    <option value="0" selected="selected">{{ text_disabled }}</option>
                    {% endif %}
                  </select>
                </div>
              </div>
              <div class="form-group">
                <label class="col-sm-2 control-label" for="input-transaction">{{ entry_transaction }}</label>
                <div class="col-sm-10">
                  <select name="payment_paypal_standard_transaction" id="input-transaction" class="form-control">
                    {% if not payment_paypal_standard_transaction %}
                    <option value="0" selected="selected">{{ text_authorization }}</option>
                    {% else %}
                    <option value="0">{{ text_authorization }}</option>
                    {% endif %}
                    {% if payment_paypal_standard_transaction %}
                    <option value="1" selected="selected">{{ text_sale }}</option>
                    {% else %}
                    <option value="1">{{ text_sale }}</option>
                    {% endif %}
                  </select>
                </div>
              </div>
              <div class="form-group">
                <label class="col-sm-2 control-label" for="input-total"><span data-toggle="tooltip" title="{{ help_total }}">{{ entry_total }}</span></label>
                <div class="col-sm-10">
                  <input type="text" name="payment_paypal_standard_total" value="{{ payment_paypal_standard_total }}" placeholder="{{ entry_total }}" id="input-total" class="form-control"/>
                </div>
              </div>
              <div class="form-group">
                <label class="col-sm-2 control-label" for="input-geo-zone">{{ entry_geo_zone }}</label>
                <div class="col-sm-10">
                  <select name="payment_paypal_standard_geo_zone_id" id="input-geo-zone" class="form-control">
                    <option value="0">{{ text_all_zones }}</option>
                    {% for geo_zone in geo_zones %}
                    {% if geo_zone.geo_zone_id == payment_paypal_standard_geo_zone_id %}
                    <option value="{{ geo_zone.geo_zone_id }}" selected="selected">{{ geo_zone.name }}</option>
                    {% else %}
                    <option value="{{ geo_zone.geo_zone_id }}">{{ geo_zone.name }}</option>
                    {% endif %}
                    {% endfor %}
                  </select>
                </div>
              </div>
              <div class="form-group">
                <label class="col-sm-2 control-label" for="input-status">{{ entry_status }}</label>
                <div class="col-sm-10">
                  <select name="payment_paypal_standard_status" id="input-status" class="form-control">
                    {% if payment_paypal_standard_status %}
                    <option value="1" selected="selected">{{ text_enabled }}</option>
                    <option value="0">{{ text_disabled }}</option>
                    {% else %}
                    <option value="1">{{ text_enabled }}</option>
                    <option value="0" selected="selected">{{ text_disabled }}</option>
                    {% endif %}
                  </select>
                </div>
              </div>
              <div class="form-group">
                <label class="col-sm-2 control-label" for="input-sort-order">{{ entry_sort_order }}</label>
                <div class="col-sm-10">
                  <input type="text" name="payment_paypal_standard_sort_order" value="{{ payment_paypal_standard_sort_order }}" placeholder="{{ entry_sort_order }}" id="input-sort-order" class="form-control"/>
                </div>
              </div>
            </div>
            <div class="tab-pane" id="tab-status">
              <div class="form-group">
                <label class="col-sm-2 control-label" for="input-canceled-reversal-status">{{ entry_canceled_reversal_status }}</label>
                <div class="col-sm-10">
                  <select name="payment_paypal_standard_canceled_reversal_status_id" id="input-canceled-reversal-status" class="form-control">
                    {% for order_status in order_statuses %}
                    {% if order_status.order_status_id == payment_paypal_standard_canceled_reversal_status_id %}
                    <option value="{{ order_status.order_status_id }}" selected="selected">{{ order_status.name }}</option>
                    {% else %}
                    <option value="{{ order_status.order_status_id }}">{{ order_status.name }}</option>
                    {% endif %}
                    {% endfor %}
                  </select>
                </div>
              </div>
              <div class="form-group">
                <label class="col-sm-2 control-label" for="input-completed-status">{{ entry_completed_status }}</label>
                <div class="col-sm-10">
                  <select name="payment_paypal_standard_completed_status_id" id="input-completed-status" class="form-control">
                    {% for order_status in order_statuses %}
                    {% if order_status.order_status_id == payment_paypal_standard_completed_status_id %}
                    <option value="{{ order_status.order_status_id }}" selected="selected">{{ order_status.name }}</option>
                    {% else %}
                    <option value="{{ order_status.order_status_id }}">{{ order_status.name }}</option>
                    {% endif %}
                    {% endfor %}
                  </select>
                </div>
              </div>
              <div class="form-group">
                <label class="col-sm-2 control-label" for="input-denied-status">{{ entry_denied_status }}</label>
                <div class="col-sm-10">
                  <select name="payment_paypal_standard_denied_status_id" id="input-denied-status" class="form-control">
                    {% for order_status in order_statuses %}
                    {% if order_status.order_status_id == payment_paypal_standard_denied_status_id %}
                    <option value="{{ order_status.order_status_id }}" selected="selected">{{ order_status.name }}</option>
                    {% else %}
                    <option value="{{ order_status.order_status_id }}">{{ order_status.name }}</option>
                    {% endif %}
                    {% endfor %}
                  </select>
                </div>
              </div>
              <div class="form-group">
                <label class="col-sm-2 control-label" for="input-expired-status">{{ entry_expired_status }}</label>
                <div class="col-sm-10">
                  <select name="payment_paypal_standard_expired_status_id" id="input-expired-status" class="form-control">
                    {% for order_status in order_statuses %}
                    {% if order_status.order_status_id == payment_paypal_standard_expired_status_id %}
                    <option value="{{ order_status.order_status_id }}" selected="selected">{{ order_status.name }}</option>
                    {% else %}
                    <option value="{{ order_status.order_status_id }}">{{ order_status.name }}</option>
                    {% endif %}
                    {% endfor %}
                  </select>
                </div>
              </div>
              <div class="form-group">
                <label class="col-sm-2 control-label" for="input-failed-status">{{ entry_failed_status }}</label>
                <div class="col-sm-10">
                  <select name="payment_paypal_standard_failed_status_id" id="input-failed-status" class="form-control">
                    {% for order_status in order_statuses %}
                    {% if order_status.order_status_id == payment_paypal_standard_failed_status_id %}
                    <option value="{{ order_status.order_status_id }}" selected="selected">{{ order_status.name }}</option>
                    {% else %}
                    <option value="{{ order_status.order_status_id }}">{{ order_status.name }}</option>
                    {% endif %}
                    {% endfor %}
                  </select>
                </div>
              </div>
              <div class="form-group">
                <label class="col-sm-2 control-label" for="input-pending-status">{{ entry_pending_status }}</label>
                <div class="col-sm-10">
                  <select name="payment_paypal_standard_pending_status_id" id="input-pending-status" class="form-control">
                    {% for order_status in order_statuses %}
                    {% if order_status.order_status_id == payment_paypal_standard_pending_status_id %}
                    <option value="{{ order_status.order_status_id }}" selected="selected">{{ order_status.name }}</option>
                    {% else %}
                    <option value="{{ order_status.order_status_id }}">{{ order_status.name }}</option>
                    {% endif %}
                    {% endfor %}
                  </select>
                </div>
              </div>
              <div class="form-group">
                <label class="col-sm-2 control-label" for="input-processed-status">{{ entry_processed_status }}</label>
                <div class="col-sm-10">
                  <select name="payment_paypal_standard_processed_status_id" id="input-processed-status" class="form-control">
                    {% for order_status in order_statuses %}
                    {% if order_status.order_status_id == payment_paypal_standard_processed_status_id %}
                    <option value="{{ order_status.order_status_id }}" selected="selected">{{ order_status.name }}</option>
                    {% else %}
                    <option value="{{ order_status.order_status_id }}">{{ order_status.name }}</option>
                    {% endif %}
                    {% endfor %}
                  </select>
                </div>
              </div>
              <div class="form-group">
                <label class="col-sm-2 control-label" for="input-refunded-status">{{ entry_refunded_status }}</label>
                <div class="col-sm-10">
                  <select name="payment_paypal_standard_refunded_status_id" id="input-refunded-status" class="form-control">
                    {% for order_status in order_statuses %}
                    {% if order_status.order_status_id == payment_paypal_standard_refunded_status_id %}
                    <option value="{{ order_status.order_status_id }}" selected="selected">{{ order_status.name }}</option>
                    {% else %}
                    <option value="{{ order_status.order_status_id }}">{{ order_status.name }}</option>
                    {% endif %}
                    {% endfor %}
                  </select>
                </div>
              </div>
              <div class="form-group">
                <label class="col-sm-2 control-label" for="input-reversed-status">{{ entry_reversed_status }}</label>
                <div class="col-sm-10">
                  <select name="payment_paypal_standard_reversed_status_id" id="input-reversed-status" class="form-control">
                    {% for order_status in order_statuses %}
                    {% if order_status.order_status_id == payment_paypal_standard_reversed_status_id %}
                    <option value="{{ order_status.order_status_id }}" selected="selected">{{ order_status.name }}</option>
                    {% else %}
                    <option value="{{ order_status.order_status_id }}">{{ order_status.name }}</option>
                    {% endif %}
                    {% endfor %}
                  </select>
                </div>
              </div>
              <div class="form-group">
                <label class="col-sm-2 control-label" for="input-void-status">{{ entry_voided_status }}</label>
                <div class="col-sm-10">
                  <select name="payment_paypal_standard_voided_status_id" id="input-void-status" class="form-control">
                    {% for order_status in order_statuses %}
                    {% if order_status.order_status_id == payment_paypal_standard_voided_status_id %}
                    <option value="{{ order_status.order_status_id }}" selected="selected">{{ order_status.name }}</option>
                    {% else %}
                    <option value="{{ order_status.order_status_id }}">{{ order_status.name }}</option>
                    {% endif %}
                    {% endfor %}
                  </select>
                </div>
              </div>
            </div>
          </div>
        </form>
      </div>
    </div>
  </div>
</div>
{{ footer }}

We describe some important code only as mostly they are same.

Let’s start with the submit or save button code:

<button type="submit" form="form-payment" data-toggle="tooltip" title="{{ button_save }}" class="btn btn-primary"><i class="fa fa-save"></i></button>

The button type is submitted, and form equals value needs to be the form id. The form id is form-payment that is why it is, form=”form-payment”, the form code is like below:

<form action="{{ action }}" method="post" enctype="multipart/form-data" id="form-payment" class="form-horizontal">

Following is the code to create a tab in the Opencart admin section, as they use the bootstrap v3.3.7 so it is the same as bootstrap.

<ul class="nav nav-tabs">
  <li class="active"><a href="#tab-general" data-toggle="tab">{{ tab_general }}</a></li>
  <li><a href="#tab-status" data-toggle="tab">{{ tab_order_status }}</a></li>
</ul>

We create the form email field like below, similarly we create other fields.

<div class="form-group required">
  <label class="col-sm-2 control-label" for="entry-email">{{ entry_email }}</label>
  <div class="col-sm-10">
    <input type="text" name="payment_paypal_standard_email" value="{{ payment_paypal_standard_email }}" placeholder="{{ entry_email }}" id="entry-email" class="form-control"/>
  </div>
</div>

If some error need to show then here is the code that we set in the controller for the email.

{% if error_email %}
  <div class="text-danger">{{ error_email }}</div>
{% endif %}

Another code to see is the geo zones code, here the geo_zones is for loop to show lists of geo zones available.

 <select name="payment_paypal_standard_geo_zone_id" id="input-geo-zone" class="form-control">
    <option value="0">{{ text_all_zones }}</option>
    {% for geo_zone in geo_zones %}
        {% if geo_zone.geo_zone_id == payment_paypal_standard_geo_zone_id %}
            <option value="{{ geo_zone.geo_zone_id }}" selected="selected">{{ geo_zone.name }}</option>
        {% else %}
            <option value="{{ geo_zone.geo_zone_id }}">{{ geo_zone.name }}</option>
        {% endif %}
    {% endfor %}
</select>

Likewise, look at Order status tab, the code is similar for all the statuses, the select field name starts with payment_ and it loops order_statuses and the selected order status is saved in the database setting table.

<select name="payment_paypal_standard_canceled_reversal_status_id" id="input-canceled-reversal-status" class="form-control">
    {% for order_status in order_statuses %}
        {% if order_status.order_status_id == payment_paypal_standard_canceled_reversal_status_id %}
            <option value="{{ order_status.order_status_id }}" selected="selected">{{ order_status.name }}</option>
        {% else %}
            <option value="{{ order_status.order_status_id }}">{{ order_status.name }}</option>
        {% endif %}
    {% endfor %}
</select>

This way you can check other codes and let us know in a comment if you need any code explanation.

With above four files created, our admin side coding is completed.

Now, catalog language file of Payment extension:

Let’s start with the language file catalog/language/en-gb/extension/payment and create paypal_standard.php, let’s define some variables which are useful for module

<?php
// Text
$_['text_title']	= 'PayPal';
$_['text_testmode']	= 'Warning: The payment gateway is in \'Sandbox Mode\'. Your account will not be charged.';
$_['text_total']	= 'Shipping, Handling, Discounts & Taxes';

Now, catalog controller file of Payment extension:

The following code is of front end controller file, go to catalog/controller/extension/payment and create paypal_standard.php and paste following code, here there are two methods index method and callback method.

<?php
class ControllerExtensionPaymentPaypalStandard extends Controller
{
    public function index()
    {
        $this->load->language('extension/payment/paypal_standard');

        $data['text_testmode'] = $this->language->get('text_testmode');
        $data['button_confirm'] = $this->language->get('button_confirm');

        $data['testmode'] = $this->config->get('payment_paypal_standard_test');

        if (!$this->config->get('payment_paypal_standard_test')) {
            $data['action'] = 'https://www.paypal.com/cgi-bin/webscr';
        } else {
            $data['action'] = 'https://www.sandbox.paypal.com/cgi-bin/webscr';
        }

        $this->load->model('checkout/order');

        $order_info = $this->model_checkout_order->getOrder($this->session->data['order_id']);

        if ($order_info) {
            $data['business'] = $this->config->get('payment_paypal_standard_email');
            $data['item_name'] = html_entity_decode($this->config->get('config_name'), ENT_QUOTES, 'UTF-8');

            $data['products'] = array();

            foreach ($this->cart->getProducts() as $product) {
                $option_data = array();

                foreach ($product['option'] as $option) {
                    if ($option['type'] != 'file') {
                        $value = $option['value'];
                    } else {
                        $upload_info = $this->model_tool_upload->getUploadByCode($option['value']);

                        if ($upload_info) {
                            $value = $upload_info['name'];
                        } else {
                            $value = '';
                        }
                    }

                    $option_data[] = array(
                        'name' => $option['name'],
                        'value' => (utf8_strlen($value) > 20 ? utf8_substr($value, 0, 20) . '..' : $value),
                    );
                }

                $data['products'][] = array(
                    'name' => htmlspecialchars($product['name']),
                    'model' => htmlspecialchars($product['model']),
                    'price' => $this->currency->format($product['price'], $order_info['currency_code'], false, false),
                    'quantity' => $product['quantity'],
                    'option' => $option_data,
                    'weight' => $product['weight'],
                );
            }

            $data['discount_amount_cart'] = 0;

            $total = $this->currency->format($order_info['total'] - $this->cart->getSubTotal(), $order_info['currency_code'], false, false);

            if ($total > 0) {
                $data['products'][] = array(
                    'name' => $this->language->get('text_total'),
                    'model' => '',
                    'price' => $total,
                    'quantity' => 1,
                    'option' => array(),
                    'weight' => 0,
                );
            } else {
                $data['discount_amount_cart'] -= $total;
            }

            $data['currency_code'] = $order_info['currency_code'];
            $data['first_name'] = $order_info['payment_firstname'];
            $data['last_name'] = $order_info['payment_lastname'];
            $data['address1'] = $order_info['payment_address_1'];
            $data['address2'] = $order_info['payment_address_2'];
            $data['city'] = $order_info['payment_city'];
            $data['zip'] = $order_info['payment_postcode'];
            $data['country'] = $order_info['payment_iso_code_2'];
            $data['email'] = $order_info['email'];
            $data['invoice'] = $this->session->data['order_id'] . ' - ' . $order_info['payment_firstname'] . ' ' . $order_info['payment_lastname'];
            $data['lc'] = $this->session->data['language'];
            $data['return'] = $this->url->link('checkout/success');
            $data['notify_url'] = $this->url->link('extension/payment/paypal_standard/callback', '', true);
            $data['cancel_return'] = $this->url->link('checkout/checkout', '', true);

            if (!$this->config->get('payment_paypal_standard_transaction')) {
                $data['paymentaction'] = 'authorization';
            } else {
                $data['paymentaction'] = 'sale';
            }

            $data['custom'] = $this->session->data['order_id'];

            return $this->load->view('extension/payment/paypal_standard', $data);
        }
    }

    public function callback()
    {
        if (isset($this->request->post['custom'])) {
            $order_id = $this->request->post['custom'];
        } else {
            $order_id = 0;
        }

        $this->load->model('checkout/order');

        $order_info = $this->model_checkout_order->getOrder($order_id);

        if ($order_info) {
            $request = 'cmd=_notify-validate';

            foreach ($this->request->post as $key => $value) {
                $request .= '&' . $key . '=' . urlencode(html_entity_decode($value, ENT_QUOTES, 'UTF-8'));
            }

            if (!$this->config->get('payment_paypal_standard_test')) {
                $curl = curl_init('https://www.paypal.com/cgi-bin/webscr');
            } else {
                $curl = curl_init('https://www.sandbox.paypal.com/cgi-bin/webscr');
            }

            curl_setopt($curl, CURLOPT_POST, true);
            curl_setopt($curl, CURLOPT_POSTFIELDS, $request);
            curl_setopt($curl, CURLOPT_RETURNTRANSFER, true);
            curl_setopt($curl, CURLOPT_HEADER, false);
            curl_setopt($curl, CURLOPT_TIMEOUT, 30);
            curl_setopt($curl, CURLOPT_SSL_VERIFYPEER, false);

            $response = curl_exec($curl);

            if (!$response) {
                $this->log->write('paypal_standard :: CURL failed ' . curl_error($curl) . '(' . curl_errno($curl) . ')');
            }

            if ($this->config->get('payment_paypal_standard_debug')) {
                $this->log->write('paypal_standard :: IPN REQUEST: ' . $request);
                $this->log->write('paypal_standard :: IPN RESPONSE: ' . $response);
            }

            if ((strcmp($response, 'VERIFIED') == 0 || strcmp($response, 'UNVERIFIED') == 0) && isset($this->request->post['payment_status'])) {
                $order_status_id = $this->config->get('config_order_status_id');

                switch ($this->request->post['payment_status']) {
                    case 'Canceled_Reversal':
                        $order_status_id = $this->config->get('payment_paypal_standard_canceled_reversal_status_id');
                        break;
                    case 'Completed':
                        $receiver_match = (strtolower($this->request->post['receiver_email']) == strtolower($this->config->get('payment_paypal_standard_email')));

                        $total_paid_match = ((float) $this->request->post['mc_gross'] == $this->currency->format($order_info['total'], $order_info['currency_code'], $order_info['currency_value'], false));

                        if ($receiver_match && $total_paid_match) {
                            $order_status_id = $this->config->get('payment_paypal_standard_completed_status_id');
                        }

                        if (!$receiver_match) {
                            $this->log->write('paypal_standard :: RECEIVER EMAIL MISMATCH! ' . strtolower($this->request->post['receiver_email']));
                        }

                        if (!$total_paid_match) {
                            $this->log->write('paypal_standard :: TOTAL PAID MISMATCH! ' . $this->request->post['mc_gross']);
                        }
                        break;
                    case 'Denied':
                        $order_status_id = $this->config->get('payment_paypal_standard_denied_status_id');
                        break;
                    case 'Expired':
                        $order_status_id = $this->config->get('payment_paypal_standard_expired_status_id');
                        break;
                    case 'Failed':
                        $order_status_id = $this->config->get('payment_paypal_standard_failed_status_id');
                        break;
                    case 'Pending':
                        $order_status_id = $this->config->get('payment_paypal_standard_pending_status_id');
                        break;
                    case 'Processed':
                        $order_status_id = $this->config->get('payment_paypal_standard_processed_status_id');
                        break;
                    case 'Refunded':
                        $order_status_id = $this->config->get('payment_paypal_standard_refunded_status_id');
                        break;
                    case 'Reversed':
                        $order_status_id = $this->config->get('payment_paypal_standard_reversed_status_id');
                        break;
                    case 'Voided':
                        $order_status_id = $this->config->get('payment_paypal_standard_voided_status_id');
                        break;
                }

                $this->model_checkout_order->addOrderHistory($order_id, $order_status_id);
            } else {
                $this->model_checkout_order->addOrderHistory($order_id, $this->config->get('config_order_status_id'));
            }

            curl_close($curl);
        }
    }
}

As our file is paypal_standard.php so Class name is ControllerExtensionPaymentPaypalStandard which extends the Controller base class

class ControllerExtensionPaymentPaypalStandard extends Controller{ 

Create index method. Index method is called automatically if no parameters are passed, check this video tutorial for details https://www.youtube.com/watch?v=X6bsMmReT-4. In payment extension you don’t need to pass any parameter in index() method.

public function index() { 

Loads the language file by which the varaibles of language file are accessible in twig files

$this->load->language('extension/payment/paypal_standard'); 

Text to show when it is in test mode.

$data['text_testmode'] = $this->language->get('text_testmode'); 

Text to show for the button.

$data['button_confirm'] = $this->language->get('button_confirm'); 

Get the configured value, and find when it is on test mode or not.

$data['testmode'] = $this->config->get('payment_paypal_standard_test'); 

If it is on test mode then set the form action URL to sandbox paypal URL else set the form action URL to live paypal URL

if (!$this->config->get('payment_paypal_standard_test')) { 
$data['action'] = 'https://www.paypal.com/cgi-bin/webscr'; 
} else { 
$data['action'] = 'https://www.sandbox.paypal.com/cgi-bin/webscr'; 
}

Notify URL is important to get the callback once the payment gateway processes the payment.

$data['notify_url'] = $this->url->link('extension/payment/paypal_standard/callback', '', true);

This is the custom data that we are passing to the PayPal and it will return us back to the website server, in our case we are sending the Order Id.

$data['custom'] = $this->session->data['order_id'];

Now, let’s check the callback() method. Some Instant Update variables set up the Cart Upload to use your callback server. Include the following required variables in the Cart Upload command to have PayPal send Instant Update requests to your callback server. It means the Paypal will call this URL and update the order status in the database of the website.

public function callback() {

PayPal sends back the order id so that we know it it is the right order that we are processing back.

if (isset($this->request->post['custom'])) {
$order_id = $this->request->post['custom'];
} else {
$order_id = 0;
}

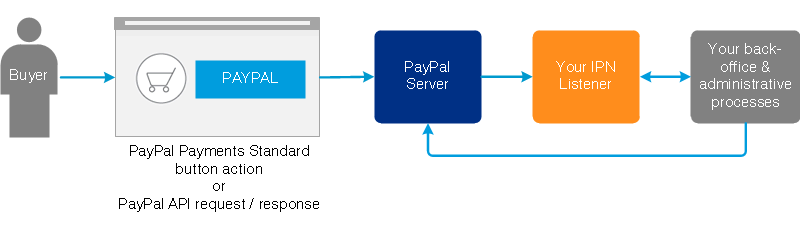
Once the Paypal sends us back data, we need to verify again with the returned data to finalized if the data are not tampered. The image shows the flow:

Paypal IPN
https://developer.paypal.com/docs/api-basics/notifications/ipn/IPNIntro/#ipn-overview

In PHP we use CURL to call the Paypal server to verify it.

$request = 'cmd=_notify-validate';

foreach ($this->request->post as $key => $value) {
$request .= '&' . $key . '=' . urlencode(html_entity_decode($value, ENT_QUOTES, 'UTF-8'));
}
if (!$this->config->get('payment_paypal_standard_test')) {
$curl = curl_init('https://www.paypal.com/cgi-bin/webscr');
} else {
$curl = curl_init('https://www.sandbox.paypal.com/cgi-bin/webscr');
}
curl_setopt($curl, CURLOPT_POST, true);
curl_setopt($curl, CURLOPT_POSTFIELDS, $request);
curl_setopt($curl, CURLOPT_RETURNTRANSFER, true);
curl_setopt($curl, CURLOPT_HEADER, false);
curl_setopt($curl, CURLOPT_TIMEOUT, 30);
curl_setopt($curl, CURLOPT_SSL_VERIFYPEER, false);
$response = curl_exec($curl);
if (!$response) {
$this->log->write('paypal_standard :: CURL failed ' . curl_error($curl) . '(' . curl_errno($curl) . ')');
}

if ($this->config->get('payment_paypal_standard_debug')) {
$this->log->write('paypal_standard :: IPN REQUEST: ' . $request);
$this->log->write('paypal_standard :: IPN RESPONSE: ' . $response);
}

Once we call the CURL, it returns back the responses whether it is verified or not. Then, we can check and update our order status, for checking the code is like below:

if ((strcmp($response, 'VERIFIED') == 0 || strcmp($response, 'UNVERIFIED') == 0) && isset($this->request->post['payment_status'])) {

In the switch statement, check Canceled_Reversal case, the code is

case 'Canceled_Reversal':
  $order_status_id = $this->config->get('payment_paypal_standard_canceled_reversal_status_id');
  break;

It sets the $order_status_id to Canceled Reversal value or as per the setting configuration we do in the Paypal standard extension. Other order statuses are similar except Completed. See the Completed switch case code:

case 'Completed':
$receiver_match = (strtolower($this->request->post['receiver_email']) == strtolower($this->config->get('payment_paypal_standard_email')));

$total_paid_match = ((float) $this->request->post['mc_gross'] == $this->currency->format($order_info['total'], $order_info['currency_code'], $order_info['currency_value'], false));

if ($receiver_match && $total_paid_match) {
$order_status_id = $this->config->get('payment_paypal_standard_completed_status_id');
}

if (!$receiver_match) {
$this->log->write('paypal_standard :: RECEIVER EMAIL MISMATCH! ' . strtolower($this->request->post['receiver_email']));
}

if (!$total_paid_match) {
$this->log->write('paypal_standard :: TOTAL PAID MISMATCH! ' . $this->request->post['mc_gross']);
}
break;

For the completed status, we check whether the received amount and paid amount are matched or not. If it matched then only order status is set to completed. If the amount is not matched then a log is written on the log file.

Finally the order status is added on the history with the following lines of code:

$this->model_checkout_order->addOrderHistory($order_id, $order_status_id);

In this way, we write the code at the catalog controller of Paypal Standard, similarly way we can write for other payment extensions.

Now, catalog model file of Payment extension

We need to create the model file, although we don’t call in the controller file. It is automatically called for payment methods. For that go to catalog/model/extension/payment and create paypal_standard.php and paste following code.

<?php
class ModelExtensionPaymentPaypalStandard extends Model {
	public function getMethod($address, $total) {
		$this->load->language('extension/payment/paypal_standard');

		$query = $this->db->query("SELECT * FROM " . DB_PREFIX . "zone_to_geo_zone WHERE geo_zone_id = '" . (int)$this->config->get('payment_paypal_standard_geo_zone_id') . "' AND country_id = '" . (int)$address['country_id'] . "' AND (zone_id = '" . (int)$address['zone_id'] . "' OR zone_id = '0')");

		if ($this->config->get('payment_paypal_standard_total') > $total) {
			$status = false;
		} elseif (!$this->config->get('payment_paypal_standard_geo_zone_id')) {
			$status = true;
		} elseif ($query->num_rows) {
			$status = true;
		} else {
			$status = false;
		}

		$currencies = array(
			'AUD',
			'CAD',
			'EUR',
			'GBP',
			'JPY',
			'USD',
			'NZD',
			'CHF',
			'HKD',
			'SGD',
			'SEK',
			'DKK',
			'PLN',
			'NOK',
			'HUF',
			'CZK',
			'ILS',
			'MXN',
			'MYR',
			'BRL',
			'PHP',
			'TWD',
			'THB',
			'TRY',
			'RUB'
		);

		if (!in_array(strtoupper($this->session->data['currency']), $currencies)) {
			$status = false;
		}

		$method_data = array();

		if ($status) {
			$method_data = array(
				'code'       => 'paypal_standard',
				'title'      => $this->language->get('text_title'),
				'terms'      => '',
				'sort_order' => $this->config->get('payment_paypal_standard_sort_order')
			);
		}

		return $method_data;
	}
}

The payment class is created and we need the getMethod() method whose parameters are address and total. In getMethod() method we return the value when the currencies is supported, when geo zones are supported.

$method_data = array(
'code' => 'paypal_standard',
'title' => $this->language->get('text_title'),
'terms' => '',
'sort_order' => $this->config->get('payment_paypal_standard_sort_order')
);

Once this is returned then only it is shown in the payment methods.

Now, catalog template file of Payment extension:

Finally we create the frontend template file, go to catalog/view/theme/default/extension/payment/ and create paypal_standard.twig.

the form should match the provided form from payment gateway.

For paypal, the form is provided here: https://developer.paypal.com/docs/paypal-payments-standard/integration-guide/formbasics/#sample-html-code-for-auto-fill-forms

Paste the following code in paypal_standard.twig

{% if testmode %}
<div class="alert alert-danger alert-dismissible"><i class="fa fa-exclamation-circle"></i> {{ text_testmode }}</div>
{% endif %}
<form action="{{ action }}" method="post">
  <input type="hidden" name="cmd" value="_cart" />
  <input type="hidden" name="upload" value="1" />
  <input type="hidden" name="business" value="{{ business }}" />
  {% set i = 1 %}
  {% for product in products %}
  <input type="hidden" name="item_name_{{ i }}" value="{{ product.name }}" />
  <input type="hidden" name="item_number_{{ i }}" value="{{ product.model }}" />
  <input type="hidden" name="amount_{{ i }}" value="{{ product.price }}" />
  <input type="hidden" name="quantity_{{ i }}" value="{{ product.quantity }}" />
  <input type="hidden" name="weight_{{ i }}" value="{{ product.weight }}" />
  {% set j = 0 %}
  {% for option in product.option %}
  <input type="hidden" name="on{{ j }}_{{ i }}" value="{{ option.name }}" />
  <input type="hidden" name="os{{ j }}_{{ i }}" value="{{ option.value }}" />
  {% set j = j + 1 %}
  {% endfor %}
  {% set i = i + 1 %}
  {% endfor %}
  {% if discount_amount_cart %}
  <input type="hidden" name="discount_amount_cart" value="{{ discount_amount_cart }}" />
  {% endif %}
  <input type="hidden" name="currency_code" value="{{ currency_code }}" />
  <input type="hidden" name="first_name" value="{{ first_name }}" />
  <input type="hidden" name="last_name" value="{{ last_name }}" />
  <input type="hidden" name="address1" value="{{ address1 }}" />
  <input type="hidden" name="address2" value="{{ address2 }}" />
  <input type="hidden" name="city" value="{{ city }}" />
  <input type="hidden" name="zip" value="{{ zip }}" />
  <input type="hidden" name="country" value="{{ country }}" />
  <input type="hidden" name="address_override" value="0" />
  <input type="hidden" name="email" value="{{ email }}" />
  <input type="hidden" name="invoice" value="{{ invoice }}" />
  <input type="hidden" name="lc" value="{{ lc }}" />
  <input type="hidden" name="rm" value="2" />
  <input type="hidden" name="no_note" value="1" />
  <input type="hidden" name="no_shipping" value="1" />
  <input type="hidden" name="charset" value="utf-8" />
  <input type="hidden" name="return" value="{{ return }}" />
  <input type="hidden" name="notify_url" value="{{ notify_url }}" />
  <input type="hidden" name="cancel_return" value="{{ cancel_return }}" />
  <input type="hidden" name="paymentaction" value="{{ paymentaction }}" />
  <input type="hidden" name="custom" value="{{ custom }}" />
  <input type="hidden" name="bn" value="OpenCart_2.0_WPS" />
  <div class="buttons">
    <div class="pull-right">
      <input type="submit" value="{{ button_confirm }}" class="btn btn-primary" />
    </div>
  </div>
</form>

No header, no footer, no left or right column are needed on the template, with this, only the submit button is shown. Check the following code, this is to show the text saying it is only for test.

{% if testmode %}
<div class="alert alert-danger alert-dismissible"><i class="fa fa-exclamation-circle"></i> {{ text_testmode }}</div>
{% endif %}

In this way, we write the code at the catalog template of PayPal Standard, similarly way we can write for other payment extensions. Please let us know in the comment if we need to define any of the code above.

Now once the Paypal Standard is activated then it will show like below:

Paypal Standard Opencart

In this way, you can create the form in the admin section, validate the form data, validate the permission, and save the data to the database in the setting database table for the Payment extension and show it in the front. Hope you liked this article, please subscribe to our YouTube Channel for Opencart video tutorials. You can also find us on Twitter and Facebook.

How to create a payment module or extension in the Opencart 3? Developer guide Part I of III

In this Opencart tutorial developer guide, we are showing how to create a custom payment module or extension in the Opencart version 3. Opencart by default supports more than 45 payment modules. Log in into admin, go to Extensions >> Extensions >> Choose the extension type “Payments”, you can see the lists of payments module in Opencart.

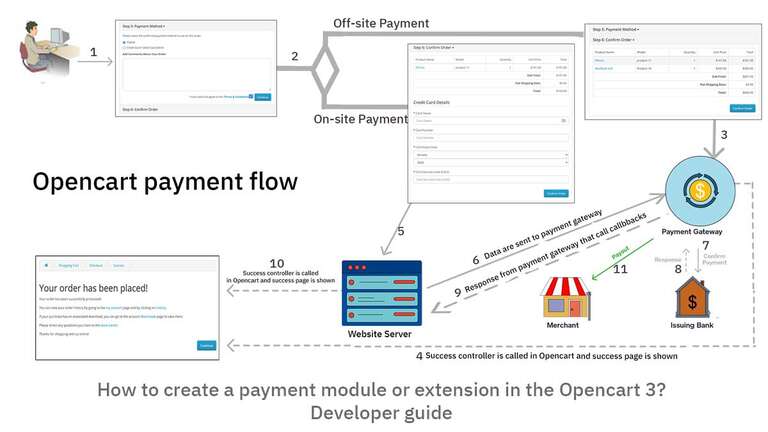
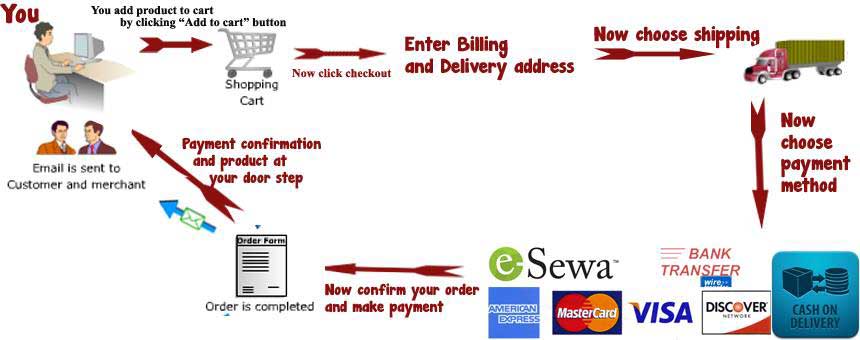
Here is the flow of the most eCommerce website.

eCommerce flow diagram

Today we are showing you postmortem the payment gateway section.

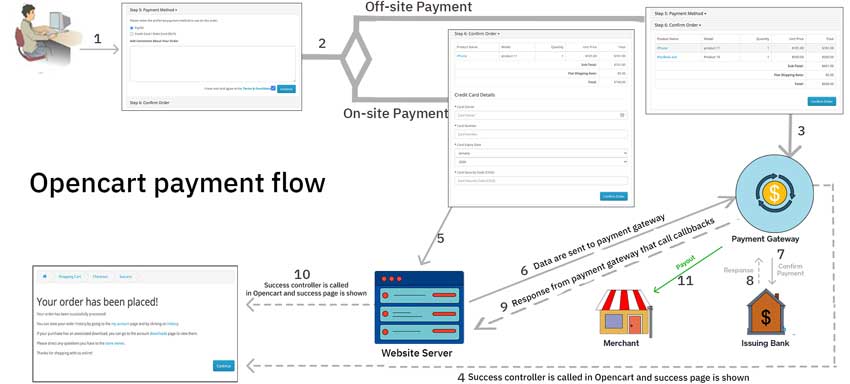
Here are some of the normal steps that happen in the payment section:

ecommerce payment flow
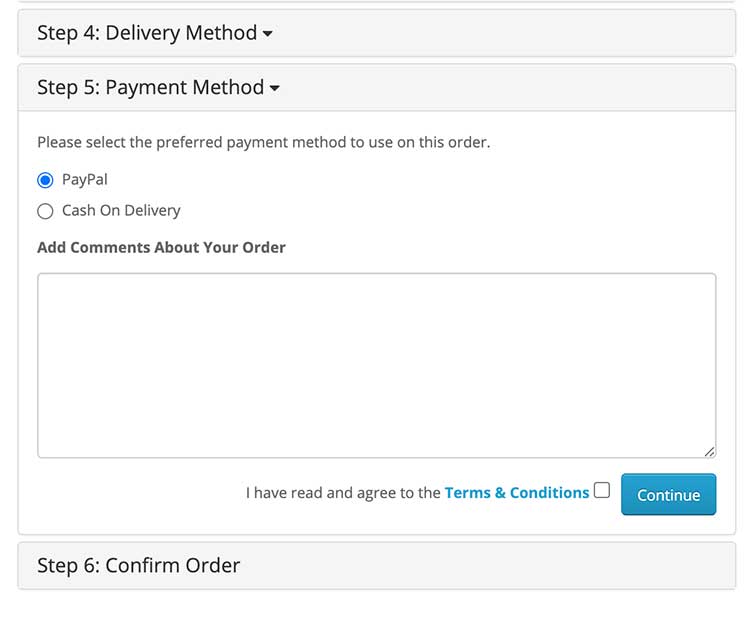
  1. When the customer is ready to pay for goods or services on your website, they select the payment method on your website.
  2. There are two ways of payment gateway processing:
    • One is Off-site payment processing
      In the off-site payment, the website is redirected to the payment service website and payment is made on the payment service website.
      There will be no place to enter the credit card information or login to payment gateways.
      The payment gateway provides a Payment form in which we matched similar fields.
      Data are passed from Form.
      Need return URL or cancel URL so that when payment is a success it returns to that return URL and if the payment fails then it returns to the cancel URL.
      Skrill, Paypal Standard, Liqpay, etc. are the default payment modules for Off-site payment processing.
    • Another is on-site payment processing.
      In the on-site payment, the payment is made on the same site, the payment processing is done through APIs.
      The payment gateway provides a JSON request.
      There will be a form where they can enter the credit card details or bank information etc.
      Data are passed as JSON format.
      It will return success or failure messages through API in JSON format. Once you get the success or failure data then further processing can be done in the website server and the message can be shown or redirected to the success page.
      Authorize.net’s AIM, Paypal Pro, Square, etc. are the default payment modules for on-site payment processing.
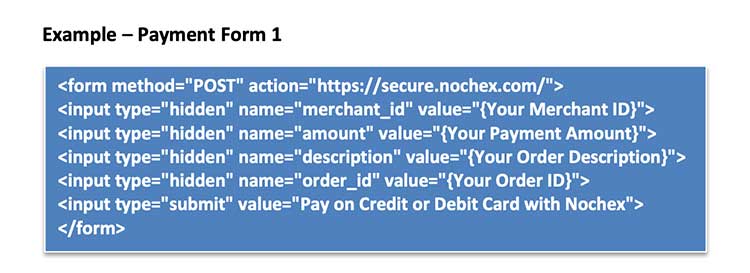
  3. When the payment method is Off-side payment processing then data are passed on hidden fields in the form. If we check the documentation of NoChex you can see the form code like below:
    Off site payment form code
    https://ssl.nochex.com/downloads/Payment%20Guides/payment_page_integration_guide.pdf page no. 5

    Mostly the payment gateway provides us with the form method type, action URL, and fields that we can pass to them for processing. Once you click the “Confirm Order” button, these hidden fields data are passed to the payment gateway and processing happens in their website.
  4. When a payment gateway process the payment and is successful then the customer is directed to the success URL.
  5. When the payment method is On-side payment processing then data are passed from website Server to payment gateway through API, as we are using Opencart which is builtin PHP so we use CURL to call the API.
  6. The website server passes the data to the payment gateway through API, mostly CURL is used to communicate with the APIs, we pass JSON-formatted HTTP requests to the API endpoint in either the sandbox or production environment of the payment gateway.
  7. Payment gateway requests authorization for the payment from the customer’s bank, third party provider, or card issuer.
  8. The bank/provider/card issuer approves or rejects the transaction.
  9. Payment gateway sends the success or failure response, containing the transaction result, and calls the Callback where the website server can process the data.
  10. The website server processes data returned by the payment gateway and it redirects to the success page.

These are the steps that happen on Opencart for payments. So we need to take each step into consideration while developing the payment extensions.

Checklist for Developers while integrating the payment extension

Here is the checklist for the developer while integrating the payment extension on the Opencart or custom platform

  1. Always make a google search if the Opencart payment extension is available, sometimes it is available for free.
  2. If free is not available then start by creating/asking an account and visiting the documentation.
  3. Mostly each payment gateway has a test environment so get test credentials. Create a playground account to get test credentials and get familiar with the test environment.
  4. Check out the PHP SDKs, with this, it will be easy to understand the code. Like for Paypal https://packagist.org/packages/paypal/paypal-checkout-sdk
  5. Follow the integration guide. Each of the product documentation provides an integration guide. Follow the instructions to make sure your payment process works as needed.
  6. Be sure to check if what ISO country codes (3‐digit or 4-digit), what language support, and what currencies support are available for that payment gateway.
  7. Check all your APIs in Postman to confirm everything, before development
  8. Test the system. Make sure everything works. Remember you can place a test order using test credentials on Postman.
  9. Be sure to read how error handling is done, how many rate limits, if any domains & IP address restrictions, policies, and compliance
  10. After reading the documentation, now you can decide whether you need to make the Off-site payment extension or on-site payment extension.
  11. Then start the development.

In our next post, we will show you how to create the off-site payment extensions, we start by cloning the Skrill or Opencart Paypal standard payment extension, which will help us to understand how we can create the Opencart payment extensions. Till then, please let us know if you need any help or custom development, and keep on learning Opencart.

Bibliography

Opencart code snippets VSCode extensions

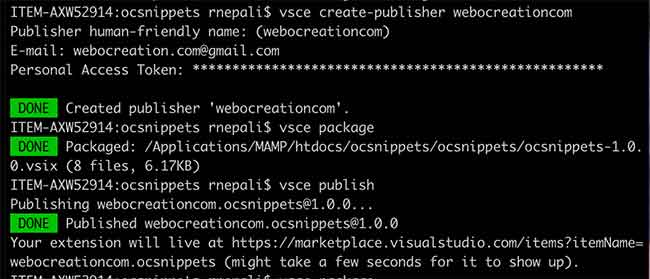
Today we launched OpenCart code snippets VSCode extensions which you can find at https://marketplace.visualstudio.com/items?itemName=webocreationcom.ocsnippets, We published OpenCart code snippets VScode extensions for OpenCart developers. It contains some OpenCart code snippets for PHP and Twigs. Github repository for this https://github.com/rupaknepali/opencartsnippetsvscode.

How to use Opencart code snippets VSCode extensions?

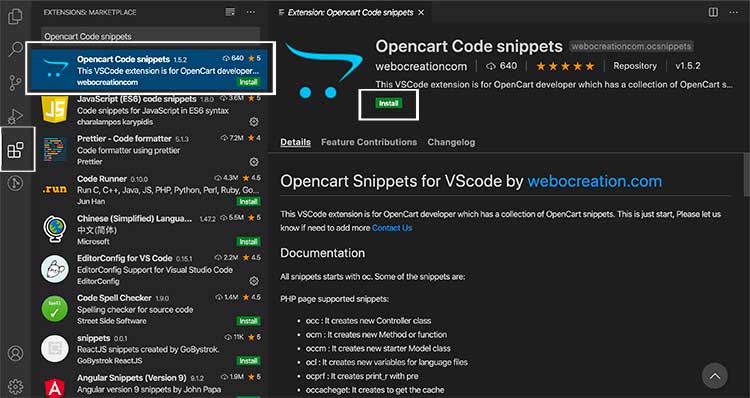
  • Find “Opencart code snippets” extensions to install using the Extensions View.
  • Install an extension.
VScode extensions Install
  • Once you installed the “Opencart Code snippets”, open ***.php or ***.twig or ***.xml
  • Then start typing oc… then you will see a list of Opencart related code snippets available.
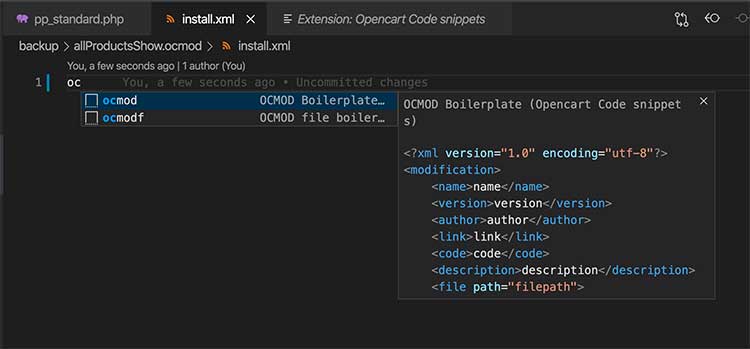
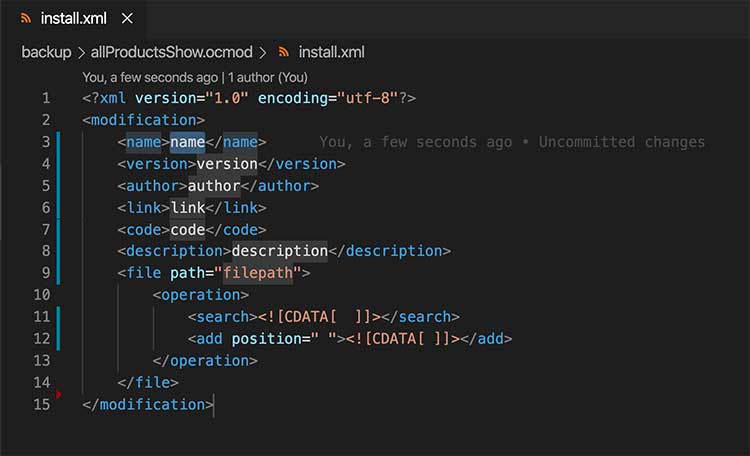
  • For example, create a file called install.xml, then start typing oc, it will show ocmod and ocmodf, these are the Opencart code snippets available in the VScode extensions that you installed.
Opencart code snippets
  • Once you finished the word like ocmod then it creates the codes automatically.
Ocmode code generated
  • It highlights the word to be changed, enter the word that you need and click tab, then it will highlights the another words to be change

In this way, you can use the OpenCart Code snippets for rapid development.

Creating and publishing Visual Studio code extensions

Creating and publishing Visual Studio code extensions is easy than I thought just follow https://code.visualstudio.com/api/get-started/your-first-extension and https://code.visualstudio.com/api/working-with-extensions/publishing-extension

vscode opencart

Opencart Snippets for Visual Studio Code

This VSCode extension is for OpenCart developer which has a collection of OpenCart snippets. This is just starting, Please let us know if need to add more Contact Us

Documentation

All snippets start with oc. Some of the snippets are:

PHP page supported snippets:

  • occ: It creates a new Controller class
  • ocm: It creates a new Method or function
  • occm: It creates new starter Model class
  • ocl: It creates new variables for language files
  • ocprf: It creates print_r with pre

Twig page supported snippets:

  • oct: It creates starting template layouts in twig files
  • octfor: It creates for loop in twig files
  • octif: It creates if statement in twig files
  • ocbtn: It creates button markup
  • ocimg: It creates image markup
  • ocbc: It creates breadcrumbs loop in twig files

OCMOD XML page supported snippets:

  • ocmod: It creates OCMOD XML code boilerplate
  • ocmodf: It creates OCMOD XML code boilerplate for files only

Release Notes

Users appreciate release notes as you update your extension.

1.2.0
– OCMOD support added.
– ocmod- for install.xml boilerplate creation
– ocmodf- OCMOD XML file boilerplate
– ocprf- print_r with pre

1.0.0

  • The initial release of Opencart Snippets for vscode
  • Added some snippets. Others are coming soon.

For more information

Please install the extension, try it out and share it with other Opencart developers which may help the development speed. It is free and open-source. Any suggestions, feedback, and other code snippets of Opencart are appreciated.

Creating a Custom Page in OpenCart 3 – categories listing page

In this opencart tutorial, we are showing you, how to create an additional custom page in my OpenCart 3 website by coding. We are showing you by creating the categories listing custom page in Opencart 3.0.3.1.

 “OpenCart theme and Module development” book says “OpenCart is an e-commerce shopping cart application built with its own in-house framework which uses MVCL (Model, view, controller, and language) pattern. Thus, each module in OpenCart also follows the MVCL pattern. The controller creates logic and gathers data from the model and it passes data to display in the view.” So to create a custom page, we will need a few files for it to work as a page.

Required files:

  1. A controller file
  2. A template file

Optional files:

  1. Model file
  2. Language file

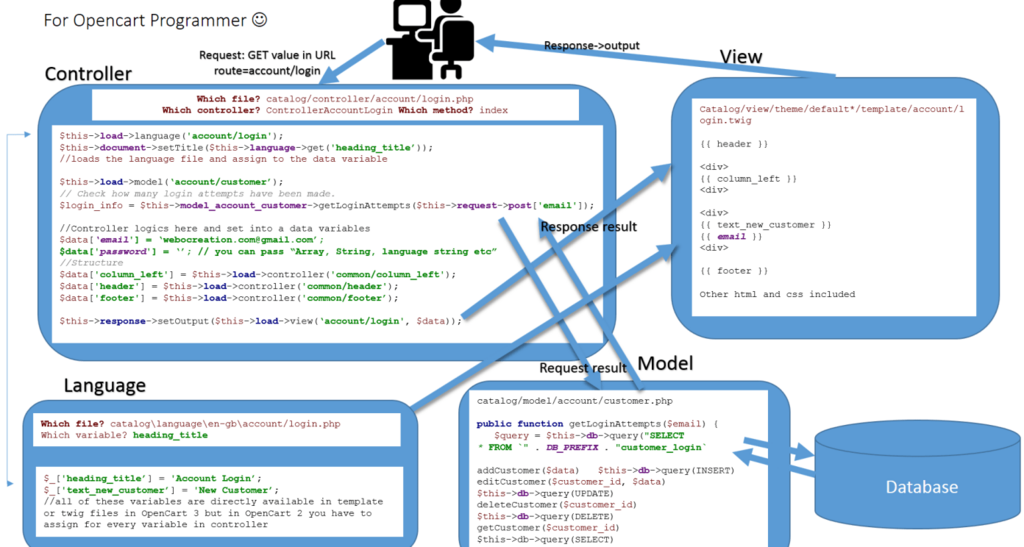
Before you start reading below first, understand about the request and response in OpenCart, just understand the image and watch the following video which will clarify MVCL flow of Opencart.:

MVCL flow of opencart

https://webocreation.com/code-flow-request-response-mvcl-pattern-opencart

After watching the above video, you know about MVCL so it will be easy to understand below.

Controller File

Let’s start by creating a controller file in the controller folder. For this tutorial, we create a file named ‘categorieslist.php’ in the /catalog/controller/catalog/ folder. Since we named the file categorieslist.php and put it at the catalog/ folder, the controller class name will be ControllerCatalogCategorieslist which inherits the Controller like below, if you are thinking of any other custom pages then you also need to do same.

<?php
class ControllerProductCategorieslist extends Controller
{
    public function index()
    {
        echo "This is category listing page";
    }
}

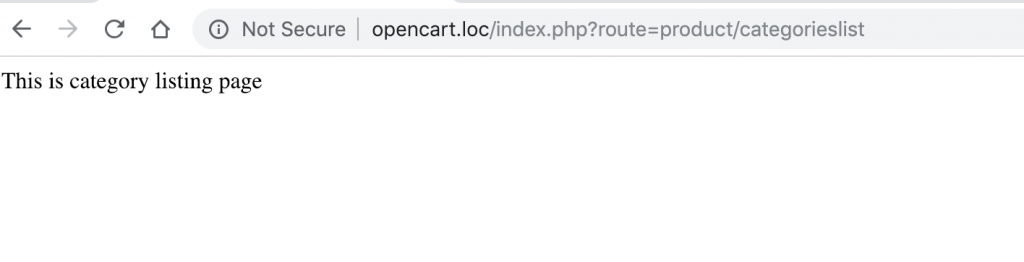
The user requests to the controller through URL, so the URL here become YOURSITE.com/index.php?route=product/categorieslist. I was working in my localhost with “opencart.loc” domain so it shows like below:

Categories list page in Opencart

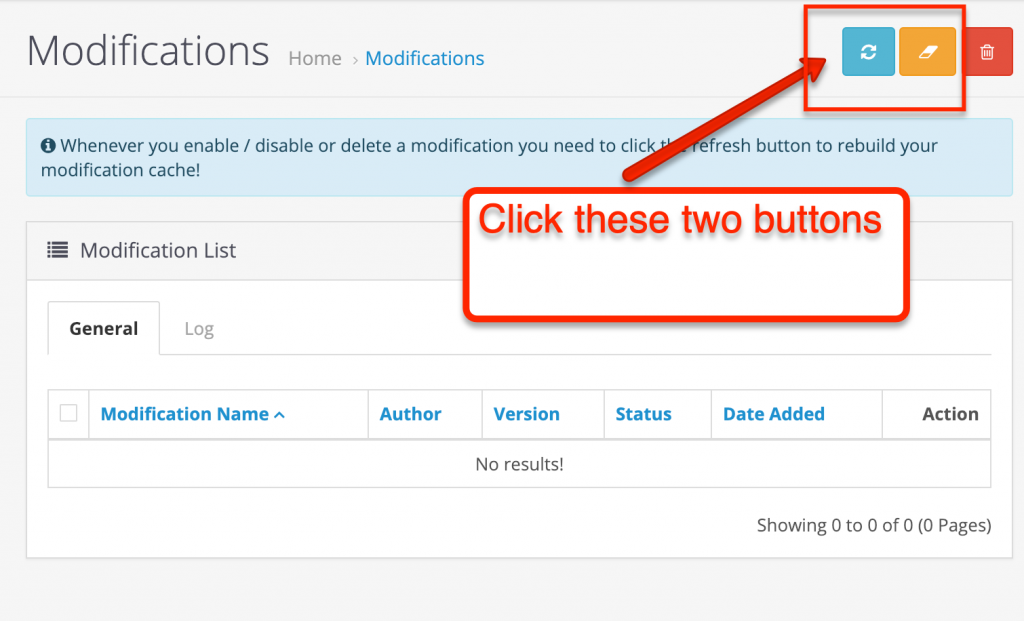
If you get an error like below don’t panic just got to Admin >> Extensions >> Modifications and click the Refresh button.

Fatal error: Uncaught Error: Class ‘Controllerproductcategorieslist’ not found in …/modification/system/engine/action.php:71 Stack trace: #0 ../catalog/controller/startup/router.php(25): Action->execute(Object(Registry)) #1 …/modification/system/engine/action.php(79): ControllerStartupRouter->index() #2 /system/engine/router.php(67): Action->execute(Object(Registry)) #3 /system/engine/router.php(56): Router->execute(Object(Action)) #4 /system/framework.php(165): Router->dispatch(Object(Action), Object(Action)) #5 system/startup.php(104): require_once(‘/Applications/X…’) #6 /index.php(19): start(‘catalog’) #7 {main} thrown in modification/system/engine/action.php on line 71

Clear the cache in Opencart

Auto Cache clearing instead of doing manually

https://webocreation.com/twig-cache-removing-while-developing-theme-or-module-developer-tips/

Activating twig debugging

Go to /system/library/template/twig.php •Find this line:
$this->twig = new \Twig_Environment($loader, $config);

Below that line adds following two lines:

//Adding Twig Debug Extension
 $this->twig->addExtension(new \Twig_Extension_Debug()); 

These will help on easy debugging and no need to keep on clearing the cache again and again.

Now let’s add header, footer, column left, column right, content top and content-bottom like below and render the response output to categories list template.

<?php
class ControllerProductCategorieslist extends Controller
{
    public function index()
    {
        $data['column_left'] = $this->load->controller('common/column_left');
        $data['column_right'] = $this->load->controller('common/column_right');
        $data['content_top'] = $this->load->controller('common/content_top');
        $data['content_bottom'] = $this->load->controller('common/content_bottom');
        $data['footer'] = $this->load->controller('common/footer');
        $data['header'] = $this->load->controller('common/header');
        $this->response->setOutput($this->load->view('product/categorieslist', $data));
    }
}

As we write in our code $this->response->setOutput($this->load->view(‘product/categorieslist’, $data));, it means we are outputting code in categorieslist.twig file at catalog/theme/view/THEMENAME/template/product/categorieslist.twig. Let create the categorieslist.twig in that folder and put the following code:

{{ header }}
{{ column_left }}
{{ column_right }}
<div class="container">
<div class="col-sm-12">
This is categories list page
</div>
</div>
{{ content_top}}
{{ content_bottom }}
{{ footer }} 

Then go to the URL YOURSITE.com/index.php?route=product/categorieslist and you will see like below with header and footer as we have not added any modules for this pages so there will be no module in this page for now:

Custom page created in Opencart

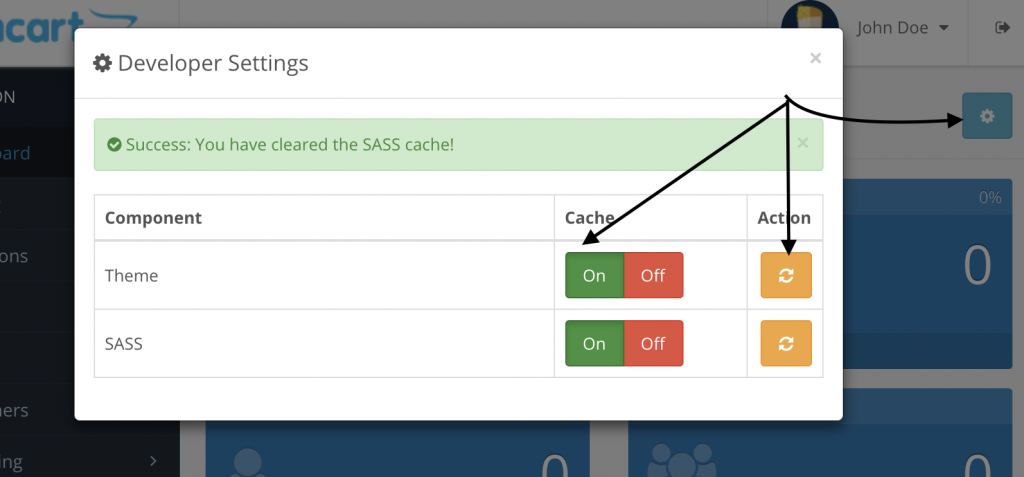
If you don’t see the page, it means you have not cleared the theme cache and SCSS cache, which you can do from the admin dashboard:

Clear theme cache and SCSS cache in Opencart

Template File

Nothing fancy here, but whatever data you passed from the controller in $data[‘YOURVARIABLE’], you have access to the YOURVARIABLE in template twig file and just output as {{ YOURVARIABLE }}. Like this way you build logic in the controller, get the desired results and assign it in $data array and send it to the template.

Language File

OpenCart supports multi-language. So let’s create a language file and transfer data from language file to template twig file. For that let’s create a file named categorieslist.php in catalog/language/en-gb/product/categorieslist.php and paste the code below:

<?php
// Text
$_['meta_title']        = 'All Categories';
$_['meta_description']  = 'All Categories';
$_['meta_keyword']      = 'All Categories';
$_['categories_text']   = 'This is categories list page';

Whatever you define here, it will be access to template twig file when you load in a file in the controller. Now let’s change the /catalog/controller/catalog/categorieslist.php like below:

<?php
class ControllerProductCategorieslist extends Controller
{
    public function index()
    {
        $this->load->language('product/categorieslist');
        $this->document->setTitle($this->language->get('meta_title'));
        $this->document->setDescription($this->language->get('meta_description'));
        $this->document->setKeywords($this->language->get('meta_keyword'));

        $data['column_left'] = $this->load->controller('common/column_left');
        $data['column_right'] = $this->load->controller('common/column_right');
        $data['content_top'] = $this->load->controller('common/content_top');
        $data['content_bottom'] = $this->load->controller('common/content_bottom');
        $data['footer'] = $this->load->controller('common/footer');
        $data['header'] = $this->load->controller('common/header');

        $this->response->setOutput($this->load->view('product/categorieslist', $data));
    }
}

This is how we load the language files in the controller:

$this->load->language('product/categorieslist');

Then we can use the language file variable in controller and language file. In the controller, we use the language variable like:

$this->language->get('meta_title')

In the template twig file that is rendered by the controller, we can use directly with {{LANGUAGEVARIABLE}}, so our catalog/theme/view/THEMENAME/template/product/categorieslist.twig can directly access to categories_text variable of the language file.

{{ header }}
{{ column_left }}
{{ column_right }}
<div class="container">
<div class="col-sm-12">
{{categories_text}}
</div>
</div>
{{ content_top}}
{{ content_bottom }}
{{ footer }} 

Please be careful you can directly access to language variable into the twig file in Opencart 3, in OpenCart you cannot directly access without assigning to $data variable in the controller.

You can download all files from this tutorial in the file below:

We have successfully made our custom page. W can now access the page we created from YOURSITE.com/index.php?route=product/categorieslist .

In our next post, we will show all logics implemented to pull the categories from the database and work with the model class, databases, whole twig files by which we will make a whole module to show categories on a page.

Please let us know if you have any questions, suggestions and follow us at twitter @rupaknpl and subscribe to our youtube channel Opencart tutorials where you can see OpenCart tutorials for beginners to advance programmers.

Swapping image when hovering over in products – Opencart free module

Another free Opencart module for this Christmas and Happy New Year, we are providing Opencart module when activated we can add hovering image and in the frontend when we hover over to the image in products of category page it will swap with the hovering image.

How to install the swapping image Opencart module?

First, download the module by clicking the download button above and you will get hoveroverimage.ocmod.zip file. Then go to admin >> Extensions >> Installer >> then upload the hoveroverimage.ocmod.zip file.

Second go to admin >> Extensions >> Modifications >> then click the refresh button

Third, go to admin >> Extensions >> Extensions >> Choose module in extension type >> then find the “Hover Over Image” and click the install button for the Hover Over Image module. Once you install click edit and then choose enabled and click save.

Fourth, go to admin >> Catalog >> Products >> add or edit the product >> then enter the details of the product and click the Image tab, where you will see the “Upload Hover over Image” field, upload the image to show when it hovers over.

swapping image on hover Opencart

Finally, go to the frontend and visit the category where the product is assigned and then hover over the product image and see the swap of the image.

On hover image change opencart

You installed the module, configured it and see the result like above. Let us know if you see any issues or want any improvement.

For developers:

The OCMOD file https://github.com/rupaknepali/Opencart-free-modules/blob/master/hoveroverimage/install.xml will modify the following files:

modified:   admin/controller/catalog/product.php
modified:   admin/language/en-gb/catalog/product.php
modified:   admin/model/catalog/product.php
modified:   admin/view/template/catalog/product_form.twig
modified:   catalog/controller/product/category.php
modified:   catalog/model/catalog/product.php
modified:   catalog/view/theme/default/template/product/category.twig

The new files added when you upload the module are the following:

added:      admin/controller/extension/module/hoveroverimage.php
added:      admin/language/en-gb/extension/module/hoveroverimage.php
added:      admin/model/extension/module/hoveroverimage.php
added:      admin/view/template/extension/module/hoveroverimage.twig

Once you upload the module then install the module, then it will create the oc_product_to_image_back database table. We need to create a new table because Opencart 3 doesn’t allow us to alter the core database tables.

public function installTableBackImage()
{
    $this->db->query("CREATE TABLE `" . DB_PREFIX ."product_to_image_back` ( `id` INT NOT NULL AUTO_INCREMENT , `image_back` VARCHAR(255) NOT NULL , `product_id` INT NOT NULL , PRIMARY KEY (`id`))");
}

public function dropTableBackImage()
{
    $this->db->query("DROP TABLE IF EXISTS `" . DB_PREFIX . "product_to_image_back`");
}

When you upload the image in “Upload Hover over Image” field at product section then all data are stored in the DB_PREFIX.product_to_image_back database table.

The Ocmod install.xml contains the following code:

<?xml version="1.0" encoding="utf-8"?>
<modification>
  <name>Module Hover Over Image</name>
  <version>1.0</version>
  <author>Rupak Nepali</author>
  <link>https://webocreation.com</link>
  <code>webocreation_module_hover_over_image</code>
  <file path="admin/view/template/catalog/product_form.twig">
    <operation>
      <search><![CDATA[ <div class="tab-pane" id="tab-image"> ]]></search>
      <add position="after"><![CDATA[
            {% if image_back_status %}
              <div class="table-responsive">
                {# HoverOver Image #}
                <table class="table table-striped table-bordered table-hover">
<thead>
<tr>
<td class="text-left">{{ entry_image_back }}</td>
</tr>
</thead>
<tbody>
<tr>
<td class="text-left"><a href="" id="thumb-image-back" data-toggle="image" class="img-thumbnail"><img src="{{ thumb_back }}" alt="" title="" data-placeholder="{{ placeholder }}" /></a><input type="hidden" name="image_back" value="{{ image_back }}" id="input-image-back" /></td>
</tr>
</tbody>
</table>
</div>
            {% endif %}
            ]]>
      </add>
    </operation>
  </file>

  <file path="admin/controller/catalog/product.php">
    <operation>
      <search><![CDATA[if (isset($this->request->post['product_image'])) {]]></search>
      <add position="before"><![CDATA[
                // Hoverover Image
    $data['image_back_status'] = $this->config->get('module_hoveroverimage_status');
    if ($this->config->get('module_hoveroverimage_status')) {
		if (isset($this->request->post['image_back'])) {
			$data['image_back'] = $this->request->post['image_back'];
		} elseif (isset($this->request->get['product_id'])) {
			$image_back= $this->model_catalog_product->getBackProductImage($this->request->get['product_id']);
			if (!empty($image_back['image_back'])){
				$data['image_back'] = $image_back['image_back'];
			}	
		} else {
			$data['image_back'] = array();
		}

		if (isset($this->request->post['image_back']) && is_file(DIR_IMAGE . $this->request->post['image_back'])) {
			$data['thumb_back'] = $this->model_tool_image->resize($this->request->post['image_back'], 100, 100);
		} elseif (!empty($image_back) && is_file(DIR_IMAGE . $image_back['image_back'])) {
			$data['thumb_back'] = $this->model_tool_image->resize($image_back['image_back'], 100, 100);
		} else {
			$data['thumb_back'] = $this->model_tool_image->resize('no_image.png', 100, 100);
		}
    }
            ]]>      </add>
    </operation>
  </file>

  <file path="admin/language/en-gb/catalog/product.php">
    <operation>
      <search><![CDATA[ $_['error_unique'] ]]></search>
      <add position="before"><![CDATA[ $_['entry_image_back'] = 'Upload Hoverover Image'; ]]></add>
    </operation>
  </file>

  <file path="admin/model/catalog/product.php">
    <operation>
      <search><![CDATA[if (isset($data['image'])) {]]></search>
      <add position="before"><![CDATA[ 
        //Hoverover Image
        if ($this->config->get('module_hoveroverimage_status')) {
        if (isset($data['image_back'])) {
          $this->db->query("DELETE FROM " . DB_PREFIX . "product_to_image_back WHERE product_id = '" . (int)$product_id . "'");
          $this->db->query("INSERT INTO " . DB_PREFIX . "product_to_image_back SET product_id = '" . (int)$product_id . "', image_back = '" . $this->db->escape($data['image_back']) . "'");
        }
        }
         ]]>      </add>
    </operation>
  </file>
  <file path="admin/model/catalog/product.php">
    <operation>
      <search><![CDATA[public function getProductRelated($product_id) {]]></search>
      <add position="before"><![CDATA[ 
          //Hoverover Image
          public function getBackProductImage($product_id) {
            $query = $this->db->query("SELECT * FROM " . DB_PREFIX . "product_to_image_back WHERE product_id = '" . (int)$product_id . "'");

            return $query->row;
          }
        ]]>      </add>
    </operation>
  </file>

  <file path="catalog/model/catalog/product.php">
    <operation>
      <search><![CDATA[public function getProductRelated($product_id) {]]></search>
      <add position="before"><![CDATA[ 
          //Hoverover Image
          public function getBackProductImage($product_id) {
            $query = $this->db->query("SELECT * FROM " . DB_PREFIX . "product_to_image_back WHERE product_id = '" . (int)$product_id . "'");

            return $query->row;
          }
        ]]>      </add>
    </operation>
  </file>

  <file path="catalog/controller/product/category.php">
    <operation>
      <search><![CDATA[$data['products'][] = array(]]></search>
      <add position="before"><![CDATA[ 
        //Hoverover Image
        $image_back_final = "";
        $data['image_back_status'] = $this->config->get('module_hoveroverimage_status');
        if ($this->config->get('module_hoveroverimage_status')) {
            $image_back = $this->model_catalog_product->getBackProductImage($result['product_id']);
            if (isset($image_back['image_back'])) {
              $image_back_final = $this->model_tool_image->resize($image_back['image_back'], $this->config->get('theme_' . $this->config->get('config_theme') . '_image_product_width'), $this->config->get('theme_' . $this->config->get('config_theme') . '_image_product_height'));
            } else {
              $image_back_final = "";
            }
        }
      ]]>      </add>
    </operation>
  </file>

  <file path="catalog/controller/product/category.php">
    <operation>
      <search><![CDATA[$data['products'][] = array(]]></search>
      <add position="after"><![CDATA['thumb_back'       => $image_back_final, //Hoverover Image]]></add>
    </operation>
  </file>

  <file path="catalog/view/theme/default/template/product/category.twig">
    <operation>
      <search><![CDATA[<img src="{{ product.thumb }}" alt="{{ product.name }}" title="{{ product.name }}" class="img-responsive"/>]]></search>
      <add position="replace"><![CDATA[ 
        {% if product.thumb_back %}
            <img src="{{ product.thumb }}" alt="{{ product.name }}" title="{{ product.name }}" onmouseover="this.src='{{ product.thumb_back }}'" onmouseout="this.src='{{ product.thumb }}'" class="img-responsive"/>
        {% else %}
            <img src="{{ product.thumb }}" alt="{{ product.name }}" title="{{ product.name }}" class="img-responsive"/>
        {% endif %}
        ]]>      </add>
    </operation>
  </file>

</modification>

In this way, you can set up the swapping the image when hovering over in products on the category page. Let us know if need any support. Please subscribe to our YouTube Channel for Opencart video tutorials and get lots to other Opencart free modules. You can also find us on Twitter and Facebook. Merry Christmas and Happy New Year 2020.

Free checkout all orders are going to missing orders in Opencart 3.0.2.0

We activate the free checkout payment module in Opencart 3.0.2.0, then we start ordering but all orders go to the Missing Orders in Sales, so debugging we found out that somehow the free checkout files were not updated properly in the Opencart version 3.0.2.0. Here are the changes that we did to make it work:

Open the file admin/controller/extension/payment/free_checkout.php and find the following lines of code:

if (isset($this->request->post['free_checkout_order_status_id'])) {
	$data['free_checkout_order_status_id'] = $this->request->post['free_checkout_order_status_id'];
} else {
	$data['free_checkout_order_status_id'] = $this->config->get('free_checkout_order_status_id');
}

Replace it with the following:

if (isset($this->request->post['payment_free_checkout_order_status_id'])) {
	$data['payment_free_checkout_order_status_id'] = $this->request->post['payment_free_checkout_order_status_id'];
} else {
	$data['payment_free_checkout_order_status_id'] = $this->config->get('payment_free_checkout_order_status_id');
}

See the “payment_”, as we mentioned in Single instance Opencart module development tutorial all single instance payment module fields should start with “payment_”, it was missing in the above code that is why it was not working.

Similarly, open admin/view/template/extension/payment/free_checkout.twig and find the following lines of code:

<select name="free_checkout_order_status_id" id="input-order-status" class="form-control">

Replace with the following code:

<select name="payment_free_checkout_order_status_id" id="input-order-status" class="form-control">

You can download the module below which was developed before we find the above solution, next time we need to search more.

Download and upload the files to the respective folder which will override the files and you are good to go. With these changes, our orders are showing in Sales.

In this way, you can solve the issues of free checkout sales going to the missing order’s sales. Please don’t forget to post your questions or comments so that we can add extra topics. You can follow us at our twitter account @rupaknpl. Subscribe to our YouTube channel for Opencart tutorials, and click to see all Opencart free module.

Opencart 3 module development tutorial, multi-instance testimonial free

In this opencart tutorial, we are showing you how to create a multi-instance opencart 3 module step by step, we are making a testimonial module as an example, click to download this module for free. In our last two posts, we show you how to make the single instance module: Single Instance module, Form creation, validation, and submission to the database and Single Instance module frontend login module. Check the difference between the single instance and multi-instance opencart module. Similarly, one of our blog posts describes how to perform Opencart CRUD functionalities of testimonials, create an admin custom listing page, form, validate it and save in the database, now we will use those testimonials to show in the multi-instance module in the admin section and in next post we will show you the frontend section code.

Here are the files and folders structure of testimonial module:

  • admin/controller/extension/module/testimonial.php
  • admin/language/en-gb/extension/module/testimonial.php
  • admin/view/template/extension/module/testimonial.twig
  • catalog/controller/extension/module/testimonial.php
  • catalog/model/extension/module/testimonial.php
  • catalog/language/en-gb/extension/module/testimonial.php
  • catalog/view/theme/default/template/extension/module/testimonial.twig

In this post, we will show only admin code, in the next post we will show you the catalog or frontend code.

The code in admin/controller/extension/module/testimonial.php describes the controller code of the multi-instance opencart module. We describe the code in the comment:

<?php
/*** As our file is testimonial.php so Class name is ControllerExtensionModuleTestimonial which extends the Controller base class ***/
class ControllerExtensionModuleTestimonial extends Controller
{
	/*** Declaration of the private property 'error' so that we can get check if any error occurs in the whole class**/
	private $error = array();
	/*** Index method is called automatically or by default, if no parameters are passed, check this video tutorial for details https://www.youtube.com/watch?v=X6bsMmReT-4 . ***/
	public function index()
	{
		/*** Loads the language file admin/language/en-gb/extension/module/testimonial.php by which the varaibles of the language file are accessible in twig file. ***/
		$this->load->language('extension/module/testimonial');
		/*** Set the Document title ***/
		$this->document->setTitle($this->language->get('heading_title'));
		/*** Loads the model admin/model/setting/module.php so that we can use the methods defined there. The difference in single instance and multi-instance is here, in single instance we used to load  $this->load->model('setting/setting'); but here we load setting/module ***/
		$this->load->model('setting/module');
		/*** This is how we check if it is form submitted or not. When we submit the form then this block of code also run. Then it also validate the modify permission and other validation. ***/
		if (($this->request->server['REQUEST_METHOD'] == 'POST') && $this->validate()) {
			/*** Look at these lines of code, this code section which distinguishes from Single Instance to Multi-instance. If it is single instance then it will be like 	$this->model_setting_setting->editSetting('***', $this->request->post); This editSetting save the data to  oc_setting database table. But in multi-instance the code is like below it checks if the module_id is set if it is set then it get edit module data by editModule method, but if someone click Add button then no module_id is set and it adds new module data to the module database table. ***/
			if (!isset($this->request->get['module_id'])) {
				$this->model_setting_module->addModule('testimonial', $this->request->post);
			} else {
				$this->model_setting_module->editModule($this->request->get['module_id'], $this->request->post);
			}
			/*** This is to delete the cache of the testimonial. ***/
			$this->cache->delete('testimonial');
			/*** This set the success message in the session. ***/
			$this->session->data['success'] = $this->language->get('text_success');
			/*** This is to redirect to the extensions page. ***/
			$this->response->redirect($this->url->link('marketplace/extension', 'user_token=' . $this->session->data['user_token'] . '&type=module', true));
		}
		/*** This is to check if there are any warnings	 ***/	
		if (isset($this->error['warning'])) {
			$data['error_warning'] = $this->error['warning'];
		} else {
			$data['error_warning'] = '';
		}
		/*** As we are validating 'Module Name' in the validate method so if validate method returns name error then it is assigned here and the error is shown in the form field. ***/
		if (isset($this->error['name'])) {
			$data['error_name'] = $this->error['name'];
		} else {
			$data['error_name'] = '';
		}
		/*** This is also to set the error for the form field width ***/
		if (isset($this->error['width'])) {
			$data['error_width'] = $this->error['width'];
		} else {
			$data['error_width'] = '';
		}
		/*** This is also to set the error for the form field height ***/
		if (isset($this->error['height'])) {
			$data['error_height'] = $this->error['height'];
		} else {
			$data['error_height'] = '';
		}

		/*** Following are for breadcrumbs ***/
		$data['breadcrumbs'] = array();
		$data['breadcrumbs'][] = array(
			'text' => $this->language->get('text_home'),
			'href' => $this->url->link('common/dashboard', 'user_token=' . $this->session->data['user_token'], true)
		);
		$data['breadcrumbs'][] = array(
			'text' => $this->language->get('text_extension'),
			'href' => $this->url->link('marketplace/extension', 'user_token=' . $this->session->data['user_token'] . '&type=module', true)
		);
		/*** Check this section of if else statement, we see the difference in single instance and multi-instance. Here it is checking if module_id is set then it has different href URl and if not set different URL. ***/
		if (!isset($this->request->get['module_id'])) {
			$data['breadcrumbs'][] = array(
				'text' => $this->language->get('heading_title'),
				'href' => $this->url->link('extension/module/testimonial', 'user_token=' . $this->session->data['user_token'], true)
			);
		} else {
			$data['breadcrumbs'][] = array(
				'text' => $this->language->get('heading_title'),
				'href' => $this->url->link('extension/module/testimonial', 'user_token=' . $this->session->data['user_token'] . '&module_id=' . $this->request->get['module_id'], true)
			);
		}
		/*** Form action URL as per the module edited or for new module ***/
		if (!isset($this->request->get['module_id'])) {
			$data['action'] = $this->url->link('extension/module/testimonial', 'user_token=' . $this->session->data['user_token'], true);
		} else {
			$data['action'] = $this->url->link('extension/module/testimonial', 'user_token=' . $this->session->data['user_token'] . '&module_id=' . $this->request->get['module_id'], true);
		}
		/*** Form cancel URL ***/
		$data['cancel'] = $this->url->link('marketplace/extension', 'user_token=' . $this->session->data['user_token'] . '&type=module', true);
		/*** This is to get the module data, if module_id is set then it gets module data from database and set it to $module_info variable. ***/
		if (isset($this->request->get['module_id']) && ($this->request->server['REQUEST_METHOD'] != 'POST')) {
			$module_info = $this->model_setting_module->getModule($this->request->get['module_id']);
		}
		/*** This will check if it form filled and clicked save button and occurs some errors then it will set the name with POST name value. If it is edit then it will set the name value with the module detail. If it is add then empty is set. ***/
		if (isset($this->request->post['name'])) {
			$data['name'] = $this->request->post['name'];
		} elseif (!empty($module_info)) {
			$data['name'] = $module_info['name'];
		} else {
			$data['name'] = '';
		}
		/*** Same as above this will check if it form filled and clicked save button and occurs some errors then it will set the limit with POST limit value. If it is edit then it will set the limit value with the module detail. If it is add then empty is set. ***/
		if (isset($this->request->post['limit'])) {
			$data['limit'] = $this->request->post['limit'];
		} elseif (!empty($module_info)) {
			$data['limit'] = $module_info['limit'];
		} else {
			$data['limit'] = 5;
		}
		/*** Same as above this will check if it form filled and clicked save button and occurs some errors then it will set the width with POST width value. If it is edit then it will set the width value with the module detail. If it is add then default value is set to 200. ***/
		if (isset($this->request->post['width'])) {
			$data['width'] = $this->request->post['width'];
		} elseif (!empty($module_info)) {
			$data['width'] = $module_info['width'];
		} else {
			$data['width'] = 200;
		}
		/*** Same as above this will check if it form filled and clicked save button and occurs some errors then it will set the height with POST height value. If it is edit then it will set the height value with the module detail. If it is add then default value is set to 200. ***/
		if (isset($this->request->post['height'])) {
			$data['height'] = $this->request->post['height'];
		} elseif (!empty($module_info)) {
			$data['height'] = $module_info['height'];
		} else {
			$data['height'] = 200;
		}
		/*** Same as above this will check if it form filled and clicked save button and occurs some errors then it will set the status with POST status value. If it is edit then it will set the status value with the module detail. If it is add then default value is set to empty. ***/
		if (isset($this->request->post['status'])) {
			$data['status'] = $this->request->post['status'];
		} elseif (!empty($module_info)) {
			$data['status'] = $module_info['status'];
		} else {
			$data['status'] = '';
		}
		/*** This is how we load the header, column left and footer ***/
		$data['header'] = $this->load->controller('common/header');
		$data['column_left'] = $this->load->controller('common/column_left');
		$data['footer'] = $this->load->controller('common/footer');
		/*** This is to set output data variables to the view or twig files and twig file is loaded and html rendering is done with it. ***/
		$this->response->setOutput($this->load->view('extension/module/testimonial', $data));
	}
	/*** This is how validation is done, we check whether the user has permission to modify or not.***/
	/*** Here we validate name, width and height ***/
	/*** If there is error then $this->error['warning'] is set and warning are shown.***/
	protected function validate()
	{
		if (!$this->user->hasPermission('modify', 'extension/module/testimonial')) {
			$this->error['warning'] = $this->language->get('error_permission');
		}
		if ((utf8_strlen($this->request->post['name']) < 3) || (utf8_strlen($this->request->post['name']) > 64)) {
			$this->error['name'] = $this->language->get('error_name');
		}
		if (!$this->request->post['width']) {
			$this->error['width'] = $this->language->get('error_width');
		}
		if (!$this->request->post['height']) {
			$this->error['height'] = $this->language->get('error_height');
		}
		return !$this->error;
	}
}

For language we create testimonail.php file at admin/language/en-gb/extension/module/ and paste the following code. We defined required language variables and assign them the text of that language.

<?php
// Heading
$_['heading_title']    = 'Testimonial';
// Text
$_['text_extension']   = 'Extensions';
$_['text_success']     = 'Success: You have modified Testimonial module!';
$_['text_edit']        = 'Edit Testimonial Module';
// Entry
$_['entry_name']       = 'Module Name';
$_['entry_limit']      = 'Limit';
$_['entry_width']      = 'Width';
$_['entry_height']     = 'Height';
$_['entry_status']     = 'Status';
// Error
$_['error_permission'] = 'Warning: You do not have permission to modify Testimonial module!';
$_['error_name']       = 'Module Name must be between 3 and 64 characters!';
$_['error_width']      = 'Width required!';
$_['error_height']     = 'Height required!';

For the form page, we create testimonial.twig at admin/view/template/extension/module/ and add the following lines of code, they are self-explanatory, let us know in the comment is you didn’t understand anything.

{{ header }}{{ column_left }}
<div id="content">
  <div class="page-header">
    <div class="container-fluid">
      <div class="pull-right">
        <button type="submit" form="form-module" data-toggle="tooltip" title="{{ button_save }}" class="btn btn-primary"><i class="fa fa-save"></i></button>
        <a href="{{ cancel }}" data-toggle="tooltip" title="{{ button_cancel }}" class="btn btn-default"><i class="fa fa-reply"></i></a></div>
      <h1>{{ heading_title }}</h1>
      <ul class="breadcrumb">
        {% for breadcrumb in breadcrumbs %}
        <li><a href="{{ breadcrumb.href }}">{{ breadcrumb.text }}</a></li>
        {% endfor %}
      </ul>
    </div>
  </div>
  <div class="container-fluid">
    {% if error_warning %}
    <div class="alert alert-danger alert-dismissible"><i class="fa fa-exclamation-circle"></i> {{ error_warning }}
      <button type="button" class="close" data-dismiss="alert">×</button>
    </div>
    {% endif %}
    <div class="panel panel-default">
      <div class="panel-heading">
        <h3 class="panel-title"><i class="fa fa-pencil"></i> {{ text_edit }}</h3>
      </div>
      <div class="panel-body">
        <form action="{{ action }}" method="post" enctype="multipart/form-data" id="form-module" class="form-horizontal">
          <div class="form-group">
            <label class="col-sm-2 control-label" for="input-name">{{ entry_name }}</label>
            <div class="col-sm-10">
              <input type="text" name="name" value="{{ name }}" placeholder="{{ entry_name }}" id="input-name" class="form-control" />
              {% if error_name %}
              <div class="text-danger">{{ error_name }}</div>
              {% endif %}
            </div>
          </div>
          <div class="form-group">
            <label class="col-sm-2 control-label" for="input-limit">{{ entry_limit }}</label>
            <div class="col-sm-10">
              <input type="text" name="limit" value="{{ limit }}" placeholder="{{ entry_limit }}" id="input-limit" class="form-control" />
            </div>
          </div>
          <div class="form-group">
            <label class="col-sm-2 control-label" for="input-width">{{ entry_width }}</label>
            <div class="col-sm-10">
              <input type="text" name="width" value="{{ width }}" placeholder="{{ entry_width }}" id="input-width" class="form-control" />
              {% if error_width %}
              <div class="text-danger">{{ error_width }}</div>
              {% endif %}
            </div>
          </div>
          <div class="form-group">
            <label class="col-sm-2 control-label" for="input-height">{{ entry_height }}</label>
            <div class="col-sm-10">
              <input type="text" name="height" value="{{ height }}" placeholder="{{ entry_height }}" id="input-height" class="form-control" />
              {% if error_height %}
              <div class="text-danger">{{ error_height }}</div>
              {% endif %}
            </div>
          </div>
          <div class="form-group">
            <label class="col-sm-2 control-label" for="input-status">{{ entry_status }}</label>
            <div class="col-sm-10">
              <select name="status" id="input-status" class="form-control">
                {% if status %}
                <option value="1" selected="selected">{{ text_enabled }}</option>
                <option value="0">{{ text_disabled }}</option>
                {% else %}
                <option value="1">{{ text_enabled }}</option>
                <option value="0" selected="selected">{{ text_disabled }}</option>
                {% endif %}
              </select>
            </div>
          </div>
        </form>
      </div>
    </div>
  </div>
</div>
{{ footer }}

In our next post, we will create the frontend section of the multi-instance testimonial module and show it in different layouts.

Like this way we create a testimonial module setting form in Opencart admin, validate the form, submit the form data to the database, list out the multiple instances of the module in the module listing page, edit each module and update it, and we can perform the delete from the module listing page, like this we create admin section of the multi-instance module in Opencart.

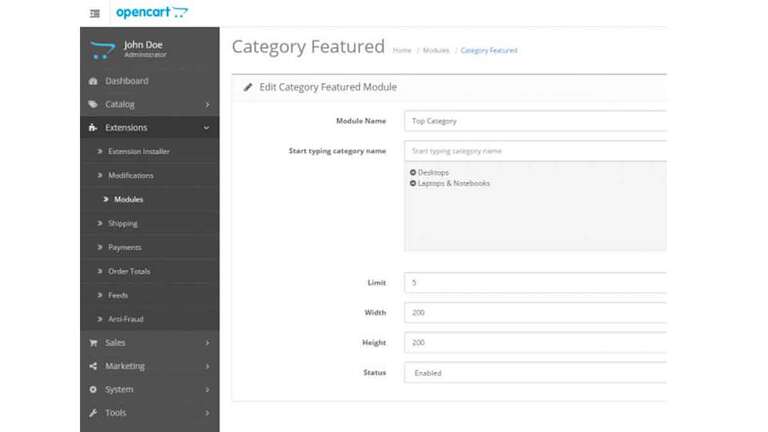
Hope you liked this post, let us know if you have any questions or suggestions, please subscribe to our YouTube Channel for Opencart video tutorials. You can also find us on Twitter and Facebook. Enjoy!

Single Instance module frontend login module, Opencart 3 documentation

In our previous post, we show how to create an admin section of a module in Opencart 3, today in this Opencart documentation we will show you the frontend code of the single instance module, download the login module and install it, and show it in the frontend page.

How to install the login module?

Steps to install Opencart 3 module:

  1. Download the login module

    Once you download the login module, you will see zip file named login-module.ocmod.zip

  2. Upload the zip file from extension installer, refresh in modification and install it

    Go to Admin >> Extensions >> Installer and upload the login-module.ocmod.zip. Then go to Admin >> Extensions >> Modifications and click Refresh button. Then go to Admin >> Extensions >> Extensions >> Choose Module >> find Login module then click the install blue button. Then click the edit button and select status to Enabled and click Save button.

  3. Add to the layout to show in the frontend

    Go to Admin >> Design >> Layouts >> edit one of the layouts, in our case let’s edit the Contact layout. Then add the login module in the left column. Then go to the contact us page and you can see like below:
    Opencart 3 login module

Following are the frontend files for the login module:

  • catalog/language/en-gb/extension/module/login.php
  • catalog/controller/extension/module/login.php
  • catalog/view/theme/default/template/extension/module/login.twig

Let’s start with the Language file admin/language/en-gb/extension/module/login.php, let’s define some variables which are useful for module: https://github.com/rupaknepali/Opencart-free-modules/blob/master/login-module/upload/catalog/language/en-gb/extension/module/login.php

<?php
// Text
$_['text_login']                   = 'Login';
$_['text_register']                = 'Register Account';
$_['text_forgotten']               = 'Forgotten Password';
// Entry
$_['entry_email']                  = 'E-Mail Address';
$_['entry_password']               = 'Password';

Now we work with the controller, open catalog/controller/extension/module/login.php, the code is in the GitHub link https://github.com/rupaknepali/Opencart-free-modules/blob/master/login-module/upload/catalog/controller/extension/module/login.php

<?php
As our file is login.php so Class name is ControllerExtensionModuleLogin which extends the Controller base class
class ControllerExtensionModuleLogin extends Controller {

Create the index method. The Index method is called automatically if no parameters are passed, check this video tutorial for details https://www.youtube.com/watch?v=X6bsMmReT-4. The difference between the single instance and multi-instance module is in the index method, multi-instance module’s index method is like “public function index($setting) {
public function index() {

Loads the language file by which the variables of language file are accessible in twig files
$this->load->language('extension/module/login');

This is to set the value if the customer is logged in or not if the customer is logged in then the value is 1
$data['logged'] = $this->customer->isLogged();

This is to set the form action URL, register link, and forgotten password URL 
$data['action'] = $this->url->link('account/login', '', true);
$data['register'] = $this->url->link('account/register', '', true);
$data['forgotten'] = $this->url->link('account/forgotten', '', true);


This is to set redirect so that when someone is logged in then they will get redirected to that page.
if (isset($this->request->post['redirect']) && (strpos($this->request->post['redirect'], $this->config->get('config_url')) !== false || strpos($this->request->post['redirect'], $this->config->get('config_ssl')) !== false)) {    $data['redirect'] = $this->request->post['redirect'];} elseif (isset($this->session->data['redirect'])) {    $data['redirect'] = $this->session->data['redirect'];    unset($this->session->data['redirect']);} else {    $data['redirect'] = '';}

This is to set the success message
if (isset($this->session->data['success'])) {    $data['success'] = $this->session->data['success'];    unset($this->session->data['success']);} else {    $data['success'] = '';}

To check is there is post value of an email is set, if not then it is empty
if (isset($this->request->post['email'])) {    $data['email'] = $this->request->post['email'];} else {    $data['email'] = '';}

To check is there is post value of an email is set, if not then it is empty
if (isset($this->request->post['password'])) {    $data['password'] = $this->request->post['password'];} else {    $data['password'] = '';}

To load the login view
return $this->load->view('extension/module/login', $data);}
}

With this the controller code is done, now let’s make the catalog/view/theme/default/template/extension/module/login.twig with the following code, GitHub link for the code is https://github.com/rupaknepali/Opencart-free-modules/blob/master/login-module/upload/catalog/view/theme/default/template/extension/module/login.twig

{% if not logged %}
    <div class="well">
        <form action="{{ action }}" method="post" enctype="multipart/form-data">
            <h2>Log in</h2>
            <div class="form-group">
                <label class="control-label" for="input-email">{{ entry_email }}</label>
                <input type="text" name="email" value="{{ email }}" placeholder="{{ entry_email }}" id="input-email" class="form-control"/>
            </div>
            <div class="form-group">
                <label class="control-label" for="input-password">{{ entry_password }}</label>
                <input type="password" name="password" value="{{ password }}" placeholder="{{ entry_password }}" id="input-password" class="form-control"/>
                <a href="{{ forgotten }}">{{ text_forgotten }}</a>
                /
                <a href="{{register}}">{{text_register}}</a>
            </div>
            <input type="submit" value="{{ button_login }}" class="btn btn-primary"/>
            {% if redirect %}
                <input type="hidden" name="redirect" value="{{ redirect }}"/>
            {% endif %}
        </form>
    </div>
{% endif %}

The above code is to show the form, with this login module is done.

Let’s list out the difference between a single instance module and multi-instance module


In our next post, we will start to create the admin section of the multi-instance module.

In this way, you can create a module in the frontend. Let us know if need any support. Hope you liked this post, please subscribe to our YouTube Channel for Opencart video tutorials. You can also find us on Twitter and Facebook.