

In this Opencart tutorial, we show you how to set up taxes with geocodes in Opencart for each product by giving you an example of US taxes for California residents 8.75%. Setting up taxes in OpenCart is essential to ensure compliance with local regulations and accurate pricing for your customers. With OpenCart’s geo zones feature, you can easily configure tax rates based on the geographic locations of your customers. Here’s a step-by-step guide to setting up taxes in OpenCart using geo zones.
Why Use Geo Zones for Tax Setup?
Geo zones in OpenCart allow you to apply specific tax rates based on customer location, which is especially helpful if you operate across multiple regions or countries with varying tax rules. By customizing tax rates per region, you can:
- Ensure Accurate Tax Calculation: Meet tax regulations based on customer locations.
- Simplify Tax Management: Easily manage and update tax settings as needed.
- Enhance Customer Experience: Provide transparency in pricing with region-specific tax rates.
Step-by-Step Guide to Setting Up Taxes with Geo Zones in OpenCart
Let’s dive into setting up taxes in OpenCart by using geo zones.
Step 1: Define Geo Zones for Target Regions
- Go to the OpenCart Admin Dashboard.
- Navigate to System > Localization > Geo Zones.
- Click Add New to create a geo zone.
- Fill in the Geo Zone Name (e.g., “US State Tax” or “EU VAT Zone”) and add a Description.
- Under the Geo Zone tab, click Add Geo Zone.
- Select Country and Region/State to specify the areas this tax rate applies to.
- Save the geo zone.
Repeat this step for each location where you need to apply specific tax rates.
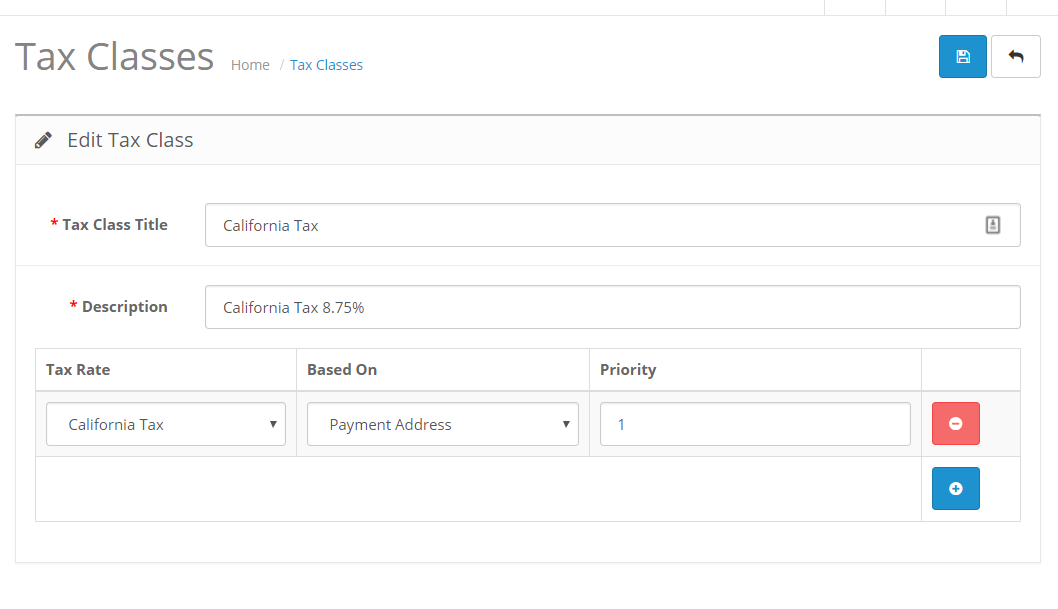
Step 2: Create Tax Classes for Different Products
Tax classes help apply tax rates to various product types. To create tax classes:
- Go to System > Localization > Tax Classes.
- Click Add New to create a tax class.
- Enter the Tax Class Title (e.g., “Standard Tax,” “Reduced Tax”).
- In the Tax Rate section, specify:
- Priority: Set a priority level if you have multiple tax rates.
- Geo Zone: Select the geo zone to apply to this tax rate.
- Save the tax class.
Step 3: Define Tax Rates
- Go to System > Localization > Tax Rates.
- Click Add New to create a new tax rate.
- Fill in the following:
- Tax Name: Give it a descriptive name, like “California Sales Tax.”
- Rate: Enter the percentage of the tax rate (e.g., “8.5”).
- Type: Select Percentage for most tax setups.
- Geo Zone: Choose the geo zone you created earlier.
- Save the tax rate.
Repeat for each tax rate that corresponds to your geo zones.
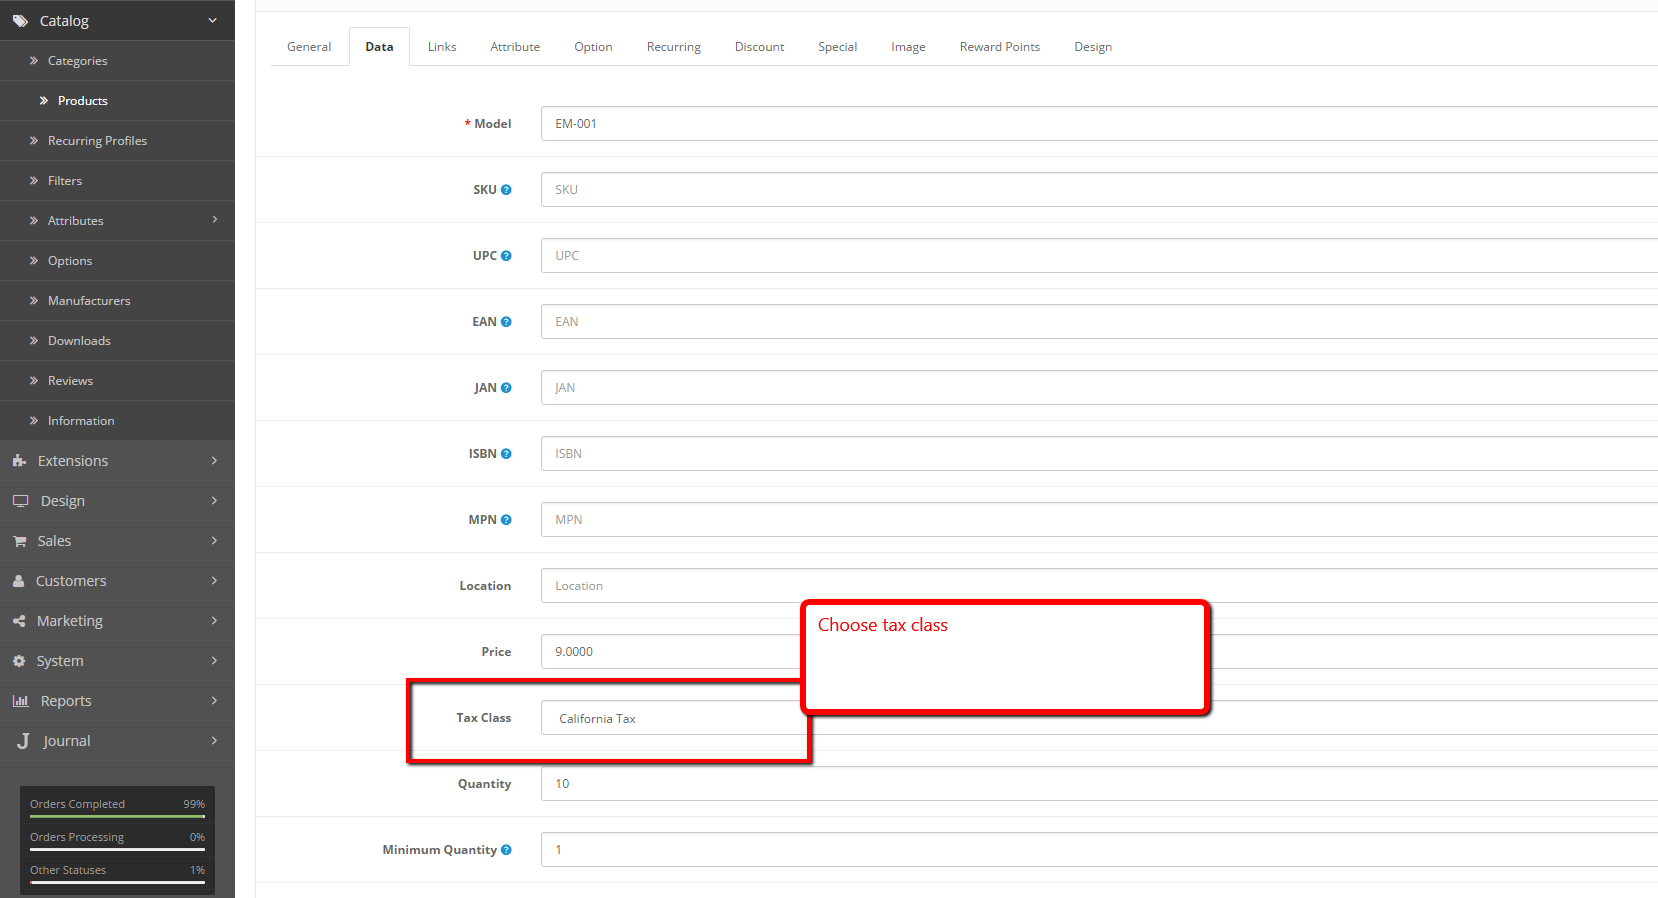
Step 4: Apply Tax Classes to Products
- Go to Catalog > Products in the OpenCart Admin Dashboard.
- Edit the product to which you want to apply the tax class.
- In the Data tab, locate the Tax Class dropdown.
- Select the appropriate tax class (e.g., “Standard Tax” or “Reduced Tax”).
- Save your changes.
Step 5: Configure Store Tax Settings
For OpenCart to apply the correct tax rates based on geo zones, check your tax settings:
- Go to System > Settings > Edit for your store.
- In the Options tab, set the following:
- Display Prices With Tax: Choose Yes if you want product prices to include taxes.
- Calculate Taxes Based On: Select the Shipping Address or Payment Address depending on your tax regulations.
- Use Store Tax Address: Choose whether to use the store’s location for tax calculations on non-shipping orders.
Step 6: Test the Tax Setup
Place a test order to confirm that taxes are calculated correctly based on the customer’s address. Ensure that products display tax-inclusive prices (if configured), and verify that different addresses in your geo zones reflect the accurate tax rates.
Need to set up US Taxes for California residents where CA Tax is 8.75%.
- Login to Admin
- Go to Left Menu >> System >> Localisation >> Geo Zones >> Click Add button, then fill as in the image below:

- Go to Left Menu >> System >> Localisation >> Taxes >> Tax Rates >> Click Add button, then fill as in the image below:

- Go to Left Menu >> System >> Localisation >> Taxes >> Tax Classes >> Click Add button, then fill as in the image below:
- Please choose the Payment Address or Shipping Address as per your need.
- Now go to Catalog >> Products >> Add/Edit your product >> Choose the Tax Class:
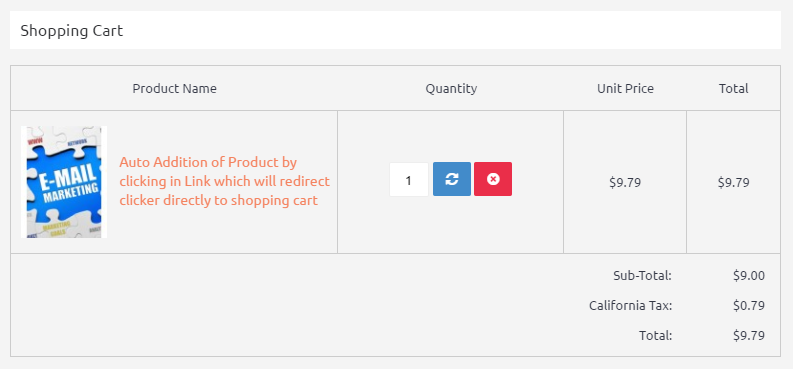
- In the checkout section tax is applied when your payment address’s state is California:
Conclusion
Configuring taxes in OpenCart using geo zones allows you to automate tax calculations accurately across various regions. By following this setup, you ensure compliance and transparency with customer pricing, enhancing both store management and customer experience. With OpenCart’s flexibility, you can adapt to regional tax changes easily and continue to scale your business globally. In this way, you can set up taxes with geocodes in Opencart. Let us know if need any support. Hope you liked this post, please subscribe to our YouTube Channel for Opencart video tutorials. You can also find us on Twitter and Facebook.