Opencart Module Development: Single Instance module, Form creation, validation, and submission to the database

This Opencart tutorial is to learn about the single instance and multi-instance module and create admin section for single instance by creating the form in the admin, validate the form data and submit, edit or add data to the database. In our last two posts, we show the hello world module workflow and the basic hello world module in OpenCart, now we are showing how to create the form, validate it and submit it to the database.

We show you the way to show the simple text in our previous hello world module in Opencart. Now, let’s start with the normal flow that happens from frontend to backend:

  1. User logged into the Admin section
  2. They go to Admin >> Extensions >> Extensions >> Choose Modules >> Then edit the module
  3. After clicking the edit they will see a form
  4. They enter the data and click save or cancel button.
  5. If clicked cancel button then returns to the module listing page
  6. If clicked save button then first it will validate the permission of the user if they can have modified permission
  7. Then we check the data if it is POST or not and if it is POST then we save into database.
  8. While saving the module data in the database, there are two ways as Opencart support two modules way:
    1. One way is a single instance
    2. Another way is multi-instance

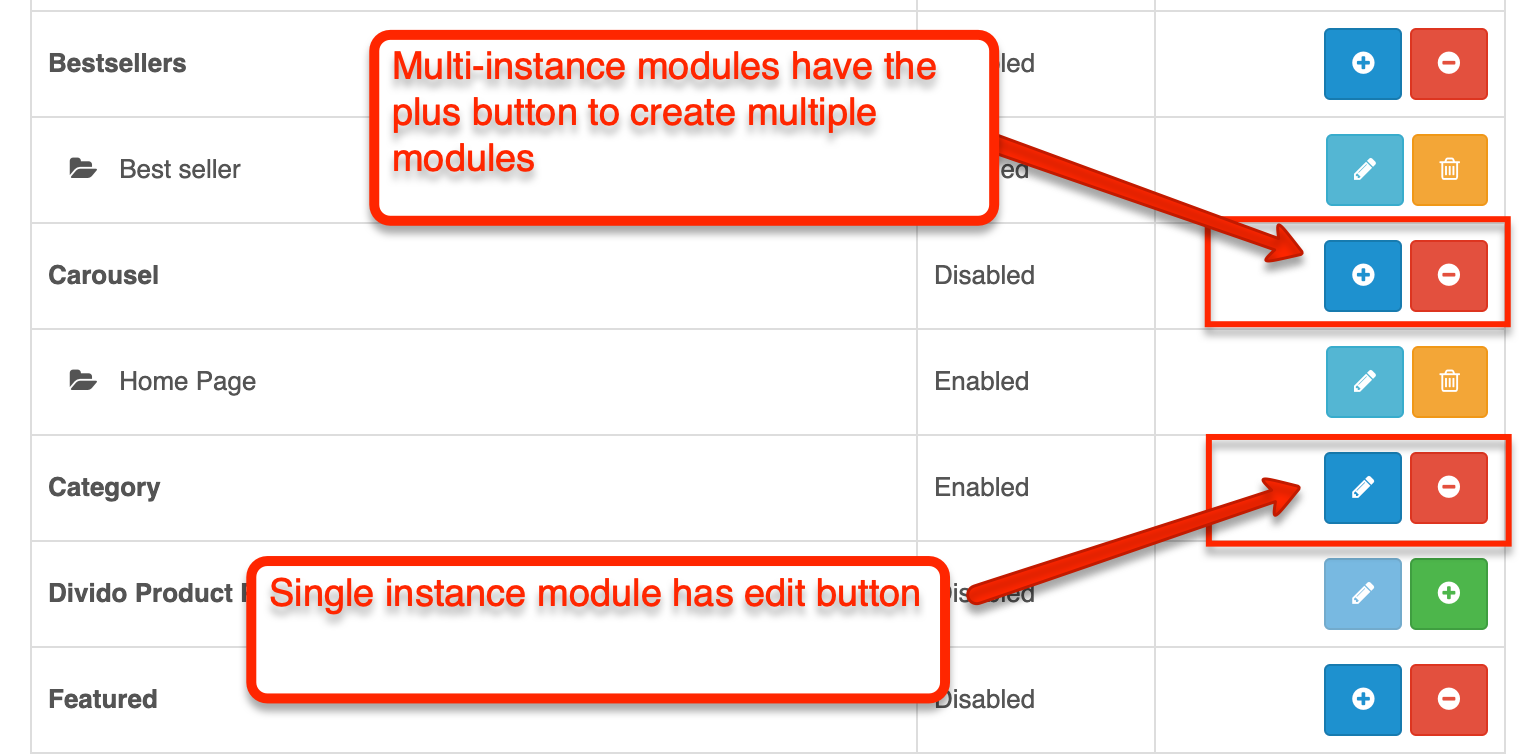
      Single vs Multi instance opencart module
  9. Single instance module means it has one module only, install, edit and save the same module and use the same module in different layouts. It will not create another instance of modules. Example of core available only one instance Opencart module are: Account module, Category module, Information module, etc
  10. Multi-instance module created multiple instances. Each is taken as a different module instance and can be used different in layouts. Example of core available multi-instance Opencart modules is: Banner module, Bestsellers module, Carousel module, Featured module, latest module, a slideshow module, special module, etc.
  11. Once we save the data to the database and then add them to the layout and they are ready to show in the frontend.

In this blog post, we show you how to create a single instance Opencart module admin section and in the upcoming post, we will show you the frontend or catalog code of login module. Let’s create a module that shows the login form in the layout of the frontend.

Following are the files that we need to create:

  • admin/language/en-gb/extension/module/login.php
  • admin/controller/extension/module/login.php
  • admin/view/template/extension/module/login.twig
  • catalog/controller/extension/module/login.php
  • catalog/language/en-gb/extension/module/login.php
  • catalog/view/theme/default/template/extension/module/login.twig

First, let’s work on Language file admin/language/en-gb/extension/module/login.php, let’s define some variables which are useful for module: https://github.com/rupaknepali/Opencart-free-modules/blob/master/login-module/upload/admin/language/en-gb/extension/module/login.php

<?php
// Heading
$_['heading_title']    = 'Login';
// Text
$_['text_extension']   = 'Extensions';
$_['text_success']     = 'Success: You have modified Login module!';
$_['text_edit']        = 'Edit Login Module';
// Entry
$_['entry_status']     = 'Status';
// Error
$_['error_permission'] = 'Warning: You do not have permission to modify Login module!';

These are normal variables we defined, you can define as much as you can as per your need.

Second, open admin/controller/extension/module/login.php, you can see the code at this GitHub link: https://github.com/rupaknepali/Opencart-free-modules/blob/master/login-module/upload/admin/controller/extension/module/login.php We are defining the code below:

<?php
//As our file is login.php so Class name is ControllerExtensionModuleLogin which extends the Controller base class
class ControllerExtensionModuleLogin extends Controller {

//Declaration of the private property ‘error’ so that we can get check if any error occurs in the whole class.
private $error = array();

//Create an index method. The index method is called automatically if no parameters are passed, check this video tutorial for details https://www.youtube.com/watch?v=X6bsMmReT-4
public function index() {

//Loads the language file by which the variables of language file are accessible in twig files
$this->load->language('extension/module/login');

//Set the Document title
$this->document->setTitle($this->language->get('heading_title'));

//Loads the model admin/model/setting/setting.php so that we can use the methods defined there.
$this->load->model('setting/setting');

//This is how we check if it is form submit. When we submit the form then this block of code also runs. Then it also validates the modify permission and other validation.
if (($this->request->server['REQUEST_METHOD'] == 'POST') && $this->validate()) {

//Look at this line of code, this is the code section which distinguish from Single Instance to Multi Instance. If it is multi instance then it will look like below instead of editSetting it will be addModule and editModule and setting module model is called above.
//
if (!isset($this->request->get[‘module_id’])) {
//
$this->model_setting_module->addModule(‘bestseller’, $this->request->post);
//
} else {
//
$this->model_setting_module->editModule($this->request->get[‘module_id’], $this->request->post);
//
}
//This editSetting save the data to oc_setting database table, see module_ is important else it will not be saved. If you are //creating shipping extension then it should be shipping_, for payment extension it should be payment_

$this->model_setting_setting->editSetting('module_login', $this->request->post);
//This set the success message in the session.
$this->session->data['success'] = $this->language->get('text_success');
//This is to redirect to the extensions page.
$this->response->redirect($this->url->link('marketplace/extension', 'user_token=' . $this->session->data['user_token'] . '&type=module', true));
}

//This is to check if there are any warnings
if (isset($this->error['warning'])) {
$data['error_warning'] = $this->error['warning'];
} else {
$data['error_warning'] = '';
}

//Following are for breadcrumbs
$data['breadcrumbs'] = array();
$data['breadcrumbs'][] = array(
'text' => $this->language->get('text_home'),
'href' => $this->url->link('common/dashboard', 'user_token=' . $this->session->data['user_token'], true)
);
$data['breadcrumbs'][] = array(
'text' => $this->language->get('text_extension'),
'href' => $this->url->link('marketplace/extension', 'user_token=' . $this->session->data['user_token'] . '&type=module', true)
);
$data['breadcrumbs'][] = array(
'text' => $this->language->get('heading_title'),
'href' => $this->url->link('extension/module/login', 'user_token=' . $this->session->data['user_token'], true)
);

//Form action URL
$data['action'] = $this->url->link('extension/module/login', 'user_token=' . $this->session->data['user_token'], true);

//Form cancel URL
$data['cancel'] = $this->url->link('marketplace/extension', 'user_token=' . $this->session->data['user_token'] . '&type=module', true);

//This is to check what we fill out in the form, whether the status is Enabled or Disabled. If it is the loading time then it gets the //config value which we store in the oc_setting database table.
if (isset($this->request->post['module_login_status'])) {
$data['module_login_status'] = $this->request->post['module_login_status'];
} else {
$data['module_login_status'] = $this->config->get('module_login_status');
}

//This is how we load the header, column left and footer
$data['header'] = $this->load->controller('common/header');
$data['column_left'] = $this->load->controller('common/column_left');
$data['footer'] = $this->load->controller('common/footer');

//This is to set output data variables to the view or twig files and twig file is loaded and HTML rendering is done with it.
$this->response->setOutput($this->load->view('extension/module/login', $data));
}

//This is how validation is done, we check whether the user has permission to modify or not.
//If you want to validate the form data then you can check it here as well.
//If there is error then $this->error[‘warning’] is set and warning are shown.
protected function validate() {
if (!$this->user->hasPermission('modify', 'extension/module/login')) {
$this->error['warning'] = $this->language->get('error_permission');
}
return !$this->error;
}

//Closing of the Class
}

Like this way we write the code in the controller, so distinguishing difference for single instance and multi-instance is how it saves data in the database, for single instance it uses model setting setting and editSetting method and save data at oc_setting database table.

Third, open admin/view/template/extension/module/login.twig and have a look at the following code, here we create the form and other layouts. https://github.com/rupaknepali/Opencart-free-modules/blob/master/login-module/upload/admin/view/template/extension/module/login.twig

{{ header }}{{ column_left }}
<div id="content">
    <div class="page-header">
        <div class="container-fluid">
            <div class="pull-right">
                <button type="submit" form="form-module" data-toggle="tooltip" title="{{ button_save }}" class="btn btn-primary">
                    <i class="fa fa-save"></i>
                </button>
                <a href="{{ cancel }}" data-toggle="tooltip" title="{{ button_cancel }}" class="btn btn-default">
                    <i class="fa fa-reply"></i>
                </a>
            </div>
            <h1>{{ heading_title }}</h1>
            <ul class="breadcrumb">
                {% for breadcrumb in breadcrumbs %}
                    <li>
                        <a href="{{ breadcrumb.href }}">{{ breadcrumb.text }}</a>
                    </li>
                {% endfor %}
            </ul>
        </div>
    </div>
    <div class="container-fluid">
        {% if error_warning %}
            <div class="alert alert-danger alert-dismissible">
                <i class="fa fa-exclamation-circle"></i>
                {{ error_warning }}
                <button type="button" class="close" data-dismiss="alert">×</button>
            </div>
        {% endif %}
        <div class="panel panel-default">
            <div class="panel-heading">
                <h3 class="panel-title">
                    <i class="fa fa-pencil"></i>
                    {{ text_edit }}</h3>
            </div>
            <div class="panel-body">
                <form action="{{ action }}" method="post" enctype="multipart/form-data" id="form-module" class="form-horizontal">
                    <div class="form-group">
                        <label class="col-sm-2 control-label" for="input-status">{{ entry_status }}</label>
                        <div class="col-sm-10">
                            <select name="module_login_status" id="input-status" class="form-control">
                                {% if module_login_status %}
                                    <option value="1" selected="selected">{{ text_enabled }}</option>
                                    <option value="0">{{ text_disabled }}</option>
                                {% else %}
                                    <option value="1">{{ text_enabled }}</option>
                                    <option value="0" selected="selected">{{ text_disabled }}</option>
                                {% endif %}
                            </select>
                        </div>
                    </div>
                </form>
            </div>
        </div>
    </div>
</div>
{{ footer }}

All others are similar, check <select name="module_login_status" the name you are using for the field should start with module_ for the single instance module.

Like this way, you can create the form in the admin section, validate the form data, validate the permission, and save the data to the database in the setting database table. Hope you liked this article, please subscribe to our YouTube Channel for Opencart video tutorials. You can also find us on Twitter and Facebook.
Duplicate Products are added in Opencart – submitting the same form twice

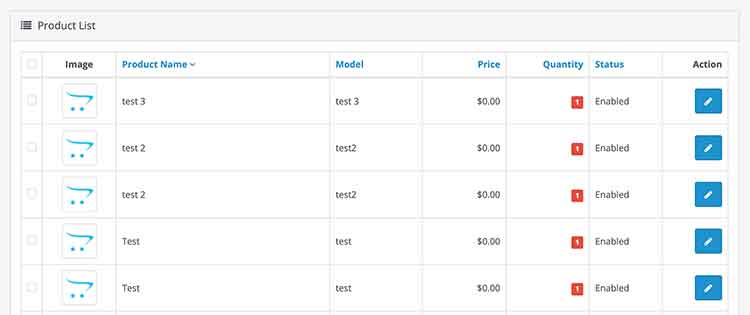
We are seeing issues in the Chrome browser for Opencart that it is adding duplicate products while adding the products, it looks like it is submitting the same form twice. We just commented on the form submission for the IE browser and it is not submitting duplicate products.

Duplicate products issues on Opencart

Go to admin/view/javascript/common.js and find the following lines of code:

$(document).ready(function() {
	//Form Submit for IE Browser
	$('button[type=\'submit\']').on('click', function() {
		$("form[id*='form-']").submit();
	});

Then comment out like below:

$(document).ready(function() {
	//Form Submit for IE Browser
	// $('button[type=\'submit\']').on('click', function() {
	// 	$("form[id*='form-']").submit();
	// });

After commenting on those lines of code it is not submitting the product twice, so there are no duplicate products inserted. We tested with test 3 products as in the above image.

Please don’t forget to post your questions or comments so that we can add extra topics. You can follow us at our twitter account @rupaknpl and subscribe to our YouTube channel for opencart tutorials.

How to easily set up Cloudflare for eCommerce websites like Opencart?

In this tutorial, we set up Cloudflare CDN for eCommerce websites like Opencart, three steps are: first create a Cloudflare account, add a website domain in the Cloudflare dashboard, and change the DNS records of your domain. We show you how to fix the SSL issues that we face in Cloudflare, how to connect to FTP after Cloudflare is set up, and finally, how to log the real visitors’ IP rather than the Cloudflare IP.

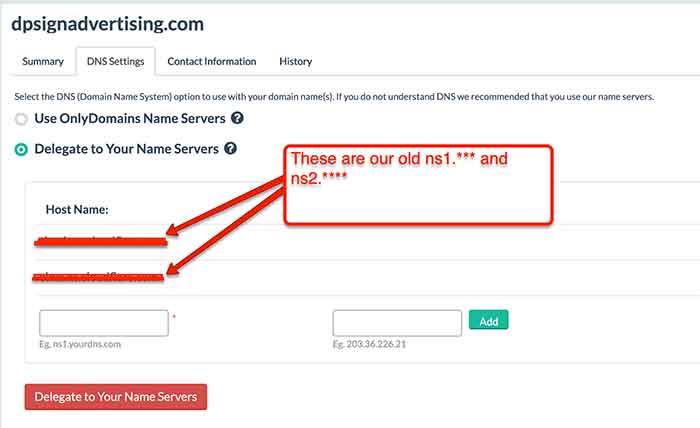
Let’s take an example of https://dpsignadvertising.com where we install Opencart, register this domain at onlydomains.com, and delegate to name servers:

Delegate to your name servers

It is similar in your DNS settings also, mostly we point to servers ns1 and ns2.

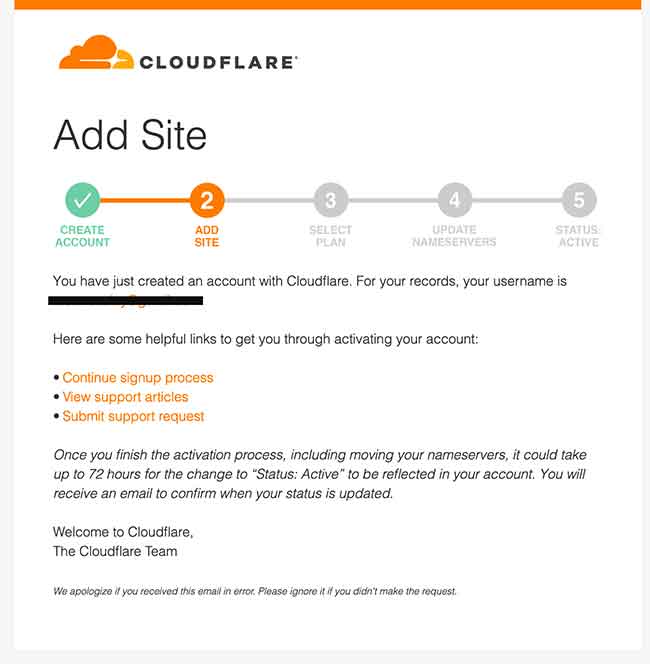
Let’s create a Cloudflare account

Cloudflare email to setup

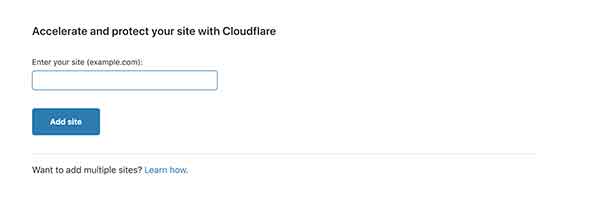
Now is the time to add a domain to Cloudflare

If you were following the steps while registering an account, then it will directly take you to add the site.

  • Log in to your Cloudflare account.
  • Click on Add Site from the top navigation bar.
    Add new site in cloudflare
  • Enter your website URL and then click “Add Site”.
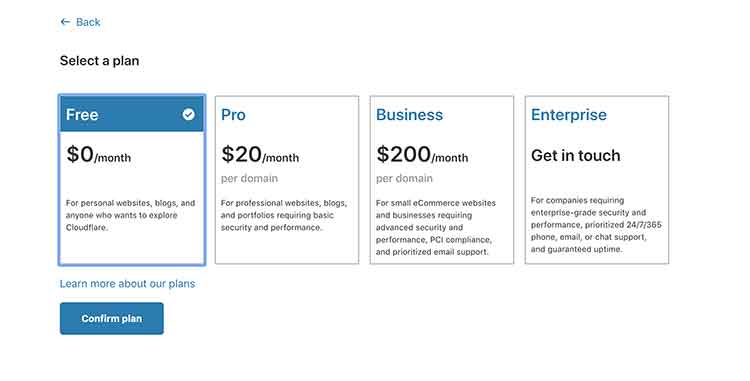
  • Then you need to select the plan as per your needs. We are using a free plan. Select the free plan and click “Confirm plan.”
    Cloudflare free plan
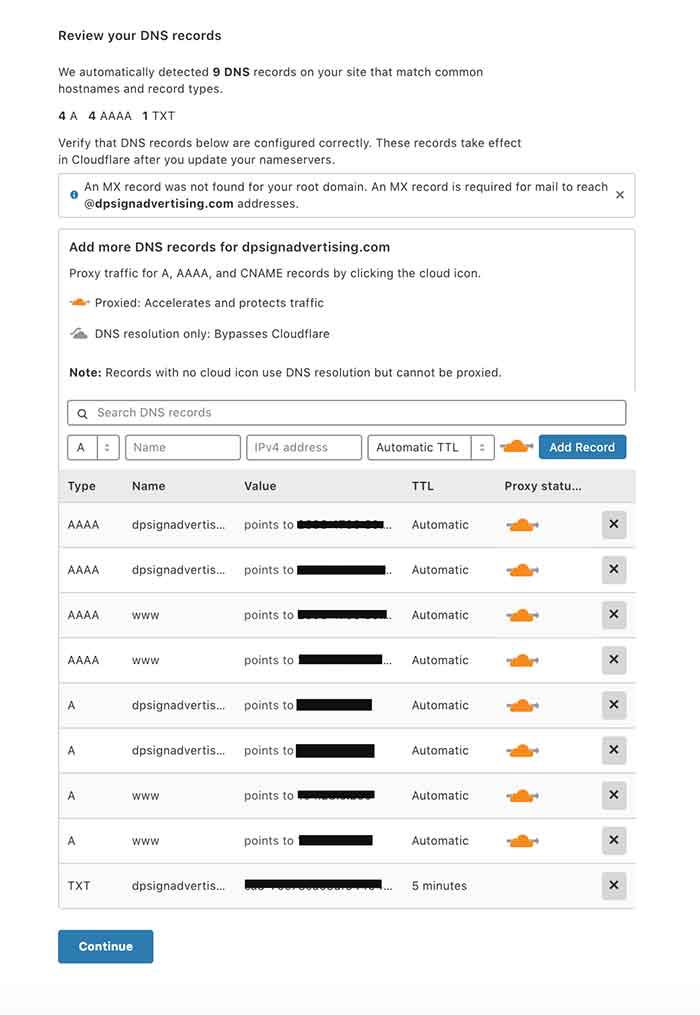
  • Now Cloudflare attempts to automatically identify your DNS records and shows lists of DNS results, for dpsignadvertising.com it is showing as in the image:
    DNS record cloudflare
    Be careful and check for missing DNS records, mostly MX records, if you have set up. Then, click Continue.
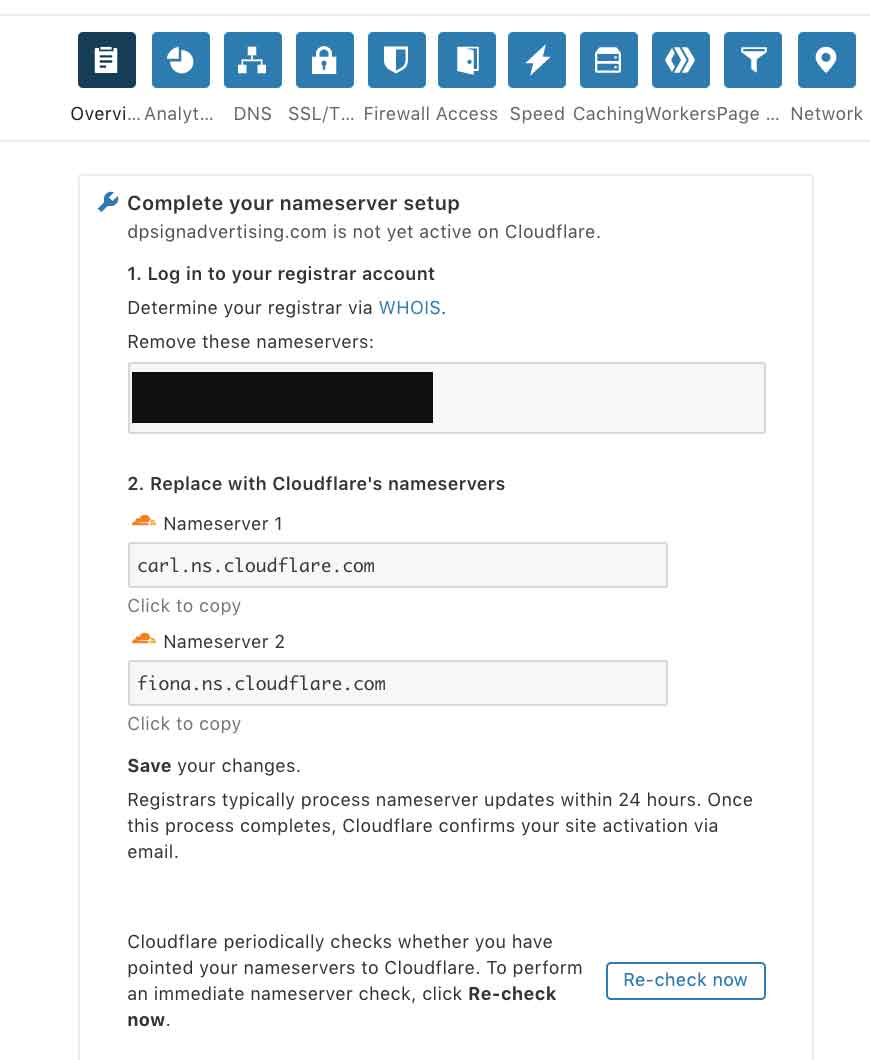
  • Now you will see the NS records of Cloudflare:
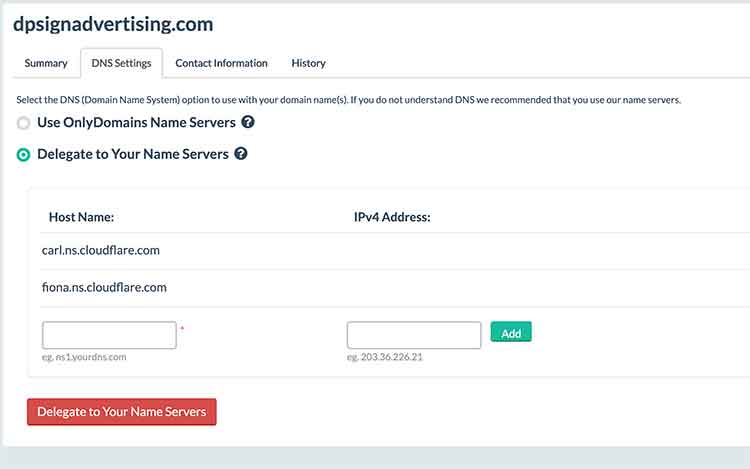
  • Now, log in to the domain registrar, in our case is onlydomains.com, and we change the NS1 and NS2, now it looks like in the image below:
    NS changed as cloudflare
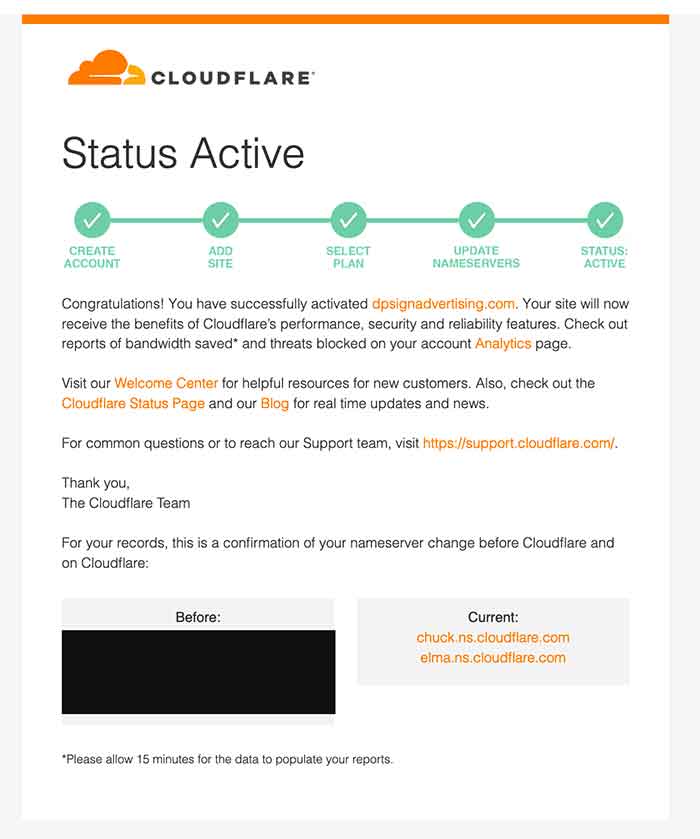
  • Once you click “Delegate to your Name Servers”, it sometimes takes up to 24 hours to 48 hours. In our case, it was done within 10mins and we received an email like below:
    Setup complete cloudflare Opencart
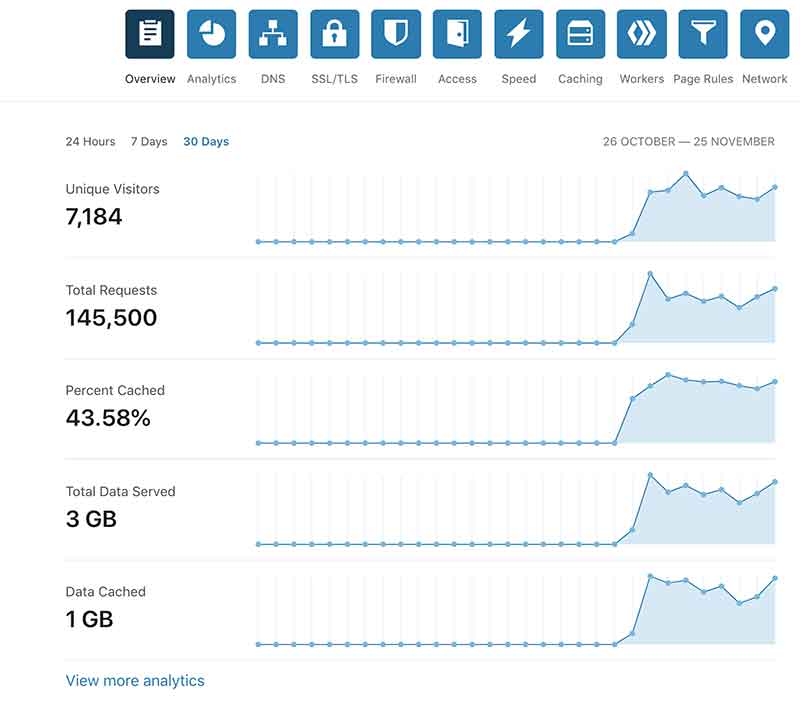
  • Once you get an email, your Cloudflare is active, and you can see the active status in the Cloudflare admin. Similarly, you can see the analytics that it is serving.
    Cloudflare analytics in dashboard

How to solve the SSL issue of Cloudflare?

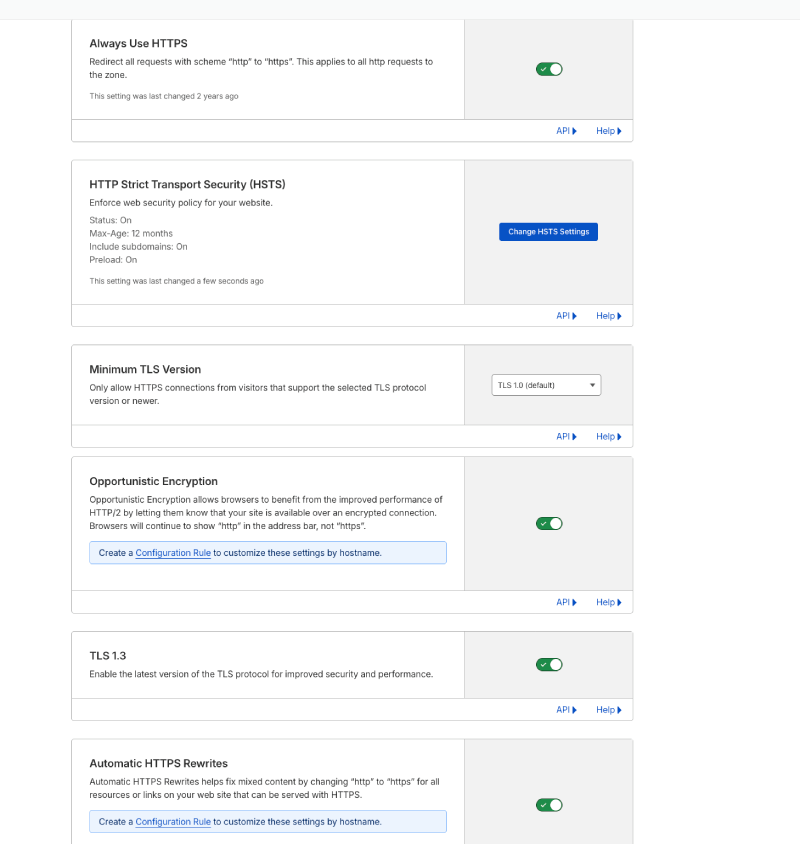
Go to Cloudflare Dashboard >> Click SSL/TLS >> Edge Certificates >> Then toggle to ON for “Always Use HTTPS”

SSL TLS HSTS

Then the SSL issues are resolved.

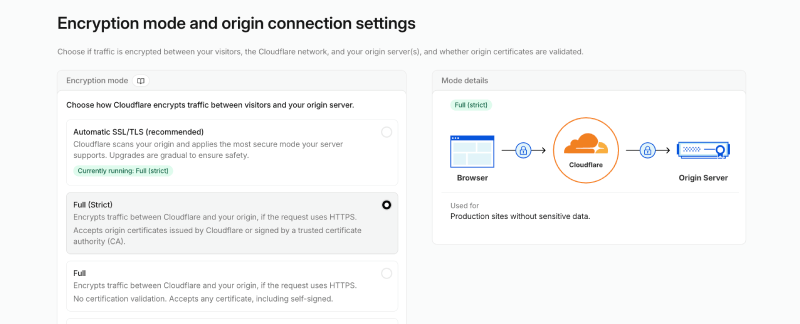
As most servers support SSL, it is best to use the Full (Strict) SSL for Encryption mode and origin connection settings

SSL Cloudflare Opencart

Cloudflare FTP issues?

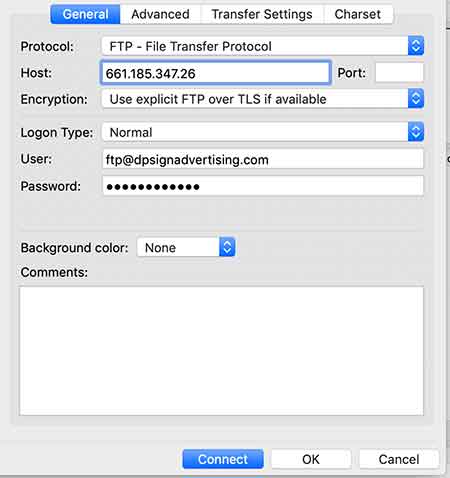
The solution to FTP Cloudflare issues: With Cloudflare set up, you will not be able to connect to your FTP with the domain name, so you need to use the IP of your server. You can find the Cloudflare Dashboard >> DNS >>, then find the FTP IP or your website URL IP.

Solution to FTP cloudflare issues

Get the actual visitors’ IP address rather than the Cloudflare IP address in Opencart

If you are using Google Analytics, then you may see the same Cloudflare IP address as the visitor’s IP address, as all IPs are proxied by Cloudflare. Sometimes, the Payment gateway may block all the payments, as well as see the same IP ordering the products, which may create suspicious activities, so to fix that, you need to add the following code at the top of index.php

if (isset($_SERVER["HTTP_CF_CONNECTING_IP"])) {
  $_SERVER['REMOTE_ADDR'] = $_SERVER["HTTP_CF_CONNECTING_IP"];
}

Cloudflare can be used on any website, so it does not stick to Opencart. With the above, you can enable Cloudflare on any website. It is the same case for the Opencart, we also installed Cloudflare in our webocreation.com blog and see a good improvement in site speed. You can hire us directly or can hire the top 3% of Freelance Cloudflare Experts.

We hope this helps someone to set up Cloudflare properly and easily in Opencart. Please don’t forget to post your questions or comments so that we can add extra topics. You can follow us on our Twitter account @rupaknpl and subscribe to our YouTube channel for opencart tutorials.

Full webpage screenshot chrome with two commands – easiest way

1

The easiest and fastest way to take the full webpage screenshot in chrome without the extension and just two commands is below:

  • Click “Option + Command + J”
  • Then click “Command + Shift + P”
  • Type “Capture full-size screenshot” and click it, your full screenshot will be captured and downloaded

Above is the Mac command, in Windows, it is similar just use Ctrl instead of Command and Alt instead of Option.

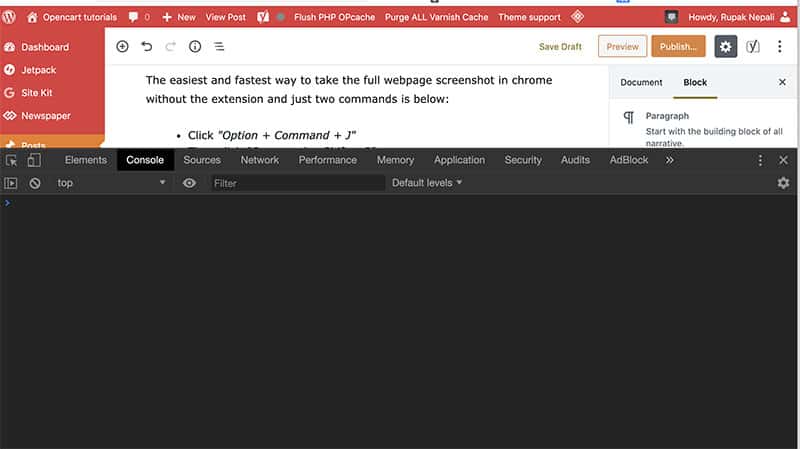
When you click the “Option + Command + J” it opens developer console:

open chrome console developer

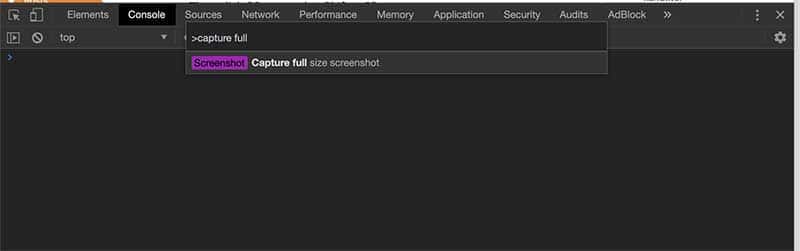
Then click “Command + Shift + P” to open the input box and start to type full size to run command and you will see like below:

Capture full size screenshot

Click it and your fullscreen webpage is captured and downloaded.

We hope this help someone to take the full page screen capture in chrome easily. Please don’t forget to post your questions or comments so that we can add extra topics. You can follow us at our twitter account @rupaknpl and subscribe to our YouTube channel for opencart tutorials.

Show top popular posts in categories wise by widgets in WordPress

This WordPress plugin “Category Popular Posts” is to show category wise top popular posts in a widget. The widget has options to add a description, limit the number of posts, an option to show date or not, an option to show the author or not, and an option to show the featured image or not.

Installation:

  • Download from the above link and got to WordPress admin >> Plugins >> Add Plugin and upload the downloaded zip file “category-popular-posts.zip“.
  • Then go to Appearance >> Widgets >> Add the “Category wise Popular posts” widgets to the widgets places like in the sidebar.

Settings:

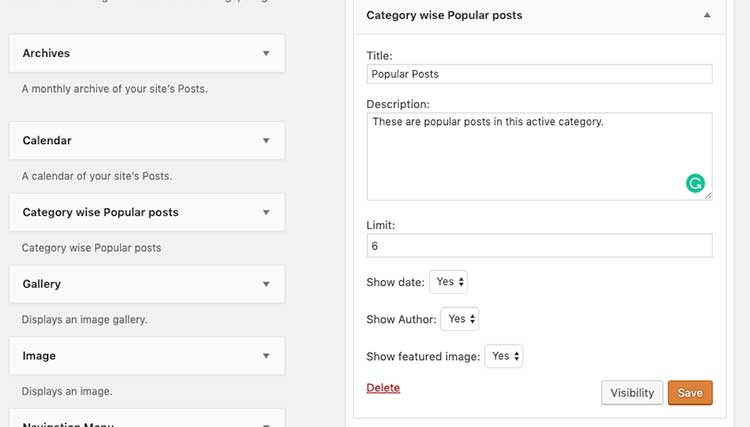
Enter title, if needed description, number of posts to show here in our example it is 6, choose an option Yes or no to show date, author and featured image, click save and done.

Category wise popular posts wordpress

Frontend view:

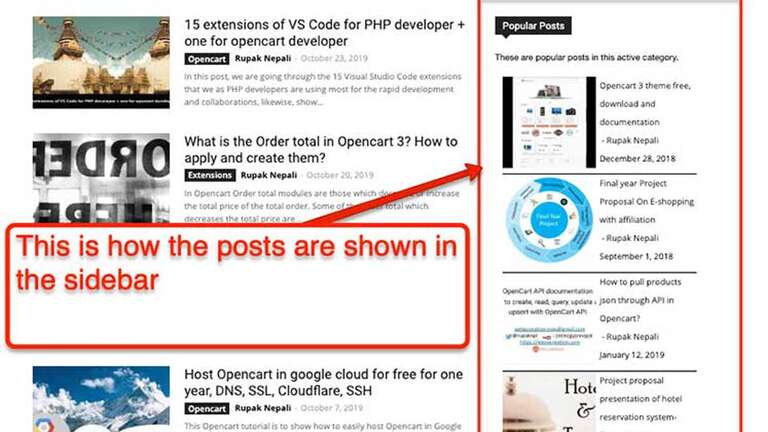
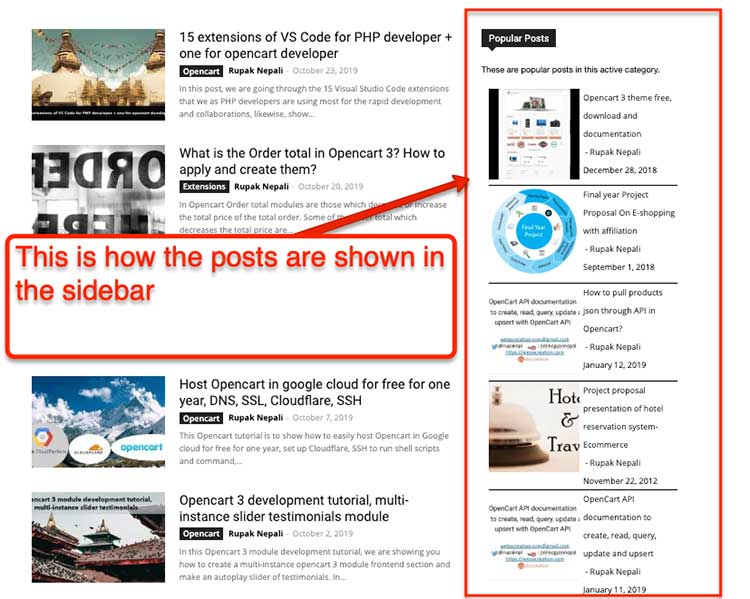
It displays popular posts of the category in the categories pages, and on the posts page, it displays the popular posts of the active post’s category posts.

frontend view category wise popular posts

CSS change:

You can make the CSS changes for the following CSS classes to match your theme design:

  1. .post-image: for the image
  2. .post-content: for the content
  3. For others just target as per your need.

The code is written as below:

<?php
/**
 * Plugin Name: Category Popular Posts
 * Description: Categories wise Popular Posts.
 * Plugin URI: https://webocreation.com
 * Author: Rupak Nepali
 * Author URI: https://webocreation.com
 * Version: 1.0
 * License: GPLv2 or later
 *
 */

// Adds widget: Categories Wise Popular Posts
class Categorywisepopularp_Widget extends WP_Widget
{
    public function __construct()
    {
        parent::__construct(
            'categorywisepopularp_widget',
            esc_html__('Category wise Popular posts', 'textdomain')
        );
    }
    private $widget_fields = array(
        array(
            'label' => 'Description',
            'id' => 'description_textarea',
            'type' => 'textarea',
        ),
        array(
            'label' => 'Limit',
            'id' => 'limit_number',
            'type' => 'number',
        ),
        array(
            'label' => 'Show date',
            'id' => 'showdate_select',
            'type' => 'select',
            'options' => array(
                'Yes',
                'No',
            ),
        ),
        array(
            'label' => 'Show Author',
            'id' => 'showauthor_select',
            'type' => 'select',
            'options' => array(
                'Yes',
                'No',
            ),
        ),
        array(
            'label' => 'Show featured image',
            'id' => 'showfeaturedima_select',
            'type' => 'select',
            'options' => array(
                'Yes',
                'No',
            ),
        ),
    );
    public function widget($args, $instance)
    {
        if (!isset($args['widget_id'])) {
            $args['widget_id'] = $this->id;
        }
        $title = (!empty($instance['title'])) ? $instance['title'] : __('Recent Posts');
        /** This filter is documented in wp-includes/widgets/class-wp-widget-pages.php */
        $title = apply_filters('widget_title', $title, $instance, $this->id_base);
        $number = (!empty($instance['limit_number'])) ? absint($instance['limit_number']) : 5;
        if (!$number) {
            $number = 5;
        }
        $show_date = isset($instance['showdate_select']) ? $instance['showdate_select'] : false;
        $r = new WP_Query(
            apply_filters(
                'widget_posts_args',
                array(
                    'meta_key' => 'post_views_count',
                    'cat' => get_query_var('cat'),
                    'orderby' => 'meta_value_num',
                    'posts_per_page' => $number,
                    'no_found_rows' => true,
                    'post_status' => 'publish',
                    'ignore_sticky_posts' => true,
                ),
                $instance
            )
        );
        if (!$r->have_posts()) {
            return;
        }
        echo $args['before_widget'];
        if ($title) {
            echo $args['before_title'] . $title . $args['after_title'];
        }
        echo '<p>' . $instance['description_textarea'] . '</p>';
        echo "<style>.post-image{ float:left; width:50%;}.post-content{float:right; width:50%;}</style>";
        echo '<ul>';
        foreach ($r->posts as $recent_post):
            $post_title = get_the_title($recent_post->ID);
            $p_title = (!empty($post_title)) ? $post_title : __('(no title)');
            echo "<li>";
            if ($instance['showfeaturedima_select'] == "Yes") {
                echo "<div class='post-image'><a href='" . esc_url(get_permalink($recent_post->ID)) . "' rel='bookmark'  title='" . $recent_post->post_title . "'><img class='category-popular-posts-image' src='" . get_the_post_thumbnail_url($recent_post->ID, 'thumbnail', 'full') . "' alt='" . $recent_post->post_title . "'></a></div>";
            }
            echo "<div class='post-content'><a href='" . esc_url(get_permalink($recent_post->ID)) . "' rel='bookmark' title='" . $recent_post->post_title . "'>" . $recent_post->post_title . "</a>";
            if ($instance['showauthor_select'] == "Yes") {
                echo "<br> - <a href='" . esc_url(get_author_posts_url($recent_post->post_author)) . "'>" .
                get_the_author_meta('display_name', $recent_post->post_author) . "</a>";
            }
            if ($instance['showdate_select'] == "Yes") {
                echo "<br><span class='post-date'>" . get_the_date('', $recent_post->ID) . "</span>";
            }
            echo "</div>";
            echo "<div style='clear:both;'></div>";
            echo "</li>";
        endforeach;
        echo "</ul>";
        echo $args['after_widget'];
    }
    public function field_generator($instance)
    {
        $output = '';
        foreach ($this->widget_fields as $widget_field) {
            $default = '';
            if (isset($widget_field['default'])) {
                $default = $widget_field['default'];
            }
            $widget_value = !empty($instance[$widget_field['id']]) ? $instance[$widget_field['id']] : esc_html__($default, 'textdomain');
            switch ($widget_field['type']) {
                case 'textarea':
                    $output .= '<p>';
                    $output .= '<label for="' . esc_attr($this->get_field_id($widget_field['id'])) . '">' . esc_attr($widget_field['label'], 'textdomain') . ':</label> ';
                    $output .= '<textarea class="widefat" id="' . esc_attr($this->get_field_id($widget_field['id'])) . '" name="' . esc_attr($this->get_field_name($widget_field['id'])) . '" rows="6" cols="6" value="' . esc_attr($widget_value) . '">' . $widget_value . '</textarea>';
                    $output .= '</p>';
                    break;
                case 'select':
                    $output .= '<p>';
                    $output .= '<label for="' . esc_attr($this->get_field_id($widget_field['id'])) . '">' . esc_attr($widget_field['label'], 'textdomain') . ':</label> ';
                    $output .= '<select id="' . esc_attr($this->get_field_id($widget_field['id'])) . '" name="' . esc_attr($this->get_field_name($widget_field['id'])) . '">';
                    foreach ($widget_field['options'] as $option) {
                        if ($widget_value == $option) {
                            $output .= '<option value="' . $option . '" selected>' . $option . '</option>';
                        } else {
                            $output .= '<option value="' . $option . '">' . $option . '</option>';
                        }
                    }
                    $output .= '</select>';
                    $output .= '</p>';
                    break;
                default:
                    $output .= '<p>';
                    $output .= '<label for="' . esc_attr($this->get_field_id($widget_field['id'])) . '">' . esc_attr($widget_field['label'], 'textdomain') . ':</label> ';
                    $output .= '<input class="widefat" id="' . esc_attr($this->get_field_id($widget_field['id'])) . '" name="' . esc_attr($this->get_field_name($widget_field['id'])) . '" type="' . $widget_field['type'] . '" value="' . esc_attr($widget_value) . '">';
                    $output .= '</p>';
            }
        }
        echo $output;
    }
    public function form($instance)
    {
        $title = !empty($instance['title']) ? $instance['title'] : esc_html__('', 'textdomain');
        ?>
<p>
    <label
        for="<?php echo esc_attr($this->get_field_id('title')); ?>"><?php esc_attr_e('Title:', 'textdomain');?></label>
    <input class="widefat" id="<?php echo esc_attr($this->get_field_id('title')); ?>"
        name="<?php echo esc_attr($this->get_field_name('title')); ?>" type="text"
        value="<?php echo esc_attr($title); ?>">
</p>
<?php
$this->field_generator($instance);
    }
    public function update($new_instance, $old_instance)
    {
        $instance = array();
        $instance['title'] = (!empty($new_instance['title'])) ? strip_tags($new_instance['title']) : '';
        foreach ($this->widget_fields as $widget_field) {
            switch ($widget_field['type']) {
                default:
                    $instance[$widget_field['id']] = (!empty($new_instance[$widget_field['id']])) ? strip_tags($new_instance[$widget_field['id']]) : '';
            }
        }
        return $instance;
    }
}
function register_categorywisepopularp_widget()
{
    register_widget('Categorywisepopularp_Widget');
}
add_action('widgets_init', 'register_categorywisepopularp_widget');

Please let us know if you have any suggestions or requirements, you can also find us on Twitter and Facebook. Enjoy!

15 extensions of VS Code for PHP developer + one for opencart developer

In this post, we are going through the 15 Visual Studio Code extensions that we as PHP developers are using most for the rapid development and collaborations, likewise, show you how to use the Opencart code snippets for rapid development of the Opencart module and themes.

PHP Language Basics

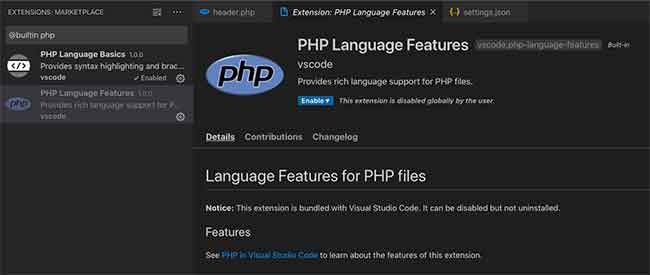
In the extension, search for “@builtin PHP” and enable the “PHP Language Basics” extension. This is the VS Code built-in extension.

PHP Intelephense

Intelephense is a high-performance PHP language server packed full of essential features for productive PHP development.

Advanced autocompletion and refactoring for PHP

To avoid double suggestions better to disable the VS code’s built-in PHP Intellisense by setting:

"php.suggest.basic": false

Or in the extension search for “@builtin PHP” and disable the “PHP Language Features” extension.

PHP language features

https://marketplace.visualstudio.com/items?itemName=bmewburn.vscode-intelephense-client

PHP Debug

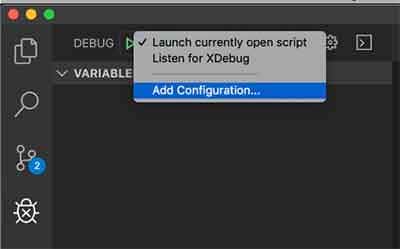
Once you configured the Xdebug for your PHP server then you can just add the configuration for the PHP.

Xdebug configuration in VSCode

The launch.json will look like below:

{
  "version": "0.2.0",
  "configurations": [
  
    {
      "name": "Launch currently open script",
      "type": "php",
      "request": "launch",
      "program": "",
      "cwd": "",
      "port": 9000
    },

    {
      "name": "Listen for XDebug",
      "type": "php",
      "request": "launch",
      "port": 9000
    }
  ]
}

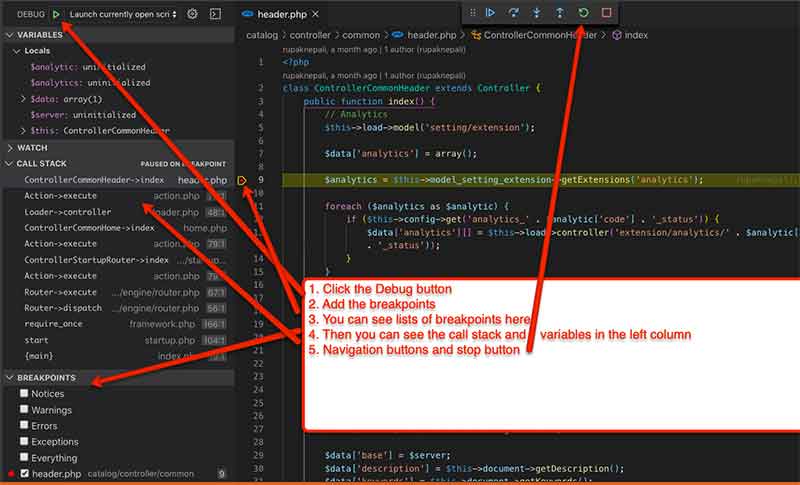
While debugging, first click the debug button in VS Code, add the breakpoints, you will see lists of breakpoints in the bottom of the left column then enter the URL in your browser then you will see the call stack and variables in the left column. You can move into different steps using the navigation buttons and perform the debug and you can stop by clicking the stop button.

Debugging steps of PHP in VScode

https://marketplace.visualstudio.com/items?itemName=felixfbecker.php-debug

Auto Rename Tag

Auto rename paired tag for HTML, XML, twig, etc. Once you install the extension you need to paste the following setting in the setting.json

"auto-rename-tag.activationOnLanguage": [
    "xml",
    "php",
    "twig",
    "html",
    "blade",
    "ejs",
    "jinja",
    "javascript",
    "javascriptreact",
    "typescript",
    "typescriptreact",
    "plaintext",
    "markdown",
    "vue",
    "liquid",
    "erb",
    "lang-cfml",
    "cfml",
    "HTML (Eex)"
  ],

The language extension id should be as defined in VS Code extension, for eg: for “.js” file, it will be “javascript”

https://marketplace.visualstudio.com/items?itemName=formulahendry.auto-rename-tag

AutoClose Tag

Automatically add a closing tag when you type in the closing bracket of the opening tag.

"auto-close-tag.enableAutoCloseTag": true,
"auto-close-tag.enableAutoCloseSelfClosingTag": true
"auto-close-tag.activationOnLanguage": [
    "xml",
    "php",
    "twig",
    "html",
    "blade",
    "ejs",
    "jinja",
    "javascript",
    "javascriptreact",
    "typescript",
    "typescriptreact",
    "plaintext",
    "markdown",
    "vue",
    "liquid",
    "erb",
    "lang-cfml",
    "cfml",
    "HTML (Eex)"
  ],

https://marketplace.visualstudio.com/items?itemName=formulahendry.auto-close-tag

Bracket Pair Colorizer 2

An extension that colorizes matching brackets. Use “Bracket Pair Colorizer 2” then V1 “Bracket Pair Colorizer” as it increases the speed and accuracy.

https://marketplace.visualstudio.com/items?itemName=CoenraadS.bracket-pair-colorizer-2

Format HTML in PHP

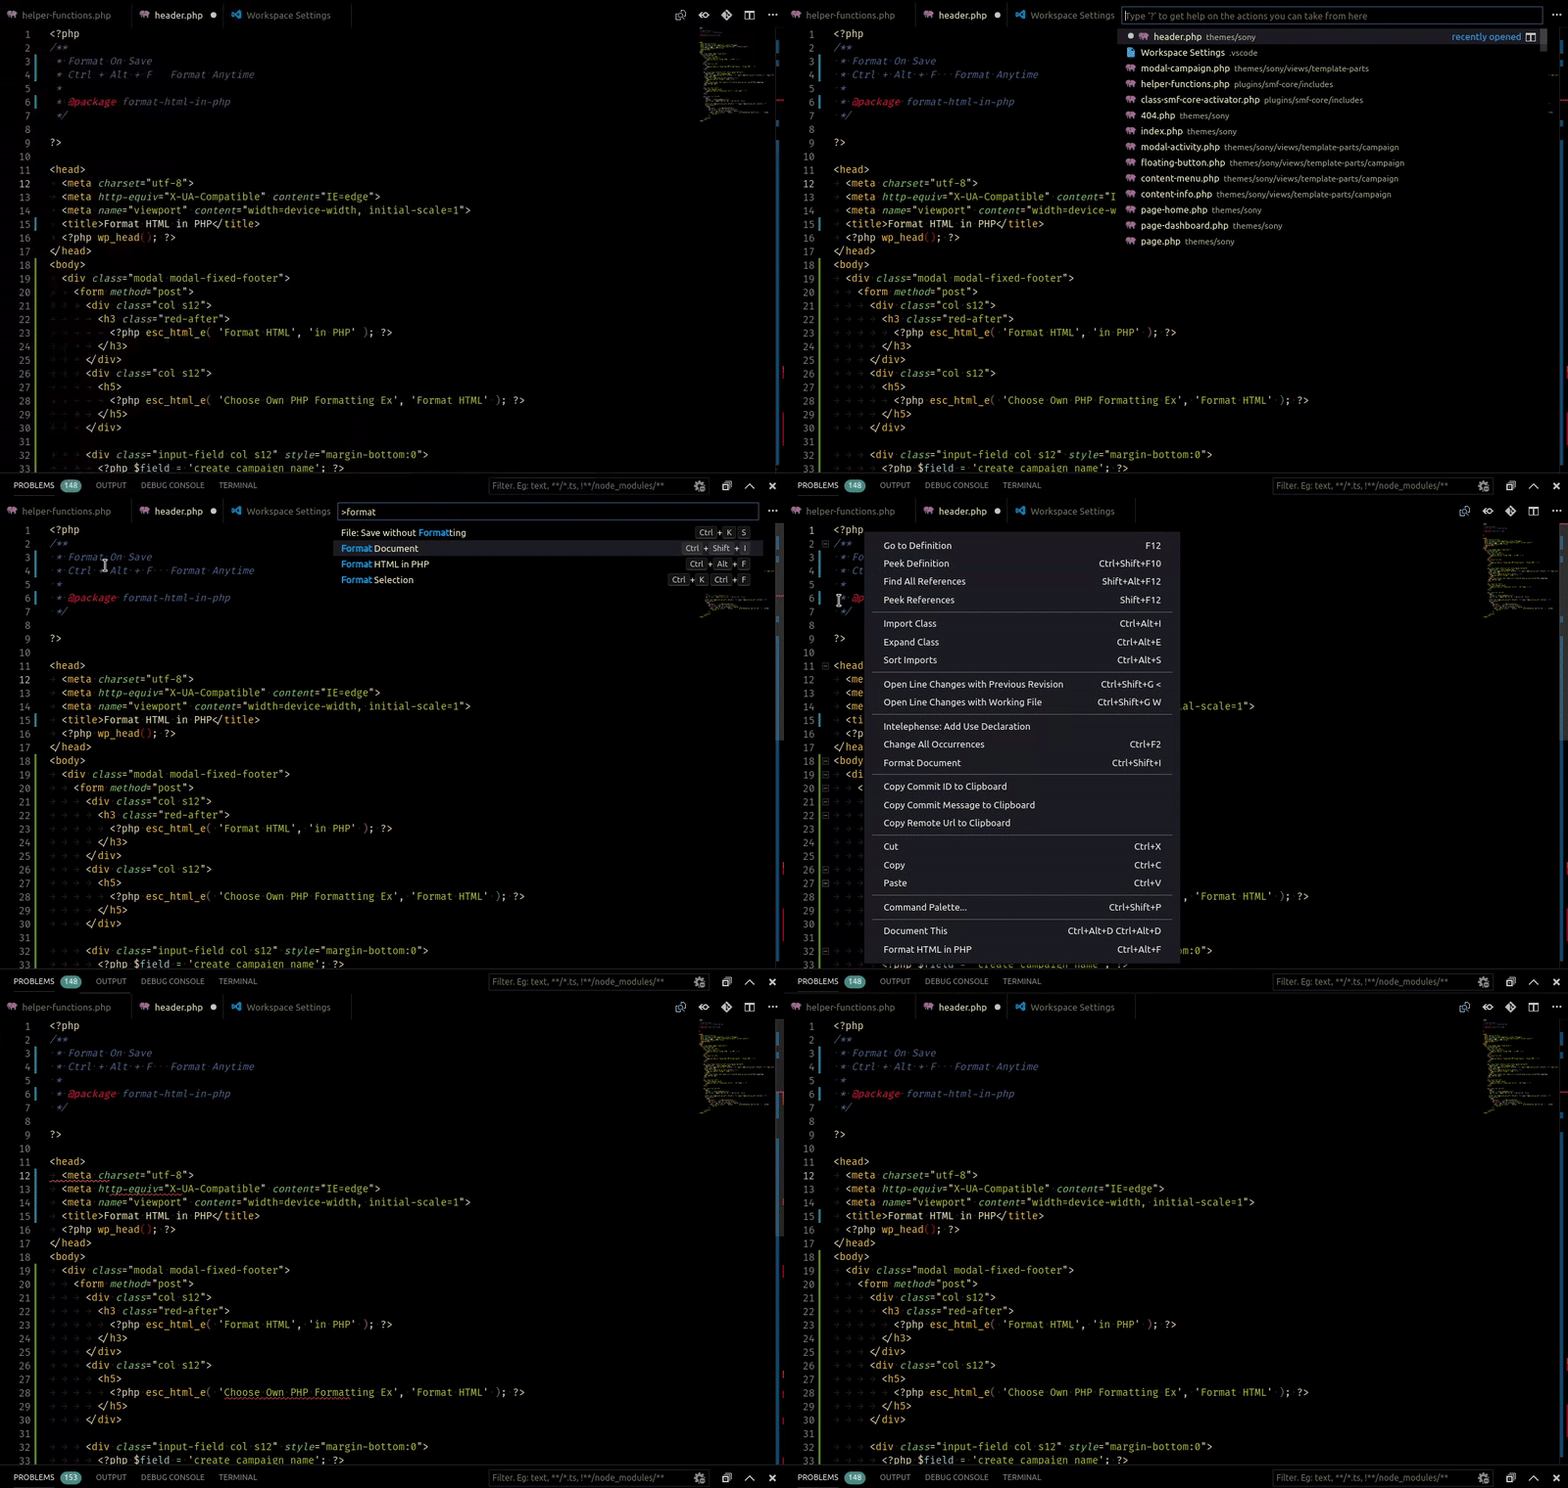
We can format HTML code in PHP files with this extension, install it and right-click and click “Format HTML in PHP”

HTML formatting in PHP file

https://marketplace.visualstudio.com/items?itemName=rifi2k.format-html-in-php

Prettier

The Prettier VS Code extension is for code formatting.

1. CMD + Shift + P -> Format Document
OR
1. Select the text you want to Prettify
2. CMD + Shift + P -> Format Selection

https://marketplace.visualstudio.com/items?itemName=esbenp.prettier-vscode

MySQL

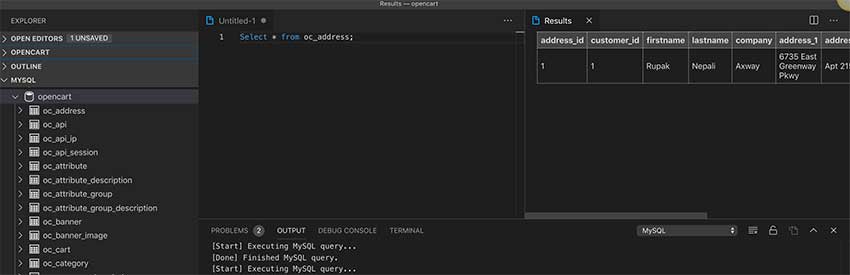
After installing this extension you can easily run queries and test your queries directly from VS Code. Right-click the database and click “New Query” then type your query, right-click and run the query, which will show the results in the side.

Query and its results in vscode

https://marketplace.visualstudio.com/items?itemName=formulahendry.vscode-mysql

Gitlens

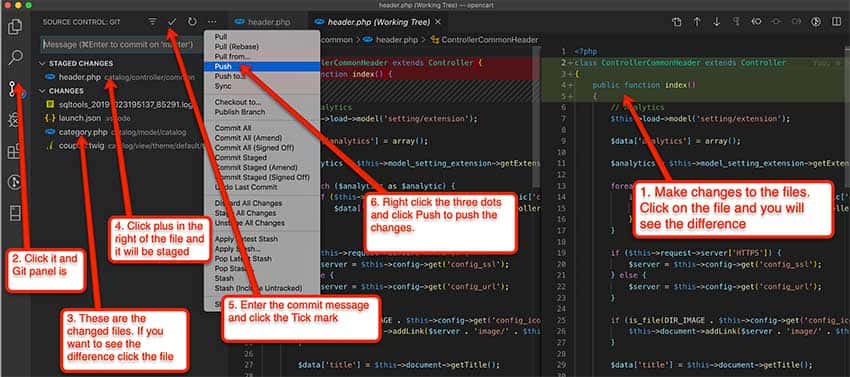
Git in VS code. Install it, connect to GitHub or bitbucket or Git and you can directly push code from the VS code.

Git in VS Code

https://marketplace.visualstudio.com/items?itemName=eamodio.gitlens

Editor Config

EditorConfig helps maintain consistent coding styles for multiple developers working on the same project across various editors and IDEs. Install the extensions and right-click in the project and click “Generate .editorconfig” which will create the .editorconfig file by which all indent style, indent size trim trailing whitespace will be same for all developers. This will remove the formatting issues for different developers.

root = true

[*]
indent_style = space
indent_size = 4
charset = utf-8
trim_trailing_whitespace = false
insert_final_newline = false

PHP Getters & Setters

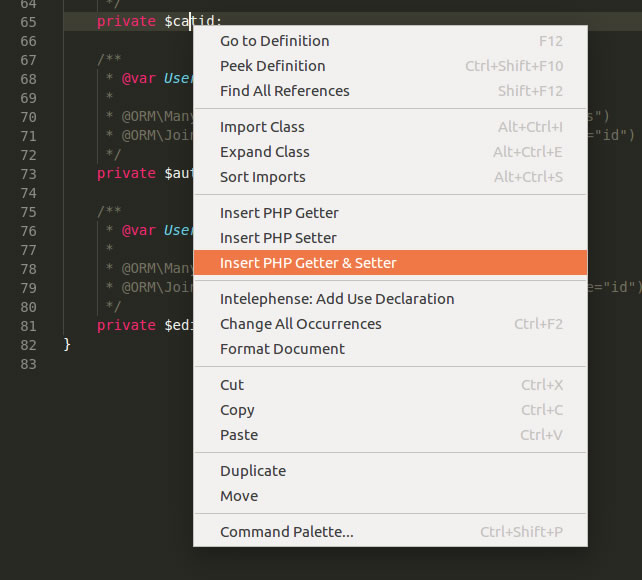
Create PHP getters and setters from class properties.

PHP getter and setter

https://marketplace.visualstudio.com/items?itemName=phproberto.vscode-php-getters-setters

PHP Awesome Snippets

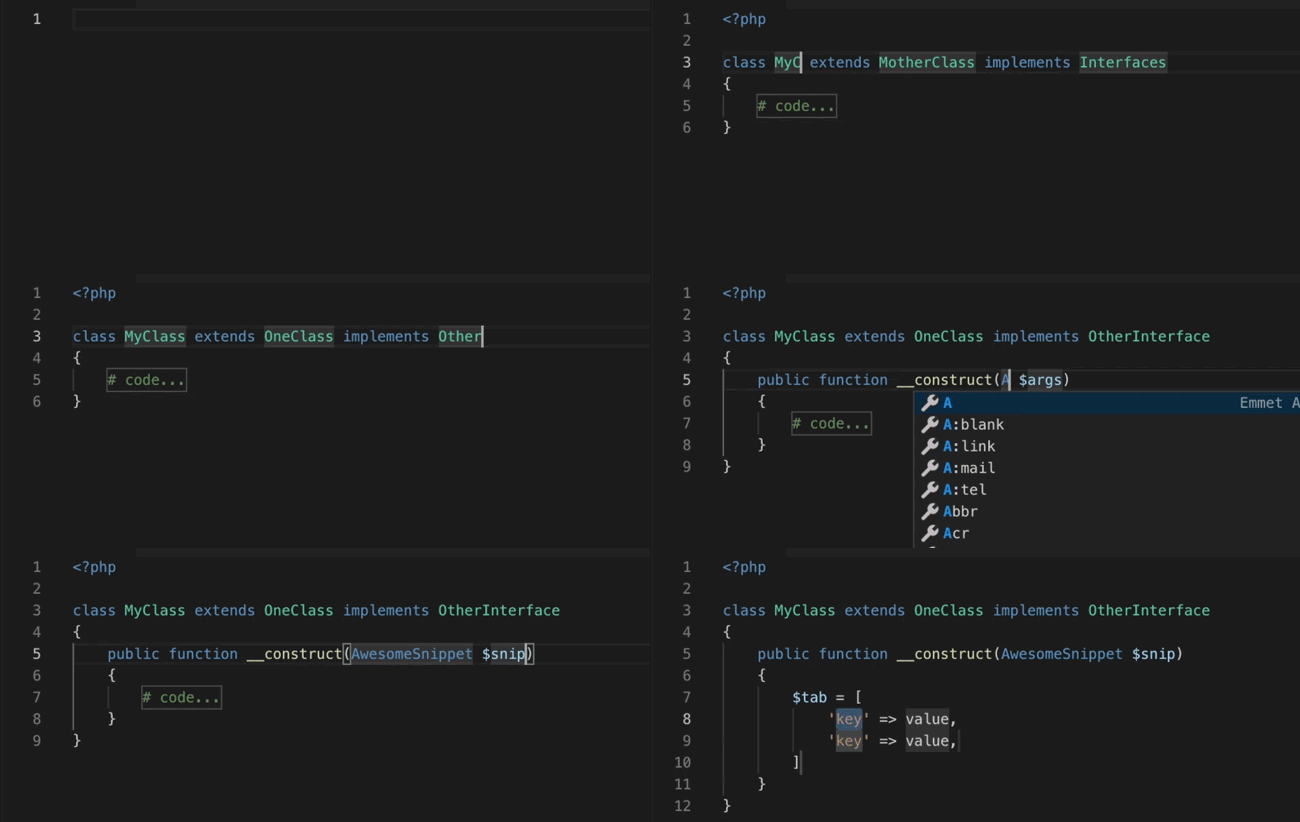
A full set of snippets for PHP devs to boost coding productivity.

PHP Awesome Snippets

https://marketplace.visualstudio.com/items?itemName=hakcorp.php-awesome-snippets

PHP DocBlocker

This extension is for the documentation. A simple, dependency-free PHP specific DocBlocking package.
https://marketplace.visualstudio.com/items?itemName=neilbrayfield.php-docblocker

Live Share

You can share your Visual studio code with others and get real-time collaborative development within VS Code.
https://marketplace.visualstudio.com/items?itemName=MS-vsliveshare.vsliveshare

Opencart Snippets

For Opencart, we have created the Opencart Snippets which has a collection of OpenCart snippets. Just start with “oc” and it lists out the snippets. Documentation at https://webocreation.com/opencart-code-snippets-vscode-extensions/

https://marketplace.visualstudio.com/items?itemName=webocreationcom.ocsnippets

The settings.json that we use for our development is as follow:

{
  "git.autofetch": true,
  "workbench.iconTheme": "material-icon-theme",
  "editor.wordWrap": "on",
  "window.zoomLevel": 0,
  "window.openFilesInNewWindow": "off",
  "files.autoSave": "afterDelay",
  "window.restoreFullscreen": true,
  "editor.renderIndentGuides": true,
  "editor.mouseWheelZoom": true,
  "php.validate.enable": true,
  "php.validate.run": "onType",
  "editor.minimap.enabled": false,
  "emmet.includeLanguages": {
    "javascript": "javascriptreact",
    "vue-html": "html",
    "razor": "html",
    "*.html": "twig",
    "plaintext": "jade"
  },
  "phpFormatter.composer": true,
  "editor.formatOnSave": true,
  "prettier.jsxSingleQuote": true,
  "prettier.singleQuote": true,
  "editor.suggestSelection": "first",
  "php.suggest.basic": false,
  "vsintellicode.modify.editor.suggestSelection": "automaticallyOverrodeDefaultValue",
  "auto-close-tag.enableAutoCloseTag": true,
  "auto-close-tag.activationOnLanguage": [
    "xml",
    "php",
    "twig",
    "html",
    "blade",
    "ejs",
    "jinja",
    "javascript",
    "javascriptreact",
    "typescript",
    "typescriptreact",
    "plaintext",
    "markdown",
    "vue",
    "liquid",
    "erb",
    "lang-cfml",
    "cfml",
    "HTML (Eex)"
  ],
  "auto-rename-tag.activationOnLanguage": [
    "xml",
    "php",
    "twig",
    "html",
    "blade",
    "ejs",
    "jinja",
    "javascript",
    "javascriptreact",
    "typescript",
    "typescriptreact",
    "plaintext",
    "markdown",
    "vue",
    "liquid",
    "erb",
    "lang-cfml",
    "cfml",
    "HTML (Eex)"
  ],
  "files.associations": {
    "*.html": "twig",
    "*.module": "php"
  },
  "twig-language-2.bracePadding": true,
  "twig-language-2.braces": true,
  "twig-language-2.compressedCss": true,
  "twig-language-2.correct": true,
  "twig-language-2.elseLine": true,
  "[json]": {
    "editor.defaultFormatter": "vscode.json-language-features",
    "editor.formatOnSave": true
  },
  "[php]": {
    "editor.defaultFormatter": "kokororin.vscode-phpfmt",
    "editor.formatOnSave": true
  },
  "[html]": {
    "editor.defaultFormatter": "vscode.html-language-features",
    "editor.formatOnSave": true
  },
  "terminal.integrated.rendererType": "dom",
  "files.autoSaveDelay": 5000
}

Please let us know if you have any suggestions, you can also find us on Twitter and Facebook. Enjoy!

Create OpenCart theme development from scratch for designer (Part 1)

In this Opencart tutorial, we are listing out to create opencart theme development from scratch for the designer, we are trying to show how to integrate HTML into the Opencart theme. We would like to introduce the OpenCart theme development course and make the OpenCart theme from scratch.

Right now OpenCart version is 3 and we are desperately waiting for OpenCart version 4 and hope it will be launched soon. We are using Opencart 3.0.2 for demo purposes. Before going through the theme development please watch the following videos playlist which describes OpenCart programming knowledge:

To develop an Opencart theme let’s start with the MVCL pattern of Opencart:

Then go through the files and folder structure of Opencart:

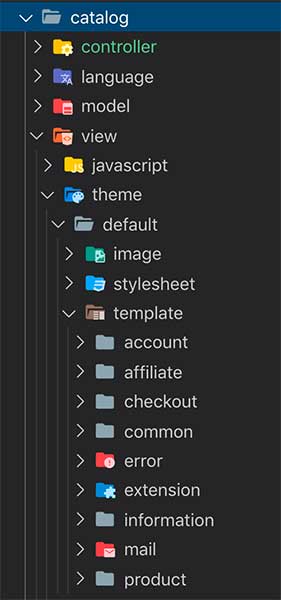
An OpenCart theme is a collection of the images, stylesheet and template, files and folders which is found in the view folder. Let’s see the default theme folder structure:

Opencart theme folder structure

See the template folder they are separated into multiple folders as per needs. In Opencart 2, those template folders contain TPL files but in Opencart 3 they consist of Twig files, they are the section we use for regular HTML markup interspersed by PHP code for the functionality.

Then better to understand the layouts and position of Opencart in theme

After that study, the Opencart Library Predefined objects’ methods so that you can understand what is already available:

Then read the blog post about how to see all variables available in twig template:

Then, see how we can install the Opencart 3 theme, in the video we are giving an example of our free opencart 3 themes, which you can download the free theme here:

Setup Local environment for the development of Opencart 3 theme

Once you study those, see how you can clone the default theme to custom opencart theme:

Here is another video to setup local environment and setup up automation with Gulp for the Opencart 3 theme development video

Youtube Opencart Video Playlists:

We keep on updating the youtube opencart video playlists for the Opencart theme development at below:

Hope you liked this post, we will come up with part II soon, till then let us know if you have any questions or suggestions, please subscribe to our YouTube Channel for Opencart video tutorials. You can also find us on Twitter and Facebook. Enjoy!
Out of Stock Sold out label, Out of Stock button Opencart 3 module for free

We launched another Opencart 3 free module Out Of Stock label and out of stock button, or you can take it as sold out also, these will get active when this module is installed and activated and quantity is zero. You can customize or add CSS as per your need in this module.

Installation

  • Download the module “Out Of stock
  • You will get an “outofstock.ocmod.zip” zip file
  • Go to Opencart admin >> Extensions >> Installer
  • Upload the outofstock.ocmod.zip zip file
  • Then go to admin >> Extensions >> Modifications >> Clear the cache by clicking the refresh button at the top right.
  • Now to admin >> Extensions >> Extensions >> Choose Modules >> Find Out of Stock >> Then click the install button
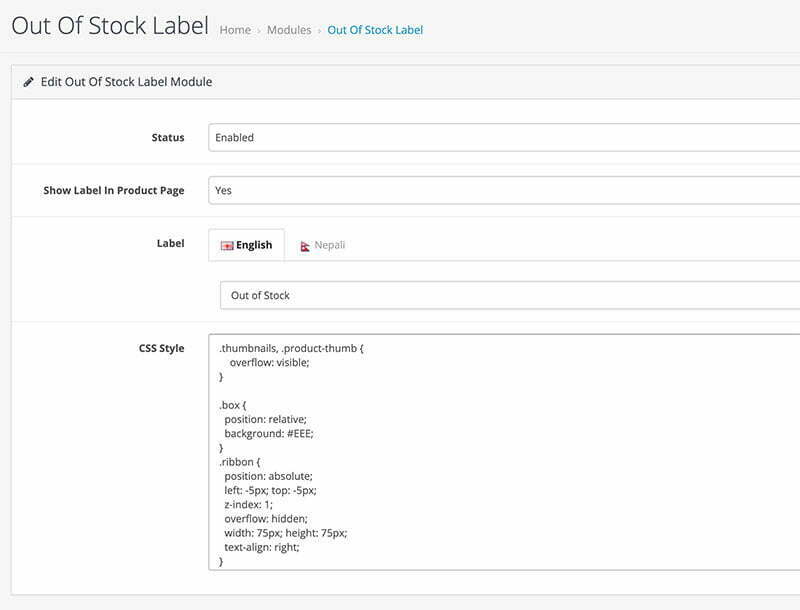
  • Then edit it and you will see admin settings for Out of Stock like below:
Out of Stock Admin Settings
  • Now select the Status to Enabled
  • Show Label in the Product page to Yes
  • Enter your required label like “Out of Stock” or “Sold Out”, if your site is multi-language then enter words for all language.
  • Then click Save blue button.

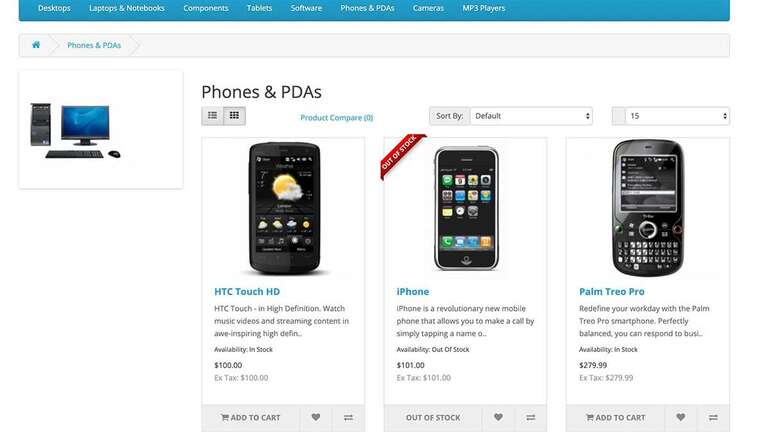
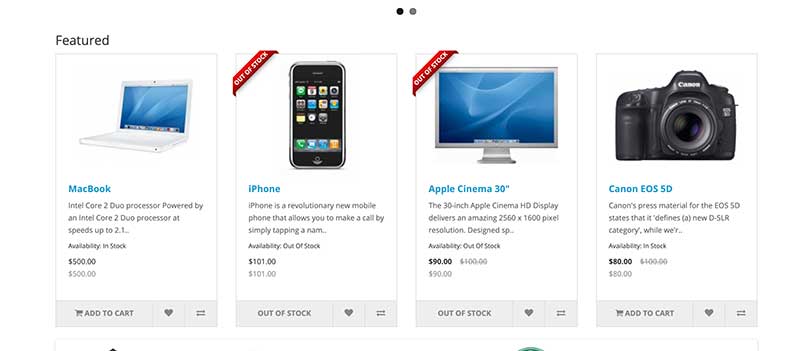
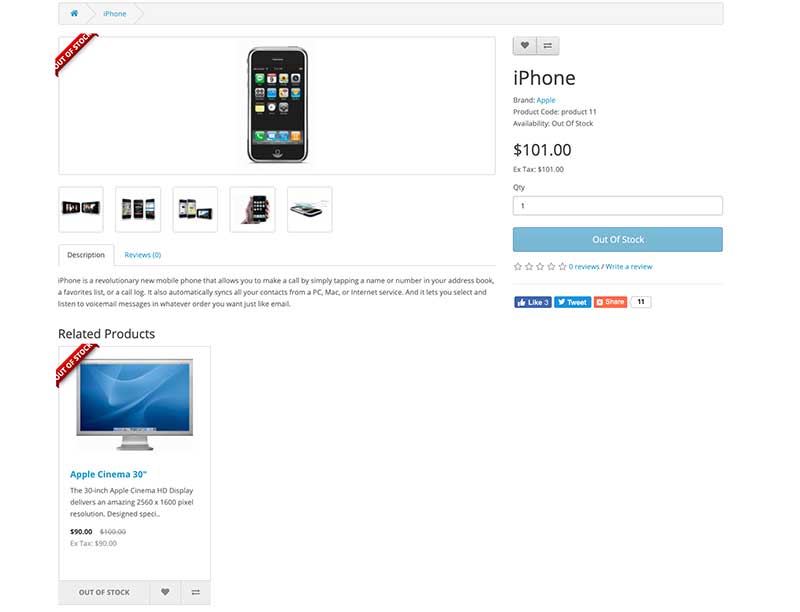
Now go to the front end and you can see the red label with Out of Stock ribbon if the product quantity is zero, similarly, the button becomes Out Of Stock and disabled. Like for featured products module, it will be seen as below:

Featured module out of stock

For the product page, it is like below:

Product page out of Stock

Modules and pages these gets activated as per the install.xml we created are the following:

Pages:

  • Product Page
  • Special page
  • Search page
  • Category page
  • Manufacturer info page

Modules:

  • Bestseller
  • Latest
  • Special
  • Featured

It works 100% with the default OpenCart 3 theme but it may not work in custom theme because of the OCMOD code target. Some customization may be needed for the custom theme, but we tried to adjust code matching as much as possible.

You can study and make changes to OCMOD install.xml as per your requirement

<?xml version="1.0" encoding="utf-8"?>
<modification>
    <name>Out of Stock</name>
    <version>1.1</version>
    <author>Rupak Nepali</author>
    <link>https://webocreation.com</link>
    <code>webocreation_module_outofstock2</code>
    <file path="catalog/controller/product/product.php">
        <operation>
            <search position="after"><![CDATA[$data['points'] = $product_info['points'];]]></search>
            <add><![CDATA[
                if ($this->config->get('module_outofstock_status')) {
                    $this->load->model('extension/module/outofstock');
                    $data['quantity'] = $this->model_extension_module_outofstock->getQuantity($product_info);
                    if ($data['quantity']<1){
                        $this->load->model('extension/module/outofstock');
                        $data['text_out_of_stock'] = $this->config->get('module_outofstock_label')[$this->config->get('config_language_id')];
                        $data['module_outofstockstyle'] = htmlspecialchars_decode($this->config->get('module_outofstock_style'));
                        $data['module_outofstock_show_marker_in_product_page'] = $this->config->get('module_outofstock_show_marker_in_product_page');
                    }
                }
                $data['button_cart_outOfStock'] = "Out Of Stock";
                ]]>
            </add>
        </operation>
        <operation>
            <search position="replace"><![CDATA[foreach ($results as $result) {]]></search>
            <add><![CDATA[
                foreach ($results as $result) {
                    if ($this->config->get('module_outofstock_status')) {
                        $this->load->model('extension/module/outofstock');
                        $data['text_out_of_stock'] = $this->config->get('module_outofstock_label')[$this->config->get('config_language_id')];
                        $data['module_outofstock_style'] = htmlspecialchars_decode($this->config->get('module_outofstock_style'));
                    }
                ]]>
            </add>
        </operation>
        <operation>
            <search position="replace"><![CDATA[$data['products'][] = array(]]></search>
            <add><![CDATA[
                $data['products'][] = array(
                    'quantity' => ($this->config->get('module_outofstock_status'))?$this->model_extension_module_outofstock->getQuantity($result):1, 
                ]]>
            </add>
        </operation>
    </file>
    <file path="catalog/view/theme/*/template/product/product.twig">
        <operation>
            <search position="replace"><![CDATA[<ul class="nav nav-tabs"> ]]></search>
            <add><![CDATA[
                        <div class="clearfix"></div><ul class="nav nav-tabs">
                ]]>
            </add>
        </operation>
        <operation>
            <search position="replace"><![CDATA[<a class="thumbnail" href="{{ popup }}" ]]></search>
            <add><![CDATA[
                        {% if module_outofstock_style and module_outofstock_show_marker_in_product_page and module_outofstock_show_marker_in_product_page %}
                            <style>
                                {{module_outofstock_style}}</style>
                        {% endif %}
                        {% if  (quantity < 1) and text_out_of_stock and module_outofstock_show_marker_in_product_page %}
                            <div class="box"><div class="ribbon"><span>{{ text_out_of_stock }}</span></div></div>
                        {% endif %}
                        <a class="thumbnail" href="{{ popup }}" 
                ]]>
            </add>
        </operation>
        <operation>
            <search position="replace"><![CDATA[ {{ header }} ]]></search>
            <add><![CDATA[
                    {{ header }}
                    {% if module_outofstock_style and module_outofstock_style %}
                        <style>
                            {{module_outofstock_style}}</style>
                    {% endif %}
                ]]>
            </add>
        </operation>
        <operation>
            <search position="replace"><![CDATA[<button type="button" id="button-cart" data-loading-text="{{ text_loading }}" class="btn btn-primary btn-lg btn-block">{{ button_cart }}</button>]]></search>
            <add><![CDATA[
                {% if  (quantity < 1) %}
                    <button type="button" id="button-cart" data-loading-text="{{ text_loading }}" class="btn btn-primary btn-lg btn-block" disabled>{{ button_cart_outOfStock }}</button>
                {% else %}
                    <button type="button" id="button-cart" data-loading-text="{{ text_loading }}" class="btn btn-primary btn-lg btn-block">{{ button_cart }}</button>
                {% endif %}
                ]]>
            </add>
        </operation>
        <operation>
            <search position="replace"><![CDATA[<div class="product-thumb transition">]]></search>
            <add><![CDATA[
               <div class="product-thumb transition">
                    {% if (product.quantity<1) and text_out_of_stock %}
                        <div class="box"><div class="ribbon"><span>{{ text_out_of_stock }}</span></div></div>
                    {% endif %}
                ]]>
            </add>
        </operation>
        <operation>
            <search position="replace"><![CDATA[<button type="button" onclick="cart.add('{{ product.product_id }}']]></search>
            <add><![CDATA[
                {% if  (product.quantity < 1) %}
                    <button type="button" onclick="cart.add('{{ product.product_id }}', '{{ product.minimum }}');" disabled><span class="hidden-xs hidden-sm hidden-md" disabled>{{ button_cart_outOfStock }}</span></button>
                {% else %}
                    <button type="button" onclick="cart.add('{{ product.product_id }}'
                ]]>
            </add>
        </operation>
        <operation>
            <search position="replace"><![CDATA[<i class="fa fa-shopping-cart"></i></button>]]></search>
            <add><![CDATA[
                <i class="fa fa-shopping-cart"></i></button>
                {% endif %}
                ]]>
            </add>
        </operation>
    </file>
    <file path="catalog/controller/product/{search,category,special,manufacturer}*.php">
        <operation>
            <search position="replace"><![CDATA[$data['products'] = array();]]></search>
            <add><![CDATA[  
                    $data['products'] = array();       
                    $data['module_outofstock_style'] = false;
                    $data['button_cart_outOfStock'] = "Out Of Stock";
                ]]>
            </add>
        </operation>
        <operation>
            <search position="replace"><![CDATA[foreach ($results as $result) {]]></search>
            <add><![CDATA[
                    foreach ($results as $result) {
                    if ($this->config->get('module_outofstock_status')) {
                        $this->load->model('extension/module/outofstock');
                        $data['text_out_of_stock'] = $this->config->get('module_outofstock_label')[$this->config->get('config_language_id')];
                        $data['module_outofstock_style'] = htmlspecialchars_decode($this->config->get('module_outofstock_style'));
                    }
                ]]>
            </add>
        </operation>
        <operation>
            <search position="replace"><![CDATA[$data['products'][] = array(]]></search>
            <add><![CDATA[
                $data['products'][] = array(
                    'quantity' => ($this->config->get('module_outofstock_status'))?$this->model_extension_module_outofstock->getQuantity($result):1,
                ]]>
            </add>
        </operation>
    </file>
    <file path="catalog/view/theme/*/template/product/{search,special,category,manufacturer_info}*.twig">
        <operation>
            <search position="replace"><![CDATA[{{ header }}]]></search>
            <add><![CDATA[
                    {{ header }}
                    {% if module_outofstock_style %}
                    <style>{{ module_outofstock_style }}</style> 
                    {% endif %}
                ]]>
            </add>
        </operation>
        <operation>
            <search position="replace"><![CDATA[<div class="product-layout product-list col-xs-12">]]></search>
            <add><![CDATA[
                <div class="product-layout product-list col-xs-12">  
                {% if (product.quantity<1) and text_out_of_stock %}
                    <div class="box"><div class="ribbon"><span>{{ text_out_of_stock }}</span></div></div>
                {% endif %}
                ]]>
            </add>
        </operation>
        <operation>
            <search position="replace"><![CDATA[<button type="button" onclick="cart.add('{{ product.product_id }}']]></search>
            <add><![CDATA[ 
                {% if  (product.quantity < 1) %}
                    <button type="button" onclick="cart.add('{{ product.product_id }}', '{{ product.minimum }}');" disabled><span class="hidden-xs hidden-sm hidden-md" disabled>{{ button_cart_outOfStock }}</span></button>
                {% else %}
                    <button type="button" onclick="cart.add('{{ product.product_id }}'
                ]]>
            </add>
        </operation>
        <operation>
            <search position="replace"><![CDATA[{{ button_cart }}</span></button>]]></search>
            <add><![CDATA[
                {{ button_cart }}</span></button>
                {% endif %}
                 ]]>
            </add>
        </operation>
    </file>
    <file path="catalog/controller/extension/module/{bestseller,latest,special}*.php">
        <operation>
            <search position="replace"><![CDATA[foreach ($results as $result) {]]></search>
            <add><![CDATA[
                $data['button_cart_outOfStock'] = "Out Of Stock";
              foreach ($results as $result) {
                if ($this->config->get('module_outofstock_status')) {
                    $this->load->model('extension/module/outofstock');
                    $data['text_out_of_stock'] = $this->config->get('module_outofstock_label')[$this->config->get('config_language_id')];
                    $data['module_outofstock_style'] = htmlspecialchars_decode($this->config->get('module_outofstock_style'));
                } else{ 
                $data['module_outofstock_style'] = false;
                }
                ]]>
            </add>
        </operation>
        <operation>
            <search position="replace"><![CDATA[$data['products'][] = array(]]></search>
            <add><![CDATA[
                 $data['products'][] = array(
                    'quantity' => ($this->config->get('module_outofstock_status'))?$this->model_extension_module_outofstock->getQuantity($result):1,  
                ]]>
            </add>
        </operation>
    </file>
    <file path="catalog/controller/extension/module/featured.php">
        <operation>
            <search position="replace"><![CDATA[foreach ($products as $product_id) {]]></search>
            <add><![CDATA[
                $data['button_cart_outOfStock'] = "Out Of Stock";
                foreach ($products as $product_id) {
                if ($this->config->get('module_outofstock_status')) {
                    $this->load->model('extension/module/outofstock');
                    $data['text_out_of_stock'] = $this->config->get('module_outofstock_label')[$this->config->get('config_language_id')];
                    $data['module_outofstock_style'] = htmlspecialchars_decode($this->config->get('module_outofstock_style'));
                } else{ 
                    $data['module_outofstock_style'] = false;
                }
                ]]>
            </add>
        </operation>
        <operation>
            <search position="replace"><![CDATA[$data['products'][] = array(]]></search>
            <add><![CDATA[
                 $data['products'][] = array(
                    'quantity' => ($this->config->get('module_outofstock_status'))?$this->model_extension_module_outofstock->getQuantity($product_info):1,     
                ]]>
            </add>
        </operation>
    </file>
    <file path="catalog/view/theme/*/template/extension/module/{bestseller,featured,latest,special}*.twig">
        <operation>
            <search position="replace"><![CDATA[<h3>{{ heading_title }}</h3>]]></search>
            <add><![CDATA[
                <h3>{{ heading_title }}</h3>
                {%  if module_outofstock_style %}
                    <style>{{module_outofstock_style}}</style>
                {% endif %}
                ]]>
            </add>
        </operation>
        <operation>
            <search position="replace"><![CDATA[<div class="product-layout col-lg-3 col-md-3 col-sm-6 col-xs-12">]]></search>
            <add><![CDATA[
               <div class="product-layout col-lg-3 col-md-3 col-sm-6 col-xs-12">
                {%  if (product.quantity<1) and text_out_of_stock %}
                <div class="box"><div class="ribbon"><span>{{ text_out_of_stock }}</span></div></div>
                {% endif %}
                ]]>
            </add>
        </operation>
        <operation>
            <search position="replace"><![CDATA[<button type="button" onclick="cart.add('{{ product.product_id }}']]></search>
            <add><![CDATA[
                {% if  (product.quantity < 1) %}
                    <button type="button" onclick="cart.add('{{ product.product_id }}', '{{ product.minimum }}');" disabled><span class="hidden-xs hidden-sm hidden-md" disabled>{{ button_cart_outOfStock }}</span></button>
                {% else %}
                    <button type="button" onclick="cart.add('{{ product.product_id }}'
                ]]>
            </add>
        </operation>
        <operation>
            <search position="replace"><![CDATA[{{ button_cart }}</span></button>]]></search>
            <add><![CDATA[
                {{ button_cart }}</span></button>
                {% endif %}
                 ]]>
            </add>
        </operation>
    </file>
</modification>

You can check the GitHub Opencart free module repositories.

You can make the ribbon as per your requirement from here https://www.cssportal.com/css-ribbon-generator/ and paste the CSS into the admin settings.

Please don’t forget to post your questions or comments so that we can add extra topics, free module or opencart tutorial that we need to develop which helps to develop quality. You can follow at twitter account rupaknpl and subscribe YouTube user opencart tutorial. Thanks a lot.

Undefined property: Proxy::method in storage/modification/system/engine/action.php on line

Opencart error: Notice: Undefined property: Proxy::getLabels in /htdocs/storage/modification/system/engine/action.php on line 79

If you get an error like above then find the “getLabels” in your opencart directory and you can find two places like:

public function getLabels()
{

Or something like below of model reference or controller reference

$this->model_extension_module_outofstock->getLabels();

If it is model then check the class name of the model, for our example it should be like below:

class ModelExtensionModuleOutOfStock extends Model
{

Once you correct the class name then the proxy issue will be removed.

The main method is at system/engine/proxy.php

public function __call($key, $args) {
	$arg_data = array();
	
	$args = func_get_args();
	
	foreach ($args as $arg) {
		if ($arg instanceof Ref) {
			$arg_data[] =& $arg->getRef();
		} else {
			$arg_data[] =& $arg;
		}
	}
	
	if (isset($this->{$key})) {		
		return call_user_func_array($this->{$key}, $arg_data);	
	} else {
		$trace = debug_backtrace();
		
		exit('<b>Notice</b>:  Undefined property: Proxy::' . $key . ' in <b>' . $trace[1]['file'] . '</b> on line <b>' . $trace[1]['line'] . '</b>');
	}
}

Hope this helps someone, let us know if you have any questions or issues so that we try to solve it. We have listed out errors that you may get in Opencart and their solutions at:

How to make the custom language pack in OpenCart 4?

In this Opencart tutorial, we will show you easy localization, and how to make the language pack in OpenCart 4. We will use “Nepalese” or “Nepali” as a new language as there is no language pack for Nepali. Once we created the language pack then we will add and activate in the OpenCart.

Time needed: 1 hour

Localization or globalization is done by making the Opencart language pack. Here are the steps to make the language pack:
  1. Create a language folder in admin/ folder
    Go to admin/language then copy en-gb/ folder and paste it and change the folder name to your language name.
    In our example, we name it “ne”.

  2. Change the flag and main language name file

    Find the flag for your language, preferable transparent png with 16*16 size. Go to admin/language/ne and then place there with the same name as code. In Nepali, it is “ne” so we make it ne.png
    Change the filename admin/language/ne/en-gb.php to admin/language/ne/ne.php

  3. Change code name to your language

    Find your language code, for Nepali, it is “ne”, now open admin/language/ne/ne.php, and change Locale code. Like:

    $_[‘code’] = ‘ne’;

    You can find the lists of ISO 639-1 Language Codes at W3Schools.

    Change others as per your language like direction, date format short, date format long, time format, decimal point, thousand points.

  4. Now start adding your language text

    Open each and every ***.php and change English text to your language text except the variable in $_[‘DONTCHANGE’]. For example, if you open admin/language/ne/ne.php then you need to change the

    $_[‘text_yes’] = ‘Yes’;
    to
    $_[‘text_yes’] = ‘हुन्छ’;

    Just change values after the equal sign. Do the same for all of the others then your admin language is ready to install.

    Opencart language pack

  5. Similarly, we need to do the same thing in the catalog/ folder, so the first step, create a language folder in the catalog/language folder

    Go to catalog/language then copy the en-gb and paste it and change the name to your language.
    In our example, we name it “ne”.

  6. Change the filename to language name and flag name to language name in catalog/ folder

    Go to catalog/language/ne and add the flag related to the country and name it as per the language code. In our example, we named it ne.png. Previously in Opencart 2.0, they had collections of flags, but now they removed in 3.0, if you still need lists of small flags collection then you can download from download small flags.
    Then, rename the en-gb.php to ne.php

  7. Replace code name to your language in catalog/ folder also

    Open catalog/language/ne/ne.php and change $_[‘code’]= ‘en’; to

    $_[‘code’] = ‘ne‘;

    Similarly if needed change other Locale as per language needs.

  8. Start changing English text to your language text in catalog/language/ne folder

    Open each and every ***.php and change English text to your language text except the variable in $_[‘DONTCHANGE’]. For example, if you open catalog/language/ne/ne.php then you need to change the

    $_[‘text_yes’] = ‘Yes’;
    to
    $_[‘text_yes’] = ‘हुन्छ’;

    Create Opencart language pack

  9. Now make a ***.ocmod.zip

    Create upload/ folder and add the admin/ and catalog/ folder and inside the admin/ folder create language/ folder and then copy the translated folder. Here we copy the ne/ folder. Then, make zip and name ****.ocmod.zip. Your extension is ready to add.
    Language pack folder structure

How to add the language in Opencart?

  • Go to Extensions >> Installer and upload the ***.ocmod.zip
  • Go to Extensions >> Modifications and Refresh it
  • Go to System >> Localisation >> Languages
  • Then add the language, in our Nepali case it is something like below:
    How to add language in Opencart
  • Select the folder of your language at Code select box.
  • If you see “Warning: You added before the language!” then ignore for the first time and save again.
  • Your language is active.

Please don’t forget to post your questions or comments so that we can add extra topics, free modules, or Opencart tutorials that we need to develop which helps to develop quality. You can follow our Twitter account @rupaknpl and subscribe to the YouTube user Opencart tutorial. Thanks a lot.