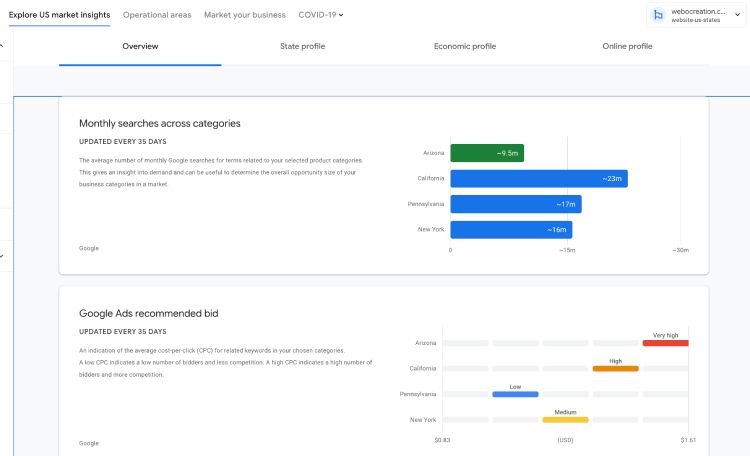
Expanding your business internationally can seem daunting, but what if there was a tool to make it simple, insightful, and actionable? Enter Google Market Finder – a free and intuitive resource designed to help businesses identify untapped markets, gather crucial operational insights, and reach new customers worldwide. Whether you’re a seasoned global seller or just starting your export journey, this tool can be a game-changer. Webocreation just started at Glendale Arizona, so we were checking to expand to California, New York and other states.
Let’s dive into what makes Google Market Finder so powerful and how it can help your business thrive globally.
What is Google Market Finder?
Google Market Finder is a comprehensive tool that provides data-driven insights to help businesses discover new internal and international markets and develop strategies to enter them effectively. By analyzing your website and product offerings, it highlights potential growth opportunities and offers actionable recommendations tailored to your needs.
With features like operational guides, marketing resources, and analytics dashboards, Google Market Finder goes beyond just identifying markets—it equips you with the knowledge to succeed.
Why Use Google Market Finder?
Identify High-Potential Markets: Google Market Finder uses search trends and data to recommend markets that show demand for your products or services. For example, if you’re selling eco-friendly home goods, it will pinpoint countries where interest in sustainability is rising.
Operational Guidance: The tool provides step-by-step guidance on logistics, regulations, taxes, and payment methods in your target markets. This reduces guesswork and streamlines your international expansion.
Customized Marketing Insights: Learn how to tailor your marketing efforts for each market. With localized advertising tips, consumer behavior insights, and industry trends, you can create campaigns that resonate with local audiences.
Data-Driven Decisions: The multiple charts and visualizations offered by Google Market Finder are incredibly helpful for spotting opportunities you might have missed. These visuals make complex data easier to understand and act upon.
Free Access: As a free tool, it offers immense value without the need for hefty investments, making it accessible to businesses of all sizes.
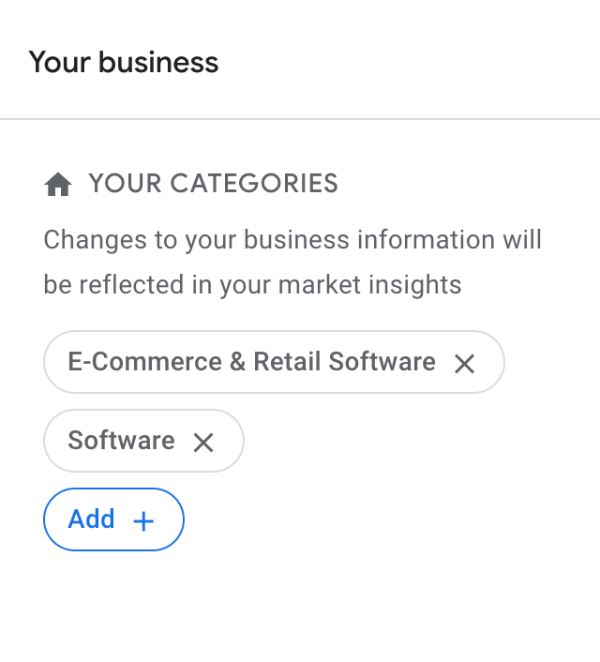
Enter Your Website or Industry: Start by inputting your website URL and selecting your industry categories from the dropdown menu. For webocreation, we selected E-Commerce & Retail Software and Software.
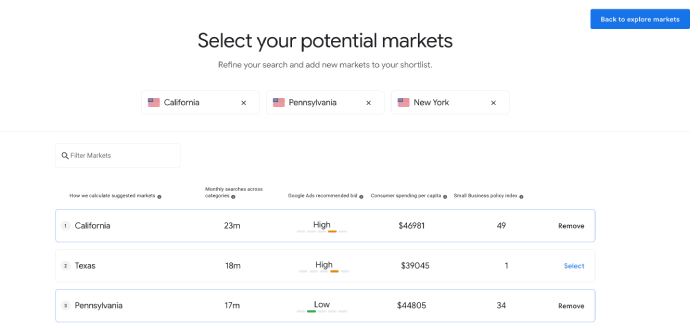
Potential Markets, Review Market Suggestions: The tool analyzes global data to provide you with a ranked list of potential markets based on demand and competition. Select Potential Markets, for us we selected California, Pennsylvania and New York.
Explore Insights: Click on each suggested market to explore consumer behavior, purchasing habits, and logistical considerations.
Operational Areas: In the Operational Areas, you can access guides on how to navigate legal, tax, and shipping requirements for your chosen markets.
Market your Busineass: Use the provided marketing and advertising tips to reach your new audience effectively.
Key Features of Google Market Finder
1. Market Insights:
Discover where your products are in demand by leveraging Google’s massive data pool. Market Finder highlights search volume, average income, and market competitiveness for each potential market.
2. Operational Guidance:
Operational success is crucial when entering a new market. Market Finder provides localized insights into:
Shipping logistics
Payment methods
Legal and tax considerations
Customer support best practices
3. Marketing Tools:
From understanding cultural nuances to crafting ads in the local language, Market Finder provides detailed advice on how to market your product effectively in each country.
4. Interactive Charts and Visuals:
The tool’s intuitive interface presents data through interactive charts, making it easy to understand market trends, compare opportunities, and strategize accordingly.
Why We Love It
We used it to explore opportunities for our own business and were impressed by its user-friendly interface and depth of insights. The charts and data visualizations were particularly helpful in highlighting areas we hadn’t considered. For instance, we discovered a growing demand for our products in Southeast Asia, a region we hadn’t previously prioritized. With actionable insights on logistics and consumer preferences, we developed a targeted strategy to enter this market.
Who Should Use Google Market Finder?
it is ideal for:
Small to Medium-Sized Businesses (SMBs): Looking to explore export opportunities with minimal resources.
eCommerce Brands: Aiming to identify international markets for their products.
Service Providers: Wanting to expand their client base globally.
Marketers: Seeking data-driven insights to refine their global strategies.
Get Started with Google Market Finder Today
Expanding into global markets has never been easier, thanks to tools like Google Market Finder. With its data-driven insights, operational guides, and marketing recommendations, you can confidently identify and enter new markets without the typical hurdles of international expansion.
In this Opencart guide, we are showing how to customize the Opencart 3 homepage and make changes to layouts, and modules, edit homepage content in Opencart 3.
As the homepage of Opencart is made of modules, to change home page layout in opencart for demo data here are the steps:
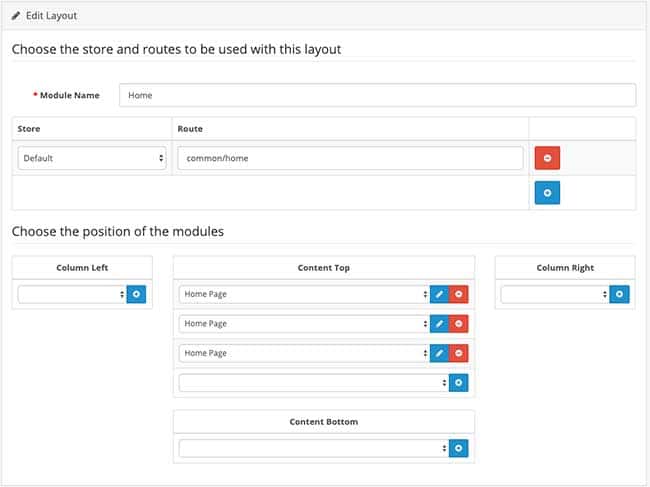
Go to admin >> Design >> Layouts >> Edit the Home Layouts >> you will see similar like below:
You can see which modules are active on the homepage, in the demo data of Opencart 3 there are three modules which are active only in the Content Top layout. These three modules in Opencart are Slideshow module, Featured products module, and Carousel module. You can add and remove the modules as per your requirement in the layouts.
Where can you find modules in Opencart 3?
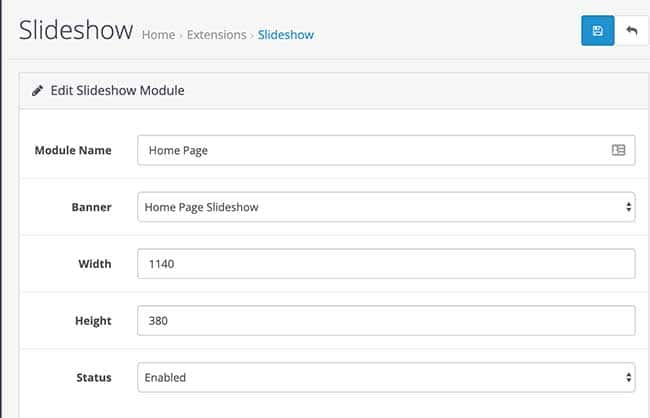
Go to Admin >> Extensions >> Extensions >> Choose the Extension type “Modules”, you will see all the modules here. Now see for the Slideshow module and edit it. You will find the settings for the Slideshow like in the image below:
You can select the banner, give width and height and change the status. Likewise, you can make changes in the Featured products module and Carousel module. Similarly, you can activate the modules that you want to show on the home page, enable it. Then, add in the layouts. You can see the following video to install the module, configure it, uninstall it and remove it:
If you want to understand more about the layouts and positions then here are opencart layouts explained video:
Once you see the videos above then you understand how you can install, configure, uninstall and remove the module and understand how layout and position work in Opencart 3 by which you can make changes to any Opencart page and customize as per your need.
Please let us know if you have any questions or concerns. Please don’t forget to post your questions or comments so that we can add extra topics. You can follow us at our twitter account @rupaknpl and subscribe to our YouTube channel for opencart tutorials.
In this Opencart tutorial, we go through OpenCart Events. Opencart events are hooks that developers can attach custom code to, allowing them to execute specific actions at different points in the application’s lifecycle. Events can be triggered by various actions within the OpenCart system, such as user authentication, order creation, product editing, email sending, and more.
Event Types
Pre-Events:
Triggered before a specific action occurs. For example, a pre-event can be triggered before an order is saved, allowing developers to perform custom actions like validating order data.
Post-Events:
Triggered after a specific action occurs. For example, a post-event can be triggered after a product is edited, allowing developers to perform custom actions like updating related data.
Using OpenCart Events:
To use OpenCart events, developers need to create an event listener, which is a function or method that responds to a specific event. An event completes the tasks that a controller, a model, a theme override, a language, and a config need to be achieved in the back-end of the store. Upon startup, the Engine automatically registers triggers, actions, and sorts orders in both the admin/controller/startup/event.php and catalog/controller/startup/event.php files.
Event listeners are registered using the addEvent method from the Event class. The method takes three parameters: the event name, the class/method to be executed, and the priority of the listener.
Example Code:
// In your custom extension, add this code to the controller
$this->event->addEvent('catalog/controller/product/product/after', 'extension/event/custom_event/afterProductView');

// Define the event listener in your custom event class
class ControllerExtensionEventCustomEvent extends Controller {
    public function afterProductView(&$route, &$data, &$output) {
        // Custom code to execute after a product view
        // Example: modify the product data before it's rendered
        $data['custom_text'] = 'This is a custom message after product view.';
    }
}
Registering Events:
Events can be registered in an extension’s install method or directly in the controller if needed.
It’s important to unregister events in the extension’s uninstall method to avoid any unwanted behavior after removing the extension.
Using Events for Customization:
Developers can use OpenCart events to customize and extend the platform in various ways, such as:
Adding custom logic to product pages, checkout processes, or other areas of the platform.
Modifying data before it’s displayed to the user.
Integrating with third-party services or APIs.
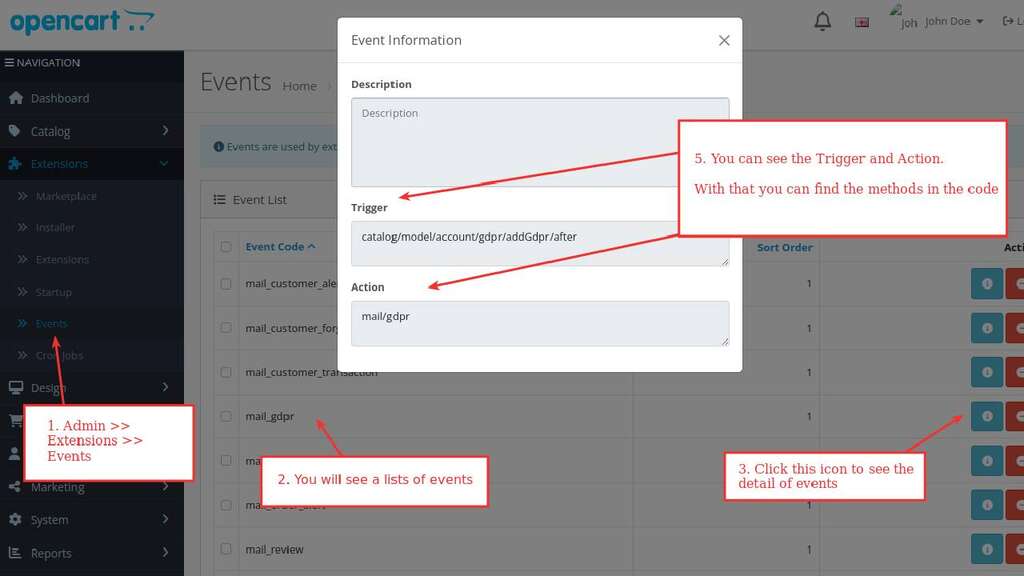
For developers, add event code, description, trigger, and action in the database. The action is the method that does what you want. The trigger is the path that you want for the existing Opencart controller and methods.
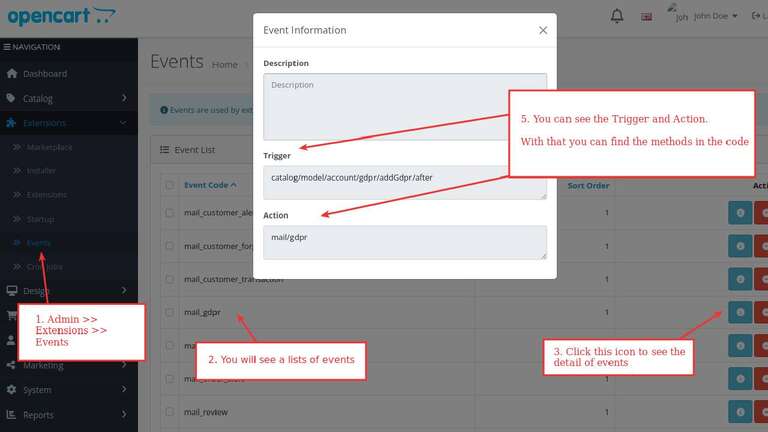
You can see all the events at >> Admin >> Extensions >> Events
List of Events
Catalog and administer events. Here are the lists of Catalog events for different functionalities.
Language events
OpenCart’s language events system is an important part of managing and customizing language-related aspects of the platform. Language events allow developers to add, modify, or manipulate language files and translations within the OpenCart application. This is crucial for providing multilingual support and customizing the text displayed to users.
view/*/before
Dump all the language vars into the template.
controller/*/before
Before the controller loads stores all current loaded language data
controller/*/after
After the controller loads and stores all current loaded language data
Activity events
OpenCart’s activity events system allows developers to monitor and respond to user activities and other important events within the platform. These events are useful for tracking user actions, generating logs, and performing custom operations based on specific activities. This system enhances the ability to understand user behavior, provides better support, and maintains the platform effectively.
Here’s an overview of OpenCart activity events and how you can use them:
Understanding Activity Events:
Activity events in OpenCart track significant actions performed by users, such as login, logout, product views, purchases, and more.
These events enable developers to create custom responses and logs based on specific user activities.
Common Activity Events:
customer_login: Triggered when a customer logs in. This event is useful for monitoring login activity or taking specific actions upon login.
customer_logout: Triggered when a customer logs out. You can use this event to perform cleanup operations or logging.
product_viewed: Triggered when a product is viewed. Useful for tracking product popularity or taking custom actions based on product views.
order_added: Triggered when a new order is added. This event can be used to log order information or trigger post-order processes.
customer_register: Triggered when a customer registers a new account. Useful for sending welcome emails or performing other onboarding activities.
Creating Activity Event Listeners:
To use activity events, create event listeners that respond to specific events of interest.
Register event listeners in your extension’s controller using the addEvent method from the Event class.
// Registering an activity event listener in your controller
$this->event->addEvent('customer_login', 'extension/event/activity/onCustomerLogin');

// Define the event listener method in your custom event class
class ControllerExtensionEventActivity extends Controller {
    public function onCustomerLogin(&$route, &$args, &$output) {
        // Custom code to execute when a customer logs in
        // For example, log the customer login event
        $this->log->write('Customer logged in: ' . $args['customer_id']);
    }
}
OpenCart’s theme events system allows developers to customize and extend the behavior of themes within the platform. By using Theme events, you can modify how themes render content, alter page elements, and integrate custom logic to achieve a unique look and feel for your store.
Here’s an overview of OpenCart theme events and how you can utilize them:
Understanding Theme Events:
Theme Events are hooks that allow you to customize the rendering of pages and elements in your OpenCart theme.
These events are triggered during different stages of the rendering process and provide opportunities to manipulate the data or layout before it’s displayed to users.
Common Theme Events:
view/*/before: Triggered before rendering a view file in a specific directory, such as catalog/view/theme/[theme_name].
view/*/after: Triggered after rendering a view file in a specific directory.
template/*/before: Triggered before rendering a template file in a specific directory, such as catalog/view/theme/[theme_name]/template.
template/*/after: Triggered after rendering a template file in a specific directory.
Creating Theme Event Listeners:
To use the theme events, you need to create event listeners that respond to the specific events you want to customize.
Register event listeners in your extension’s controller using the addEvent method from the Event class.
// Registering a theme event listener in your controller
$this->event->addEvent('view/common/header/before', 'extension/event/theme/customizeHeader');

// Define the event listener method in your custom event class
class ControllerExtensionEventThemeCustomizeHeader extends Controller {
    public function customizeHeader(&$route, &$data, &$output) {
        // Custom code to modify the header before rendering
        $data['custom_message'] = 'Welcome to our store!';
    }
}
Here are lists of Opencart theme events:
view/*/before
view/*/after
template/*/before
template/*/after
Here is the main code for the catalog that controls the theme events: upload/catalog/controller/event/theme.php
class Theme extends \Opencart\System\Engine\Controller {
	/**
	 * Index
	 *
	 * @param string            $route
	 * @param array<int, mixed> $args
	 * @param string            $code
	 *
	 * @return void
	 */
	public function index(string &$route, array &$args, string &$code): void {
		// If there is a theme override we should get it
		$this->load->model('design/theme');

		$theme_info = $this->model_design_theme->getTheme($route, $this->config->get('config_theme'));

		if ($theme_info) {
			$code = html_entity_decode($theme_info['code'], ENT_QUOTES, 'UTF-8');
		}
	}
}
Admin Currency Events
model/setting/setting/editSetting
model/localisation/currency/addCurrency
model/localisation/currency/editCurrency
Admin Statistics Events
admin/model/catalog/review/addReview/after
admin/model/catalog/review/deleteReview/after
admin/model/sale/returns/addReturn/after
admin/model/sale/returns/deleteReturn/after
Translation Event
OpenCart’s translation events system allows developers to customize and extend the language and translation aspects of the platform. By using translation events, you can modify or extend the existing translations, add new language strings, and customize language files to achieve a more personalized or localized experience for your store. Here is the main code that you can find at upload/catalog/controller/event/translation.php and upload/admin/controller/design/translation.php
By default, in the system/config/catalog.php file, the debug key and value are commented out at the bottom of the file because they should only be active for debugging purposes. Remove the comment from the code like below:
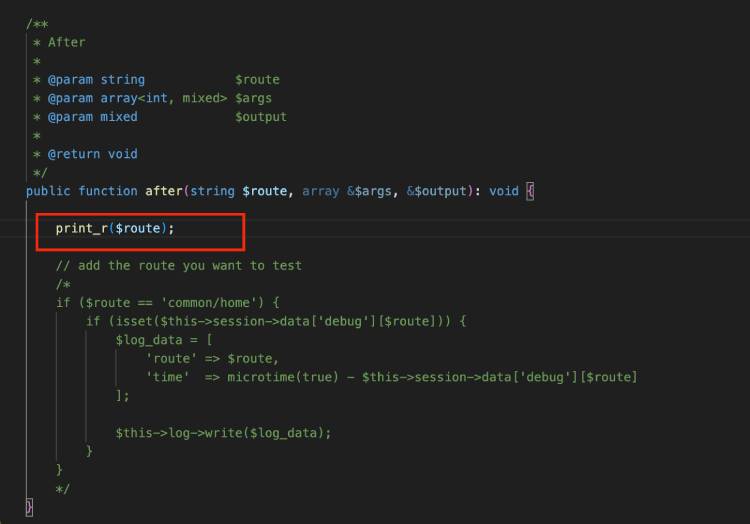
After enabling debugging, you can test the code within the catalog/controller/event/debug.php file. You see the after and before methods. Here is an example of an after-method test to find all the routes used on the page.
It is essential to undo the changes of the debugging by commenting out the debug line in the system/config/catalog.php file after testing.
Challenges
Performance Impact: Every event adds a layer of processing, which can slightly impact page load times, especially with numerous event handlers. Monitor performance and prioritize essential events to avoid noticeable slowdowns.
Debugging Complexity: Debugging problems within event handlers can be more challenging than traditional code because they may be triggered from different locations. Employ proper logging and testing practices to identify and resolve issues effectively.
Security Risks: Improper event handler implementation might introduce security vulnerabilities. Always validate and sanitize user input within event handlers to prevent potential security risks.
Maintenance burden: As your store and codebase grow, managing numerous event handlers can become complex. Organize your events and handlers logically, document their purpose, and update them regularly to maintain code clarity and avoid conflicts.
Version compatibility: While events strive for backward compatibility, updates to core files or other extensions might break event handlers. Thoroughly test your events after updates to ensure continued functionality.
Best Practices while using Opencart Events:
Use events judiciously: Don’t overuse events for simple tasks that can be handled efficiently within core files. Reserve events for extending functionality beyond core capabilities.
Write clean and efficient code: Optimize your event handlers for performance and avoid unnecessary processing.
Test thoroughly: Test your event handlers under various scenarios, including edge cases and potential conflicts with other extensions.
Document your work: Document the purpose and logic of your event handlers to facilitate future maintenance and collaboration.
Stay updated: Monitor changes in OpenCart and event-related functionality to adapt your code when necessary.
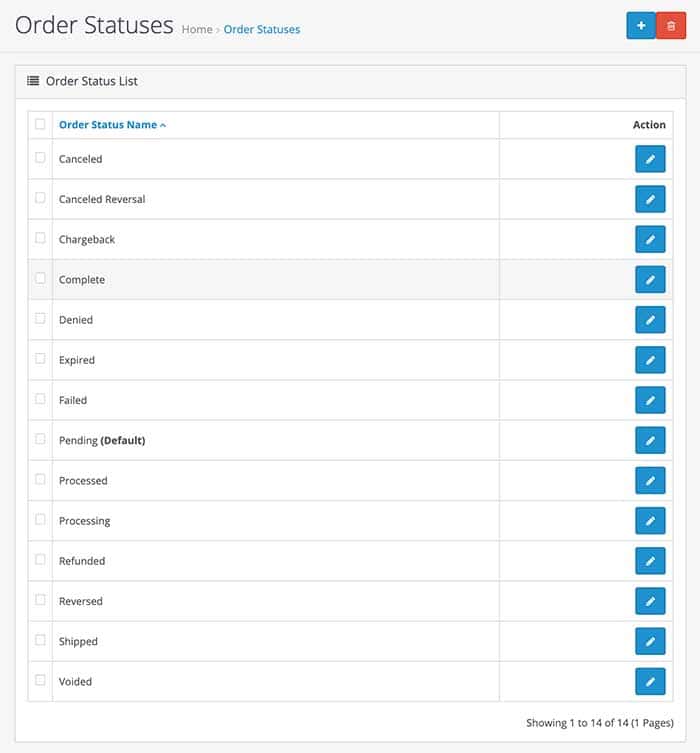
In Opencart 3 we can manage the order statuses. For that go to admin >> System >> Localization >> Order Statuses then click “Add New” and you can enter the Order Status Name. In this section, you can create order statuses that you can use on Payment gateways and manage sales orders. The image below shows default order statuses provided in the Opencart 3:
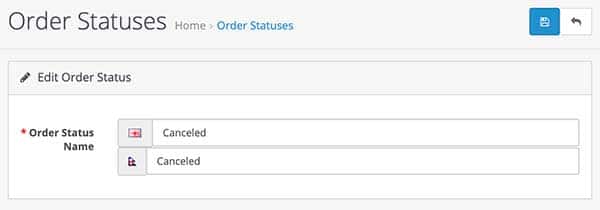
By default, Opencart provided all the possible order statuses but if you want to add a new order status for your requirement. Then click then click “Add New” blue button in the top right and you will get the form like below:
Enter the order status name and click save and your order status is saved so that you can see it in multiple places like Sales orders, payment gateway settings and many more.
Order status global setting
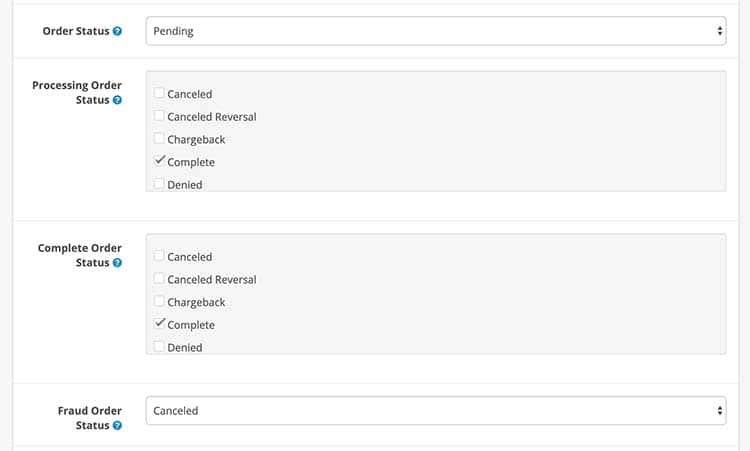
There are some order status settings at admin >> System >> Settings >> edit the store >> click Options tab and go to the checkout section where you can find following order status settings:
Order Status: Set the default order status when an order is processed.
Processing Order Status: Set the order status the customer’s order must reach before the order starts stock subtraction and coupon, voucher and rewards redemption.
Complete Order Status: Set the order status the customer’s order must reach before they are allowed to access their downloadable products and gift vouchers.
Fraud Order Status: Set the order status when a customer is suspected of trying to alter the order payment details or use a coupon, gift voucher or reward points that have already been used.
Order statuses at Payment gateways
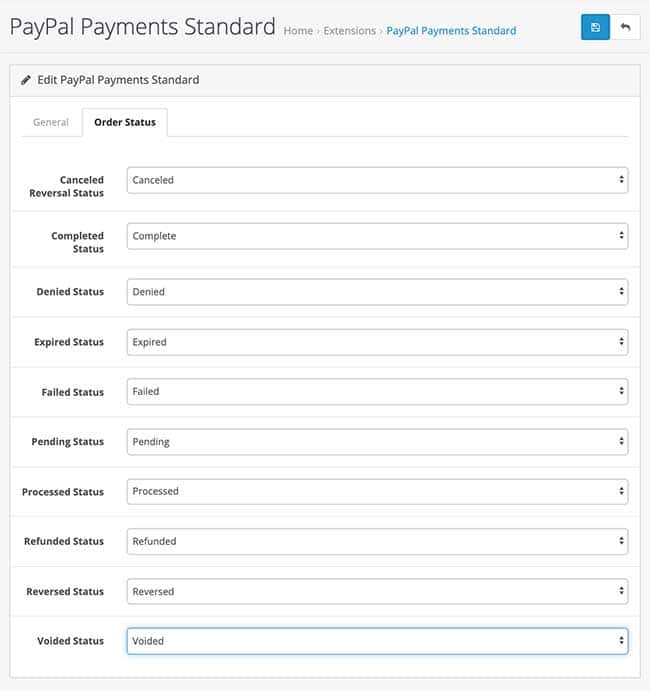
With the above default settings for order statuses, each payment gateway has its own order statuses settings. Like for example, the PayPal payments standard module supports all the order status like in the below example. If an order is canceled then the logged order status will be Canceled as per the setting below. So don’t forget to set up the order status for the payment gateway that you are using. For that go to admin >> Extensions >> Extensions >> Choose the payments as the extension type, which will list out all the payment gateways that are available and edit the one you are using and check the order status.
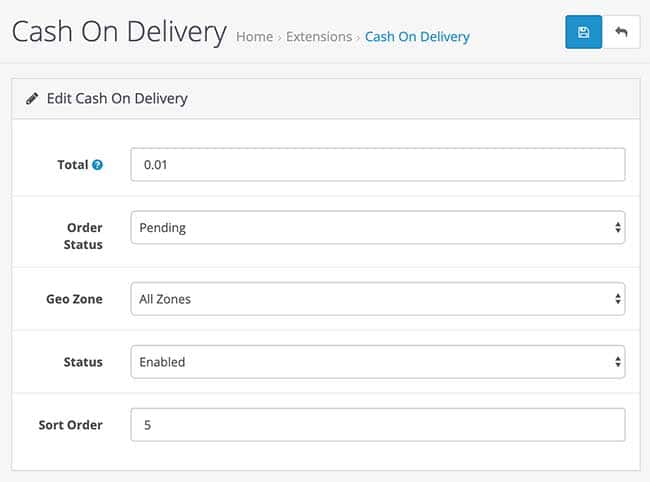
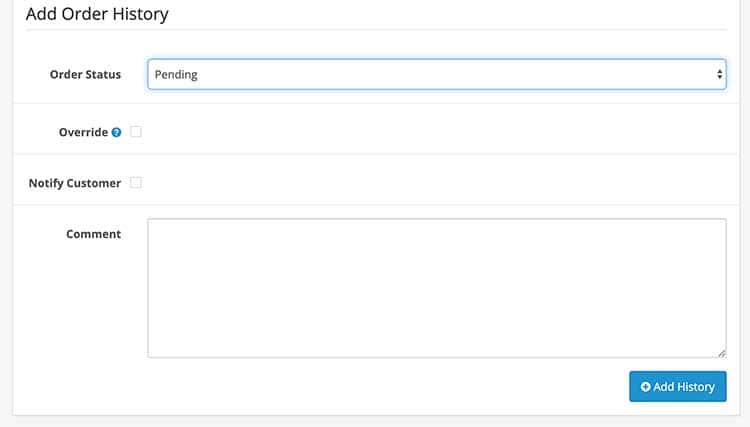
For Cash on Delivery, the order status is only pending as per the setting below as it does not have all other settings support like for the PayPal. So when someone ordered with Cash on Delivery then all order goes to pending then you can change it on Order History.
Customer Order status in Order History
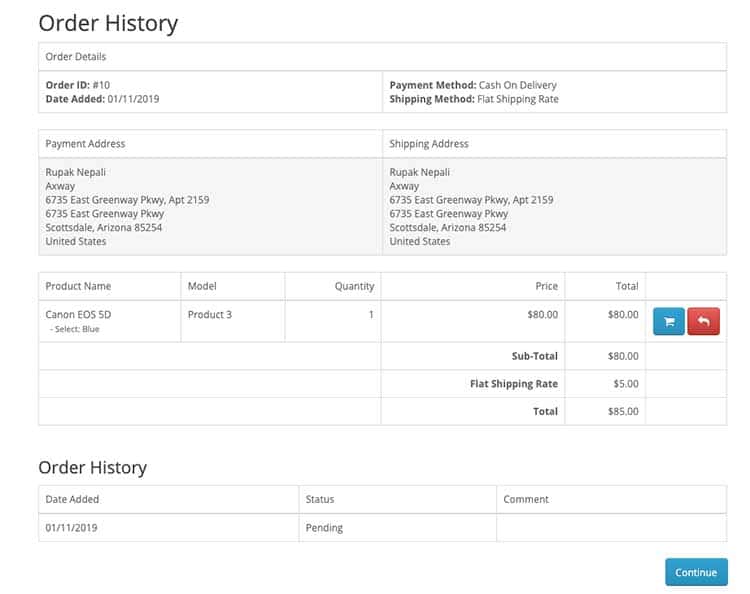
In the image below the order status is shown in the Order history section. To see it go to admin >> Sales >> Orders >> View one of the order. Then in the Order History section, you can see the drop-down of Oder status which you can notify the customer if needed with the order status. If you don’t notify then it will not show in the order history of the customer at the frontend section. Like this the order status is used, so you can add new order status as per your need.
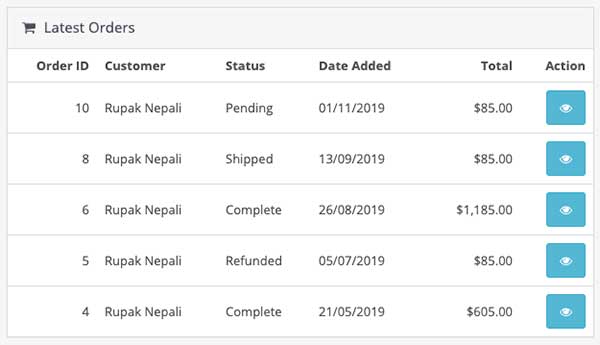
You can see the order statuses mostly in payment gateways, sales orders, and Customer Orders Report. You can get reports as per the filtering of the order status.
Customers can see the order status when they check their Order history and view their order. Their order statuses are shown in the Order history section:
In this way, you can manage the Order statuses in Opencart. Please don’t forget to post your questions or comments so that we can add extra topics. You can follow us at our twitter account @rupaknpl, subscribe to our YouTube channel for opencart tutorials, and click to see all Opencart user manual.
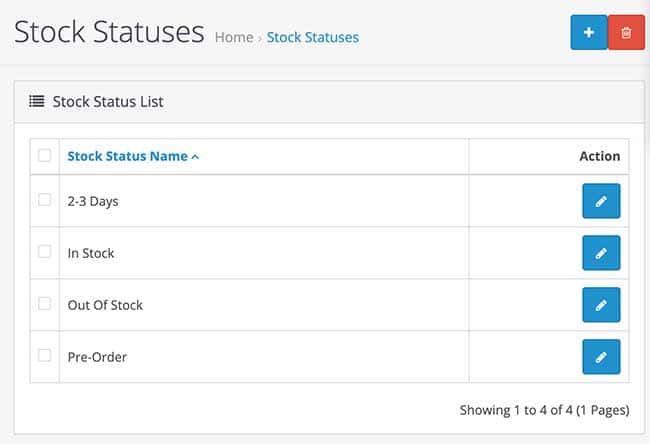
In Opencart 3 we can manage the stock statuses. For that go to admin >> System >> Localization >> Stock Statuses then you can enter the Stock Status Name. In this section, you can create Out of Stock statuses to be displayed on the product page when a product is out of stock. The image below shows default stock statuses:
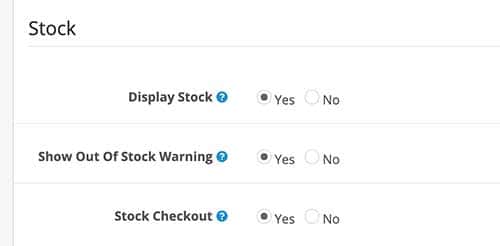
Opencart has multiple stock settings at admin >> System >> Settings >> Edit the store >> and go to Option tab >> Stock section, you will see multiple settings for Stock.
Display Stock: Display stock quantity on the product page.
Show Out Of Stock Warning: Display out of stock message on the shopping cart page if a product is out of stock but stock checkout is yes. (Warning always shows if stock checkout is no)
Stock Checkout: If selected yes it allows customers to still check out if the products they are ordering are not in stock.
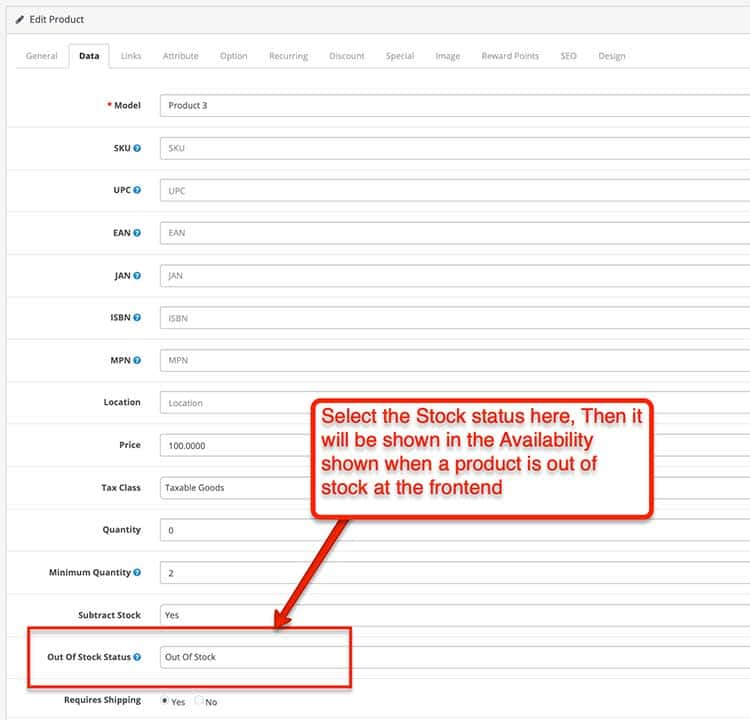
If you select the Display Stock to Yes then you can select which Stock Status name to show on the product page. Go to admin >> Catalog >> Products >> Edit/Add the product >> go to the Data tab, then go to the Out Of Stock Status field then you can choose which Stock status name to show in the frontend on the product page.
As in the below image, it will show the Out of Stock Status in the frontend.
In this way, you can manage the Stock statuses in Opencart. Please don’t forget to post your questions or comments so that we can add extra topics. You can follow us at our twitter account @rupaknpl, subscribe to our YouTube channel for Opencart tutorials, and click to see all Opencart user manual.
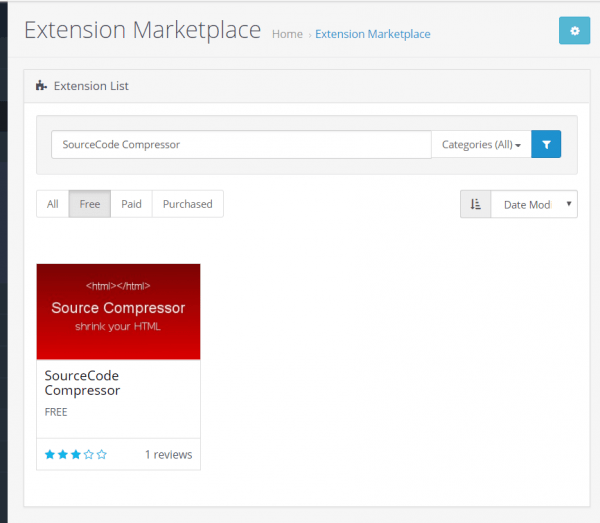
We set it up but not able to find the required modules although we searched for the same name of the modules which is frustrating with this setup because all modules developer may not have *.ocmod.zip file.
Another issue can be server issue if your file_get_contents are not active then it will install the module:
Warning: file_get_contents(): https:// wrapper is disabled in the server configuration by allow_url_fopen=0 Failed to open stream no suitable wrapper could be found
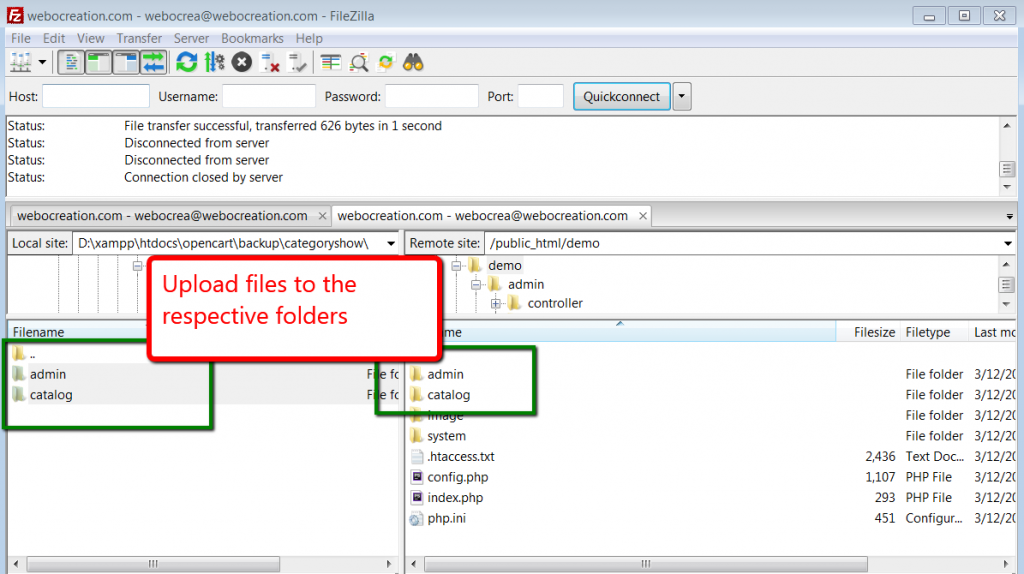
Uploading files and folders from FTP
Upload files from FTP and you are set
Uploading Ocmod file directly from the admin section:
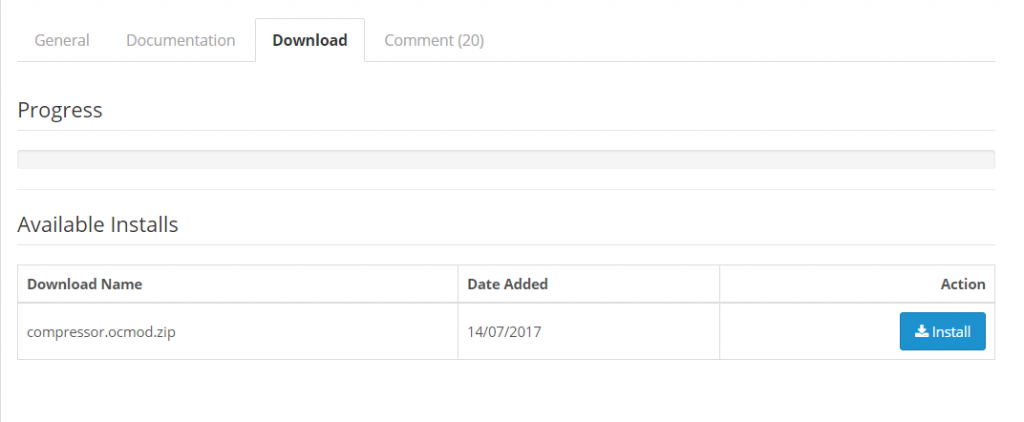
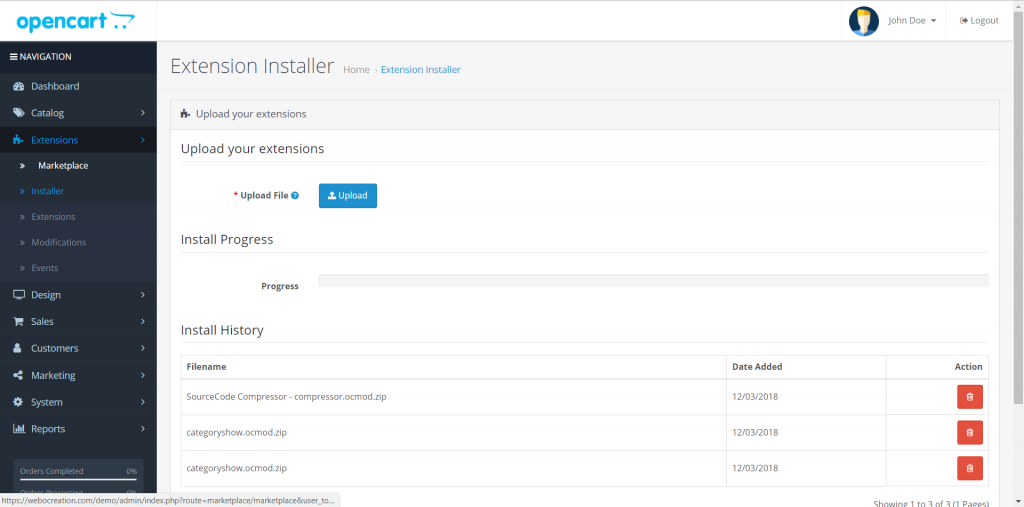
Download the *.ocmod.zip file for the modules and then upload from admin>>extensions>>Installer
In Opencart we can create a variant product based on the master product. A product variant is a pre-defined option product. For example, let’s say we add a product with red and blue options (product id 50), now we can create a variant based on this product and select the option red only to make the red variant product (product id 51 with master id 50).
How to add the product variant in Opencart?
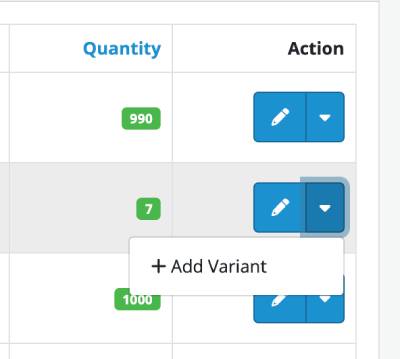
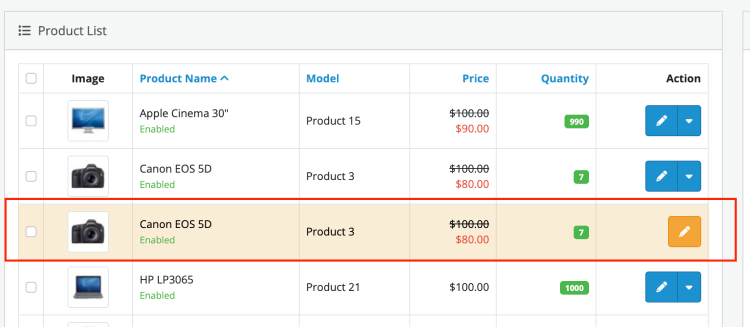
Go to products listing or Catalog>>Products and click the dropdown near the edit button in the Action column and you will see the “Add Variant”, click it and you are ready to add the variant.
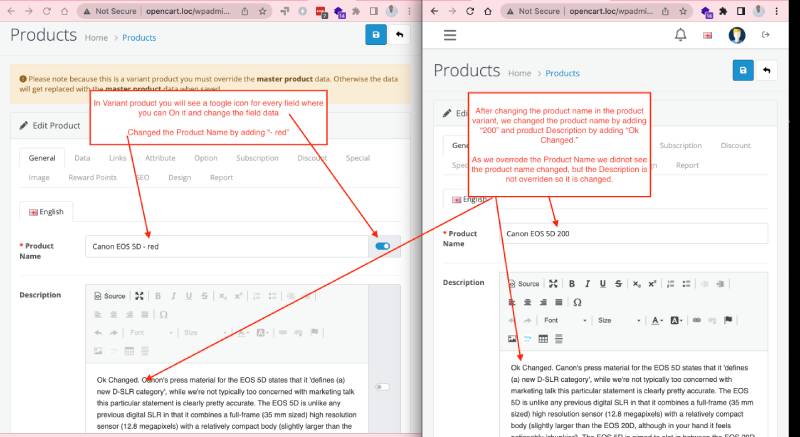
Once you clicked the “Add Variant”, all the data of the master product is copied and a new product is created where you can override the data as per your need. Please note that when you override the variant product data, the field data which is changed will not get replaced with the master product data when the master product data is changed and saved. If the field data is not overridden then when master product data is changed the changes will be seen on the variant product as well.
How to override the variant product data?
In the Variant product, you will see a toggle icon for every field where you can click On it and change the field data as per your need.
Let’s say you change the product name but did not change the product description of the product variant, then when you changed the product name and description of the master product then the changes will be seen only on the product description but not on the product name. Variants products are pre-selected options so you cannot change the options on the variant product.
Note: if you save the product variant after the master product’s data is changed then the variant product overridden data is replaced by the master product’s data, so be careful.
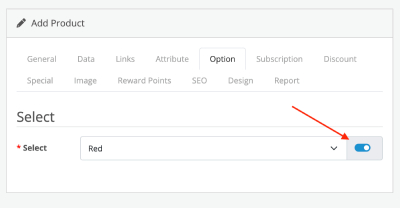
Select the Option:
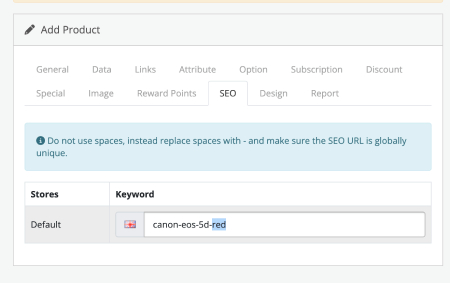
Change the SEO URL:
Now click save and you have added the product variant.
As the product variants are also added like new standalone products so you can view them on the category page as well.
Improvements needed:
When we select the option in the master product and have the product variants, then it would be better to show the product variant page.
When the option price is added, it is better to show the added price on the product variant page, right now it is showing as the product price instead of the Option price.
SEO improvements for the product variants.
Conclusion:
In this way, you can easily create product variants from master products and customize your own data except for options and making it easy to create product variants. Please let us know if you have any kind of projects, you can email us at webocreation.com@gmail.com. Hope you liked this tutorial, please subscribe to our YouTube Channel and get more Opencart free extensions. You can also find us on Twitter and Facebook.
In Opencart 4, filters allow customers to quickly narrow down product searches based on specific attributes like size, color, price range, rating, or brand. Filters enhance the shopping experience by allowing customers to easily find products that match their needs, leading to higher conversion rates and a more user-friendly interface.
This guide will cover how filters work in Opencart 4, including filter groups, assigning filters to products, and how to use them in categories.
1. Understanding Filters and Filter Groups
Filters in Opencart are used to categorize and display product attributes. These attributes can be anything that is relevant to your product line, such as size, color, brand, material, and more.
Filter Groups are categories of filters that organize related attributes together. For instance, a Color filter group may contain individual color filters like Red, Blue, Green, and so on. Similarly, a Size filter group might include filters for Small, Medium, Large, etc.
Key Terminology:
Filter Group: A collection of filters (e.g., Color, Size, Brand).
Filter: An individual attribute within a filter group (e.g., Red, Blue, Green for the Color group).
2. Setting Up Filters and Filter Groups
To set up filters and filter groups in Opencart 4:
Creating Filter Groups and Filters:
Access the Filters Section:
Navigate to the admin panel: Catalog > Filters.
Here, you can add or manage filter groups and individual filters.
Add a Filter Group:
Click on Add Filter Group to create a new group (e.g., “Color”, “Size”, “Brand”).
Enter the name of the group (e.g., Color, Size, Material).
Save the filter group.
Add Filters to the Group:
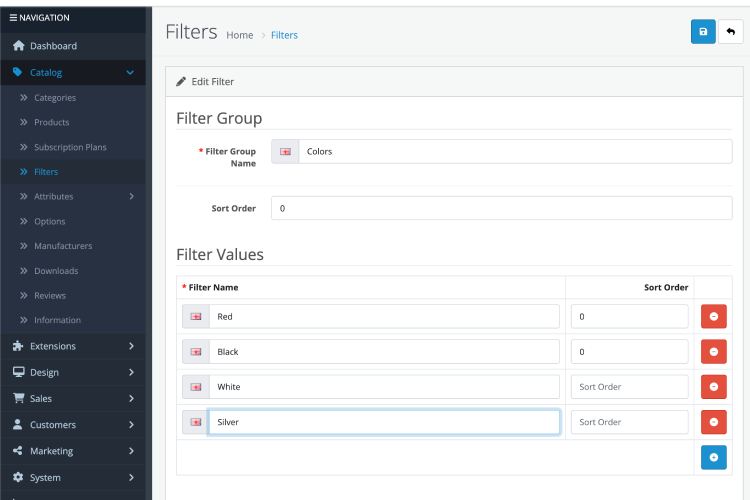
Once a filter group is created, you can add filters (e.g., Red, Black, White, Silver) to the group.
Click on Add Filter and enter the filter details. Assign filters to the relevant group (e.g., Red, Black etc under the Color filter group).
Save the filters.
Assigning Filters to Categories:
Go to Categories:
Navigate to Catalog > Categories and select the category where you want to enable filters.
Enable Filters for Category:
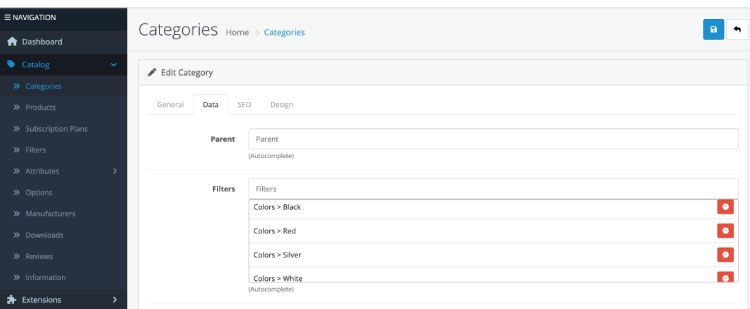
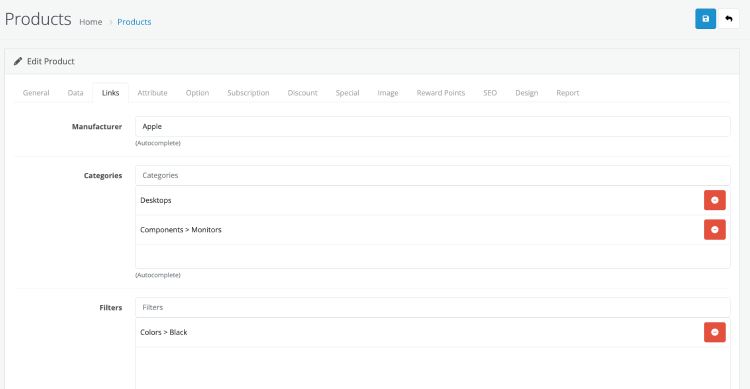
In the category edit page, under the Filter tab, choose which filters are applicable for that category.
Enable and save the selected filters for the category.
Assigning Filters to Products:
Navigate to Products:
Go to Catalog > Products and select the product you want to assign filters to.
Assign Filters:
On the product edit page, find the Filters tab.
Select the relevant filters from the available filter groups (e.g., size, color, brand) and assign them to the product.
Save the changes.
3. Using Filters in the Frontend (Store)
Once filters and filter groups are created and assigned to products and categories, customers can use the filters on the front end to narrow down their product search.
Filters will appear on the category pages in the store, usually in the sidebar or as a dropdown. To show the filter first you need to enable the Filter module.
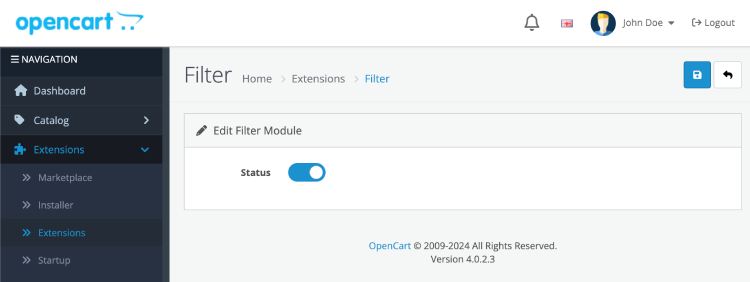
Go to Admin >> Extensions >> Extensions >> Filter out with modules >> Install the Filter module >> Edit it and Enable the filter module
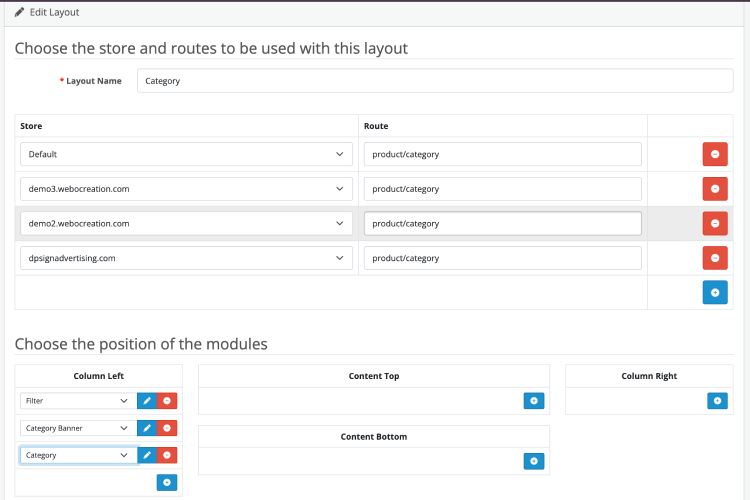
Once enabled, add the Filter module to the category layout. For that, go to admin >> Design >> Layout >> Edit the Category and add the Filter module, which we added in the left column >> Save the layout.
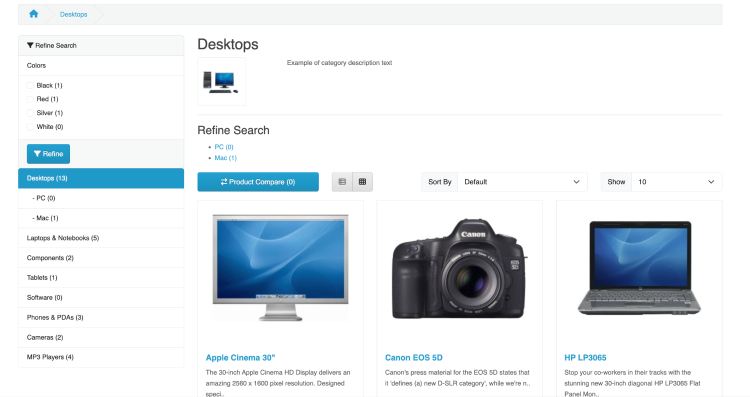
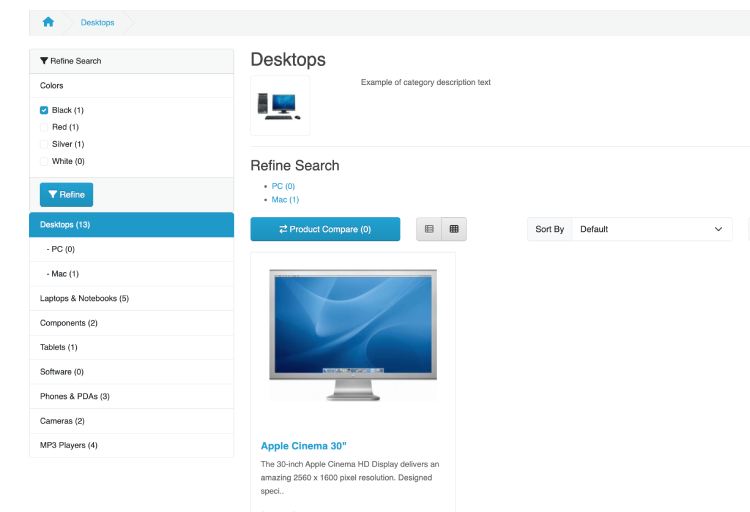
Now, customers can select filters on the category page (e.g., Color: Red, Black, etc.) to refine the product listings based on their preferences.
Now customers or visitors can use the Refine search to filter out the products.
Opencart 4 allows for various filter display options, including checkboxes, dropdown lists, and multi-select options, which provide flexibility for the store design.
4. Examples of Filters and Filter Groups
Here are some common examples of filters and filter groups for different product categories:
Filters: Modern, Vintage, Classic, Industrial, etc.
Filter Group: Size
Filters: Small, Medium, Large, Custom.
5. Use Cases of Filters in Opencart 4
Filters are essential for providing a better customer experience in your store. Below are some use cases and scenarios where filters can significantly improve product discovery:
Use Case 1: Narrowing Product Choices
Scenario: A customer is shopping for a T-shirt in your online clothing store. They want a Red T-shirt in Medium size. Instead of browsing through all products, they can use filters for Color and Size to quickly find the products they’re looking for.
Outcome: The customer saves time and finds the right product more easily, improving their shopping experience.
Use Case 2: Price Range Selection
Scenario: A customer is looking for a new smartphone, but their budget is limited to $300. They can filter products by Price to only show phones in that price range.
Outcome: The customer finds relevant products within their budget, leading to a higher likelihood of conversion.
Use Case 3: Sorting Products by Features
Scenario: A customer browsing laptops in your electronics store may want one with Bluetooth or Wi-Fi. They can filter by product Features such as Wi-Fi or Bluetooth to refine their search.
Outcome: The customer finds exactly what they need and is more likely to make a purchase.
Use Case 4: Finding Specific Categories of Products
Scenario: In a furniture store, a customer is searching for a Wooden Coffee Table. By applying the Material filter for Wood, the customer can narrow down their choices without needing to scroll through unrelated furniture.
Outcome: The customer is able to focus on the specific product category they are interested in, improving their shopping efficiency.
Use Case 5: Product Comparison
Scenario: A customer wants to compare different brands of Smartwatches. By using the Brand filter and selecting multiple brands, the customer can compare products side by side based on specifications, prices, and features.
Outcome: The customer gains clarity on their options, making it easier to choose the best smartwatch for their needs.
Conclusion
Filters in Opencart 4 are a crucial tool for improving product discovery and the overall shopping experience. By setting up Filter Groups and Filters, assigning them to products and categories, and presenting them in an intuitive way on the front end, you can enable customers to find the exact products they are looking for more easily. Whether you sell clothing, electronics, or furniture, using filters can streamline the browsing process, increase customer satisfaction, and ultimately boost sales. We hope you liked this article, please subscribe to our YouTube Channel for Opencart video tutorials. You can also find us on Webocreation Twitter and Webocreation Facebook. Please let us know if you have any questions or concerns.
In this Opencart tips and tricks, we are showing you to set different shipping methods like free shipping on Opencart, similarly flat rate shipping, shipping rate as per item, free shipping after some amount is reached on total orders, pick from store setup, flat rate up to 100 and then free shipping and so on. We are using Opencart 4.0.1.1 version for demo purposes but it is similar to other Opencart versions. Let’s start with a free shipping setup.
How to set up free shipping in the Opencart store?
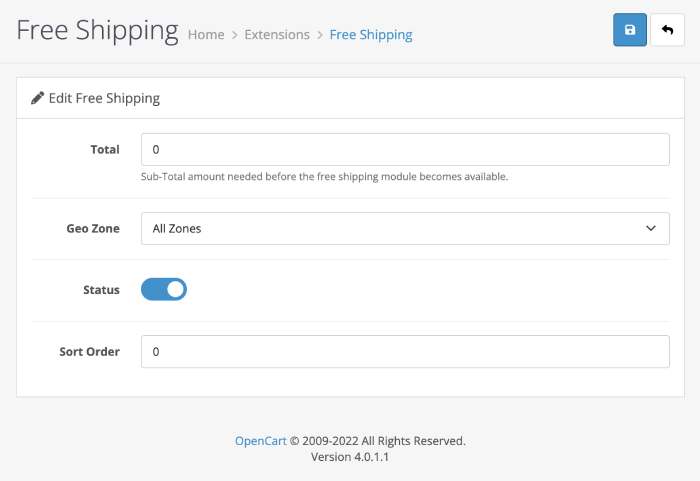
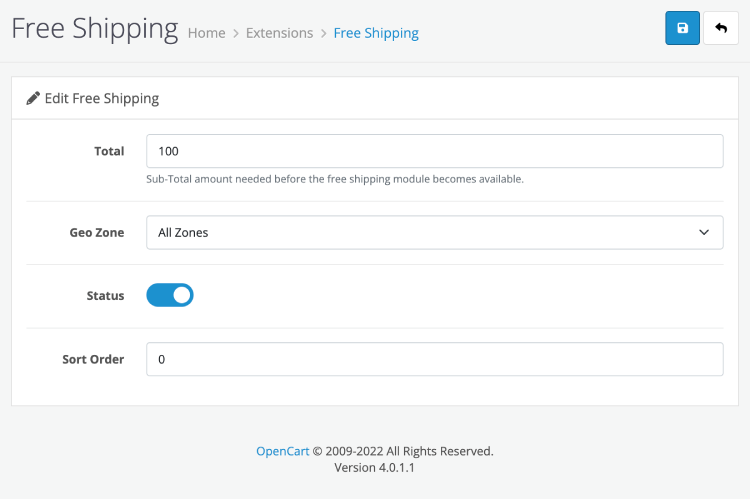
To set up the free shipping, log into the admin section >> Extensions >> Extensions >> select Shipping, where you will see lists of available shipping extensions, install the “Free Shipping” extension if it is not installed, after that click the edit and you will see a form like below where you can enter total as 0, select the geo zone as “All Zones”, toggle to enable the status and sort order to 0 and click the blue button to save the setting. With this your free shipping extension is active.
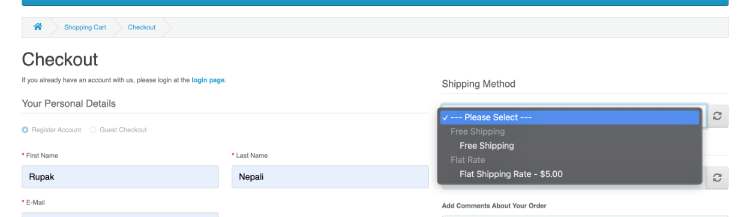
Now, when someone checkout, they will see the free checkout option on the Shipping methods.
How to set up a flat shipping rate in the Opencart store?
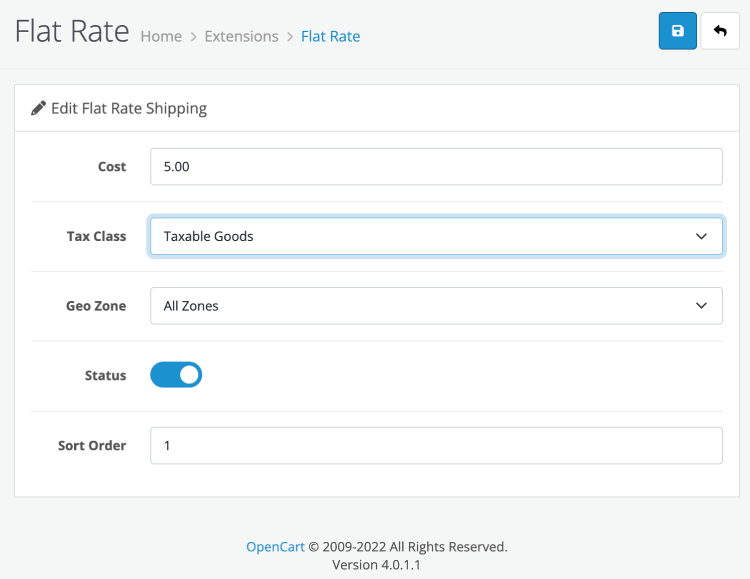
You can set the flat shipping rate similar to the free shipping, log into admin >> Extensions >> Extensions >> select Shipping >> install “Flat rate” extension and edit it. You will see a form like below, where you enter the amount in the Cost field for flat shipping.
Now, let’s set up a combination of free shipping and flat-rate shipping.
How to set up free shipping for over $100 and for below it will be $5 flat-rate shipping?
First, we need to install both free shipping and flat rate extensions, which you can do like above. Once extensions are installed, then edit the free shipping extension and enter the setting in the form as shown below, the only change is the Total field is set to 100. That 100 is the sub-total amount needed before the free shipping module becomes active.
You can set the flat rate cost of 5 and you are good to go. Now free shipping is shown only when the sub-total reached 100.
How to set the shipping rate per item?
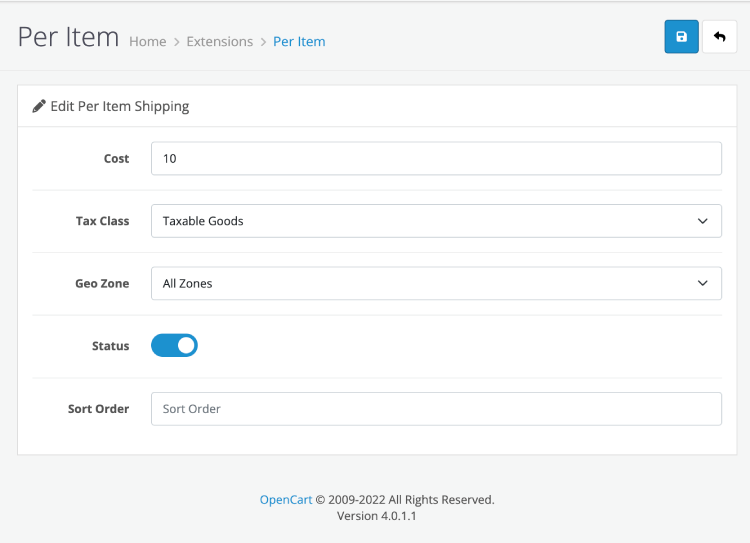
in some cases, you need to set the shipping rate per item, in that case, also Opencart provides default extensions, log into admin >> Extensions >> Extensions >> select Shipping >> install “Per Item” extension and enter the cost for each item.
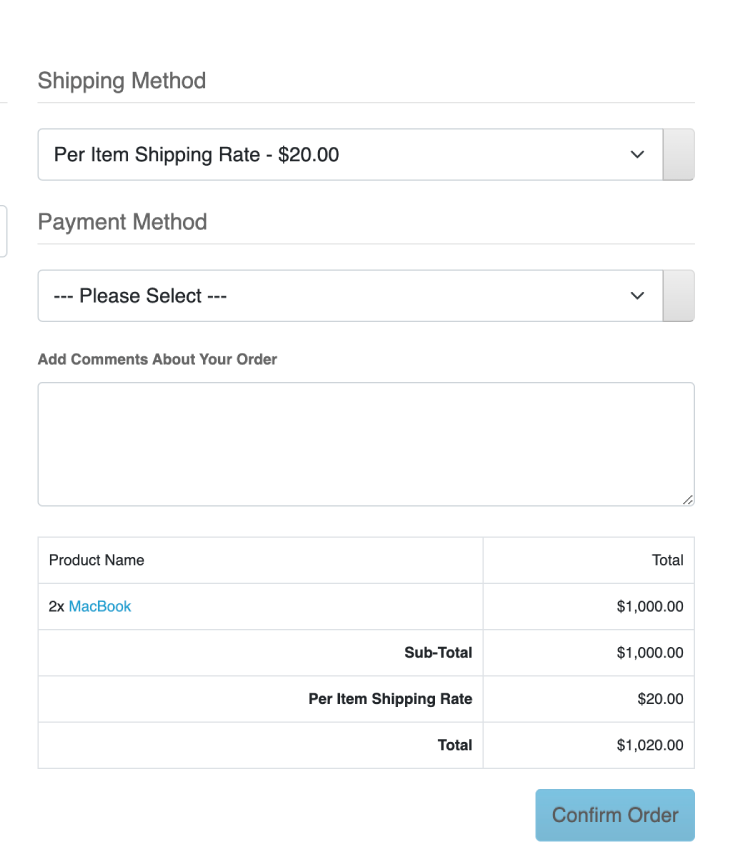
With this now if you order two items then shipping will be 20. Here is one example, we order 2 Macbooks and the shipping is 20.
How do you can set up pick up from the store shipping in the Opencart store?
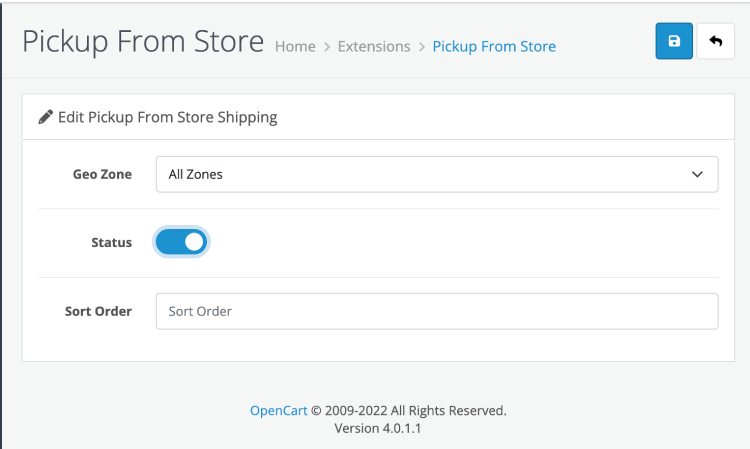
Similar to other extensions, you can install the “Pickup From Store” extension and edit it, enable the status and you will see the Pick up from store option in shipping methods.
How to set up a weight-based shipping rate?
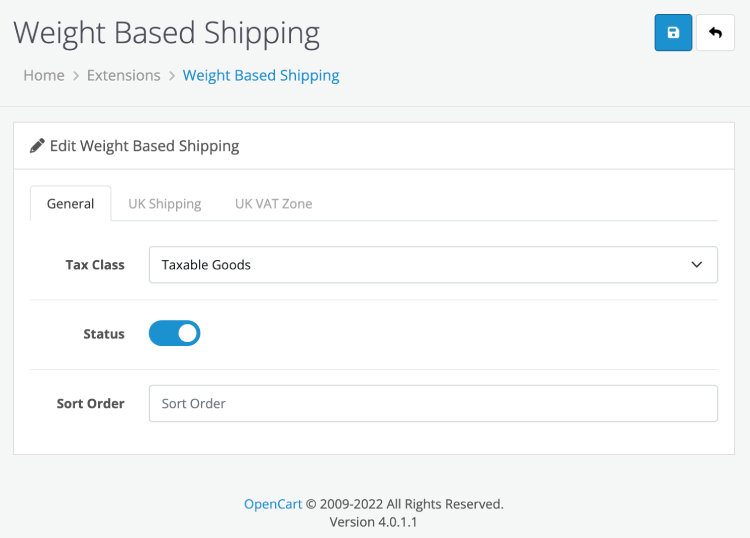
First, you need to set up weight classes and then add the weight for each product. Once the weight is added for products you can use the weight-based shipping rate. You can install the “Weight Based Shipping” extension, edit it and you will set up the general options like below:
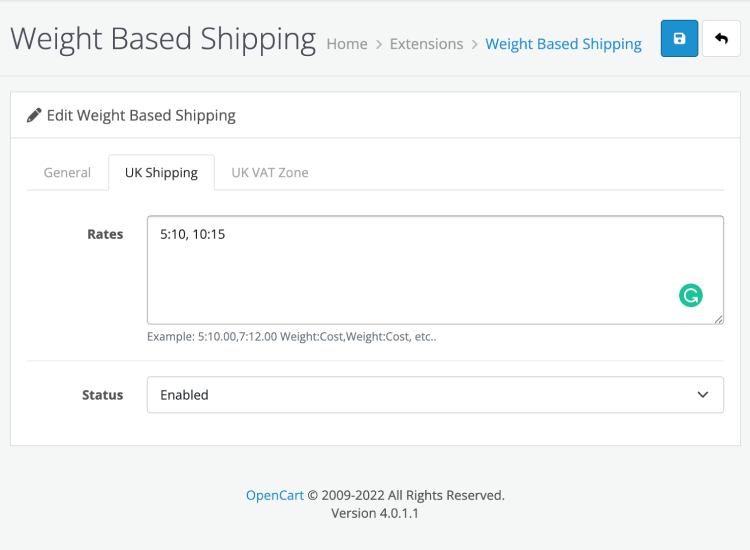
You will see a general tab and other Zone shipping tabs. In the general tab, select the tax class, enable the status and enter the sort order as you like to show in the Shipping methods. In the Zone shipping let’s select the UK shipping tab, you can enter the rates in the format of weight:cost comma weight:cost and enable the status. Here is an example:
Let’s say your weight setting is Kilogram at Settings >> Local tab >> Weight class. Then, with that rate setting, it means that 5 kilograms of product cost 10 and 10 kilograms, and more costs 15. So you can set those options as many as you want.
In this way, you can set shipping methods in Opencart. Please let us know if you have any questions or comments so that we can add extra topics. You can follow us at our Twitter account @rupaknpl, subscribe to our YouTube channel for opencart tutorials, and click to see all Opencart user manuals.
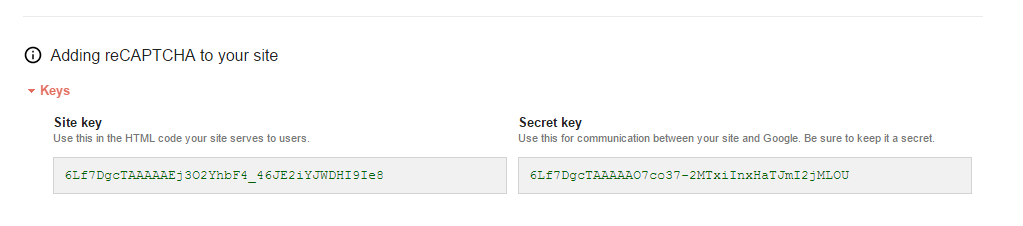
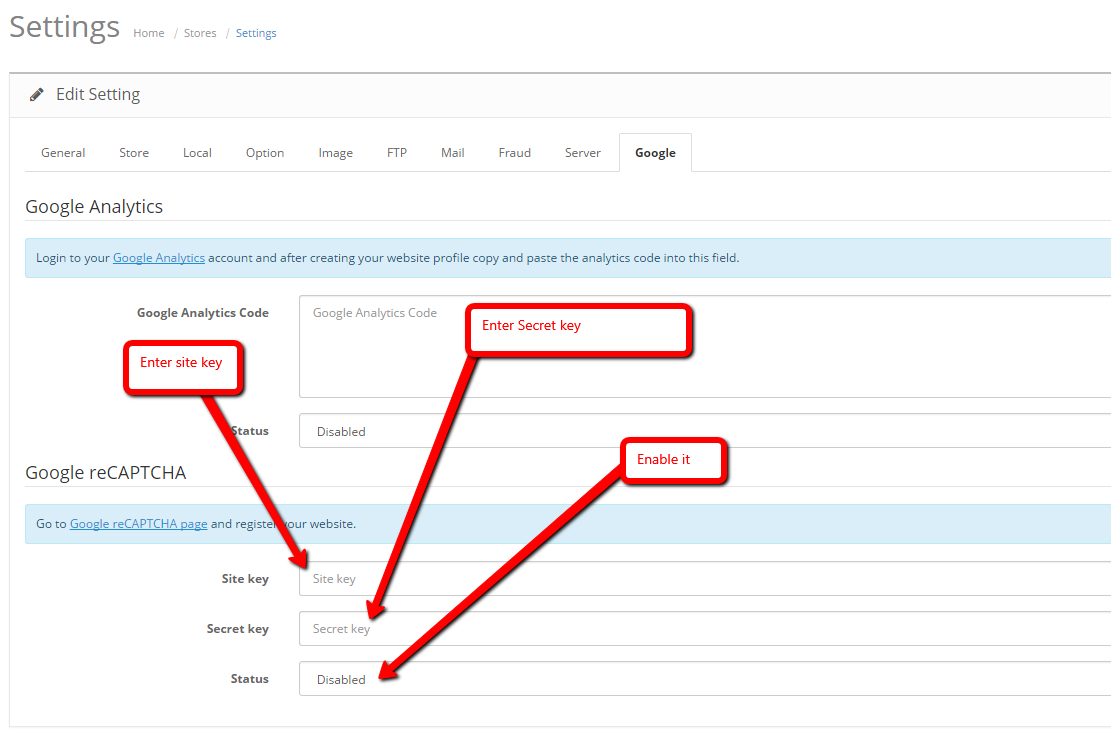
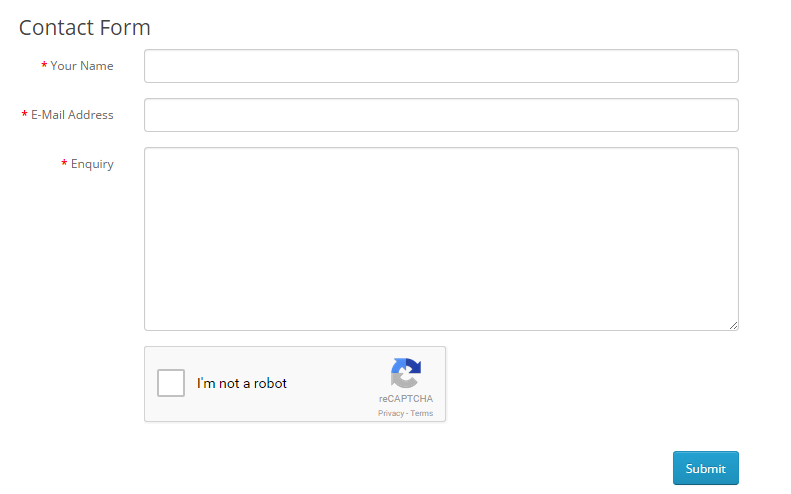
With advancement of versions OpenCart is using best opensource like bootstrap, flex slider, Magnific Popup: Responsive jQuery Lightbox Plugin, OWL Carousel, font awesome and for captcha now it is using Google reCAPTCHA, in this blog post we will show you how to set it up in contact us page so captcha is easy for human and tough for the bots and in part 2 I will show how to make it work in registration page.
What do you mean by Google reCAPTCHA? reCAPTCHA is a free service to protect your website from spam and abuse. reCAPTCHA uses an advanced risk analysis engine and adaptive CAPTCHAs to keep automated software from engaging in abusive activities on your site. It does this while letting your valid users pass through with ease. Get more details from https://www.google.com/recaptcha/intro/index.html
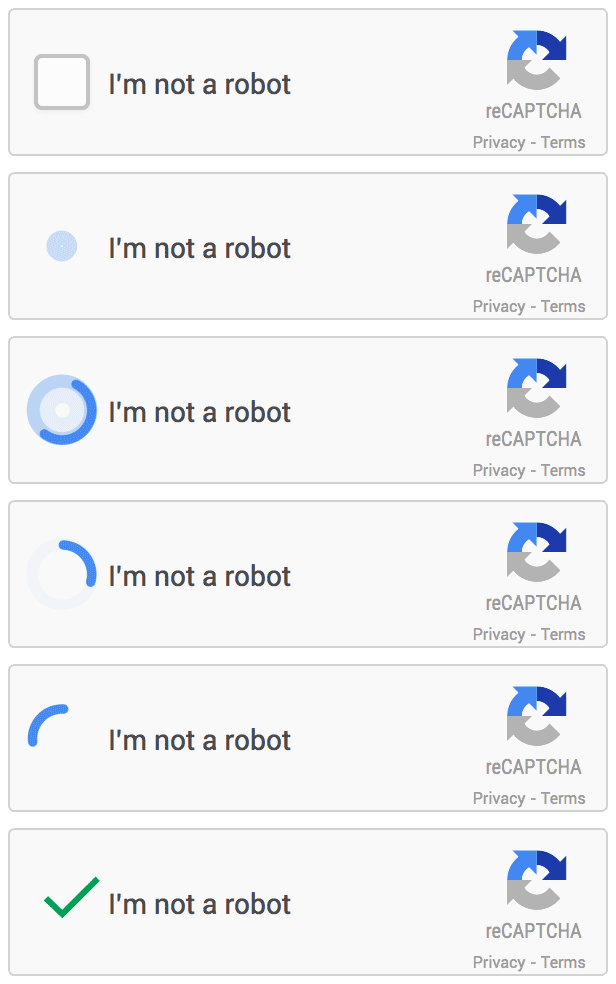
How does it work? It is demonstrated by the following videos.