OpenCart 4 provides a robust and flexible design layout system for customizing the appearance and functionality of your online store. One of the standout features is the ability to override design layouts without modifying core files. This functionality ensures that you can implement customizations in a way that’s easy to manage and update. Let’s explore what design layout overrides are, their use cases, and how to implement them effectively.
What Are Design Layout Overrides?
In OpenCart, layouts define how different pages of your store are structured. A layout specifies which modules appear in various positions (e.g., header, footer, sidebar) on a page. Design layout overrides allow you to customize these layouts for specific pages, categories, or products without altering the default settings or core files. This makes your store highly customizable while maintaining compatibility with future updates. This helps on:
Implementing unique promotional layouts
Maintaining upgradability
Creating custom pages
Modifying existing layouts for specific categories or products
Why Use Design Layout Overrides?
1. Custom Page Designs
You can create unique designs for individual pages, such as a custom homepage, promotional landing pages, or special campaign pages.
For example, you might want a “Black Friday Sale” page with its own layout and modules like countdown timers and banners.
2. Category-Specific Layouts
Different categories may require unique layouts based on the type of products they contain.
For example, the “Electronics” category might feature a slideshow of gadgets, while the “Clothing” category displays a carousel of featured apparel.
3. Product-Specific Layouts
Highlight premium or featured products with dedicated layouts.
For instance, a flagship product might have an expanded description, video module, and additional call-to-action buttons.
4. SEO and User Experience Enhancements
Tailored layouts can improve user experience (UX) by presenting content in a way that’s optimized for specific audiences.
This also enhances SEO by ensuring relevant and structured content is displayed for search engines.
How to Implement Design Layout Overrides in OpenCart 4
Follow these steps to apply design layout overrides in OpenCart 4:
Step 1: Access Layouts in Admin Panel
Log in to your OpenCart admin panel.
Navigate to Design > Layouts.
You will see a list of predefined layouts (e.g., Home, Product, Category).
Step 2: Create or Edit a Layout
Click the Add New button to create a new layout or edit an existing one.
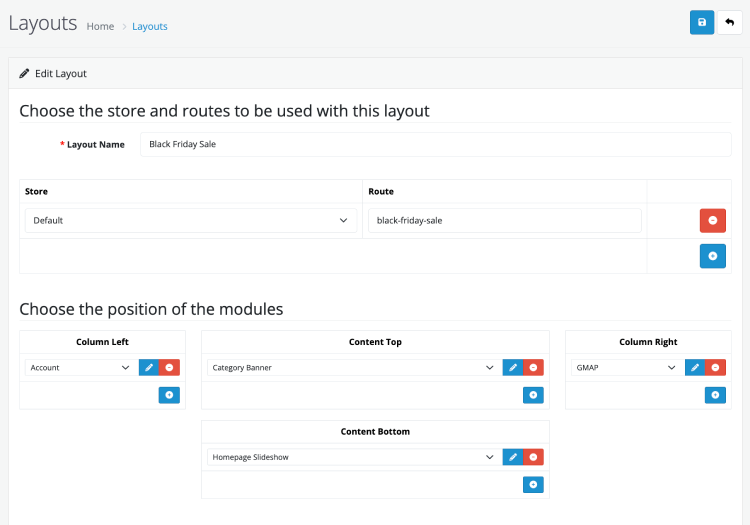
Provide a meaningful name for your layout (e.g., “Black Friday Sale”).
Assign the desired route (e.g., black-friday-sale). Routes define where the layout will be applied.
Step 3: Add Modules to Layout Positions
In the layout editor, assign modules (e.g., Banners, Carousels, Latest Products) to specific positions (e.g., Content Top, Content Bottom, Column Left and Column Right).
Configure each module as needed. For example, set banner images or define product categories.
Step 4: Save and Test
Save your changes and navigate to the assigned route in your store.
Verify that the layout displays as expected. Tweak module settings or positions if necessary.
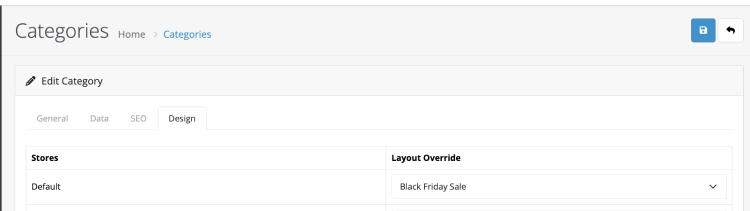
Step 5: Assign Layout to the Category
Edit the category where you want to assign the new layout. Here for an example, we will edit the Camera category and assign the Black Friday Sale layout to override the default category layout.
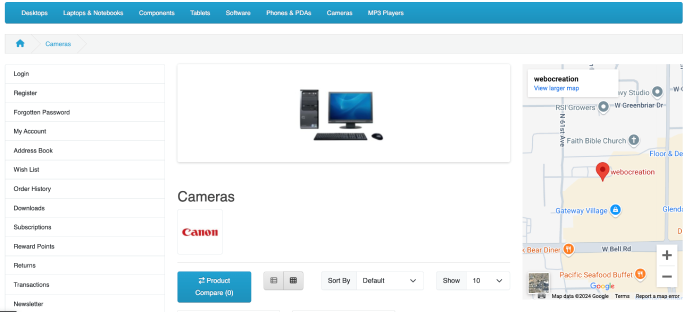
Then in the frontend the layout is different for the Camera category.
Examples of Layout Overrides
1. Promotional Landing Page
Use Case: A dedicated page for a holiday sale.
Implementation:
Create a new layout.
Assign modules like a countdown timer, featured products, and promotional banners.
Route: promo/holiday-sale.
2. Category-Specific Layout
Use Case: Enhancing the layout of the “Books” category.
Implementation:
Edit the “Category” layout or create a new one.
Assign a carousel module to display bestsellers in “Books.”
Route: category/books.
3. Product-Specific Layout
Use Case: Highlighting a flagship smartphone.
Implementation:
Create a new layout.
Add modules such as a video gallery and a technical specifications block.
Route: product/flagship-smartphone.
Best Practices for Using Design Layout Overrides
Plan Ahead: Sketch your desired layouts and identify which pages need overrides.
Use Descriptive Names: Name your layouts meaningfully to avoid confusion.
Test Thoroughly: Always test your layouts on different devices and browsers.
Keep It Modular: Utilize reusable modules to streamline your design process.
Backup Regularly: Before making major changes, back up your store to avoid data loss.
Conclusion
Design layout overrides in OpenCart 4 provide unparalleled flexibility for customizing your store. By leveraging this feature, you can create unique and engaging shopping experiences tailored to your customers’ needs. With proper planning and implementation, layout overrides can significantly enhance your store’s visual appeal and functionality.
In this Opencart user manual, we will learn to manage categories in Opencart 4, a fundamental task for organizing your products and improving your store’s navigation. Here’s a step-by-step guide to managing categories from the Opencart admin panel.
Accessing the Admin Panel
Log in to the Admin Panel:
Navigate to http://yourdomain.com/admin (In Opencart 4, the admin URL can be different as per the installation).
Enter your username and password to log in.
Navigating to Categories Management
Access Categories:
In the admin dashboard, go to Catalog > Categories.
This section will display a list of all existing categories.
Creating a New Category
Add New Category:
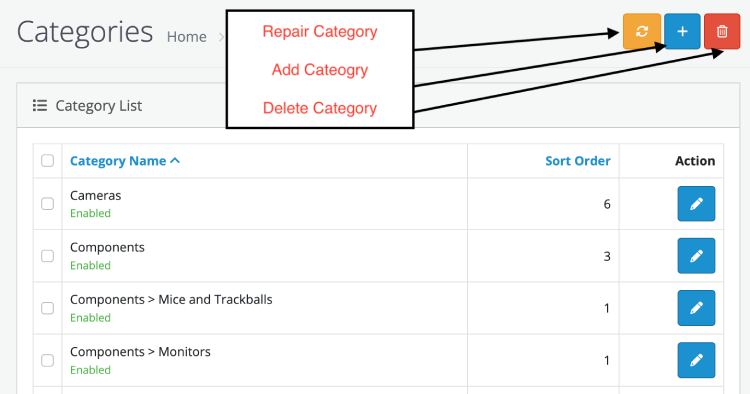
Click on the “+” (Add New) button at the top right corner.
Category Details:
General Tab:
Category Name: Enter the name of the category.
Description: Provide a detailed description of the category. Format the text using the editor and add images if necessary.
Meta Tag Title: Enter a title for SEO purposes.
Meta Tag Description: Add a meta description for SEO.
Meta Tag Keywords: Include relevant keywords for SEO.
Data Tab:
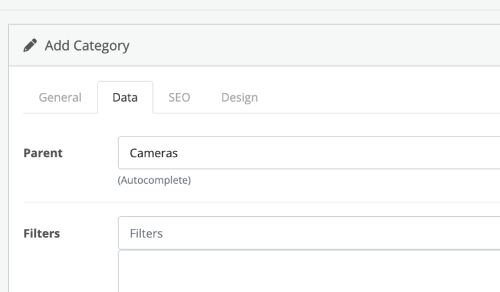
Parent Category: If this category is a subcategory, select the parent category. You can start typing in the Parent and select the parent category.
Filters: Add filters that apply to this category. Read more about Opencart filters
Stores: Select the store where this category will be available (useful for multi-store setups).
Image: Upload an image representing the category.
Top: Choose whether to display this category in the top menu bar. If you don’t check this checkbox it will not show in the Top main menu.
Columns: Specify the number of columns to use for the bottom categories.
Sort Order: Define the order in which this category appears relative to others.
Status: Set the status to “Enabled” to make the category active or “Disabled” to hide it.
SEO Tab:
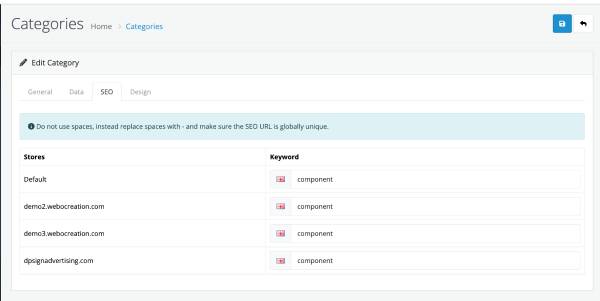
SEO URL: Create a search engine-friendly URL. Do not use spaces, instead replace spaces with – and make sure the SEO URL is globally unique.
In the Categories list, find the category you want to edit.
Click the “Edit” button (pencil icon) next to the category name.
Modify Details:
Make necessary changes in the General, Data, and Design tabs.
Save Changes:
Click the “Save” button to update the category.
Deleting a Category
Delete Category:
In the Categories list, select the checkbox next to the category you want to delete.
Click the “Delete” button (trash can icon) at the top right corner.
Confirm the deletion when prompted.
Managing Subcategories
Creating Subcategories:
Follow the steps for creating a new category.
In the Data tab, select the appropriate parent category.
Viewing Subcategories:
In the Categories list, subcategories are usually displayed hierarchically under their parent categories.
Bulk Actions
Bulk Editing:
Select multiple categories by checking the boxes next to their names.
Use the bulk actions (e.g. deleting) at the top right corner.
SEO and Best Practices
SEO URL Management:
Ensure each category has a unique and descriptive SEO URL.
Use keywords in the meta tags to improve search engine rankings.
Optimized Descriptions:
Write clear and detailed descriptions for each category, incorporating relevant keywords.
Use the editor to enhance descriptions with images and formatted text.
Category Images:
Use high-quality images that represent the category well.
Optimize images for fast loading times.
Managing categories in Opencart from the admin panel is straightforward and crucial for maintaining an organized and user-friendly ecommerce store. By effectively creating, editing, and organizing categories, you enhance the shopping experience for your customers and improve your store’s SEO performance.
This Opencart tutorial collects the most common errors that we face while developing and provides solutions for errors, try them and hope you could solve the issues
foreach (glob(trim($next, '/') . '/{*,.[!.]*,..?*}', GLOB_BRACE) as $file) {
to following
foreach (glob($next . '/{*,.[!.]*,..?*}', GLOB_MARK|GLOB_BRACE) as $file) {
2. Blank White Pages or 500 Internal Server Error
Blank white pages are a PHP error that for some reason the error messages don’t show because your server is not set up to display the errors.
Go to the admin>> System >> Setting >> Edit store >> Server tab and at the end where you see the Error handling choose Yes to “Display Errors “.
If you still don’t see the error, open php.ini and add code below: display_errors = 1; error_reporting = E_ALL; log_errors = 1;
If you still don’t see the error then open index.php and add code below at the top (line 2): ini_set(‘display_errors’, 1); ini_set(‘log_errors’, 1); error_reporting(E_ALL);
Still seeing the error then, set your “Output Compression Level” to 0 in the System > Settings > Server tab.
If you still see the error, solve the issues but if you did not see the errors then most probably it will be a Server error.
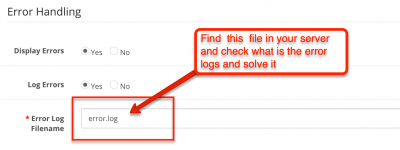
You can see error logs in the file also if you had enabled it.
Above mostly it gets solved and the 500 Internal Server Error can be solved with a similar approach.
2. Undefined Index / Variable
An undefined variable in the source code of a computer program is a variable that is accessed in the code but has not been previously declared by that code. So for that using “isset()” to check if the variable has been set will solve the issue.
Error variant:
Notice: Undefined index: filter in /Applications/XAMPP/xamppfiles/htdocs/opencart303/catalog/controller/product/category.php on lin
Commenting $filter = $this->request->get[‘filter’]; and checking with isset is one way to solve it.
If you get the issue while installing the modules or extensions then you need to check the code or solve the issues or contacting the developer can be also another solution.
3. Undefined Function / Method
Undefined function/method errors are seen when you call those functions or methods that are not defined and not found. IE_ERROR: A fatal error that causes script termination “Fatal error: Call to undefined function” or “Fatal error: Call to undefined method”. It happens if files are not found or the extensions are not compatible with your OpenCart version. Solutions can be below:
Error variant:
Related to OpenCart core files
Fatal error: Uncaught Error: Call to undefined method DB\MySQLi::query()
Fatal error: Uncaught Error: Call to undefined method Cart\Cart::getProducts()
Fatal error: Uncaught Error: Call to undefined method ControllerAccountLogin::validate() in …/catalog/controller/account/login.php:54
Go to the file and check whether the function or methods are defined there.
4. Headers Already Sent
Error variant:
Warning: Cannot modify header information – headers already sent by (output started at /public_html/config.php:31) in /path/public_html/index.php online.
Solution:
Remove spaces at the beginning and end of the file mentioned. Like in the above error check with the config.php
5. Session Issue
The product on the cart is self-cleared.
The product on the cart is cleared after the user logged in.
No items stored at product compares.
OpenCart admin always asking to login and get message “Invalid token session. Please log in again”.
Error variant:
Warning: session_start () [function.session-start]: open (/tmp/…, O_RDWR) failed: No such file or directory (2) in /path/public_html/system /library /session.php on line
Solution:
No such file or directory issue
Open php.ini and add code below:session.save_path = /tmp;
If the solution above does not work, contact your host and ask them how to set session.save_path.
6. Allowed Memory Size Exhausted
This error happens because your memory is not enough to execute the PHP code (uploading large images, deleting a lot of products, sending mass emails, etc). Increasing the memory allocated for PHP will solve the issue.
Error variant:
Fatal error: the Allowed memory size of 1111 bytes exhausted (tried to allocate 1111 bytes) in /path/public_html/system/library/image.php on line
Solution:
Edit php.ini and set memory_limit = 128M;
Or put code below to .htaccess php_value memory_limit 128M
If the above does not works then contacting the hosting providers is only the solution where they can increase the number.
Warning: Use of undefined constant DIR_STORAGE – assumed ‘DIR_STORAGE’ (this will throw an Error in a future version of PHP) in …/config.php on line
Some other errors that you can face are below:
Error: Calls to magic methods are not allowed!
// Stop any magical methods being called
if (substr($this->method, 0, 2) == '__') {
return new \Exception('Error: Calls to magic methods are not allowed!');
}
Error: Could not call product/category
// Initialize the class
		if (is_file($file)) {
			include_once($file);

			$controller = new $class($registry);
		} else {
			return new \Exception('Error: Could not call ' . $this->route . '/' . $this->method . '!');
		}
Error: Could not load model
if (!$this->registry->has('model_' . str_replace('/', '_', $route))) {
    $file = DIR_APPLICATION . 'model/' . $route . '.php';
    $class = 'Model' . preg_replace('/[^a-zA-Z0-9]/', '', $route);

    if (is_file($file)) {
        include_once($file);
        $proxy = new Proxy();
	// Overriding models is a little harder so we have to use
        //  PHP's magic methods
	// In future version we can use runkit
        foreach (get_class_methods($class) as $method) {
            $proxy->{$method} = $this->callback($this->registry, $route . '/' . $method);
        }

        $this->registry->set('model_' . str_replace('/', '_', (string)$route), $proxy);
    } else {
        throw new \Exception('Error: Could not load model ' . $route . '!');
    }
}
Error: Could not load library
Error: Could not load helper
Error: Could not load cache adaptor Memcache/Redis/APC cache!
$class = 'Cache\\' . $adaptor;
if (class_exists($class)) {
    $this->adaptor = new $class($expire);
} else {
    throw new \Exception('Error: Could not load cache adaptor ' . $adaptor . ' cache!');
}
Error: Could not load database adaptor mpdo/mssql/mysql/mysqli/postgre !
$class = 'DB\\' . $adaptor;
if (class_exists($class)) {
    $this->adaptor = new $class($hostname, $username, $password, $database, $port);
} else {
    throw new \Exception('Error: Could not load database adaptor ' . $adaptor . '!');
}
Error: Could not make a database connection using this username and password
Error: Could not connect to database opencart
Error: PHP GD is not installed!
if (!extension_loaded('gd')) {
    exit('Error: PHP GD is not installed!');
}
Error: Could not load image filename!
Error: Invalid session ID!
Warning: Install folder still exists and should be deleted for security reasons!
Installed bad extension, pressed refresh in the modification, and both admin panel and site are down
Remove it from the database, then open config.php and find what is the value defined for storage. Go to that storage/ folder, then go to modification and remove folders, similarly go to upload/ folder and see if there are folders if you have, remove it also. With this, it will remove the cached files and folder. Then, you can access your admin again.
Fatal error uncaught exception
Fatal error: Uncaught Exception: Error: Table ‘….oc_session’ doesn’t exist in engine<br />Error No: 1932<br />SELECT `data` FROM `oc_session` WHERE session_id = ‘….’ AND expire > 1548638620 in …/system/library/db/mysqli.php:40 Stack trace: #0 …/system/library/db.php(45): DB\MySQLi->query(‘SELECT `data` F…’) #1
For these errors to solve creating a database table will solve most of the issues
Fatal error: Uncaught Exception: Error: Could not load database adaptor DB_DRIVER!
Check in the system/library/DB folder whether the required driver file is there.
In this Opencart tutorial, we are showing you how to add HTML in Opencart, similarly how to add google analytics, google tag manager, Adroll, Facebook pixels, MailChimp conversion code, google ads conversion in success page only, and other third-party JavaScript code in the Opencart, likewise our best way to manage the JavaScript code through google tag manager and test and preview in the google tag manager.
How to add HTML in the Opencart?
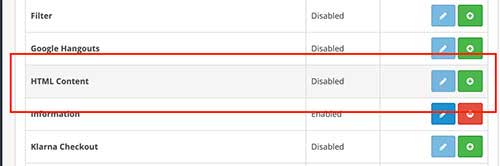
Opencart has an HTML content module in which you can add the custom HTML in the Opencart and show in any layout you want. Go to admin >> Extensions >> Extensions >> Choose the extension type “Modules”, then look for HTML content and then install it. As HTML content is a multi-instance Opencart module, you can install as many different modules as you want.
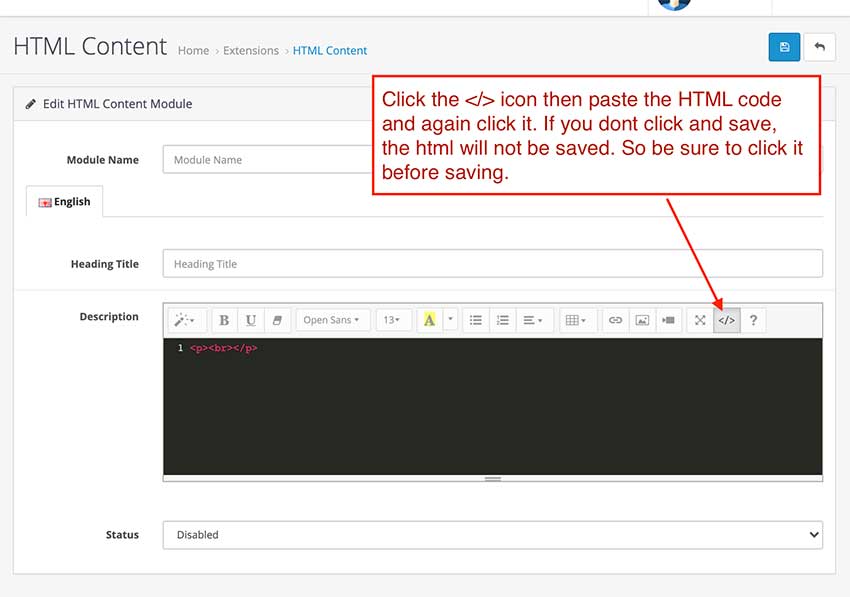
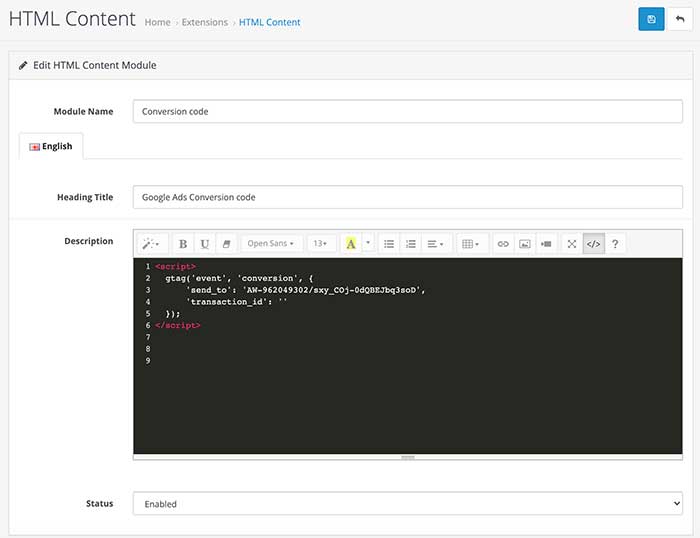
Once you install, click the add module button of the HTML content and you will see a form like below:
Click the </> icon then paste the HTML that you have and again click the icon </> and then only the HTML will be saved, else HTML code will not be saved. So be sure to click </> and see WYSIWYG editor and then only click the Save button.
Now, go to admin >> Design >> Layouts and edit where you want to show the module and then select the positions where to show. Here is a video which shows the layouts and position details of Opencart 3
How to add google analytics in the Opencart?
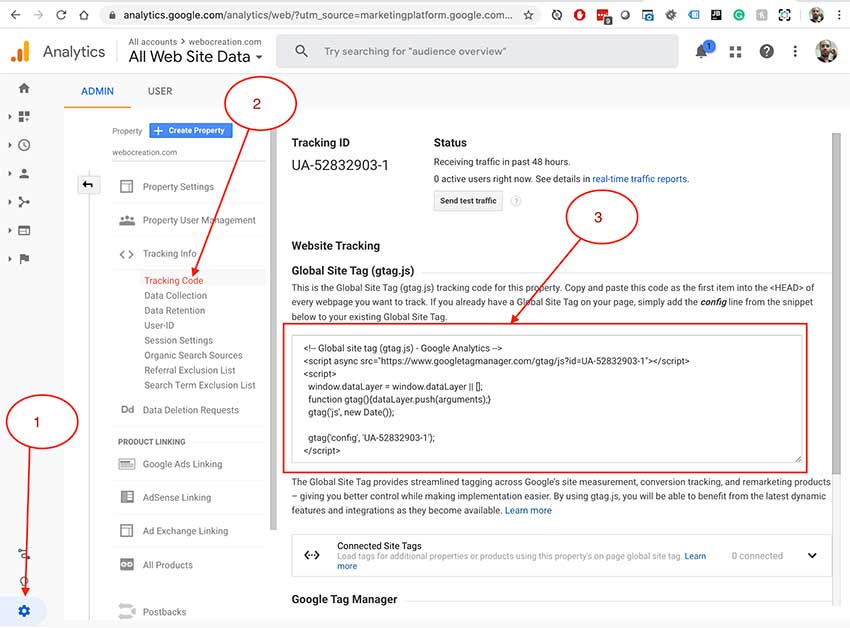
Go to https://google.com/analytics, then log in, choose your accounts and select the “All Web Site Data”, then click in the left menu (1) “Admin”, then to the (2) Tracking Code and then (3) copy the code.
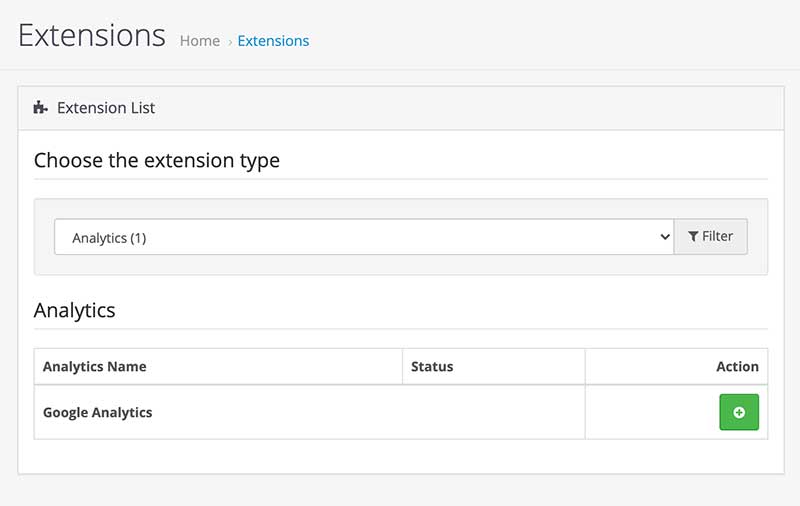
Once you copy the code, go to the Opencart admin >> Extensions >> Extensions >> Choose the extension type “Analytics”. Click the install button.
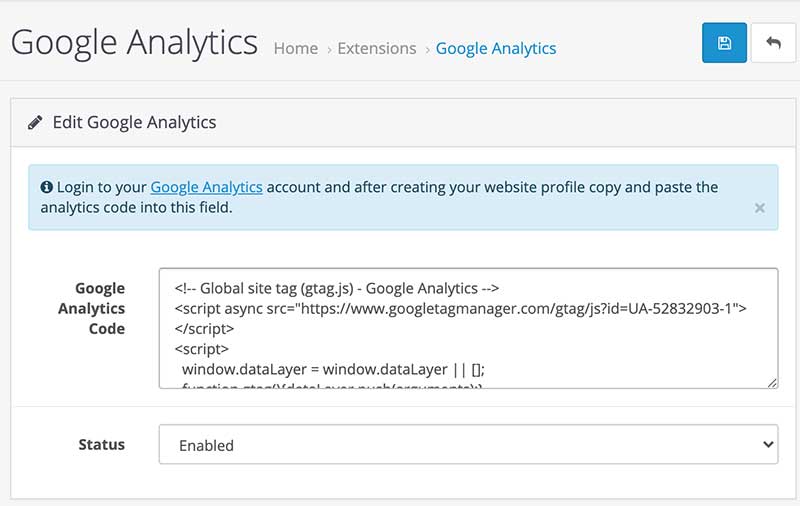
After install click the edit button and you will see the form like below where you can paste the javascript analytics code.
Similarly, you can add any third-party JavaScript code here like, the google tag manager, Facebook pixels, MailChimp conversion code, etc.
How to add conversion code on the success page of Opencart?
Conversion codes are mostly added on the success page. Here are the steps to add conversions the Opencart way, it may long way but it is Opencart way taking layouts into consideration:
Go to admin >> Extensions >> Extensions >> Choose the extension type “Module” and install the Custom HTML module >> add new >> Enter module name >> Click the </> icon on description >> insert the JavaScript code >> Click the </> icon again >> select Enabled on status >> click Save.
Now, go to admin >> Design >> Layouts
Edit the checkout layout
Change the module name to “Checkout Cart”
In the route field change “checkout/%” to “checkout/cart”
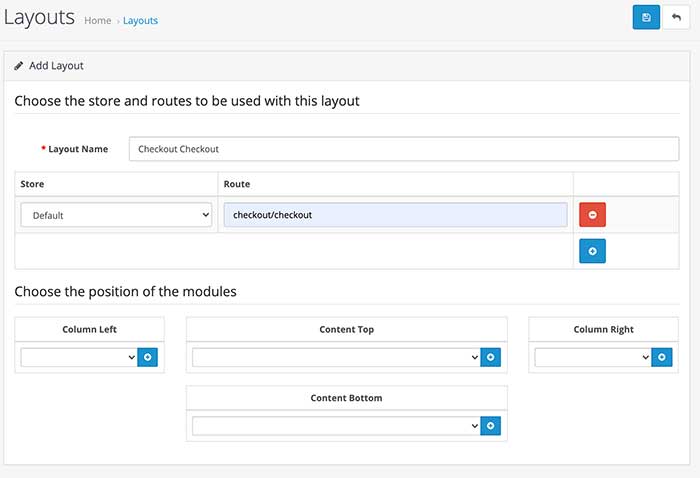
Now, click add a new layout, then enter module name is “Checkout Checkout” and in the route field click “add new” button and add the route as “checkout/checkout” and then click Save.
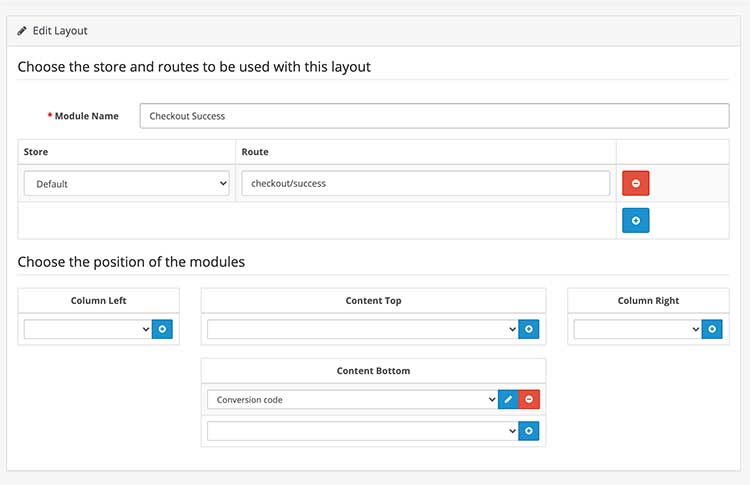
Similarly, click add a new layout, then enter the module name as “Checkout Success” and in the route field click “add new” button, enter “checkout/success”, then click the add button on the Content Bottom position and select the Conversion code HTML module, then click Save button.
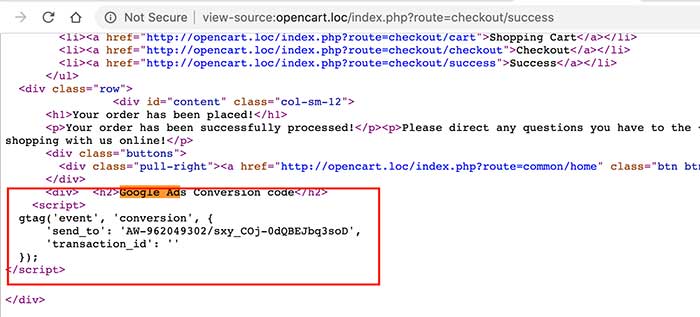
With the above steps, the conversions code is shown only on the success page.
In this way, you can add conversion code on the success page only. We made three different layouts because checkout/% took preferences so we cannot create only checkout/success only. Thus we need to create for all of the routes that checkout contains, thus there are three different layouts.
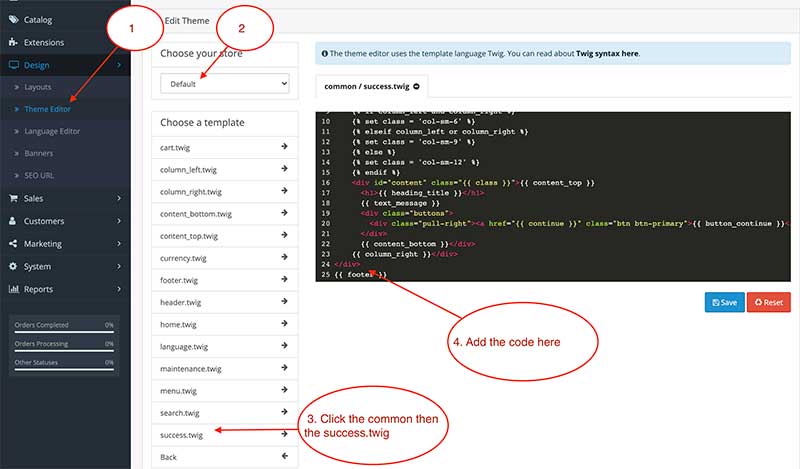
If you are a developer and using the default theme then you can add the code directly into the code from theme editor. Go to admin >> Design >> Theme Editor >> Choose your store mostly “Default” >> Choose the template “Common” >>then click “success.twig” and add JavaScript code above {{footer}}.
How to add custom JavaScript code and custom CSS code in the Opencart Journal theme?
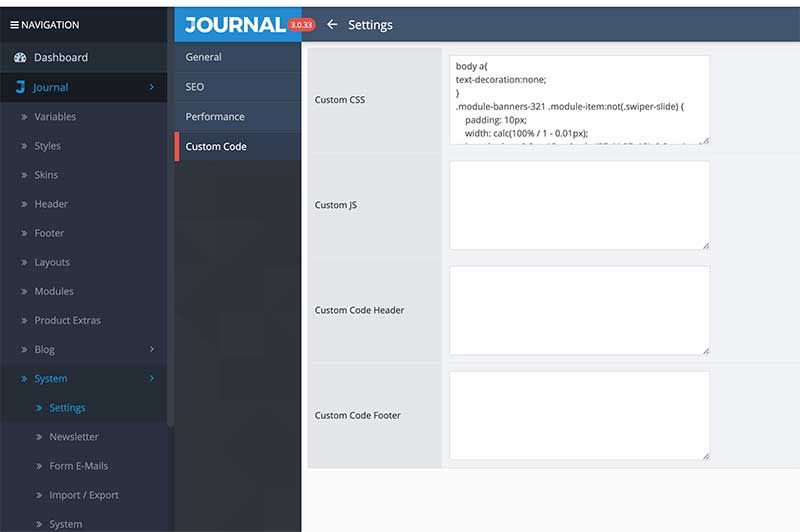
Go to admin >> Journal >> System >> Settings >> Edit your store >> Then Custom Code >> you can add css and Javascript here.
Our best way to manage third-party JavaScript code is by using Google Tag manager
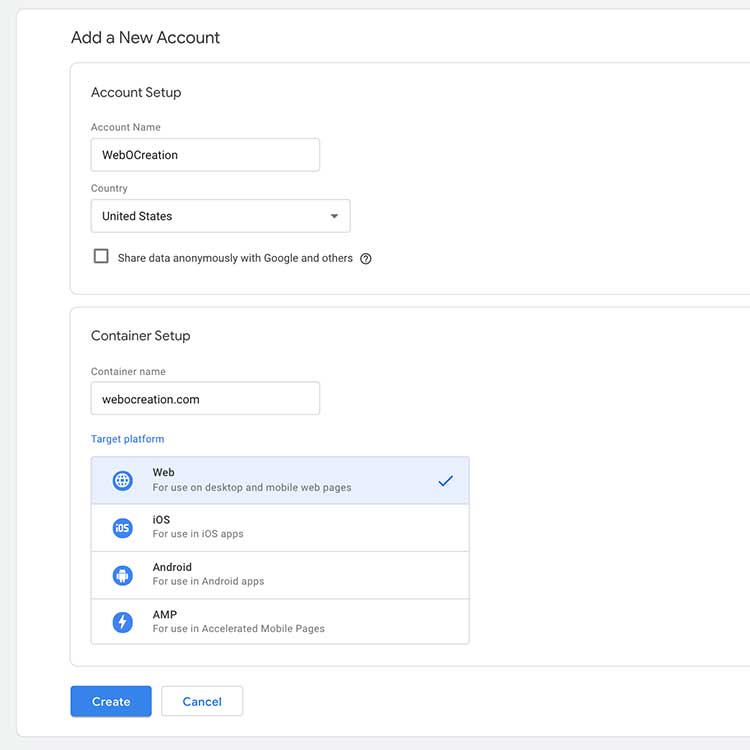
We use Google Tag Manager to manage third-party JavaScript code and we think this is the best way because all of our external JavaScript will be on Google Tag manager and we can control a lot of things in google tag manager. Go to http://tagmanager.google.com, sign in, and create an account.
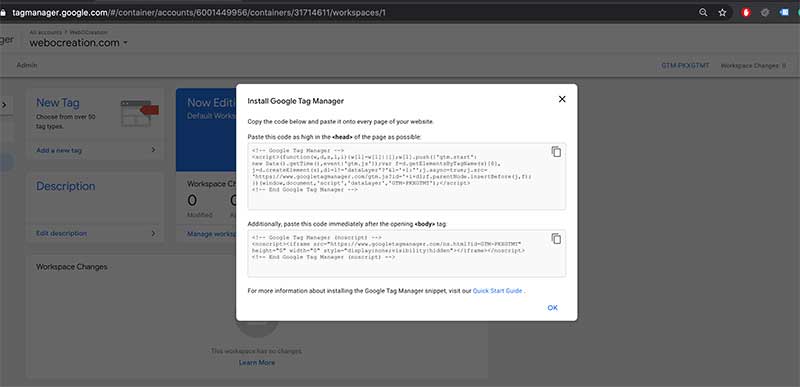
Enter the Account Name, select Country, Container Name, and select Web for a website, then click create button. You will get code to add in your website:
Copy the JS code and go to Opencart admin >> Extensions >> Extensions >> Choose extension type “Analytics”, then install the Google Analytics and edit and you can add the Google tag manager code at the “Google Analytics Code”, enabled it and click save. Once these are done, the google tag manager is installed in Opencart.
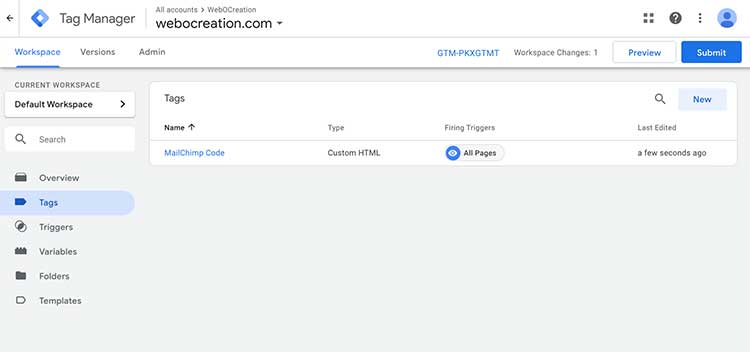
Now in the Google tag manager admin section, click the Tags, then click New, click Triggering, click “All Pages”, after that click the Tag configuration, choose the custom HTML, where you can add any third party JavaScripts.
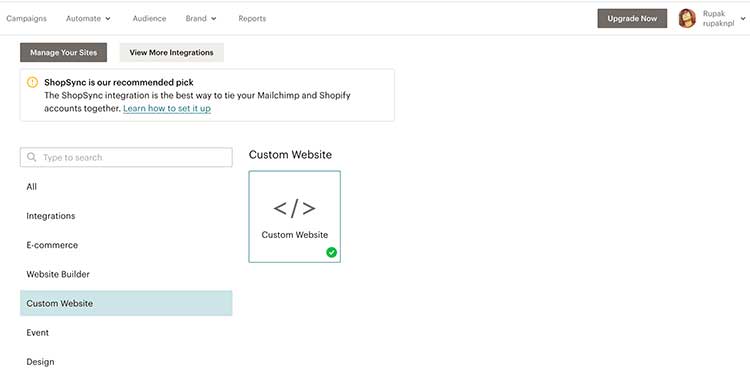
Here let’s take an example of MailChimp. Login to the MailChimp, click on the profile, in the dropdown click Connect, then integrations,
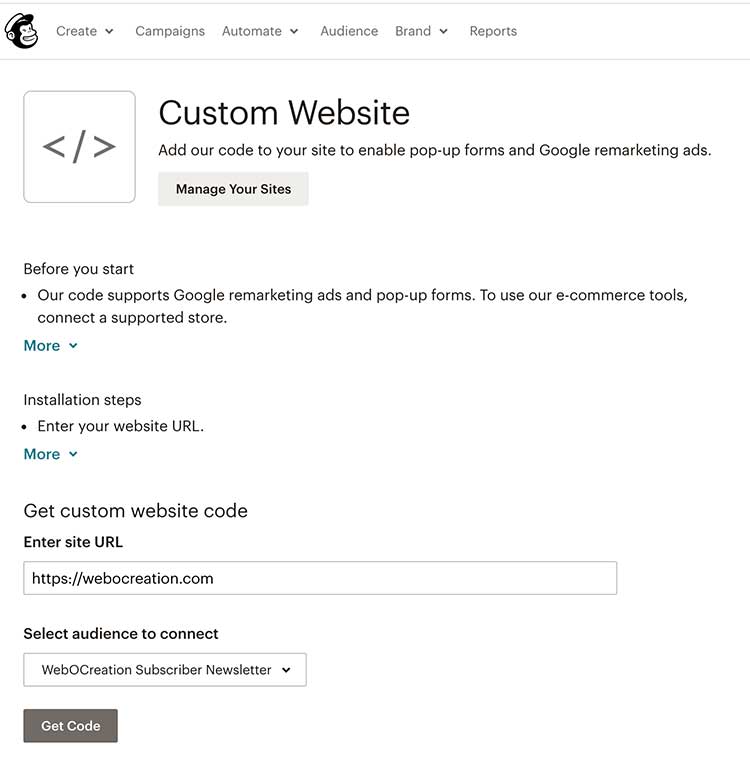
Then custom website, enter the website URL, and click “Get Code”.
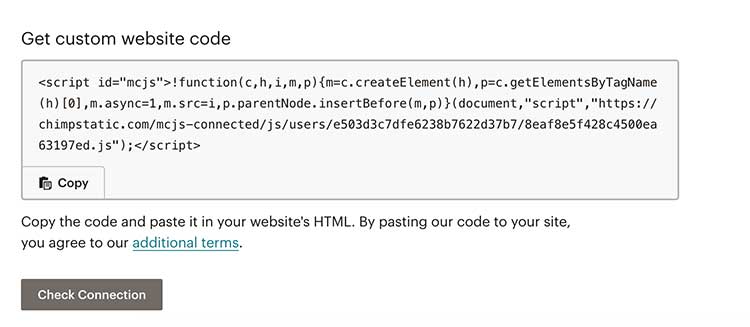
You will get like below:
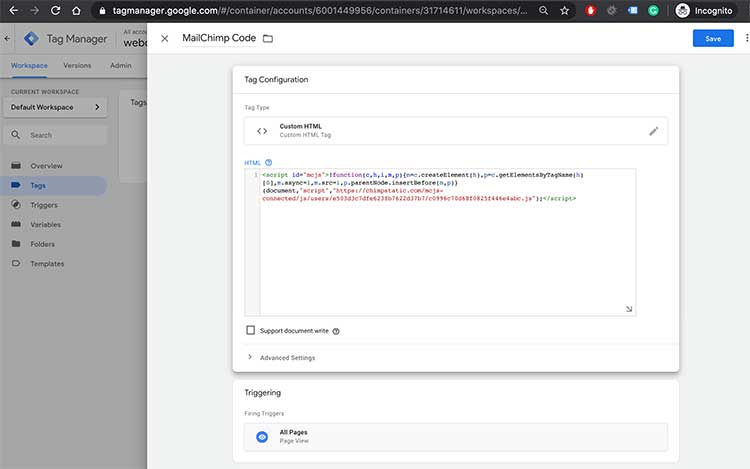
Copy that code and paste that code in the google tag manager Custom HTML like below:
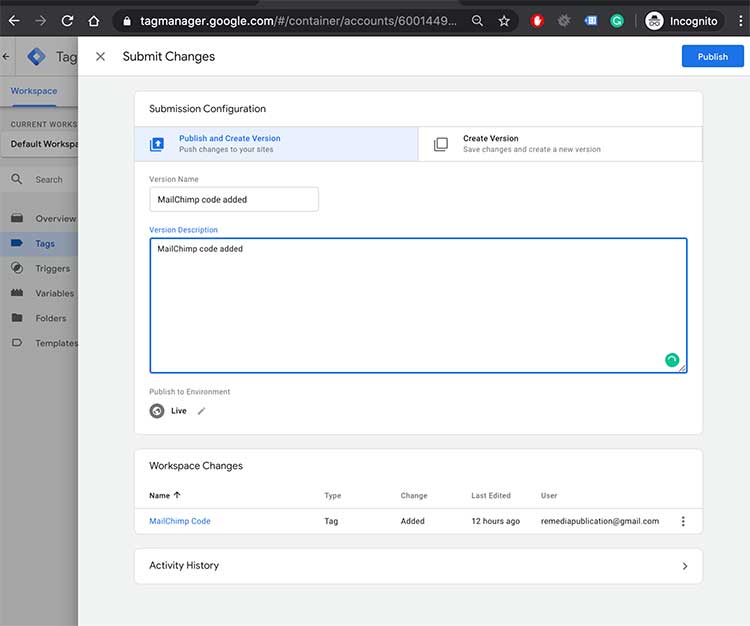
Click Save. Then submit.
Enter the version details:
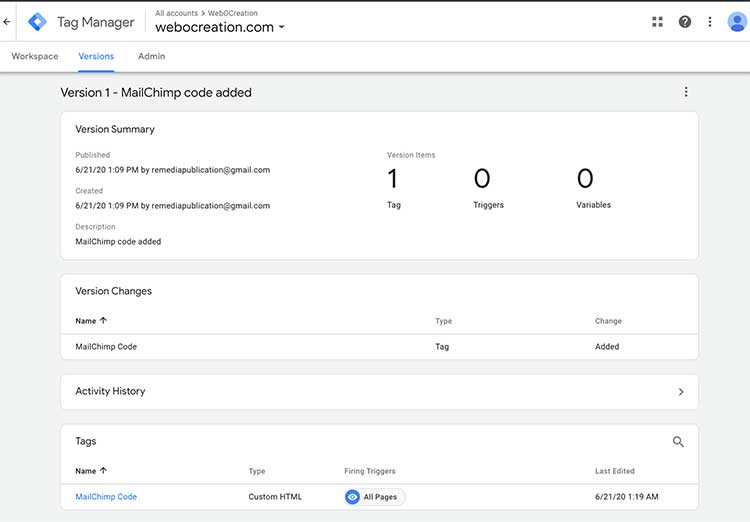
It saved the tag and show details like below:
Now your tag is shown in your Opencart store. Likewise, you can add as many third-party JavaScript codes as you want, similarly, you can add code on different pages with the help of triggers.
In this way, you can add the custom Javascript, custom HTML module, CSS, google analytics, Mailchimp tracking code, google tag manager, etc in the Opencart. Please post your questions or comments or errors so that we can help you. You can follow us at our twitter account @rupaknpl. Subscribe to our YouTube channel for Opencart tutorials, and click to see all Opencart tutorials.
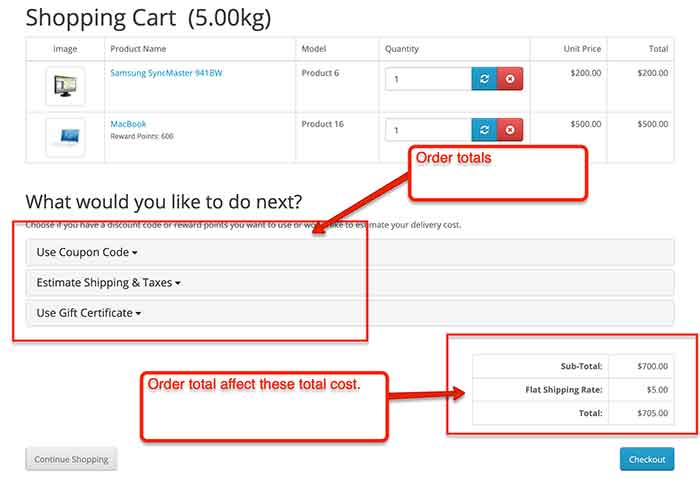
In Opencart Order total modules are those which decrease or increase the total price of the total order. Some of the order total which decreases the total price are coupons, store credits, reward points, etc. Some of the order totals which increases the total price are Handling fees, low order fees, taxes, etc. You can see order totals by going to Admin >> Extensions >> Extensions >> Choose the extension type Order Totals, then you will see all the order totals. Some of the default order totals are the following:
Coupon
Store Credit
Handling Fee
Klarna Fee
Low Order Fee
Reward Points
Shipping
Sub-total
Taxes
Total
Gift Voucher
How to install the Order total in Opencart?
Go to Admin >> Extensions >> Extensions >> Choose the extension type “Order Totals” and click the install button that you want to install and Edit it, Enabled it and click Save.
Order totals affect the total price of order so they are placed in the order total so you will find the order total at the shopping cart page and the confirmation page of the order.
Why shipping is not showing in Opencart?
First, check if the shipping order total is enabled or not. If it is not enabled then we need to enabled it. Next is to check for the Geozone setting of Opencart for the products.
How to apply and create the Order total in Opencart?
When we install the Order total modules then it is stored as ‘total’ code in the oc_extension database table. Check the following code how it pulls all the enabled Order total and applied it to the order total costs.
$results = $this->model_setting_extension->getExtensions('total');
foreach ($results as $key => $value) {
    $sort_order[$key] = $this->config->get('total_' . $value['code'] . '_sort_order');
}
array_multisort($sort_order, SORT_ASC, $results);
foreach ($results as $result) {
    if ($this->config->get('total_' . $result['code'] . '_status')) {
        $this->load->model('extension/total/' . $result['code']);
        // We have to put the totals in an array so that they pass by reference.
        $this->{'model_extension_total_' . $result['code']}->getTotal($total_data);
    }
}
We hope this post may help you understand the Order total of Opencart 3. Let us know if you have any questions or suggestions, please subscribe to our YouTube Channel for Opencart video tutorials. You can also find us on Twitter and Facebook. Enjoy!
With the launch of Opencart 4 and lots of changes, today we are showing how we can install the Opencart 4 theme and how to create the Opencart 4 theme admin section. How to install is the Opencart user manual, and we will go through all the code for the developer guide. For demo purposes we are showing you the admin section in this tutorial and in the next upcoming Opencart 4 tutorial, we will go through Opencart frontend settings and codes.
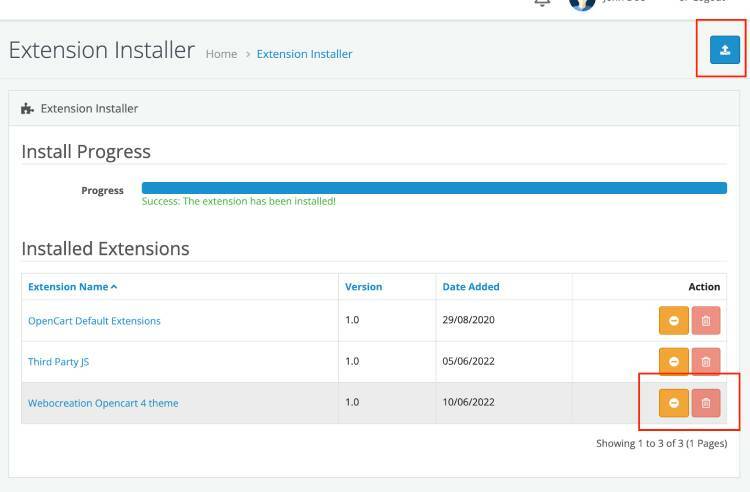
Once you download the above, you will get a zip file named webocreation4.ocmod.zip, then go to Opencart admin >> Extensions >> Installer >> Click the blue upload button. Once the upload is completed, it will list in the Installed Extensions, when you can click the install green button.
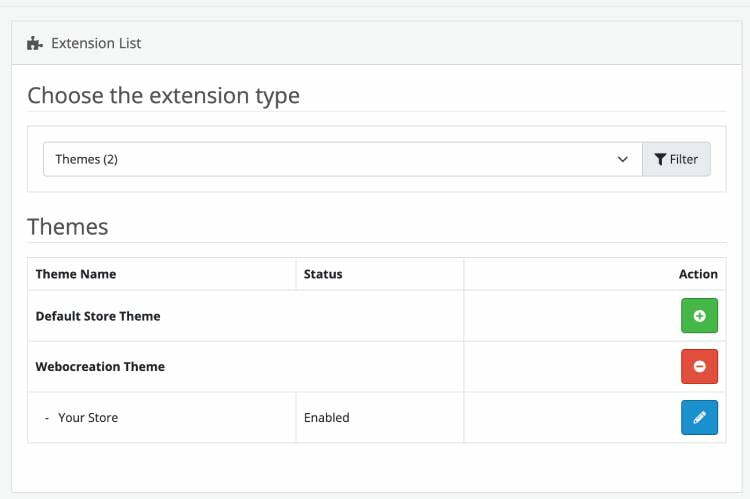
Now, go to Extensions >> Extensions >> Choose the extension type >> Themes
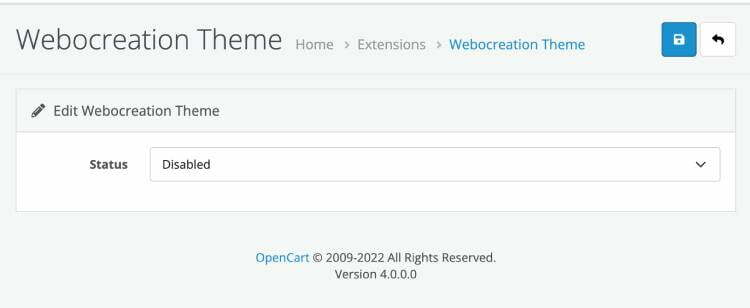
Click the green install button on the new theme, and you can uninstall the old one. Then, click the blue edit button and change the status to enable, and click Save.
With these, your new Opencart 4 theme is active.
How to uninstall the Opencart 4 theme?
Login into Opencart admin, then Extensions >> Installer >> Find the theme and click Uninstall. If you totally want to remove it then you can delete it.
File and folders structure of the Opencart 4 theme
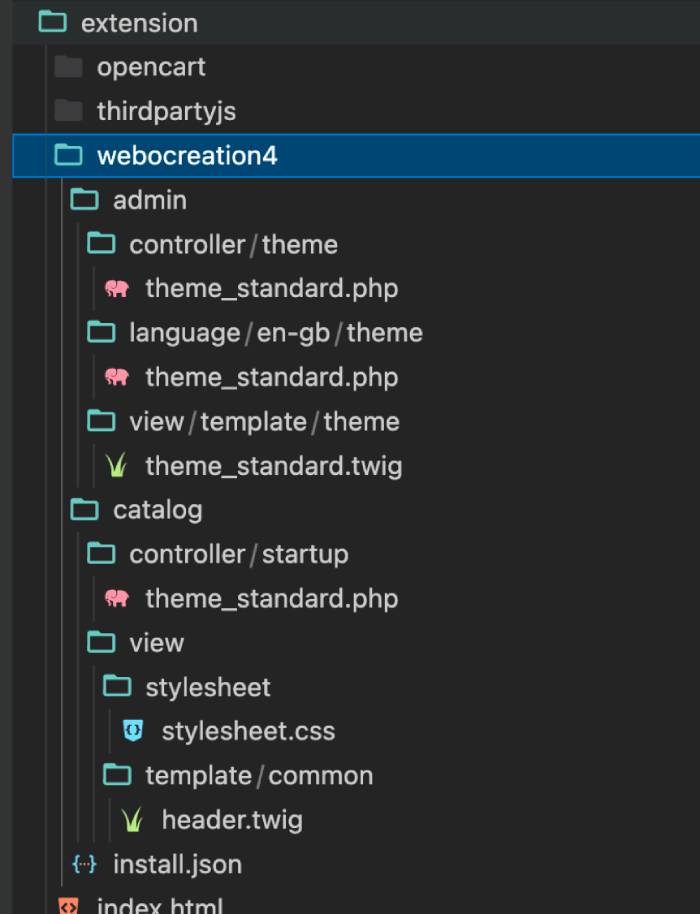
Now all theme files and folders also reside in the extension folder. The theme folder should be inside the theme folder. Here is one example of how the admin files and folders reside, overall our main theme folder is named “webocreation4” and all the files are named as standard.***. You can name them as you like.
Admin Language of custom Opencart 4 theme
Let’s start by creating the language file for the Opencart 4 theme. Create files and fodlers like extension >> webocreation4 >> admin >> language >> en-gb >> theme >> theme_standard.php. Here is one simple example of texts added for our custom theme.
<?php
// Heading
$_['heading_title'] = 'Webocreation Theme';
// Text
$_['text_extension'] = 'Extensions';
$_['text_success'] = 'Success: You have modified the Webocreation theme!';
$_['text_edit'] = 'Edit Webocreation Theme';
// Entry
$_['entry_status'] = 'Status';
// Error
$_['error_permission'] = 'Warning: You do not have permission to modify the Webocreation theme!';
Admin View of custom Opencart 4 theme
Create a new file at extension >> webocreation4 >> admin >> view >> template >> theme and create theme_standard.twig. Paste following code. Most of the code are similar to other modules.
“Check the Select field name, which is name=”theme_standard_status” the name of all settings for theme should start with theme_ and then with the file name, as our file name is standard.php so each field name should start with theme_standard_
Only we need to make sure that the field names start with theme_standard_, others are similar to other module codes.
Admin Controller of custom Opencart 4 theme
Now, let’s create a controller file and folders like extension >> webocreation4 >> admin >> controller >> theme >> theme_standard.php. Now you can add following code, we are describing some important code below:
Now Opencart 4 starts using namespace a powerful concept that provides a way to organize code into groups that allow you to create reusable components that can be reused across multiple projects. So, each Opencart modules, theme, and all extensions now start with a namespace. As we are creating a theme so at the end it is Theme, if you are creating a module, it will be Module, if you are creating an analytics extension then it will be Analytics.
Now, in the second line, we create the class with the name same as the file, as our file name is standard.php, so we name the class as Standard and inherits the main Opencart controller.
class ThemeStandard extends \Opencart\System\Engine\Controller
Now, we create an index method and add the return type
public function index(): void
In the index method, all other codes are similar to other modules and extensions, one line of code that you need to look at is below where you add the theme_standard as the first parameter. This first parameter and each field name of the form should start with the same so here in our example is theme_standard
Another code to look into is below, right now we have one field so it is like below, you need to do similar for each field that you will add. $setting_info holds all the setting that is given by the above getSetting method.
The first parameter of editSetting method should be theme_standard.
Above is the main code that we need to check and change, other similar to all other Opencart 4 modules or extensions or themes.
public function install(): void
{
    if ($this->user->hasPermission('modify', 'extension/webocreation4/theme/standard')) {
        $this->load->model('setting/startup');
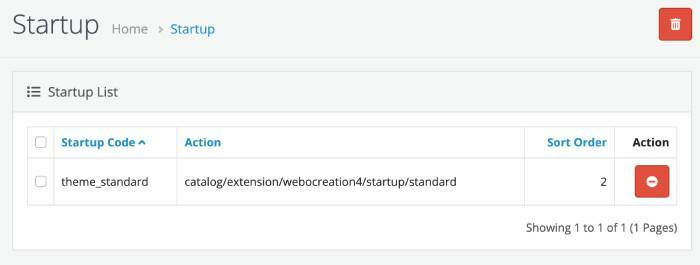
        $this->model_setting_startup->addStartup('theme_standard', 'catalog/extension/webocreation4/startup/standard', 1, 2);

    }
}
The above code will add the Startup like below which we will be using in the catalog code, which we will show in the next upcoming post.
Likewise, we add the uninstall code like below so that all rows are removed from the database
public function uninstall(): void
{
    if ($this->user->hasPermission('modify', 'extension/webocreation4/theme/standard')) {
        $this->load->model('setting/startup');
        $this->model_setting_startup->deleteStartupByCode('theme_standard');
    }
}
In this way, you can install and create a new custom Opencart 4 theme and create the form in the admin section where you can add the setting for the custom theme. Hope you liked this article, please subscribe to our YouTube Channel for Opencart video tutorials. You can also find us on Webocreation Twitter and Webocreation Facebook. Please let us know if you have any questions or concerns. In our next upcoming tutorial, we will go through how to show in the frontend, as now everything is events based so there will be a lot of changes for the new frontend changes of the Opencart 4 custom theme. Please let us know if you have any questions or concerns.
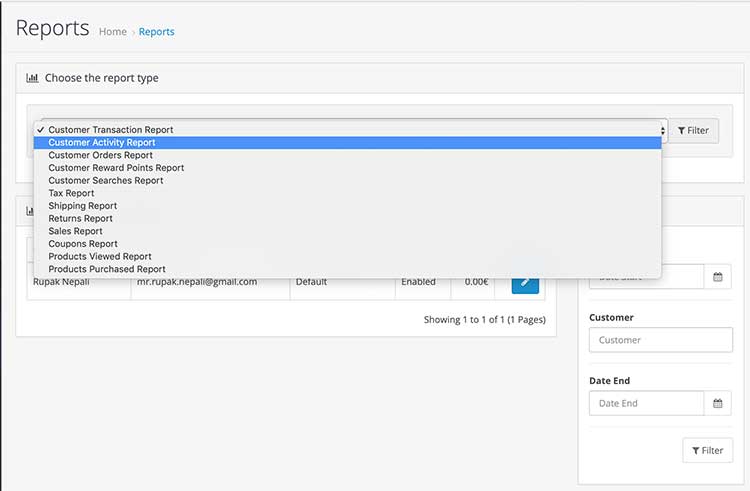
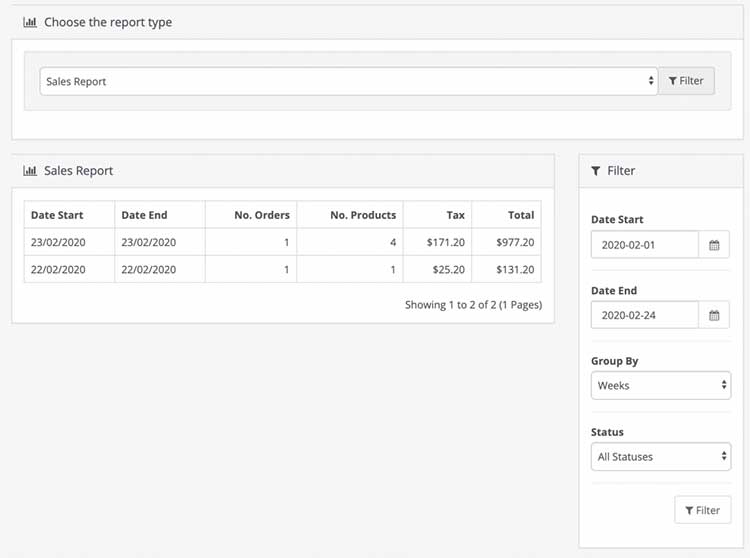
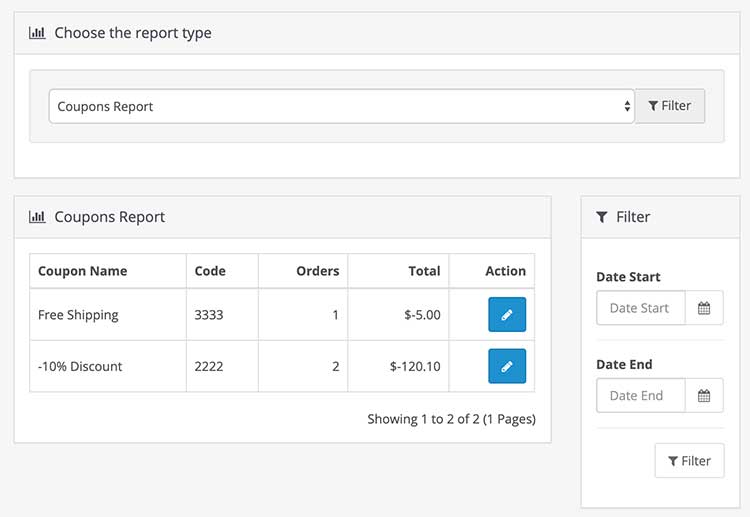
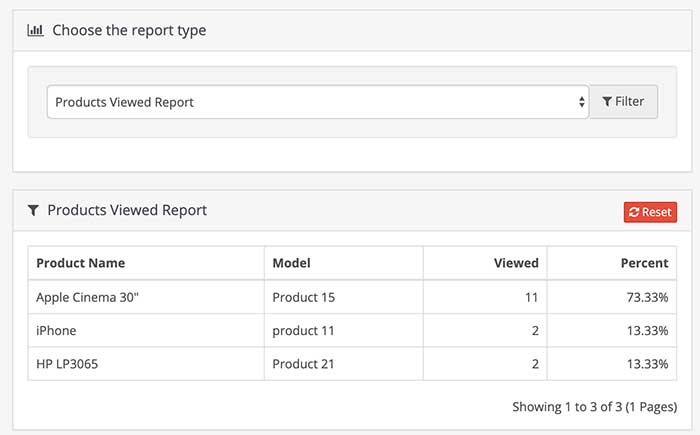
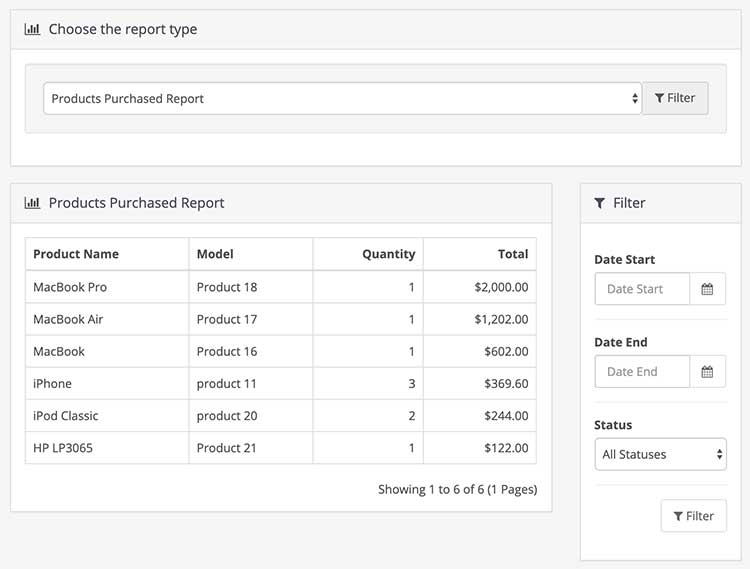
In Opencart 4 and 3, we can get reports, who’s online, and statistics for sales report, customer transaction report, customer activity report, customer orders report, customer searches report, tax report, shipping report, return reports, sales report, coupons report, products viewed reports, and products purchased report. Login into the admin section and in the left menu you have the Reports menu item, click it and you will see Reports page where you can choose the report type and see the data.
In the world of e-commerce, reports and analytics play a crucial role in providing valuable insights into business performance, customer behavior, and market trends. Here are 25 popular e-commerce reports that businesses commonly use to monitor and optimize their operations:
Sales Performance Report
Description: Tracks total sales over a specific period.
Metrics: Gross sales, net sales, average order value, total orders.
Benefits: Helps gauge overall business performance and sales trends.
Product Performance Report
Description: Evaluates the sales performance of individual products.
Metrics: Units sold, revenue generated, return rates, stock levels.
Benefits: Helps in inventory management and identifying bestsellers and underperforming products.
Inventory Turnover Report
Description: Measures how quickly inventory is sold and replaced over a period.
Metrics: Cost of goods sold (COGS), average inventory.
Benefits: Helps in optimizing inventory levels and reducing holding costs.
In Opencart, you can use the Sales reports to analyze the inventory turnover report
Sales by Geography Report
Description: Analyzes sales performance across different geographic locations.
Metrics: Total sales, number of orders, average order value by region.
Benefits: Identifies high-performing regions and potential markets for expansion.
Cart Abandonment Report
Description: Tracks the rate at which customers add items to their cart but do not complete the purchase.
Metrics: Abandonment rate, recovery rate, average cart value.
Benefits: Identifies reasons for abandonment and helps in implementing recovery strategies.
Traffic and Conversion Report
Description: Analyzes website traffic and conversion rates.
Metrics: Total visitors, unique visitors, conversion rate, bounce rate.
Benefits: Helps in understanding website performance and optimizing the user experience.
Customer Demographics Report
Description: Provides insights into the demographic profile of customers.
Metrics: Age, gender, location, income level.
Benefits: Aids in tailoring marketing strategies and product offerings to target audiences.
Profit Margin Report
Description: Calculates the profitability of the business or individual products.
Metrics: Gross profit, net profit, profit margin percentage.
Benefits: Helps in pricing strategy and cost management.
Return and Refund Report
Description: Tracks the rate of returns and refunds.
Metrics: Number of returns, refund amount, return rate by product/category.
Benefits: Identifies issues with product quality or customer satisfaction.
Customer Feedback and Reviews Report
Description: Summarizes customer reviews and feedback.
Metrics: Average rating, number of reviews, sentiment analysis.
Benefits: Provides insights into customer satisfaction and areas for improvement.
Subscription and Recurring Revenue Report
Description: Tracks revenue from subscription-based products or services.
Benefits: Assists in inventory planning, budgeting, and resource allocation.
Wishlist and Saved Items Report
Description: Tracks items that customers add to their wishlists or save for later.
Metrics: Number of items saved, frequency of wishlist usage, conversion rates from wishlist to purchase.
Benefits: Identifies popular products and potential sales opportunities.
Customer Support and Service Report
Description: Analyzes customer support interactions and service quality.
Metrics: Number of support tickets, response time, resolution time, customer satisfaction.
Benefits: Improves customer service operations and identifies common issues.
Affiliate Program Performance Report
Description: Evaluates the effectiveness of the affiliate marketing program.
Metrics: Number of affiliates, sales generated, commissions paid, conversion rates.
Benefits: Helps in optimizing the affiliate program and identifying high-performing affiliates.
Customer Acquisition Report
Description: Analyzes the effectiveness of different customer acquisition channels.
Metrics: Number of new customers, acquisition cost per channel, conversion rates.
Benefits: Identifies the most cost-effective channels for acquiring new customers.
Customer Lifetime Value (CLV) Report
Description: Estimates the total value a customer brings over their entire relationship with the business.
Metrics: Average purchase value, purchase frequency, customer lifespan.
Benefits: Helps in understanding the long-term value of customers and informs marketing spend.
Customer Retention Report
Description: Measures how effectively a business retains customers over time.
Metrics: Repeat purchase rate, churn rate, average order frequency.
Benefits: Identifies retention trends and highlights areas for improvement.
Sales by Channel Report
Description: Breaks down sales performance by different sales channels (e.g., online store, marketplaces, social media).
Metrics: Revenue per channel, number of orders per channel.
Benefits: Helps in optimizing marketing strategies and resource allocation.
Social Media Engagement Report
Description: Analyzes the effectiveness of social media channels in driving engagement and sales.
Metrics: Likes, shares, comments, referral traffic, conversion rates from social media, revenue generated from social media campaigns.
Benefits: Helps in understanding the impact of social media efforts, optimizing social media strategies, and identifying the most effective platforms for marketing.
Reports
You can choose the following report type:
Customer Transaction Report
Opencart Customer Activity Report
Customer Orders Report
Opencart Customer Reward Points Report
Customer Searches Report
Tax Report
Shipping Report
Returns Report
Sales Report
Coupons Report
Products Viewed Report
Products Purchased Report
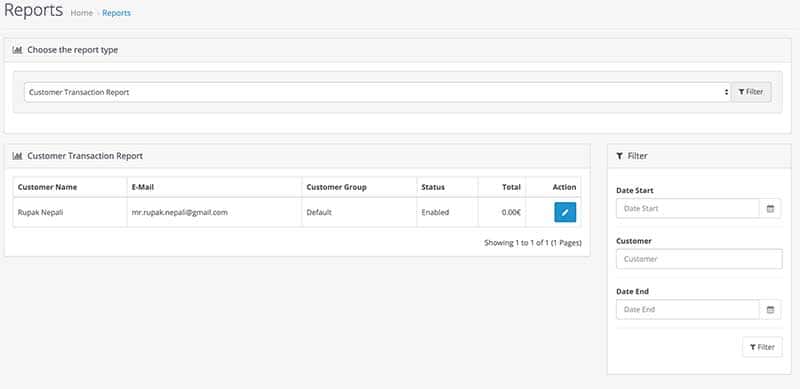
Customer Transaction Report
In the Customer Transaction report, you can see all the sales reports by customer name, email, customer group, status, and total. You can filter it with Date Start, Customer Name, and Date End.
Customer Activity Report
When you enabled the track customers’ activity via the customer reports section at admin >> System >> Settings >> edit the store >> then in the Options tab >> find the Customers Activity and select Yes, then it starts to log the customer activity in the report sections. Checking the code at catalog/controller/event/activity.php, we can see that they add the following comment, IP, and date added for the following:
Added or registered customer then it logs with key as “register”
Edit customer then it logs with the key as “edit”
Edit the password when the customer is logged in with the key as “password”
Reset the password when the customer is not logged in with the key as “reset”
Login by the customer with key as “login”
Forgotten password request by the customer with key as “forgotten”
The transaction is added for the customer then it logs with key as “transaction”
If the customer is added as Affiliate then it logs with key as “affiliate_add”
When you edit the affiliate information then it logs with key as “affiliate_edit”
If an address is added for the customer then it logs with key as “address_add”
When the address is edited for the customer then it logs with key as “address_edit”
When the address is deleted for the customer then it logs with key as “address_delete”
Return is added by the customer then it logs with key “return_account”
Return is added by the guest buyer then it logs with key “return_guest”
The order added by the customer then it logs with key as “order_account”
The order added by the guest buyer then it logs with key “order_guest”
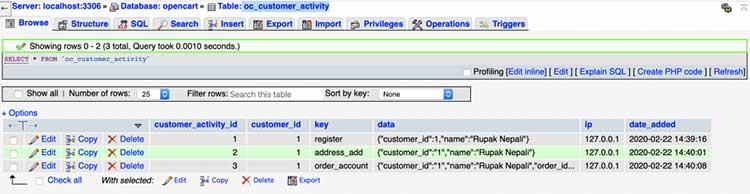
The database table “oc_customer_activity” will have data like below:
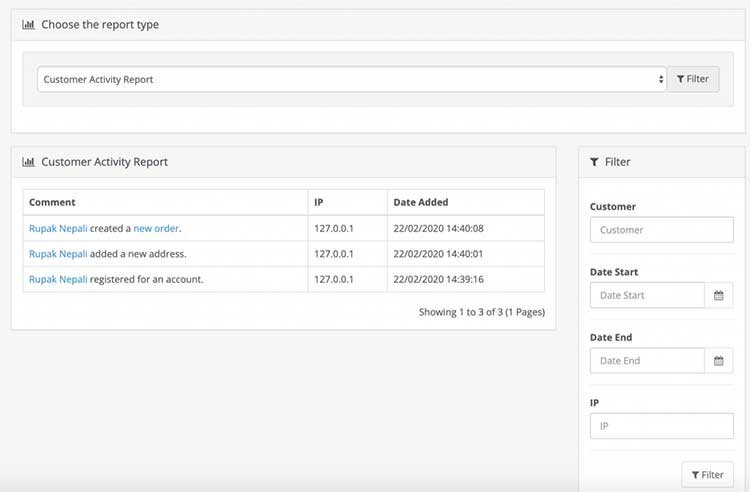
In the report section, you can see the customer activity report as below image:
Customer Orders Report
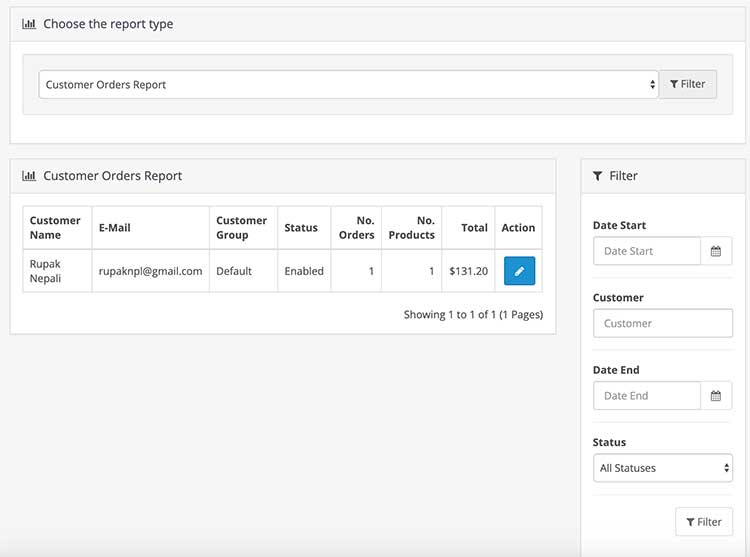
You can see the Customer orders report in Opencart, where you can filter out with date start, customer, date end, and status of orders.
Customer Reward Points Report
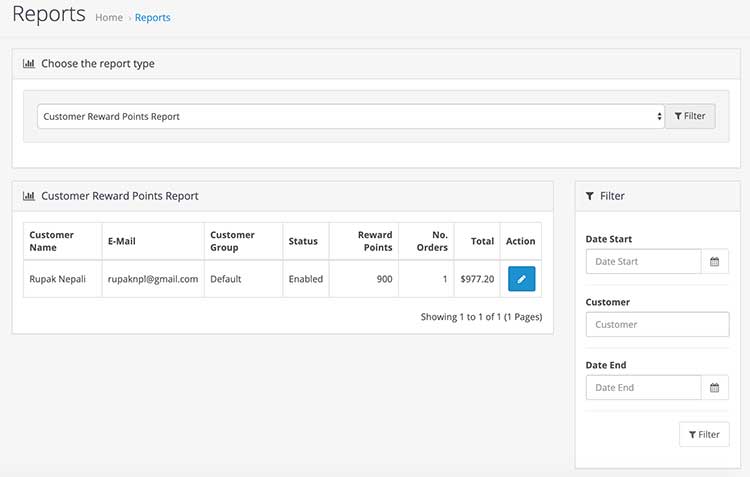
Read the post on how reward works in Opencart. Once the reward is applied to the customer then you can see the customer reward points report. The report looks like below where you can filter out by data start, customer, and date end:
Customer Searches Report
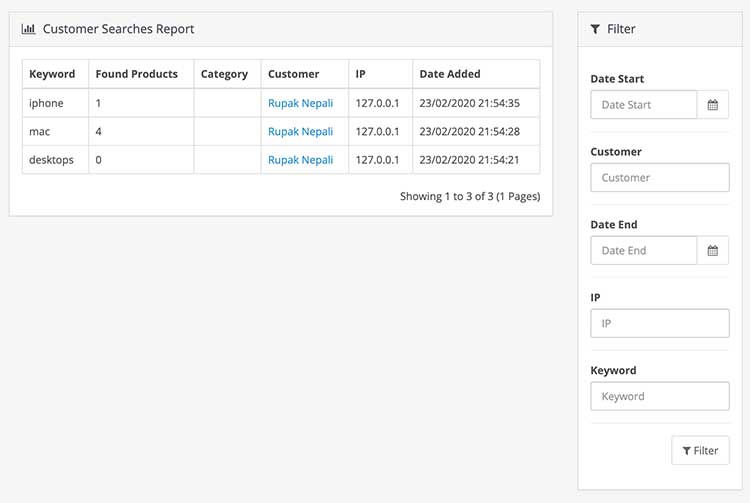
In the “customer searches report” you can see what customers are searching for. You can filter the report by date start, customer, date end, IP and keyword.
Tax Report
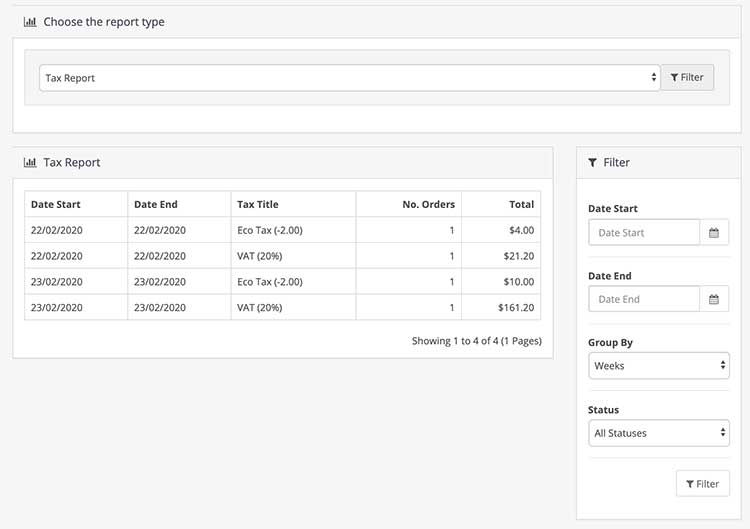
You can get the tax report in Opencart. For that go to admin >> Reports >> then choose the Tax report where you will see all the tax details. You can filter out by date start, date end, group by days or weeks or months or years, and status.
Shipping Report
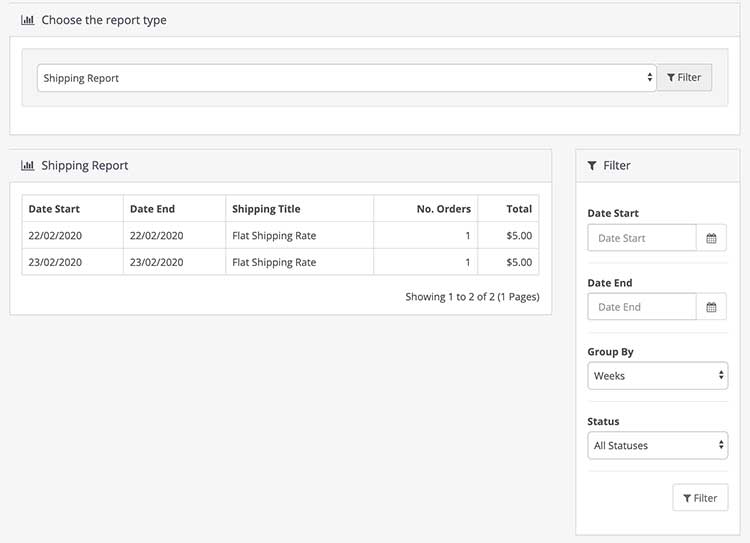
You can see the shipping report which you can filter out by date start, date end, group by days or weeks or months or years, and status.
Returns Report
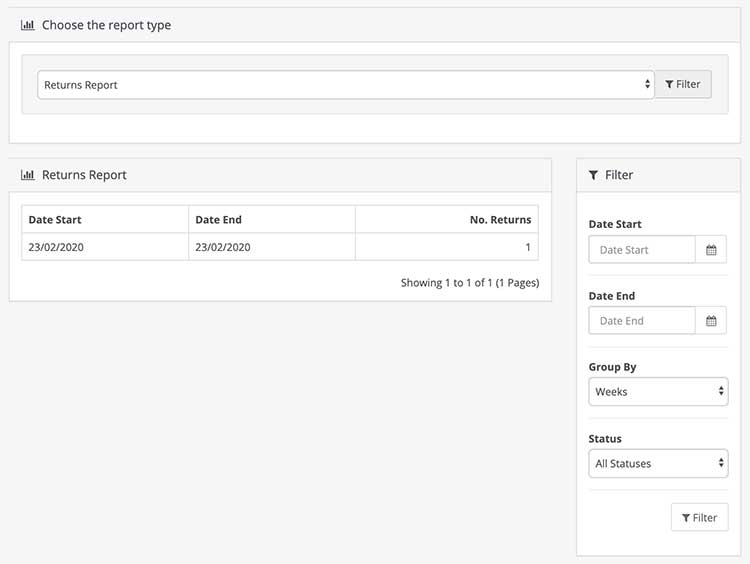
You can see the post for how product returns are handled in Opencart 3, you can see the returns report and filter out with date start, date end, group by days or weeks or months or years, and status.
Sales Report
You can see the sales report on Opencart 3. You can filter out by date start, date end, group by days or weeks or months or years, and status.
Coupon Report
You can see the coupon report on Opencart 3. You can filter out by date start and date end.
Products Viewed Report
You can see a Products Viewed Report.
Products Purchased Report
You can see a report of products purchased. You can filter it out with date start, date end, and status.
Who’s Online
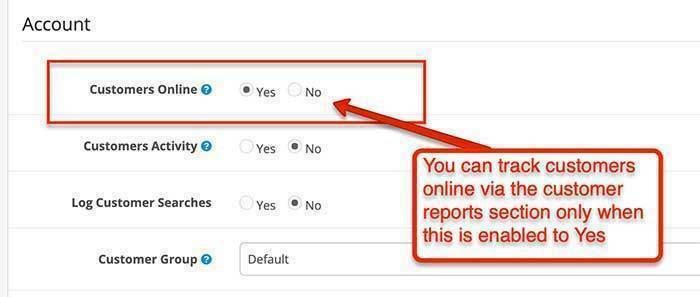
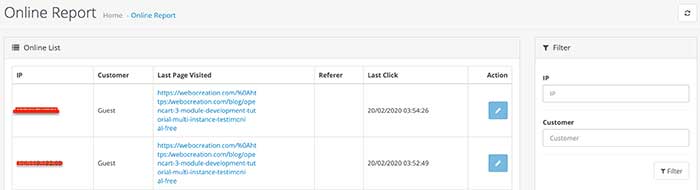
You can track customers online via the customer reports section and see who is online right now. To activate the customer online report go to admin >> System >> Settings >> Option tab >> Account section and select Yes for customers online.
The reports start showing at admin >> Reports >> Who’s online.
Statistics
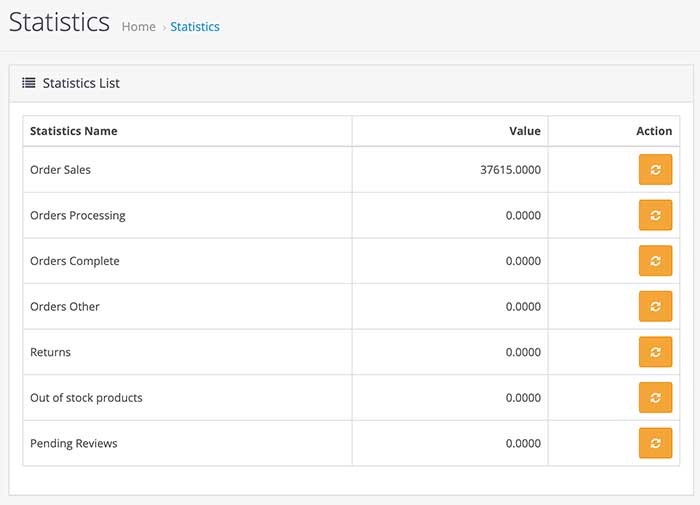
You can see the overall statistics of the order sales, order processing, orders complete, returns, out-of-stock products, and pending reviews in the statistics report.
Opencart 4 and 3 has lots of reportings, it is in the Reports section and some are available in the admin dashboard as well. But still, there are some functionalities that are missing like exporting on CSV or excels, reporting on charts and sometimes the best report of what visitors are doing on your website is tricky, however, to get the best reporting we would recommend you use Google analytics enhanced reporting as well so that you can analyze what visitors and customers are doing in your website and get best decisions. In this way, you can see reporting in Opencart 4 and 3. Please don’t forget to post your questions or comments. Additionally, this will allow us to add extra topics. You can follow us at our Twitter account @rupaknpl, subscribe to our YouTube channel for Opencart tutorials, and click to see all Opencart user manuals.
In this Opencart tips and tricks, we are showing you 25 Opencart security tactics to make Opencart’s website secure by providing a cheat sheet for Opencart eCommerce users, so that the customers can buy products confidently, which may increase your conversion rates. Here are the 25 lists of things that you can do to make the Opencart website secure:
Use a good and secure hosting
Research and buy good, reliable, and secure hosting.
Check if the install/ folder is still there
Once Opencart is installed, you need to remove/delete the install/ folder. Renaming the folder will also create a security hole. Thus, always delete the install/ folder.
Proper Security settings in the admin
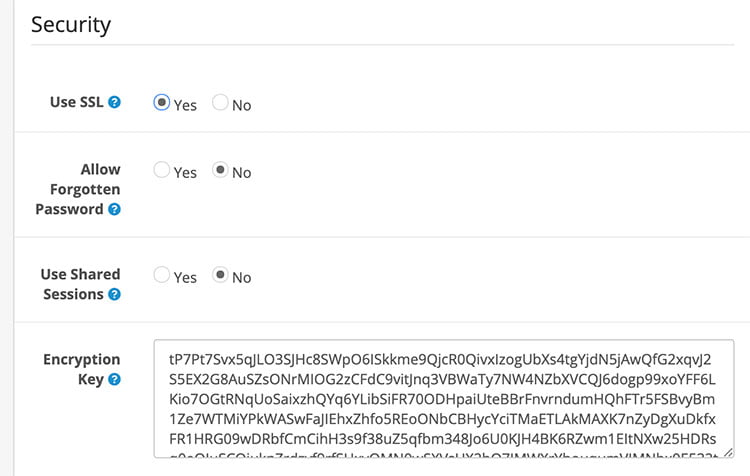
Log in to the admin section >> System >> Settings >> Edit required store >> then in the Server tab, select the use SSL to Yes
Use SSL: To use SSL, check with your host if an SSL certificate is installed and add the SSL URL to the catalog and admin config files.
Allow Forgotten Password: Allow forgotten passwords to be used for the admin. This will be disabled automatically if the system detects a hack attempt.
Use Shared Sessions: Try to share the session cookie between stores so the cart can be passed between different domains.
Encryption Key: Please provide a secret key that will be used to encrypt private information when processing orders.
Use HTTPS/SSL Certificate
Selecting SSL to Yes on the above setting will not give you an HTTPS URL; your server also needs to have SSL installed. Nowadays, most servers provide free SSL certificates, which can be set up with just a few clicks, or you can use more secure SSL certificates.
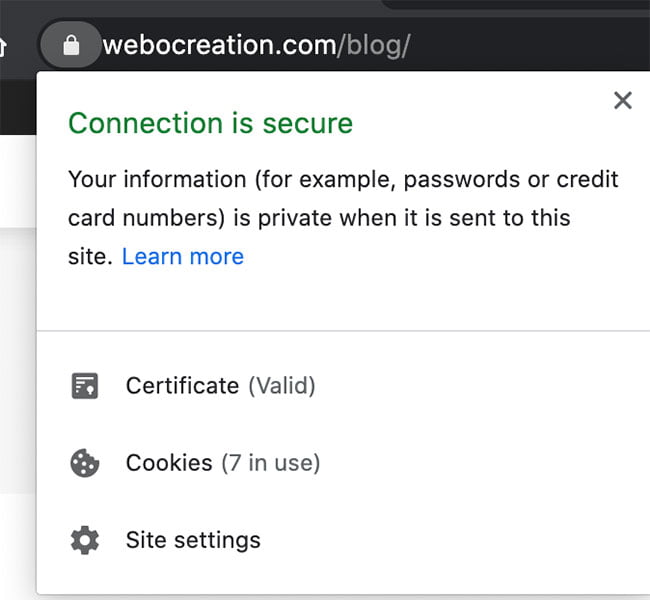
One thing you need to take care of is that all of your URL links need to start with HTTPS:// instead of HTTP://, else it will not be fully secured. If you are using external URLs, make sure they start with HTTPS://. With proper SSL installation, your URL will look like the one below when you click on the SSL icon:
Protect your storage/ folder and other files, like the config.php file and admin/config.php
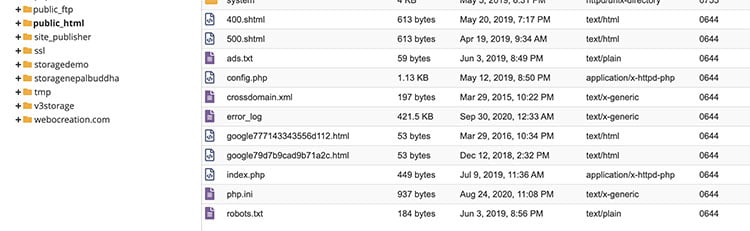
Keep storage/ folder outside of the public_html folder. In the image below, my storage folder is v3storage. Similarly, check your file permissions and keep them below 0644.
Use the latest PHP version
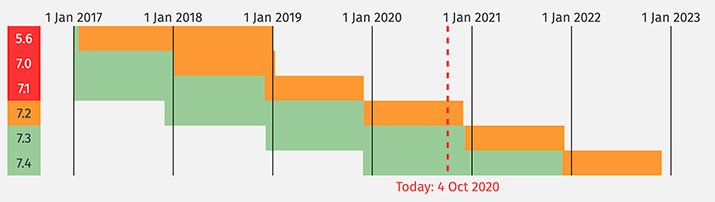
See the chart, the PHP V5.6 is already at the end of its life, which means there will be no updates for security, and they are exposed to unpatched security vulnerabilities. So, for security, always use the latest version of PHP.
https://www.php.net/supported-versions.php
Watch this session on how the creator of PHP describes the performance in PHP 7. Performance always good impact.
Use the Anti-fraud extension
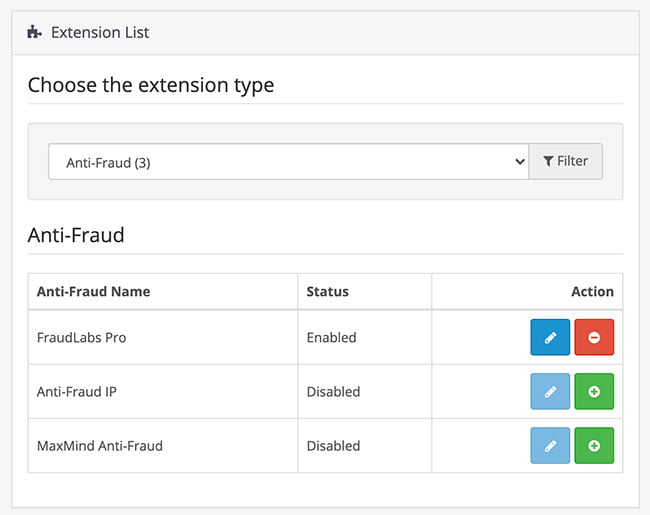
Opencart by default provides some Anti-fraud extensions, which help store owner to secure their online e-commerce website from malicious fraudsters and make it more secure. Log in to admin >> Extensions >> Extensions >> Choose the extension type as Anti-Fraud >> then you will see a list of modules that you can use. You can use some of them for free, like 500 queries/month.
Error handling setting
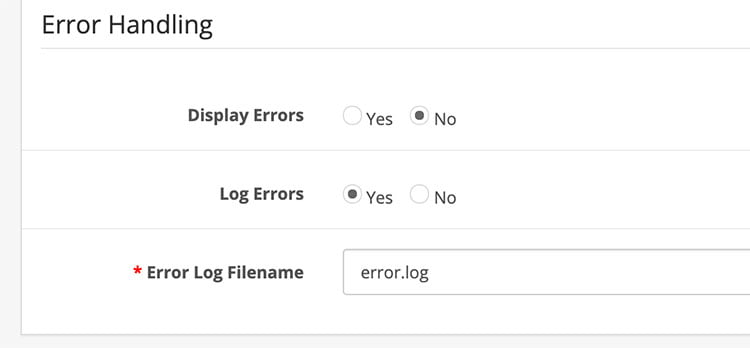
Enable error logging into the error.log file, and it will be inserted into the database. It is a better idea not to display errors. If you display errors, then it will show all full paths of files, and it may help hackers. While you perform your debugging, you can enable it, but for security reasons, keep it checked as No. You can set the error handling at admin >> System >> Settings >> edit Your Store >> Server tab, and you will see the error handling section at the end.
Monitor your admin error logs
Analyzing error logs also gives what issues are happening, and fixing them is important. Similarly, check logs at admin >> Extensions >> Modifications >> Log tab. Fixing errors makes the site more secure.
Block bad bots
Opencart provides settings for Robots. You can get it at admin >> System >> Settings >> Edit Your Store >> Server tab and you can see the Robots field. A list of web crawler user agents that shared sessions will not be used with. Use separate lines for each user agent.
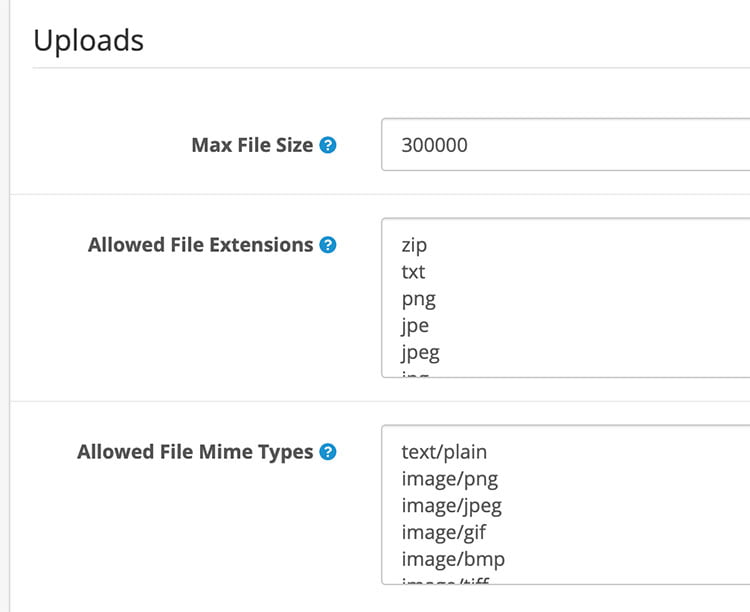
Be sure there are no PHP and JS. In this way, you can secure your file upload buttons.
Review All Users, user groups, and grant the Minimum Permissions Necessary
Go to admin >> System >> Users and see all users and verify what user group is assigned. Then, check all User groups and see what access permissions and modification permissions are given. Try to grant the minimum permissions as necessary. In Opencart, you can make as many User groups as you want.
Use a strong username and password
Set a strong password. Better not to use admin as a username.
Opencart V3 has Max Login Attempts
Maximum login attempts are allowed before the account is locked for 1 hour. Customer and affiliate accounts can be unlocked on the customer or affiliate admin pages.
It is available only on Opencart v3, but you can implement this by following the tutorials at https://forum.opencart.com/viewtopic.php?t=218405#p790296
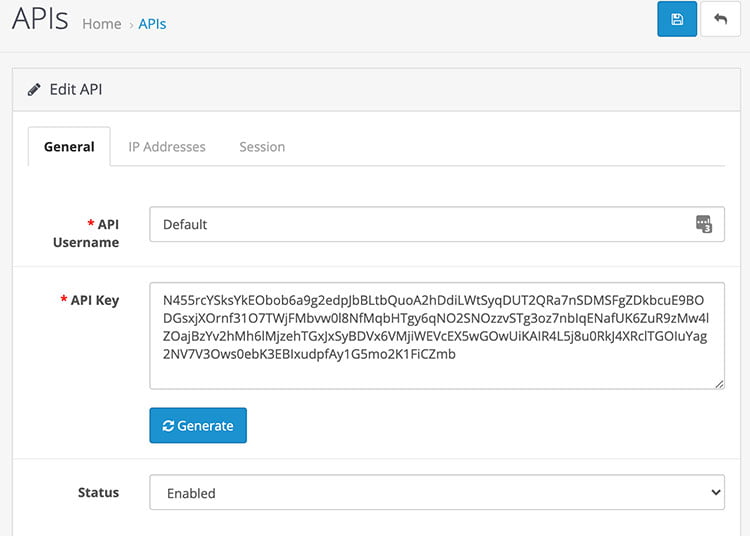
Similarly, check your API access as well. Go to admin >> System >> Users >> API and review all your API usernames and set proper API usernames, API keys, and IP addresses.
Always use the latest Opencart version, theme, modules, and extensions
It is better to use the latest Opencart version, theme, modules, and extensions. You may get problems getting the upgraded version of your custom modules and extensions, but if you don’t update it then you risk the security.
Remove unused modules or extensions
Log in to admin >> Extensions >> Installer >>, you can see a list of modules that are installed. Remove unused modules or extensions. Similarly, verify if old files and folders are remaining, especially for custom modules and themes.
Don’t use a nulled Opencart theme, modules, or extensions
Choose trustworthy plugins and theme providers; it can cost you some, but it will protect you a lot.
Monitor your server logs as well
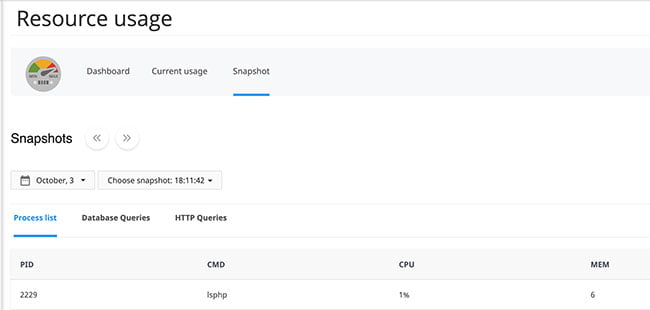
If you are using CPanel hosting, then you can check the Resources Usage at Login to Cpanel >> Metrics >> Resources Usage >> Snapshots. You can check that resource limits are being reached, resulting in slow performance or errors. Often, resource issues are due to scripting/plugins on your site, development work such as making changes, or an increased amount of traffic. You and your web developer can review the resource usage of your account and take steps to reduce the load. Some scripts that are running long by some IP address means there is some fishy going on, so make sure to keep on checking it and see if you can improve your code and scripts.
If the programmer is tricky, then in Opencart, it is easy to add the JS script, which may easily cause Cross-Site Scripting. Cross-Site Scripting (XSS) is when a malicious script is injected into a trusted website or application. The attacker uses this to send malicious code, typically browser-side scripts, to the end-user without them knowing it. The purpose is usually to grab cookies or session data or perhaps even rewrite HTML on a page. Go to admin>> Extensions >> Extensions >> Choose the Extensions Type as “Analytics” and see in the Google Analytics code field, if only the required JS codes are added. If you see suspicious JS code, then better to remove it.
Database Security and SQL Injections
Always use a strong database username and a strong password. You can check this at config.php and admin/config.php, if you don’t have then you need to change to a strong password and username.
Similarly, if you are using custom modules and there are database queries, then you need to verify whether the queries are written properly, whether all the fields are escaped properly, or not and so.
One example of how they can inject the extra queries if you don’t escape the fields is below:
See that bold section in the above queries; another query is concatenated, and SQL injection is done.
Denial of Service
This is the most dangerous vulnerability, Denial of Service (DoS) exploits errors and bugs in the code to overwhelm the memory of website’s operating systems. Hackers have compromised millions of websites and raked in millions of dollars by exploiting outdated and buggy versions of Opencart software with DoS attacks. The hackers keep on running the code, and your server CPU usage will be 100%, your server’s Physical Memory Usage is full, and the website will not be available for real users or customers.
One of the best recommendations is to use a reputable 3rd party security service like Cloudflare or Sucuri, and be sure to use the code and scripts properly.
Back up
Be sure to make as much backup as possible.
Use Google Captcha or Basic Captcha
Using Google Captcha or basic Captcha on the form also helps you remove spam and get emails that contain vulnerable links.
These are some of the securities cheat sheets for Opencart. Please let us know if you are using any other tactics to make the Opencart website secure. Hope you liked this article, please subscribe to our YouTube Channel for Opencart video tutorials. You can also find us on Twitter and Facebook. Happy learning.
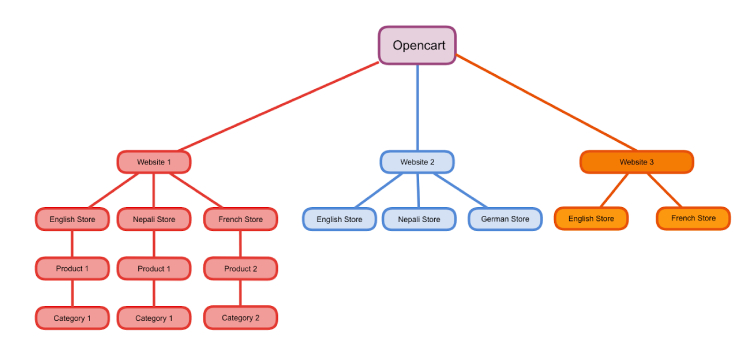
Opencart multiple websites. It can handle multiple stores with one Opencart installation. Creating a Multi-Store Opencart allows for multi-store management using only one installation. If you have installed Opencart into at least one store, you can add multiple stores to your admin panel without having to repeat the installation process. To add a new store you must first create a subdomain in your cPanel, then add the store in the Settings section of the admin panel.
OpenCart 4 allows you to manage multiple online stores from a single admin interface. This multi-site capability is particularly useful for businesses that operate in different regions, sell various product lines, or want to create separate storefronts for different customer segments. Setting up multiple sites in OpenCart is straightforward and provides a centralized way to control and monitor all your stores.
Benefits of a Multisite Setup
Centralized Management: Manage multiple stores from a single admin dashboard. One admin management with one log in for products, categories, customers, orders, design, etc
Shared Resources: Use the same product catalog, customer database, and settings across multiple stores. You can configure each product to show on which store and can set different prices for the same product
Customized Storefronts: Tailor the appearance and functionality of each store to target specific audiences. Although having one admin management, you can have different layouts and different themes for different stores
Cost-Effective: Save on infrastructure and maintenance costs by running multiple stores on the same installation.
Customer easiness: Customers can have a single sign-on for different stores that are managed on multiple.
Prerequisites
Before setting up multiple stores, ensure you have the following:
A working installation of OpenCart 4 on the server (In our example we are using demo.webocreation.com)
Administrative access to the OpenCart admin panel.
Domain names or subdomains for each store, both the server and
DNS Domain name server settings
You use the addon domain in cpanel to add the 2nd domain to your hosting account. Then change the document root in that 2nd domain to be the same as your first store – the folder opencart is installed in. Add the store to opencart settings and done.
Point their A records to the IP of your server.
Associate them with that hosting account which can be done in cPanel via “Aliases” which used to be called “Parked Domains” if I remember correctly.
Step-by-Step Guide to Setting Up Multisite in OpenCart 4
Step 1: Configure Your Domain/Subdomain
First, set up your additional domains or subdomains. This process will vary depending on your hosting provider but generally involves the following steps:
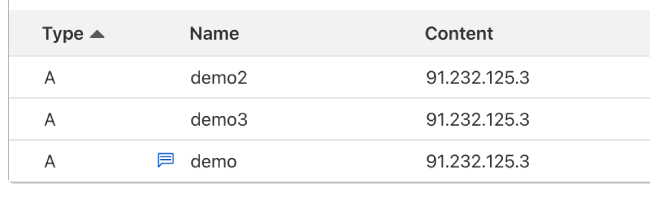
DNS management: Access to domain registrar admin section so you can point domain A records to the server. In this example, we are using Cloudflare DNS so we added the A records like below, as in this example we are using sub-domain demo2.webocreation.com and demo3.webocreation.com, so pointed the A record to the IP address. Fig: 2
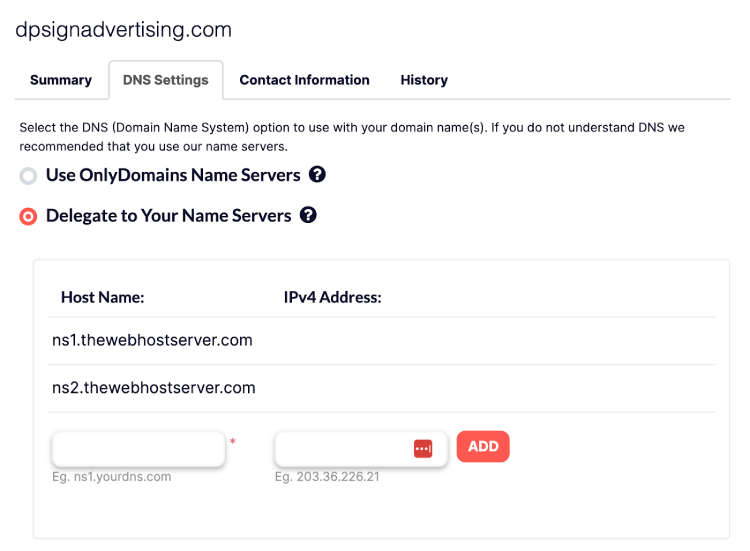
For main domains like dpsignadvertising.com, you need to delegate the same name server that you are using for the opencart installed server, here is https://demo.webocreation.com, so for dpsignadvertising.com, we add the same ns1 and ns2 as demo.webocreation.com
Fig: 12.3
Subdomains: Create subdomains (e.g., store1.yourdomain.com, store2.yourdomain.com) and point them to the OpenCart installation directory.
Fig: 12.4
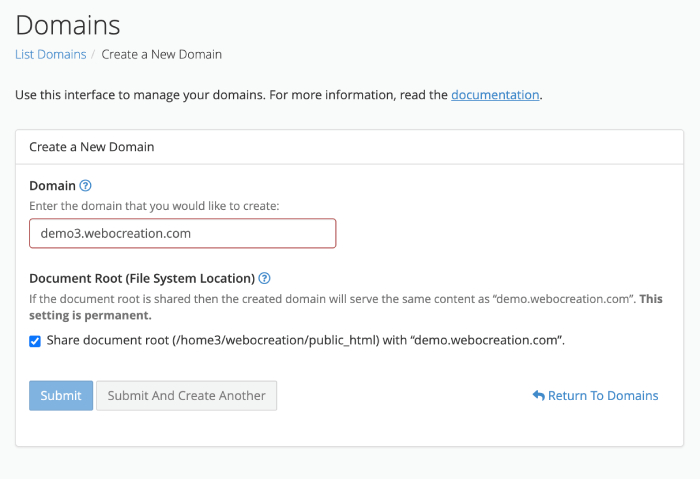
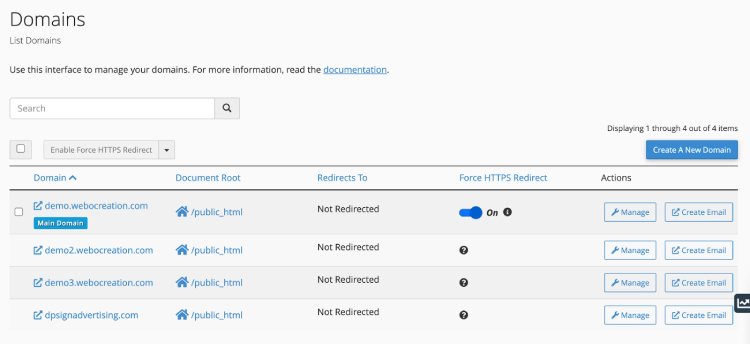
Then click “Create a New Domain” enter the domain URL and submit, here we entered demo3.webocreation.com
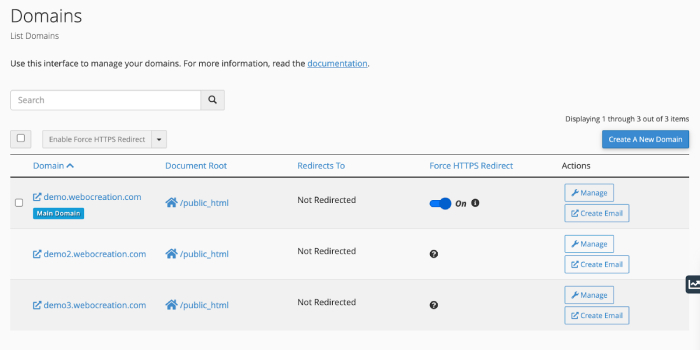
Similarly, you can enter as many domains as needed.
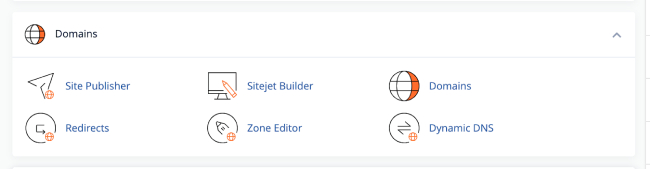
Domains: Same as sub-domains, point each domain to the root directory of your OpenCart installation. We are using the cPanel so we find the domain section, for us here is an example, click in the Domains and enter the domains.
2: Add New Stores in OpenCart Admin
Log in to Admin Panel: Log in to your OpenCart admin dashboard.
Navigate to Store Settings: Go to System -> Settings.
Add New Store:
Click the “+” button to add a new store.
Store Name: Enter the name of the new store.
Store URL: Enter the URL of the new store, including the trailing slashLog in., https://dpsignadvertising.com/).
If you forget the trailing slash multi-store will not work
3: Configure Store Settings
General Settings: Configure general settings such as store name, owner, address, email, and phone number. You can select different themes, logos, and layouts for each store
Local Settings: Set local settings like country, region, language, and currency for the new store.
Option Settings: Set all settings like products, legal, etc for the new store.
Image Settings: Enter the image sizes
4: Customize Your Store
Themes: Go to Design -> Themes and select a theme for your new store. You can choose to use the same theme as your main store or a different one.
Layouts: Customize the layouts for your new store by navigating to Design -> Layouts. Adjust the positions and modules according to your requirements.
Banners and Sliders: Set up banners and sliders specific to the new store under Design -> Banners.
5: Assign Products and Categories
Products: Navigate to Catalog -> Products and edit each product to assign it to the new store. Use the “Stores” tab to select the stores where the product should be visible.
Categories: Go to Catalog -> Categories and assign categories to the new store using the “Stores” tab.
6: Test Your Store
Access the Store URL: Open a web browser and navigate to the URL of your new store.
Verify Functionality: Ensure that all links, images, and functionalities are working correctly.
Place a Test Order: Complete a test purchase to verify that the checkout process is functioning correctly.
Setting up a multisite environment in OpenCart 4 is an efficient way to manage multiple online stores from a single admin interface. By following the steps outlined above, you can configure and customize each store to meet the needs of different markets or customer segments. This powerful feature of OpenCart helps streamline operations, reduce costs, and expand your business reach effectively.
This tutorial covers how to change the timezone in OpenCart as well as change time of the database.
Go to system/startup.php and find following lines of code:
if (!ini_get('date.timezone')) {
	date_default_timezone_set('UTC');
}
Replace with following lines of code by changing to your timezone
date_default_timezone_set('Australia/Sydney');
Synchronize PHP and Database Timezone
The query we use to set database timezone if you are super admin is below:
SET time_zone='offset';
But everyone has no super admin access so need to change in the code level. For that go to system/library/db/mysqli.php if you are using MySQLi and add code below after $this->connection->query(“SET SQL_MODE = ””);
$dt = new \DateTime();
$this->connection->query("SET time_zone='" . $dt->format('P') . "';");
With these changes your timezone in Opencart are changed.