Opencart 4 layout management, Customize layouts and positions to show different modules

A layout is a blueprint that determines how pages are structured and displayed. Layout management in OpenCart 4 allows you to control how content is displayed across various pages of your eCommerce store. By assigning modules and specifying their positions, you can create a cohesive and user-friendly shopping experience for your customers. This guide will help you understand how to manage layouts effectively. It defines:

  • Route
  • Page regions (header, footer, columns)
  • Module placement
  • Content arrangement
  • Visual hierarchy of store pages

In this Opencart user manual, we are showing how to customize layouts and positions to show different modules in Opencart. The layout is the process of setting out material on a page, in OpenCart materials are modules. So if we want to show a set of modules in a specific URL or set of URLs then we can us Layouts and Positions.

Default Layout in Opencart 4

Go to Admin >> Design >> Layouts where you can see all the layouts.

By default OpenCart has following layouts:

  1. Account
  2. Affiliate
  3. Category
  4. Checkout
  5. Compare
  6. Contact
  7. Default
  8. Home
  9. Information
  10. Manufacturer
  11. Product
  12. Search
  13. Sitemap

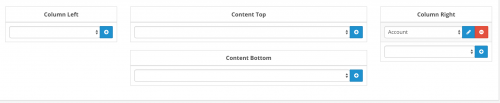
Inside each layout it has four positions:

  1. Column left
  2. Content Top
  3. Content Bottom
  4. Column Right
layouts in opencart

You can add your own custom layouts and show modules in that layout.  Let’s say you want to show the different layout for each Category.

How to show different layouts for different pages in OpenCart 3?

By default, there are 2–columns layout sets for each category. We can add different layout for different pages if it is set. Like we can assign different layout for each category, product and information pages. Let’s say you want to show two columns for the “About us” information page and three-column for the “Delivery Information” information page and default layout for the “Privacy Policy” information page.

Here are the steps:

  • Go to Admin >> Design >> Layouts.
  • Click “+: at the top right corner, to create the new layout. Say “Information 3 columns”
  • Click Add route and enter catalog/information.
  • To have 3 columns on the information page add some modules in Column Left and Column Right position, for example, Information and Category.
  • Do the same for other

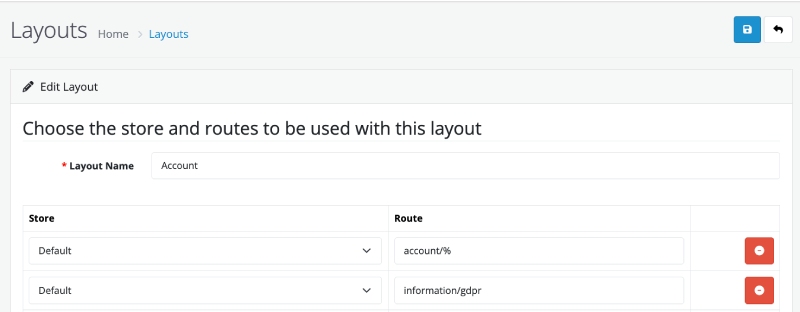
In one layout, you can also have multiple route, here is an example:

One layout multiple route

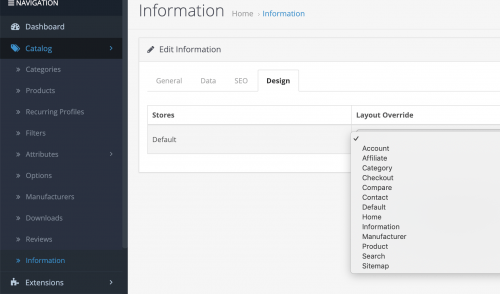
Now in the Admin >> Catalog >> Information >> Edit respective one (About us, Delivery Information or Privacy Policy) >> In the Design tab choose the required layout.

Opencart layout tutorial

In this way, you can override the layout.

Read more: Design layout override – use cases and examples in Opencart 4

Common Layout Scenarios

1. Homepage Layout

  • Typically includes:
    • Slideshow
    • Featured products
    • Latest products
    • Promotional banners

2. Product Page Layout

  • Recommended components:
    • Product images
    • Product details
    • Related products
    • Reviews section

3. Category Page Layout

  • Suggested elements:
    • Category description
    • Filter options
    • Product grid
    • Pagination

SEE ALSO to show full-width position: https://webocreation.com/opencart-free-extension-to-add-full-width-position-in-layout/

What programmers/designers need to take care about positions and layout are:

  1. Include CSS classes as per Opencart while creating the module so everyone can use your module, similarly while designing the theme be sure to use OpenCart Bootstrap CSS so all custom modules that you use do not give design issues.
  2. Be sure to add CSS that supports a three-column structure, two-column left column activated, two-column right column and only one column activated.
    With bootstrap you can see how opencart is handling it:
    {% if column_left and column_right %}
    {% set class = ‘col-sm-6’ %}
    {% elseif column_left or column_right %}
    {% set class = ‘col-sm-9’ %}
    {% else %}
    {% set class = ‘col-sm-12’ %}
    {% endif %}
  3. CSS adjustment for multi-column modules like:
/* fixed colum left + content + right*/
@media (min-width: 768px) {
    #column-left .product-layout .col-md-3 {
        width: 100%;
    }
    #column-left+#content .product-layout .col-md-3 {
        width: 50%;
    }
    #column-left+#content+#column-right .product-layout .col-md-3 {
        width: 100%;
    }
    #content+#column-right .product-layout .col-md-3 {
        width: 100%;
    }
}
/* fixed product layouts used in left and right columns */
#column-left .product-layout, #column-right .product-layout {
    width: 100%;
}

In the above CSS you can see how bootstrap classes style are overridden when the module is in the left column or the right column. So we also need to take care of them likewise while making modules.

As OpenCart is using bootstrap, it is handling this with col-sm classes. As per the above code, it is assigning a different class. If both the column left and column right are activated which means three columns then the content middle will be col-sm-6, if only one column is activated either column left or column right then col-sm-9 is assigned. If none column is activated then col-sm-12 is assigned to the content middle and widths are adjusted accordingly.

Layouts in Opencart database tables:

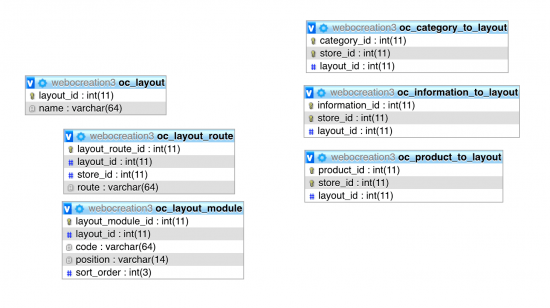
layout database schema in opencart

Taking layout related database tables into consideration we can see that layout has the name. Each layout can have multiple routes as per the store. The layout can have many modules for each different position. Each page can use the layout as we see a layout id in the category, information, product, etc. So, if you are creating the pages then take the layout into consideration.

Effective layout management is crucial for creating an engaging, user-friendly online store. Experiment, test, and continuously refine your layouts to provide the best user experience.

Please let us know if you have any questions or concerns. Please don’t forget to post your questions or comments so that we can add extra topics. You can follow at my twitter account @rupaknpl and subscribe to YouTube user opencart tutorial.

Banners Management in OpenCart 4

Banners are an essential element in eCommerce, as they allow you to highlight key products, promotions, and updates effectively. In OpenCart 4, banner management is streamlined, enabling you to create and manage banners effortlessly from the admin panel. This article will guide you through the process of using the Banners feature in OpenCart 4.

Overview of the Banners Page

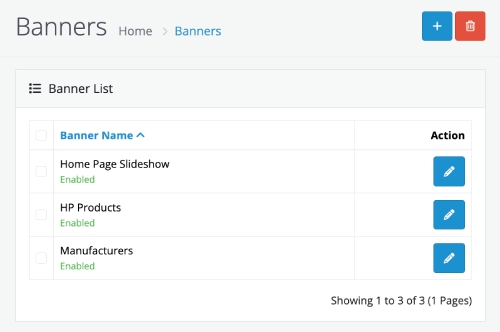
The Banners page lists all the banners created for your store. Each entry includes:

  • Banner Name: The name used to identify the banner.
  • Status: Indicates whether the banner is enabled or disabled.
  • Actions: Options to edit or delete the banner.

Adding a New Banner

Opencart Banners

Read more: Design Layout in Opencart

  1. Navigate to Design > Banners from the main menu.
  2. Click the Add New button.
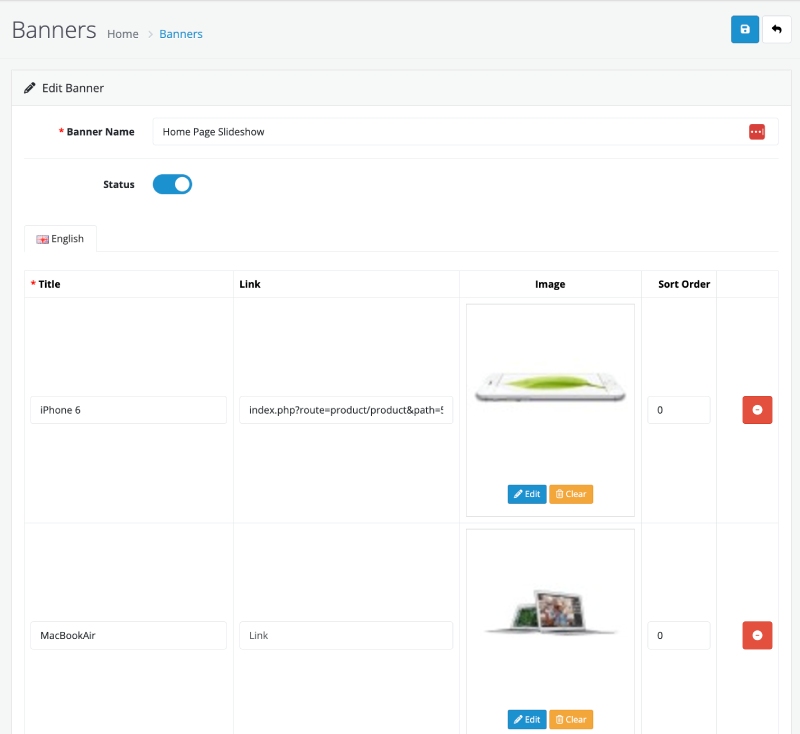
  3. Fill in the required fields:
    • Banner Name: Provide a meaningful name for the banner.
    • Status: Set the banner status to “Enabled” or “Disabled.”
  4. Add banner images:
    • Click the Add Banner button.
    • Fill out the following fields for each image:
      • Title: A short description or title for the banner.
      • Link: The URL where the banner will redirect users.
      • Image: Upload an image for the banner using the file manager.
      • Sort Order: Define the display order for multiple banners.
  5. Save your changes by clicking the Save button.
Banner management

Editing an Existing Banner

  1. On the Banners page, locate the banner you wish to modify.
  2. Click the Edit button.
  3. Update the details and save your changes.

Deleting a Banner

  1. On the Banners page, find the banner you want to remove.
  2. Click the Delete button.
  3. Confirm the deletion. Note: This action is irreversible.

Assigning Banners to Layouts

To display your banners on specific pages:

  1. Navigate to Design > Layouts in the admin panel.
  2. Edit the desired layout (e.g., Home, Category, Product).
  3. Add the Banner Module to the layout:
    • Choose the position (e.g., Content Top, Column Left).
    • Select the banner you created.
    • Define the sort order if multiple modules are assigned to the same position.
  4. Save your layout changes.
Module Layout

Best Practices for Banner Management

  • High-Quality Images: Use clear and high-resolution images for better visual appeal.
  • Compelling Titles and Links: Ensure the title and link align with the promotional message.
  • Mobile Optimization: Design banners that are responsive and look great on all devices.
  • Regular Updates: Keep your banners fresh by updating them regularly to match current promotions.
  • A/B Testing: Experiment with different banners to determine which performs best.

Example Use Case

Creating a Holiday Promotion Banner

  1. Go to Design > Banners and click Add New.
  2. Name the banner “Holiday Sale.”
  3. Enable the status.
  4. Add a banner image:
    • Title: “Holiday Sale – Up to 50% Off”
    • Link: Link to the sale category or a special landing page.
    • Image: Upload a festive promotional image.
    • Sort Order: 1
  5. Save the banner.
  6. Assign the banner to the Home layout under Design > Layouts.

Troubleshooting Common Issues

  • Banners Not Displaying:
    • Ensure the banner is enabled.
    • Verify that the Banner Module is assigned to the correct layout.
    • Clear the cache under Dashboard > Developer > Cache.
  • Broken Links or Images:
    • Double-check the URLs and image paths in the banner settings.

By effectively managing banners in OpenCart 4, you can enhance user engagement, drive sales, and create a visually appealing store tailored to your customers’ needs.

Information Pages Management in OpenCart 4

Information pages in OpenCart 4 serve as a crucial tool for presenting non-product-specific content, such as your store’s about us, terms and conditions, policies, company details, FAQs, or any other custom information you wish to display. This article will walk you through managing these pages effectively to enhance your online store’s usability and professionalism.

Importance of Information Pages

  • Customer Trust: Clearly outline your policies, terms, and company information to build customer trust.
  • SEO Benefits: Use information pages to target specific keywords and improve your website’s visibility on search engines.
  • Enhanced User Experience: Provide quick access to essential information for customers, improving their shopping journey.

Adding a New Information Page

To create a new page:

  1. Click the Add New button at the top-right corner.
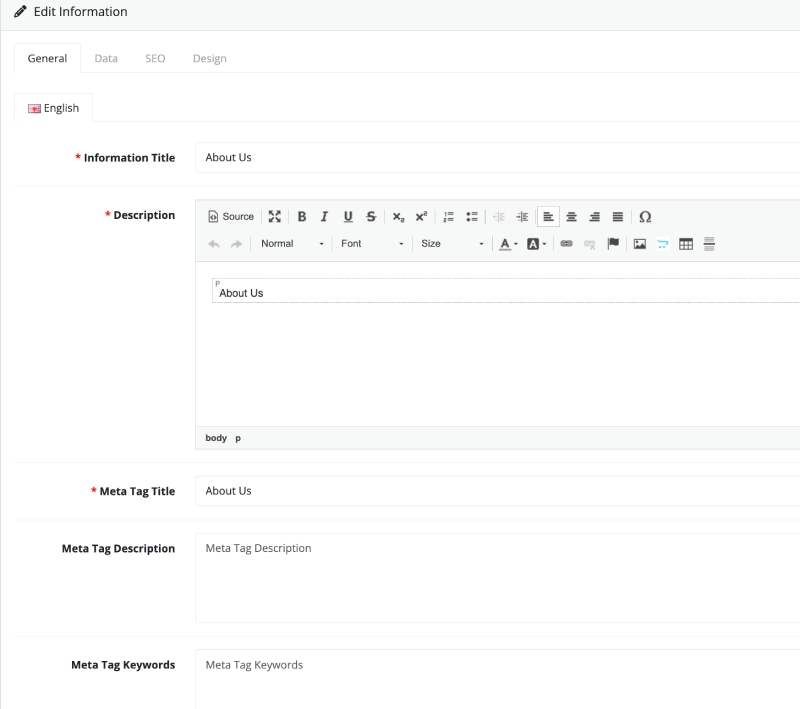
  2. Fill in the following fields:
    • Information Title: Enter the title of the page (e.g., “About Us,” “Shipping Policy”).
    • Description: Add the content of the page using the rich text editor. Include headings, bullet points, or links as necessary.
    • Meta Tag Title: Enter the meta title for SEO purposes.
    • Meta Tag Description: Provide a brief description to improve search engine visibility.
    • Meta Tag Keywords: Include relevant keywords separated by commas.
      information opencart

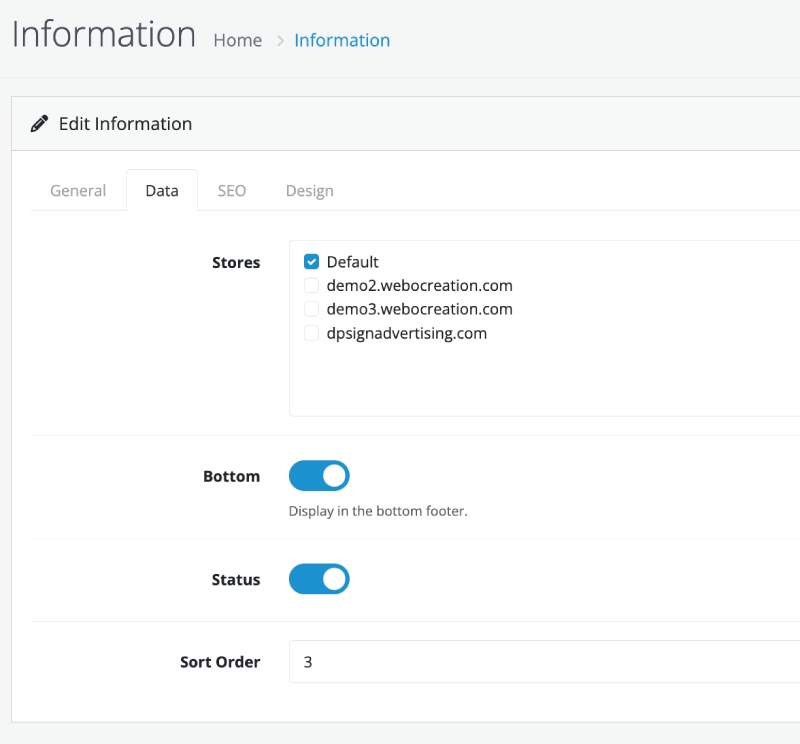
      Data Tab:
      Information opencart
  3. Store Assignment:
    • Specify which store(s) should display the page.
  4. Bottom: If enabled, the information page will show in footer menu list.
  5. Sort Order:
    • Determine the position of the page in lists. Lower numbers display first.
  6. SEO URL: Create a user-friendly URL for the page (e.g., “about-us”).
  7. Set the Status to “Enabled.”
  8. Click Save to create the page.

Editing an Information Page

  1. Locate the page you want to edit in the Information list.
  2. Click the Edit button next to the page.
  3. Modify the desired fields.
  4. Click Save to update the page.

Deleting an Information Page

  1. Select the checkbox next to the page(s) you wish to delete.
  2. Click the Delete button.
  3. Confirm the deletion to remove the page(s).

Assigning Information Pages to Layouts

You can assign information pages to specific layouts for better control of their appearance:

  1. Navigate to Design > Layouts.
  2. Choose the layout you wish to edit (e.g., “Information”).
  3. Add the newly created page under the desired layout section.
  4. Save the changes.

Best Practices for Information Pages

  • Clarity: Write concise and clear content to ensure your customers understand your policies and information.
  • Accessibility: Link essential information pages in the header, footer, or sidebars for easy access.
  • SEO Optimization: Use relevant keywords, meta titles, and descriptions for better search rankings.
  • Regular Updates: Keep your pages updated with current policies, contact details, or any relevant changes.

Example Use Cases

  • Privacy Policy: Detail how customer data is collected, stored, and used.
  • Terms and Conditions: Provide your store’s terms of service.
  • Returns Policy: Explain the steps for product returns and refunds.
  • About Us: Share your company’s story to build a connection with customers.
  • FAQs: Answer common customer queries to reduce support requests.

Conclusion

Efficient management of information pages in OpenCart 4 helps create a professional and user-friendly shopping environment. By regularly updating and optimizing these pages, you can enhance customer satisfaction, build trust, and improve your store’s SEO performance. Take advantage of this feature to deliver essential information and elevate your eCommerce store’s credibility.

Please let us know if you have any questions or suggestions, have a look at Opencart user manual as well. You can also find us on Twitter and Facebook.

Reviews Management in OpenCart 4

Product reviews play a vital role in building trust, improving product credibility, and enhancing customer engagement on eCommerce platforms. OpenCart 4 provides a powerful Reviews Management system, enabling store owners to manage customer feedback efficiently. This opencart user manual will guide you through the features, benefits, and steps for managing reviews in OpenCart.

Why Product Reviews Matter

  • Build Trust: Positive reviews increase customer confidence.
  • SEO Benefits: Reviews generate unique user-generated content, enhancing search engine visibility.
  • Customer Insights: Feedback helps you understand what customers love or where improvements are needed.

Accessing Reviews Management in OpenCart

To manage reviews in OpenCart:

  1. Log in to the OpenCart admin panel.
  2. Navigate to Catalog > Reviews from the menu.
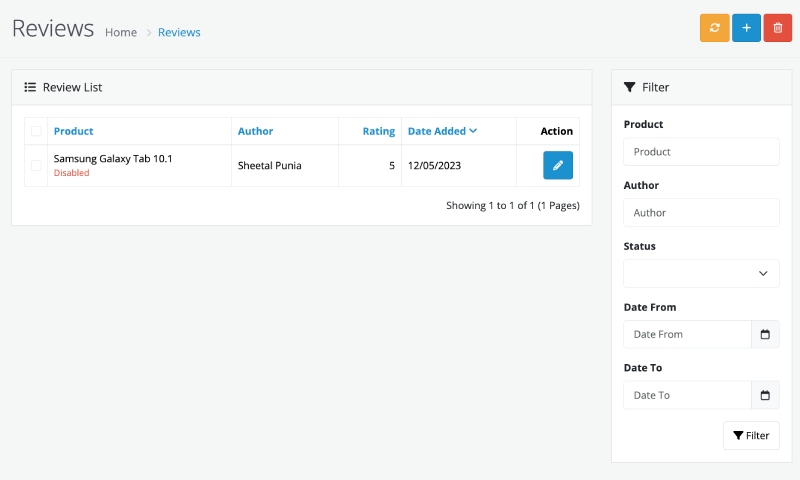
Opencart reviews

Adding a New Review

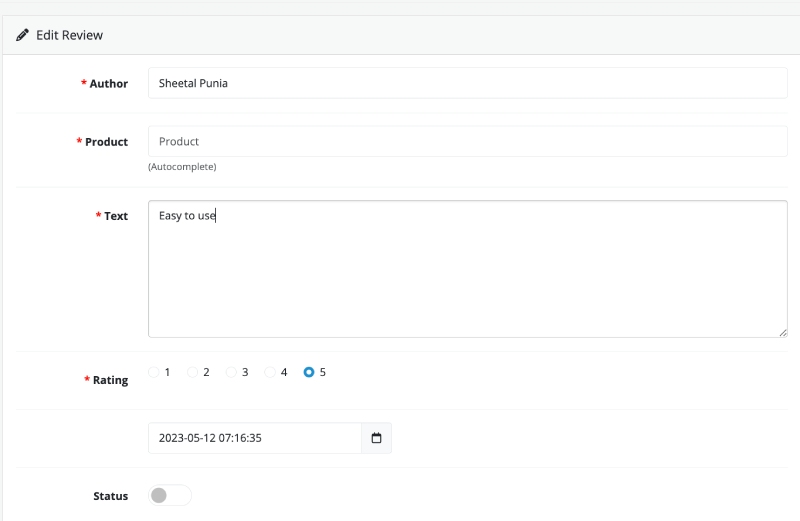
Although most reviews are submitted by customers on the storefront, administrators can manually add reviews if needed. Here’s how:

  1. Click the Add New button in the Reviews section.
  2. Fill in the required fields:
    • Author: Enter the name of the reviewer.
    • Product: Select the product the review pertains to.
    • Text: Write or paste the review content.
    • Rating: Assign a rating between 1 (lowest) and 5 (highest).
    • Status: Set the review status to “Enabled” to make it visible on the storefront.
  3. Click Save to add the review.
Opencart Add reviews

Editing a Review

If a customer submits a review that requires modifications (e.g., grammar correction or inappropriate content), follow these steps:

  1. Locate the review in the Reviews list.
  2. Click the Edit button next to the review.
  3. Make the necessary changes.
  4. Click Save to update the review.

Deleting a Review

To remove reviews that are irrelevant, spammy, or inappropriate:

  1. Select the checkbox next to the review(s) you wish to delete.
  2. Click the Delete button.
  3. Confirm the action to permanently delete the selected review(s).

Enabling and Disabling Reviews

Reviews can be temporarily hidden by disabling them:

  1. Edit the review and set the Status to “Disabled.”
  2. Save the changes.

Best Practices for Reviews Management

  • Moderate Reviews Regularly: Regularly review and approve customer feedback to maintain quality.
  • Encourage Reviews: Use follow-up emails to request reviews from customers after purchase.
  • Respond to Feedback: Address negative reviews constructively to demonstrate excellent customer service.

Troubleshooting Reviews Issues

  • Reviews Not Showing: Ensure the review status is “Enabled” and the product linked to the review is active.
  • Spam Reviews: Use CAPTCHA or manual moderation to prevent spam submissions.

Conclusion

The Reviews Management system in OpenCart 4 empowers store owners to leverage customer feedback for building trust and driving sales. By efficiently moderating, responding to, and encouraging reviews, you can create a dynamic and trustworthy shopping experience for your customers.

Manufacturer or Brand Management in OpenCart 4 – user manual

Manufacturer management or Brand management in OpenCart 4 allows you to organize and display products by brand or manufacturer. This feature is especially useful for users who prefer to shop by brand and for showcasing brand-specific product offerings.

Adding a New Manufacturer

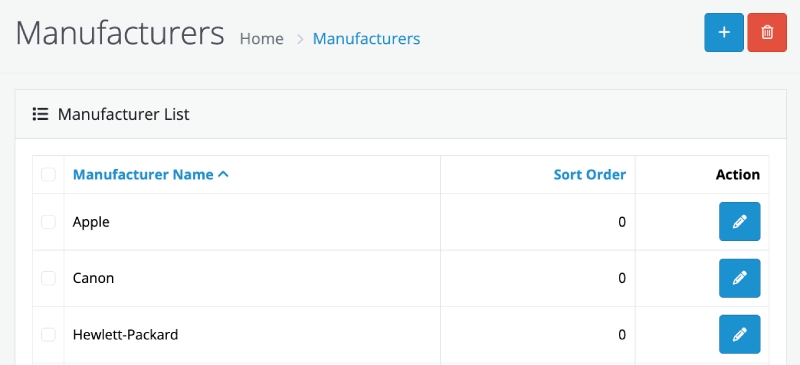
Opencart manufacturers
  1. Log in to your OpenCart admin panel.
  2. Navigate to Catalog > Manufacturers from the admin menu.
  3. Click the Add New button in the Manufacturer Management section.
  4. Fill in the following details:
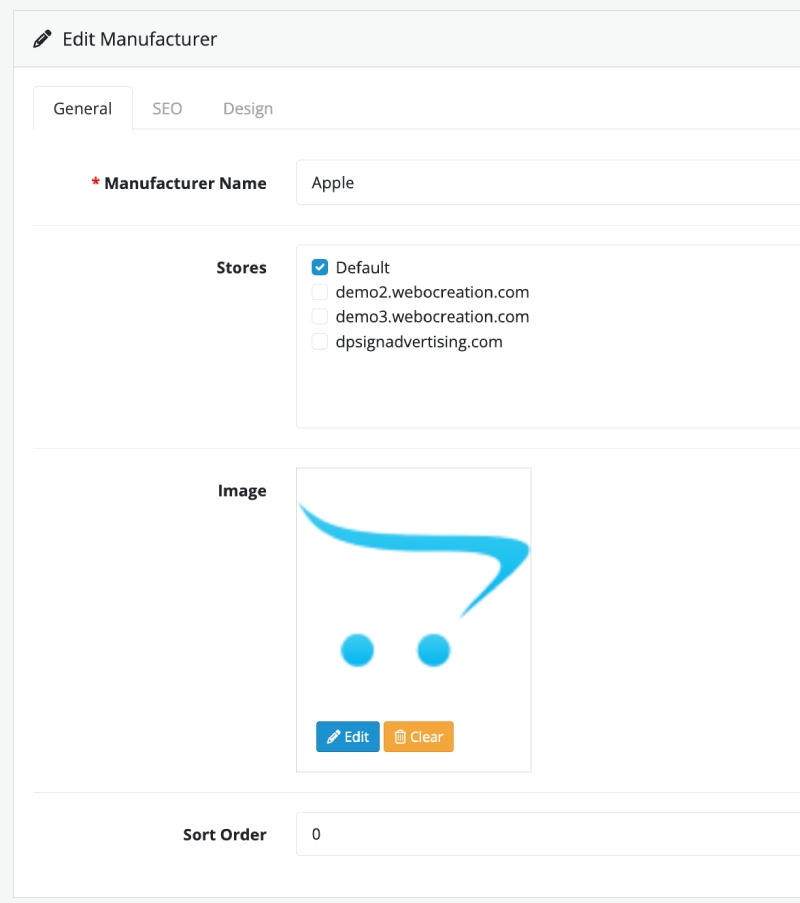
    • Manufacturer Name: Enter the name of the manufacturer.
    • Stores: Select stores where you want this manufacturer to show
    • Image: Upload a logo or image to represent the manufacturer. Click the image field and choose or upload an image from the media manager.
    • Sort Order: Set the order in which the manufacturer will appear in lists. Leave blank to use default sorting.
  5. SEO URL: Provide a unique SEO-friendly URL for the manufacturer. This improves search engine visibility.
  6. Design: You can have different layout as per manufacturer. Flexible design layout system for customizing the appearance and functionality of the Product. Learn more about Design layout override.
  7. Click Save to add the new manufacturer to the system.
Opencart manufacturers or brands

    Editing an Existing Manufacturer

    1. In the Manufacturer Management list, locate the manufacturer you wish to edit.
    2. Click the Edit button next to the manufacturer name.
    3. Update the desired fields.
    4. Click Save to apply the changes.

    Deleting a Manufacturer

    1. Select the checkbox next to the manufacturer(s) you wish to delete.
    2. Click the Delete button at the top right.
    3. Confirm the deletion when prompted.

      Note that deleting a manufacturer does not delete the associated products but removes the manufacturer link.

    Assigning Manufacturers to Products

    1. Navigate to Catalog > Products.
    2. Edit the product you want to associate with a manufacturer.
    3. Under the Links tab, select the manufacturer from the dropdown list.
    4. Save the product.
    Links Products

    By properly managing manufacturers in OpenCart, you can enhance user experience, improve product organization, and boost your store’s SEO rankings. We hope you liked this article, please subscribe to our YouTube Channel for Opencart video tutorials. You can also find us on Webocreation Twitter and Webocreation Facebook. Please let us know if you have any questions or concerns.

    Attributes management in Opencart 4 – user manual

    Attributes in OpenCart 4 enable you to provide detailed product information and help customers make informed purchasing decisions. This Opencart user manual will guide you through the process of managing attributes in OpenCart 4.

    What are Attributes?

    Attributes provide additional information or specifications about a product. They are more descriptive and non-interactive. These details help customers refine their search and compare products effectively.

    Key Differences between Options and Attributes

    FeatureOptionsAttributes
    PurposeInteractive selection by customersDescriptive product details
    Customer InteractionYesNo
    DisplayedOn product page, selectableIn product details, non-selectable
    Affects PricingYes, can adjust priceNo
    Stock TrackingLimited (requires extensions)No
    ExamplesSize, Color, Add-onsMaterial, Features, Weight, Dimensions

    Accessing Attribute Management

    1. Log in to your OpenCart admin panel.
    2. Navigate to Catalog > Attributes.
    3. You will see two submenus:
      • Attributes: Manage individual attributes.
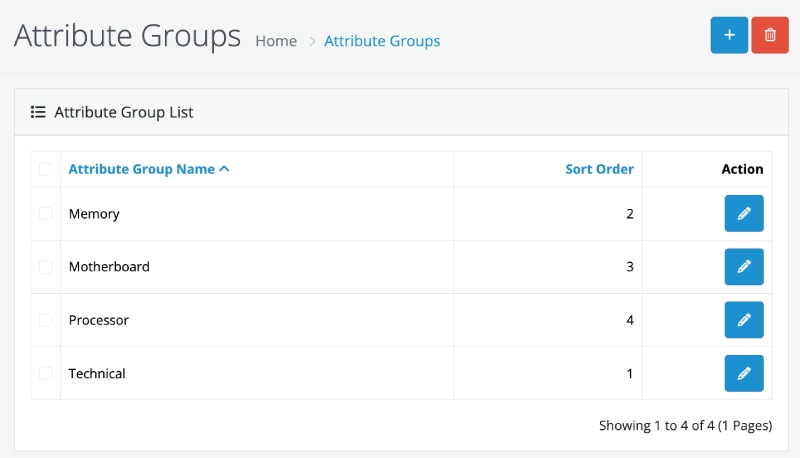
      • Attribute Groups: Organize attributes into groups for better usability.

    Creating an Attribute Group

    Attribute groups product
    1. Navigate to Catalog > Attributes > Attribute Groups.
    2. Click the Add New button.
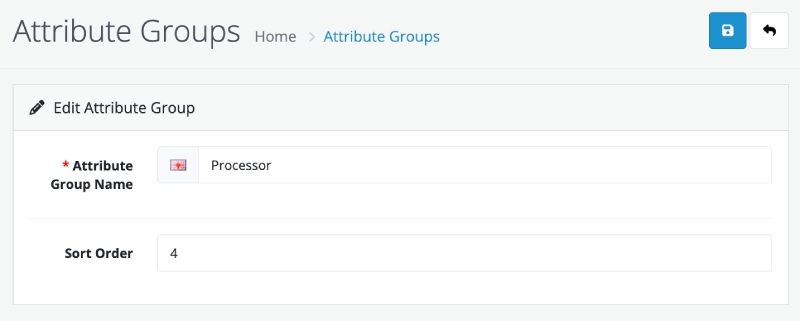
    3. Fill in the required fields:
      • Attribute Group Name: Enter a name for the group (e.g., “Processor”).
      • Sort Order: Define the display order.
    4. Click Save.
    Attribute group add

    Creating a New Attribute

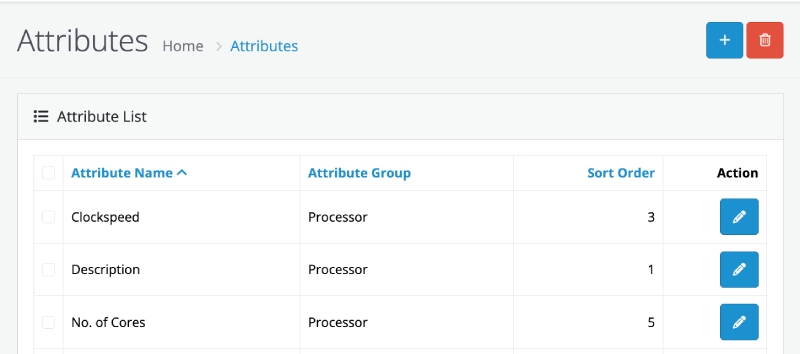
    Product attributes
    1. Go to Catalog > Attributes > Attributes.
    2. Click the Add New button.
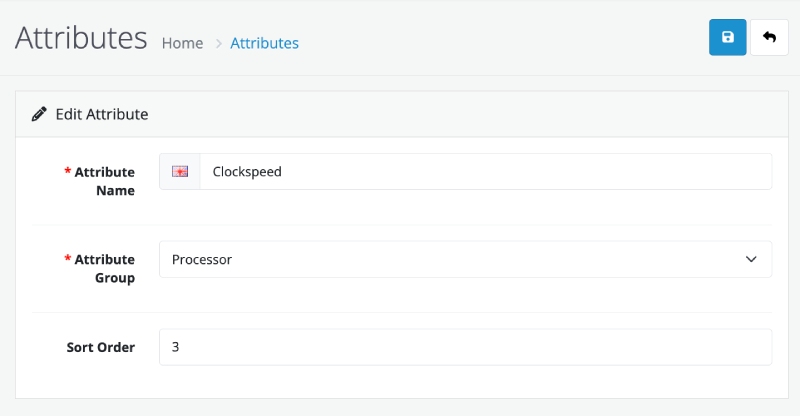
    3. Fill in the required fields:
      • Attribute Name: Enter the name of the attribute (e.g., “Clockspeed”).
      • Attribute Group: Select the group this attribute belongs to (optional).
      • Sort Order: Enter a number to define the display order of this attribute.
    4. Click Save.
    Attributes add product

    Editing an Attribute

    1. Go to Catalog > Attributes > Attributes.
    2. Locate the attribute you want to edit using the search or filter options.
    3. Click the Edit button next to the attribute.
    4. Make the necessary changes and click Save.

    Deleting an Attribute

    1. Go to Catalog > Attributes > Attributes.
    2. Select the checkbox next to the attribute(s) you want to delete.
    3. Click the Delete button.
    4. Confirm the deletion.

    Note: Deleting an attribute will remove it from all products where it is used.

    Assigning Attributes to Products

    1. Go to Catalog > Products and edit the desired product.
    2. Navigate to the Attributes tab.
    3. Click Add Attribute.
    4. Select an attribute from the dropdown list.
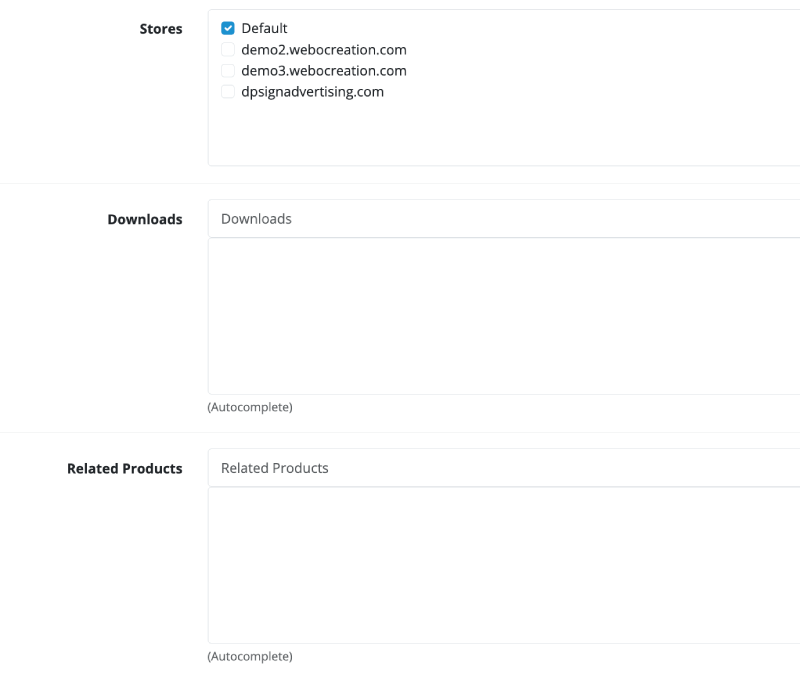
    5. Enter the corresponding value for the attribute (e.g., “100mhz” for “Clockspeed”).
    6. Repeat for additional attributes as needed.
    7. Click Save.
      Assign attributes to product
    8. In the frontend, it shows in Description section at Specification tab
    Specification tab in Product

    Best Practices for Attribute Management

    1. Organize Attributes Using Groups:
      • Group related attributes (e.g., “Display” group for screen size and resolution).
    2. Use Descriptive Names:
      • Clearly define attribute names to avoid confusion.
    3. Consistent Values:
      • Use consistent formatting for attribute values (e.g., “5.5 inches” instead of “5.5”).
    4. Update Regularly:
      • Periodically review and update attributes to reflect product changes.
    5. Test on Frontend:
      • Verify that attributes display correctly on the product page.

    Troubleshooting

    Attribute Not Showing on the Product Page

    • Ensure the attribute is assigned to the product.
    • Verify the attribute group is properly configured.
    • Clear the cache from Dashboard > Developer Settings.

    Duplicate Attributes

    • Use the search functionality to check for duplicates before creating new attributes.
    • Regularly review your attribute list.

    Conclusion

    Proper attribute management enhances the customer experience and improves search functionality on your e-commerce website. OpenCart 4 provides a robust system to organize and display product attributes effectively. Follow this manual to streamline attribute management and ensure accurate product representation.

    Products management in OpenCart 4 with Best Practices

    Managing products effectively is one of the key aspects of running a successful e-commerce store. OpenCart 4 makes it easy to add, edit, and delete products through its intuitive admin panel. This opencart user manual walks you through the process and shares some best practices for product management and SEO optimization.

    Adding a Product

    Follow these steps to add a new product in OpenCart:

    • Login to Admin Panel: Navigate to your OpenCart admin dashboard.
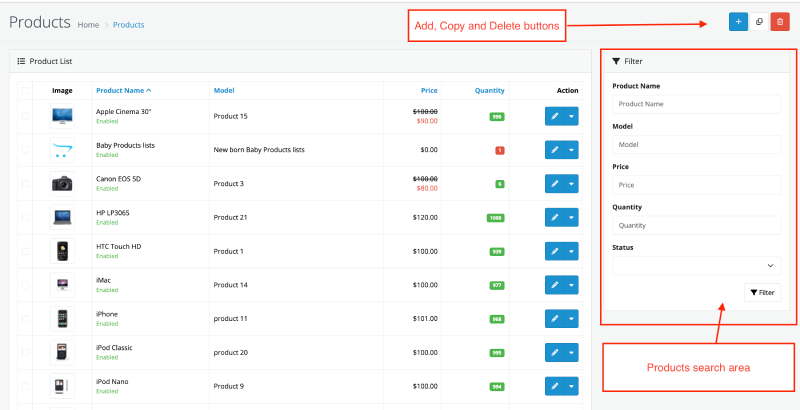
    • Go to Products: Click on Catalog > Products.
      Opencart product listing page
    • Add New Product: Click the Add New blue button (➕).
    • Fill in Product Details:

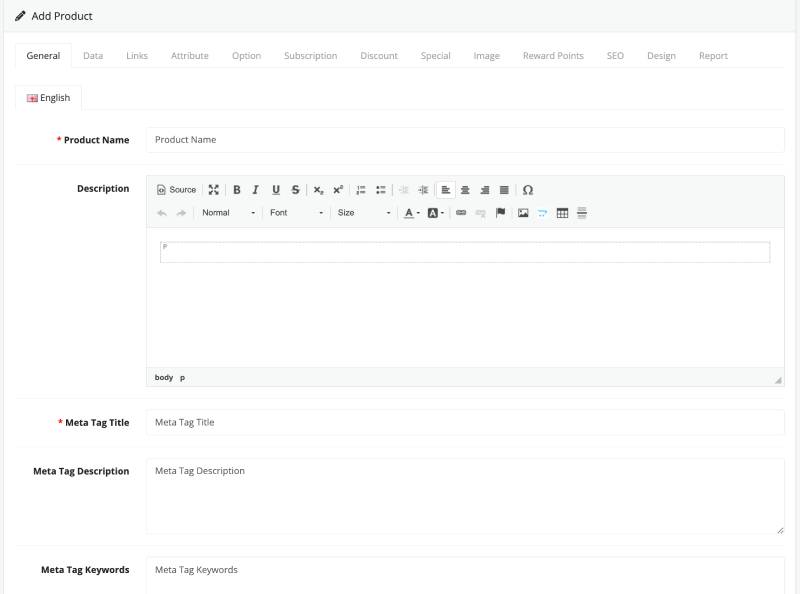
      General Tab:

      Product Name: Enter the name of the product.
      Description: Provide a detailed description using keywords to improve SEO.
      Meta Tag Title: Title of the page, mostly useful for SEO Title. Create an engaging title using the primary keyword.
      Meta Tag Description: Write a concise, compelling summary of the product, including keywords.
      Meta Tag keywords: It used to be useful for SEO but for nowadays not very beneficial but does not hurt if entered useful keyword.
      Product General Tab
    • Data Tab:
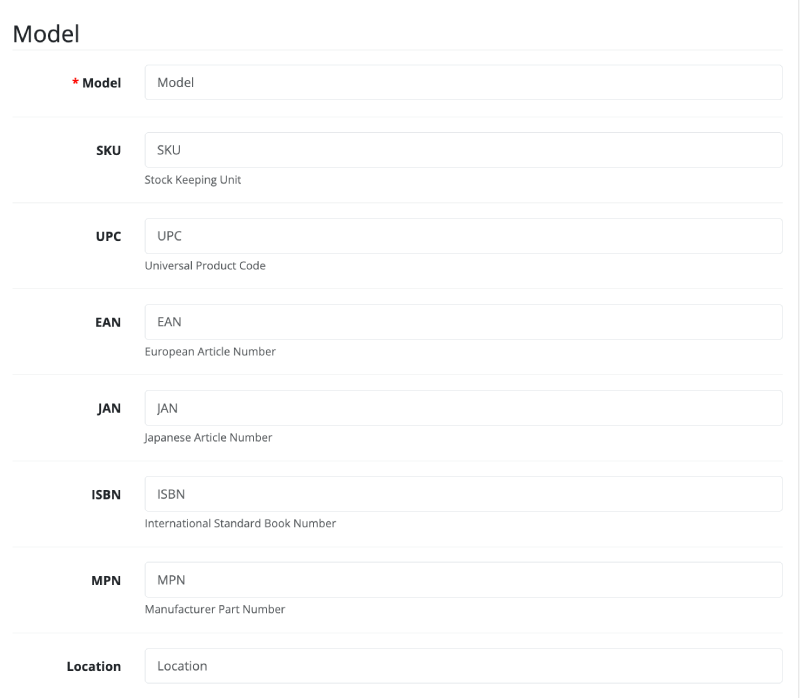
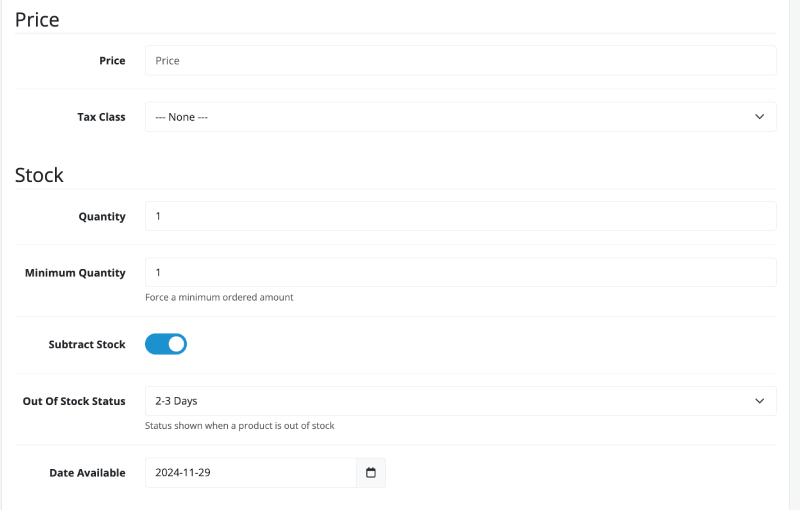
      It is separated to Model, Price, Stock and Specification section
      Model: Enter the product model which is required field. Other fields like SKU (Stock Keeping Unit), UPC (Universal Product Code), EAN (European Article Number), JAN (Japanese Article Number), ISBN (International Standard Book Number), MPN (Manufacturer Part Number) and location
      Model Products
      Price: Set the main price of the product.
      Tax Class: Select the tax class for the product. Read more about how to set the different tax class
      Quantity: Quantity of products available
      Minimum Quantity: Force a minimum ordered quantity. If you set 2, then at least 2 same products need to be ordered.
      Subtract Stock: When this is enabled, the quantity will decrease once someone order the product.
      Out of Stock Status: When the quantity of products become zero then this stock status is shown. Learn how to set the Out of Stock Status
      Date Available: Make sure this date available is before now time, else the product will not show in frontend. You can set this Date Available to future date if you want it to be available on future date.


      Price Stock Products
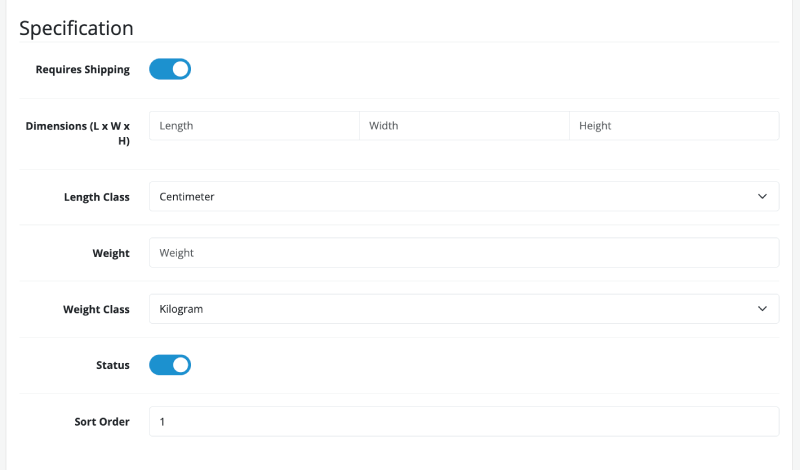
      Specification section
      Requires Shipping: If you are selling physical products and needed it to be shipped then this needs to be enabled. If you are selling digital products like PDF where no shipping is required then you can disable it.
      Dimensions: Enter length, width and height of product. This information are used by Shipping method for calculating the shipping prices.
      Length Class: As different countries different measurement units, so you can select which length class you will set for this product. Read more how to set Length Class.
      Weight: Enter the weight of the product.
      Weight Class: Select the weight class. Read more how to set weight class.
      Status: Status is to show in the frontend or not.
      Sort Order: This is useful when you want to sort the products. Mostly useful for searching products, category listing etc.

      Product Specification
    • Links Tab:
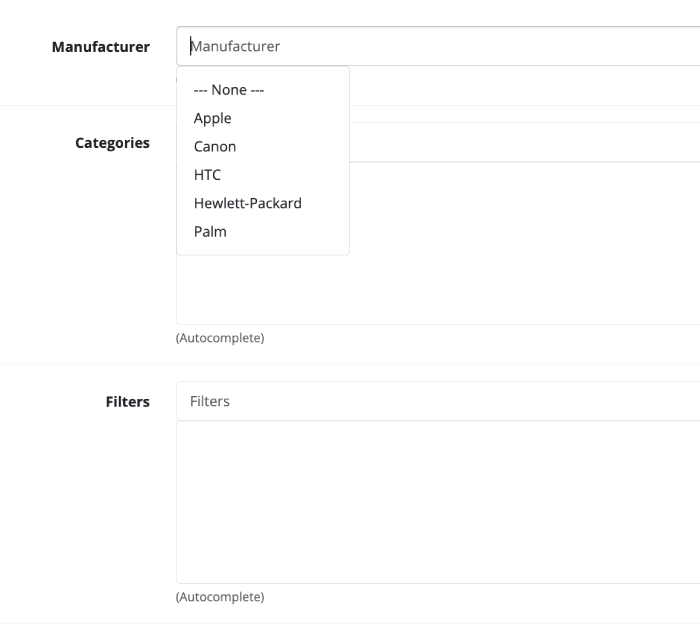
      Manufacturer: Select or add the manufacturer. As Manufacturer field is autocomplete select type, so start typing the manufacturer name and it will list out and then select it.
      Categories: Start typing the category name and select it. You can select multiple categories for a product. Category Management
      Filters: Add filters to the products which helps on filtering at category page or other product listing page where filter is enabled. Filter management.
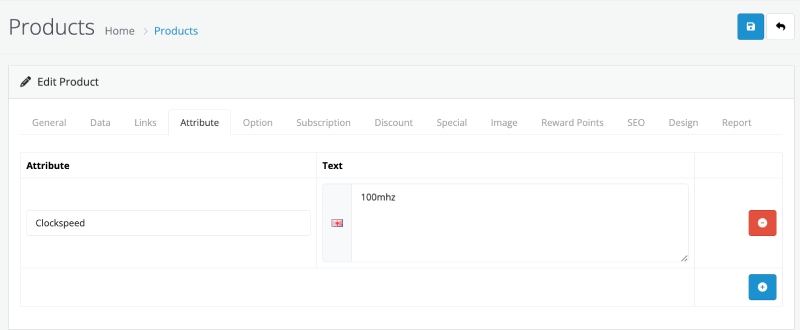
      Links Products
      Stores: Assign products to one or more stores. Mostly there will be default store available if you have not set multi-store. Multistore setup.
      Downloads: If you are selling digital products like PDF, docs, zip, images etc then you can add the download here. Downloads management.

      Related Products: Link other relevant products to cross-sell.
      Products links
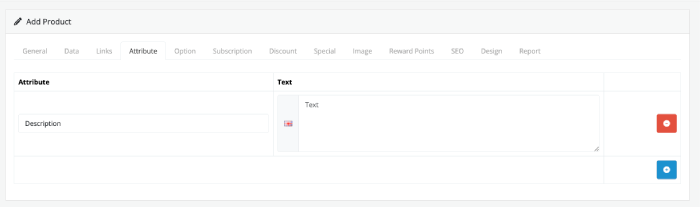
    • Attribute Tab:
      Click the add button on the Attribute tab and enter the attribute and its description
      Attribute tab product
      The same entered attributes shows in the frontend product detail page at specification tab.
      Specification tab in Product
    • Option Tab:
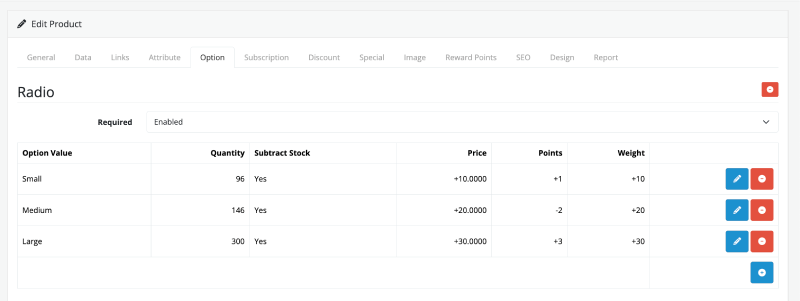
      In the Option tab, enter the available option for the product.
      Product Option
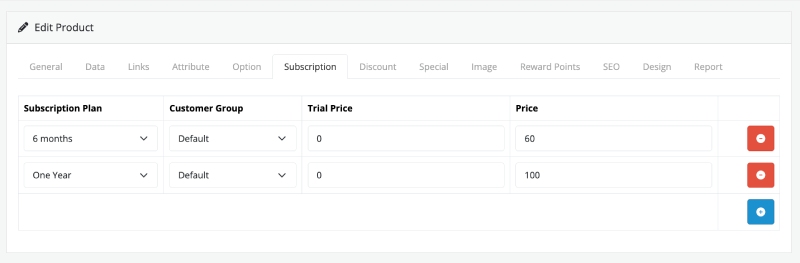
    • Subscription Tab:
      If your product offer subscription payment then you can enter the details here.
      Product Subscription
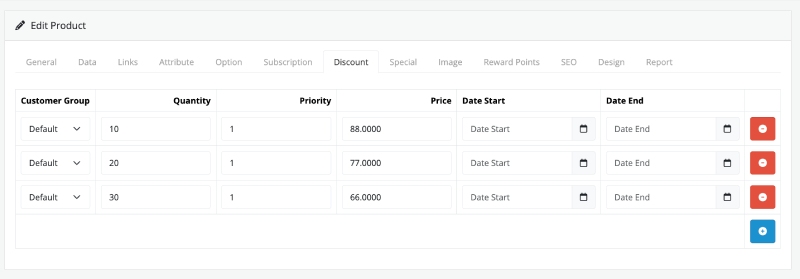
    • Discount Tab: A discount is a price reduction applied to a product based on certain conditions, such as the quantity purchased.
      Product discount
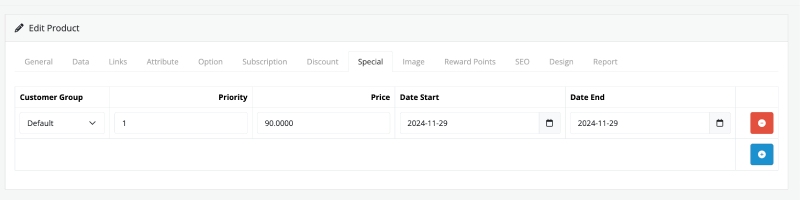
    • Special Tab: A special is a temporary promotional price for a product, regardless of the quantity purchased. Add promotional pricing if applicable.
      Product Special pricing
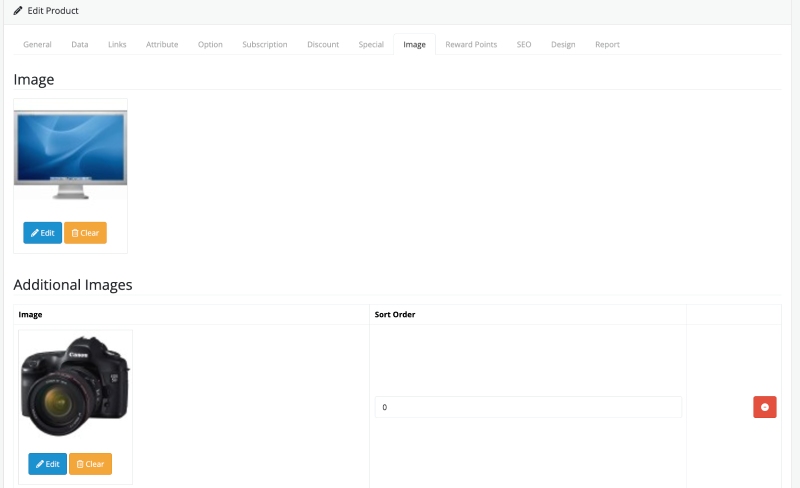
    • Images: The top image is the main image of the product. Additional images are show below the main image in the frontend of default theme.
      Product Images
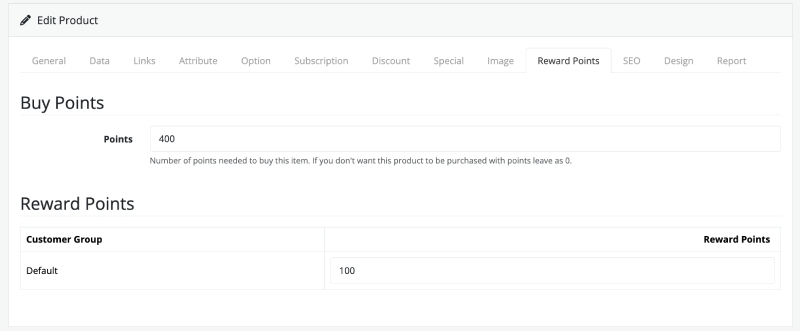
    • Reward Points: If your store support reward points, then you can manage reward points for the product in the Reward Points tab. Here in the screenshot, 400 is number of points needed to buy this product. 100 is the reward points earned when someone ordered this product.
      Products reward points
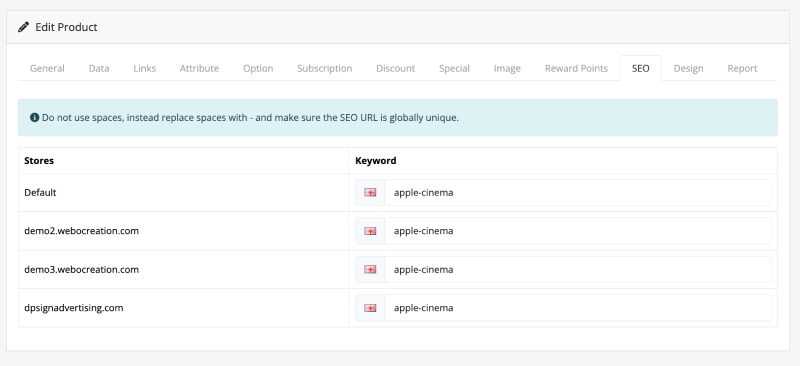
    • SEO: The keyword entered here will be shown in the URL. Use short, descriptive URLs that include keywords. Do not use spaces, instead replace spaces with – and make sure the SEO URL is globally unique. Example: /apple-cinema
      Product SEO
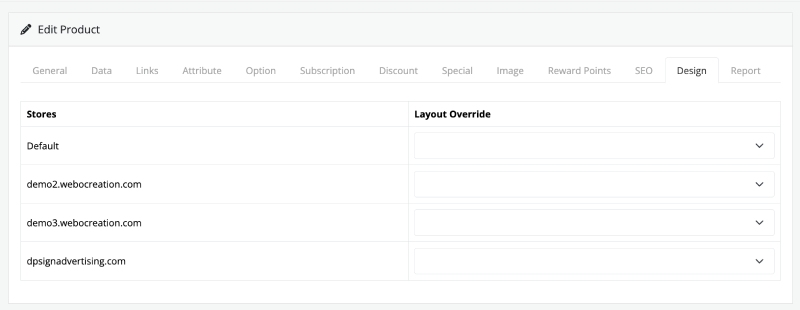
    • Design Tab: You can have different layout as per product. Flexible design layout system for customizing the appearance and functionality of the Product. Learn more about Design layout override.
      Product Design
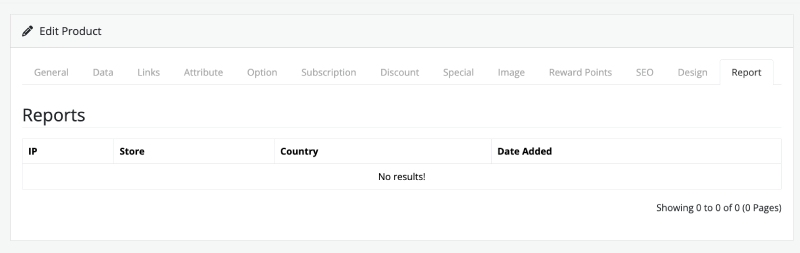
    • Report: You can see some list of IPs, store, country and date added.
      Product Report
    • Save the Product: Click Save to add the product to your catalog.

      Editing a Product

      1. Locate the Product:
        • Navigate to Catalog > Products.
        • Use the search bar to find the product you want to edit.
      2. Edit Details:
        • Click the Edit button (✏️) next to the product.
        • Update the necessary fields (e.g., price, stock, images, description).
      3. Save Changes: After making the updates, click Save.

      Deleting a Product

      1. Select the Product:
        • Go to Catalog > Products.
        • Check the box next to the product(s) you wish to delete.
      2. Delete the Product:
        • Click the Delete button (🗑️).
        • Then, click to confirm the deletion when prompted.

      Note: Deleting a product is permanent. Make sure to back up your database regularly.
      SEO Best Practices

      1. Product Titles

      • Make product titles descriptive and keyword-rich.
      • Example: Instead of “Shaving Cream,” use “Natural Aloe Vera Shaving Cream for Sensitive Skin.”

      2. Meta Tags

      • Meta Title: Create an engaging title using the primary keyword (e.g., “Buy Natural Shaving Cream | Gentle on Skin”).
      • Meta Description: Write a concise, compelling summary of the product, including keywords.

      3. SEO-Friendly URLs

      • Use short, descriptive URLs that include keywords.
      • Example: /natural-aloe-vera-shaving-cream

      4. Product Descriptions

      • Include long-tail keywords naturally.
      • Use bullet points to highlight features and benefits.
      • Avoid duplicate content to prevent SEO penalties.

      5. Categories and Tags

      • Place products in relevant categories.
      • Add tags that reflect popular search terms related to the product.
      Best Practices for Managing Products

      1. Keep Product Data Up-to-Date:
        • Regularly review and update stock levels, descriptions, and prices.
      2. Optimize for Mobile:
        • Ensure images and descriptions display well on mobile devices.
      3. Monitor Analytics:
        • Use OpenCart’s reporting tools or integrate Google Analytics to track product performance.
      4. Offer Variations:
        • Use product options for size, color, or other variations.
      5. Leverage Reviews:
        • Encourage customers to leave reviews to build trust and improve SEO.

      Where to look if the product is not showing in the frontend?

      If a product is not showing on the frontend of an OpenCart store, several factors could be causing the issue. Here’s a checklist to systematically diagnose and resolve the problem:

      • Date available is set for future date
      • Status is not enabled
      • Stores assignment is not checked for default or to specific store where needed
      • Cache issue, clear the cache

      By following these steps and best practices, you can efficiently manage your OpenCart product catalog while optimizing for search engines, ensuring that your e-commerce store remains competitive and user-friendly.

      Anti-Fraud IP in Opencart 4, block IP that are fraudulent

      E-commerce platforms must prioritize security to maintain trust and protect transactions. OpenCart 4 comes equipped with features to combat fraudulent activities, one of which is the Anti-Fraud IP functionality. This feature allows store administrators to block specific IP addresses suspected of fraudulent behavior, safeguarding the integrity of the store and its customers.

      Key Features of Anti-Fraud IP

      1. Custom IP Blocking: Administrators can manually add IP addresses to the blocked list.
      2. Real-Time Monitoring: Detect and flag suspicious activities originating from certain IP addresses.
      3. Integration with Other Anti-Fraud Modules: OpenCart’s Anti-Fraud system integrates seamlessly with extensions that provide additional fraud detection capabilities.
      4. Logs and Reports: View logs of blocked IPs to analyze patterns and improve fraud detection strategies.

      Read more: Opencart Security

      How to Use Anti-Fraud IP

      1. Accessing the Anti-Fraud IP Settings

      • Log in to the OpenCart admin dashboard.
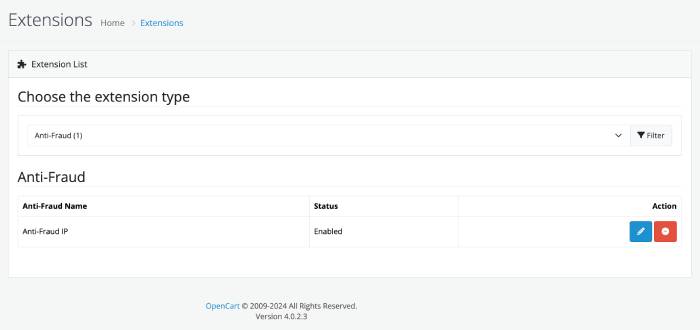
      • Navigate to Extensions > Extensions.
      • Select Anti-Fraud from the dropdown menu.
      • Locate and enable the Anti-Fraud IP extension.
      Anti Fraud Extension Opencart

      2. Adding an IP Address to the Blocked List

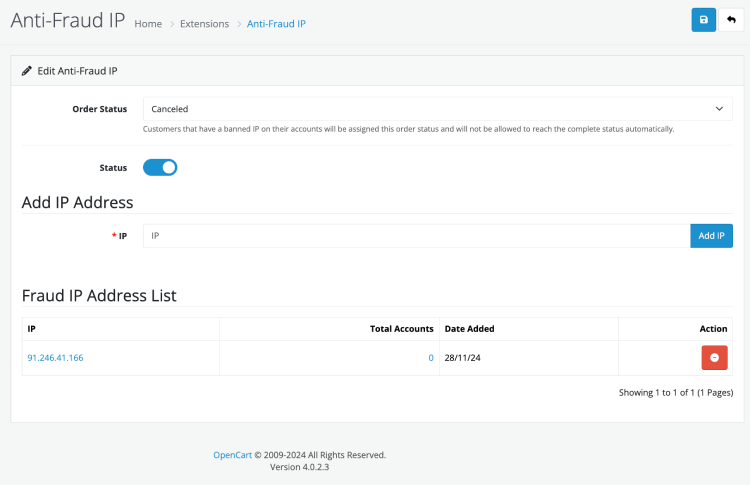
      • Go to Extensions > Extensions > Anti-Fraud > Anti-Fraud IP.
      • If not installed, install it then click edit it.
      • Paste the IP in IP input box and Click the Add IP button.
      • Save the changes.
      • The blocked IPs will be listed under the Anti-Fraud IP section.
      Block IP in Opencart

      Identify fraudulent IPs

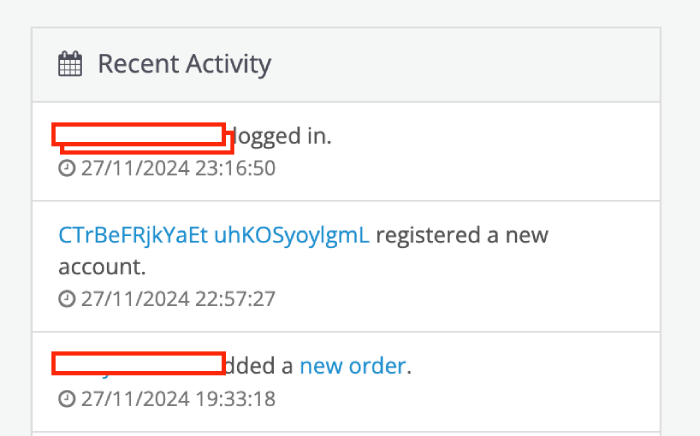
      One way to identify fraudulent IP is by analyzing the Recent Activities in the Dashboard activities

      Recent Activity Customer

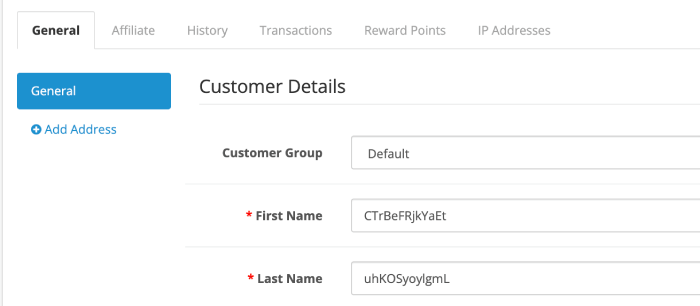
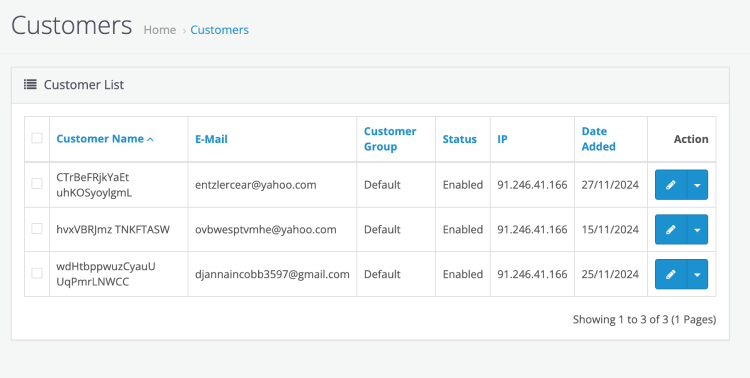
      We saw the First name and Last name looks suspicious and we click to get the details. Those name looks suspicious and we clicked the IP addresses tab.

      Suspicious name fraud

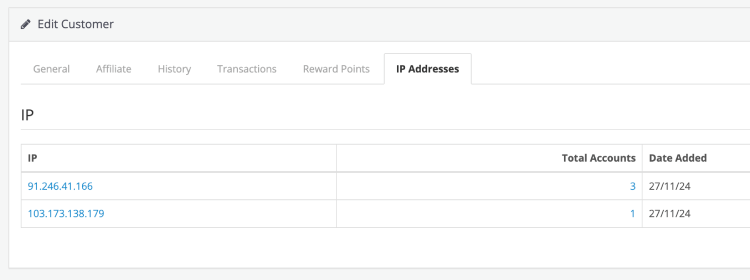
      We saw two IPs and one IP created multiple accounts:

      Customer IP lists

      When we click the 3 in the Total Accounts column, then we got a list of customers with weird name so those are suspicious registration so we blocked that IP.

      Suspicious customer IP

      Other ways to identify fraudulent IPs effectively are by following steps below:

      1. Monitor Website Traffic Logs:
        • Use tools like Google Analytics, server logs, or third-party monitoring tools to review unusual patterns, such as spikes in requests or repeated access attempts.
      2. Look for Repeated Failed Login Attempts:
        • Multiple login failures from the same IP might indicate brute-force attempts.
      3. Analyze Suspicious Order Patterns:
        • Orders with mismatched billing and shipping addresses or unusually large volumes from a single IP.
      4. Check for Scraping Activity:
        • Bots scraping product data may send multiple rapid requests, which can be traced to specific IPs.
      5. Use Anti-Fraud Tools:
        • Platforms like FraudLabs Pro or MaxMind can help detect fraudulent IPs by analyzing behavioral patterns.
      6. Engage Real-Time Blacklists (RBL):
        • Use databases like Spamhaus or Project Honeypot to cross-check IPs against known malicious addresses.
      7. Monitor Failed Payment Attempts:
        • Repeated payment failures, especially if associated with multiple card details, can signal fraud.
      8. Enable Firewall Alerts:
        • Security solutions like Cloudflare or Sucuri can provide alerts for unusual IP activity.
      9. Customer Feedback:
        • If customers report unusual account activity or transactions, investigate the associated IPs.
      10. Geolocation Analysis:
        • Check if the IP location aligns with the user’s claimed location. Discrepancies might indicate proxy or VPN usage.

      Benefits of Blocking Fraudulent IPs

      1. Enhanced Security: Prevent unauthorized access and fraudulent transactions.
      2. Reduced Chargebacks: Mitigate the risk of financial loss due to fraudulent orders.
      3. Improved Customer Trust: Demonstrates a commitment to protecting customer data and transactions.
      4. Better Resource Management: Minimize server load caused by malicious traffic.

      Best Practices for Anti-Fraud IP Management

      1. Use Trusted Fraud Detection Services: Integrate third-party fraud detection tools for more comprehensive coverage.
      2. Regularly Monitor Activity Logs: Review logs to identify new threats and patterns.
      3. Whitelist Trusted IPs: Ensure essential partners or services are not accidentally blocked.
      4. Educate Your Team: Train staff to recognize signs of fraudulent behavior.

      Conclusion

      The Anti-Fraud IP feature in OpenCart 4 provides a robust line of defense against fraudulent activities. By actively monitoring and managing IP addresses, store administrators can enhance security, protect revenue, and foster customer trust. Coupled with other security measures, it is an essential tool for any e-commerce business aiming to stay ahead of fraudsters.

      Design layout override – use cases and examples in Opencart 4

      OpenCart 4 provides a robust and flexible design layout system for customizing the appearance and functionality of your online store. One of the standout features is the ability to override design layouts without modifying core files. This functionality ensures that you can implement customizations in a way that’s easy to manage and update. Let’s explore what design layout overrides are, their use cases, and how to implement them effectively.

      What Are Design Layout Overrides?

      In OpenCart, layouts define how different pages of your store are structured. A layout specifies which modules appear in various positions (e.g., header, footer, sidebar) on a page. Design layout overrides allow you to customize these layouts for specific pages, categories, or products without altering the default settings or core files. This makes your store highly customizable while maintaining compatibility with future updates. This helps on:

      • Implementing unique promotional layouts
      • Maintaining upgradability
      • Creating custom pages
      • Modifying existing layouts for specific categories or products

      Why Use Design Layout Overrides?

      1. Custom Page Designs

      • You can create unique designs for individual pages, such as a custom homepage, promotional landing pages, or special campaign pages.
      • For example, you might want a “Black Friday Sale” page with its own layout and modules like countdown timers and banners.

      2. Category-Specific Layouts

      • Different categories may require unique layouts based on the type of products they contain.
      • For example, the “Electronics” category might feature a slideshow of gadgets, while the “Clothing” category displays a carousel of featured apparel.

      3. Product-Specific Layouts

      • Highlight premium or featured products with dedicated layouts.
      • For instance, a flagship product might have an expanded description, video module, and additional call-to-action buttons.

      4. SEO and User Experience Enhancements

      • Tailored layouts can improve user experience (UX) by presenting content in a way that’s optimized for specific audiences.
      • This also enhances SEO by ensuring relevant and structured content is displayed for search engines.

      How to Implement Design Layout Overrides in OpenCart 4

      Follow these steps to apply design layout overrides in OpenCart 4:

      Step 1: Access Layouts in Admin Panel

      1. Log in to your OpenCart admin panel.
      2. Navigate to Design > Layouts.
      3. You will see a list of predefined layouts (e.g., Home, Product, Category).

      Step 2: Create or Edit a Layout

      1. Click the Add New button to create a new layout or edit an existing one.
      2. Provide a meaningful name for your layout (e.g., “Black Friday Sale”).
      3. Assign the desired route (e.g., black-friday-sale). Routes define where the layout will be applied.
      Opencart Design Layout

      Step 3: Add Modules to Layout Positions

      1. In the layout editor, assign modules (e.g., Banners, Carousels, Latest Products) to specific positions (e.g., Content Top, Content Bottom, Column Left and Column Right).
      2. Configure each module as needed. For example, set banner images or define product categories.

      Step 4: Save and Test

      1. Save your changes and navigate to the assigned route in your store.
      2. Verify that the layout displays as expected. Tweak module settings or positions if necessary.

      Step 5: Assign Layout to the Category

      1. Edit the category where you want to assign the new layout. Here for an example, we will edit the Camera category and assign the Black Friday Sale layout to override the default category layout.
        Category Design Layout override in Category
      2. Then in the frontend the layout is different for the Camera category.
      Opencart Design layout frontend

      Examples of Layout Overrides

      1. Promotional Landing Page

      • Use Case: A dedicated page for a holiday sale.
      • Implementation:
        • Create a new layout.
        • Assign modules like a countdown timer, featured products, and promotional banners.
        • Route: promo/holiday-sale.

      2. Category-Specific Layout

      • Use Case: Enhancing the layout of the “Books” category.
      • Implementation:
        • Edit the “Category” layout or create a new one.
        • Assign a carousel module to display bestsellers in “Books.”
        • Route: category/books.

      3. Product-Specific Layout

      • Use Case: Highlighting a flagship smartphone.
      • Implementation:
        • Create a new layout.
        • Add modules such as a video gallery and a technical specifications block.
        • Route: product/flagship-smartphone.

      Best Practices for Using Design Layout Overrides

      • Plan Ahead: Sketch your desired layouts and identify which pages need overrides.
      • Use Descriptive Names: Name your layouts meaningfully to avoid confusion.
      • Test Thoroughly: Always test your layouts on different devices and browsers.
      • Keep It Modular: Utilize reusable modules to streamline your design process.
      • Backup Regularly: Before making major changes, back up your store to avoid data loss.

      Conclusion

      Design layout overrides in OpenCart 4 provide unparalleled flexibility for customizing your store. By leveraging this feature, you can create unique and engaging shopping experiences tailored to your customers’ needs. With proper planning and implementation, layout overrides can significantly enhance your store’s visual appeal and functionality.

      We hope you liked this article, please subscribe to our YouTube Channel for Opencart video tutorials. You can also find us on Webocreation Twitter and Webocreation Facebook. Please let us know if you have any questions or concerns.

      Categories management in Opencart 4

      In this Opencart user manual, we will learn to manage categories in Opencart 4, a fundamental task for organizing your products and improving your store’s navigation. Here’s a step-by-step guide to managing categories from the Opencart admin panel.

      Accessing the Admin Panel

      Log in to the Admin Panel:

      • Navigate to http://yourdomain.com/admin (In Opencart 4, the admin URL can be different as per the installation).
      • Enter your username and password to log in.

      Navigating to Categories Management

      Access Categories:

      • In the admin dashboard, go to Catalog > Categories.
      • This section will display a list of all existing categories.
      Add Opencart category

      Creating a New Category

      Add New Category:

      • Click on the “+” (Add New) button at the top right corner.

      Category Details:

      • General Tab:
        • Category Name: Enter the name of the category.
        • Description: Provide a detailed description of the category. Format the text using the editor and add images if necessary.
        • Meta Tag Title: Enter a title for SEO purposes.
        • Meta Tag Description: Add a meta description for SEO.
        • Meta Tag Keywords: Include relevant keywords for SEO.
      • Data Tab:
        • Parent Category: If this category is a subcategory, select the parent category.
          You can start typing in the Parent and select the parent category.
        • Parent Cateogry
        • Filters: Add filters that apply to this category.
          Read more about Opencart filters
        • Stores: Select the store where this category will be available (useful for multi-store setups).
        • Image: Upload an image representing the category.
        • Top: Choose whether to display this category in the top menu bar. If you don’t check this checkbox it will not show in the Top main menu.
        • Columns: Specify the number of columns to use for the bottom categories.
        • Sort Order: Define the order in which this category appears relative to others.
        • Status: Set the status to “Enabled” to make the category active or “Disabled” to hide it.

          SEO Tab:
        • SEO URL: Create a search engine-friendly URL.  Do not use spaces, instead replace spaces with – and make sure the SEO URL is globally unique.
          Category SEO
      • Design Tab:

      Save Category:

      • Click the “Save” button to create a new category.

      Editing an Existing Category

      Edit Category:

      • In the Categories list, find the category you want to edit.
      • Click the “Edit” button (pencil icon) next to the category name.

      Modify Details:

      • Make necessary changes in the General, Data, and Design tabs.

      Save Changes:

      • Click the “Save” button to update the category.

      Deleting a Category

      Delete Category:

      • In the Categories list, select the checkbox next to the category you want to delete.
      • Click the “Delete” button (trash can icon) at the top right corner.
      • Confirm the deletion when prompted.

      Managing Subcategories

      Creating Subcategories:

      • Follow the steps for creating a new category.
      • In the Data tab, select the appropriate parent category.

      Viewing Subcategories:

      • In the Categories list, subcategories are usually displayed hierarchically under their parent categories.

      Bulk Actions

      Bulk Editing:

      • Select multiple categories by checking the boxes next to their names.
      • Use the bulk actions (e.g. deleting) at the top right corner.

      SEO and Best Practices

      SEO URL Management:

      • Ensure each category has a unique and descriptive SEO URL.
      • Use keywords in the meta tags to improve search engine rankings.

      Optimized Descriptions:

      • Write clear and detailed descriptions for each category, incorporating relevant keywords.
      • Use the editor to enhance descriptions with images and formatted text.

      Category Images:

      • Use high-quality images that represent the category well.
      • Optimize images for fast loading times.

      Managing categories in Opencart from the admin panel is straightforward and crucial for maintaining an organized and user-friendly ecommerce store. By effectively creating, editing, and organizing categories, you enhance the shopping experience for your customers and improve your store’s SEO performance.

       We hope you liked this article, please subscribe to our YouTube Channel for Opencart video tutorials. You can also find us on Webocreation Twitter and Webocreation Facebook. Please let us know if you have any questions or concerns.