How product returns are handled in Opencart 4? Opencart user manual

Opencart 4 has return functionalities by default. In this Opencart user manual, we are showing you how returns are managed and handled in Opencart 4 by the site administrator and the customer.

Product Returns settings management:

For the product returns settings management, go to Admin >> System >> Localization >> Returns, where you can find three sections: Return statuses, Return Actions, and Return Reasons.

Return Statuses:

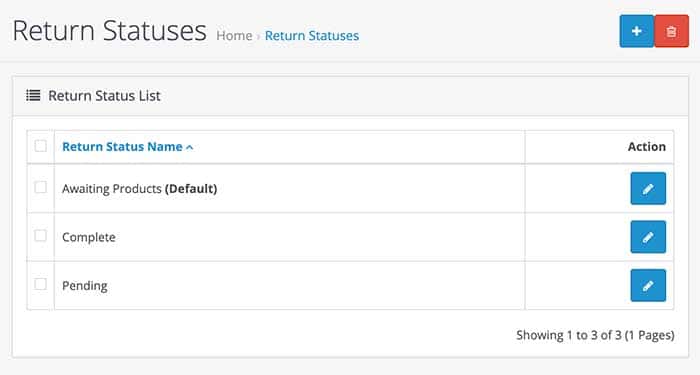
Return statuses are used by the store administrator when product returns are filed. You can add multiple return statuses as per need at Admin >> System >> Localization >> Returns >> Returns Statuses. By default, Opencart 3 provides “Awaiting Products”, complete and pending return statuses.

Product return statuses Opencart

Return Actions

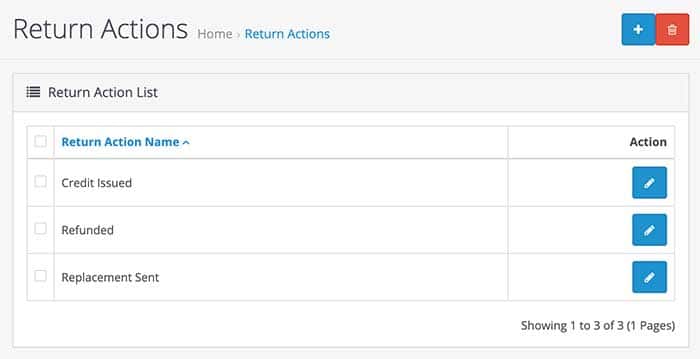
Return Actions are also used by the store administrator when product returns are filed. You can add the return actions at Admin >> System >> Localization >> Returns >> Returns Actions, and three actions are provided by default: Credit Issued, Refunded, and Replacement Sent.

return actions opencart

You can see the return actions when you edit a return at Admin >> Sales >> Returns, and you will see at the bottom where you can select the return action.

Return Reasons

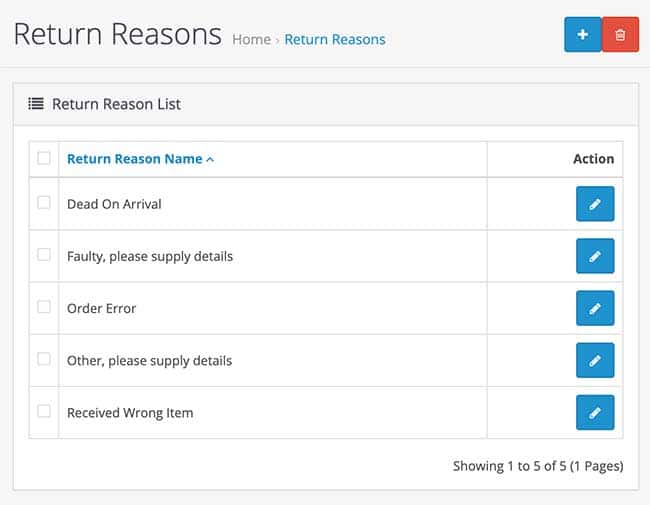
We can see the return reasons on the customer’s return form. You can add the return reasons from Admin >> System >> Localization >> Returns >> Returns Reason. Five return reasons are provided by default by Opencart: Dead on Arrival, Faulty, please supply details, Order Error, Other, please supply details, and Received the Wrong Item.

Opencart return reason

How does a customer submit product returns in Opencart 4?

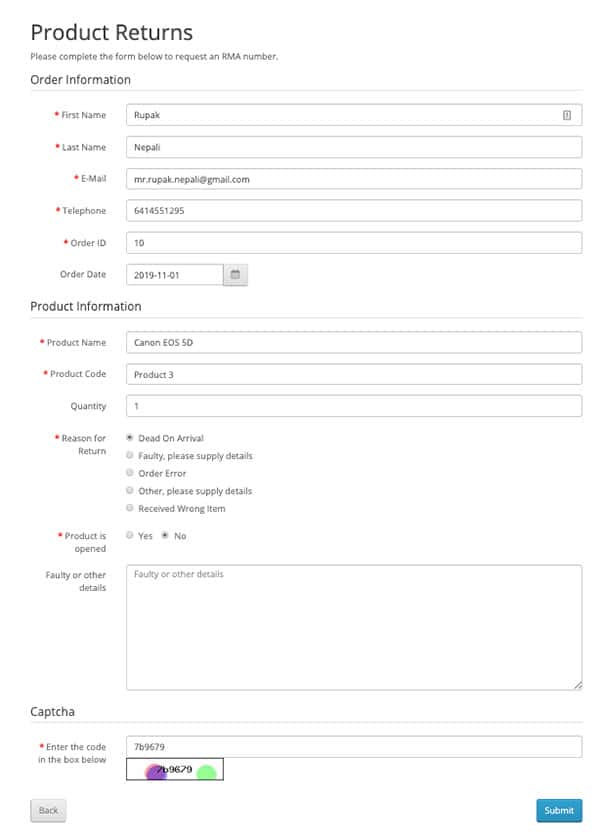
In Opencart 4, customers can submit product returns by going to the URL https://YOURURL//index.php?route=account/return/add. In the default installation, the return link is in the footer’s second column at customer services. The product returns form looks like below:

Frontend product returns section of Opencart

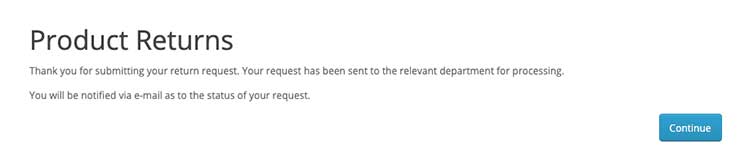
When someone fills this out then they will get a success message like:

Product return success

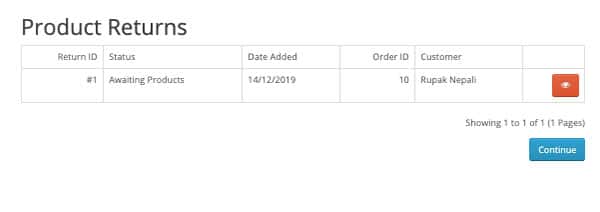
Customer can view their return requests by going to their account dashboard and clicking “View your return requests”. You can see the list of returns that you requested like below:

Customer product return list

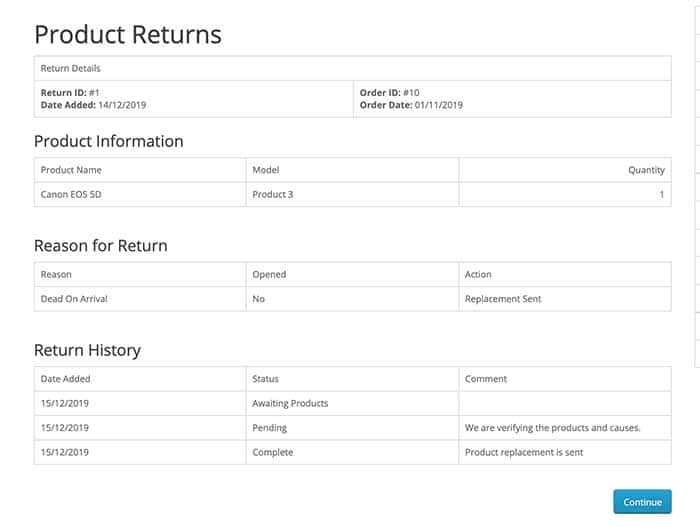
When the customer clicks the view, then they will see the product returns like below:

Customer product return detail

Store administrator management of product returns

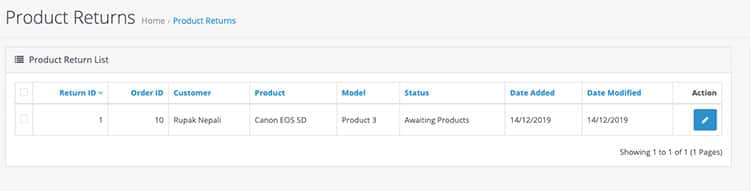
After the customer submits the product returns then the Store administrator will see the product returns at Admin >> Sales >> Returns. You will see a list of product returns submitted by customers.

administrator product returns

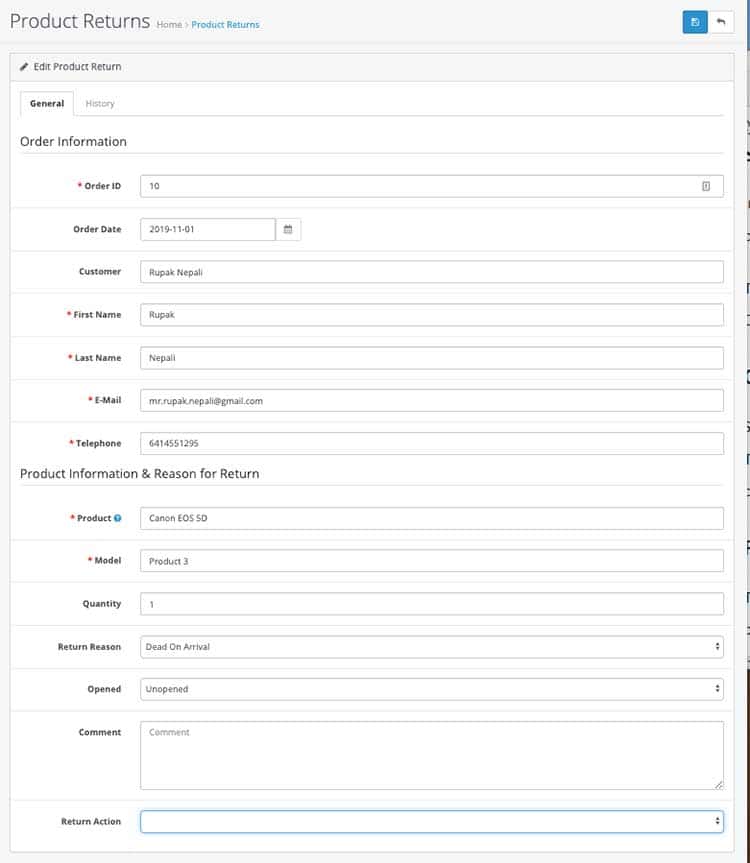
When you click edit then you will see the form like below:

edit product returns opencart

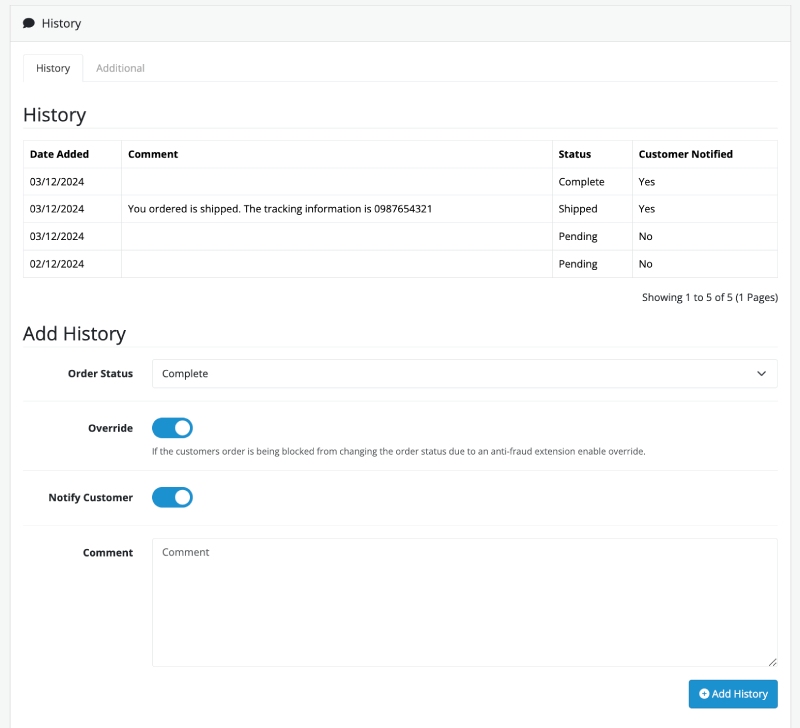
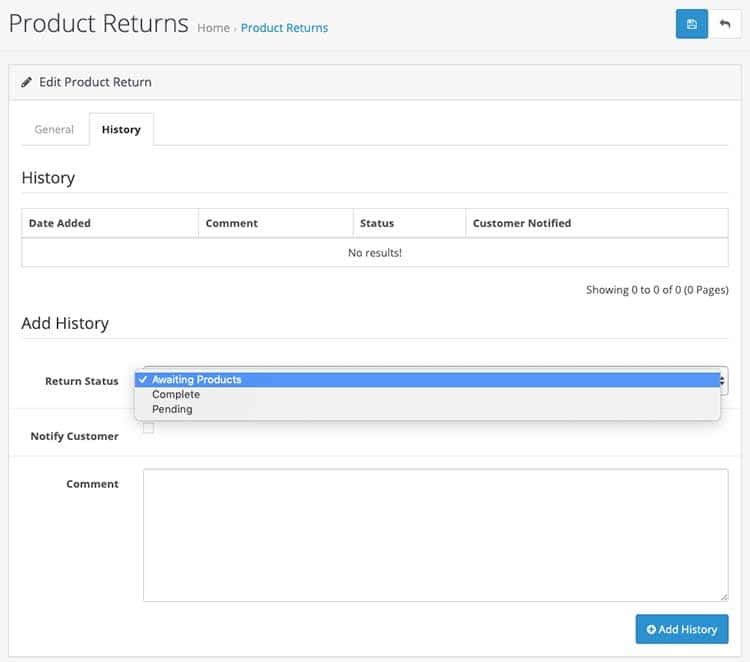
You can see the details given by the customer, order information, product information, reason for the return, and return action. Once you change the return action, it will show in the customer section as well. Now click on the History tab, then you will see the form like below:

product returns history in Opencart

When you add a return history of the product and it will be shown in the customer section.

In this way, you can manage the product returns in Opencart. Please don’t forget to post your questions or comments so that we can add extra topics. Likewise, you can follow us at our Twitter account @rupaknpl, subscribe to our YouTube channel for opencart tutorials, and click to see all the Opencart user manual.

Marketing Mail in OpenCart 4 – user manual

Marketing mail is a powerful feature in OpenCart 4 that allows store owners to engage with their customers directly through email campaigns. By leveraging this tool, businesses can inform customers about new products, special offers, and promotions, and build long-lasting relationships. This article covers the essentials of managing marketing mail in OpenCart 4, including its setup, features, and best practices.

Benefits of Marketing Mail

  • Customer Engagement: Stay connected with your customers by sharing updates, offers, and personalized messages.
  • Sales Boost: Promote specific products or sales campaigns to drive more revenue.
  • Brand Awareness: Keep your brand at the forefront of customers’ minds.
  • Cost-Effective: Reach a wide audience without incurring high costs.

Accessing the Marketing Mail Feature

To access marketing mail in OpenCart 4:

  1. Log in to the admin dashboard.
  2. Navigate to Marketing > Mail in the menu.

Read: Enable email configuration in Opencart

Creating a Marketing Mail Campaign

Follow these steps to create and send a marketing email:

  1. Navigate to Mail: Go to Marketing > Mail and click on Add New or directly start configuring a new email.
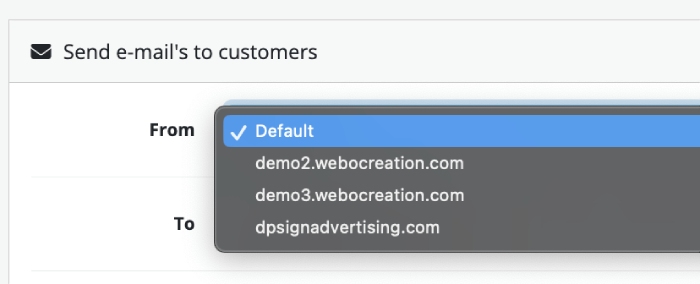
  2. FROM: Select from which store you want to send the email
    Email from
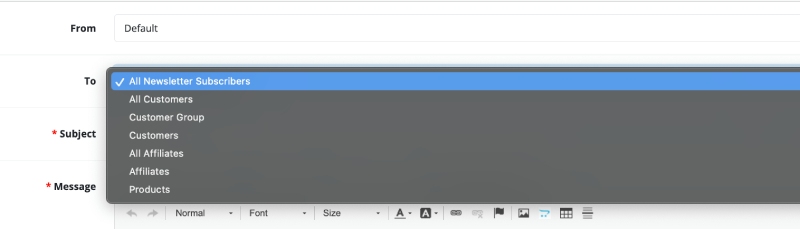
  3. TO: There are multiple ways to select the Recipients.
    Email to Opencart
    • All Newsletter Subscribers: Send email to all newsletter subscribers
    • All Customers: Send email to all customers
    • Customer Group: Send email to selected customer group
      Send email to Customer Group
    • Customers: Send email to lists of selected customers
    • All Affiliates: Send email to all affiliates
    • Affiliates: Send email to selected affiliates
    • Products: Send email only to customers who have ordered products in the list.
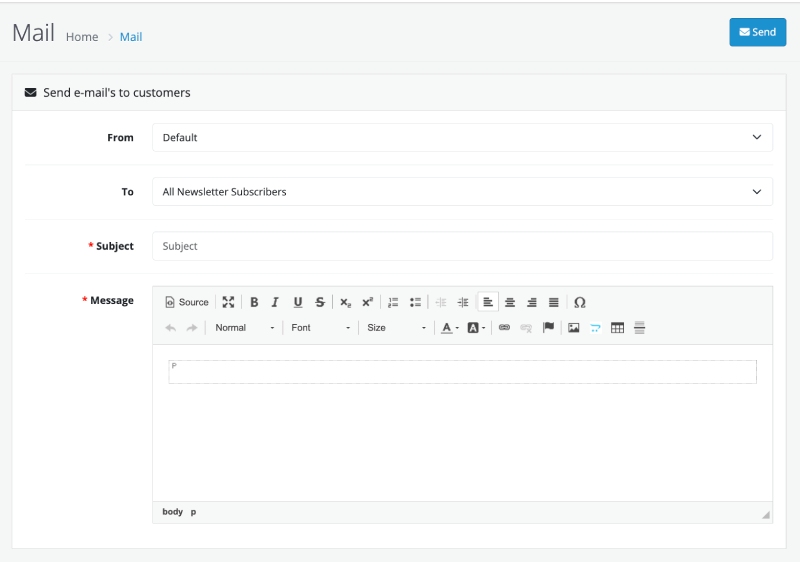
  4. Compose the Email:
    • Subject: Write a clear and enticing subject line that grabs attention.
    • Message: Use the built-in text editor to create the email body. You can add images, links, and formatted text to make your email visually appealing.
  5. Send:
    • Click Send to dispatch the email to your selected recipients.
Opencart Marketing Mail

Features of Marketing Mail in OpenCart

  • Customer Targeting: Segment your audience by customer group or individual selection for personalized campaigns.
  • Rich Text Editor: Create professional-looking emails with formatting, images, and links.
  • Flexible Attachments: Include promotional PDFs, catalogs, or discount codes in your emails.
  • Built-in Email Sending: No need for external email tools; manage campaigns directly from your OpenCart admin. For high-volume email campaigns, consider integrating with external email services like Mailchimp or SendGrid to ensure better deliverability and scalability.

Best Practices for Marketing Mail

For larger campaigns, consider using dedicated email servers or services like Mailchimp or SendGrid for reliable email delivery

  1. Segment Your Audience: Target emails based on customer behavior, preferences, or demographics for higher engagement.
  2. Personalize Messages: Address customers by name and tailor content to their interests.
  3. Use Clear Call-to-Actions (CTAs): Encourage customers to take action with prominent CTAs like “Shop Now” or “Claim Your Discount.”
  4. Test Before Sending: Preview your email and send test emails to avoid errors.
  5. Analyze Performance: Track open rates, click-through rates, and conversions to refine your email strategy.
  6. Comply with GDPR: Ensure customers have opted in to receive marketing emails and include an unsubscribe option.

Example Use Cases

  • Seasonal Promotions: Notify customers about holiday sales or exclusive discounts.
  • Product Launches: Introduce new arrivals with compelling descriptions and images.
  • Abandoned Cart Recovery: Send reminders to customers who left items in their cart.
  • Loyalty Rewards: Reward repeat customers with special offers or coupons.

Troubleshooting Marketing Mail

If you encounter issues: Opencart email sending issues

  • Emails Not Sending: Check your email settings under System > Settings > Mail to ensure SMTP or mail settings are configured correctly. For larger campaigns, consider using dedicated email servers or services like Mailchimp or SendGrid for reliable email delivery.
  • Emails Marked as Spam: Use professional subject lines and avoid spam-triggering words.
  • Formatting Issues: Preview emails on multiple devices to ensure they display correctly.

Conclusion

Marketing mail in OpenCart 4 is an invaluable tool for building customer relationships and driving sales. By crafting engaging emails, targeting the right audience, and adhering to best practices, you can make the most of this feature to grow your eCommerce business.

Manage, send, apply and design custom Gift Vouchers in Opencart 3

In Opencart 3, gift certificates or gift vouchers are the same. Customers can send a gift certificate to another recipient, and the gift certificate will be emailed to the recipient after the customer’s order has been paid for. Then the recipient can redeem the gift vouchers at checkout. The admin can add different voucher themes and send the gift vouchers to recipients from the admin section.

Opencart v 4 version the Gift Vouchers are removed

Create or design the voucher themes

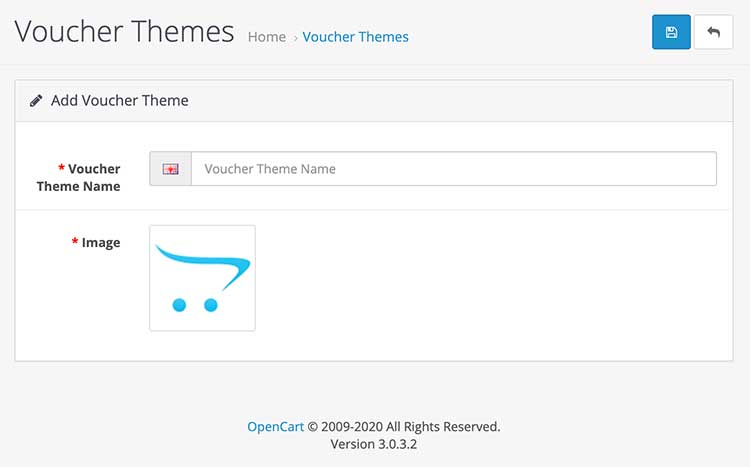
Log in to the admin, then go to Sales >> Gift Vouchers >> Vouchers theme, then click the add button, then enter the Voucher theme name and Image. The image you uploaded here will be sent to the email address associated with the email template image. Then click the Save button.

Opencart Vouchers theme Opencart

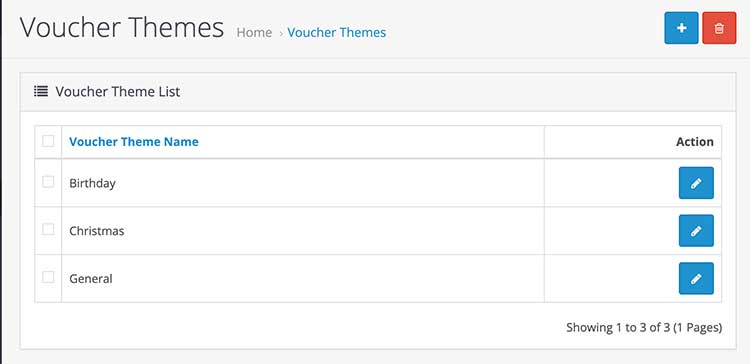
Once you save it, you can see it in the gift vouchers listing page:

Gift voucher theme list Opencart

Purchase a Gift Certificate and send it to someone in Opencart

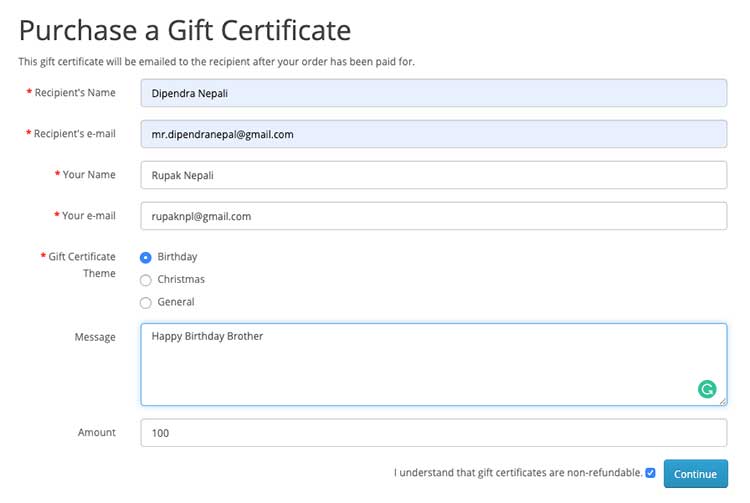
When someone visits https://YOURSITE/index.php?route=account/voucher then they will see the form like below:

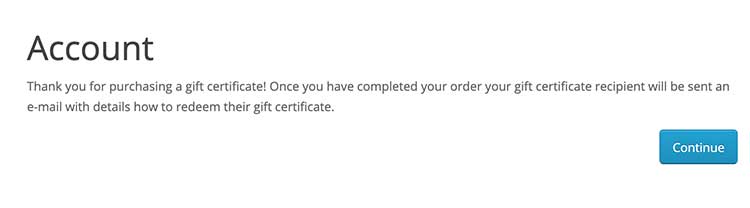
The form includes the recipient’s name, the recipient’s email, your name, your email, the gift certificate theme that the admin set up in the gift voucher theme, the message, and the amount that the sender wants to send. Once they entered the details, check the checkbox of terms and click continue. Then you will see a message like below:

Thank you message before purchase gift certificate

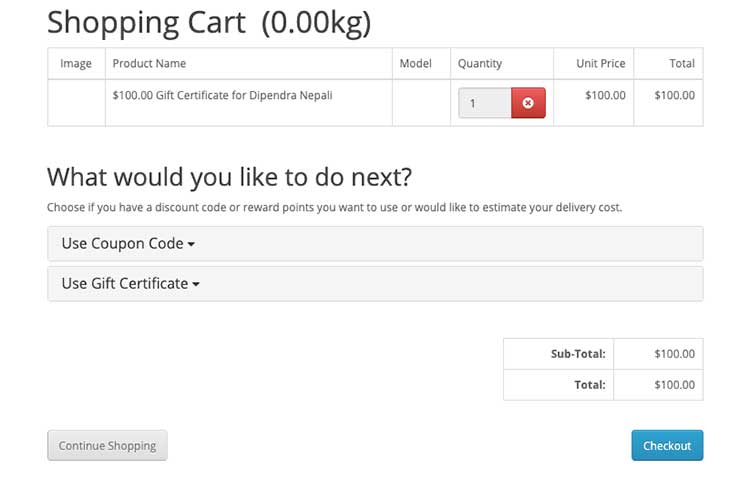
Then the buyer will click continue, then they will see the shopping cart with the gift certificate like below, see the Product Name is “the amount sent” Gift Certificate for “name of the recipient”:

Shopping cart gift voucher Opencart

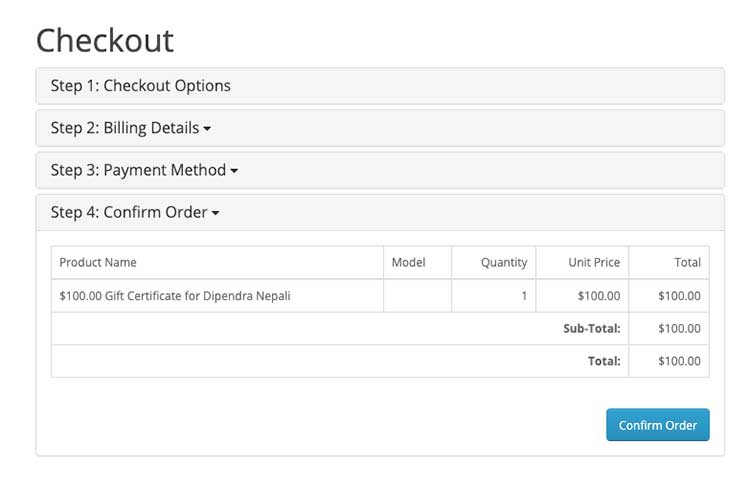
Once the sender clicks checkout and selects or adds the billing address then they will see the confirmation section:

Confirm Gift voucher purchase

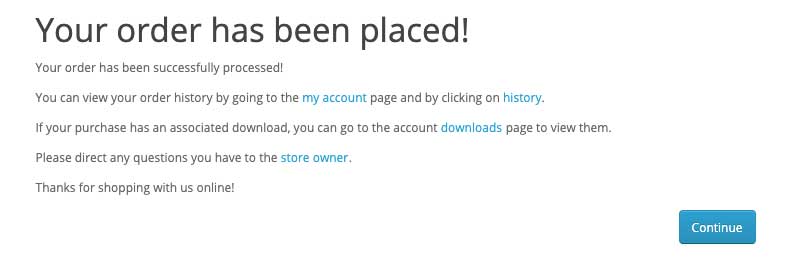
Once they click the confirm order button, they will get the order success message.

Gift certificate order placed thank you

How do recipients redeem the gift certificate?

When the sender sends the gift certificate then the recipient will get an email like below:

Gift certificate Opencart

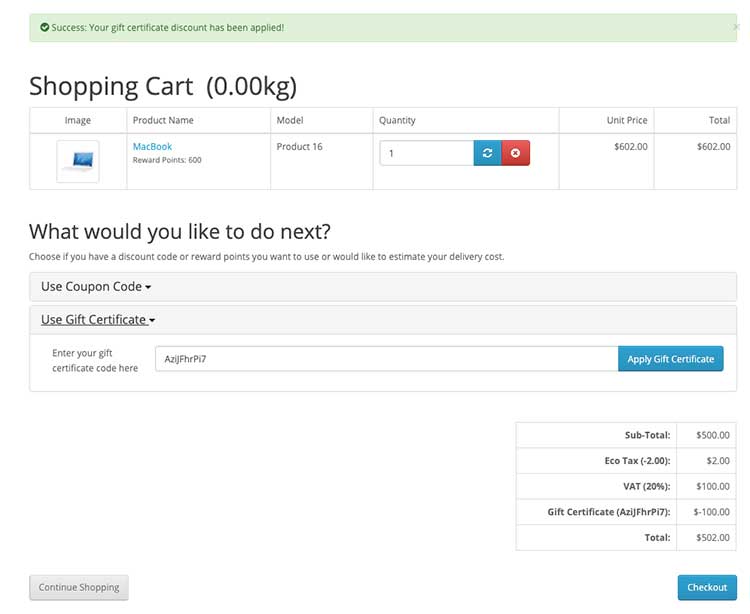
In that email, you can see the redemption code, which is “AziJFhrPi7”; the recipient can use the code in the shopping cart. When the recipient goes to the website which is in the email then the recipient add the product/s to the shopping cart and when they see the shopping cart then they can see the Use Gift Certificate section when the above code is entered and click “Apply Gift Certificate” button then the amount of gift certificate is applied like below:

Apply gift voucher in shopping cart Opencart

In the above example, the $100 gift certificate is applied, and the amount is subtracted from the order total. Then the recipient can pay the remaining amount and check out the products.

Management of Gift Vouchers by Admin

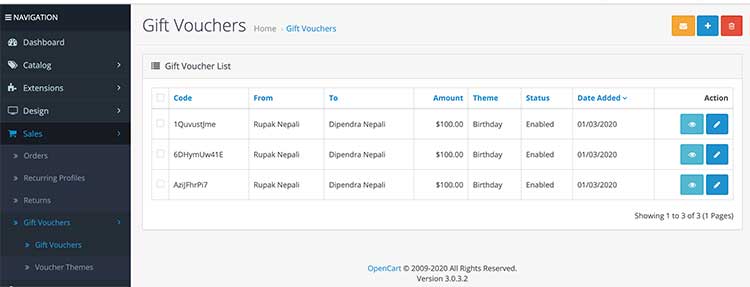
The administrator can see the list of Gift vouchers or certificates created at admin >> Sales >> Gift Vouchers >> Gift Vouchers. The administrator can resend the email, delete the gift vouchers, and add the gift vouchers.

Gift vouchers created Opencart

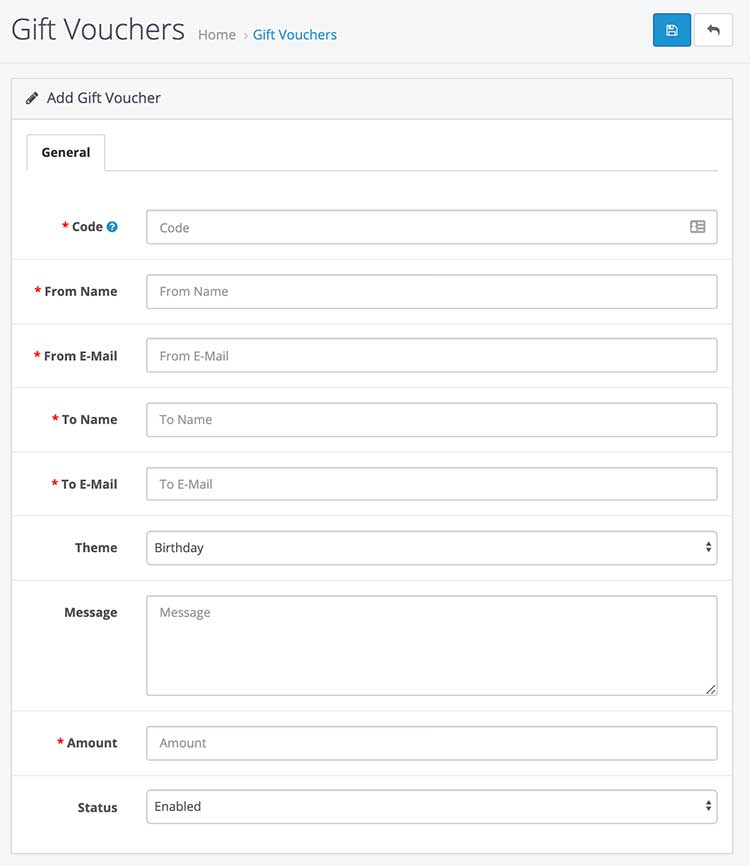
When the administrator clicks the add button then they will see the form like below:

Gift certificate add by admin

The administrator needs to add the “Code”, “From Name”, “From Email”, “To Name”, “To Email”, “Theme”, “Message”, “Amount”, and “Status” enabled, and click the save button. Then, a similar email like above will be sent to the email address where they can see the gift voucher code, which the recipient can use in their checkout.

How to set a minimum and maximum amount a customer can purchase a voucher for?

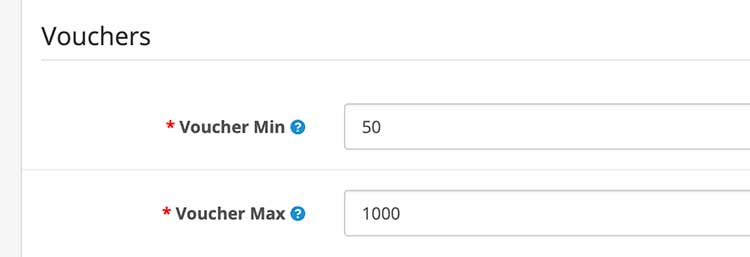
The administrator can set a minimum and maximum amount that a customer can purchase a gift voucher. For that, go to admin >> System >> Settings >> edit the store >> click the Options tab and go to the Voucher section where you can set Voucher min and Voucher max.

Gift vouchers min and max setting

In this way, you can manage, send, apply, and design custom gift vouchers or certificates in Opencart 4. Please post your questions or comments so that we can add extra topics. You can follow us on our Twitter account @rupaknpl. Subscribe to our YouTube channel for Opencart tutorials, and click to see the Opencart user manual.

Coupons Management in OpenCart 4

Coupons are an essential marketing tool in OpenCart 4, enabling store owners to attract and retain customers by offering discounts. By creating and managing coupons effectively, businesses can drive sales, clear inventory, and reward loyal customers. This guide covers the key aspects of coupons management in OpenCart 4 and provides best practices for using them efficiently.

Why Use Coupons in Your Store?

Coupons provide numerous benefits for eCommerce businesses:

  • Increased Sales: Attract new customers and encourage repeat purchases.
  • Customer Loyalty: Reward existing customers with exclusive discounts.
  • Inventory Management: Clear out slow-moving stock with targeted promotions.
  • Competitive Edge: Stand out from competitors by offering special deals.

Accessing Coupons Management

To manage coupons in OpenCart 4:

  1. Log in to your admin panel.
  2. Navigate to Marketing > Coupons from the menu.
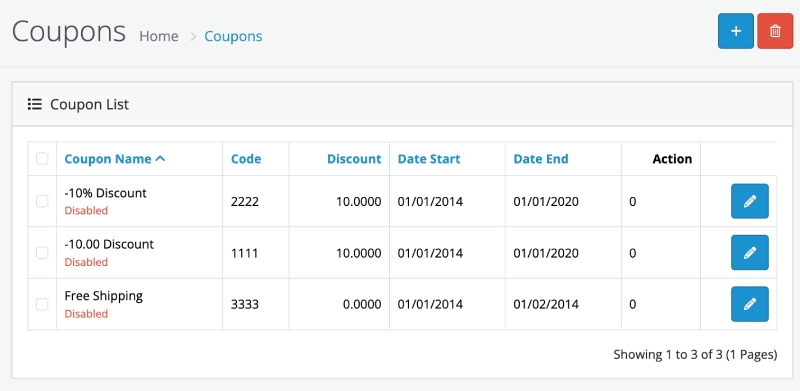
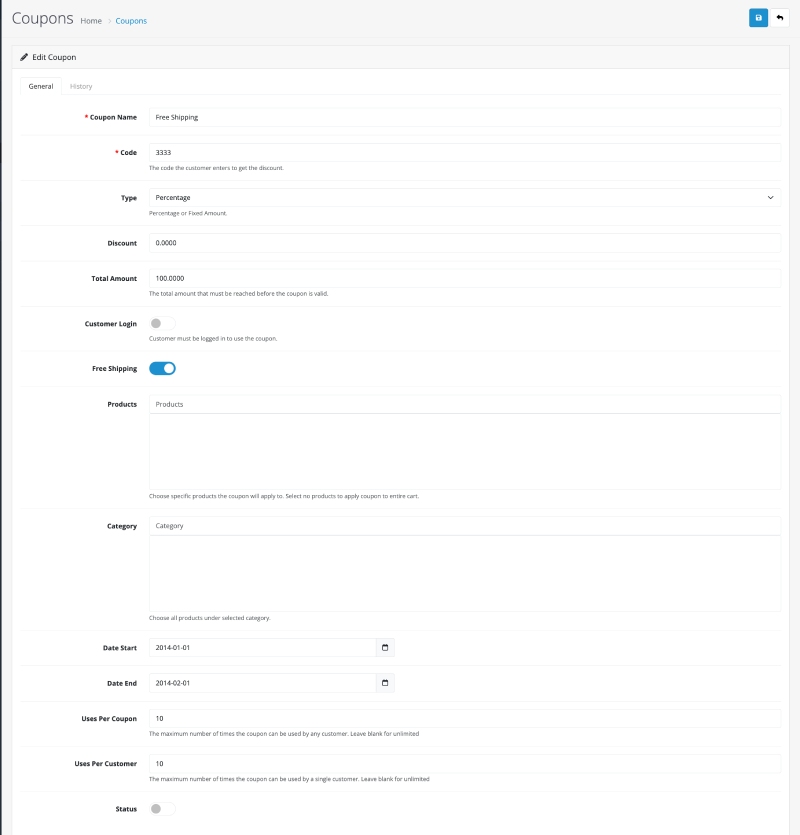
Coupons management

Creating a New Coupon

Follow these steps to create a coupon in OpenCart 4:

  1. Go to the Coupons Section: Navigate to Marketing > Coupons and click the Add New button.
  2. Fill in Basic Information:
    • Coupon Name: Enter a descriptive name for internal reference.
    • Code: Create a unique coupon code for customers to use at checkout.
    • Type: Select whether the coupon provides a fixed amount or percentage discount.
    • Discount: Specify the discount value.
  3. Usage Restrictions:
    • Total Amount: The total amount that must be reached before the coupon is valid.
    • Customer login: If enabled, Customer must be logged in to use the coupon.
    • Free Shipping: If enabled, valid coupon will give free shipping
    • Products: Choose specific products the coupon will apply to. Select no products to apply coupon to entire cart.
    • Category: Choose all products under selected category.
  4. Validity Period:
    • Start Date and End Date: Set the start and end dates for the coupon to determine its validity period.
  5. Usage Limits:
    • Uses Per Coupon: The maximum number of times the coupon can be used by any customer. Leave blank for unlimited.
    • Uses Per Customer: The maximum number of times the coupon can be used by a single customer. Leave blank for unlimited
  6. Status: Enable or Disable
  7. Save: Click the Save button to activate the coupon.
Coupons edit add in Opencart

Editing or Deleting Coupons

To modify or delete an existing coupon:

  1. Go to Marketing > Coupons in the admin panel.
  2. Locate the coupon you wish to edit or delete.
  3. Click Edit to make changes or Delete to remove the coupon.

Tracking Coupon Performance

OpenCart 4 provides insights into coupon usage:

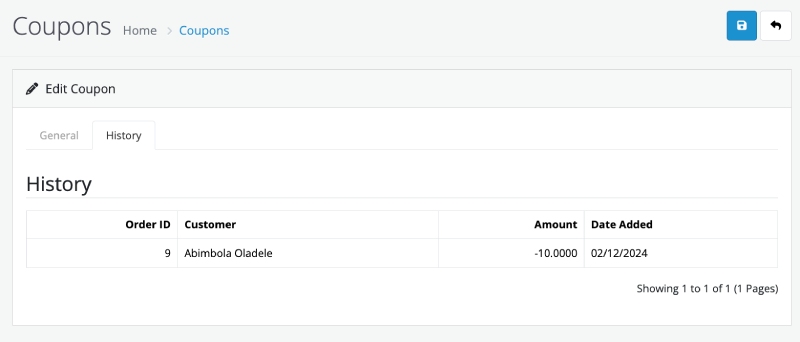
  • View details like how many times a coupon has been used and the total discount value applied.
  • Analyze the effectiveness of different campaigns and adjust your strategy accordingly.
  • Edit the coupon and click the History tab.
Coupon Performance

Best Practices for Coupon Management

  1. Keep Codes Simple: Use easy-to-remember codes that align with your campaigns.
  2. Set Expiry Dates: Encourage urgency by limiting coupon validity.
  3. Promote Coupons: Advertise coupons via newsletters, social media, or on your store’s homepage.
  4. Monitor Abuse: Limit usage per customer to prevent exploitation.
  5. Evaluate Performance: Regularly review which coupons drive the most sales and refine your approach.

Examples of Coupon Campaigns

  • Holiday Sales: “HOLIDAY20” for 20% off during a specific holiday season.
  • New Customer Discount: “WELCOME10” for 10% off the first purchase.
  • Clearance Sale: “CLEAR50” for a 50% discount on selected items.
  • Free Shipping: “FREESHIP” for orders over a certain amount.

Conclusion

Coupons are a powerful feature in OpenCart 4 that can help boost your sales, reward customers, and clear out inventory. By managing coupons strategically and analyzing their performance, you can enhance your marketing efforts and maximize customer satisfaction.

Marketing Tracking in OpenCart 4

Marketing Tracking is an integral feature in OpenCart 4 that helps store owners monitor and analyze the effectiveness of their marketing campaigns. This feature enables businesses to understand which strategies drive traffic and generate sales, allowing them to make data-driven decisions for improving their marketing efforts.

Why Use Marketing Tracking?

Marketing Tracking in OpenCart 4 is beneficial for:

  1. Measuring Campaign Performance: Identify which campaigns bring the most traffic and conversions.
  2. Optimizing Marketing Spend: Focus on strategies that yield the best return on investment (ROI).
  3. Understanding Customer Behavior: Gain insights into customer preferences and interactions.
  4. Improving Marketing Strategies: Refine your campaigns based on real data.

Setting Up Marketing Tracking in OpenCart 4

Follow these steps to set up and utilize Marketing Tracking:

  1. Access the Marketing Section:
    • Log in to the OpenCart admin panel.
    • Navigate to Marketing > Marketing.
  2. Add a New Campaign:
    • Click on the Add New button.
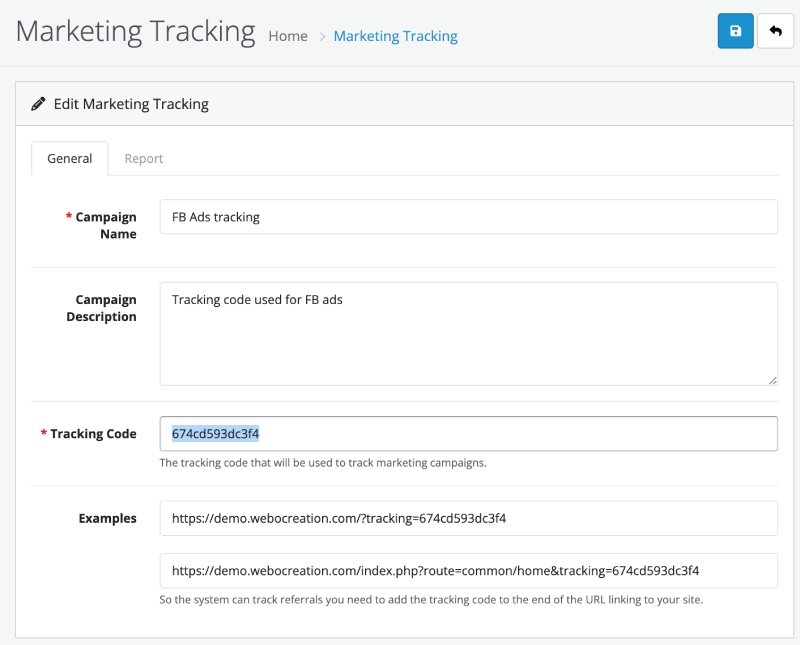
    • Fill in the following fields:
      • Campaign Name: Enter a descriptive name for the campaign.
      • Campaign Description: Enter description about the campaign.
      • Tracking Code: Create a unique tracking code for this campaign.
      • Example URL: Include the URL where the campaign will be directed.
    • Click Save to store your campaign details.
      Marketing Tracking in Opencart
  3. Integrate the Tracking Code:
    • Use the generated tracking code in your marketing materials, such as emails, ads, or social media posts.
    • This code will link customer activity back to the specific campaign.

Key Differences Between Marketing Tracking and Affiliate Tracking

FeatureMarketing TrackingAffiliate Tracking
PurposeTracks internal marketing campaigns.Tracks performance of external affiliate partners.
UsersUsed by store owners or internal marketing teams.Used by external affiliates promoting your store.
Tracking MechanismUses unique tracking codes for each campaign.Assigns unique affiliate IDs for each partner.
Performance MetricsFocuses on campaign-based metrics like clicks and orders.Focuses on affiliate-specific metrics like referred traffic and commissionable sales.
Commission SystemDoes not include a commission system.Automates commission payouts for affiliates.
Use CaseEmail campaigns, ads, and social promotions.Partner-driven promotions and referrals.

Monitoring Campaign Performance

Once your campaigns are live, you can monitor their performance:

  1. View Campaign Data:
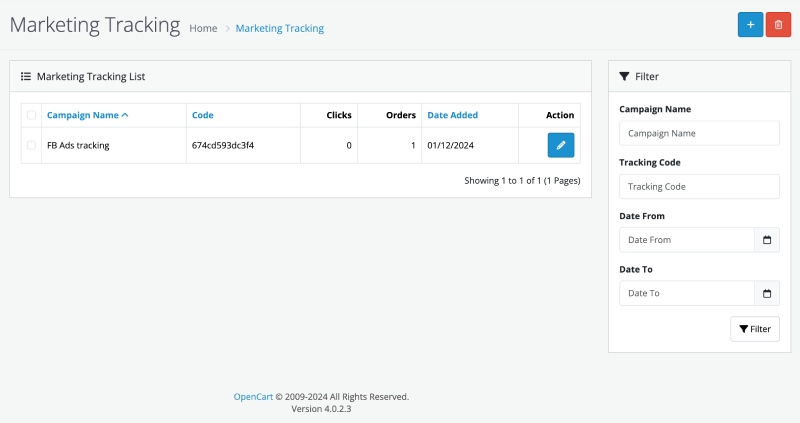
    • Go to Marketing > Marketing in the admin panel.
    • Review the list of campaigns to see key metrics like clicks and orders.
      Marketing Tracking listing
  2. Analyze Reports:
    • Use built-in analytics tools to evaluate the effectiveness of your campaigns.
    • Identify high-performing campaigns and areas for improvement.

Practical Use Cases

  • Email Marketing: Track clicks and sales generated from email newsletters.
  • Social Media: Measure the effectiveness of promotions on platforms like Facebook or Instagram.
  • Affiliate Programs: Monitor traffic and sales driven by affiliates using unique tracking codes.
  • Ads: Monitor clicks and orders ratio as per the links promoted in Ads.

Best Practices for Marketing Tracking

  1. Use Unique Codes: Ensure each campaign has a distinct tracking code to avoid data overlap.
  2. Monitor Regularly: Check your campaign performance frequently to identify trends and act quickly.
  3. Test Campaigns: Experiment with different strategies and track their outcomes to discover what works best.
  4. Optimize Landing Pages: Ensure the reference URL provides a seamless user experience to maximize conversions.

Conclusion

Marketing Tracking in OpenCart 4 is a valuable tool for eCommerce businesses aiming to enhance their marketing strategies. By effectively using this feature, store owners can gain actionable insights into their campaigns, optimize marketing efforts, and boost overall sales performance. Whether you’re running email promotions, social media ads, or affiliate campaigns, Marketing Tracking provides the data you need to succeed.
How does Affiliate work in Opencart 4?

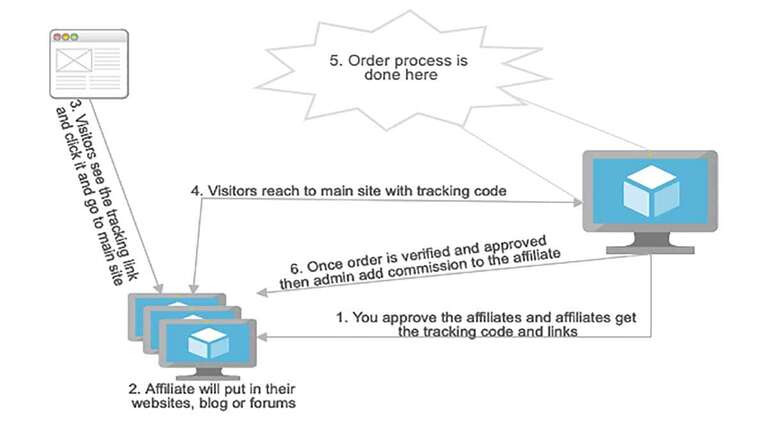
An affiliate program is a marketing strategy to increase sales by increasing the partner who will sell our products for some commission. In Opencart 4 we will show how affiliate works. We did the customer as an affiliate, in Opencart 2 affiliate needs to be registered separately.

The whole flow of the affiliate is shown in the following image:

Affiliate flow chart

How does the affiliate is registered?

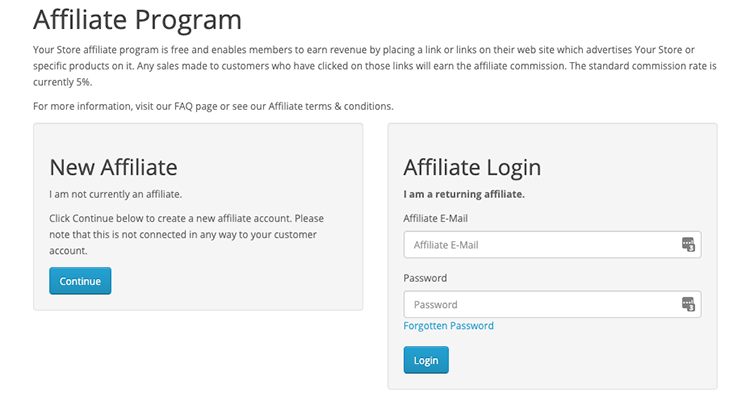
In Opencart 3

The Affiliate link is in the footer of the extra column in the default Opencart theme. The link to register is like https://YOURURL/index.php?route=affiliate/login, then the visitors of the website can register for the Affiliate program which will become a customer as well. They will get an email with the tracking code.

New Affiliate in Opencart

In Opencart 4

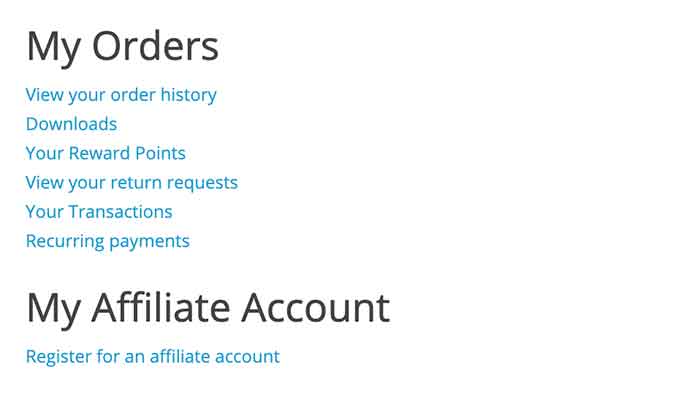
The affiliate and customer registration are from the same Customer registration form and the customer can Register for an Affiliate Affiliate account from the Customer Dashboard.

Register for an affiliate account in Opencart

How to activate the affiliate for the already registered customers?

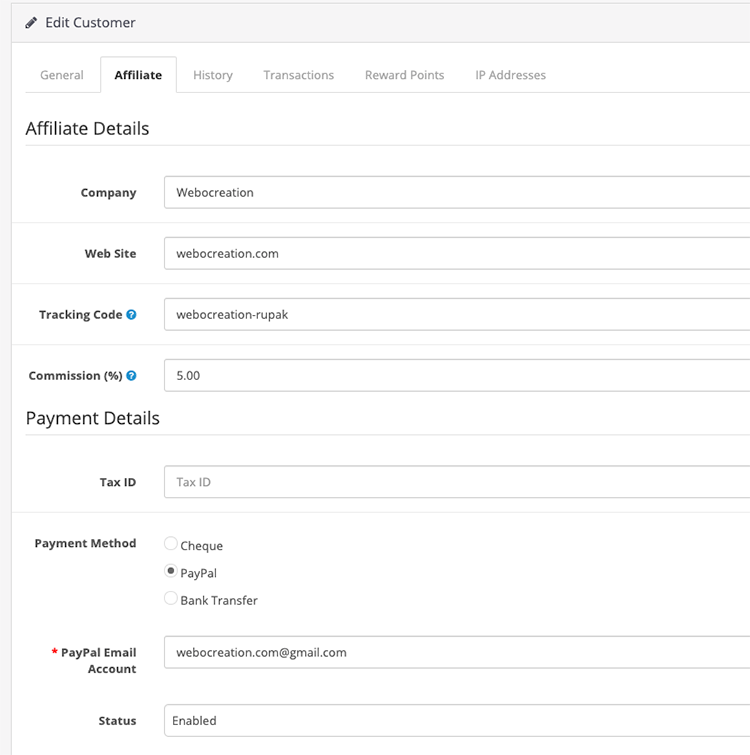
In Opencart 3

Go to Admin >> Customers >> Customers >> Edit the customer whom you want to make affiliate >> Click on Affiliate tab and enter the details and choose Status to enabled:

Affiliate details in Opencart admin

Save it and the customer became an affiliate.

In Opencart 4

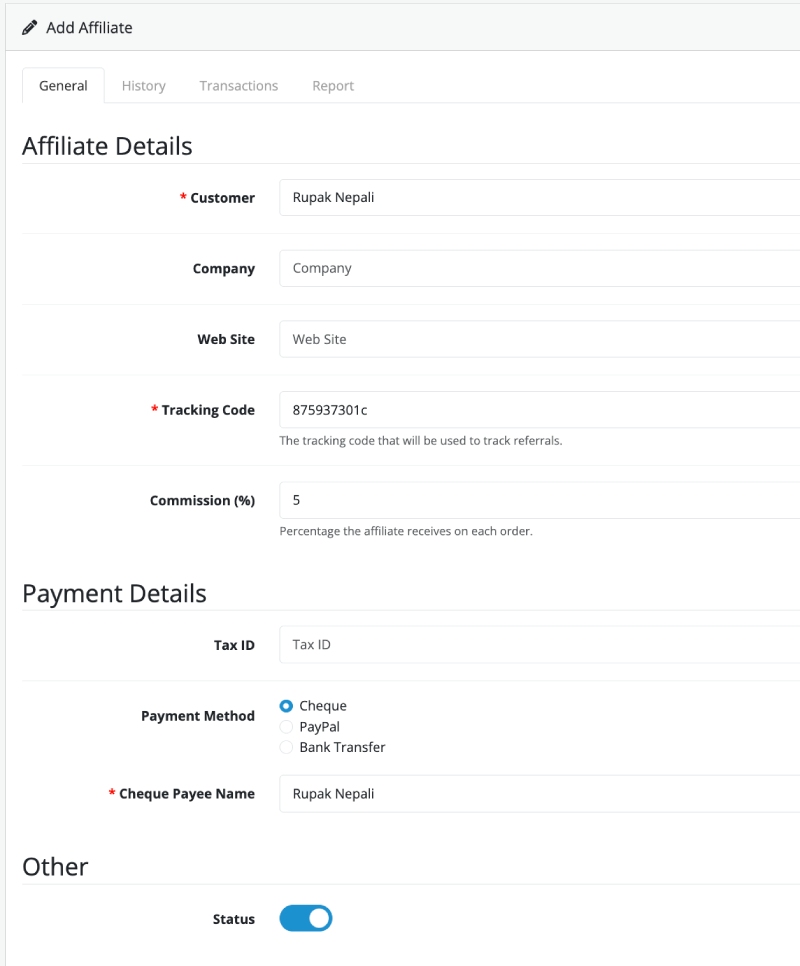
Go to admin >> Marketing >> Affiliate and click Add button >> In the Customer field, search for the customer and enter other details and click save, with these an affiliate is added.

Opencart 4 affiliate

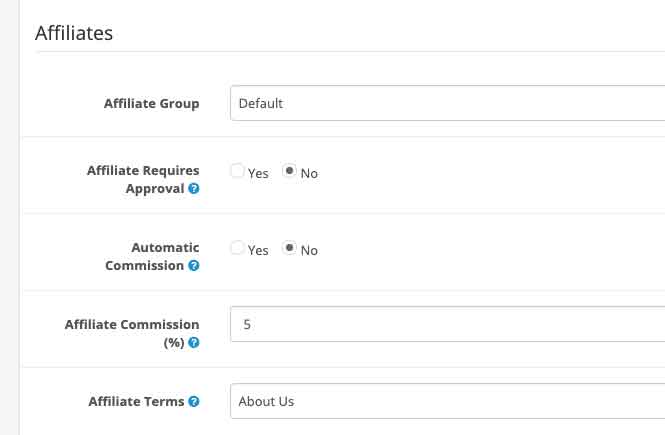
Sometimes approval is needed if the setting “Affiliate Required Approval” is enabled at admin >> System >> Settings >> Edit your store >> In the Options tab there is Affiliates section where there are multiple options to select for the affiliates as shown in the image below:

Opencart affiliate admin settings

How does the affiliate use the URL on their websites or blogs or forums?

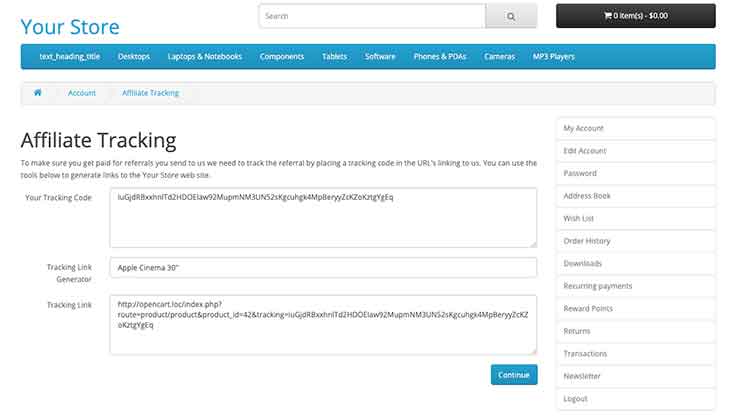
Login to the frontend as customer or affiliate then go to the “My Account” and click “Custom Affiliate Tracking Code“. You will see the tracking code, tracking link generator and tracking link.

Don’t change the tracking code as this is unique for you and if you change then old URL will not work. Then in the tracking link generator enter the product name that you want to link, it will autocomplete your product, select it and the Tracking link is showing which is the link that you will use in the websites or blogs or forums.

Affiliate tracking link generator

Your tracking link is http://YOURURL/index.php?route=product/product&product_id=42&tracking=YOURTRACKINGCODE. If you want to redirect to the home page of the website then it will be like http://opencart.loc/index.php?tracking=YOURTRACKINGCODE. The Opencart will set the cookie “tracking” with your tracking code for 1000 days.

If you want to change those days then go to catalog >> controller >> startup >> startup.php and find following code

// Tracking Code
if (isset($this->request->get['tracking'])) {
    setcookie('tracking', $this->request->get['tracking'], time() + 3600 * 24 * 1000, '/');
    $this->db->query("UPDATE `" . DB_PREFIX . "marketing` SET clicks = (clicks + 1) WHERE code = '" . $this->db->escape($this->request->get['tracking']) . "'");
}

Now change the setcookie(‘tracking’, $this->request->get[‘tracking’], time() + 3600 * 24 * 1000, ‘/’); time to your preferred seconds. It should be in seconds like if you want to set cookie only for 60 days then it will be time() + 3600 * 24 * 60 and so on.

How the commission is added to the affiliate?

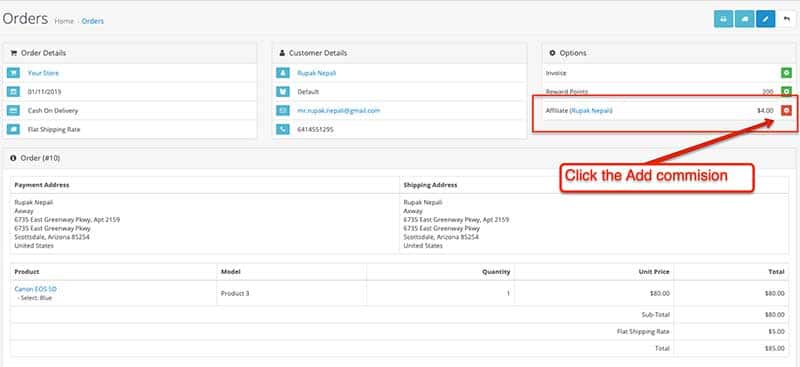
When someone clicks the affiliates tracking link and reach the website. Then the cookie is set, once the order is complete, the Affiliate amount is shown in the Admin >> Sales >> Orders like in the image below:

Add commission to the affiliate

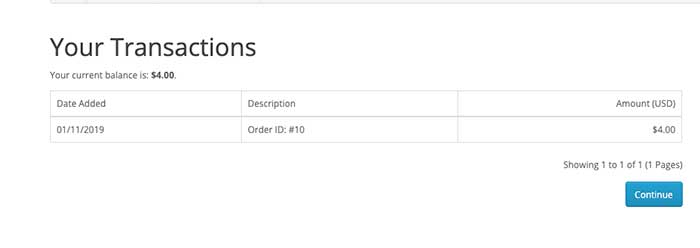
Now the affiliate will see the commission amount at their dashboard >> My Orders >> Your Transactions. They will see the amount there:

Transaction amount for the Customer in Opencart

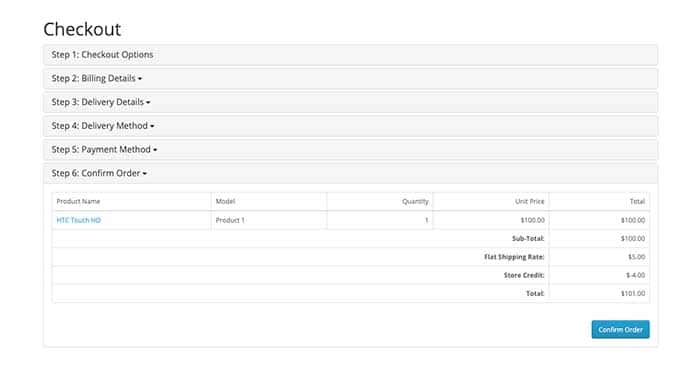
The current balance can be used as Store Credit to buy the products in the store. It will be like below:

Store Credit of Affiliates

We didn’t find the way to request a check or request to send in Paypal although Opencart had the option. We think this will be a manual process. For now, just contact the store owner once you have some balance.

We hope this opencart tutorial helps you understand the affiliate flow of Opencart 3. Let us know if you have any questions or suggestions, please subscribe to our YouTube Channel for Opencart video tutorials. You can also find us on Twitter and Facebook.

Opencart cookie and GDPR management for Legal policies in Opencart 4, 3, and 2 versions

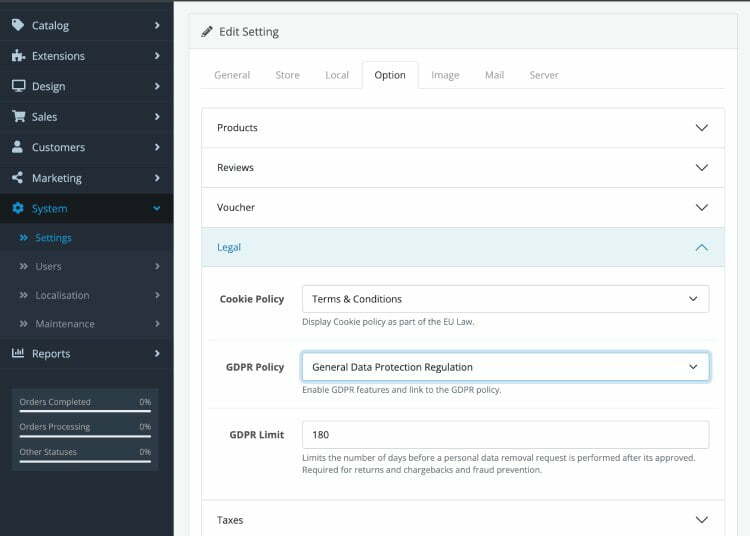
In Opencart 4, the cookie and GDPR management are available by default for the legal policies, where you can select the pages for them and show the popup at the footer. You can set them at Admin >> System >> Settings >> Option tab >> Legal carousel tab where you can select the Coolie policy page, GDPR Policy page, and GDPR limit time in days.

Opencart legal cookie GDPR settings

Cookie Policy: Display the Cookie policy as part of the EU Law. 

GDPR Policy: Display the Cookie policy as part of the EU Law. 

GDPR Limit: Limits the number of days before a personal data removal request is performed after its approval. Required for returns and chargebacks and fraud prevention.

General Data Protection Regulation Request page and setting

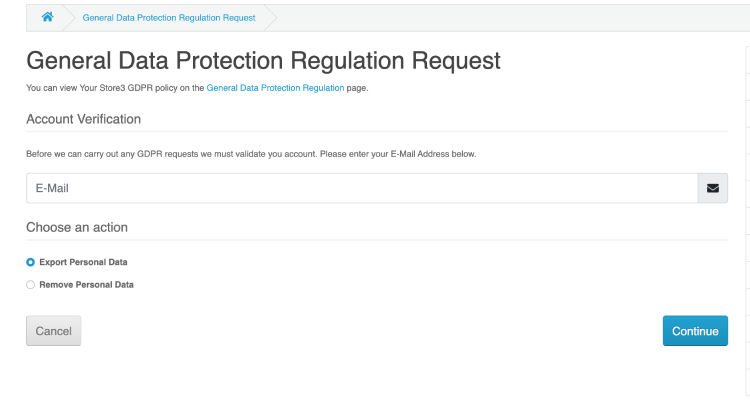
With the above setting, you can view a GDPR request page that is active on “?route=information/gdpr”. For example, in our Opencart demo, the URL is https://demo.webocreation.com/index.php?route=information/gdpr where you will see the form below:

Opencart GDPR request page

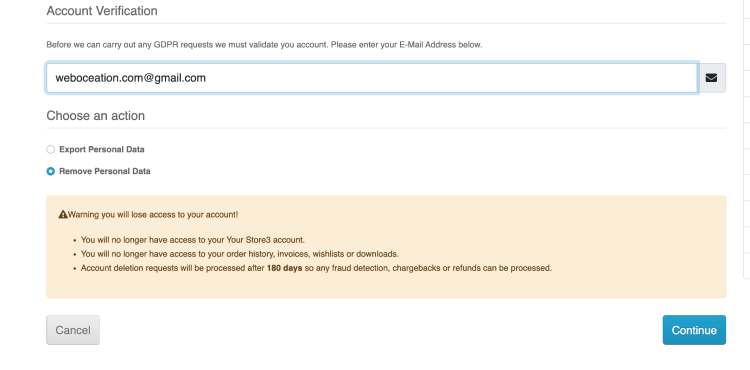
Once you entered the email and choose “Remove Personal Date” to remove, you will see notices like the below:

Warning you will lose access to your account!

  • You will no longer have access to your account.
  • You will no longer have access to your order history, invoices, wishlists, or downloads.
  • Account deletion requests will be processed after 180 days so any fraud detection, chargebacks, or refunds can be processed.
gdpr removal request

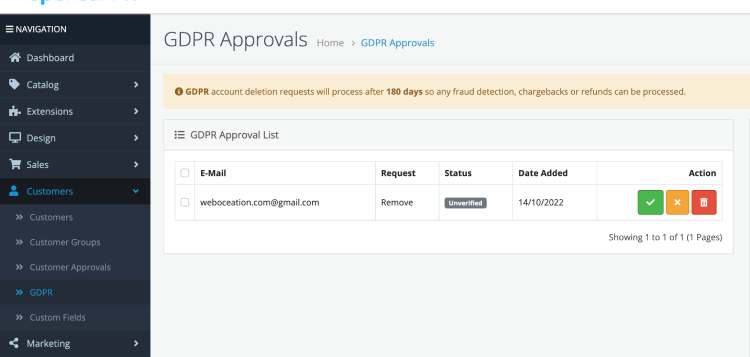
When someone submits the request, the administrator gets the lists at Admin >> Customers >> GDPR and you will see like below and from where the admin can approve, deny or delete.
gdpr admin section

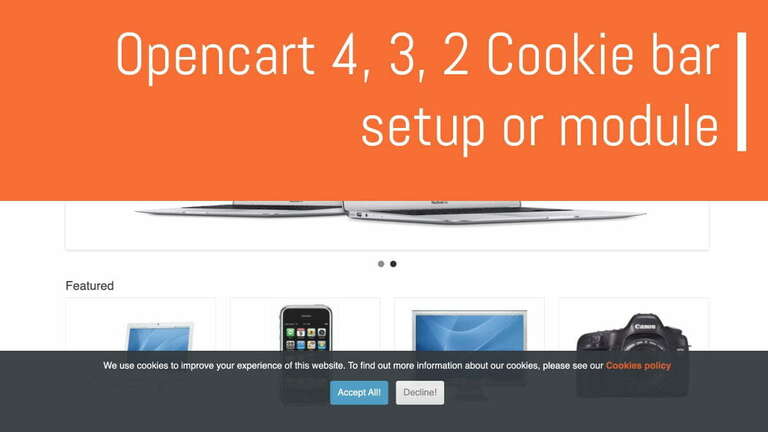
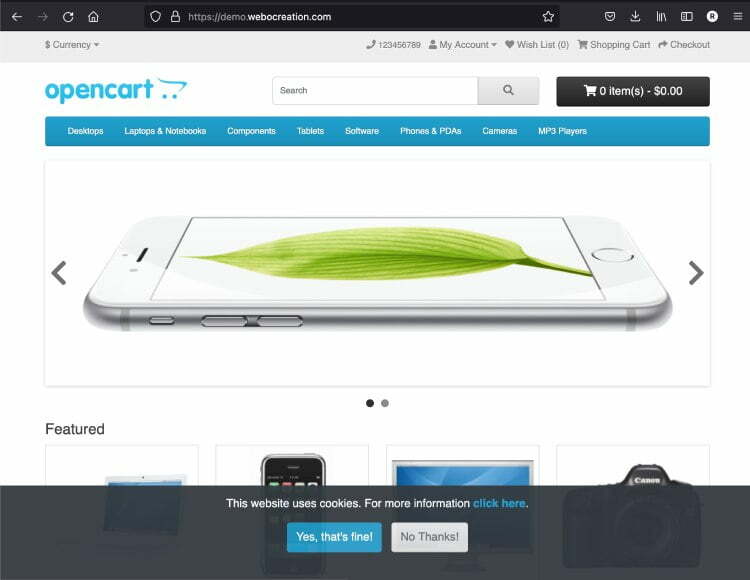
Once you set the GDPR settings, you will see the popup at the bottom of the website like the one below:

Opencart cookie bar popup at bottom

Once clicked “Yes, that’s fine!” it will not show the days you set on the GDPR limit, here in our example it is 180 days.
For Opencart 2 and 3, we have  developed a module called “Cookie bar for OpenCart 2 and 3

How to change the Cookie or GDPR text which you see in the popup?

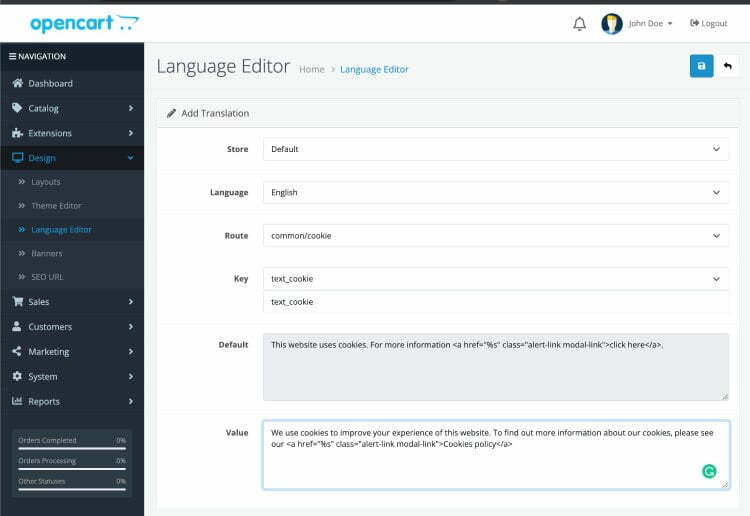
You can change the text of the cookie text “This website uses cookies. For more information click here.” to your desired text. For that you need to login to the Opencart admin section >> Design >> Language Editor >> Add New (blue button)  and enter the following:

Store: Default

Language: English

Route: common/cookie

Key: text_cookie

Default: Auto-filled and not editable

Value: Enter your desired text, we are entering below:
We use cookies to improve your experience with this website. To find out more information about our cookies, please see our <a href=”%s” class=”alert-link modal-link”>Cookies policy</a>

Opencart cookies text language change

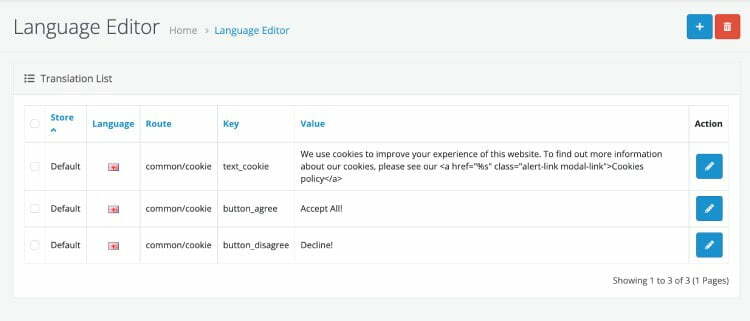
Then click Save. You can make changes to the agree and disagree button also, we added two more language changes like below:

Opencart agree disagree button text change for cookie

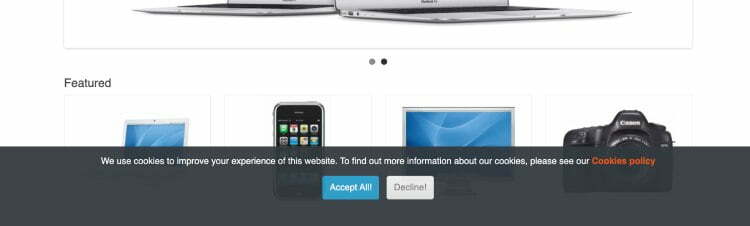
After these changes, the frontend cookie bar shows like below:

Opencart language changed for cookie bar

In Opencart 4 cookie bar persists, fix the cookie bar to hide once clicked

In Opencart 4 the cookie bar persists even though you click the agree on the button or the disagree button. We have the following fix for now:

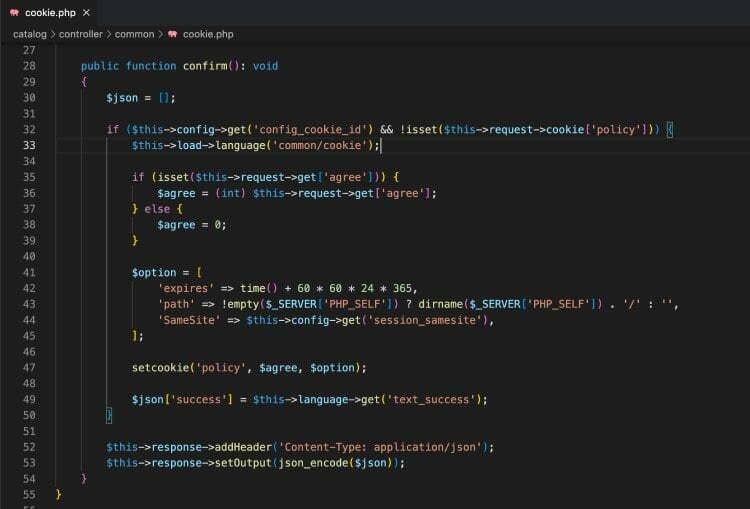
Open the catalog/controller/common/cookie.php file and look for confirm method:

public function confirm(): void and find the following lines of code:

$option = [
	'expires' => time() + 60 * 60 * 24 * 365,
	'path' => !empty($_SERVER['PHP_SELF']) ? dirname($_SERVER['PHP_SELF']) . '/' : '',
	'SameSite' => $this->config->get('session_samesite'),
];

From the above code, remove dirname($_SERVER[‘PHP_SELF’]) .

With that the confirm method looks like the below:

public function confirm(): void
{
	$json = [];
	if ($this->config->get('config_cookie_id') && !isset($this->request->cookie['policy'])) {
		$this->load->language('common/cookie');
		if (isset($this->request->get['agree'])) {
			$agree = (int) $this->request->get['agree'];
		} else {
			$agree = 0;
		}
		$option = [
			'expires' => time() + 60 * 60 * 24 * 365,
			'path' => !empty($_SERVER['PHP_SELF']) ? '/' : '',
			'SameSite' => $this->config->get('session_samesite'),
		];
		setcookie('policy', $agree, $option);
		$json['success'] = $this->language->get('text_success');
	}
	$this->response->addHeader('Content-Type: application/json');
	$this->response->setOutput(json_encode($json));
}

With these changes, the policy cookie is set and the policy cookie value is set to 1 or 0 as per the selection. You can see what cookie value is set by right-clicking on the page >> Inspect element (Chrome browser) >> Application tab >> Cookies tab on the left >> select the URL >> and you can see the policy value. Here in the example below the policy value is set to 1 as we clicked the accept cookie button.

Opencart cookie code changes to hide bar

In this way, you can manage the Cookies policies and GDPR policies on the Opencart websites of version 4 and for versions 3 and 2 you can use the Cookie module. Hope you liked this article, please subscribe to our YouTube Channel for Opencart video tutorials. You can also find us on Webocreation Twitter and Webocreation Facebook. Please let us know if you have any questions or concerns.

Managing custom fields in Opencart 4, account, address, and affiliate

In Opencart 4 we can add custom fields in the account section, address section and affiliate section. When you add the custom fields in the account section then it will show the fields in the registration form and shows it when customer edit their information and similar for the address and affiliate section.

Example of the custom field in the registration form

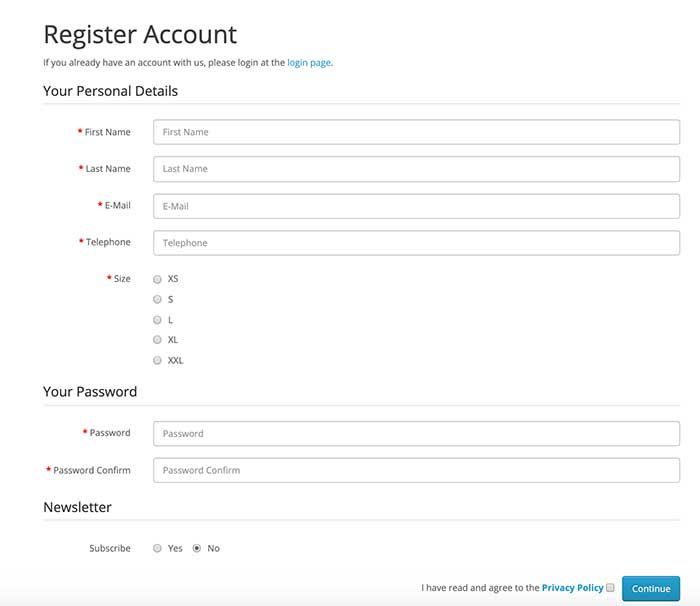
Let’s say we want to know the size of the customer while they register so that we can target our marketing efforts with their sizes of products. When you add the custom radio field then it may look like below in the registration form:

Register custom field Opencart

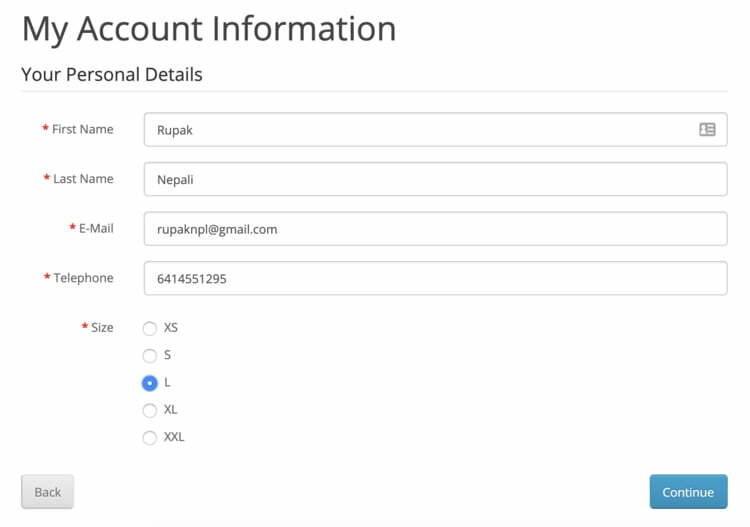
You can see the custom filed similar to below when the customer edits their personal detail.

Custom field account information Opencart

How to add the custom fields in Opencart?

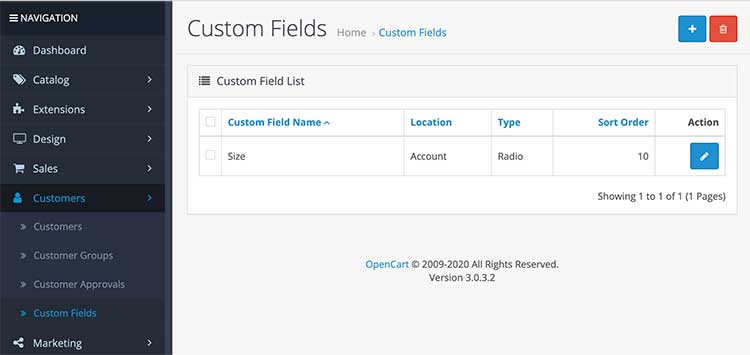
Opencart 4 supports custom fields only for customer or account, address, and affiliate. Log into admin >> Customers >> Custom fields >> then you can see the custom field list, where you can add and delete the custom field.

Custom fields Opencart

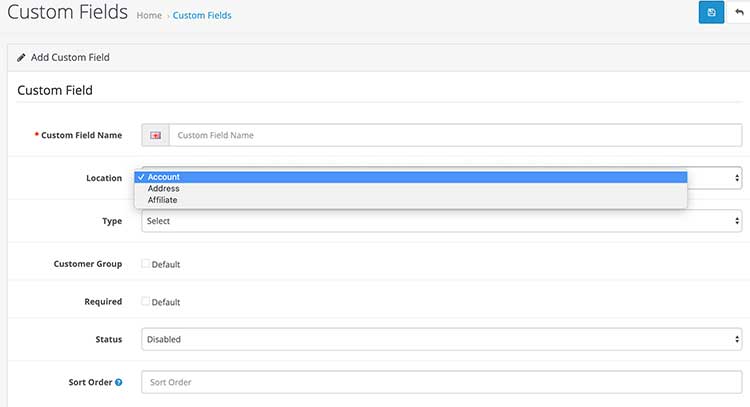
Click the blue-button to add the custom field then you will see a form like below. The location field is the one you will select where you want to show the field. You can show the field on the account section, address section and affiliate section. We have a “Contact us” form also but we cannot add a custom field on Contact us form for now. We will soon write a post on how to add the custom field to the contact us form.

Location to show custom field Opencart

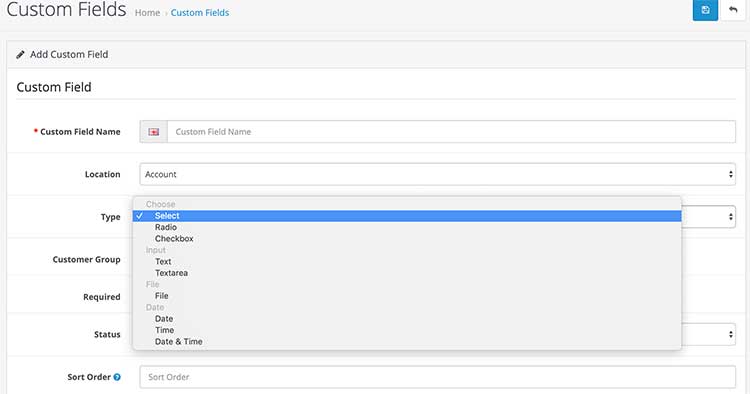
Now see the field Type where you can select the type of field, you can select: Select field or Radio field or Checkbox field or Text field or Textarea field or File field or Date field or Time field or Date & Time field. For our above example, we select the Select field.

Custom field type Opencart

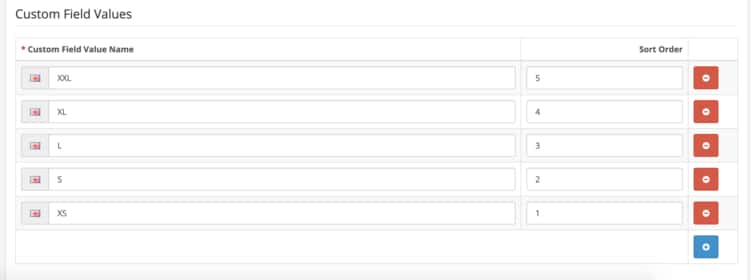
Then you can see a section where you can add custom field values for select field option like below:

Custom field values for select field Opencart

Then, you choose other options like which customer group to show, whether it is required or not, select the status to Enabled and add the sort order. Use minus to count backward from the last field in the set to show above the field as for sorting the field. Once you set all of these options then save it and your custom fields are shown in the front end and backend.

In this way, you can add custom fields in Opencart 4 for customers, addresses, and affiliates. Please don’t forget to post your questions or comments so that we can add extra topics. You can follow us at our twitter account @rupaknpl. Subscribe to our YouTube channel for Opencart tutorials, and click to see all Opencart user manual.

Customer Groups in OpenCart 4

Customer Groups in OpenCart 4 are an essential feature that allows store owners to categorize their customers based on specific characteristics. This categorization enables businesses to offer customized shopping experiences, tailored pricing, and special promotions to different customer segments.

Benefits of Customer Groups

Customer Groups provide several advantages:

  1. Customized Pricing: Assign different product prices to specific customer groups, such as wholesale and retail customers.
  2. Exclusive Offers: Provide discounts or promotions to selected groups.
  3. Access Restrictions: Limit access to certain parts of your store or specific products.
  4. Tax Classes: Assign unique tax rules based on the customer’s group.
  5. Enhanced Customer Segmentation: Understand and target customer segments effectively.

Creating Customer Groups

To create a Customer Group in OpenCart 4, follow these steps:

  1. Log in to Admin Panel: Access your OpenCart admin dashboard.
  2. Navigate to Customer Groups: Go to Customers > Customer Groups.
  3. Add New Group:
    • Click the Add New button.
    • Fill in the required fields:
      • Customer Group Name: Enter a descriptive name for the group.
      • Description: Provide details about the group’s purpose or benefits.
      • Approval for New Customers: Specify whether admin approval is required for customers in this group.
  4. Save Changes: Click the Save button to create the group.
Customer Group Opencart

Editing Customer Groups

To edit an existing customer group:

  1. Go to Customers > Customer Groups.
  2. Locate the group you want to modify and click Edit.
  3. Update the necessary fields and save your changes.

Assigning Customers to Groups

Customers can be assigned to groups either during registration or manually by the admin:

  1. During Registration:
    • Enable the Customer Group dropdown in the registration form under System > Settings > Option.
      Setting customer group
    • Customers can select their group while signing up.
      Customer group frontend
  2. Manual Assignment:
    • Navigate to Customers > Customers.
    • Edit the desired customer record.
    • Select the appropriate group from the Customer Group dropdown and save changes.
      Customer's customer group

Practical Use Cases

  • Wholesale vs. Retail:
    • Create a wholesale group with discounted pricing and tax rules.
    • Assign retail customers to a group with standard pricing.
  • Loyalty Programs:
    • Create groups for VIP customers and offer exclusive perks.
  • Regional Tax Rules:
    • Use groups to apply different tax rates based on geographical regions.

Best Practices

  1. Descriptive Naming: Use clear and descriptive names for customer groups to avoid confusion.
  2. Review Regularly: Periodically review your customer groups to ensure they align with your business strategy.
  3. Communicate Clearly: Inform customers about the benefits of joining specific groups to encourage sign-ups.

Conclusion

Customer Groups in OpenCart 4 are a powerful way to segment your audience and offer tailored shopping experiences. By leveraging this feature, you can enhance customer satisfaction, streamline store management, and boost sales. Whether you’re catering to wholesalers, VIPs, or region-specific customers, Customer Groups provide the flexibility and control needed for effective eCommerce management.

Customer Approvals in Opencart

Opencart 4 supports Customer Approvals functionalities as per Customer Group that allows store owners to manage who can access specific parts of their eCommerce platform. This feature is particularly useful for wholesale businesses or platforms where customer access needs to be restricted or approved before purchase.

Why Use Customer Approvals?

Customer approvals provide control over who can interact with your store by ensuring:

  • Security: Restrict access to your store from potentially fraudulent or unauthorized users.
  • Exclusivity: Limit access to certain user groups, such as members-only or wholesale customers.
  • Compliance: Meet industry regulations or organizational policies requiring customer verification.

Enabling Customer Approvals

To enable the Customer Approvals feature in OpenCart 4, follow these steps:

  1. Login to Admin Dashboard: Log in to your OpenCart admin panel.
  2. Navigate to Settings: Go to Customers > Customer Groups and click on the Edit button or Add button .
  3. Configure Customer Group Settings:
    • Enable the Approve New Customers option. When this is enabled, Customers must be approved by an administrator before they can login.
  4. Save Changes: Click on Save to apply your settings.
Customer Group Opencart

Once enabled, any new customer registration, they will see success message like below:

account created approval

Read more: Check if customer is logged or not

Approving or Denying Customers

  1. Go to Customer Management: Navigate to Customers > Customers Approval in the admin panel.
  2. Approve/Deny Customers:
    • Click the green Thumbs up to Approved or thumbs down to Deny which make customer approved or denied.
    • For multiple approve or deny, you can check checkbox and click the green Approve or Deny at the Top.
Customer Approval listing

Practical Use Cases

Here are some scenarios where Customer Approvals can be helpful:

  • Wholesale Stores: Grant access only to verified businesses.
  • Exclusive Membership Platforms: Approve members after they meet eligibility criteria.
  • High-Value Goods: Ensure only trusted customers can purchase expensive products.

Conclusion

The Customer Approvals feature in OpenCart 4 is a robust tool for managing customer access to your store. By enabling and properly managing this feature, store owners can create a secure and controlled shopping environment tailored to their business needs. Whether for security, exclusivity, or compliance, Customer Approvals offer a streamlined approach to vetting your audience.