Subscription Plans in OpenCart: Transforming E-commerce Revenue Models

Subscription Plans in OpenCart is a powerful feature that allows you to set up subscription-based payment systems for products or services. This is particularly useful for businesses offering memberships, digital subscriptions, or products that require regular replenishment, such as meal kits, pet supplies, or shaving cream etc. Subscription plans have revolutionized e-commerce, providing businesses with recurring revenue streams and customers with convenient, predictable purchasing experiences. OpenCart’s subscription feature enables merchants to create flexible, dynamic subscription models across various product categories. Below is a comprehensive guide to understanding and managing Subscription Plans in OpenCart.

What Are Subscription Plans?

A subscription plan is a payment plan associated with a product that allows customers to make recurring payments at set intervals. These profiles work with supported payment gateways to charge the customer automatically at the specified frequency. For example, a customer can subscribe to receive a product every month and be automatically billed for it.

Key Features of Subscription Plans in OpenCart

  • Flexible Payment Options: Define payment intervals such as daily, weekly, monthly, or yearly.
  • Customizable Durations: Set the total number of recurring payments or keep them ongoing until canceled.
  • Trial Periods: Offer a trial period with a different price or payment frequency to attract new customers.
  • Payment Gateways Support: Works with payment methods that support recurring transactions, such as PayPal.

Setting Up Subscription Plans in OpenCart

To set up a subscription plan for a product, follow these steps:

Define the Subscription Plan Details

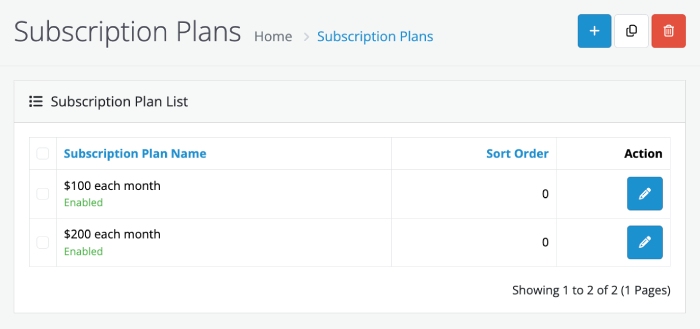
Go to Admin >> Catalog >> Subscription Plans, where you will see the lists of plan already set up.

Opencart subscription plans

Click the blue + button to add new one and fill out the following fields:

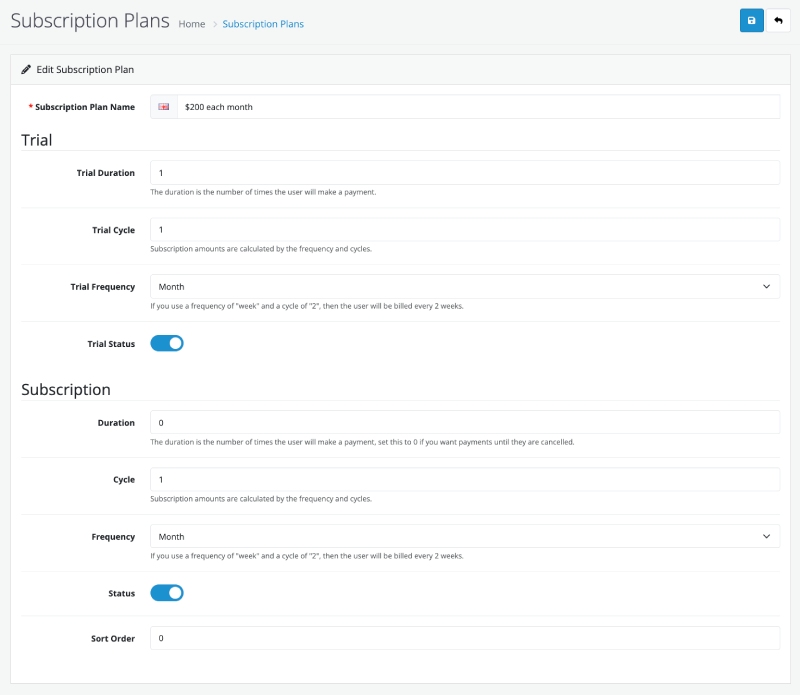
Trial

  • Trial Duration: Number of trial payments. The duration is the number of times the user will make a payment.
  • Trial Cycle: Duration of the trial period. Subscription amounts are calculated by the frequency and cycles.
  • Trial Frequency: How often the trial payment will be charged? If you use a frequency of “week” and a cycle of “2”, then the user will be billed every 2 weeks.
  • Trial Status: Enable if you want to offer a trial period.

Subscription

  • Recurring Name: A name for internal reference (e.g., “Monthly Subscription”).
  • Duration: Set the total number of recurring payments or leave it at 0 for ongoing payments. The duration is the number of times the user will make a payment, set this to 0 if you want payments until they are cancelled.
  • Cycle: Define how often the customer will be billed (e.g., every 1 month). Subscription amounts are calculated by the frequency and cycles.
  • Frequency: Choose from options like daily, weekly, semi-monthly, monthly, or yearly. If you use a frequency of “week” and a cycle of “2”, then the user will be billed every 2 weeks.
  • Status: Set the profile to Enabled or Disabled.
  • Sort Order: Sort order between the subscription plan while showing in the frontend.

In the setting below the trial status is active

Opencart Subscription free trial and subscription

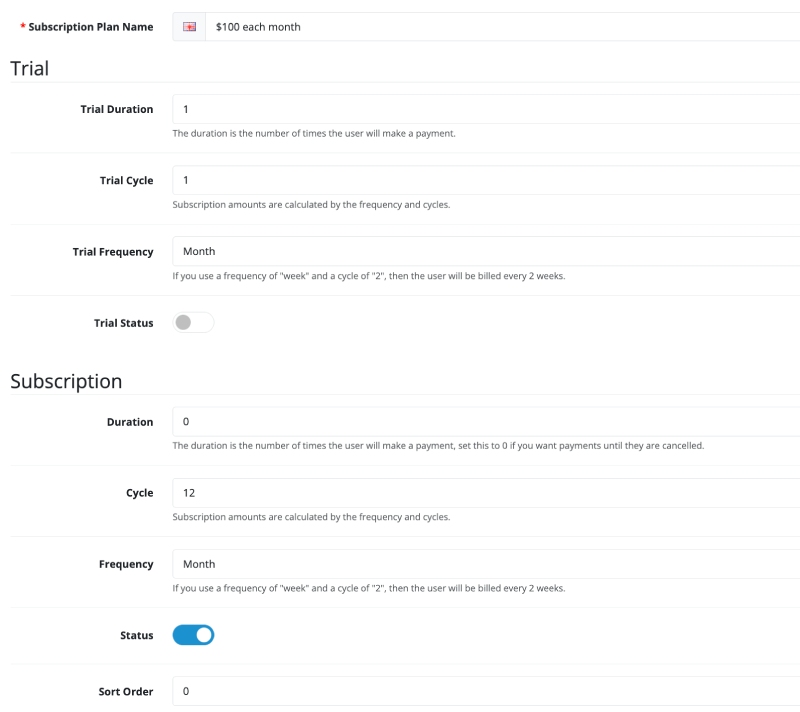
Let’s add another Subscription plan with trial status disabled.

Opencart Subscription plan without trials

Assign Subscription Plans to the Product

  1. Log in to the OpenCart Admin Panel.
  2. Go to Catalog > Products.
  3. Click on the product for which you want to enable a subscription plan or create a new product.

Configure Subscription Plan Details

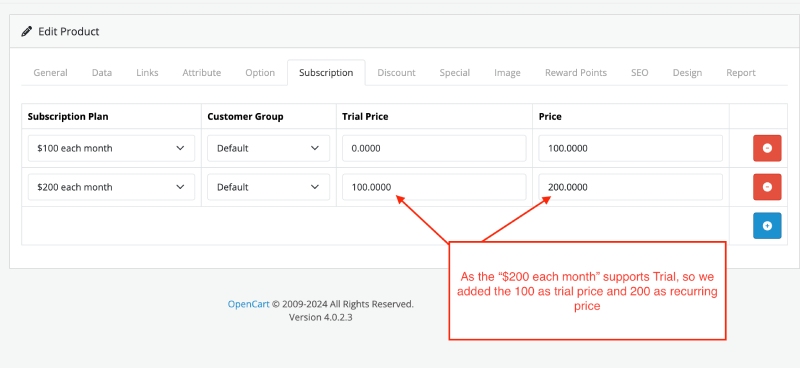
  1. Navigate to the Subscription tab under the product settings.
  2. Click Add subscription plan.
  3. Select the Customer Group, mostly Default, but if you are planning to specific customer group then you can select here.
  4. Trial Price: If you enabled the trial period then you can enter the trial price
  5. Price: The amount the customer will be charged for each cycle.
Opencart assign subscription to product

Save the Product

Once the recurring profile is configured, click Save to apply the changes.

Frontend view of subscription plan

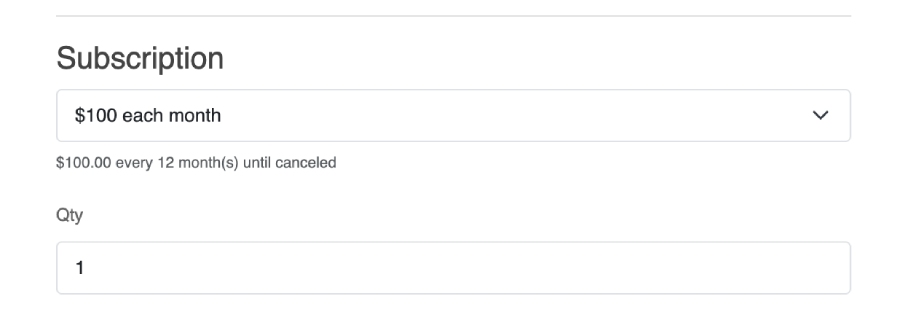
When you view the product and select the subscription “$100 each month“, it will show like below and will charge “$100.00 every 12 month(s) until canceled

Frontend subscription plan Opencart

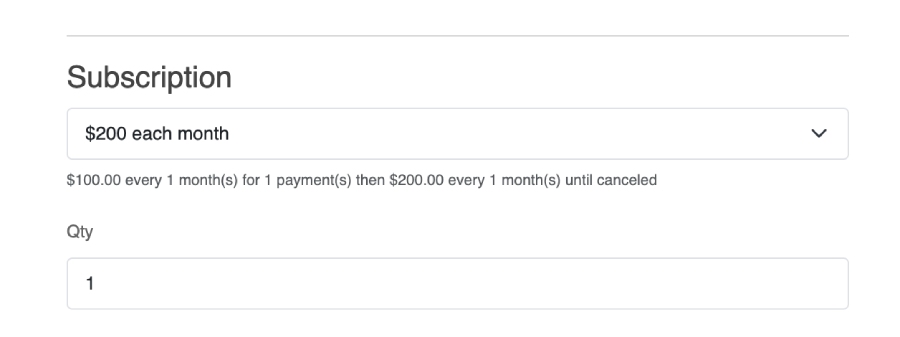
If you select another subscription plan “$200 each month“, it will show like below and will charge “$100.00 every 1 month(s) for 1 payment(s) then $200.00 every 1 month(s) until canceled”

Frontend view subscription with free trial

In this way, you can assign the subscription plan to Products.

Managing Subscription Plans

Subscription Plans are managed automatically by the payment gateway. However, as an administrator, you can:

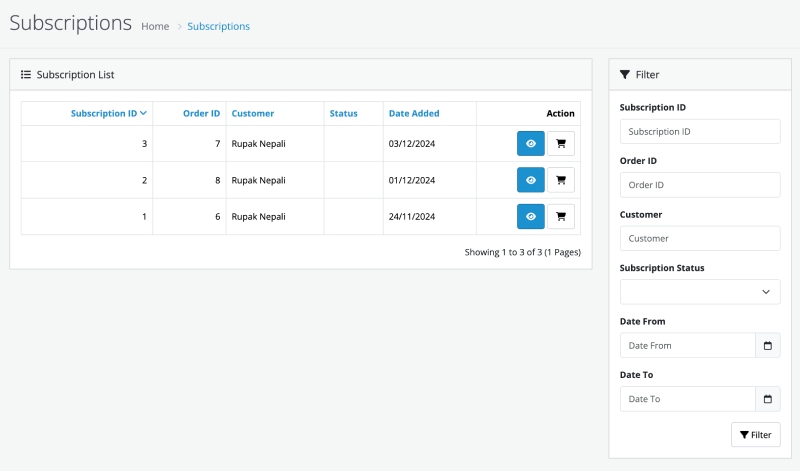
  • View Active Recurring Payments: Check customer subscriptions from the Admin >> Orders >> Subscriptions.
  • Cancel Subscriptions: If a customer requests cancellation, this can be managed through your payment gateway interface.
  • Modify Profiles: Edit the recurring settings for future subscriptions (existing subscriptions will not be affected).
Opencart Subscription Orders

Payment Gateway Considerations

Integration Requirements

  • Recurring billing support
  • Automatic payment processing
  • Secure token management
  • Failed payment handling

Recommended Gateways

Not all payment gateways support recurring payments, but several well-known ones do. Here’s a list of commonly used payment gateways that are compatible with recurring payments:

1. PayPal

  • Supported in OpenCart: Yes
  • Features:
    • Offers seamless integration with recurring billing.
    • Supports PayPal subscriptions and automatic billing agreements.
  • Why Use: PayPal is widely accepted, easy to set up, and popular with customers.

2. Stripe

  • Supported in OpenCart: Yes (via extensions)
  • Features:
    • Advanced recurring billing options with Stripe Subscriptions.
    • Allows custom billing intervals, free trials, and prorated billing.
  • Why Use: Easy to integrate and ideal for businesses needing flexibility in subscription management.

3. Authorize.Net

  • Supported in OpenCart: Yes
  • Features:
    • Recurring Billing (ARB) is a built-in feature.
    • Allows customization of subscription intervals and durations.
  • Why Use: Reliable for businesses in North America, offering robust subscription management.

4. Square

  • Supported in OpenCart: Yes (via extensions)
  • Features:
    • Allows recurring invoices for subscriptions and memberships.
    • Integrated with POS systems for omnichannel businesses.
  • Why Use: Ideal for businesses that use Square for both online and offline sales.

5. 2Checkout (now Verifone)

  • Supported in OpenCart: Yes
  • Features:
    • Recurring billing options for global subscriptions.
    • Supports multiple currencies and payment methods.
  • Why Use: Great for businesses with international customers.

6. Braintree

  • Supported in OpenCart: Yes (via extensions)
  • Features:
    • Supports subscriptions and recurring billing.
    • Offers customization options for payment schedules.
  • Why Use: Suitable for businesses wanting a PayPal alternative (Braintree is a PayPal subsidiary).

7. Worldpay

  • Supported in OpenCart: Yes
  • Features:
    • Provides recurring payments with Worldpay’s FuturePay.
    • Supports global payment processing.
  • Why Use: Great for large-scale enterprises with international operations.

8. Klarna

  • Supported in OpenCart: Yes (via extensions)
  • Features:
    • Allows subscription payments via invoice-based options.
    • Popular in European markets.
  • Why Use: Ideal for businesses targeting European customers who prefer invoice payments.

9. Amazon Pay

  • Supported in OpenCart: Yes (via extensions)
  • Features:
    • Offers recurring payment support for Prime-style subscription models.
  • Why Use: Trusted by customers already familiar with Amazon’s ecosystem.

10. Mollie

  • Supported in OpenCart: Yes (via extensions)
  • Features:
    • Recurring payment support for SEPA, credit cards, and PayPal.
    • Popular in European countries.
  • Why Use: Great for businesses targeting European markets with diverse payment options.

11. Adyen

  • Supported in OpenCart: Yes (via extensions)
  • Features:
    • Recurring billing for global subscriptions.
    • Supports various payment methods and currencies.
  • Why Use: Perfect for businesses that need a global payment solution.

12. Recurly (via Custom Integration)

  • Supported in OpenCart: Requires custom setup.
  • Features:
    • Advanced subscription management and analytics.
  • Why Use: Ideal for businesses seeking a dedicated recurring billing platform.

Use Cases for Subscription Plans

Subscription Plans are ideal for:

  1. Subscription Boxes: Monthly delivery of curated products like beauty, snacks, or books.
  2. Digital Subscriptions: Access to software, online courses, or memberships.
  3. Consumable Products: Regular replenishment of items like pet food, groceries, or toiletries.
  4. Service Plans: Maintenance services, gym memberships, or web hosting plans.

Benefits of Using Subscription Plans

  1. Steady Revenue Stream: Recurring payments ensure consistent cash flow for your business.
  2. Enhanced Customer Experience: Automated billing reduces the need for manual intervention and increases convenience for customers.
  3. Improved Customer Retention: Subscription models encourage long-term engagement.
  4. Scalable Growth: Easier to manage as your customer base expands.

Limitations of Subscription Plans

  • Payment Gateway Dependency: Subscription Plans require payment gateways that support recurring billing.
  • Limited Gateway Options: Not all payment gateways are compatible with OpenCart’s Subscription Plans.
  • Customer Control: Customers may need to manage their subscriptions outside the OpenCart platform, depending on the payment gateway.

Best Practices for Subscription Plans

  1. Be Transparent: Clearly explain the subscription terms, including the price, frequency, and cancellation policy, on your product pages.
  2. Offer Trial Periods: Allow customers to try before committing to a long-term subscription.
  3. Send Notifications: Notify customers about upcoming charges, changes to their subscriptions, or successful renewals.
  4. Monitor Performance: Use analytics to track the popularity and retention rates of subscription products.

Conclusion

Subscription Plans in OpenCart provide a convenient way to manage subscription-based products and services. By offering flexible payment options and automated billing, you can enhance the customer experience and generate consistent revenue for your business. With careful setup and management, Subscription Plans can become a key driver of growth for your eCommerce store.

Pro Tip: Always prioritize customer experience and flexibility when designing subscription plans.

How to use VqMod in Opencart 4? Installation, configuration, and example use.

In the Opencart tutorial, we are showing you how to use VqMod with examples in Opencart, vqmod installation steps, configurations, example and discuss what kind of issues can occur and its solutions. With this installation, you can use the vqmod XML file to override the core file without changing core files.

Looking for OcMod click here.

Download:

Installation steps of VqMod for Opencart 4

Following the steps below will install Vqmod for Opencart 4:

  • Before doing anything please back up your OpenCart installation so that you can revert if unexpected results happened.
  • Download the VqMod from the above download button
  • Extract the zip that you download, vQmod-oc4-master.zip
  • You will get vqmod folder and readme file and copy the vqmod directory in your OpenCart root directory, alongside the admin, catalog, extension, system, etc. directories.
  • If you’ve renamed your admin directory, you’ll have to do this bit manually for now:
    • Open vqmod/install/index.php and change $admin = ‘admin’; on around line 33 to match your new admin directory name. We have used wpadmin, so that line is $admin=’wpadmin’
    • Open vqmod/pathReplaces.php and change the line you’d add would be:
// START REPLACES //
$replaces[] = array('~^admin\b~', 'wpadmin');
// END REPLACES //

Configuration:

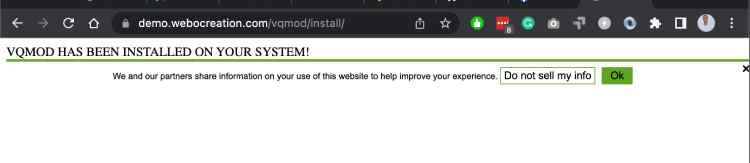
Now, open your website and add /vqmod/install/ at the end of the URL something like https://demo.webocreation.com/vqmod/install/. If everything is correct, you will get messages like:

VQMOD HAS BEEN INSTALLED ON YOUR SYSTEM!

vqmod installation

Errors and Solutions:

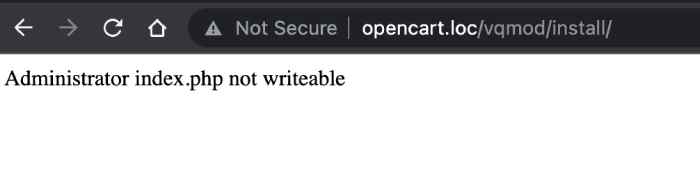
1. Administrator index.php is not writeable

vqmod issues solution

For this issue, first, check and please make sure you replace your admin folder correctly on the vqmod/install/index.php and vqmod/pathReplaces.php, and then you can check the file permission if your server can write on index.php file.

2. ERROR – COULD NOT DETERMINE OPENCART PATH CORRECTLY

For this issue also, we need to make sure you replace your admin folder correctly on the vqmod/install/index.php and vqmod/pathReplaces.php

Example use of Vqmod in Opencart 4

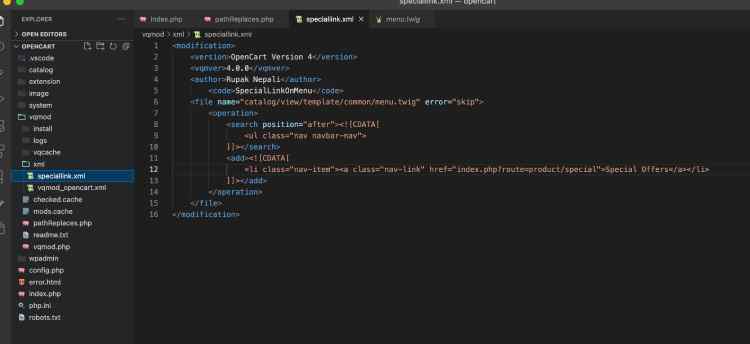
Here is one demo XML file in which you show the “Special Offers” links in the main menu. Open the project in your text editor and go to vqmod folder and then the XML folder create a file named speciallink.xml and add the following lines of code:

<modification>	
	<version>OpenCart Version 4</version>
	<vqmver>4.0.0</vqmver>
	<author>Rupak Nepali</author>
	    <code>SpecialLinkOnMenu</code>
	<file name="catalog/view/template/common/menu.twig" error="skip">
		<operation>
			<search position="after"><![CDATA[
				<ul class="nav navbar-nav">
			]]></search>
			<add><![CDATA[
				<li class="nav-item"><a class="nav-link" href="index.php?route=product/special">Special Offers</a></li>
			]]></add>
		</operation>
	</file>
</modification>
Vqmod xml file example for Opencart 4

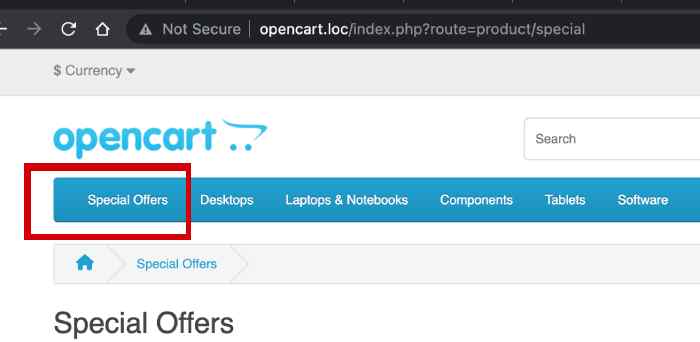
Once, you add the above code and then refresh the frontend URL, then you will see a menu item added at the beginning of the Opencart top menu.

Special links in the Menu Opencart vqmod example

In this way, you can use VqMod, know how to install vqmod, and its configurations, for example, and learn how to fix issues that may occur. Hope you liked this article, please subscribe to our YouTube Channel for Opencart video tutorials. You can also find us on Webocreation Twitter and Webocreation Facebook. Please let us know if you have any questions or concerns.

Comprehensive Opencart eCommerce Site Launch Checklist for a Successful Start

Launching an eCommerce website is an exciting milestone. However, ensuring everything runs smoothly requires thorough preparation. Here is a comprehensive checklist to help you successfully launch your eCommerce site. This launch checklist may help you to check everything before disabling the maintenance status on the Opencart live site. Once you feel everything is going good, check the following to verify things.

Backend Checklist

In the admin section, check the following after clicking the Refresh button at Admin >> Extensions >> Modification.

  1. Site Settings
    Go to Admin >> System >> Settings >> Edit the store and go through every tab:
    1. Check your site name, meta description, stock, order status, invoice prefix, and encryption key.
    2. SSL URL to yes, SEO URL to yes, Output Compression Level to around 5, display errors to No.
    3. Check the logo image and favicon, and all other tabs.
  2. Remove All Demo Data. As much as possible, all customer data, test orders, coupons, and even try to remove the Demo image folder
  3. Products and Categories
    Check products and categories attributes, options, URL alias, meta keywords, and meta description.
  4. Payment and Shipping
    Check the payment and shipping modules settings. Make sure you have already set it correctly. If you are providing free shipping, then don’t forget to activate that.
  5. Localization
    Localization is important for your site, so make sure it already has the correct settings.
  6. Product Feeds
    Enabled your feed and sitemap. And don’t forget to submit your sitemap to Google Webmaster.
  7. Error Free
    Do not forget to check the error logs and Modification logs. Make sure the logs are empty.
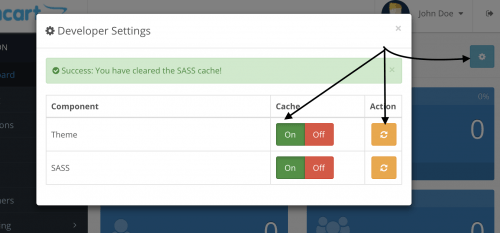
  8. Clear the theme Cache and make sure it is on.
  9. Add Google Analytics or Google Tag Manager as per your need
  10. Check Admin >> Design >> SEO URL and check URLs if all are as expected.
  11. Check the Report settings as well.

Frontend Checklist

  1. Check Basic Functionality like add to cart, add to compare, add to wishlist, dropdown view cart, grid-list toggle, and search is working correctly.
  2. Url Alias
    Check that the URL alias/ SEO URLs work properly. If you use an SEO extension, make sure it works properly as expected. Don’t forget to change your htaccess.txt to .htaccess in your root folder where OpenCart is installed.
  3. Check that robots.txt is in the root folder
  4. Verify with Google Search Console
  5. Check Registration: Check Checkout Process,  Be sure to check shipping address and methods, payment methods, address, and complete order
  6. Mail Function
  7. Check out the contact us page
  8. Check social share functionalities
  9. Submit your sitemap.xml to google.com/webmaster
  10. Review cross-browser compatibility and responsiveness
  11. Check broken links
  12. Check optimized images are used or not
  13. Check timezone settings
  14. Check performance with Google Page Speed https://developers.google.com/speed/pagespeed/insights or https://tools.pingdom.com

Other checklists are below:

1. Website Functionality

  • Broken Links: Check all internal and external links to ensure they work correctly.
  • Forms: Verify that contact forms and checkout forms are working.
  • Navigation: Ensure that the navigation menu is intuitive and fully operational.
  • Cross-Browser Testing: Test your website on popular browsers (Chrome, Safari, Firefox, Edge).
  • Mobile Responsiveness: Verify that the site is fully responsive and user-friendly on mobile devices.

2. Content Review

  • Product Descriptions: Ensure all product details, including specifications, prices, and SKUs, are accurate.
  • Images: Optimize and test product images for fast loading and quality.
  • Grammar and Spelling: Proofread all content, including blog posts, FAQs, and policies.
  • Metadata: Double-check all meta titles, descriptions, and keywords for SEO.

3. Technical Setup

  • SEO Optimization: Confirm that SEO-friendly URLs are enabled and that a sitemap is submitted to search engines.
  • 301 Redirects: Redirect old pages to the new site if you’re migrating from an existing site.
  • SSL Certificate: Ensure your website is secure with an SSL certificate (https://).
  • Page Speed Optimization: Use tools like Google PageSpeed Insights to improve site speed.
  • Error Monitoring: Set up error-tracking tools to identify potential issues.

4. eCommerce Settings

  • Payment Gateways: Test all payment options (credit cards, PayPal, etc.) for successful transactions.
  • Shipping Methods: Verify shipping rates, methods, and integrations.
  • Taxes: Ensure taxes are calculated accurately based on locations.
  • Currency Settings: Verify that the correct currencies are enabled for your target audience.

5. Security

  • Backup System: Ensure regular automatic backups are scheduled.
  • Admin Access: Use strong passwords and restrict admin access to essential personnel.
  • Firewalls and Security Plugins: Enable firewalls and install security plugins or tools to prevent attacks.

Read More: 25 website security measures for eCommerce developers – Opencart

6. Analytics and Tracking

  • Google Analytics: Install and verify Google Analytics tracking.
  • Conversion Tracking: Set up tracking for purchases, cart abandonments, and other key metrics.
  • Heatmaps: Use heatmap tools to monitor user behavior and identify areas for improvement.

7. Marketing and Launch Preparation

  • Social Media Links: Ensure links to your social media profiles are working.
  • Email Marketing: Create and schedule welcome emails or promotional campaigns.
  • Promotions and Discounts: Test any discount codes or special offers.
  • Ads: Set up and test ad campaigns (Google Ads, Facebook Ads, etc.).

8. Customer Support

  • Live Chat: Enable live chat support for instant customer assistance.
  • FAQ Section: Make sure the FAQ page covers common questions.
  • Contact Information: Display clear contact details for support.

9. Legal Compliance

  • Privacy Policy: Ensure your site includes a privacy policy.
  • Terms and Conditions: Clearly outline the terms of service.
  • GDPR Compliance: Confirm compliance with GDPR or other relevant data protection regulations.
  • Refund and Shipping Policies: Clearly state your refund and shipping policies.

10. Final Pre-Launch Checks

  • Test Purchases: Perform end-to-end testing by placing test orders.
  • Performance Stress Testing: Test how your site performs under high traffic conditions.
  • DNS Settings: Confirm that your domain settings are correctly pointing to the live server.
  • Launch Announcement: Prepare a launch email, blog post, or social media update.

11. Post-Launch Activities

  • Monitor Analytics: Keep a close eye on traffic and conversion rates.
  • User Feedback: Collect and act on feedback from visitors.
  • Bug Fixes: Address any issues that arise after launch.
  • Continuous Updates: Regularly update your site with new products, blogs, and features.

Conclusion

Launching an eCommerce website is a complex process, but following this checklist will help you avoid common pitfalls and ensure a smooth launch. With everything in place, you can focus on driving traffic and growing your online business.

Happy Launch and Best of luck for your business.

Leruna’s Hilarious Algorithm Coding Interview – programming joke

0

Leruna was a coding machine for weeks she’d been prepping for this interview she ate slept and breathed algorithms bubble sort easy, Dijkstra algorithm please, Laruna could practically write them in her sleep

Dijkstra’s algorithm (/ˈdaɪkstrəz/ DYKE-strəz) is an algorithm for finding the shortest paths between nodes in a weighted graph, which may represent, for example, a road network.

She even dreamt in binary code some nights this job was hers she could feel it the day of the interview arrived. Leruna put on her lucky Blazer, it had pockets for snacks essential for coding marathons she took a deep breath and reminded herself you got this, The company was sleek and modern.

Leruna liked it immediately the interviewer a man named Mark seemed friendly enough but then Leruna noticed it Mark’s chair it was wobbly like really wobbly Mark caught her looking ah yes he chuckled the chair a classic problem solving exercise tell me Leruna how would you determine if a chair is wobbly using code.

Problem SolVing Exercise how to determine if a chair is wobbly using code

Leruna blinked this wasn’t in cracking the coding interview she thought back to her algorithms could she use a binary search tree to model the chair’s stability well. Leruna began we could think of the chair legs as nodes in a binary tree she went on to describe a complex system of comparing leg lengths and angles Mark listened patiently eyebrows raised that’s certainly creative

Mark said finally but perhaps a bit over engineered for a chair don’t you think. Leruna’s shoulders slumped of course it it was so obvious how about she offered, we just sit on it. Mark burst out laughing he wiped a tear Leruna he said you’re hired not for this job maybe but for your real world debugging skills top-notch.

Just sit in the chair and find out if it is wobbly or not. No need to overcomplicate the things

A few weeks later Leruna received an email it was from Mark he had started his own company and he needed someone who knew that sometimes the best solution is the simplest one and someone who wouldn’t judge a wobbly chair.

Please let us know if you have any questions or suggestions, please subscribe to our YouTube Channel for Opencart video tutorials. You can also find us on Twitter and Facebook. Enjoy!

When Code Talks Back: A Programmer’s Nightmare

Programming Jokes

if you’re a programmer then you know the pain of talking to your code but what if it talked back. Our hero a programmer stuck on a bug for hours frustrated he mutters why don’t you work and then like a scene from a sci-fi movie The Code replies I only do what you tell me not what you mean.

I only do what you tell me not what you mean

Yep you heard that right the code talked back horrified and slightly amused he realized he’d reached his Breaking Point the next day he traded in his keyboard for a tri and switch careers to gardening yep from bugs in the code to bugs in the soil.

yep from bugs in the code to bugs in the soil

Turns out plants are much better listeners so next time your code gives you attitude maybe consider a career where the toughest problem is a stubborn weed and remember code can be snarky but plants they just grow.

OpenCart 4 Extension Marketplace: Empowering your E-commerce

OpenCart 4 Extension Marketplace is a vibrant ecosystem that allows store owners to enhance, customize, and optimize their online businesses through a wide range of extensions and modules. This Opencart user manual will explore the intricacies of the OpenCart 4 Extension Marketplace, providing insights into its features, benefits, and strategies for effective extension management.

Understanding the OpenCart Extension Marketplace

What is the Extension Marketplace?

The Extension Marketplace is an official platform where developers and vendors can:

  • Publish commercial and free extensions
  • Provide solutions for various e-commerce needs
  • Offer add-ons for OpenCart stores
  • Store owner can easily buy extension to improve the functionalities that default opencart does not provide.

Marketplace Categories

OpenCart’s Extension Marketplace typically includes extensions in these primary categories:

  1. Themes
    Complete store design packages
    Responsive layouts
    Customizable templates
  2. Languages
  3. Payment
    Global payment processors
    Regional payment methods
    Cryptocurrency support
  4. Shipping
    Carrier integrations
    Shipping calculation tools
    International shipping support
  5. Modules
    Extra functionalities
    SEO optimization
    Social media integration
    Email marketing extensions
    Promotional tool
    Marketing tools
    Analytics integrations
  6. Order Totals
  7. Feeds
  8. Reports
  9. Other

Accessing the OpenCart Extension Marketplace

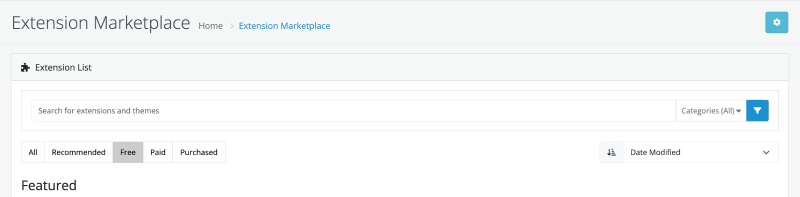
    • Go to Admin>> Extensions >> Marketplace
      Extension Marketplace
      If you see a error message like “Signature hash does not match!” then follow the solution provided at Solution for Signature hash does not match!
    • Browse available extensions
    • Search for specific solutions
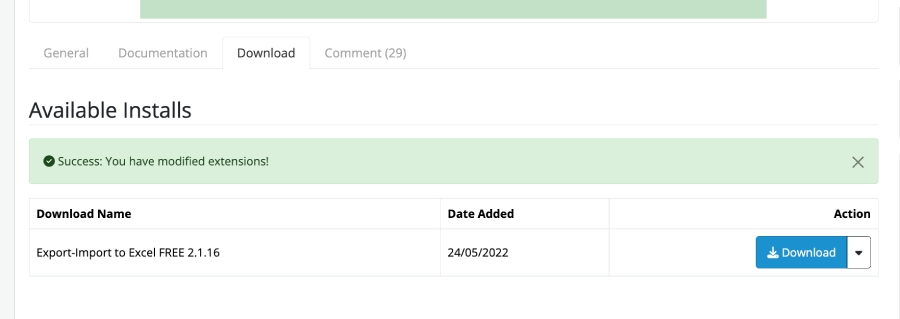
    • Click the Download tab and click download button
      Extension download from marketplace
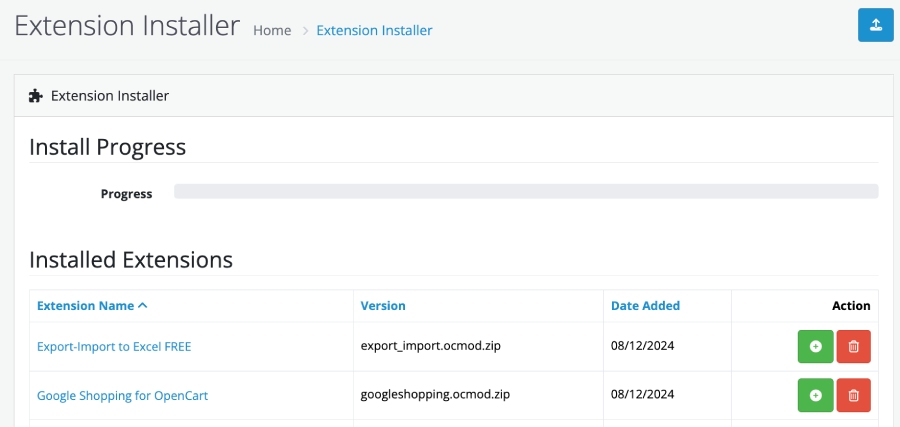
    • Once successful, go to Extensions >> Installer and find the extension and start the installation processes.
      Extension Installer

    Read more: How to install extensions in OpenCart 4

    Extension Selection Criteria

    Key Evaluation Factors

    1. Compatibility
    • OpenCart 4 version support
    • PHP version compatibility
    • Theme integration
    1. User Reviews
    • Customer ratings
    • Detailed feedback
    • Implementation experiences
    1. Developer Reputation
    • Marketplace standing
    • Update frequency
    • Support responsiveness
    1. Feature Set
    • Functionality scope
    • Customization options
    • Performance impact

    Installation Process

    Standard Extension Installation

    1. Download Extension
    • Purchase or select free extension
    • Download installation package
    1. Upload Process
    • Navigate to Extensions → Installer
    • Upload extension file
    • Follow installation wizard
    1. Configuration
    • Configure extension settings
    • Set up required parameters
    • Test functionality

    Extension Management Best Practices

    Strategic Implementation

    Compatibility Verification

      • Test before live deployment
      • Check version requirements
      • Validate theme compatibility

      Performance Monitoring

        • Assess extension load time
        • Monitor resource consumption
        • Use performance profiling tools

        Security Considerations

          • Verify extension source
          • Check developer reputation
          • Review code quality
          • Update regularly

          Troubleshooting Extension Issues

          Common Challenges

          • Compatibility conflicts
          • Performance degradation
          • Unexpected behavior
          • Installation errors

          Recommended Solutions

          • Maintain backup
          • Test in staging environment
          • Contact extension developer
          • Seek community support

          Cost Considerations

          Pricing Models

          • Free extensions
          • One-time purchase
          • Annual subscription
          • Freemium models

          ROI Evaluation

          • Feature value
          • Implementation cost
          • Potential revenue impact
          • Long-term benefits

          Community and Support

          Support Channels

          • Official forums
          • Developer support tickets
          • Community discussions
          • Documentation resources

          Future of OpenCart Marketplace

          Emerging Trends

          • AI-powered extensions
          • Headless commerce integrations
          • Enhanced personalization tools
          • Improved security frameworks

          Conclusion

          The OpenCart Extension Marketplace represents a dynamic ecosystem enabling store owners to rapidly enhance their e-commerce capabilities. By strategically selecting, implementing, and managing extensions, businesses can create robust, feature-rich online stores.

          Key Takeaways

          • Carefully evaluate extensions
          • Prioritize compatibility
          • Monitor performance
          • Stay updated with marketplace developments

          Recommended Next Steps

          • Explore marketplace regularly
          • Follow top developers
          • Attend OpenCart community events
          • Continuously learn and adapt

          Pro Tip: Always maintain a staging environment for testing new extensions before live deployment.

          Signature hash does not match! OpenCart Solution

          While installing modules from the marketplace directly from the website you may encounter an error message like “Signature hash does not match!”, solution for this is following for OpenCart version 3.0.2.0:

          • Log in to your OpenCart account https://www.opencart.com/index.php?route=account/login
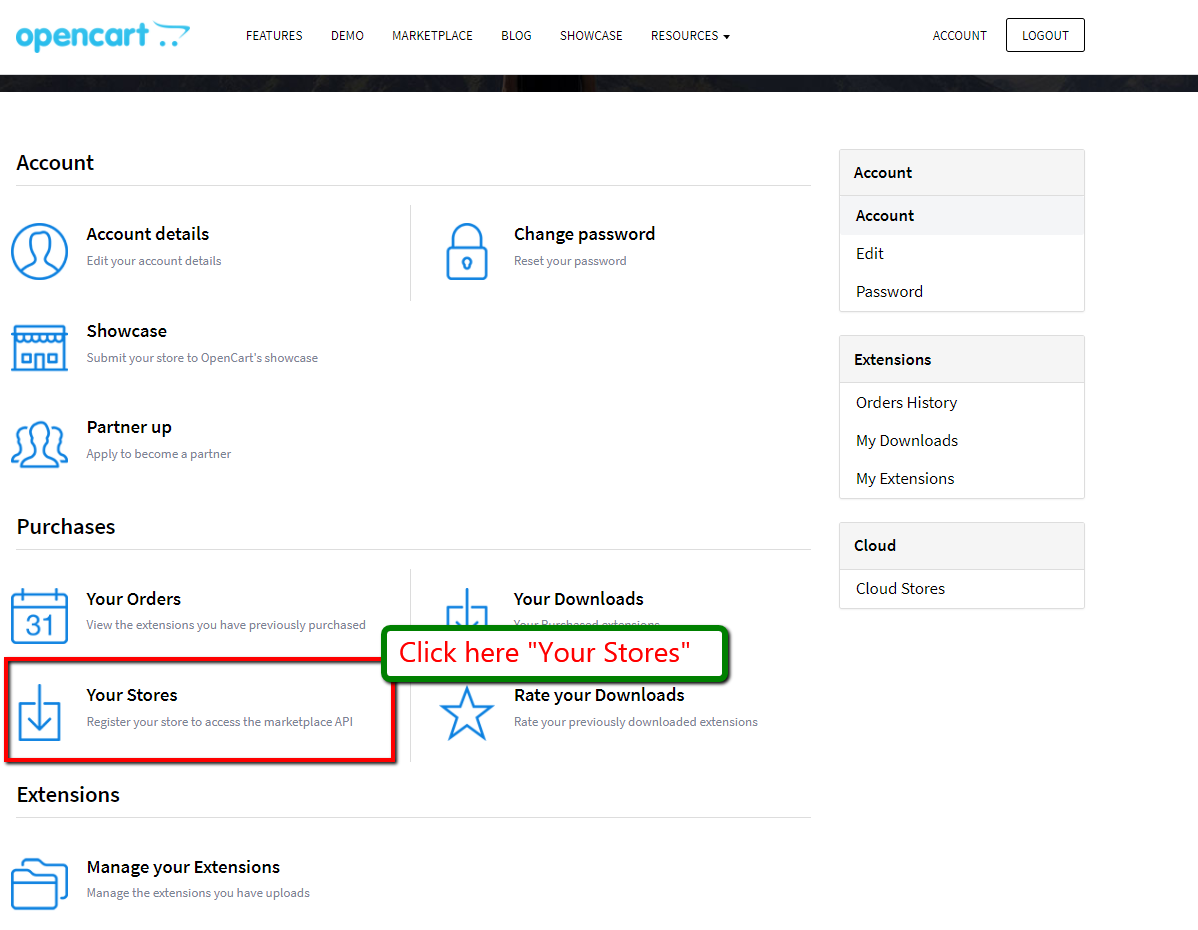
          • In the Dashboard you will see “Your Stores”, click it then click the “Add Store” button.
          Add signature hash for your store in Opencart
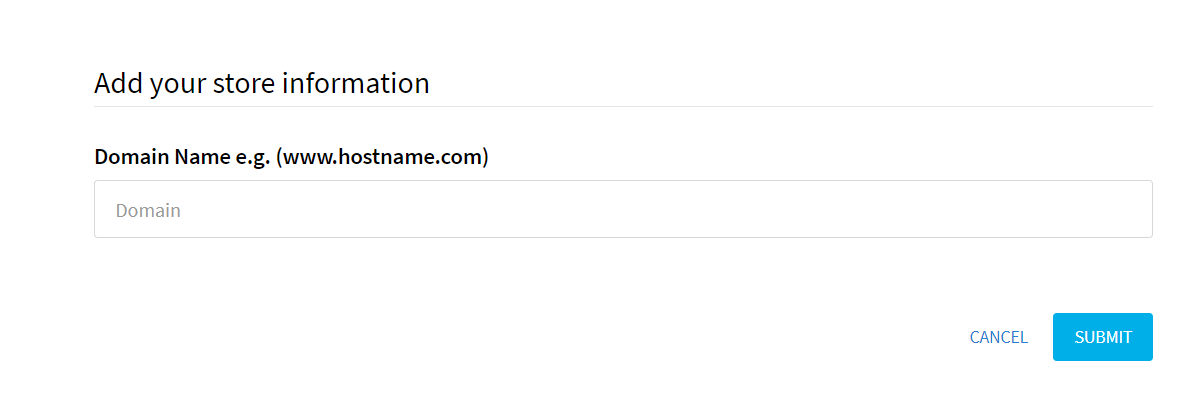
          • Then Add your store information which is the domain name
          Add domain name for signature hash
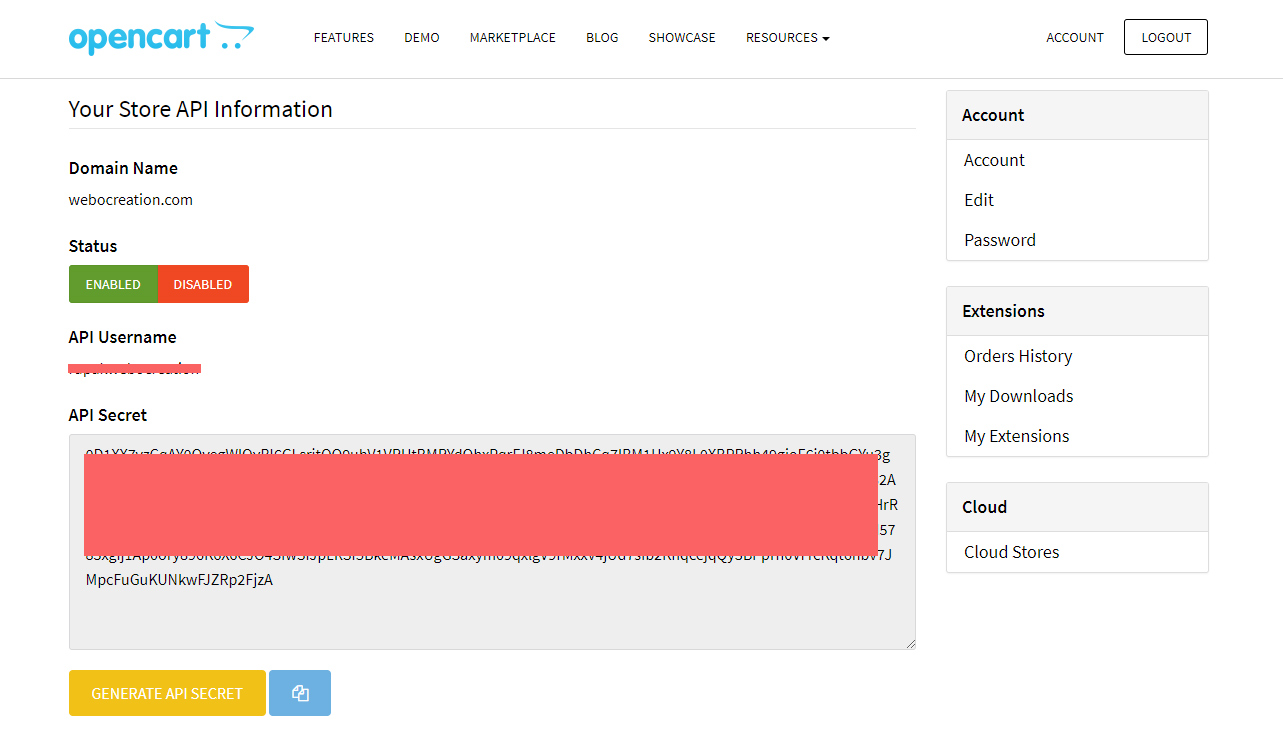
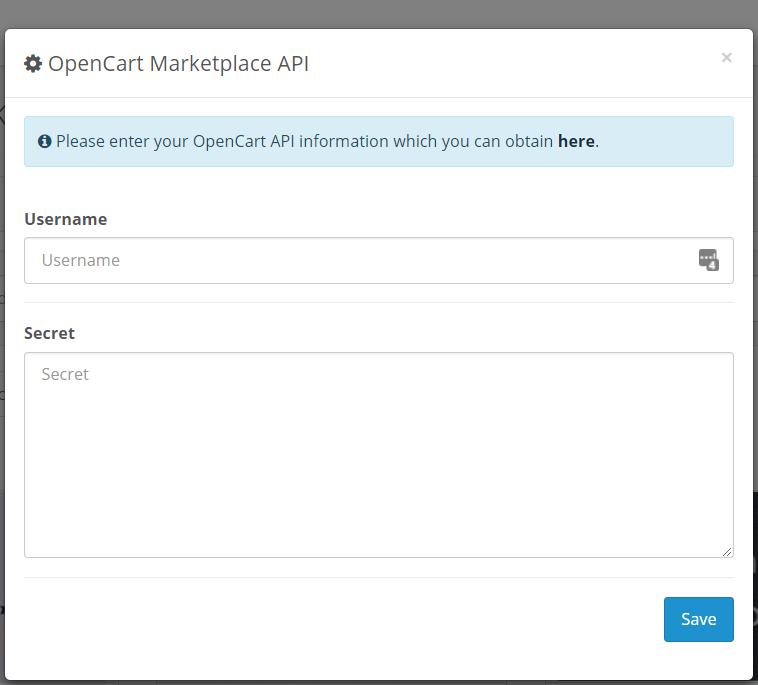
          • Then click submit, you will get details of your username and secret key
          Opencart Marketplace API
          • Go to your website and log in to the admin section.
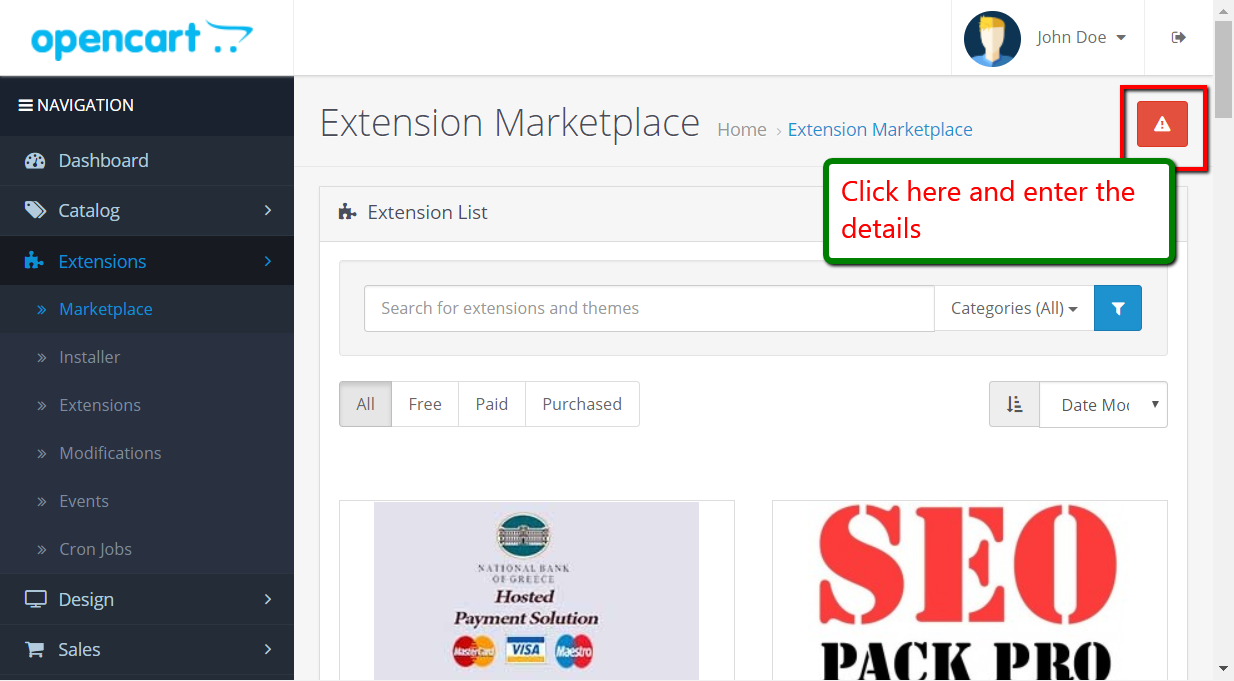
          • Go to Extensions >> Marketplace and click the setting button
          Install extension form Marketplace Opencart
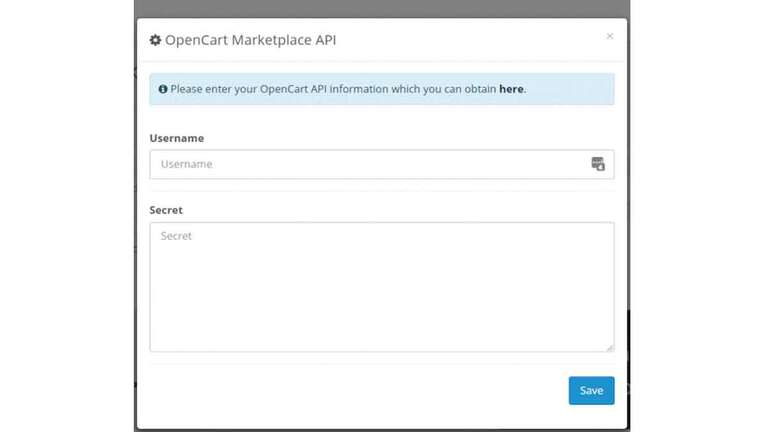
          • It will show the popup where you enter the username and the secret key, enter them that you get above at opencart.com account dashboard
          Opencart Marketplace API add
          • Then you are set to install directly from OpenCart Marketplace from the dashboard.

          For installation of OpenCart extensions, please watch the following video:

          Please let us know if you have any questions or suggestions, please subscribe to our YouTube Channel for Opencart video tutorials. You can also find us on Twitter and Facebook. Enjoy!

          Product Options Management – OpenCart 4 User Manual

          You always have a choice, Options in OpenCart allow you to provide customers with selectable choices for your products. These could include variations such as size, color, or customizations like engraving. Managing options effectively ensures your customers can personalize their purchases while keeping your store organized.

          Accessing Options Management

          1. Log in to the Admin Panel.
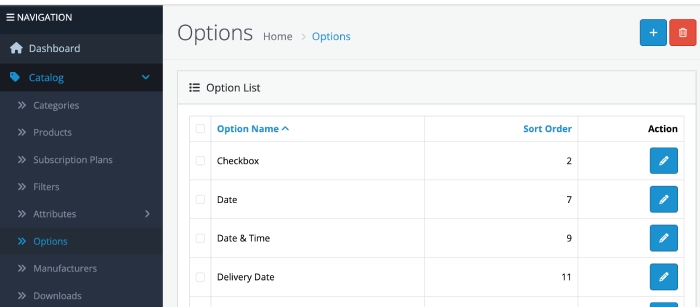
          2. Navigate to Catalog > Options from the main menu.
          3. This will open the Options List page, where you can view, add, edit, or delete product options.
          Options in Opencart

          Adding a New Option

          1. Click on the “Add New” (+) button on the top right.
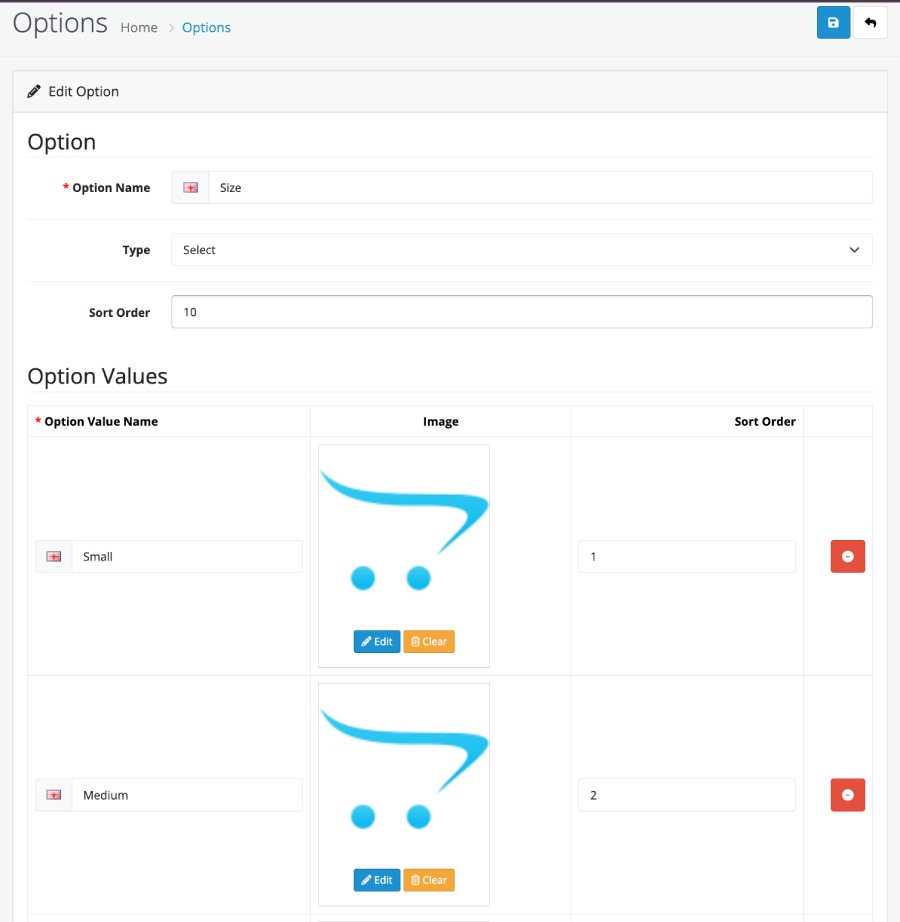
          2. Fill out the following fields:
            • Option Name: Enter a descriptive name (e.g., “Size”, “Color”).
            • Option Type: Select the type of option from the dropdown. Types include:
              OpenCart 4 supports several types of product options:
              • Select Option: Dropdown menu for selecting variations
                – Ideal for choosing sizes, colors, or configurations.
                – Can impact product price, weight, and stock
                Example:
                T-Shirt Size: Small, Medium, Large
                Color: Red, Blue, Green
              • Radio Option: Mutually exclusive selection
                – Good for simple choices with few alternatives
                – Displays as radio buttons
                Example:
                Warranty: Standard (Free), Extended (+$29.99)
                Gift Wrapping: Yes, No
              • Checkbox Option: Multiple selections allowed
                – Perfect for additional features or add-ons
                Example:
                Computer Accessories: Keyboard (+$50), Mouse (+$30), Extended Warranty (+$99)
              • Text Option: Free-form text input
                – Useful for personalization
                Example:
                Engraving message
                Special instructions
                Custom text on products
              • Textarea Option: Longer text input
                – Ideal for detailed customizations
                Example:
                Gift card message
                Product customization details
                Special requests
              • File Option: Allow customers to upload files
                – Great for custom design services
                Example:
                Logo upload for custom printing
                Design file for personalized products
                Supporting documentation
              • Date Option: Select specific dates
                – Useful for bookings, reservations
                Example:
                Event date selection
                Delivery date preference
                Service scheduling
          3. Sort Order: Enter the position this option will appear relative to others.
          4. Add Option Values (if applicable):
            • Click the “Add Option Value” button.
            • Enter the value name (e.g., “Small”, “Medium”).
            • Set a sort order for the values.
          5. Click Save to create the new option.
          Add Option in Opencart

          Editing an Existing Option

          1. From the Options List, locate the option you want to edit.
          2. Click the Edit button (pencil icon) next to the option.
          3. Make the necessary changes to the option name, type, values, or sort order.
          4. Click Save to apply your changes.

          Deleting an Option

          1. From the Options List, select the checkbox next to the option(s) you wish to delete.
          2. Click the Delete button at the top.
          3. Confirm the deletion when prompted.

          Note: Deleting an option will remove it from all products that use it. Be cautious when deleting options.

          Assigning Options to Products

          1. Navigate to Catalog > Products.
          2. Locate the product you want to assign options to and click Edit.
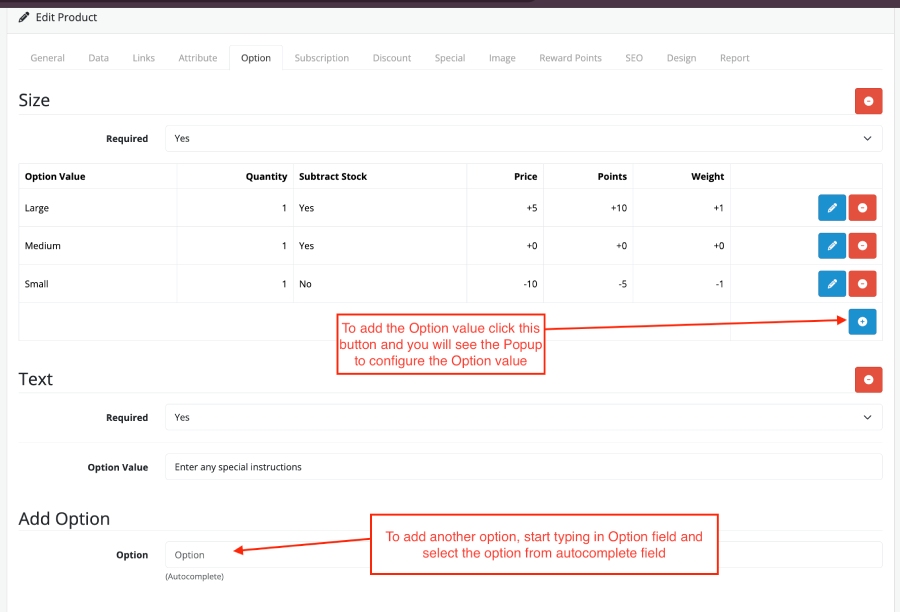
          3. Go to the Options tab in the product form.
            Assign Option to Product Opencart
          4. Start typing the name of an option in the Option Name field, then select it from the dropdown.
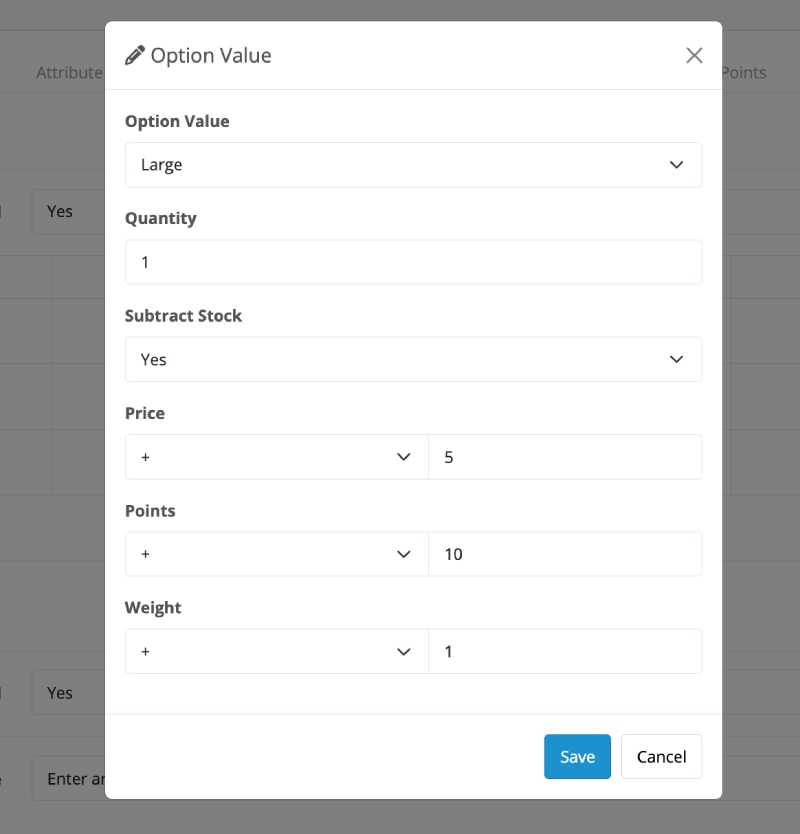
          5. Configure the option for the product:
            • Set Option Values: Select applicable values (e.g., “Red”, “Blue”).
            • Quantity: Specify the stock for each option value.
            • Subtract Stock: Indicate whether stock for the option should decrease upon purchase.
            • Price: Add or subtract an amount for the option value.
            • Points: Add or subtract loyalty points.
            • Weight: Add or subtract weight for shipping calculations.

              Option value in Opencart
          6. Repeat for additional options if needed.
          7. Click Save to update the product.

          Real-World Examples

          1. Custom T-Shirt Store

          • Size (Select)
          • Color (Select)
          • Custom Text (Text)
          • Upload Design (File)

          2. Electronics Retailer

          • Storage Capacity (Radio)
          • Extended Warranty (Checkbox)
          • Installation Service (Select)

          3. Personalized Gifts

          • Engraving Message (Textarea)
          • Gift Wrapping (Checkbox)
          • Delivery Date (Date)

          Best Practices for Options Management

          1. Use Descriptive Names: Make option names clear and customer-friendly.
          2. Group Related Options: Keep similar options together for better organization.
          3. Limit Option Types: Avoid overloading products with too many options to reduce customer confusion.
          4. Test on the Frontend: After adding options, check the product page to ensure they display and function correctly.
          5. Keep Stock Updated: Use the subtract stock feature to manage inventory for specific option values.

          Common Issues and Troubleshooting

          • Options Not Displaying: Ensure the option is assigned to the product and saved correctly.
          • Incorrect Pricing: Double-check the price adjustments for each option value.
          • Duplicate Options: Avoid creating duplicate options by checking the list before adding new ones.

          By effectively managing options in OpenCart, you can enhance the shopping experience for your customers and improve operational efficiency. For further assistance, refer to the OpenCart documentation or community forums.

          Design SEO URLs in OpenCart – user manual

          Search Engine Optimization (SEO) is a critical component of running a successful eCommerce website. OpenCart provides multiple robust features, and one of them is URL management called SEO URLs, which helps make your store’s links more user-friendly and search engine-friendly. In this Opencart user manual, we will guide you through managing SEO URLs in OpenCart 4.

          What are SEO URLs?

          SEO URLs replace complex and unattractive query strings in web addresses with clean, readable links. For example:

          • Default URL: https://demo.webocreation.com/index.php?route=product/product&language=en-gb&product_id=43
          • SEO URL: https://demo.webocreation.com/en-gb/product/macbook

          This change improves user experience and boosts your store’s ranking in search engine results.

          Enabling SEO URLs in OpenCart

          1. Log in to Admin Panel: Start by logging into your OpenCart admin panel.
          2. Navigate to Settings: Go to System > Settings and click the Edit button for your store.
          3. Enable SEO URLs: Under the Server tab, set the “Use SEO URLs” option to “Yes” and save your changes.
          4. Modify .htaccess File:
            • Rename the htaccess.txt file in your store’s root directory to .htaccess.

            • Ensure your server is configured to use mod_rewrite (Apache) or a similar module for other servers.

          Default htaccess code:

          <IfModule mod_autoindex.c>
            IndexIgnore *
          </IfModule>
          <IfModule mod_headers.c>
            Header set Referrer-Policy "no-referrer"
          </IfModule>
          <IfModule mod_headers.c>
            Header always set X-Content-Type-Options "nosniff"
            Header always set Permissions-Policy "interest-cohort=()"
          </IfModule>
          Options +FollowSymlinks
          Options -Indexes
          <FilesMatch "(?i)((\.tpl|\.twig|\.ini|\.log|(?<!robots)\.txt))">
           Require all denied
          ## For apache 2.2 and older, replace "Require all denied" with these two lines :
          # Order deny,allow
          # Deny from all
          </FilesMatch>
          RewriteEngine On
          RewriteBase /
          RewriteRule ^system/storage/(.*) index.php?route=error/not_found [L]
          RewriteCond %{REQUEST_FILENAME} !-f
          RewriteCond %{REQUEST_FILENAME} !-d
          RewriteCond %{REQUEST_URI} !.*\.(ico|gif|jpg|jpeg|png|webp|js|css|svg)
          RewriteRule ^([^?]*) index.php?_route_=$1 [L,QSA]

          Read more: 25 SEO best practices for Opencart 4

          Managing SEO URLs

          To manage or create SEO-friendly URLs for your store, follow these steps:

          1. Go to Design > SEO URL:
            • From the admin menu, navigate to Design > SEO URL.
            • Here, you can view a list of existing SEO URLs and add new ones.
              SEO URLs listing
            • Whenever you enter product, category, information page, manufacturer, etc, you will see an SEO tab where you enter the SEO URL, which is automatically listed here.

              SEO URL category
          2. Adding a New SEO URL:
            • Click the “Add New” button.
            • Fill out the form:
              Add SEO URL in Opencart
              • Store: Select store
              • Language: Select Language
              • Key: Enter the word that will be replaced in the URL for the page. Let’s take an example URL https://demo.webocreation.com/index.php?route=product/product&language=en-gb&product_id=43, in this URL keys can be route, language, and product_id.
              • Value: Value is unique as per the Key. For value, you can enter the URL parameter values, so in the above URL. Key is route and value is product/product, another key is language and value is en-gb, and key is product_id and value is 43.
                If you try to enter a duplicate value, then you can get an error like below:
                Unique SEO url value as per key
                The most popularly used route in Opencart is available by default:
                Route SEO URL
                If you want to enter the route of the contact us page, whose URL is https://demo.webocreation.com/index.php?route=information/contact&language=en-gb, then you can enter as follows:

                Contact SEO URL
                With that entry, now you can access the contact us page through the following URL: https://demo.webocreation.com/en-gb/contact
              • Keyword: Enter the desired clean and descriptive URL (in the above e.g., contact). This also needs to be unique.
                SEO URL keyword
                Make sure you only use characters in the a-z or 0-9 range and – for spaces. Use / for categories. You can use _ for space, but sometimes it is not good for SEO, so always use -.
              • Sort Order: The sort order of the keywords in the URL. For example, URL https://demo.webocreation.com/en-gb/contact, the language en-gb is shown first and route contact is shown second, because the sort order for language is lower than the route.
                SEO URL sort order
                Let’s say we want to show route contact first and then language en-gb second, then we can adjust through sort order like below:
                SEO URL sort order
                Now, the URL will be like: https://demo.webocreation.com/contact/en-gb

                Read more: Remove en-gb from the SEO URL of Opencart 4
              • Save your changes.
          3. Editing Existing SEO URLs:
            • Locate the URL you want to edit and click the “Edit” button.
            • Update the fields as necessary and save your changes.

          Tips for Optimizing SEO URLs

          • Keep It Descriptive: Use keywords that reflect the content of the page, like product names or categories.
          • Avoid Special Characters: Use hyphens to separate words and avoid spaces or symbols.
          • Be Consistent: Maintain a uniform style for URLs throughout your store.

          Common Use Cases for SEO URLs

          1. Product Pages: Ensure each product has a unique SEO-friendly URL to improve its visibility.
            • Example: https://demo.webocreation.com/en-gb/product/macbook
          2. Category Pages: Use SEO URLs for categories to help customers and search engines understand your store structure.
            • Example: https://demo.webocreation.com/en-gb/catalog/desktops
          3. Custom Pages: Apply SEO URLs to information pages like “About Us” or “Contact Us.”
            • Example: https://demo.webocreation.com/en-gb/information/about-us

          Troubleshooting SEO URL Issues

          • Broken Links: Ensure the .htaccess file is correctly configured and the server supports URL rewriting.
          • Duplicate URLs: Avoid assigning the same SEO URL to multiple routes, as this can cause conflicts.
          • Case Sensitivity: Be consistent with the case (uppercase/lowercase) in your SEO URLs.

          Conclusion

          The SEO URL feature in OpenCart 4 is a powerful tool to improve your website’s visibility and user experience. By enabling and carefully managing SEO URLs, you can drive more organic traffic to your store and enhance customer engagement. Take advantage of this feature to optimize your eCommerce platform for both search engines and your audience.

          Orders Management in OpenCart 4

          Efficiently managing customer orders is critical for running a successful eCommerce business. OpenCart 4 provides a user-friendly interface and robust features for handling orders. This guide covers all aspects of order management, including viewing, creating, and processing orders, along with advanced features like affiliate tracking and commission management.
          Orders Listing

          The Orderspage displays a list of all customer orders.

          1. Navigate to Sales > Orders In the admin panel.
          2. Use filters to search for specific orders by:
            • Order ID
            • Customer Name
            • Order Status
            • Date Added
            • Total Amount
          3. Sort orders by columns to quickly locate entries.
          Opencart Order List

          View Order Details

          To view the details of a specific order:

          1. From the Orders page, click the “View” button for the desired order.
          2. The order details include:
            • Invoice number
            • Customer information (name)
            • Date Added
            • Product details (name, model, quantity, price, total)
            • Shipping and payment details
            • Total prices
            • Order status history
            • Additional comments or notes
          Opencart Order detail page

          Invoice Creation

          Invoices are essential for both customers and internal record-keeping. OpenCart allows you to generate and print invoices:

          1. Open the order details.
          2. Click the “Generate Invoice Number” button.
            Generate Invoice Opencart

          Adjust Products

          Sometimes you may need to add extra products to an order, which you can do by clicking the button in the products table.

          Add product to Order

          Shipping and Payment Details

          Order details include:

          • Shipping Address: Editable for ensuring correct delivery.
          • Payment Address: Editable to match customer billing information.
          • Shipping Method: Updatable to select a preferred delivery option.
          • Payment Method: Adjustable to align with customer payment preferences.

          Print Invoice

          Generate a professional invoice for record-keeping or customer sharing:

          1. Open the order.
          2. Click the “Print Invoice” button to download or print a formatted invoice.
            Print Invoice Button
          3. Invoice detail page to print
          Print version of Invoice in Opencart

          Print Shipping List

          For efficient order fulfillment, print a shipping list:

          1. Select one or more orders from the Orders page.
          2. Click “Print Shipping List” to generate a document with shipping details.
            print shipping list button
          3. Use this list to prepare and dispatch shipments accurately.
          Opencart shipping label

          Order Status History

          Track the progression of an order with status updates:

          1. Update the order status (e.g., Pending, Processing, Shipped, Completed, etc).
          2. Optionally, notify the customer via email about the status change.
          3. Add comments for internal tracking or customer communication.
          Order Status history

          More details

          Click the more in the order detail page and you will see other details like affiliate, commission, rewards, voucher, coupon used, store name, language, and currency unit.

          Order more details

          Add Affiliate

          Affiliate tracking is useful for managing referral-based sales:

          1. In the order details, locate the affiliate section.
          2. Assign an affiliate to the order if applicable.
          3. Affiliates can track their referred orders, and you can calculate commissions.

          Add Commission

          For affiliate-linked orders, manually add commissions:

          1. Go to the affiliate section within the order details.
          2. Enter the commission amount based on your affiliate program’s terms.
          3. Save the changes for accurate payout tracking.

          Manually Add an Order for a Customer

          Occasionally, customers may call or email to place orders. OpenCart allows you to add orders manually:

          1. Go to Sales > Orders and click “Add New.”
          2. Select an existing customer or create a new one.
          3. Add products to the order by searching for items and specifying quantities.
          4. Fill in shipping and payment addresses.
          5. Choose the shipping and payment methods.
          6. Verify totals, including any discounts or taxes.
          7. Save the order and notify the customer if needed.
          Add Order

          Best Practices for Order Management

          • Regular Monitoring: Check orders frequently to avoid delays.
          • Verify Details: Double-check customer information for accuracy.
          • Use Notifications: Keep customers updated on order statuses.
          • Streamline Fulfillment: Use invoices and shipping lists to optimize order processing.
          • Track Affiliates: Maintain transparency and accuracy in affiliate payouts.

          Conclusion

          OpenCart 4’s order management features provide flexibility and efficiency for handling customer orders. From creating manual orders to managing invoices, shipping, and affiliate commissions, OpenCart equips you with tools to run a smooth eCommerce operation. By leveraging these features, you can enhance customer satisfaction and streamline your business processes.