What to Look for in an OpenCart Developer for Your Customization and How to Validate Their Work

When you hire an experienced OpenCart developer, you ensure that your eCommerce store will work appropriately and meet your demands. OpenCart is powerful software; however, customization of the software requires a special set of skills. Here are the aspects you will require to look into while hiring an OpenCart developer and how you can check his/her work.

Key Skills An OpenCart Developer Should Have

Following are the Opencart developer traits:

Experience In OpenCart Development

  • A qualified developer will have hands-on experience in OpenCart, specifically:
  • In-depth understanding of the core structure of OpenCart.
  • Knowledge about OpenCart modules and extensions.
  • Familiarity with the admin panel and customization options of OpenCart.

Strong Knowledge Of PHP

  • Since OpenCart is basically designed in PHP, the developer will be required to have good knowledge of:
  • Writing extremely efficient and clean PHP code.
  • Application of the MVC (Model-View-Controller) architecture in OpenCart.
  • Debugging PHP errors and optimizing performance.

Expertise In HTML, CSS, And Bootstrap Framework

  • To be in front-end customization, the developer will have:
  • Strong knowledge of HTML and CSS to manipulate layouts and styles.
  • Experience with the bootstrap framework for developing responsive designs.
  • Ability to create mobile-friendly and user-friendly interfaces.

OCMOD And VqMod Customization

  • A good OpenCart developer would have a good grasp in:
  • Using OCMOD (OpenCart Modification System) for smooth, efficient code modifications.
  • The knowledge of VqMod (Virtual Quick Mod): to override core files without making direct changes.

Understanding Of Server-Side Issues

  • Most OpenCart stores are hosted on servers using cPanel with an added advantage of Apache. The developer should know about:
  • How to configure the .htaccess for SEO friendly URL and security upgrades.
  • Responsible for managing Apache configuration and troubleshooting server-related issues.
  • How to handle MySQL database operations to optimize speed.

How to Validate OpenCart Developer’s Work

Once you hire a developer, you should assure quality in their work. Some ways of validating this work include:

  1. Code Quality and Best Practices
  • You want to assure that the code is in compliance with the OpenCart development guidelines.
  • See that OCMOD/VqMod are being leveraged rather than modifying core files directly.
  • Check that the code is well-commented and structured.
  1. Performance and Security Checks
  • Test page load speed to ensure no unnecessary slows.
  • Check the security measures, like protection against SQL injection and CSRF.
  • Verify .htaccess security and SEO configuration.

  1. Functionality Testing
  • General testing should confirm custom features function properly.
  • Check compatibility with existing extensions and themes.
  • Cross-browser testing for responsiveness using a wide range of devices.
  1. SEO and URL Structure
  • Make sure that SEO-friendly URLs have been established properly.
  • Check for meta-data, alt tags, and structured data setting up.
  • Test OpenCart built-in SEO features for completeness.
  1. Backup and Documentation
  • Check for post-change backup from the developer.
  • Request for documentation of customizations worthy of future reference.
  • Assure rollback plans for the issue at hand.

Conclusion

Finding the right OpenCart developer for your customizations will require assessment in technical capability, knowledge of OpenCart architecture, and addressing server-side tasks. Testing, checking performance, and documentation around the work done becomes essential in ensuring a smooth and efficient eCommerce experience. Keep focus on these factors and maintain a secure, scalable, and high-performing OpenCart store to suit your business needs.

Getting Started With Laravel Web Development

Laravel Get Started

Laravel, a robust PHP framework for web artisans, has become essential for efficient and modern web development. Known for its elegant syntax, Laravel eases common tasks such as routing, sessions, caching, and authentication. It has garnered a significant following in the developer community by providing a structured and pragmatic way to build web applications. Entering the world of Laravel web development demands a foundational understanding of its features and an efficient setup of your development environment. Keep reading to explore the essentials of crafting exceptional web applications with Laravel.

Setting Up Your Laravel Development Environment

Laravel Development

Getting started with Laravel requires setting up a development environment that can handle PHP applications. The Laravel developers recommend using Homestead, an official, pre-packaged Vagrant box that provides a standardized, feature-rich development environment without manual server software installation.

However, if you prefer a different setup, you may opt for local development environments such as MAMP, WAMP, or XAMPP, which simplify the installation process. Regardless of your choice, ensuring that PHP, Composer (a dependency manager for PHP), and a robust text editor or PHP Integrated Development Environment (IDE) are installed is imperative.

Laravel’s documentation provides detailed instructions on environment setup, which involves installing Composer globally and then using it to create a new Laravel project. Understanding version control systems like Git will also contribute to a smoother development process, allowing you to manage your codebase effectively and collaborate with others.

Lastly, environment-specific configurations may be managed using the .env files in Laravel. This is where you can set up database connections, mail drivers, and other services without hard-coding these details into your application, thereby maintaining security and flexibility across different development stages.

Building Your First Web Application with Laravel

Web application with Laravel

The euphoria of creating your very first web application with Laravel is unparalleled. Beginning with route definitions, you will learn how to respond to HTTP requests and delegate tasks to controllers. Laravel’s routing component is powerful yet user-friendly, allowing for expressive route definitions in your application.
Next, controllers will become the logical center of your application, where you will process incoming requests, handle user inputs, and interact with the database. Following the routing, you delve into views, where Blade templating comes into play. Blade templating offers a simple yet powerful templating engine to construct your user interfaces.

Crud operations represent the bread and butter of web applications, and Laravel’s Eloquent ORM simplifies the create, read, update, and delete functionality with expressive PHP syntax. The beauty of Eloquent lies in how it represents. database tables as classes, making interacting with your data as objects easy.

Authentication is vital to most web applications, and Laravel provides Auth scaffolding that is out of the box. You can generate the routes, views, and controllers necessary to implement a full-fledged user authentication system with a few commands. Laravel’s focus on convention over configuration translates to a series of sensible defaults that accommodate most application requirements without requiring extensive setup.

Exploring Laravel’s Ecosystem: Packages and Extensions

Laravel’s ecosystem is rich with packages and extensions extending its capabilities; Laravel Spark provides scaffolding for subscription billing, while Laravel Nova serves as an elegant administration panel for your Laravel applications. Understanding, integrating, and utilizing these tools can provide massive value and save development time.

Packages play a pivotal role in the Laravel community, with Packalyst hosting thousands of community-driven packages. Developers leverage these packages to implement complex functionality such as social authentication, API integrations, or sophisticated search capabilities without reinventing the wheel.

Laravel’s package development process is standardized to ensure package quality and compatibility. Learning how to create and distribute your own packages could bolster your applications’ functionality and contribute to the thriving Laravel community.

The scalability of the Laravel ecosystem lies in its flexibility to add only what you need, thereby keeping the application lean and performant. Regular updates and an active developer community ensure that Laravel and its associated packages remain robust, secure, and at the cutting edge of web development technologies.

Overall, Laravel web development offers a streamlined and powerful approach to building modern web applications with its elegant syntax and robust ecosystem. By mastering Laravel’s core features and leveraging its vast packages, developers can create efficient, scalable, and secure applications that meet diverse needs.

New Blog System in OpenCart 4.1 called as CMS

The introduction of the Blog System in OpenCart marks a significant milestone for this popular eCommerce platform. With this new feature, merchants can engage their customers better, improve SEO, and create an integrated content strategy directly within their OpenCart store. Let’s explore the key highlights and benefits of this newly added functionality.

Why a Blog System Matters for eCommerce

In today’s competitive market, having a blog is essential for building an online presence, driving organic traffic, and engaging with your audience. Blogging allows merchants to:

  • Share news, updates, and promotions about their store.
  • Publish educational content, such as guides and tutorials.
  • Enhance SEO by targeting keywords and generating high-quality content.
  • Build trust and establish authority in their niche.

With the Blog System in OpenCart, store owners no longer need third-party integrations to achieve these goals.

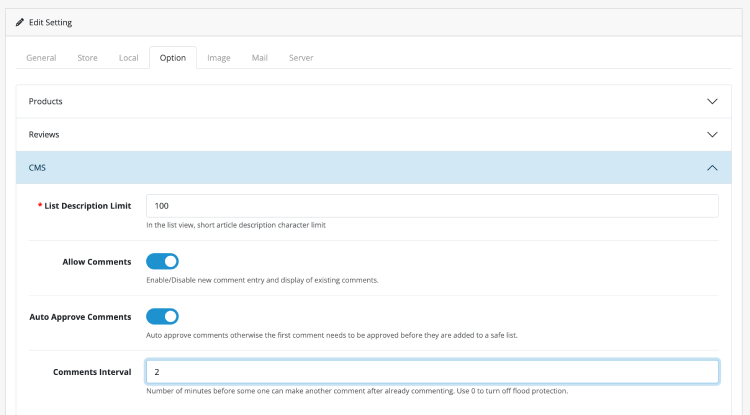
CMS or Blog setting

Go to admin >> Settings >> Edit the store where you want the blog >> Option tab >> and there is CMS section where you can enter different settings for blogs. Like:

  • List Description limit
  • Allow Comments
  • Auto Approve Comments
  • Comments Interval
CMS setting Opencart

Blog CMS Admin section

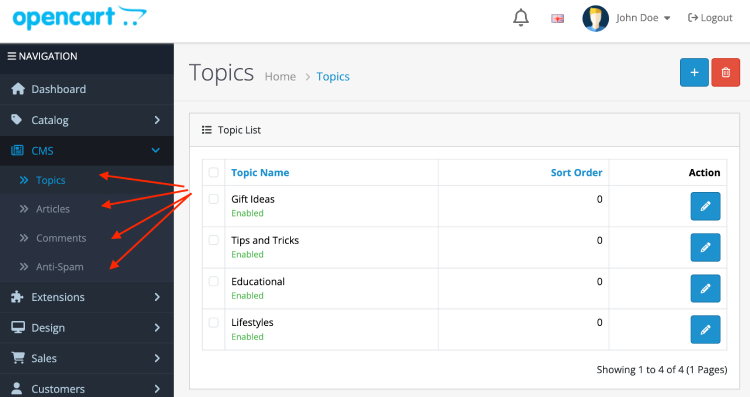
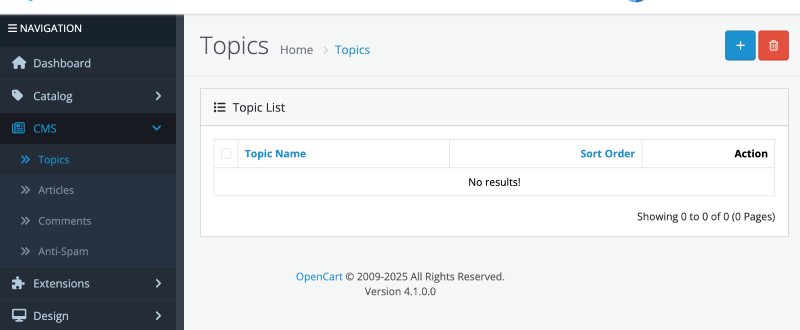
You can see the CMS link in the Opencart Admin left menu, under which you will see Topics, Articles, Comments and Anti-spam. The admin section naming convention is little different than normal blogs system that we used to see Categories as Topics and Posts as Articles.

Blog CMS opencart admin

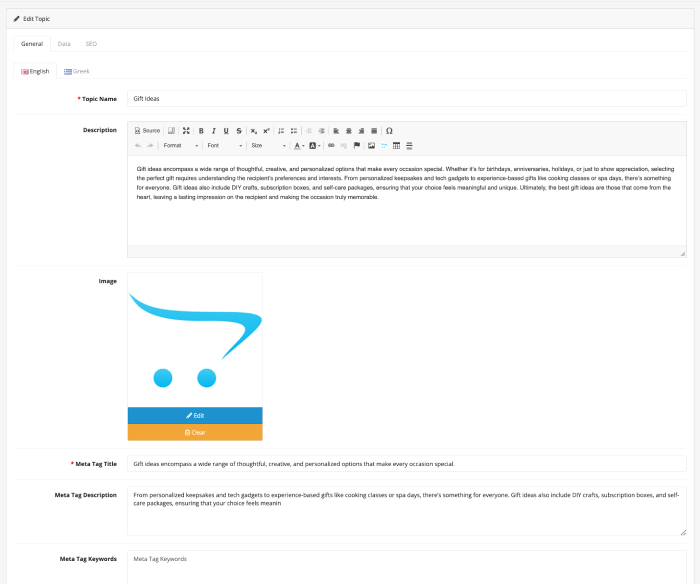
Topics or Category Management

Click on the Topics and enter the topics, in the above image, gift ideas, tips and tricks, educational and lifestyles are topics.

Topic or Category management in Opencart

Articles management (Add, edit and delete)

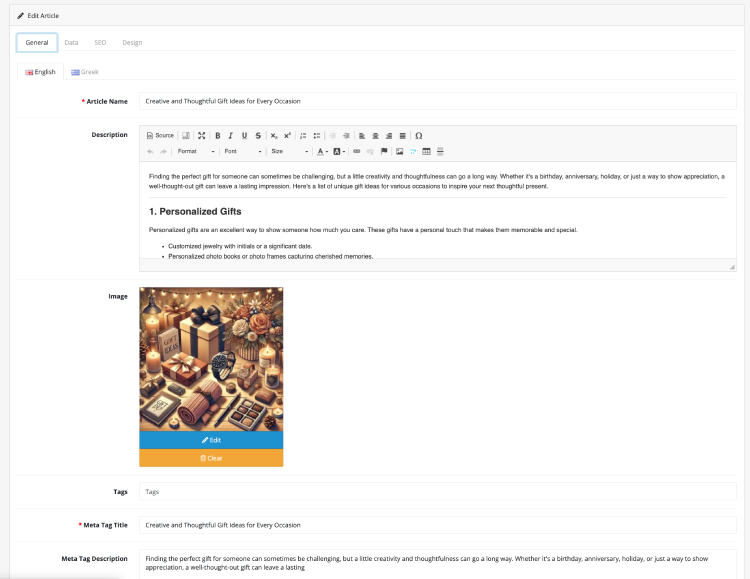
Go to CMS >> Articles and click add and enter the details in the General tab

Article general data form

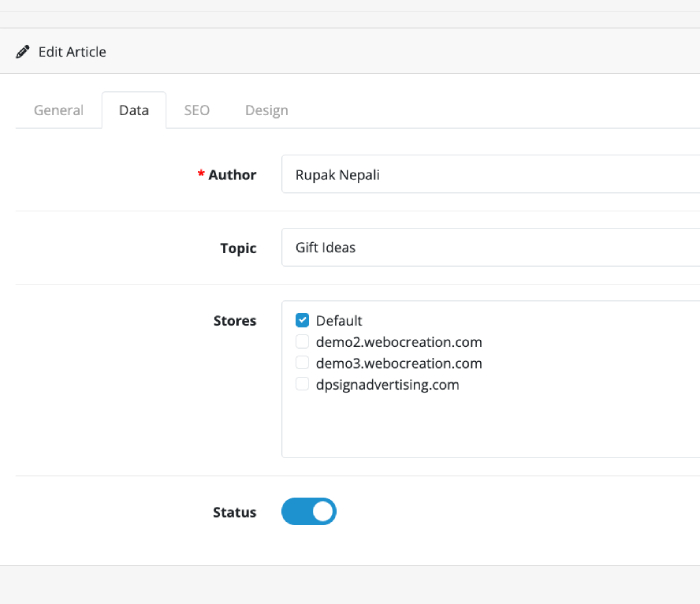
Click on the data tab. Enter the author name, just type the name. Select the Topic for the article and select the stores that you want to show.

Article data management

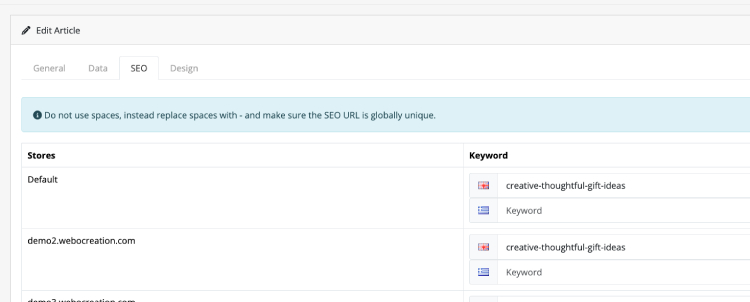
Click the SEO tab and enter the seo url

Article SEO url

In this way you can manage the topics and articles in Opencart backend.

Frontend Blog listing page

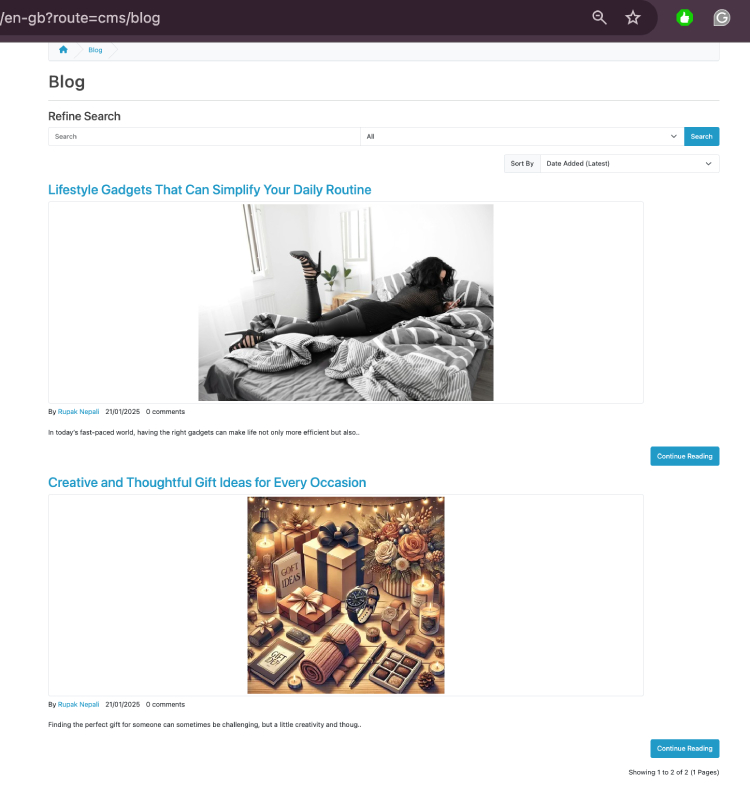
Blog Path is something like YOURURL/en-gb?route=cms/blog. In the listing page there are multiple functionalities like search, sort, etc

https://demo.webocreation.com/en-gb?route=cms/blog

Blog listing sorting search

Article or Blog detail page

For the article detail page, the route is added at the end like ?route=cms/blog.info

https://demo.webocreation.com/en-gb/creative-thoughtful-gift-ideas?route=cms/blog.info

Blog or Article detail page

Blog module in Opencart

There is Blog module in Opencart 4.1 as well. So you can go to admin >> Extensions >> Extensions >> Filter with modules >> Install or Edit the Blog.

Blog module in Opencart

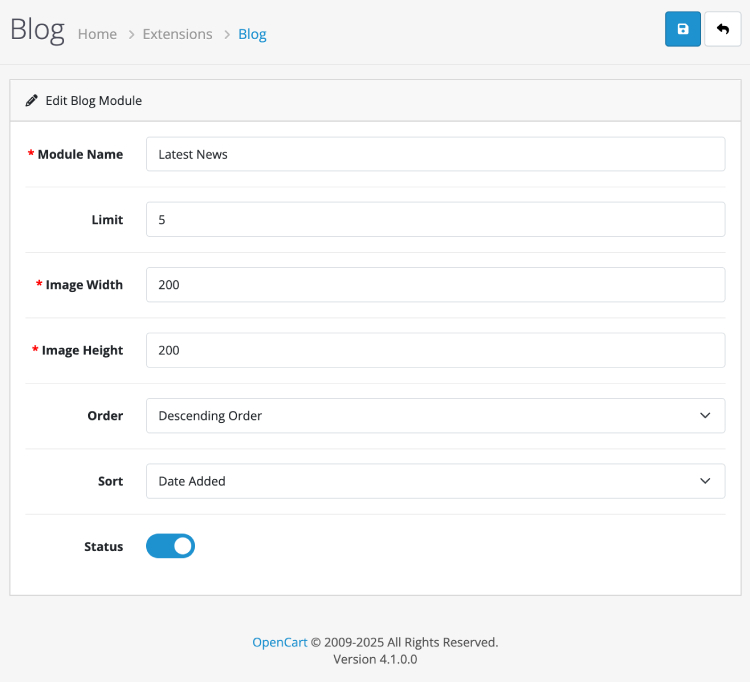
Enter module setting something like below or as per your preferences.

Blog module setting of opencart

Then add it to the layout.

Latest News module in Opencart

We add the Latest News blog module at the Content Top position of Information layout and it looks like below:

Blog module listing in Opencart

Topics module

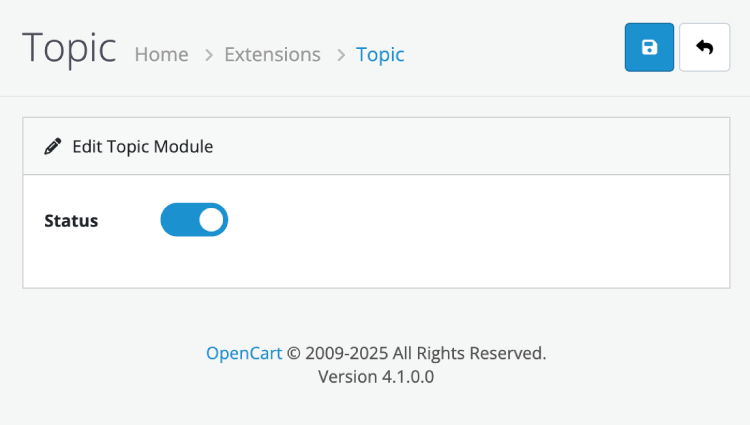
Go to Admin >> Extensions >> Extensions >> Filter with Modules and install the Topic module >> Enable the status.

Topic Module

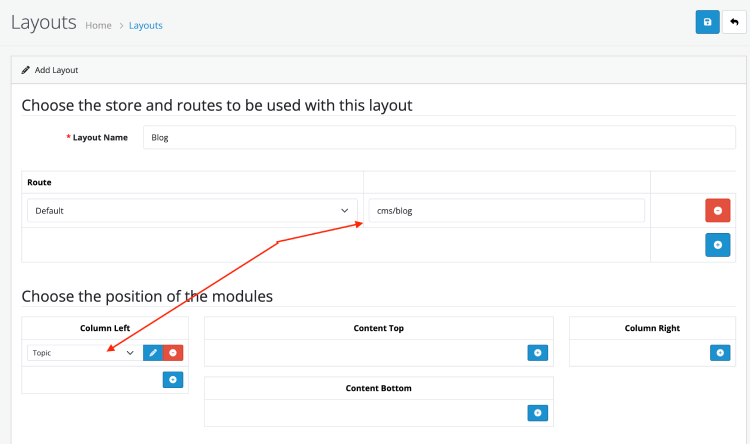
Now, navigate to Admin >> Design >> Layout >> Add new layout >> enter layout name as Blog >> Click plus sign at Route and enter the cms/blog and then in the Column left position select the Topic module.

Blog layout

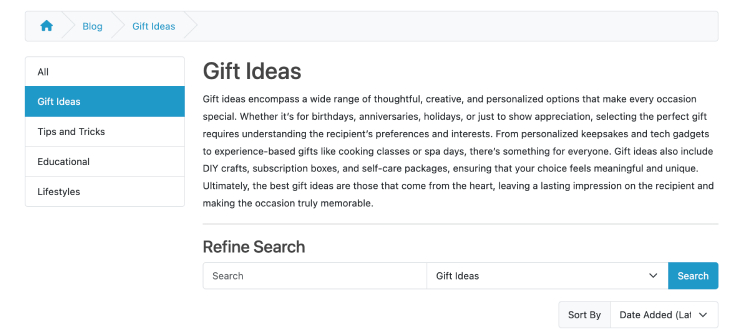
With above setting the front end will show up like below:

Blog categories list

Comment section

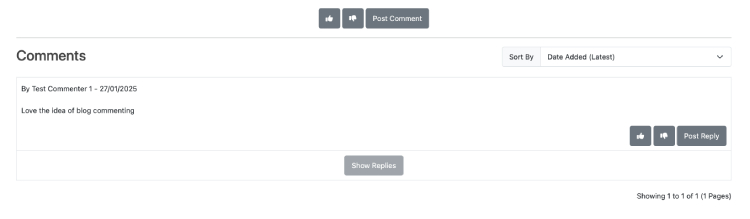
You can post comments for an Article. You must be logged in as customer to post the comment for the article.

Post comments for an Article

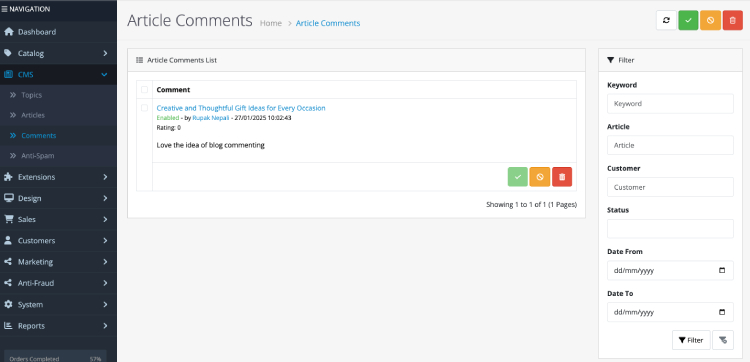
The administrator can manage the article comments and approve, mark as spam or delete them.

Article comments management

Managing User Group Permissions for CMS or Blog in OpenCart

OpenCart provides an effective permission system to control what different user groups can access and manage within the admin panel. If you’re using the built-in CMS (Information pages) or the new Blog system, you can grant or restrict access to these sections for specific user groups. Here’s a guide to managing permissions for CMS or Blog in OpenCart.

Read about Opencart customer group management and user group permission management

Granting Permissions for CMS or Blog

To allow or restrict access to the CMS or Blog sections, follow these steps:

Step 1: Log in to the Admin Panel

Go to your OpenCart admin dashboard.

Step 2: Navigate to User Group Permissions

Go to System > Users > User Groups.

Step 3: Select or Create a User Group

  • Click on the user group you want to modify (e.g., Administrator or another custom group).
  • Alternatively, click Add New to create a new user group.

Step 4: Update Access and Modify Permissions

  • In the Access Permission and Modify Permission fields, you’ll see a list of all available modules and actions.
  • To grant permissions for CMS or Blog:
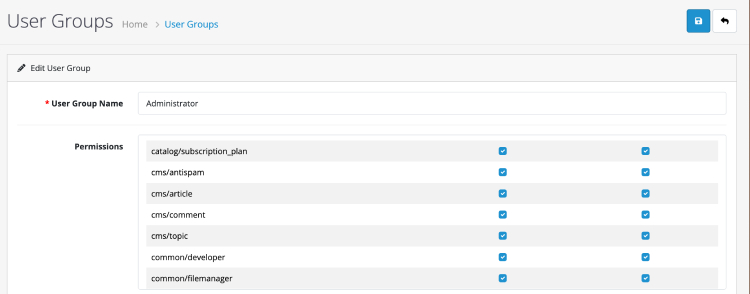
    • Find entries like for:
      cms/antispam
      cms/article
      cms/comment
      cms/topic
    • Check both boxes for Access Permission and Modify Permission to allow users in this group to view and edit these sections.
    • Then click Save button.
User group CMS or blog permission in Opencart

After these permissions are given then you will see the menu for CMS.

Key Features of the OpenCart Blog System

  1. User-Friendly Interface
    The blog system is seamlessly integrated into the OpenCart admin panel, making it easy for merchants to create, edit, and manage blog posts without needing technical expertise.
  2. SEO Optimization
    Each blog post comes with fields for meta titles, meta descriptions, and keywords, enabling merchants to optimize their content for search engines. The URLs for blog posts are also SEO-friendly, contributing to better rankings.
  3. Categories and Tags
    • Categories: Organize your blog posts into categories for better navigation and structure. For example, categories like “Guides,” “News,” or “Promotions” help users find relevant content easily.
    • Tags: Add tags to your posts to enhance discoverability and improve internal linking.
  4. Rich Content Editor
    OpenCart’s blog system includes a built-in content editor that supports text formatting, images, videos, and other media. This makes it easy to create visually appealing and informative blog posts.
  5. Comments System
    Engage with your audience by enabling comments on your blog posts. Moderation tools allow you to approve or delete comments, ensuring a positive discussion environment.
  6. Featured Posts and Highlights
    Merchants can pin featured posts to highlight important updates or promotions on the store’s homepage or blog section.
  7. Customizable Blog Layouts

    The blog system integrates seamlessly with OpenCart’s layout management, allowing merchants to customize how the blog section appears on their website.
  8. Social Sharing Buttons
    Built-in social sharing options let readers share your blog posts on platforms like Facebook, Twitter, and LinkedIn, increasing your content’s reach.
  9. Archive and Search Functionality
    Customers can easily browse through older posts using the archive feature or find specific posts with the search functionality.

Benefits of the OpenCart Blog System

  1. Improved Organic Traffic
    By creating high-quality, keyword-optimized content, merchants can attract more visitors through search engines.
  2. Enhanced Customer Engagement
    Blogs allow merchants to connect with their audience by addressing their interests, answering questions, and providing valuable information.
  3. Increased Conversions
    Content that educates customers about products or services can guide them through the purchasing journey, ultimately boosting sales.
  4. Time and Cost Savings
    With the blog system built directly into OpenCart, merchants no longer need to invest in third-party blogging platforms or integrations.

Improvements Needed in the OpenCart Blog System

While the OpenCart Blog System is a powerful and convenient feature for merchants, there are areas where it can be further enhanced to provide a more comprehensive and engaging blogging experience. Here are some suggested improvements:

1. Display Blog Categories in the Blog Section

  • Current Issue: Blog categories are not prominently displayed, making it harder for users to navigate through posts by topic.
  • Improvement: Add a blog category menu or filter in the blog section to help customers easily find articles relevant to their interests.

2. Dedicated Category Listing Pages

  • Current Issue: There is no dedicated page to display all posts within a single category.
  • Improvement: Introduce dedicated pages for each blog category with SEO-friendly URLs. For example:
    • /blog/category/guides
    • /blog/category/news
      This would enhance user navigation and improve SEO performance.

3. Enhanced Comment Spam Management

  • Current Issue: The current comment moderation system is basic and lacks advanced anti-spam measures.
  • Improvement: Integrate advanced spam filtering systems like reCAPTCHA or Akismet to prevent spammy comments. Additionally, allow merchants to block IPs or flag specific keywords in comments.

4. Product Promotion in Blog Posts

  • Current Issue: The blog system does not natively support direct promotion of products within blog posts.
  • Improvement: Add a feature that allows merchants to link products within a blog post dynamically. For example:
    • Include a “Featured Products” widget that automatically displays related products mentioned in the post.
    • Add a button for “Add to Cart” or “Learn More” within the blog content.

5. Blog Post Analytics

  • Current Issue: Merchants have no way to track how well their blog posts are performing.
  • Improvement: Add built-in analytics for blog posts to track page views, social shares, and engagement rates. This would help merchants identify which content resonates most with their audience.

6. Internal Linking Suggestions

  • Current Issue: The system does not provide suggestions for internal linking within blog posts.
  • Improvement: Add a feature that automatically suggests internal links to other blog posts or products, improving SEO and user engagement.

Conclusion

The new Blog System in OpenCart is a powerful tool that bridges the gap between content marketing and eCommerce. By allowing merchants to create and manage blog posts within the same platform, it simplifies workflows and enhances the overall customer experience. Whether you’re looking to boost your SEO, share valuable content, or increase customer engagement, OpenCart’s Blog System is a must-use feature for modern online stores.

Now is the perfect time to leverage this exciting addition and take your OpenCart store to new heights. Start blogging and watch your eCommerce business grow!

OpenCart 4.1.0.0 Launch: New Features, Updates, and Fixes

In the eCommerce world, OpenCart is one of the most frequently utilized platforms by business owners. Recently, there have been several updates made to it and version 4.1.0.0 has been launched. As a result of these changes, store managers and developers received several new features which included exciting updates and bug fixes. The purpose of this release is to streamline the processes even further and address the common issues faced by a majority of the users. OpenCart 4.1.0.0 is an upgrade that is a must in the eyes of many users.

OpenCart 4.1.0.0 Key Changes

  1. Return of OCMOD

After long wait, OCMOD is back in Opencart. OCMOD or OpenCart Modification is an application that allows store owners and developers to modify the core files of a store without overwriting them, ensuring that upgrades are easier and compatibility issues are less. Out of all the features being released OCMOD is the most anticipated one as well. Its reintroduction would take the OpenCart experience to the next level by making OCMOD customizations and extensions easier.

Read more about OCMOD module installation and development

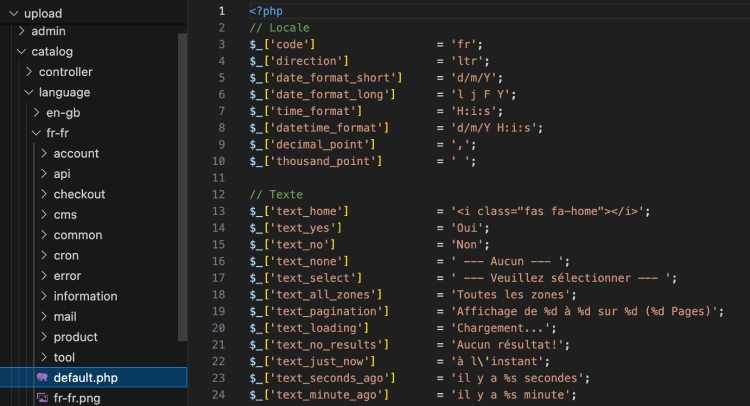
  1. Support for French language in Default code
French language Opencart

The language capabilities of OpenCart were low as French was missing from its supported language list. OpenCart 4.1.0.0 was able to add French support which should vastly increase the number of users across the globe as various French speaking users can now access the platform. This additional feature would be of great use to store owners targeting French speaking customers as they would easily be able to provide them with a French shopping experience

Add a new language and set a default language opencart 4

  1. Blog System introduced as CMS section
    Now store owners can create and edit their blog directly from the admin panel thanks to a Blog system integrated into OpenCart version 4.1.0.0. It is smooth effort for the company in providing utility features to increase customer marketing and the business’s capability as means for advertising its products More or less the business’s engagements appear less artificial.
    Most blog system has categories, in Opencart it is topics. Posts as Articles.

    Blog in Opencart
  2. Anti-Fraud
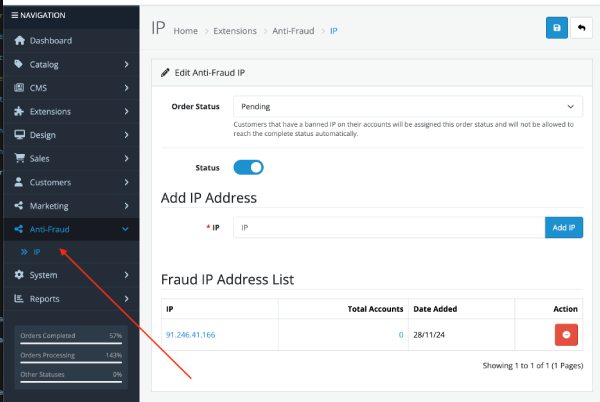
    Previously, Anti-fraud used to be extensions, now to improve security, OpenCart started to provide built-in Anti-fraud section. It helps identify and mitigate fraudulent activities on your store.
Anti Fraud IP

Read in detail about Anti-fraud in Opencart and how to block IP in Opencart

Major Updates in OpenCart 4.1.0.0

  1. Order Editor Improvements

The order editor once again has been normalized to facilitate and make the work fast and better for the store owners. Orders can now be edited by the owners in a lot less steps and more accurately adding efficiency in post purchase processes like item addition or removal customer and shipping changes.

Language editor in Opencart

  1. CKEditor Enhancements
    Another strategic tool of OpenCart, the CKEditor, is now integrated with several functional enhancements including the previously missing ShowBlocks alternate config feature For block elements, this feature provides better formatting resulting in greater control over how store owners customize product or service descriptions blogs and so on.
  2. Gift vouchers system removed
    Removed the gift vouchers system saying it over complicates the checkout process.
    https://github.com/opencart/opencart/commit/22e9247dcbb399db971d12f2da41efba46aa3136

OpenCart 4.1.0.0 fixes:

In this version, 701+ fixes, listed at opencart github.

  1. Subscription System

Subscription system error is fixed. People who use subscription-based products or services can now handle recurring payments and customer subscriptions better. This fix eliminates issues that used to disrupt or spoil the integrity of subscription services in the past.

Read about Subscription setup and processing

If you want to look how to setup subscription in Opencart 4.1.0.0, then you can see our demo opencart. You can login at https://demo.webocreation.com/wpadmin using username as demo and password as demo. View this product for subscription demo.

Why Upgrade to OpenCart 4.1.0.0?

Let us take a step back and look at how the new features and fixes can be beneficial for your eCommerce store: 

  • Improved Tooling regarding customization: With the return of OCMOD, it allows developers to alter core functionality with ease and without affecting their ability to update in the future. 
  • Targeted Language Support: The addition of French language support enables the penetration to French speaking markets abroad, which opens up new opportunities for growth. 
  • Advanced Content Marketing Tools: Through the integrated blog system you can communicate with your audience, get users to visit your page, or simply improve your optimization efforts. 
  • Simplified Processes: The editing and ordering of orders and the fixing of subscription systems increases the efficiency of running the store. 
  • Upgraded Features and Tools

Conclusion

The release of OpenCart 4.1.0.0 fulfills a lot of user requests as well as brings in new features. The latest version aims to improve your eCommerce store through various means from the revival of OCMOD, to introducing a blogging feature, support for the French language, and important improvements to subscription management. These new feature is perfect for developer seeking more control or if you are a store owner in search for better ways for customer engagement. OpenCart 4.1.0.0 certainly has many improvements to justify the upgrade.

Keep an eye out for new updates, and tips on how to make most of new features offered by OpenCart! Hope you liked this article, please subscribe to our YouTube Channel for Opencart video tutorials. You can also find us on Webocreation Twitter and Webocreation Facebook. Please let us know if you have any questions or concerns.

How to redesign a corporate website: 8 key aspects

Redesigning a corporate website is one of those can of worms that no one wants to open. Usually, no one gives it much thought until one day the CEO comes to the marketing department furious because he found a man at dinner who asked him why they are still selling services or products from the last century. Then, the CEO enters the website and sees that everything is wrong or that the website does not reflect the current reality of the company. Does this story sound familiar to you, right?

After a couple of meetings in which various departments are made to blush, it is time to start redoing the corporate website. The time has come to modify or update partially or completely its key elements.

And that’s where the mess begins… The content needs to be modified to show clients and stakeholders what the company does in a coherent way, because what we have now on the website is nothing more than a reflection of an incomprehensible internal organisational chart for anyone who doesn’t work in the organisation. To this we have to add the egos, the departments that compete with others, the Legal people who see compliance problems everywhere, the HR people who want to show a super young image of the company, which clashes with the concept of a serious and consolidated company that management wants to convey… in short, it ’s very complicated to get everyone to agree .

In addition to defining the tone and structure of the corporate website, it is necessary to think about the graphic design, structure, information architecture and format. This type of intervention is not limited to giving it a more modern look, but covers everything from usability to technical optimization to improve the user experience and search engine positioning.

The most important thing of all is that the redesign of the website stops being a project that one asks the IT nephew of one of the executives to do, and becomes a consultancy process in which the entire reality of the company must be analysed in order to translate it into a digital environment that, to top it off, can become an interesting source of business acquisition.

A corporate website with clear business objectives aligned with the digital strategy 

Redesigning a corporate website is not an isolated task. It is usually a job that responds to a more in-depth digital marketing strategy. In addition,   it is delimited by business objectives that must be clear and precise before being executed, since, to a large extent, the actions you will carry out depend on such objectives.

So before you start planning, it’s important to evaluate your performance metrics and define which aspects you want to improve and to what extent. This way, for example, you can optimize organic positioning and conversion rates to help increase sales and brand recognition and engagement.

User Experience (UX) Centered Design

User experience-centered web design is based on:

  • Ease of use: makes the user’s journey through the website   totally easy, fast and intuitive.
  • Accessibility: apply a responsive design that facilitates access from any mobile device or PC.
  • Functionality: Ensure that technical performance is optimal so that each of the functionalities runs smoothly. For example, loading speed, secure payment methods or precise forms are essential.
  • Aesthetics: A clean and harmonious design, free of distracting or out-of-place elements, decreases the bounce rate.

The goal is to make users feel comfortable and confident when interacting with your website.

Content migration

Content migration is the process of transferring existing content to the new website, this can include text, images, headers, metadata, ALT attributes, customer reviews and links.

However, not all content is part of the migration. After a performance analysis, we take into account content that can influence the maintenance or improvement of SEO positioning. This same analysis will also help us determine which content should be moved reliably and which should be updated and optimized.

In this process it is recommended to make a backup to avoid the loss of valuable information.

Technical and content SEO

Technical SEO and content SEO are essential for your corporate website. They guarantee its online visibility and organic traffic. In both cases, you must take care of numerous details.

Some of the aspects that are optimized with technical SEO are loading speed, management of duplicate content and broken links, responsive design, web architecture and site map hierarchy. On the other hand, content SEO involves the use of relevant keywords, an optimal hierarchy of headlines, among others.

Also, remember that many of the SEO tweaks you implement will have a significant impact on user experience.

When planning the content of your website, you should consider what your audience is searching for. Tools like Answerthepublic can help you create content that will reach your audience.

Visual design aligned with brand identity

We reiterate the idea of ​​keeping your corporate website design project as part of a global marketing strategy. In this case, the visual design of the page must remain   aligned with the brand identity and, precisely, contribute to transmitting the corporate values , its aesthetics, professionalism and other elements that differentiate it.

Ideally, you should use colors, fonts, and visual elements associated with your corporate image. 

Effective Calls to Action (CTA)

Calls to action (CTA) are words or phrases that are used to persuade users to take a specific action : fill out a form, download a manual, buy a product, a free trial of software, among many others.

That is, they are opportunities to generate leads and convert your visitors into potential customers . So their design should always be well thought out:

  • Be precise and clear. Sentences that are too long or complex lose impact.
  • Decide what you will offer taking into account the phase of the funnel in which the user is.
  • Be transparent, don’t offer something you can’t give.

The idea is to make it attractive and meet your users’ needs so they don’t stop clicking.

Security and data protection

Adopt security and data protection protocols that inspire confidence in your users, so that they can navigate and interact with your corporate website with complete peace of mind.

For example, SSL certificates ensure that visitors’ sensitive information is properly protected. It is also important that privacy and data management policies are accessible to users and that they have options to save their preferences.

Integration with digital marketing tools

Integrating your website with digital marketing tools is a step you cannot skip if you want to ensure that all the work you have done is effective and that your objectives are being met.

Tools like Google Analytics allow you to monitor various metrics that reflect the performance of the page, such as bounce rate, most visited pages, session time, traffic sources, among others. This way, you can obtain accurate data and know if you need to make adjustments to improve or make any informed decisions.

How much does it cost to redesign a corporate website?

The cost of redesigning a corporate website varies according to the needs of the company and the objectives it has set, since each case may require updates or renewals to a different extent.

Do you need a quote? Don’t hesitate to ask us, at Digital Concepts we offer the most complete custom web design service to help you stand out in search engines, create the best user experiences and help you achieve your business goals. Contact us.

25 SEO best practices for Opencart 4 & 3 with free SEO Opencart module

In this Opencart tutorial, we list more than 25 best practices for SEO for Opencart 4 & 3 and find out 3 free SEO Opencart 3 modules. In the near future, we will try to come up with some free modules for Opencart that address most of them but for now, have a look at the following and let us know if you have comments and suggestions.

Read more: SEO URLs in Opencart

We list out 25 free best practices for SEO for Opencart 4 and 3

  1. Rename the .htaccess.txt to .htaccess

    Go to your hosting root folder where Opencart is installed find .htaccess.txt and rename it to .htaccess

  2. Admin Setting section changes for the SEO

    – Go to Admin >> System >> Settings >> Edit your store
    – In the General tab, enter the Meta Title, Meta Tag Description, and Meta Tag Keywords, they are for the Home page of your store website.
    – Go to the Server tab, and Choose Yes for “Use SEO URLs”

  3. Enable the sitemap extension

    Go to Admin >> Extensions >> Extensions >> Choose the extension type >> Feeds then install the Google Sitemap extension and then edit it change the status to “Enabled” and save it. Now your sitemap URL will be given there which looks like this:
    https://yourwebsiteurl.com/index.php?route=extension/feed/google_sitemap

  4. Submit the sitemap to Google webmasters and Bing webmasters

    Create a Google Webmasters account and a Bing Webmaster account and submit the above sitemap URL in them.

  5. Create robots.txt in the root folder where Opencart is installed, and in that robots.txt place the following text, here change the sitemap URL to your website URL


    User-agent: *
    Disallow: /admin
    Sitemap: https://yourwebsiteurl.com/index.php?route=extension/feed/google_sitemap

  6. Opencart supports canonical URLs automatically, be sure to check it, and it removes the duplicate content penalties.

    https://yourwebsiteurl.com/cateogryname/productname and https://yourwebsiteurl.com/productname, these both URLs point to the same product page, so Google may take it as duplicate content so canonical URLs need to be set up. One example when you view the source the code you will see the canonical URL something like the below:

    Opencart canonical URL

  7. Product name and Description – Content is the key for Search Engines

    – Product description, as best practices for SEO, you should aim to write at least 300 words but be clear and write as much as possible.
    – Name the images as the product name, in Opencart most of the images’ alt tags are either product name in the product page, category name in category image, and so on.

  8. Enter SEO information for Products, Categories, Information pages, and Manufacturers.

    To enter the Products’ SEO information, go to Admin >> Catalog >> Products >> Add/Edit >>, then in the General tab, enter the meta tag title, meta tag description, and meta tag keywords. Likewise, go to the SEO tab and enter the keyword for each store.
    While entering the Meta Tag title, consider the following best practices:
    – Google only shows around 50–60 characters of a title tag so make the title tag around 50-60 characters
    – Put important keywords in the title and meta description
    While entering the Meta Tag Description, consider the following best practices:
    – 160 characters long
    – We have seen search engines always do not pick the meta descriptions but enter them.
    – Better not to include double quotation marks
    While entering the SEO keyword:
    – Include the main keyword or product name and better to use lowercase and not the prepositions words
    – Better not to use underscore (_), instead use dashes (-)
    – Better not to include double quotation marks or single quotation and special characters

    Follow same for Admin >> Catalog >> Categories and Admin >> Catalog >> Information and Admin >> Catalog >> Manufacturers

  9. Use social proof to gain user trust and keep your visitors engaged in your website

    Link to your website on all social media profiles. Social proof is for customers’ confidence. The footer has options to keep the user engaged (social media, phone number, etc)

  10. Internal linking is also important

    In product pages, we can do it by adding the related products

  11. Page Speed: Choose your hosting server properly

    Use the right cache module to get more benefits we missed Litespeed plugins in our WordPress website by which site was slow, so better to ask your hosting server which caches are supported.
    Check with the google page speed and follow their suggestions to improve the page speed. Improving the Google PageSpeed insights score will help a lot to show in the search results.

  12. For improved performance: Minify HTML, Minify CSS, and Minify JS

    – To minify the HTML you can use this free module
    HTML Minify | Compress code | SourceCode Compressor
    For CSS and JS minification use the developer’s help.

  13. Use srcset for images which helps properly size the images as per the screen

    Load images properly as per the screen like with srcset you can load different images for different screens. one example image code:
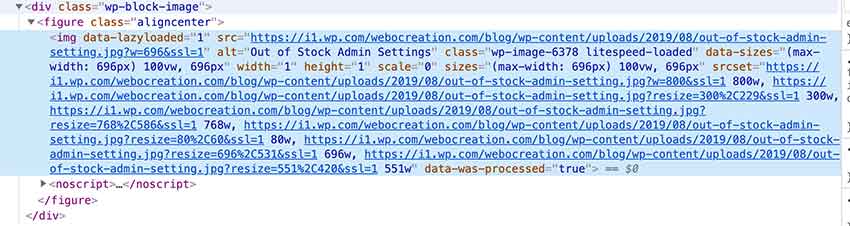
    Opencart Srcset Image optimization
    See the code srcset=”https://i1.wp.com/webocreation.com/wp-content/uploads/2019/08/out-of-stock-admin-setting.jpg?w=800&ssl=1 800w, https://i1.wp.com/webocreation.com/wp-content/uploads/2019/08/out-of-stock-admin-setting.jpg?resize=300%2C229&ssl=1 300w, https://i1.wp.com/webocreation.com/wp-content/uploads/2019/08/out-of-stock-admin-setting.jpg?resize=768%2C586&ssl=1 768w, https://i1.wp.com/webocreation.com/wp-content/uploads/2019/08/out-of-stock-admin-setting.jpg?resize=80%2C60&ssl=1 80w, https://i1.wp.com/webocreation.com/wp-content/uploads/2019/08/out-of-stock-admin-setting.jpg?resize=696%2C531&ssl=1 696w, https://i1.wp.com/webocreation.com/wp-content/uploads/2019/08/out-of-stock-admin-setting.jpg?resize=551%2C420&ssl=1 551w” this loads the images as per the width of the screen.
    We didn’t find any module for this, we will try to provide it soon, so for now, developer help is needed.

    https://developers.google.com/web/tools/lighthouse/audits/oversized-images

  14. Speed up the repeat visit by serving static assets with an efficient cache policy 

    You can serve static assets with an efficient cache policy by adding the following code in the .htaccess file, these are just our ideas, you can make changes as per your requirement:

    # Set up 1 week of caching on javascript and CSS
    <FilesMatch “\.(js|css)$”>
    ExpiresDefault A604800
    Header append Cache-Control “proxy-revalidate”
    SetOutputFilter DEFLATE
    </FilesMatch>

    # LBROWSERCSTART Browser Caching
    <IfModule mod_expires.c>
    ExpiresActive On
    ExpiresByType image/gif “access 1 year”
    ExpiresByType image/jpg “access 1 year”
    ExpiresByType image/jpeg “access 1 year”
    ExpiresByType image/png “access 1 year”
    ExpiresByType image/x-icon “access 1 year”
    ExpiresByType text/css “access 1 month”
    ExpiresByType text/javascript “access 1 month”
    ExpiresByType text/html “access 1 month”
    ExpiresByType application/javascript “access 1 month”
    ExpiresByType application/x-javascript “access 1 month”
    ExpiresByType application/xhtml-xml “access 1 month”
    ExpiresByType application/pdf “access 1 month”
    ExpiresByType application/x-shockwave-flash “access 1 month”
    ExpiresDefault “access 1 month”
    </IfModule>
    # END Caching LBROWSERCEND

  15. GZIP for more efficient transfer to requesting clients. The compression level must be between 0 – 9.

    To enable the text compression in Opencart, go to Admin >> System >> Settings >> Server tab >> Add the “Output Compression Level”. The value should be 0-9, what we find out is most of the time it works above 5 but hit and trial is the only option that we see. With these, it minimizes the byte size of network responses and fewer bytes means the page loads fast.

  16. Developer or Designer tasks: Ensure text remains visible during Webfont load

    Follow the idea provided at https://developers.google.com/web/updates/2016/02/font-display. Just for your information, we tried that and in our case, we used font-display: swap, and only works. Something like below:
    @font-face {
    font-family: ‘Arvo’;
    font-display: swap;
    src: local(‘Arvo’), url(https://fonts.gstatic.com/s/arvo/v9/rC7kKhY-eUDY-ucISTIf5PesZW2xOQ-xsNqO47m55DA.woff2) format(‘woff2’);
    }

  17. Look for Critical CSS: Defer unused CSS, remove all unused CSS on a page, and try to target CSS for each page.

    https://developers.google.com/web/tools/lighthouse/audits/unused-css

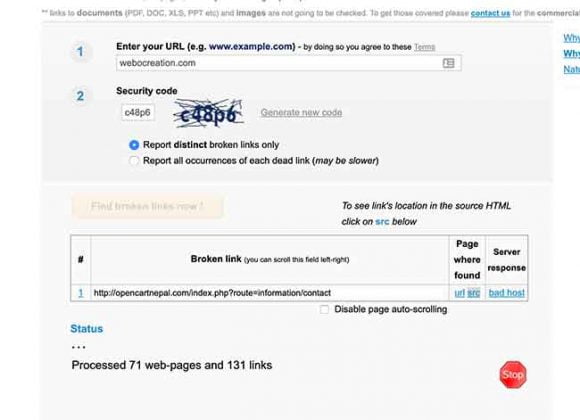
  18. Fix broken links

    Broken links on the website are harmful to SEO. So one freeway to check the broken link is https://www.brokenlinkcheck.com/
    Once it finds the broken links then fix them.

  19. 301 Redirect For Opencart 3 free module

    Install this free module 301 Redirect For Opencart 3.0.x – Beta and you can redirect old URLs to new URLs, so if you have to change the SEO URL keyword then don’t forget to add the 301 redirects.

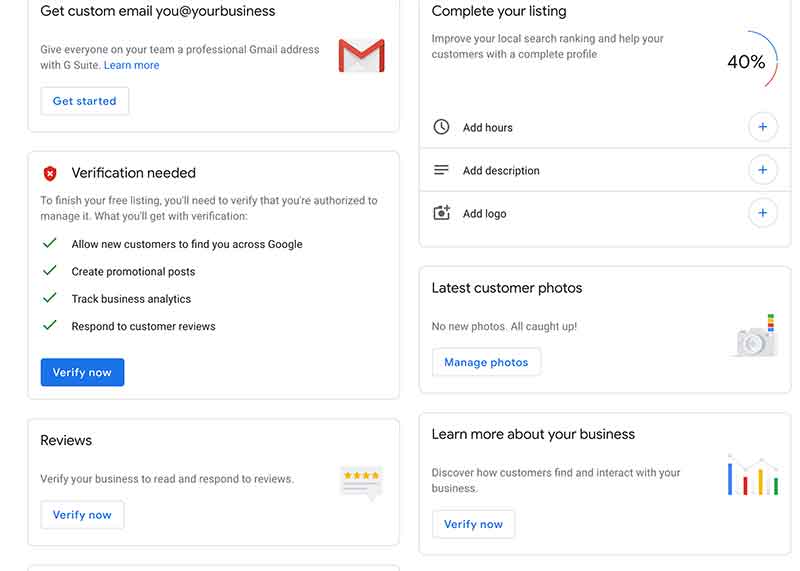
  20. Add your Business to Google

    Open https://business.google.com and add your business details.

    Opencart Google Business
    Best practices for SEO as they relate to local searches include creating a Google My Business page. This practice is especially important for brick-and-mortar businesses as it shows a rich result on local Google SERPs.

  21. Add an SSL certificate to your site and redirect to the same host

    For safety, security, and customer confidence.
    All domains are to be redirected to the same host as https://yourwebsiteurl.com, choose www or non-www redirect to one, and use one.

  22. Mobile-first approach and Use a responsive, mobile-friendly design

    Mobile-friendly is for mobile fitness, as Google search started to index the mobile-first, so be sure you don’t hide things on a mobile phone and show them on a desktop, if it is hidden on the mobile then Google search will no see it, what we found is it checks for the content, links count to see if it is similar with a desktop view and mobile view.

  23. Make AMP page for Opencart

    Consider creating and using AMP versions of your product pages for the fastest experience. Check this free module:
    AMP for Product Pages

  24. Schema structured data markup for the Opencart product page

    Schema structured data markup https://developers.google.com/search/docs/guides/intro-structured-data
    Testing tool: https://search.google.com/structured-data/testing-tool/u/0/
    But we did not find Opencart version 3, we are working on it to provide you with version 3, here is for 1.5
    https://www.opencart.com/index.php?route=marketplace/extension/info&extension_id=6485&filter_license=0

  25. Monitor website activities, get notified of downtime, set up an SEMrush account, and set up Google Analytics

    Check this blog post “Free Automated Testing and Monitoring of Opencart Functionalities and Sites” which will monitor the downtime send the notifications and monitor for any errors by automated testing.
    To add Google Analytics, Go to admin >> Extensions >> Extensions >> Choose Analytics >> Install the Google Analytics extension and edit and add the analytics tracking code.
    Setup the free Semrush account and you will get 100 pages scanned every month, we found it valuable for a free account also so added it here

  26. Remove index.php?route= in OpenCart for contact, home, and other

    Go to this blog post and download the module to remove index.php?route= in Opencart 3
    https://webocreation.com/remove-route-in-opencart-for-contact-home-and-other/

  27. Setup Cloudflare for Opencart

    Visit https://webocreation.com/how-to-setup-cloudflare-easily-for-ecommerce-websites-like-opencart/ to set up Cloudflare for your website. It helps with security, performance, and reliability.

Thanks a lot. We hope you liked this article, please subscribe to our YouTube Channel for Opencart video tutorials. You can also find us on Webocreation Twitter and Webocreation Facebook. Please let us know if you have any questions or concerns.

How to find admin URL in Opencart 4

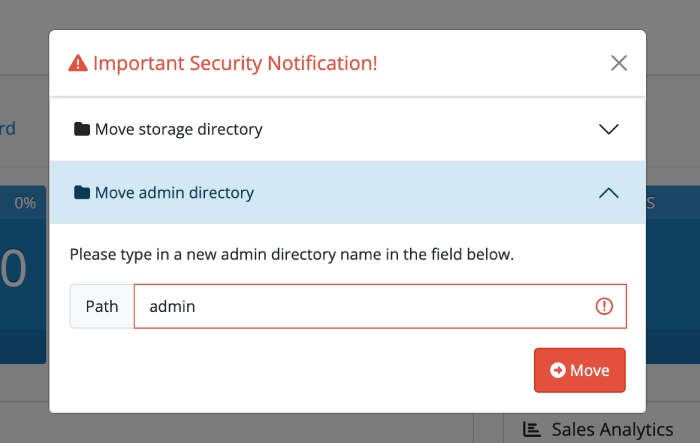
Finding the admin URL in OpenCart 4 is straightforward but can differ depending on your configuration. In Opencart 4 for security it provide important security notification to rename or move the admin folder to something else folder, because of that the admin url can be anything that is set up.

Rename admin folder opencart

Sometime you may forget or new accessor may need to find the admin URL without someone telling them. Here’s a step-by-step guide to locate the admin URL:

1. Default Admin URL

If you haven’t changed the admin folder name, your admin URL will be:

https://yourdomain.com/admin

2. Custom Admin Folder

For security reasons, many users rename the admin folder. If this is the case, you need to identify the custom admin folder name. Follow these steps:

Check the config.php File

  1. Log in to your web hosting control panel or access your website files via FTP.
  2. Navigate to the root directory of your OpenCart installation.
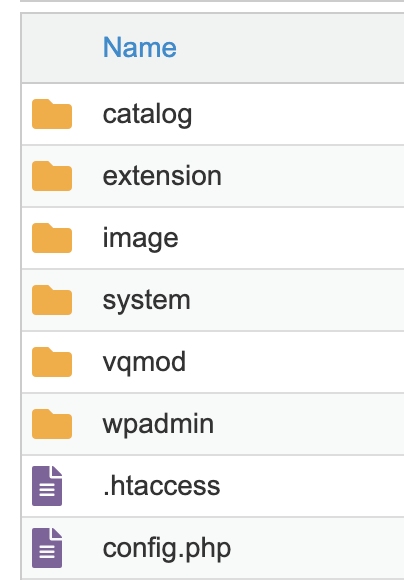
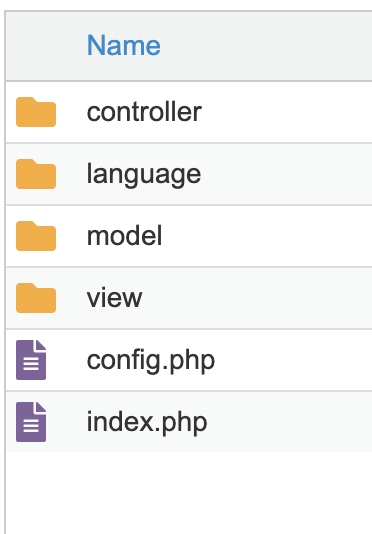
  3. Check files and folders and need to figure out which can be admin folder.
    Opencart 4 folder structure
  4. Looking at them wpadmin looks like admin folder. Open it and see if it contains all of these folders
    Admin folder Opencart 4
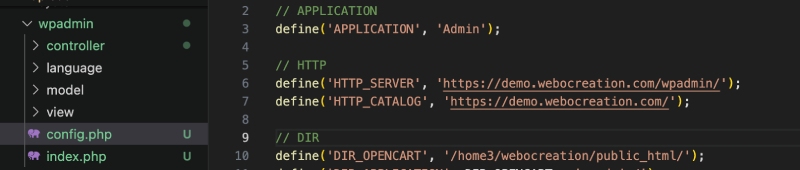
  5. Open the config.php file located in that admin directory.
  6. Look for this line:define('HTTP_SERVER', 'https://yourdomain.com/wpadmin/');
  7. The folder name (wpadmin in this example) is your admin URL.
Opencart admin URL path

Pro Tip: Secure Your Admin URL

To protect your admin URL:

We hope you found this article helpful! For more OpenCart video tutorials, be sure to subscribe to our YouTube Channel. You can also stay connected with us on Twitter and Facebook at Webocreation. If you have any questions or need further assistance, please don’t hesitate to reach out.

How to Customize the 404 Not Found Page in OpenCart

A well-designed 404 Not Found page is crucial for improving user experience and retaining customers who land on unavailable pages. OpenCart allows you to customize this page to align with your branding and provide useful navigation options.

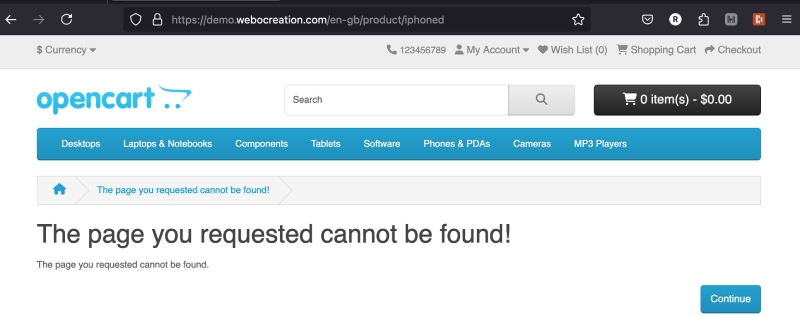
Mostly, the 404 page looks like below in Opencart:

404 page not found

Steps to Customize the 404 Page in OpenCart

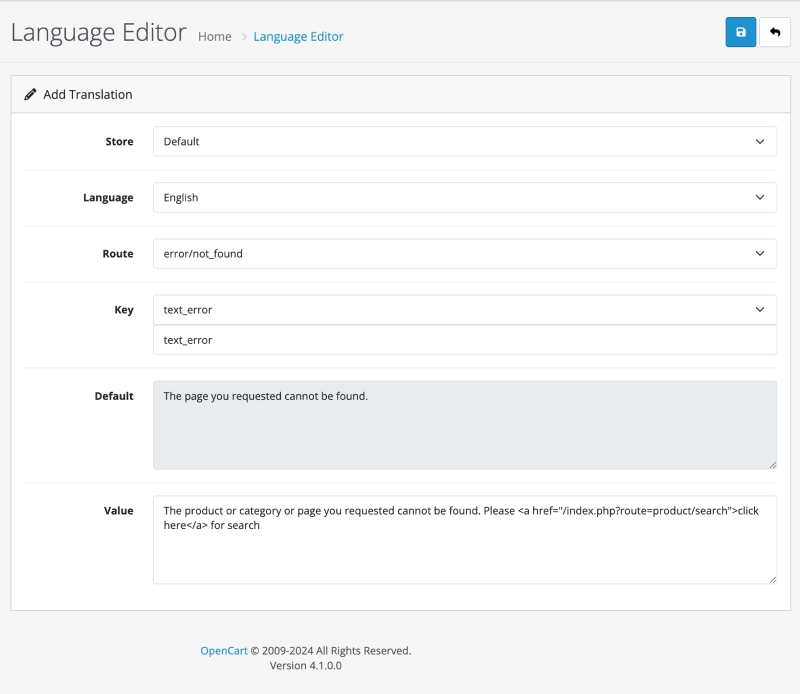
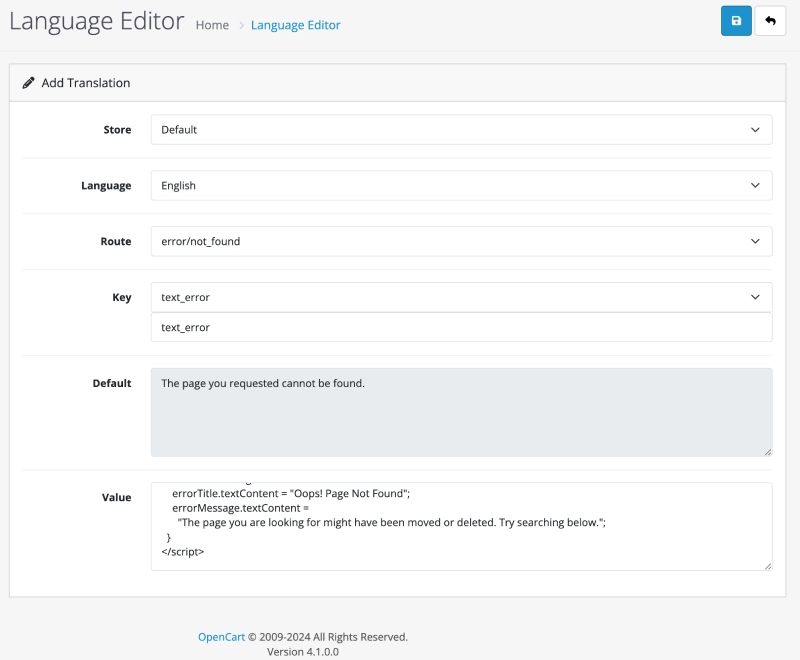
We used to need the custom module or extensions for these kinds of functionalities, but with the introduction of Language Editor in Opencart, it is easier. If you are looking to just edit the “The page you requested cannot be found!”, then you can easily do it by the language editor of Opencart. Go to the admin section >> Design >> Language Editor and click the Add button

Enter the following details:

Language editor to change 404 page

Now the 404 will look like below:

404 page content changed

Read more: Language Editor in OpenCart

Example 404 page:

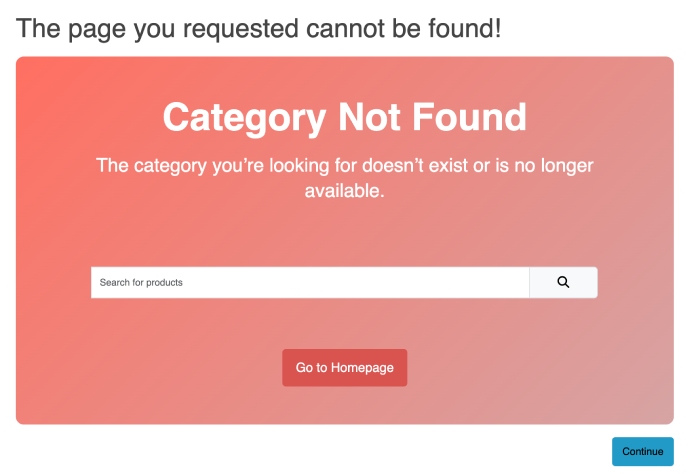
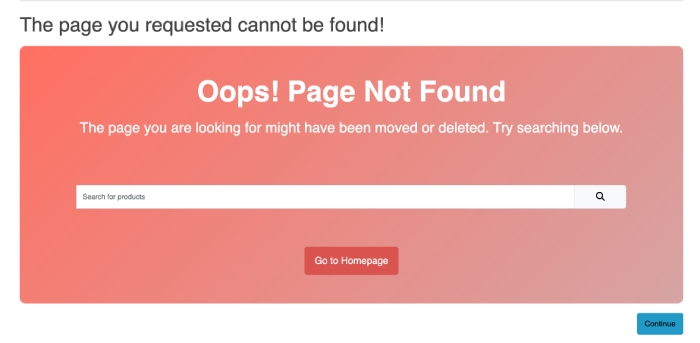
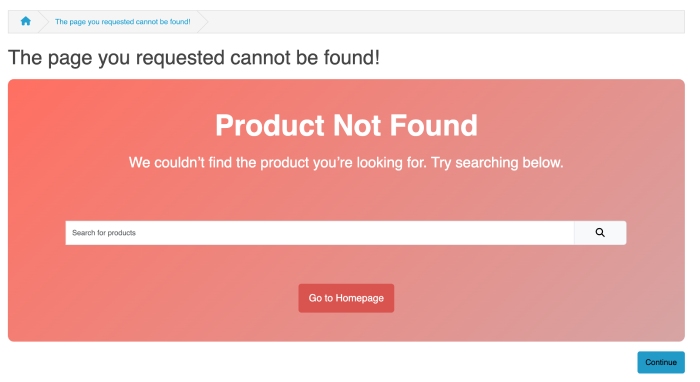
Here is one design and code example to show the different titles for Category not found, product not found, and other not found.

Design as per category, product, and other page:

Category not found
Page not found
Products not found

Add the following code to the language editor:


<div class="error-container">  
  <!-- Dynamic Error Title -->
  <h1 class="error-title" id="error-title">Oops! 404 Page Not Found</h1>

  <!-- Dynamic Error Message -->
  <p class="error-message" id="error-message">
    The page you are looking for doesn’t exist or has been moved. Try searching for what you need.
  </p>

  <!-- Search Bar -->
  <div class="p-5">
    <form id="searchbottom" method="get" action="index.php" class="input-group mb-3">
      <input type="hidden" name="language" value="en-gb"> 
      <input type="hidden" name="route" value="product/search">
      <input type="text" name="search" value="" placeholder="Search for products" class="form-control form-control-lg">  
      <button type="submit" class="btn btn-light btn-lg"><i class="fa-solid fa-magnifying-glass"></i></button>
    </form>
  </div>
  <!-- Call to Action -->
  <a href="/" class="btn btn-primary-home btn-lg">Go to Homepage</a>
</div>

<style>
  .error-container {
      border-radius: 10px;
      padding: 3rem;
      margin: auto;
      text-align: center;
      background: linear-gradient(135deg, #ff6f61, #d6a4a4);
      color: #fff;
      margin: 0;
  }
  .error-title {
      font-size: 3rem;
      font-weight: bold;
      margin-bottom: 1rem;
      color: #fff;
  }
  .error-message {
      font-size: 1.5rem;
      margin-bottom: 2rem;
      line-height: 2rem;
  }
  .btn-primary-home {
      background-color: #d9534f;
      border-color: #d9534f;
      color: #fff;
  }
</style>
<script>
  // Function to get the value of a specific query parameter from the URL
  function getQueryParam(param) {
    const urlParams = new URLSearchParams(window.location.search);
    return urlParams.get(param);
  }
  // Get the 'route' parameter from the URL
  const routeParam = getQueryParam("route");
  const errorTitle = document.getElementById("error-title");
  const errorMessage = document.getElementById("error-message");
  // Determine the error type based on the route parameter
  if (routeParam === "product/product") {
    errorTitle.textContent = "Product Not Found";
    errorMessage.textContent =
      "We couldn’t find the product you’re looking for. Try searching below.";
  } else if (routeParam === "product/category") {
    errorTitle.textContent = "Category Not Found";
    errorMessage.textContent =
      "The category you’re looking for doesn’t exist or is no longer available. Try searching for what you need.";
  } else {
    // Default to Page Not Found
    errorTitle.textContent = "Oops! Page Not Found";
    errorMessage.textContent =
      "The page you are looking for might have been moved or deleted. Try searching below.";
  }
</script>

Here is one language editor:

Language Editor

The JavaScript in the code finds the route and shows an error message as per the product, category another page. If you need a similar design, then you need to select a different language in the Language editor and enter a different value as per language.

Add Google Analytics Tracking

To monitor the 404 errors on your site:

  • Use Google Analytics to track 404 errors.
    Set up a custom report for pages with the “404 Not Found” response.
  • Add a tracking script to the 404 page to log user behavior. Example:
<script>
    // Google Analytics event tracking
    gtag('event', '404_error', {
        'page_path': window.location.pathname
    });
</script>

Best Practices for a 404 Page

  1. Provide Helpful Suggestions: Include links to your homepage, categories, or popular products.
  2. Apologize for the Inconvenience: Acknowledge the error with a friendly, empathetic text.
  3. Use Humor or Branding: Lighten the mood with creative messaging that reflects your brand’s personality.
  4. Include a Call-to-Action: Guide users back to the shopping experience with CTAs like “Continue Shopping” or “Search Our Store.”

Conclusion

Customizing the 404 Not Found page in OpenCart is an effective way to improve user experience and reduce bounce rates. By adding helpful navigation tools, engaging content, and personalized branding, you can turn an error page into an opportunity to retain potential customers and guide them back into your store.

15 Key Performance Indicators (KPIs) for eCommerce Websites

Tracking Key Performance Indicators (KPIs) is essential for measuring the success of your eCommerce website. By monitoring these metrics, businesses can identify areas of improvement, optimize performance, and enhance customer satisfaction. Here are 15 essential KPIs to measure and improve your eCommerce performance.

1. Sales Conversion Rate

Definition: The percentage of website visitors who complete a purchase.
Formula:

Sales Conversion rate

Why It Matters: A key indicator of how effective your website and marketing efforts are at turning visitors into paying customers.

2. Average Order Value (AOV)

Definition: The average amount spent per transaction.
Formula:

AOV

Why It Matters: Higher AOV means customers are spending more per purchase, improving revenue without increasing traffic.

3. Cart Abandonment Rate

Definition: The percentage of visitors who add items to their cart but fail to complete the purchase.
Formula:

Cart Abandonment rate

Why It Matters: Identifies problems in the checkout process or site usability.

4. Customer Acquisition Cost (CAC)

Definition: The cost of acquiring a new customer.
Formula:

CAC

Why It Matters: Helps determine the efficiency of marketing campaigns.

5. Customer Lifetime Value (CLV)

Definition: The total revenue expected from a customer throughout their relationship with your business.
Formula:

CLV

Why It Matters: Helps measure the long-term value of acquiring and retaining customers.

6. Bounce Rate

Definition: The percentage of visitors who leave your site after viewing only one page.
Formula:

Bounce Rate

Why It Matters: High bounce rates indicate poor user experience, slow loading times, or irrelevant content.

7. Website Traffic

Definition: The total number of visitors to your website.
Why It Matters: A foundational metric to understand site popularity and marketing success.

8. Product Return Rate

Definition: The percentage of orders returned by customers.
Formula:

Product Return Rate

Why It Matters: High return rates can signal issues with product quality, descriptions, or shipping.

9. Inventory Turnover

Definition: The rate at which inventory is sold and replaced.
Formula:

Inventory Turnover

Why It Matters: Indicates how efficiently your inventory is managed and sold.

10. Gross Profit Margin

Definition: The percentage of revenue that exceeds the cost of goods sold (COGS).
Formula:

Gross Profit Margin

Why It Matters: Measures the profitability of your products.

11. Net Profit Margin

Definition: The percentage of revenue that remains after all expenses are deducted.
Formula:

Net Profit Margin

Why It Matters: A critical measure of overall business profitability.

12. Customer Retention Rate

Definition: The percentage of customers who make repeat purchases.
Formula:

Retention Rate

Why It Matters: Retaining customers is often cheaper than acquiring new ones.

13. Page Load Time

Definition: The average time it takes for your website pages to load.
Why It Matters: Faster load times improve user experience, reduce bounce rates, and boost SEO rankings.

14. Average Session Duration

Definition: The average time a visitor spends on your website.
Why It Matters: A longer session indicates that your content is engaging and your site is user-friendly.

15. Refund Rate

Definition: The percentage of transactions that result in a refund.
Formula:

Refund Rate

Why It Matters: Helps identify dissatisfaction with products, services, or inaccurate product listings.

Summary Table of KPIs

KPIWhy It Matters
Sales Conversion RateMeasures sales efficiency.
Average Order Value (AOV)Tracks average revenue per transaction.
Cart Abandonment RateIdentifies checkout issues.
Customer Acquisition CostMeasures marketing cost efficiency.
Customer Lifetime ValueDetermines long-term customer value.
Bounce RateHighlights user experience or content issues.
Website TrafficTracks site visibility and popularity.
Product Return RateIdentifies product or service issues.
Inventory TurnoverMonitors inventory efficiency.
Gross Profit MarginMeasures product profitability.
Net Profit MarginTracks overall business profitability.
Customer Retention RateMeasures customer loyalty.
Page Load TimeImproves user experience and SEO.
Average Session DurationMonitors content and site engagement.
Refund RateIndicates dissatisfaction or fulfillment issues.

Conclusion

Monitoring these 15 KPIs for your OpenCart or eCommerce website allows you to gain actionable insights into your store’s performance. By regularly analyzing these metrics, you can improve user experience, optimize operations, and boost revenue. Use these KPIs as part of your ongoing strategy to grow your online business and ensure long-term success.

Opencart migration – How to copy the Opencart website to another URL? or transfer to another hosting?

Transferring an OpenCart website to a new domain requires careful planning and execution to maintain its functionality, SEO, and data integrity. Copying a website to another host can be daunting, especially if you have never done it before. However, with the right steps, it can be a straightforward process. Here are the steps that we follow mostly when we have to copy a website to another host. Below is an expanded, detailed step-by-step guide:

Step 1: Backup Your Website

  1. Backup Files:
    • Log in to your hosting and go to the root folder where opencart is installed. If you are using cPanel, log in >> public_html
      Files and Folder Structure
      In the above list, you can be different, like mine is wpadmin, yours can be admin, and you may not have vqmod, upload, so it depends on your settings and configuration.
    • From the root folder, open config.php
      Opencart migration config
      define(‘DIR_OPENCART’, ‘/home3/webocreation/public_html/’);
      Look at the path of DIR_OPENCART and download all the files and folders inside the public_html folder.

      define(‘DIR_STORAGE’, ‘/home/webocreation/23storage/’);
      Check the DIR_STORAGE and you need to download all of the files and folders inside the path /home/webocreation/23storage/ except the cache and logs folder. Sometimes cache has lots of files, so you can ignore them as they will be automatically generated.
      Storage Folder to download
    • Use an FTP client like FileZilla or your hosting control panel to download all files from your current website directory
  2. Backup Database:
    • In the config.php, look for the constant DB_DATABASE and see which database is connected to it.
      define(‘DB_DATABASE’, ‘webocreation_demo3’);
      Here, webocreation_demo3 is the database connected.
    • Access phpMyAdmin, select your OpenCart database, and export it as an SQL file.
    • Ensure you select both “structure” and “data” while exporting.
      PHPmyadmin Database export

Step 2: Set Up the New Domain

  1. SSL Certificate: Install an SSL certificate for the new domain to enable HTTPS.
    Read more: Install a free SSL certificate on Opencart Let’s Encrypt™
  2. Hosting Environment: Ensure the new domain has a hosting environment compatible with OpenCart’s requirements (PHP version, database type, etc.).
OpenCart VersionMinimum PHP VersionRecommended PHP Version
OpenCart 1.5.xPHP 5.2.4+PHP 5.4
OpenCart 2.0.xPHP 5.3.10+PHP 5.6
OpenCart 2.3.xPHP 5.4+PHP 5.6
OpenCart 3.0.xPHP 5.6+PHP 7.1
OpenCart 3.0.3.7+PHP 7.1+PHP 7.4
OpenCart 4.xPHP 8.0+PHP 8.1 or PHP 8.2

Recommendation: Keep both OpenCart and PHP versions up to date to avoid compatibility or security issues.

Step 3: Upload Files to the New Domain

  1. Use an FTP client or hosting control panel to upload the backed-up files to the root directory (public_html) or the appropriate folder.
  2. Verify that all files have been uploaded correctly, ensuring no files are missing.
  3. Make sure you uploaded the storage folder files and the folder as well.

Step 4: Import the Database to the New Server

  1. Create a New Database:
    • Log in to your new hosting control panel.
    • Create a new database, user, and password for the website.
  2. Import the Database:
    • Open phpMyAdmin, select the new database, and import the SQL file you exported earlier.

Step 5: Update Configuration Files

  1. Update config.php (Root Directory):
    • Open the config.php file and update the domain, directory paths, and database details:
  2. Update admin/config.php (Admin Directory):
    • Update the admin URLs and paths similarly in admin/config.php.
<?php
// APPLICATION
define('APPLICATION', 'Catalog');

// HTTP
define('HTTP_SERVER', 'https://demo.webocreation.com/');

// DIR
define('DIR_OPENCART', 'YOURNEW_ROOT_FOLDER');
define('DIR_APPLICATION', DIR_OPENCART . 'catalog/');
define('DIR_EXTENSION', DIR_OPENCART . 'extension/');
define('DIR_IMAGE', DIR_OPENCART . 'image/');
define('DIR_SYSTEM', DIR_OPENCART . 'system/');
define('DIR_STORAGE', 'YOURNEWSTORAGE_FOLDER_PATH');
define('DIR_LANGUAGE', DIR_APPLICATION . 'language/');
define('DIR_TEMPLATE', DIR_APPLICATION . 'view/template/');
define('DIR_CONFIG', DIR_SYSTEM . 'config/');
define('DIR_CACHE', DIR_STORAGE . 'cache/');
define('DIR_DOWNLOAD', DIR_STORAGE . 'download/');
define('DIR_LOGS', DIR_STORAGE . 'logs/');
define('DIR_SESSION', DIR_STORAGE . 'session/');
define('DIR_UPLOAD', DIR_STORAGE . 'upload/');

// DB
define('DB_DRIVER', 'mysqli');
define('DB_HOSTNAME', 'localhost');
define('DB_USERNAME', 'YOURNEWUSERNAME');
define('DB_PASSWORD', 'YOURNEWPASSWORD');
define('DB_DATABASE', 'YOURNEWDATABASE');
define('DB_PORT', '3306');
define('DB_PREFIX', 'oc_');

See the config.php and change to the new values which is highlighted.

Step 6: Update Domain References in the Database

  1. Access phpMyAdmin and run the following queries:
    • Update the old domain to the new one:
      UPDATE `oc_setting` SET `value` = REPLACE(`value`, 'http://olddomain.com', 'https://newdomain.com');
      Repeat for HTTPS:
      UPDATE `oc_setting` SET `value` = REPLACE(`value`, 'https://olddomain.com', 'https://newdomain.com');
    • Update the oc_store table:
      UPDATE `oc_store` SET `url` = 'https://newdomain.com/';

      *** oc_ is the database table prefix

Step 7: Update SEO URLs

  1. Open the .htaccess file and verify the RewriteBase: RewriteBase /
  2. Check and regenerate SEO-friendly URLs from the OpenCart admin panel under Design > SEO URLs.

Step 8: Update Email Settings

  1. If your email settings are domain-specific, update them under:
    • Admin Panel → SettingsMail tab.
  2. Ensure the SMTP details are correctly configured for the new domain.

    Read more: Email setup in Opencart

Step 9: Test the Website

  1. Visit the new domain and test:
    • Navigation, product listings, and category pages.
    • Add-to-cart functionality, checkout, and payment gateways.
    • Admin login and backend functionalities.
    • Ensure all images and CSS/JS files load correctly.
  2. Clear the OpenCart cache.
  3. Opencart launching checklist

Step 10: Set Up 301 Redirects for the Old Domain

  1. Log in to the old domain’s hosting panel.
  2. Edit the .htaccess file to redirect all traffic to the new domain: Redirect 301 / https://newdomain.com/
  3. Test the redirection to ensure it works properly.

Step 11: Notify Search Engines

  1. Google Search Console:
    • Use the “Change of Address” tool to notify Google about the new domain.
  2. Resubmit Sitemap:
    • Generate a new sitemap in OpenCart and submit it to Google Search Console and other search engines.

Step 12: Update External Links

  1. Update all external links pointing to your website, including:
    • Social media profiles.
    • Affiliate sites or partners.
    • Email marketing campaigns.

Step 13: Update DNS Records

  1. Update your domain’s DNS records to point to the new server.
  2. Ensure the new domain’s DNS is propagated correctly by using tools like WhatsMyDNS.

Step 14: Monitor Traffic and Performance

  1. Google Analytics:
    • Update your Google Analytics property with the new domain URL.
  2. Conversion Tracking:
    • Verify all tracking pixels (Google Ads, Facebook Ads, etc.) are working for the new domain.

Step 15: Notify Customers

  1. Send an email to your customer base announcing the domain change.
  2. Highlight the new domain benefits, such as improved performance or security.

Step 16: Perform Final Checks

  1. Conduct a full end-to-end test by placing a few test orders.
  2. Monitor server logs to ensure no broken links or errors are occurring.
  3. After completion of the transfer, don’t forget to go through the Opencart launching checklist to happily launch and check if you forgot something.

Conclusion

Transferring an OpenCart website to a new domain requires careful planning and attention to detail. By following this guide, you can ensure a seamless transition while preserving your site’s functionality, SEO rankings, and user experience. Regularly monitor the new domain post-transfer to address any unforeseen issues promptly.