

Transferring an OpenCart website to a new domain requires careful planning and execution to maintain its functionality, SEO, and data integrity. Copying a website to another host can be daunting, especially if you have never done it before. However, with the right steps, it can be a straightforward process. Here are the steps that we follow mostly when we have to copy a website to another host. Below is an expanded, detailed step-by-step guide:
Step 1: Backup Your Website
- Backup Files:
- Log in to your hosting and go to the root folder where opencart is installed. If you are using cPanel, log in >> public_html
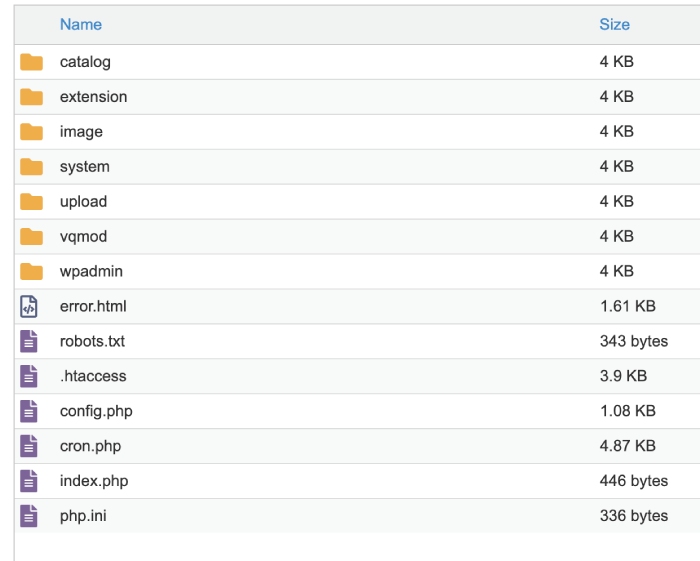
In the above list, you can be different, like mine is wpadmin, yours can be admin, and you may not have vqmod, upload, so it depends on your settings and configuration. - From the root folder, open config.php
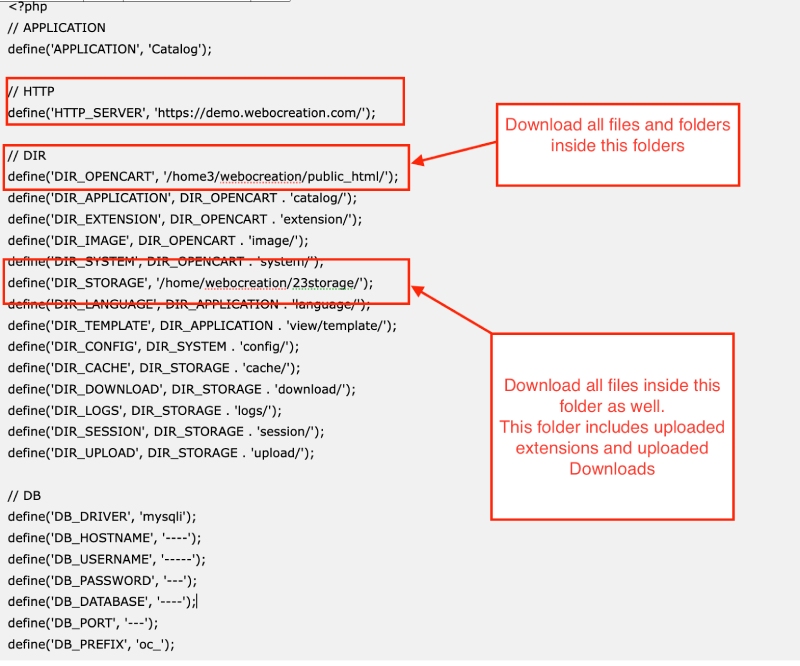
define(‘DIR_OPENCART’, ‘/home3/webocreation/public_html/’);
Look at the path of DIR_OPENCART and download all the files and folders inside the public_html folder.
define(‘DIR_STORAGE’, ‘/home/webocreation/23storage/’);
Check the DIR_STORAGE and you need to download all of the files and folders inside the path /home/webocreation/23storage/ except the cache and logs folder. Sometimes cache has lots of files, so you can ignore them as they will be automatically generated.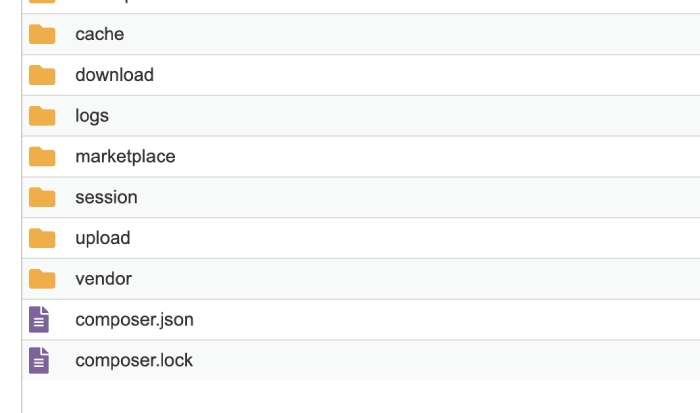
- Use an FTP client like FileZilla or your hosting control panel to download all files from your current website directory
- Log in to your hosting and go to the root folder where opencart is installed. If you are using cPanel, log in >> public_html
- Backup Database:
- In the config.php, look for the constant DB_DATABASE and see which database is connected to it.
define(‘DB_DATABASE’, ‘webocreation_demo3’);
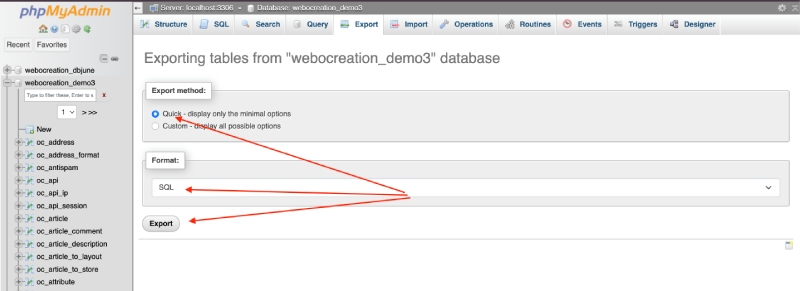
Here, webocreation_demo3 is the database connected. - Access phpMyAdmin, select your OpenCart database, and export it as an SQL file.
- Ensure you select both “structure” and “data” while exporting.
- In the config.php, look for the constant DB_DATABASE and see which database is connected to it.
Step 2: Set Up the New Domain
- SSL Certificate: Install an SSL certificate for the new domain to enable HTTPS.
Read more: Install a free SSL certificate on Opencart Let’s Encrypt™ - Hosting Environment: Ensure the new domain has a hosting environment compatible with OpenCart’s requirements (PHP version, database type, etc.).
| OpenCart Version | Minimum PHP Version | Recommended PHP Version |
| OpenCart 1.5.x | PHP 5.2.4+ | PHP 5.4 |
| OpenCart 2.0.x | PHP 5.3.10+ | PHP 5.6 |
| OpenCart 2.3.x | PHP 5.4+ | PHP 5.6 |
| OpenCart 3.0.x | PHP 5.6+ | PHP 7.1 |
| OpenCart 3.0.3.7+ | PHP 7.1+ | PHP 7.4 |
| OpenCart 4.x | PHP 8.0+ | PHP 8.1 or PHP 8.2 |
Recommendation: Keep both OpenCart and PHP versions up to date to avoid compatibility or security issues.
Step 3: Upload Files to the New Domain
- Use an FTP client or hosting control panel to upload the backed-up files to the root directory (
public_html) or the appropriate folder. - Verify that all files have been uploaded correctly, ensuring no files are missing.
- Make sure you uploaded the storage folder files and the folder as well.
Step 4: Import the Database to the New Server
- Create a New Database:
- Log in to your new hosting control panel.
- Create a new database, user, and password for the website.
- Import the Database:
- Open phpMyAdmin, select the new database, and import the SQL file you exported earlier.
Step 5: Update Configuration Files
- Update
config.php(Root Directory):- Open the
config.phpfile and update the domain, directory paths, and database details:
- Open the
- Update
admin/config.php(Admin Directory):- Update the admin URLs and paths similarly in
admin/config.php.
- Update the admin URLs and paths similarly in
<?php
// APPLICATION
define('APPLICATION', 'Catalog');

// HTTP
define('HTTP_SERVER', 'https://demo.webocreation.com/');

// DIR
define('DIR_OPENCART', 'YOURNEW_ROOT_FOLDER');
define('DIR_APPLICATION', DIR_OPENCART . 'catalog/');
define('DIR_EXTENSION', DIR_OPENCART . 'extension/');
define('DIR_IMAGE', DIR_OPENCART . 'image/');
define('DIR_SYSTEM', DIR_OPENCART . 'system/');
define('DIR_STORAGE', 'YOURNEWSTORAGE_FOLDER_PATH');
define('DIR_LANGUAGE', DIR_APPLICATION . 'language/');
define('DIR_TEMPLATE', DIR_APPLICATION . 'view/template/');
define('DIR_CONFIG', DIR_SYSTEM . 'config/');
define('DIR_CACHE', DIR_STORAGE . 'cache/');
define('DIR_DOWNLOAD', DIR_STORAGE . 'download/');
define('DIR_LOGS', DIR_STORAGE . 'logs/');
define('DIR_SESSION', DIR_STORAGE . 'session/');
define('DIR_UPLOAD', DIR_STORAGE . 'upload/');

// DB
define('DB_DRIVER', 'mysqli');
define('DB_HOSTNAME', 'localhost');
define('DB_USERNAME', 'YOURNEWUSERNAME');
define('DB_PASSWORD', 'YOURNEWPASSWORD');
define('DB_DATABASE', 'YOURNEWDATABASE');
define('DB_PORT', '3306');
define('DB_PREFIX', 'oc_');
See the config.php and change to the new values which is highlighted.
Step 6: Update Domain References in the Database
- Access phpMyAdmin and run the following queries:
- Update the old domain to the new one:
UPDATE `oc_setting` SET `value` = REPLACE(`value`, 'http://olddomain.com', 'https://newdomain.com');
Repeat for HTTPS:UPDATE `oc_setting` SET `value` = REPLACE(`value`, 'https://olddomain.com', 'https://newdomain.com'); - Update the
oc_storetable:UPDATE `oc_store` SET `url` = 'https://newdomain.com/';
*** oc_ is the database table prefix
- Update the old domain to the new one:
Step 7: Update SEO URLs
- Open the
.htaccessfile and verify the RewriteBase:RewriteBase / - Check and regenerate SEO-friendly URLs from the OpenCart admin panel under Design > SEO URLs.
Step 8: Update Email Settings
- If your email settings are domain-specific, update them under:
- Admin Panel → Settings → Mail tab.
- Ensure the SMTP details are correctly configured for the new domain.
Read more: Email setup in Opencart
Step 9: Test the Website
- Visit the new domain and test:
- Navigation, product listings, and category pages.
- Add-to-cart functionality, checkout, and payment gateways.
- Admin login and backend functionalities.
- Ensure all images and CSS/JS files load correctly.
- Clear the OpenCart cache.
- Opencart launching checklist
Step 10: Set Up 301 Redirects for the Old Domain
- Log in to the old domain’s hosting panel.
- Edit the
.htaccessfile to redirect all traffic to the new domain:Redirect 301 / https://newdomain.com/ - Test the redirection to ensure it works properly.
Step 11: Notify Search Engines
- Google Search Console:
- Use the “Change of Address” tool to notify Google about the new domain.
- Resubmit Sitemap:
- Generate a new sitemap in OpenCart and submit it to Google Search Console and other search engines.
Step 12: Update External Links
- Update all external links pointing to your website, including:
- Social media profiles.
- Affiliate sites or partners.
- Email marketing campaigns.
Step 13: Update DNS Records
- Update your domain’s DNS records to point to the new server.
- Ensure the new domain’s DNS is propagated correctly by using tools like WhatsMyDNS.
Step 14: Monitor Traffic and Performance
- Google Analytics:
- Update your Google Analytics property with the new domain URL.
- Conversion Tracking:
- Verify all tracking pixels (Google Ads, Facebook Ads, etc.) are working for the new domain.
Step 15: Notify Customers
- Send an email to your customer base announcing the domain change.
- Highlight the new domain benefits, such as improved performance or security.
Step 16: Perform Final Checks
- Conduct a full end-to-end test by placing a few test orders.
- Monitor server logs to ensure no broken links or errors are occurring.
- After completion of the transfer, don’t forget to go through the Opencart launching checklist to happily launch and check if you forgot something.
Conclusion
Transferring an OpenCart website to a new domain requires careful planning and attention to detail. By following this guide, you can ensure a seamless transition while preserving your site’s functionality, SEO rankings, and user experience. Regularly monitor the new domain post-transfer to address any unforeseen issues promptly.