Latest AI Trends Shaping the Future of Business and Technology

Imagine a robot handles all your daily tasks, from automating repetitive tasks to alerting you about any malpractices. Sounds right…!? The good news is that artificial intelligence is here to help you with all your administrative tasks, predictive analytics, content generation and marketing, handling customer service, and more. 

AI trends help reduce operational costs by about 40% and allow businesses to focus more on productive work rather than worrying about repetitive tasks. Are you looking for the current AI trends for 2026, or for AI ideas that rule business and technology? Do not worry, you have landed on the right page. In this article, we have outlined how the latest artificial intelligence trends are shaping the business and technology landscape!

Let’s delve!

Quick note:

  • Among 8/10 companies, at least one has already adopted AI in at least one business function. This shows the growing dominance of AI trends.
  • AI supports business operations in several tasks, like predictive analytics, enhanced customer experience, and process automation.
  • Agentic AI, Multi-Modal AI, AI-native software development, etc., are reshaping the future of businesses.
  • Operational efficiency, data-driven decision-making, and improved supply chain and logistics are among the impacts on businesses.
  • Autonomous AI agents, hyper-personalization, and Explainable AI are the latest AI trends that will rule the business and technology in the coming few years.

Why AI Matters In Modern Businesses

Did you know the global AI market is poised for a significant shift and is projected to reach $2 trillion by the end of 2026? This enables AI in modern businesses, including operational efficiency, enhanced decision-making, cost savings, and improved customer experience. So, AI is not just a tool you ignore; it’s more like a smart assistant that handles everyday tasks at minimal cost. 

AI automation in business streamlines operations by implementing tools like ChatGPT to automate tasks such as customer service, data entry, and lead generation.

Now you must be thinking about how to implement AI in an existing business or a startup. Here we created a step-by-step guide, explore!

  • Identify Problem

Before implementation, understand the business requirements: how AI will support your business, what problems it solves, and how it will enhance business workflows. 

  • Focus on sales first

Start by identifying the clients and target audience, and define the offering before mastering all technical aspects. 

  • Learn key tools

Don’t just rely on AI; learn the tools and techniques for using it in business.

  • Leverage AI Agents

Implement AI tools for specific, high-value tasks, such as voice agents for qualifying incoming phone leads.

  • Build & Iterate
  • Start with simple, high-impact automations that yield immediate ROI.

Top AI Trends Shaping Business & Technology

Let us delve into the AI trends driving the current market.

Agentic AI & Autonomous Systems

Businesses spend a lot of time and money on repetitive tasks and upfront investments, which can also be handled by agentic AI, such as chatbots, that support customer queries instantly and make data-driven decisions in minimal time. This approach will help businesses move with lower spending costs. 

Multimodal AI Integration

Multimodal AI is a type of machine learning that processes. It combines multiple data types, such as text, images, audio, video, and sensory input, to better understand context and achieve higher accuracy than unimodal models. 

Cost-Aware AI Engineering

Cost-aware AI engineering is a discipline that treats financial costs such as token usage, API calls, and GPU hours as a first-class engineering and business metric, alongside performance, latency, and accuracy. 

AI+Edge Computing

AI edge computing processes data locally on devices such as IoT sensors, cameras, or smartphones, rather than in a centralized cloud. Analyzing information near the source enables near-instantaneous decision-making and enhances privacy, making it crucial for autonomous vehicles, robotics, and real-time industrial automation.  

Quantum-Adjacent AI Research

Quantum AI combines quantum computing with artificial intelligence to solve complex problems beyond the reach of classical computers, accelerating AI model training and optimizing vast, complex systems in real-time.

How AI Trends Impact Different Sectors & Industries

As AI evolves, modern businesses and industries are adopting it across their workflows. Let’s explore the most impactful use cases of AI in the world’s prominent sectors. 

AI in Healthcare

AI helps the healthcare sector, and clinics diagnose and treat through image analysis, predict molecular interactions, identify potential drug candidates to support drug development, and enable AI-powered wearables to help doctors monitor patients’ health in real time, etc.

This implementation allows healthcare professionals to work more effectively and treat patients in real time through real-time monitoring. 

AI in Transportation

AI technologies are making transportation more autonomous and safer. It helps vehicles move more intelligently, like alerting you to traffic, notifying you to refuel, and integrating GPS for location detection and more. 

AI in Finance

AI is transforming banking and financial institutions by enhancing decision-making and security. AI in finance securely manages records, uses machine learning algorithms to detect unusual patterns and behaviours in real time, and automates claim processing. 

These AI in finance solutions offer a personalized user experience, alert customers to any malfunctions, help them apply for loans and insurance, and provide instant approval, and more.

AI in Manufacturing

Manufacturing needs smart sensors for smooth workflow operations. Now, modern manufacturing industries are integrating AI into their operations, boosting productivity. Smart sensors help manufacturers predict equipment failures in advance, preventing disruptions and providing real-time insights. 

AI in Retail/eCommerce

AI in the ecommerce and retail industry helps to analyze customer behaviour. With visual search, customers can easily find products by image, and it helps retailers track sales and product demand. These artificial intelligence systems just work like smart, advanced personal assistants who keep track of every step of the operation. 

AI in Gaming

Game lovers often like online games with excellent graphics, as well as real-world experience with voice assistants. Artificial Intelligence is reshaping the gaming industry by enhancing player experiences and crafting more interactive environments. This integration allows users to witness more personalized experiences.

So, AI is now an assistant that will hold your business tasks while you can care-free focus on growing needs and success for the organization.

Future of AI in business

Do you know that Statista shows the AI market is valued at $335 billion to $500 billion in 2026 and will grow to $1.68 trillion by 2031? This data shows that AI will be a game-changer in the coming years, boosting industry revenue. So, AI is something we cannot ignore if we want to stay competitive in the market. 

AI is like our well-wisher or best friend, helping your business stay ahead and work beyond. It cares about your systems and software and ensures your data is kept secure. Overall, AI-powered business solutions automate workflows, enhance decision-making, and improve customer experiences.

Conclusion

The latest AI trends show one clear thing: AI is becoming a natural part of how businesses grow and innovate. With fast-moving AI technology innovations, rising generative AI trends, and evolving machine learning trends in 2026, companies are rethinking how they work.

From AI in digital transformation to its growing impact across industries, the change is everywhere. The key is simple: those who adapt to AI today will lead tomorrow.

OpenCart 4: How to Set a Default Shipping Method (So Customers Don’t Have to Choose)

If your OpenCart store offers only one shipping method, forcing customers to select it manually during checkout creates unnecessary friction. Every extra click increases the chance of cart abandonment. In this guide, you’ll learn how to automatically set the default shipping method in OpenCart 4 so your customers can move through checkout faster and more smoothly.

Default Shipping Opencart 4

Why Set a Default Shipping Method?

When there’s only one shipping option available (for example, Flat Rate or Free Shipping), asking users to choose it is redundant. By setting it as the default, you:

  • Improve checkout speed
  • Reduce user confusion
  • Increase conversion rates
  • Create a cleaner checkout experience

How OpenCart 4 Handles Shipping Selection

By default, OpenCart requires customers to:

  1. Enter a shipping address
  2. Click “Get Quotes”
  3. Select a shipping method

Even if there’s only one option, OpenCart still requires manual selection. To change this behavior, we’ll auto-select the available shipping method using a small code override.

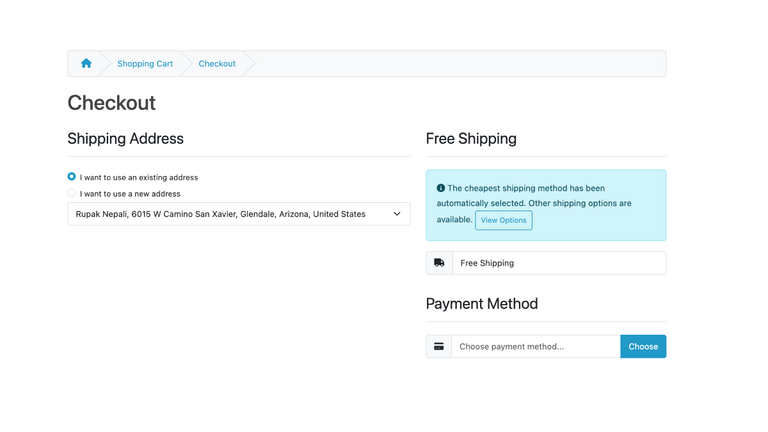
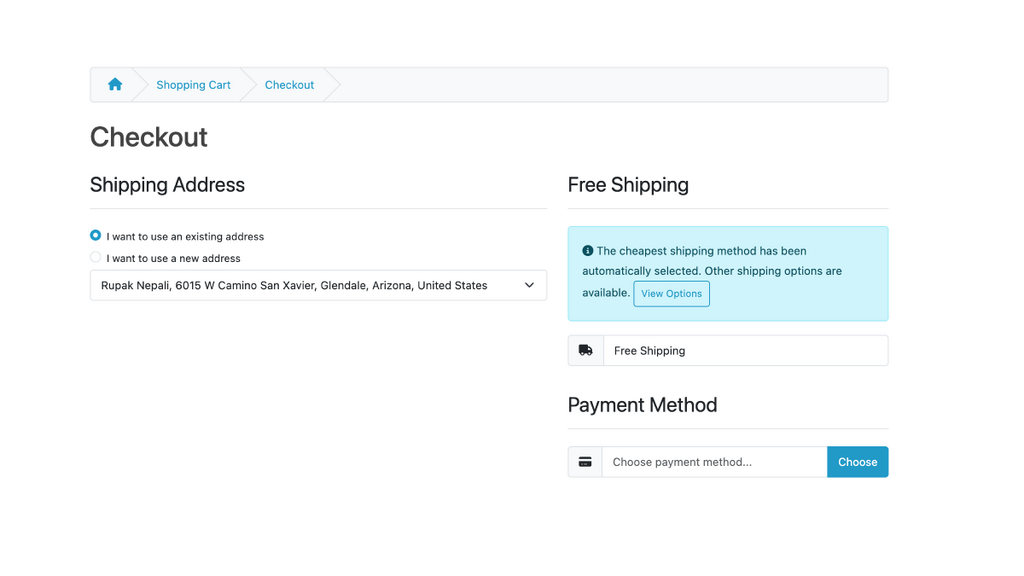
OpenCart 4 shipping method functionality to select the cheapest shipping method automatically and inform users about other available options. Here’s what I implemented:

Changes Made:

1. Updated Shipping Method Selection Logic

Locate file catalog/controller/checkout/shipping_method.php, then find the code below:

lass ShippingMethod extends \Opencart\System\Engine\Controller {
	/**
	 * Index
	 *
	 * @return string
	 */
	public function index(): string {
		$this->load->language('checkout/shipping_method');

Below the line above, paste the code below:

// Auto-set default shipping method if none exists and shipping address is available
if (!isset($this->session->data['shipping_method']) && isset($this->session->data['shipping_address'])) {
	// Validate cart has products and has stock.
	if ($this->cart->hasProducts() && ($this->cart->hasStock() || !$this->config->get('config_stock_checkout')) && $this->cart->hasMinimum()) {
		// Validate if customer data is set
		if (isset($this->session->data['customer'])) {
			// Validate if shipping not required. If not the customer should not have reached this page.
			if (!$this->cart->hasShipping() || isset($this->session->data['shipping_address']['address_id'])) {
				// Get shipping methods
				$this->load->model('checkout/shipping_method');
				$shipping_methods = $this->model_checkout_shipping_method->getMethods($this->session->data['shipping_address']);
				
				if ($shipping_methods) {
					$this->session->data['shipping_methods'] = $shipping_methods;
					
					// Auto-select cheapest available shipping method
					$cheapest_method = null;
					$cheapest_cost = null;
					$total_methods = 0;
					
					foreach ($shipping_methods as $shipping_method) {
						if (isset($shipping_method['quote']) && !empty($shipping_method['quote'])) {
							foreach ($shipping_method['quote'] as $quote) {
								$total_methods++;
								$cost = isset($quote['cost']) ? (float)$quote['cost'] : 0;
								
								if ($cheapest_cost === null || $cost < $cheapest_cost) {
									$cheapest_cost = $cost;
									$cheapest_method = $quote;
								}
							}
						}
					}
					
					if ($cheapest_method) {
						$this->session->data['shipping_method'] = $cheapest_method;
						// Store info about multiple methods for display
						$this->session->data['has_multiple_shipping_methods'] = ($total_methods > 1);
					}
				}
			}
		}
	}
}

In the same file, in the quote method public function quote(): void { find the code below:

if ($shipping_methods) {
				$json['shipping_methods'] = $this->session->data['shipping_methods'] = $shipping_methods;

Just below that line, paste these codes:

// Auto-select cheapest available shipping method if none is set
if (!isset($this->session->data['shipping_method'])) {
	$cheapest_method = null;
	$cheapest_cost = null;
	$total_methods = 0;
	
	foreach ($shipping_methods as $shipping_method) {
		if (isset($shipping_method['quote']) && !empty($shipping_method['quote'])) {
			foreach ($shipping_method['quote'] as $quote) {
				$total_methods++;
				$cost = isset($quote['cost']) ? (float)$quote['cost'] : 0;
				
				if ($cheapest_cost === null || $cost < $cheapest_cost) {
					$cheapest_cost = $cost;
					$cheapest_method = $quote;
				}
			}
		}
	}
	
	if ($cheapest_method) {
		$this->session->data['shipping_method'] = $cheapest_method;
		
		// Store info about multiple methods for display
		$this->session->data['has_multiple_shipping_methods'] = ($total_methods > 1);
	}
}

The code above has the following functionalities:

  • Cheapest Method Selection: Modified both index() and quote() methods to analyze all available shipping methods and select the one with the lowest cost instead of the first one
  • Cost Comparison: The code now compares the cost field of each shipping quote to find the cheapest option
  • Multiple Methods Tracking: Added tracking to count the total available shipping methods

2. Enhanced User Interface

Locate file catalog/view/template/checkout/shipping_method.twig and find the code below:

<legend>{{ heading_title }}</legend>

Just below that line, paste the code below:

{% if has_multiple_shipping_methods %}
  <div class="alert alert-info">
    <i class="fa fa-info-circle"></i> {{ text_cheapest_selected }} <button type="button" id="button-shipping-methods" class="btn btn-sm btn-outline-primary">{{ button_view_options }}</button>
  </div>
  {% endif %}

In the same file, find the following code

<script type="text/javascript"><!--

Paste the code below:

// Auto-load shipping methods on page load if none is selected
$(document).ready(function() {
    if (!$('#input-shipping-code').val()) {
        $('#button-shipping-methods').trigger('click');
    }
});
  • Information Message: Added an informative alert that appears when multiple shipping methods are available
  • Smart Button Display: The “Choose” button is hidden when there are multiple options (replaced with “View Options” in the info message)
  • Clean Layout: The interface now clearly communicates that the cheapest option was selected while providing easy access to alternatives

3. Added Language Support

  • New Text Strings: Added text_cheapest_selected to inform users about automatic selection
  • Button Text: Added button_view_options for the alternative shipping options button
  • User-Friendly Messaging: Clear communication about what was automatically selected and why

Locate file upload/catalog/language/en-gb/checkout/shipping_method.php and at the end of the file add the following code:

$_['text_cheapest_selected'] = 'The cheapest shipping method has been automatically selected. Other shipping options are available.';
$_['button_choose']           = 'Choose';
$_['button_view_options']     = 'View Options';

How It Works:

  1. Automatic Selection: When the checkout page loads, the system now:
    • Retrieves all available shipping methods
    • Compares costs to find the cheapest option
    • Automatically selects the cheapest method
    • Tracks if multiple methods are available
  2. User Communication:
    • If only one shipping method exists, it is auto-selected by default.
    • If multiple methods exist, Shows an info message explaining that the cheapest was selected with the “View Options” button
  3. Flexibility: Users can still change the shipping method by clicking “View Options” to see all available methods

Benefits:

  • Cost Savings: Customers automatically get the cheapest shipping option
  • Transparency: Users are informed about other available options
  • Better UX: Reduces friction while maintaining choice
  • Smart Defaults: Makes intelligent decisions on behalf of the user

The implementation ensures customers get the best value while maintaining full control over their shipping preferences.

Important Notes

  • This approach works best when only one shipping method is active
  • If multiple methods exist, customers may be forced into the wrong choice
  • Always test checkout with different addresses and cart scenarios

Testing Checklist

Before going live:

  • ✅ Add product to cart
  • ✅ Go to checkout
  • ✅ Confirm shipping is auto-selected
  • ✅ Verify order completes without manual selection
  • ✅ Test logged-in and guest checkout

Final Thoughts

Removing unnecessary steps in checkout is one of the simplest ways to improve conversion rates. If your OpenCart store only uses one shipping method, auto-selecting it is a small change with a big impact. By implementing the solution above, you streamline the checkout process and create a better user experience without complex customization. If you want to go further, you can also auto-select payment methods or skip entire checkout steps — turning OpenCart into a near one-click checkout system.

How Agentforce Consulting Services Helps You Maximize ROI?

0

The extremely dynamic digital landscape requires organizations to deliver more with less. Now, this might include minimizing operational costs, augmenting efficiency, and delivering better customer engagement. This is where Agentforce consulting services are evolving as a strategic enabler. 

As an AI-powered automation platform, Agentforce allows organizations to deploy self-directed agents that manage redundant, data-powered, and even semi-intricate tasks across various departments. However, to draw the actual value of Agentforce, technology alone isn’t sufficient; it is revealed through expert implementation, consulting, and optimization.

This article discusses how Agentforce consulting services help businesses cut costs, optimize efficiency, and generate greater return on investment (ROI).

What is Agentforce, and why does Agentforce Consulting Matter?

Unlike the common notion, Agentforce isn’t just any other AI-driven tool. Rather, it signifies a shift to agentic AI, where software systems can act independently within enterprise workflows. Agentforce adopts a hybrid and more advanced approach by amalgamating AI agents powered by large language models, process-oriented bots designed for repetitive processes, and human-in-the-loop workflows for governance and accountability.

This unified model enables organizations to automate everything from customer support and lead management to processing invoices and contract analysis. Yet, without a proper strategy, implementing such a system can result in inadequacies, operational risks, and more. This is where Salesforce AI services become essential, as it guides enterprises to deploy Agentforce successfully while maximizing its value. 

Agentforce consulting services bridge the gap between high-tech potential and tangible business outcome by enabling organizations to identify high-impact use cases, create efficient workflows, ensure strong ascendency besides data readiness, and regularly measure and optimize return on investment. 

Why Should Businesses Avail Agentforce Consulting Services?

Cost Reduction: One of the major benefits of Agentforce consulting is cost reduction. By recognizing high-volume processes that are time-consuming, redundant and process-oriented, consultants allow organizations to automate mundane work at scale. Consequently, many businesses report a significant reduction in manual effort, as well as operational costs. Agentforce also supports optimization of labor costs by enabling businesses to allocate employees to value-driven and strategic roles while reducing the need for extra hiring as the business grows.

Faster time-to-value: Working with Agentforce consultants provides significant benefits in terms of low cost of implementation and faster time-to-value due to their ability to accelerate deployment. By leveraging pre-designed frameworks and accelerators, consulting partners reduce development time significantly while reducing costly trial-and-error. Consequently, Agentforce implementations can deliver a significant leap in faster time-to-value and attain lower total cost of ownership as compared to do-it-yourself approaches.

Increased Operational Efficiency: By driving augmented operational efficiency by augmenting end-to-end workflows instead of remote task automation. Through autonomous task execution, AI agents can manage customer queries, process transactions, and initiate workflows across multiple systems. This enables organizations to streamline operations. Unlike human teams, AI agents operate incessantly without shift limitations, downtime, or delays. This ensures instant response capabilities. The outcome is faster throughput times, enhanced service levels, and a major reduction in operational backlogs. 

Augmented Client Experience: It is a significant component that goes beyond just cost savings. Agentforce augments CX by allowing faster resolution through instant replies and smart routing to human agents as and when needed. This reduces average handle time and wait times. AI-powered knowledge bases enable customers with self-service capabilities. This allows them to fix issues while reducing overall ticket volumes. As often highlighted by experts, actual self-service systems can bounce tickets even before they arise. This lowers support costs while augmenting customer satisfaction. 

Conversion Optimization: Besides cost reduction for driving revenue growth, Agentforce Consulting also helps optimize conversions. By enabling sales processes, AI agents can help in lead qualification, list valuable prospects, and generate tailored outreach at scale. Consequently, organizations leveraging Agentforce could often see tangible benefits. This includes a boost in the rate of conversion, greater outreach capacity, and more. By automating redundant tasks, teams can focus on deal closure, which reduces the time required for conversion and contributes to boosted revenue and ROI.

Data-driven decision-making: This type of consulting lays the foundation for the successful implementation of Agentforce. Moreover, consultants play a significant role in ensuring the platform is built on well-governed and clean data. This is critical because Agentforce operates independently, which means the quality of the result depends directly on data quality. Poor data, on the other hand, leads to faulty decisions, while clean data leads to scalable ROI. Experts highlight that factors such as metadata quality, system transparency, and strong frameworks are crucial to attaining enhanced results. Agentforce consultants focus on data cleaning and structuring. This establishes robust governance and enables real-time tracking. This reduces risk and maximizes performance.

Measuring the return on AI investments: This can be challenging, which makes Agentforce consulting services crucial for implementing structured ROI frameworks. Consultants assess value across three important dimensions, i.e., growth, efficiency, and experience. W.r.t efficiency, KPIs such as time efficiency, cost per conversation, and case deflection rates are tracked to evaluate functional enhancements. On the experience front, metrics such as customer satisfaction score and first-contact resolve help measure service quality. From a growth perspective, revenue per customer and conversion rates showcase business impact. With this approach, organizations can easily quantify outcomes.

Risk Reduction: When implementing AI, strong governance is crucial as uninhibited automation can lead to significant functional challenges. By leveraging these consulting services, it is possible to address these risks by introducing human-in-the-loop workflows. This establishes strong compliance frameworks – enabling constant monitoring and intervention mechanisms. This ensures automation remains compliant and safe while delivering predictable and reliable outcomes.

Continuous Optimization: Agentforce is an evolving system that advances over time. Through continuing optimization, consultants assess performance data, modify workflows, and augment agent accuracy to make the most of effectiveness. Once success is attained, organizations can scale this AI platform across the enterprise—thereby increasing ROI across multiple departments.

Final Words:

Agentforce signifies a new ray of light in enterprise automation. However, the thin line that demarcates success from failure lies in how well it is implemented. This is where Salesforce consulting services play a crucial role – offering the expertise, frameworks, and governance required to cut operational costs, optimize efficiency, augment customer experience, while delivering tangible ROI. Organizations that invest in the right strategy can attain faster payback and lower cost of overall ownership, while building a scalable foundation for long-term value.

Language Editor in OpenCart: Simplifying Language Customization

The Language Editor in OpenCart 4 is a powerful tool introduced to help store administrators easily customize text strings displayed across the website without directly modifying core language files. This feature is especially useful for tailoring default OpenCart language strings to fit your store’s branding, tone, or regional preferences.

Key Features of the Language Editor

  1. No Code Required: Modify any text on your site without diving into PHP or file editors.
  2. Dynamic Search: Quickly find the text string you want to edit by searching the existing text.
  3. Language-Specific Customization: Make changes for specific languages if your store supports multiple languages.
  4. Safe Updates: Unlike editing core files, changes made via the language editor persist even after updates, ensuring that your modifications are retained.

How to Access the Language Editor

  1. Log in to Your Admin Panel:
    • Navigate to the backend of your OpenCart store.
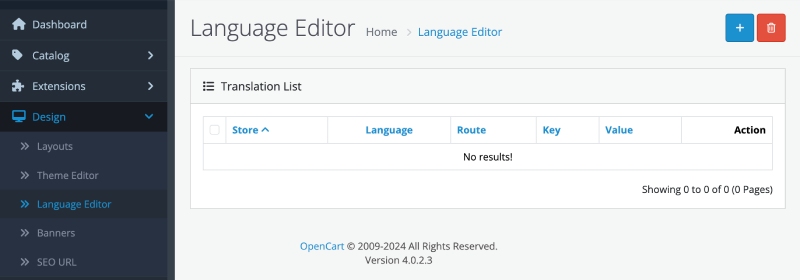
  2. Go to Design > Language Editor:
    • In the admin menu, find the “Design” section, and then select “Language Editor.”
Language Editor

How to Use the Language Editor

1. Select the Language to Edit

  • Choose the specific language you want to edit (e.g., English, Spanish, etc.).

2. Search for the Text You Want to Change

  • Use the “Search Text” field to find the exact string you want to customize. For example:
    • Searching for “Add to Cart” will locate all instances where this text appears in the current language files.

3. Edit the Text

  • Once the text appears in the search results, you can click on it to edit.
  • Replace the existing text with your desired wording. For example:
    • Change “Add to Cart” to “Buy Now” for a more engaging call to action.

4. Save Your Changes

  • After making the edits, click the “Save” button to apply the changes to your site.

5. Clear the Cache

  • Navigate to Dashboard > Extensions > Modifications and click the “Refresh” button to clear your store’s cache and ensure the changes are visible on the frontend.

Example: Modify the Order Completion Success Message in Opencart

In this Opencart tips, we are showing you how to change the success message shown at order completion from the Opencart language editor. From the success message, let’s remove the “If your purchase has an associated download, you can go to the account downloads page to view them.”

Opencart Order success text
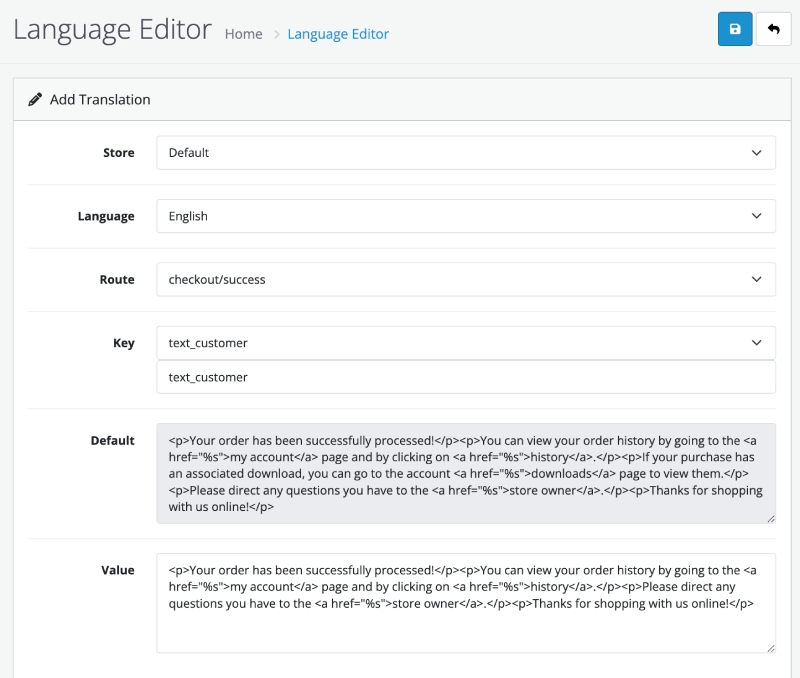
  • Go to admin >> Design >> Language Editor
  • Click the Add button
  • Enter details like below
    Language Editor success
    • Store: Select the store
    • Language: Which language
    • Route: As the success message is at the route checkout/success
    • Key: Find which key holds the text
    • Default: It auto-fills the default values.
    • Value: We remove the download message and add the text in the value field, which will override the text.
  • With this, you can click save.

Now, check the front end

Opencart success message changed

Use Cases for the Language Editor

  1. Brand-Specific Language: Replace generic text like “Checkout” with something unique, such as “Proceed to Payment.”
  2. Regional Customization: Adjust terms to suit your audience’s preferences. For example:
    • Replace “Cart” with “Basket” for stores targeting UK customers.
  3. Error Messages: Customize default error messages to make them friendlier or more informative.
  4. Multilingual Stores: Easily tweak translations for non-default languages without editing language files.

Benefits of the Language Editor

  • Time-Saving: Makes text customization quick and hassle-free.
  • No File Overwrites: Avoids the risk of breaking the site by directly editing core files.
  • Flexibility: Allows you to make real-time text changes as your store evolves.
  • Multilingual Optimization: Streamlines language customization for global audiences.

When to Use the Language Editor

  • Minor Text Changes: Ideal for small tweaks and adjustments.
  • Non-Technical Users: A perfect solution for store owners who are not comfortable with file editing or coding.
  • Consistent Branding: To ensure the tone and language of your site reflect your brand identity.

Best Practices

  1. Backup Before Making Changes: Although the Language Editor is safe, always keep backups of your site in case you need to revert changes.
  2. Be Consistent: Ensure text changes match the tone and style across your site.
  3. Test Changes: After updating text, check both desktop and mobile versions of your site to confirm the changes look and function as intended.

Conclusion

The Language Editor in OpenCart is an essential tool for modern eCommerce stores looking to fine-tune their site’s text without editing code. Whether you’re aiming for a better user experience, more personalized messaging, or just a slight tweak in wording, this feature makes it simple, efficient, and effective. By using the Language Editor, you can maintain a professional and brand-aligned storefront that resonates with your customers.

Code flow, Request & response, and MVCL pattern in OpenCart -Video

Hi everyone, me Rupak Nepali. In our fifth video, we describe OpenCart objects and a list of methods. Today, in our sixth video we are going to describe OpenCart framework code flow and how requests and responses are handled by OpenCart. Describe how MVCL works in OpenCart which will create a good foundation to start programming in OpenCart.

 “OpenCart theme and Module development” book say “OpenCart is an e-commerce shopping cart application built with its own in-house framework which uses MVCL (Model, view, controller, and language)pattern. Thus, each module in OpenCart also follows the MVCL pattern. The controller creates logic and gathers data from the model and it passes data to display in the view.”

OpenCart is based on this MVCL pattern. Let’s see what is MVCL pattern:

  • The user request to the controller through URL,
  • The controller loads the language and set the variable for any text used in the data.
  • If data is needed from the database controller loads the model, ask for results and model send back results, then controller set results to data.
  • All these data are sent to View which renders and shows the output.
MVCL pattern
From OpenCart.com

In the catalog and admin directories, you can see a tree structure of MVCL so whenever we create modules or pages we follow these directories structure:

  • Controller – The controller loads the language and set the variable for any text used in the data. If data is needed from the database controller loads the model, ask for results and model send back results, then controller set results to data.
  • Model – Database layer – All calls to the database are done. It is to structure DB calls so that all other files have access to the same DB queries.
  • View – Presentation/Template/display layer – This is where the HTML and designing are done in the respective tpl files.
  • Language – Localization/Language – This is layer is to make the translation easy, variables and text are assigned and these folder files are translated to the respective language with the same variables name.

OpenCart handles each request with a simple pattern for every incoming request are interpreted by the routing URL “route=” and passed to controller class matching the URL route part which returns Response objects. The controller is the only file in the MVC-L framework to be accessed by URL in OpenCart. The controller is where all logic goes: it’s where you interpret the request and create a response.

It’s that easy! Yes!

  • Each request executes a front controller file
  • The routing system determines which Controller class index method will be executed based on information from the request and routing URL you’ve passed.
  • Returns the appropriate Response object.

Let’s see some example
http://webocreation.loc/index.php?route=account/login
Here “route=account/login”, it means that the controller to find in Opencart is catalog/controller/account/login.php as there is no third one so by default the method is index().

http://webocreation.loc/index.php?route=account/return/add
Here “route=account/return/add”, it means that the controller to find in Opencart is catalog/controller/account/return.php and method is add().

  • The controller name must be like Controller + directory path+ filename
  • If your file name contains (_) underscore then no need to add in controller name.
  • The controller class must extend the parent class i.e.Controller

Let’s check the code. Let say the user request the same URL http://webocreation.loc/index.php?route=account/login
With route=account/login, the controller to process is ControllerAccountLoginclass and index method.

Request and response flow in Opencart
MVCL Opencart 3 defined

So, by defining MVCL we completed our fifth video, we hope you liked it. As always please don’t forget to post your questions or comments so that I can add extra topics or things that I need to develop which will help to develop the quality of videos series. You can follow at my twitter account rupaknpl and subscribe to our youtube channel opencart tutorials. Similarly, keep on visiting my personal blog https://webocreation.com where you will find lots of free modules.

In the next video, the real fun program begins the “Hello World” Opencart module. So, see you in the next video and happy learning and thanks for watching videos.
See you.

Opencart 4 OCMOD tutorial – develop extension with OCMOD

In this Opencart tutorial, we are covering OpenCart 4 OCMOD and show how to start coding in OCMOD to change the files and extend the functionalities of Opencart. We hope this helps to learn step-by-step instructions to master OCMOD elevate your e-commerce store to new heights and develop multiple Opencart extensions with OCMOD.

OCMOD is a system that allows store owners to be able to modify their store by uploading a compressed file that contains XML, SQL, and PHP files. OCMOD helps to modify OpenCart stores without changing any of the core files. This means that we did not need to restore or fix Opencart files when we removed modifications.

Here we will show the flows that happened when someone uploads the ***.ocmod.zip file, then create a test.ocmod.xml file to show the module link in the left column and give you details of Ocmod documentation in Opencart 4.

Opencart 3 OCMOD tutorial

Files and folder structure OCMOD extension

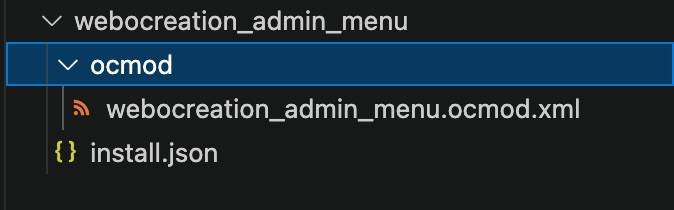
All the ocmod xml should be inside the ocmod folder. Here in the example we are creating the webocreation_admin_menu extension folder inside it are the install.json and ocmod folders. In the ocmod folder, we add the XML file, the XML file name should be the same as the code. Here the file name is webocreation_admin_menu.ocmod.xml and in the XML the code is <code>webocreation_admin_menu</code>

OCMOD folder structure Opencart 4

Flow of OCMOD

Upload of extension with OCMOD

As per the core code when you upload the ***.ocmod.zip folder from Extensions >> Installer, the following things will happen:

  1. Check if the user has permission. You will get an error like:
    “Warning: You do not have permission to modify modifications!”
  2. Check if there is an install temporary folder zip already there. If it found the file and the file created time is less than 5 seconds then it tries to unlink or remove the file, if it cannot remove the file then it throws an error saying:
    “Extension installation taking place please wait a few seconds before trying to install!”
  3. It checks whether the filename is between 3 and 128 characters or not. If not it will show an error like this:
    ‘Filename must be between 3 and 128 characters!’;
  4. It checks whether the uploaded zip file ends with .ocmod.zip
  5. It checks if there are any other file uploading errors, UPLOAD_ERR_OK: Value: 0; There is no error, and the file uploaded with success. If there is any error it will show errors like:
    “File could not be uploaded!”
  6. If everything is good then it creates a .tmp file and performs the function move_uploaded_file.
  7. Then it checks if the module file already exists or module code is already in the database or not. If exists throws the following error:
    ‘Extension already installed!’
  8. If all the above are good then it validates if the file can be opened and there is install.json that can be read. If it cannot find the install.json, then it throws the following error:
    ‘Warning: Could not find install.json!’
  9. If there is an issue with unzipping of ocmod.zip file then it throws the following error:
    ‘Zip file could not be opened!’

Database Operation

  1. If everything is fine then it gets all the info from the install.json. It gets the name, description, code, version, author, and link
  2. Then finally it adds the extension details to the database table oc_extension_install. The query ran is below:
    $this->db->query(“INSERT INTO `” . DB_PREFIX . “extension_install` SET `extension_id` = ‘” . (int)$data[‘extension_id’] . “‘, `extension_download_id` = ‘” . (int)$data[‘extension_download_id’] . “‘, `name` = ‘” . $this->db->escape($data[‘name’]) . “‘, `description` = ‘” . $this->db->escape($data[‘description’]) . “‘, `code` = ‘” . $this->db->escape($data[‘code’]) . “‘, `version` = ‘” . $this->db->escape($data[‘version’]) . “‘, `author` = ‘” . $this->db->escape($data[‘author’]) . “‘, `link` = ‘” . $this->db->escape($data[‘link’]) . “‘, `status` = ‘0’, `date_added` = NOW()”);
    As you see the status is still 0. The file upload is complete and extension info is added to the database.
    The upload is complete.

Installation of OCMOD extension

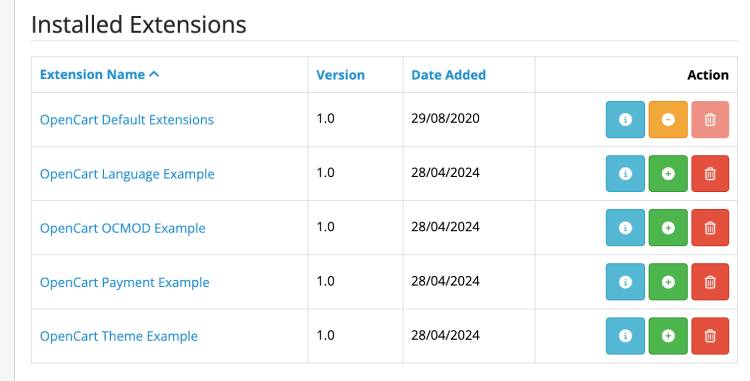
You will see extensions listed at Extensions >> Installer. You will see something like below:

Opencart Installed extension

Now, we are showing the flows that happened when you click the Install button for the Opencart OCMOD Example extension.

  1. Check if the user has permission. You will get an error like:
    “Warning: You do not have permission to modify modifications!”
  2. Then it gets the details of the extension from oc_extension_install database table
  3. It makes sure the file exists in the storage folder >> Marketplace. If the file is not found then it shows an error like this:
    ‘Install file %s could not be found!’;
  4. If there are no errors, then it starts unzipping the ***.ocmod.zip and if it cannot unzip the ocmod.zip file then it shows an error like:
    “Zip file could not be opened!”
  5. After unzipping it checks if any of the files already exist. It only extracts the contents of the upload folder. If there are images, it copies the images, then it stores the path differently for vendor folders.
  6. It checks if the path is not a directory and checks if there is no existing file, then it puts the file and adds the path in the oc_extension_path database table.
  7. It enables the module by updating the status of the module at oc_extension_install database table
  8. It adds the XML code in the oc_modification table
    OCMOD database entries
  9. Finally, it gives the success message.
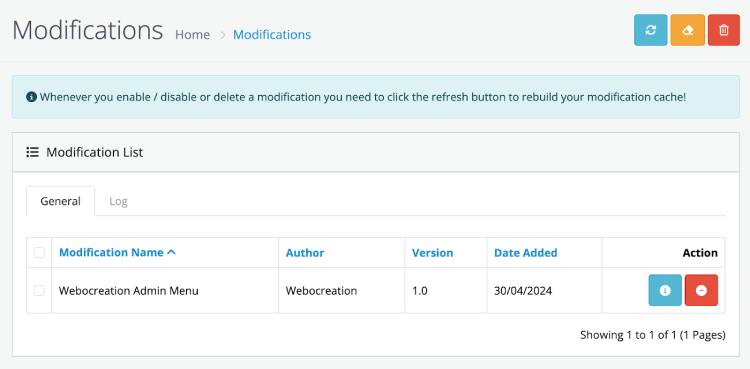
  10. Go to Extensions and Modifications and Install the extension by clicking the green install button
    OCMOD Modification admin menu
  11. Click the Clear icon and you will see the applied OCMOD 

OCMOD developer tips

  • The extension folder needs ocmod folder
  • File name except ocmod.zip and <code> value should be same.
  • While zipping the folder zip the install.json and ocmod/ folder, not the folder.
  • Testing is hard for OCMOD changes if you have to change in XML, zip, upload from the installer, and clear in modifications. So the tip for developers is they can upload the extension and enable it, then make changes in the extension code from the extension folder and you don’t need to zip and upload again and again, you can just clear the cache in modifications and you can check the changes, and once you are satisfied you can copy and make the extension and upload it.
  • oc_modification, oc_extension_install, and oc_extension_path are the three database tables that are touched after the ocmod extension is uploaded and installed.

Example OCMOD code

In the install.xml it should be something like where the ******* is your custom thing.

<?xml version="1.0" encoding="utf-8"?>
<modification>
    <name>*******</name>
    <version>*******</version>
    <author>*******</author>
    <link>*******</link>
    <code>*******</code>
    <description>*******</description>
    <file path="*******">
        <operation>
            <search><![CDATA[ ******* ]]></search>
            <add position="*******"><![CDATA[*******]]></add>
        </operation>
    </file>
</modification>

Don’t forget <code>, although it is not mentioned in the Modification system documentation https://github.com/opencart/opencart/wiki/Modification-System. You can use multiple file operations. There are two operations search and add. With the add operation, you can replace, add before, or add after by adding in the position.

<file path="">
    <operation>
        <search><![CDATA[]]></search>
        <add position=""><![CDATA[]]></add>
    </operation>
</file>

Controller OCMOD code example

<file path="admin/controller/catalog/attribute.php">
        <operation>
            <search>
                <![CDATA[Opencart\Admin\Controller\Catalog;]]>
            </search>
            <add position="replace">
                <![CDATA[Opencart\Admin\Controller\Extension\Ocmod\Catalog;]]>
            </add>
        </operation>
        <operation>
            <search regex="false">
                <![CDATA[$this->load->language('catalog/attribute');]]>
            </search>
            <add position="before">
                <![CDATA[echo 'BEFORE WORKS</br>';]]>
            </add>
        </operation>
        <operation>
            <search regex="false">
                <![CDATA[$this->load->language('catalog/attribute');]]>
            </search>
            <add position="after">
                <![CDATA[echo 'AFTER WORKS</br>';]]>
            </add>
        </operation>
        <operation>
            <search regex="false">
                <![CDATA[controller_catalog_attribute]]>
            </search>
            <add position="replace">
                <![CDATA[controller_extension_ocmod_catalog_attribute]]>
            </add>
        </operation>
        <operation>
            <search regex="false">
                <![CDATA[$this->load->language('catalog/attribute');]]>
            </search>
            <add position="replace">
                <![CDATA[$this->load->language('catalog/attribute');
                echo 'REPLACE WORKS</br>';
                ]]>
            </add>
        </operation>
    </file>

Model OCMOD code example

<file path="admin/model/catalog/attribute.php">
        <operation>
            <search>
                <![CDATA[Opencart\Admin\Model\Catalog;]]>
            </search>
            <add position="replace">
                <![CDATA[Opencart\Admin\Model\Extension\Ocmod\Catalog;]]>
            </add>
        </operation>
        <operation>
            <search regex="false">
                <![CDATA[public function addAttribute(array $data): int {]]>
            </search>
            <add position="before">
                <![CDATA[echo 'MODEL BEFORE WORKS</br>';]]>
            </add>
        </operation>
        <operation>
            <search regex="false">
                <![CDATA[public function addAttribute(array $data): int {]]>
            </search>
            <add position="after">
                <![CDATA[echo 'AFTER WORKS</br>';]]>
            </add>
        </operation>
    </file>

View OCMOD example code

<file path="admin/view/template/catalog/attribute.twig">
        <operation>
            <search regex="false">
                <![CDATA[<div class="float-end">]]>
            </search>
            <add position="before">
                <![CDATA[        // BEFORE WORKS]]>
            </add>
        </operation>
        <operation>
            <search regex="false">
                <![CDATA[<div class="float-end">]]>
            </search>
            <add position="after">
                <![CDATA[        // AFTER WORKS]]>
            </add>
        </operation>
    </file>

Library OCMOD code example

<file path="system/library/template/template.php">
        <operation>
            <search regex="false">
                <![CDATA[include]]>
            </search>
            <add position="after">
                <![CDATA[        // AFTER WORKS]]>
            </add>
        </operation>
    </file>

Admin Extension OCMOD code example

<file path="extension/opencart/admin/controller/report/customer_order.php">
        <operation>
            <search>
                <![CDATA[Opencart\Admin\Controller\Extension\Opencart\Report;]]>
            </search>
            <add position="replace">
                <![CDATA[Opencart\Admin\Controller\Extension\Ocmod\Extension\Opencart\Report;]]>
            </add>
        </operation>
        <operation>
            <search regex="false">
                <![CDATA[$this->load->language('extension/opencart/report/customer_order');]]>
            </search>
            <add position="after">
                <![CDATA[echo 'WORKS!';]]>
            </add>
        </operation>
    </file>

Admin Module menu addition with OCMOD extension

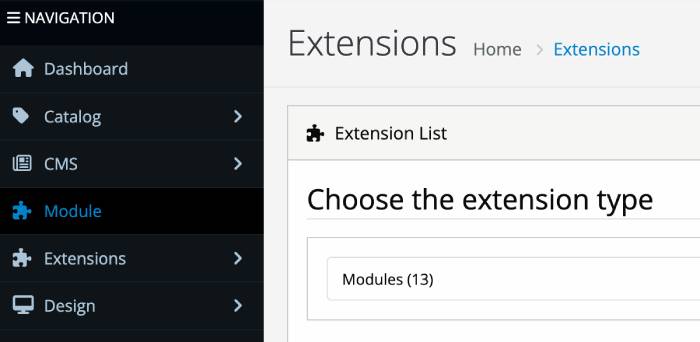
We created a free module with OCMOD to show the Module link in the left menu of the admin section so that we can directly go to the Module section and don’t need to keep on using the Extension filter. Here is the output.

Module link addition OCMOD example

 Folder creation of OCMOD extension

  • Create a folder and name it anything like for example webocreation_admin_menu
  • Inside that folder create install.json file
  • Inside webocreation_admin_menu folder, create ocmod folder
  • Inside the ocmod folder, create an XML file named webocreation_admin_menu.ocmod.xml

Code of install.json file

{
  "name": "Webocreation Admin Menu",
  "version": "1.0",
  "author": "Webocreation",
  "link": "https://www.webocreation.com"
}

Code of webocreation_admin_menu.ocmod.xml

<?xml version="1.0" encoding="utf-8"?>
<modification>
    <name>Webocreation Admin Menu</name>
    <description>Add a Module link in top menu item in the Admin section.</description>
    <code>webocreation_admin_menu</code>
    <version>1.0</version>
    <author>Webocreation</author>
    <link>https://webocreation.com</link>
    <file path="admin/controller/common/column_left.php">
        <operation>
            <search regex="false">
                <![CDATA[if ($marketplace) {]]>
            </search>
            <add position="before">
                <![CDATA[
                if ($marketplace) {
                    $data['menus'][] = [
                        'id'       => 'menu-extension',
                        'icon'     => 'fas fa-puzzle-piece',
                        'name'     => 'Module',
                        'href'     => $this->url->link('marketplace/extension', 'user_token=' . $this->session->data['user_token'].'&type=module'),
                        'children' => []
                    ];
                }
                ]]>
            </add>
        </operation>
    </file>
</modification>

OCMOD error log

You can see the OCMOD error log at the Extensions >> Modifications >> Log tab.

Some of the error codes:

It shows an error like the one below in the Ocmod log when the search code is not found

MOD: 
FILE: admin/controller/common/column_left.php
CODE: if ($this->user('access', 'marketplace/modification')) {
NOT FOUND - OPERATIONS ABORTED!

In this way, you can develop an Opencart 4 extension with OCMOD. We hope this helps to learn step-by-step instructions to master OCMOD and elevate your e-commerce store to new heights. Please let us know if you have any kind of projects, you can email us at webocreation.com@gmail.com. Please subscribe to our YouTube Channel and get more Opencart free extensions and tutorials. You can also find us on Twitter and Facebook.

Google Sitemap Opencart 4 Module or extension for free

Google Sitemap module used to be by default added on Opencart 3 but in Opencart 4 we need to add it manually and we did not find it in Opencart marketplace so we created the module. Search engine optimization (SEO) plays a pivotal role in driving organic traffic to your online store. One of the essential tools in your SEO arsenal is a well-structured sitemap.

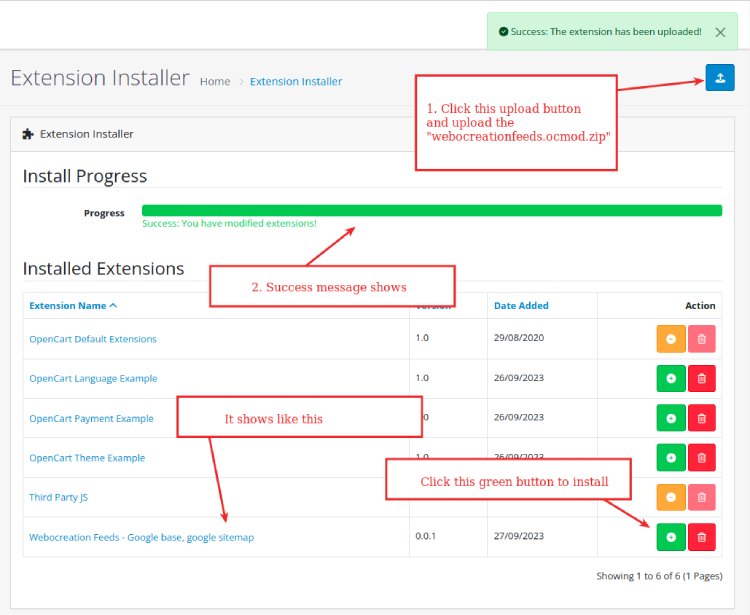
Click the above button to download the Google Base feed module, the file downloaded is webocreationgooglesitemap.ocmod.zip. Now go to the Opencart admin >> Extensions >> Installer >> Then upload the file webocreationgooglesitemap.ocmod.zip

Opencart extension installation

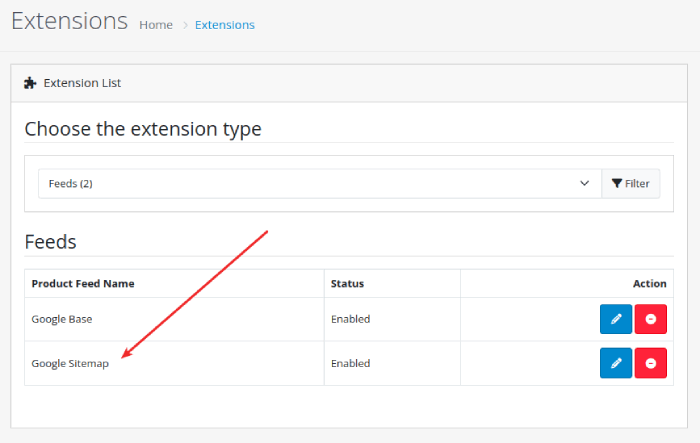
Once it is uploaded and installed. Go to Extensions >> Extensions and filter out to feed.

Opencart extension google sitemap

Click the install button and then click the edit button.

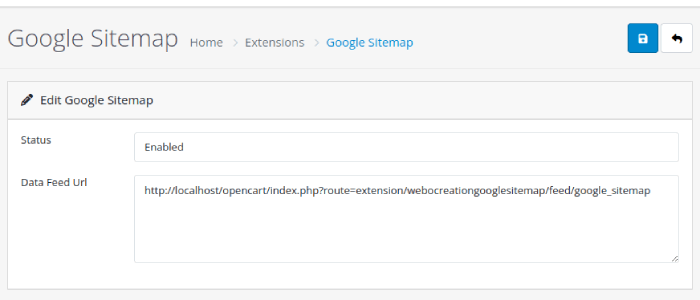
Google sitemap Opencart 4 for free

Now, select Enabled and click Save.

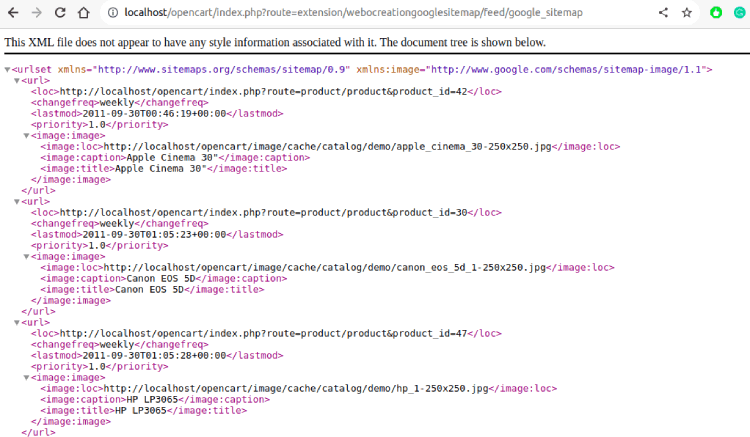
Now go to the URL below:

http://YOURURL/opencart/index.php?route=extension/webocreationgooglesitemap/feed/google_sitemap

You will see XML like below:

Google Sitemap Opencart 4

The Importance of Sitemaps in SEO

Before we delve into the module, let’s first grasp the fundamental role of sitemaps in SEO:

1. Enhanced Indexing:

Sitemaps provide search engines like Google with a roadmap of your website’s structure. This helps search engine bots crawl and index your web pages more efficiently. As a result, your site’s content is more likely to appear in search engine results pages (SERPs).

2. Faster Discovery of New Content:

When you add new pages or products to your online store, a sitemap can alert search engines to these changes promptly. This ensures that your latest content is included in search results sooner rather than later.

3. Improved SEO Performance:

By facilitating better indexing and ensuring that all your web pages are accessible to search engines, sitemaps contribute to improved SEO performance. This can lead to higher rankings, increased organic traffic, and ultimately, more conversions.

Introducing the Google Sitemap Opencart Module

Now that we understand the significance of sitemaps, let’s explore the Google Sitemap Opencart module and how it can elevate your SEO efforts:

1. Automated Sitemap Generation:

This module automates the process of creating and updating your website’s sitemap. You no longer need to manually generate and submit sitemaps to search engines. It handles everything seamlessly.

2. Dynamic Content Inclusion:

The Google Sitemap Opencart module is designed to include all the essential content on your site, such as product pages, categories, information pages, and even manufacturer listings. This comprehensive coverage ensures that search engines index all your relevant content.

3. Priority and Frequency Settings:

You have the flexibility to set priority and update frequency for different types of content. For instance, you can prioritize product pages over informational pages, indicating to search engines the relative importance of each.

4. Multilingual and Multistore Support:

For OpenCart users with multilingual websites or multiple stores, this module offers seamless support. It generates sitemaps for each language or store, making it incredibly versatile.

5. Efficient XML Sitemap Creation:

The module generates XML sitemaps, which are the preferred format for search engines. These XML sitemaps are well-structured and adhere to industry standards, ensuring compatibility with various search engines.

6. Improved SEO Performance:

By consistently providing search engines with up-to-date and well-organized sitemaps, you’re enhancing your website’s SEO performance. This can lead to higher search engine rankings and increased visibility among your target audience.

Conclusion

The Google Sitemap Opencart module is a valuable addition to your SEO toolkit, streamlining the management of sitemaps and improving your website’s search engine visibility. By automating sitemap generation and ensuring that search engines are well-informed about your site’s content, you’re giving your online store a significant advantage in the competitive world of e-commerce.

Investing in SEO tools like the Google Sitemap Opencart module not only enhances your site’s performance but also positions your business for sustained growth and success in the digital marketplace. So, take the initiative, install the module, and watch your online store climb the ranks in search engine results.

In this way, you can install and set up the Google Sitemap feed module for Opencart 4. Please let us know if you have any kind of projects, you can email us at webocreation.com@gmail.com. Hope you liked this free opencart module, please subscribe to our YouTube Channel and get more Opencart free extensions. You can also find us on Twitter and Facebook.

Opencart API, Opencart 4 and 3 API documentation for developer, postman

Opencart API documentation for the developer: supports output formats that return a JSON response. Output formats are defined by specifying the output request parameter. With opencart API we can perform CRUD functionalities.

Opencart 4 API documentation

In Opencart 4 there are some changes on the API endpoints, here is the login API endpoint /index.php?route=api/account/login:

Here is the POSTMAN testing:

Opencart POSTMAN API

Here are the API username and API key in the Opencart admin.

Opencart API username key

IP Addresses to allow to access the Opencart API endpoints:

Opencart API IP addresses

If you are not using the master branch and using the Opencart 4.0.1.1 then your endpoints may not work, and looking at the code there is a session of api_id that is checked and that session is not set. So there are some issues, so to make it work, we uncomment the following lines of code at catalog/controller/startup/api.php

<?php
namespace Opencart\Catalog\Controller\Startup;
class Api extends \Opencart\System\Engine\Controller {
	public function index(): object|null {
		if (isset($this->request->get['route'])) {
			$route = (string)$this->request->get['route'];
		} else {
			$route = '';
		}
		// if (substr($route, 0, 4) == 'api/' && $route !== 'api/account/login' && !isset($this->session->data['api_id'])) {
		// 	return new \Opencart\System\Engine\Action('error/permission');
		// }
		return null;
	}
}

Example of Opencart API call

Here is an example of an Opencart API call

<?php
$url = 'https://www.yourdomain.com/index.php?route=api/account/login&language=en-gb&store_id=0';
	 
$request_data = [
	'username' => 'Default',
	'key'      => 'YOURSECRETKEY'
];

$curl = curl_init();

curl_setopt($curl, CURLOPT_URL, $url);
curl_setopt($curl, CURLOPT_RETURNTRANSFER, 1);
curl_setopt($curl, CURLOPT_HEADER, false);
curl_setopt($curl, CURLOPT_SSL_VERIFYPEER, 0);
curl_setopt($curl, CURLOPT_CONNECTTIMEOUT, 30);
curl_setopt($curl, CURLOPT_TIMEOUT, 30);
curl_setopt($curl, CURLOPT_POST, 1);
curl_setopt($curl, CURLOPT_POSTFIELDS, $request_data);

$response = curl_exec($curl);

$status = curl_getinfo($curl, CURLINFO_HTTP_CODE);

curl_close($curl);

if ($status == 200) {
	$api_token = json_decode($response, true);

	if (isset($api_token['api_token'])) {

		// You can now store the session cookie as a var in the your current session or some of persistent storage
		$session_id = $api_token['api_token'];
	}
}

$url = 'http://www.yourdomain.com/opencart-master/upload/index.php?route=api/sale/order.load&language=en-gb&store_id=0&order_id=1';

$curl = curl_init();

curl_setopt($curl, CURLOPT_URL, $url);
curl_setopt($curl, CURLOPT_RETURNTRANSFER, 1);
curl_setopt($curl, CURLOPT_HEADER, false);
curl_setopt($curl, CURLOPT_SSL_VERIFYPEER, 0);
curl_setopt($curl, CURLOPT_CONNECTTIMEOUT, 30);
curl_setopt($curl, CURLOPT_TIMEOUT, 30);
curl_setopt($curl, CURLOPT_POST, 1);
curl_setopt($curl, CURLOPT_POSTFIELDS, $request_data);

// Add the session cookie so we don't have to login again.
curl_setopt($curl, CURLOPT_COOKIE, 'OCSESSID=' . $session_id);

$response = curl_exec($curl);

curl_close($curl);

Opencart 3 API documentation

When we see API at Admin >> System >> Users >> API, then we are interested to explore it. We checked the catalog folder and found the image below:

Opencart API folder structure

All these tests are made in demo.webocreation.com. Checking the code we have to log in first. So we type the following URL but it gives me the following error.

https://demo.webocreation.com/index.php?route=api/login

<b>Notice</b>: Undefined index: key in <b>D:\xampp\htdocs\opencart2302\catalog\controller\api\login.php</b> on line <b>11</b>[]

Again we checked the code and found the following:

// Login with API Key
$api_info = $this->model_account_api->getApiByKey($this->request->post['key']);
if ($api_info) {

Which means we have to log in through the POST request. So we wrote the following curl code to log in through the POST URL.

We write the following code in opencartapi.php and upload it to webocreation.com root server:

<?php

$curl = curl_init();

curl_setopt_array($curl, array(
  CURLOPT_URL => "https://webocreation.com/index.php?route=api%2Flogin",
  CURLOPT_RETURNTRANSFER => true,
  CURLOPT_ENCODING => "",
  CURLOPT_MAXREDIRS => 10,
  CURLOPT_TIMEOUT => 30,
  CURLOPT_HTTP_VERSION => CURL_HTTP_VERSION_1_1,
  CURLOPT_CUSTOMREQUEST => "POST",
  CURLOPT_POSTFIELDS => "------WebKitFormBoundary7MA4YWxkTrZu0gW\r\nContent-Disposition: form-data; name=\"key\"\r\n\r\nG63RZVjNnkPS3KdI8DZRrDph4LueZCRJcPwTfgnH8KzMFvVrsjp4g73YM1W3RdkTHRHyXK7c6vDVUsadxtx8c8r1uW2NWt0flPFNm5pVCq862jrBbrmztbBlPi4GWf9kQeB3YqT3uyOp7KldgRrvRu3eROSyGZZH2HEJ9sh9zSbXpm0u6wIOOdBoaNARzUOD74fHSn5iAYwCwPHeVkA29p3tkIPr8OFIzA9r3UGOXJ9xhWKojsGuKwnWEyaKuMB0\r\n------WebKitFormBoundary7MA4YWxkTrZu0gW--",
  CURLOPT_HTTPHEADER => array(
    "cache-control: no-cache",
    "content-type: multipart/form-data; boundary=----WebKitFormBoundary7MA4YWxkTrZu0gW",
    "postman-token: dc6b20c6-b84d-3b12-3b89-e586d0058347"
  ),
));

$response = curl_exec($curl);
$err = curl_error($curl);

curl_close($curl);

if ($err) {
  echo "cURL Error #:" . $err;
} else {
  echo $response;
}

CURLOPT_URL: OpenCart API URL

Below is the part of the code where you add your key that you have to change to yours:

name=\”key\”\r\n\r\nG63RZVjNnkPS3KdI8DZRrDph4LueZCRJcPwTfgnH8KzMFvVrsjp4g73YM1W3RdkTHRHyXK7c6vDVUsadxtx8c8r1uW2NWt0flPFNm5pVCq862jrBbrmztbBlPi4GWf9kQeB3YqT3uyOp7KldgRrvRu3eROSyGZZH2HEJ9sh9zSbXpm0u6wIOOdBoaNARzUOD74fHSn5iAYwCwPHeVkA29p3tkIPr8OFIzA9r3UGOXJ9xhWKojsGuKwnWEyaKuMB0\r\n

Then I run http://telgap.com/opencartapi.php

{"error":{"ip":"Warning: Your IP **.**.**.** is not allowed to access this API!","key":"Warning: Incorrect API Key!"}}

I add my telgap.com IP at Admin >> Users >> API >> edit >> IP Addresses tab:

Whitelist IP in Opencart

After I add my IP and run the URL http://telgap.com/opencartapi.php again I got the successful message:

{"success":"Success: API session successfully started!","token":"kyJoxIKh9wEShzUxvBz2urUZSq"}

Following is the POSTMAN workout to achieve it.

POSTMAN Opencart API

I hope it will help somewhat to dig more about the OpenCart API.

You can check the following Opencart API-related posts:

Please let us know where and how are you using the Opencart API that you have used in eCommerce websites or have any questions or suggestions, please subscribe to our YouTube Channel and read more about Opencart 4 tutorial, opencart 3 tutorials, custom module theme development. You can also find us on Twitter and Facebook.

Top Generative AI Strategies to Drive E-commerce Revenue Growth

Generative AI automates tasks in e-commerce, such as personalized recommendations, chat assistants, dynamic pricing, demand forecasting, and copywriting. Implementing AI in ecommerce will benefit the business operations in many ways, cut costs, boost sales, and support customers 24/7 (AI assistant and Chatbots). 

Generative AI in Ecommerce overview 

Generative AI in ecommerce enhances the business operations, as generative AI analyses customer data and behaviour to suggest products tailored to individual preferences and past purchases. Technologies like virtual AI models try on and visual search, powered by generative AI, allow customers to visualize the products, clothing, and makeup, where it makes it easy for people to use. 

AI automates many tasks without any human intervention, like, creation of product descriptions, blog posts, and marketing copy. 

Use cases of generative AI in ecommerce

There are numerous use cases of generative AI in ecommerce that enhance the ecommerce process.

  1. More personalized recommendations 

By implementing AI in ecommerce can analyse user data and browsing history to suggest relevant products, which significantly leads to increased sales and a more engaging shopping experience.

  1. Dynamic content creation

Content creation is a more time-consuming process, but with the help of AI generative tools like ChatGPT, it has made it easier to deliver the content for products in just a few minutes it would take to deliver the product description, style tips, and social media content. 

  1. Virtual try-on and augmented reality experiences

Users may get confused before purchasing any products(apparel, makeup, eyewear), but Virtual try-on has made it easier for users to purchase a product. Now, users can try on clothes or makeup by storing their image and try virtually, which will significantly lower return rates, for example, Myntra, Lenskart, and so on. 

  1. Inventory management and demand forecasting

Generative AI models help in analysing the market trends, stock levels, and demand forecasting, which significantly helps in inventory management, and it also reduces workloads for staff. 

  1. Dynamic Pricing strategies

Generative AI strategies use dynamic pricing where they analyze competitor prices, consumer behaviour, and according to market prices. 

  1. Fraud detection and prevention 

Generative AI helps in detecting the fraudulent and can provide real-time data insights. 

  1. Enhanced Search Navigation 

Generative AI helps users to search for their desired products instantly by using search tools like AI assistants, chatbots, which significantly give results on the basis of what they are looking for. 

  1. Hyper personalized marketing campaigns 

AI tools analyse customer data to create targeted email campaigns, social media ads, and even marketing campaigns.

  1. Product Design and customization 

Generative AI helps customers to experience unique shopping, where they can change colour, styles, and overall, they can customize and design their own product. 

  1. Social Commerce Integration 

Product tags, captions, and even shoppable posts for Instagram and TikTok can be produced using AI technologies. This increases revenues through social media outlets and expedites the process of reaching younger customers.

  1. Voice Commerce Powered by AI 

Generative AI is the driving force behind the growing popularity of voice commerce. Customers may use voice commands to shop thanks to AI agents like Google Assistant and Alexa. 

  1. Automated Reviews and Summaries of Feedback 

Generative AI makes managing customer reviews easier by creating summaries of user feedback, which may be a daunting task. Thousands of evaluations may be analyzed by AI systems, which can then identify recurring themes like customer service, shipment speed, and product quality. 

Generative AI’s Drawbacks and Dangers for eCommerce

While generative AI in eCommerce offers many advantages, there are drawbacks as well.

  1. Data Security and Privacy 

Generative AI models rely on vast data sets of information, like customers’ payment history, payment details, and personal preferences, it include heavy chances of misuse of information and can lead to cyberattacks and fraud.

  1. Bias and its effects on ethics

In areas like pricing strategies or product recommendations, GenAI models may inadvertently reinforce or magnify biases in their training data, producing discriminatory results.

  1. Reliability and delusions

Hallucinations are the nonsensical outputs that GenAI models can produce.

For instance, a shirt may be described as waterproof in an AI-generated product description when it isn’t, which could cause customer complaints and returns.

  1. The expense and complexity of integration

GenAI integration with current systems, especially legacy ones, can be difficult and expensive, involving expenditures for infrastructure, data management, maintenance, and training.

  1. Assessing ROI

When benefits like better customer experience are converted into quantifiable financial results, it can be challenging to calculate the return on investment for GenAI. 

Conclusion 

Generative AI is making some tasks easy, which also reduces the workload of humans and their time.  Adopting these AI-powered tactics can help companies provide unparalleled customisation, increase productivity, and maintain an advantage over rivals in a congested online market.

Custom Menu Links for OpenCart free extension

This free OpenCart extension module allows you to add custom menu links to your store’s main navigation menu. You can easily add, edit, delete, and position custom menu items from the admin panel. You can display the custom menu item either in front of categories or at the end of categories.

Features

  • Admin Interface: Manage your custom links through a user-friendly interface in the admin panel.
  • Add Custom Menu Links: Easily add new links to your main menu.
  • Position Menu link: Add the custom link at the beginning or the end of the main navigation.
  • Enable/Disable: Quickly enable or disable the extension as needed.
  • No Code Required — Easily manage from the admin
  • Unlimited Custom Links to the default main menu

Installation

  1. Download: Get the extension files.
  2. Upload: Upload the contents of the upload directory to your OpenCart root directory.
  3. Install:
    • Log in to your OpenCart admin panel.
    • Navigate to Extensions > Installer and upload the extension’s .zip file.
    • Go to Extensions > Extensions and select “Modules” from the dropdown.
    • Find “Custom Menu Links” and click the “Install” button.
      Custom Menu Links
  4. Configure:
    • After installation, click the “Edit” button next to the extension.
    • Add your custom menu links and configure their settings.
    • Enable the module to display the links on the storefront.
Custom Menu Links Settings

How to Use

Once installed:

  1. Go to Extensions > Modules > Custom Menu Links >> Edit.
  2. Make sure the Status is enabled
  3. Click the blue button to Add New Link.
  4. Enter the:
    • Link Title
    • URL in Link
    • Sort Order
    • Position: Start of Menu or End of Menu
  5. Save the changes and refresh your store’s front end — your custom links will appear in the main menu.
Custom menu links frontend

Here in the example, we add Blog at the start and Contact at the end of the main navigation.

If you don’t want to show the category in the main navigation, then uncheck the Top field by editing the categories.
Top: Choose whether to display this category in the top menu bar. If you don’t check this checkbox, it will not show in the Top main menu.

Read more: Category management in Opencart 4

Use Case Examples

Use CaseDescription
Make the Return, Shipping, or Terms pages more visible.Link to your blog even if it’s on a different CMS (e.g., WordPress).
Link to brand pageDrive traffic to a featured collection or manufacturer.
Policy pagesMake Return, Shipping, or Terms pages more visible.
External toolsLink to live chat, community, or third-party tools.

Security & Performance

  • Clean and secure code
  • No overrides — don’t modify core files manually, it uses events to handle the frontend to show at the main navigation
  • Minimal footprint — no effect on store performance

License

This extension is licensed under the GPL-3.0 License.

Final Thoughts

For any store owner looking to improve navigation and user experience without modifying templates or writing code, the Custom Menu Links Free Extension for OpenCart 4 is a must-have. It’s quick to install, easy to configure, and highly useful for modern e-commerce sites. Hope you liked this opencart module, please subscribe to our YouTube Channel for Opencart video tutorials. You can also find us on Twitter and Facebook.

💬 Do you have questions or need a custom feature added? Feel free to contact us at WeboCreation.