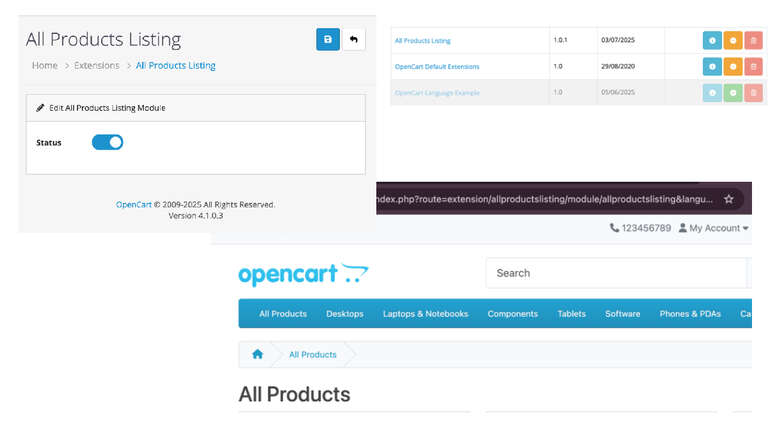
This free opencart extension provides a simple and effective way to display all products on a single, dedicated page in your OpenCart 4 store. It adds a link to your main navigation menu, making it easy for customers to browse your entire catalog. The page features a “load more” functionality, which dynamically loads products as the user scrolls, ensuring a smooth and fast browsing experience without long initial loading times. Managing a large product catalog in OpenCart can be challenging, especially when you want to provide customers with a comprehensive view of all your products. While OpenCart offers category-based browsing, sometimes you need a simple “All Products” page that displays your entire inventory in one place. Today, we are providing a free OpenCart module that does exactly that.
Features
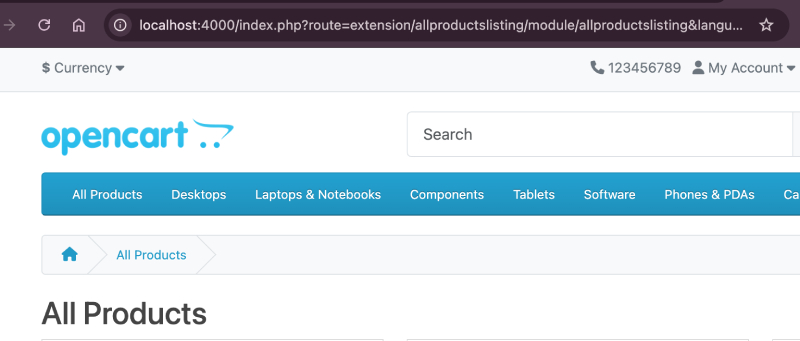
Dedicated “All Products” Page: Creates a new page to list every product in your store.
Main Menu Link: Automatically adds an “All Products” link to the main navigation menu.
Load More Functionality: Products are loaded dynamically as the user scrolls down the page, improving performance and user experience.
Admin Control: Easily enable or disable the entire module from the OpenCart admin panel.
Clean Installation: The module uses OpenCart’s event system to add the menu link and cleanly removes the event upon uninstallation.
Standard Module: Follows OpenCart 4 best practices for module development.
Prepare the Extension: Download the module from the above link, which will give you a zip file likeallproductslisting.ocmod.zip.
Upload:
Navigate to your OpenCart Admin Panel.
Go to Extensions > Installer.
Click the Upload button and select the allproductslisting.ocmod.zip file.
Then click the Install button
Install the Module:
After the upload is complete, go to Extensions > Extensions.
From the dropdown filter, select Modules.
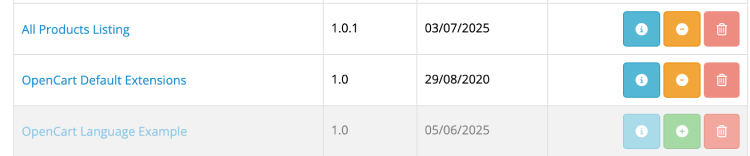
Find All Products Listing in the list and click the green Install button (plus icon).
Enable the Module:
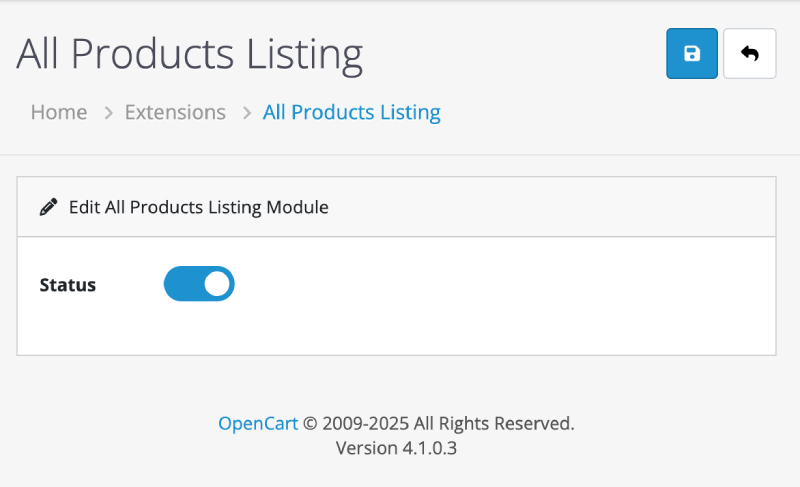
Once installed, click the blue Edit button (pencil icon) next to the module.
Change the Status to Enabled.
Click the Save button in the top right.
How It Works
Frontend
Menu Link: The module uses an event (catalog/view/common/menu/before) to add the “All Products” link to the start of your main navigation menu. This only happens if the module is enabled in the admin panel.
All Products Page: The link directs users to the route index.php?route=extension/allproductslisting/module/allproductslisting. This page lists products from your catalog.
Load More: As the user scrolls towards the bottom of the page, an AJAX request is sent to the server to fetch the next batch of products, which are then appended to the list seamlessly.
Backend (Admin)
Configuration: The admin interface Extensions > Extensions > Modules > All Products Listing is simple, containing only a status switch to enable or disable the module.
Install/Uninstall: The install() method sets up the event required for the menu link. The uninstall() method removes this event, ensuring your system is left clean if you decide to remove the extension.
File Structure
The module is contained within the upload/extension/allproductslisting/ directory and follows the standard OpenCart extension structure:
Compatibility: Developed and tested for OpenCart 4.x.
Why You Need an All Products Page
Business Benefits
Improved User Experience: Customers can browse your entire catalog without navigating multiple categories
Better SEO: A comprehensive product listing can improve search engine visibility
Simplified Navigation: Especially useful for stores with complex category structures
Inventory Overview: Helps both customers and administrators see the full product range
Use Cases
Wholesale stores showing complete catalogs
Small stores with limited product ranges
Clearance or sale sections
Product comparison shopping
Mobile-friendly browsing experiences
Conclusion
Creating a comprehensive “All Products” page in OpenCart doesn’t have to be complicated. This free module provides a solid foundation that you can customize to meet your specific needs. Whether you’re running a small boutique or a large catalog store, having an all-products view can significantly improve your customers’ shopping experience. Hope you liked this opencart module, please subscribe to our YouTube Channel for Opencart video tutorials. You can also find us on Twitter and Facebook.
In the competitive world of e-commerce, compelling product descriptions are essential. They boost SEO, build trust, and drive conversions. But writing high-quality, keyword-rich content for every product can be overwhelming, especially if you’re managing hundreds (or thousands) of SKUs.
That’s where the AI Description Generator Extension for OpenCart 4.1.0.3 comes in. This powerful new module uses artificial intelligence to generate optimized, engaging, and relevant product descriptions — all with just one click.
The AI Description Generator is a smart tool built for OpenCart 4.1.0.3 that connects your store with an AI model (such as OpenAI/GPT). It uses your existing product data — like product name, model, category, and keywords — to instantly generate human-like descriptions that are unique, readable, and SEO-friendly.
No more writer’s block. No more hiring expensive copywriters. Just smart, fast, and effective content generation directly inside your admin panel.
🧠 Key Features
✅ One-click Description Generator Generate AI-written descriptions directly from your product edit page.
✨ SEO-Optimized Content Include keywords and phrases relevant to your niche to improve your search rankings.
📌 Fully Editable Output Review and customize AI-generated text before saving it to the product.
🛠️ OpenCart 4.1.0.3 Compatible Built and tested specifically for the latest OpenCart version.
🌍 Multi-language Support (optional) Generate content in different languages based on your store configuration.
📥 Installation & Setup
Installing the extension is easy:
Upload the extension ZIP using the Extension Installer.
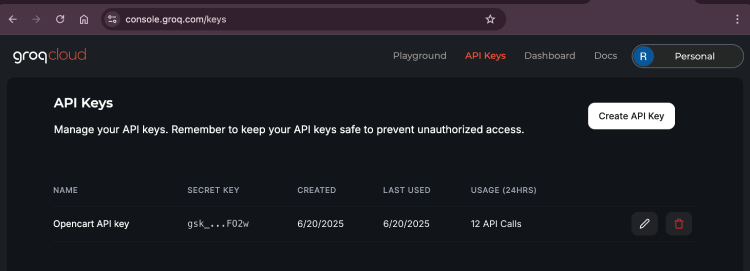
Configure your API key (for Grok or another provider). We used Grok as they have some free access for prompts. For that, go to https://console.groq.com/keys and set up the API keys, and use that API key
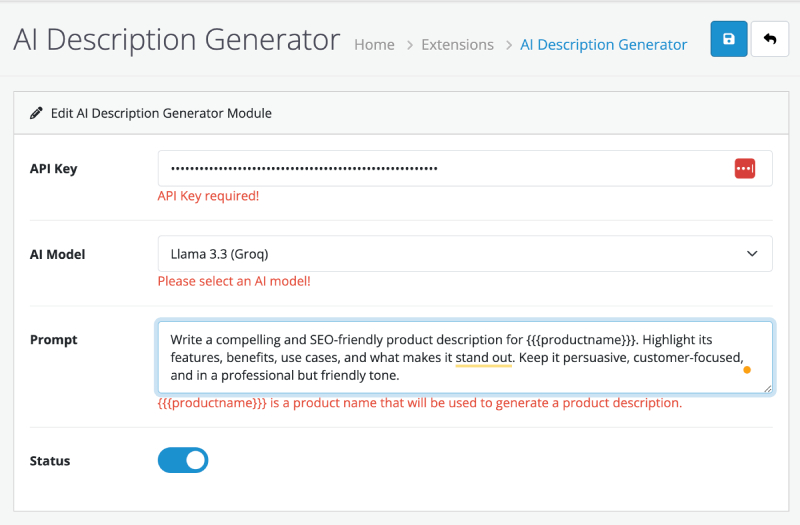
Navigate to Extensions > Extensions >> Modules and install the “AI Description Generator”. Enter the API key, select the AI model, if needed, change the prompt, enable the status, and click Save.
You’re ready to go! Start generating descriptions from the product edit screen.
📷 How It Works
Navigate to Catalog > Products in your OpenCart admin panel.
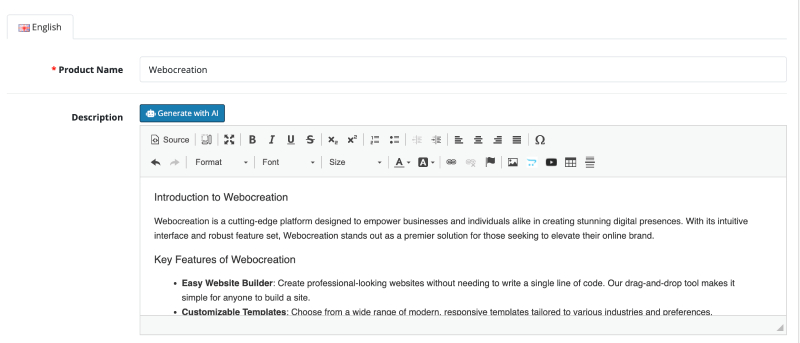
Add or edit any product, and enter the Product Name. The extension uses the product name or title to craft a detailed description.
Then, click the “Generate with AI” button, which is just above the Product description.
Review the text and make any necessary edits, then click Save.
That’s it! You now have a professional-grade product description in seconds.
💡 Benefits of Using AI-Generated Product Descriptions
Save Time: Generate 50+ descriptions in minutes instead of hours.
Consistent Tone: Ensure your brand voice stays consistent across your catalog.
Improve SEO: Well-written descriptions help boost your visibility on Google.
Boost Conversions: Informative and engaging content builds trust and drives purchases.
🎯 Ideal Use Cases
New store setup with a large catalog
Dropshipping stores with manufacturer content
SEO-focused rebranding projects
Multilingual stores needing translated content
🤖 AI That Works For You
The AI Description Generator gives OpenCart merchants a modern, intelligent way to handle one of the most tedious tasks in e-commerce. Whether you’re launching new products or revamping your entire catalog, this extension is your productivity booster.
In this hosting tutorial, we are looking into the AWS Lightsail LAMP stack, where we will host Opencart in AWS, and found out that there is no easy way to install it like WordPress or Magento even in AWS Lightsail, hope the Opencart package will be added soon, but for now, we need to use LAMP stack to host the Opencart in the AWS Lightsail. AWS Lightsail LAMP stack includes the latest versions of PHP 7+, Apache, and MySQL with phpMyAdmin and pre-configured components and PHP modules include FastCGI, ModSecurity, SQLite, Varnish, ImageMagick, xDebug, Xcache, OpenLDAP, Memcache, OAuth, PEAR, PECL, APC, GD, and cURL. All of the PHP modules and components needed for Opencart hosting are available in the LAMP stack of AWS Lightsail.
Let’s get started with AWS LightSail
Go to https://aws.amazon.com/lightsail, and create an account or log in to your AWS account. The main AWS Lightsail dashboard page is separate from the main AWS dashboard. Or you can navigate from All services >> Compute >> Lightsail. It may look similar to the below screenshot.
Create a LAMP Instance for Opencart hosting
In the Lightsail dashboard click the “Create Instance” button. You will see a page where you can select instance details:
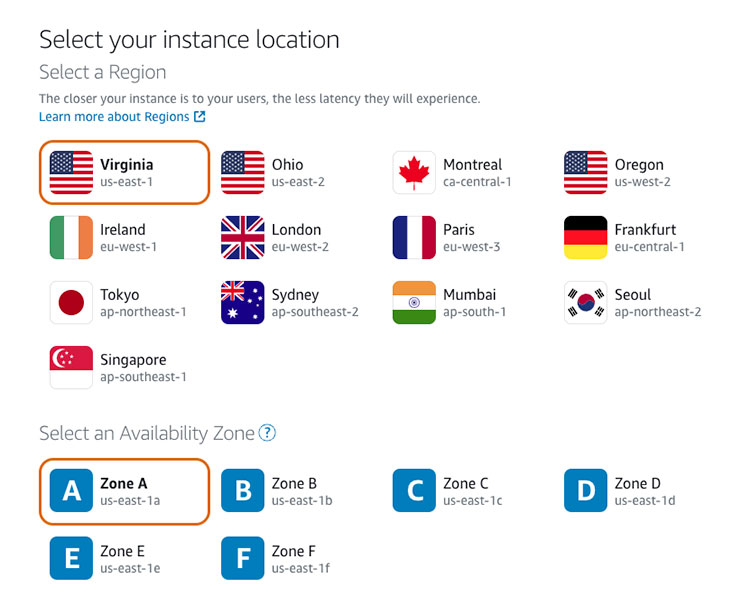
Instance Location and Availability Zone: The location is auto-selected as per your geo-location but you can change it as per your hosting need. Mostly we used Virginia, Zone A (us-east-1) as our website visitors are mostly from the USA, it is upon your requirement and decides which location and Availability zone to choose.
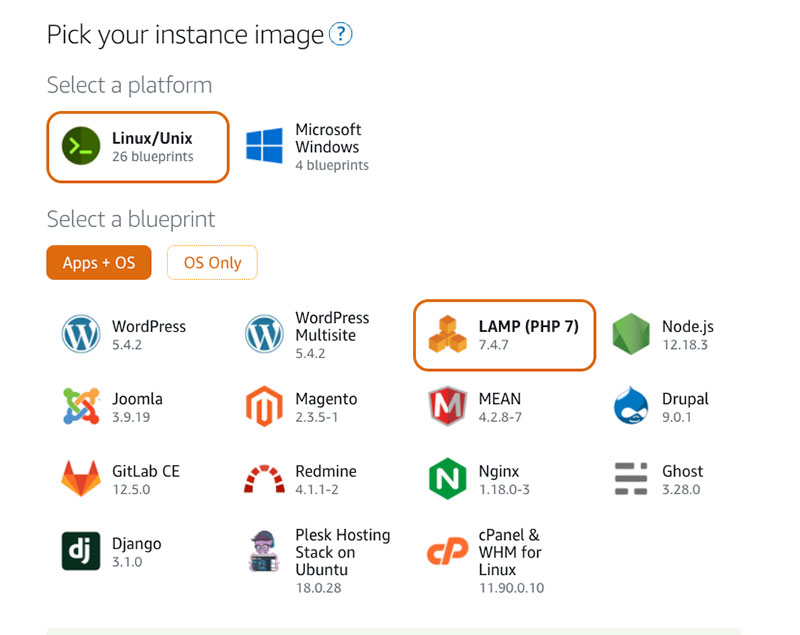
Platform instance image and Stack blueprint: We need linux/unix for the Opencart hosting so in “Select a platform” select the Linux/Unix. Then, in “Select a blueprint” select the LAMP (PHP 7)
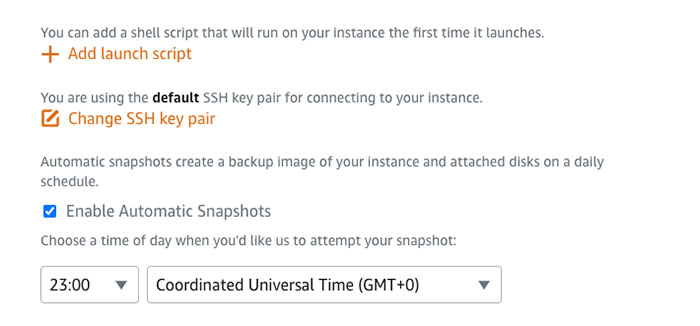
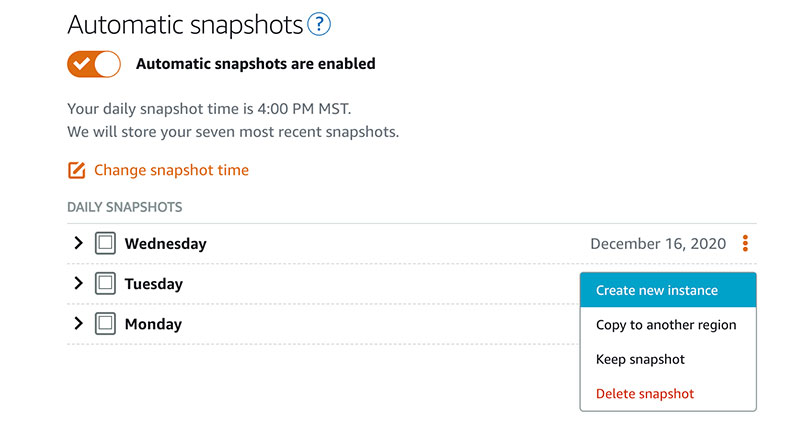
SSH key pair and Automatic snapshots: Now go more below and you will see “Add launch script”, for now, we are not adding any script there. We will run scripts one by one in a command shell. If your account is new then create an SSH key pair else by default the key is selected. If you want to create something new then you can change it by clicking “Change SSH key pair”. Then check the checkbox for “Enable Automatic Snapshots” as this acts as a backup for you. If you don’t need backup then no need to check it. After you enable it, select the time you want to create the snapshot. We select 23:00 Coordinated Universal Time.
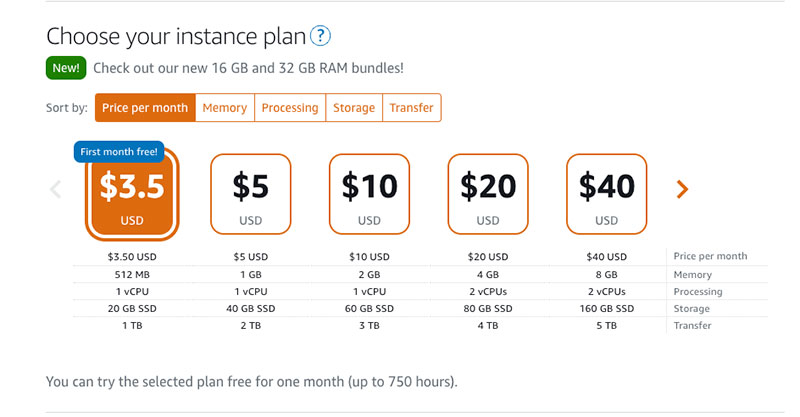
Choose your instance plan: For a start, for Linux/Unix-based instances, we can try the $3.50 USD Lightsail plan free for one month (up to 750 hours). Later, if we need to scale then we will scale by creating a new instance from the snapshots.
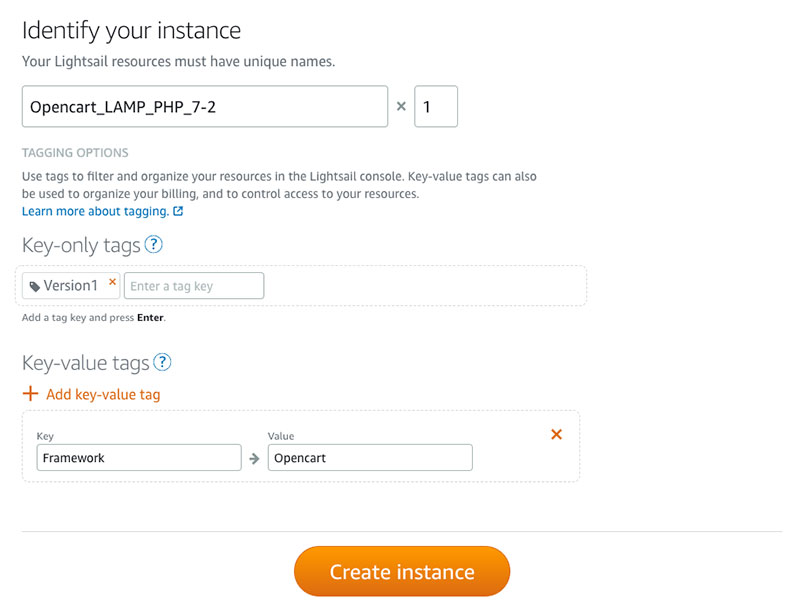
Identify your instance for Opencart: Now in the identify your instance, we entered the name as “Opencart_LAMP_PHP_7-2”, Key-only tags as Version1, and Key-value tags with Key as Framework and Value as Opencart. You can enter as per your need to identify your instance.
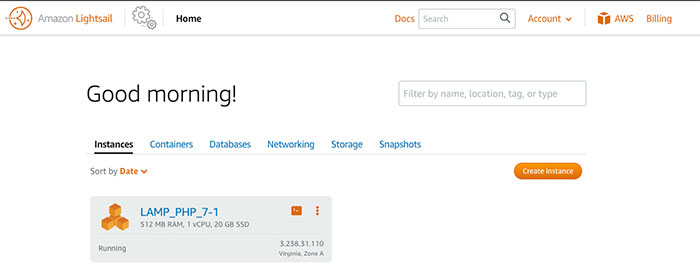
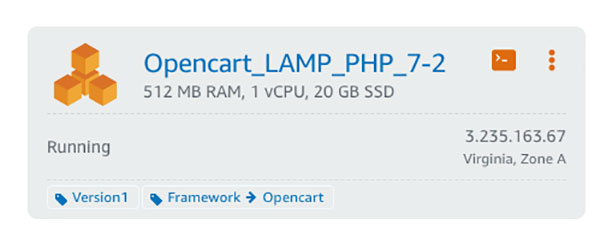
Now finally click the Create Instance button. It will take around 1 min to spin up your virtual machine with a LAMP stack. Then, you will see an instance in your dashboard like below:
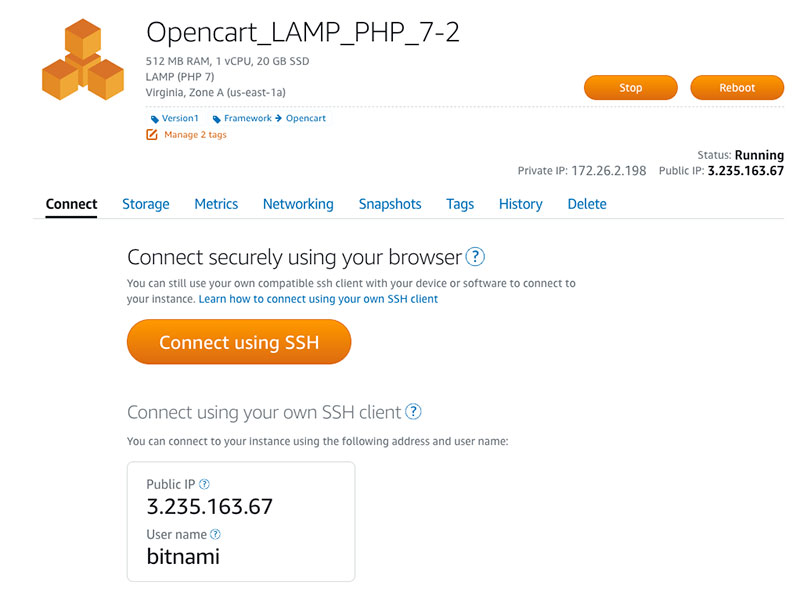
Now, click on it and you will get the details of that instance. You can see the buttons to stop and reboot. You can see the “Connect using SSH” button, Public IP and Username.
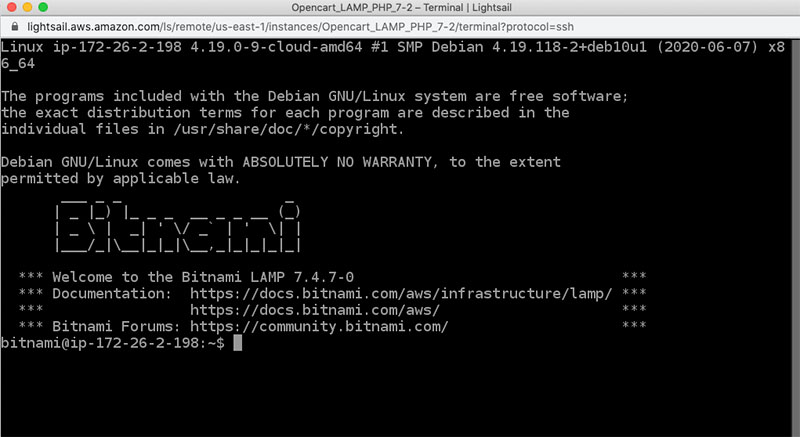
Click on the “Connect using SSH”, and you will see the command interface where you can enter your commands.
Update system and PHP version in AWS lightsail
To ensure your system is up-to-date, you can run the following command:
sudo apt update -y
Check your PHP version by the following command as Opencart needs PHP version 7.3. If your PHP version is less the 7.3 than you need to upgrade to PHP 7.3+
php -v
If you are using the latest LAMP stack in AWS Lightsail then it is greater than PHP 7.4.
Opencart installation steps in the AWS Lightsail LAMP stack
Change the directory to /opt/bitnami/apache2/htdocs
cd /opt/bitnami/apache2/htdocs
When you do the ls command then you will see index.html which shows the Bitnami page. So, let’s remove it by the following command:
sudo rm index.html
Now, let’s retrieve the Opencart zip code by using wget. You can get the zip URL from the Github Opencart releases. We are using the zip link of Opencart 3.0.3.6 as this is the latest version of Opencart now.
Let’s unzip the opencart-3.0.3.6.zip to backup/ folder
unzip opencart-3.0.3.6.zip -d ./backup
Now, move all the files and folder at backup/upload as these are the Opencart files
mv ./backup/upload/* .
Now, if you visit your Public IP, which is 3.235.163.67, then you will get a similar error to error no 1. So, let’s change the ownership of the files and folders to the daemon: daemon by running the following command:
If you want to be sure of files and folders permissions then you can run the following two commands as well:
sudo find . -type d -exec chmod 0755 {} \;
sudo find . -type f -exec chmod 0644 {} \;
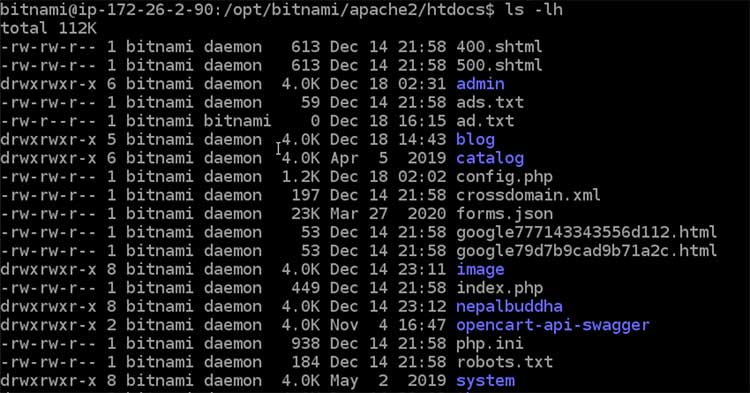
Now, see files and folders permission in AWS Lightsail for Opencart by running the command ls-lh
ls -lh
You will see the output below:
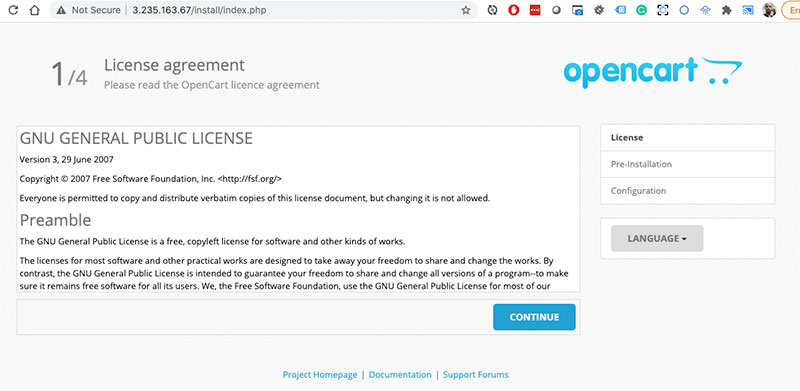
Now, if you go to public IP, then you will be able to see the first page of the Opencart installation.
Create Static IP
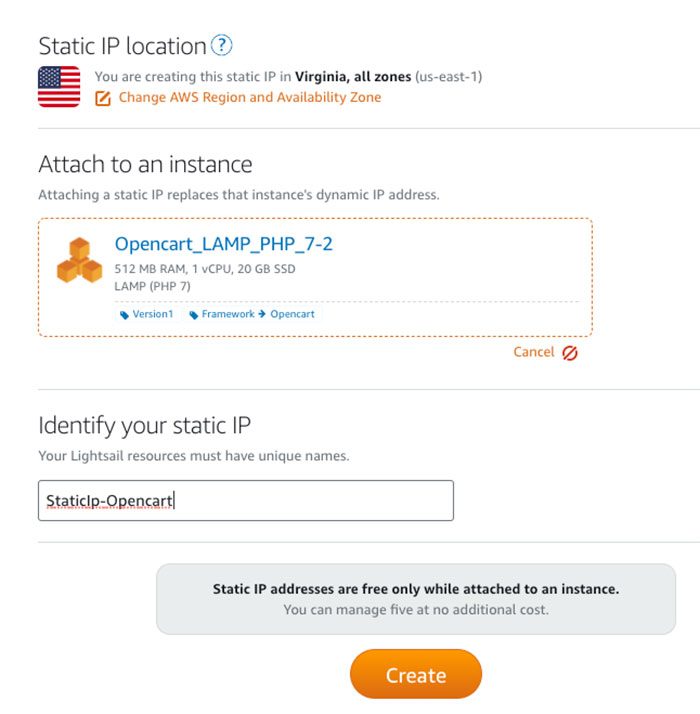
You can start the installation but it is better to set up static IP. For that, go to the instance detail page, and in the “Networking” tab in the IP addresses section, click the button “Create static IP“.
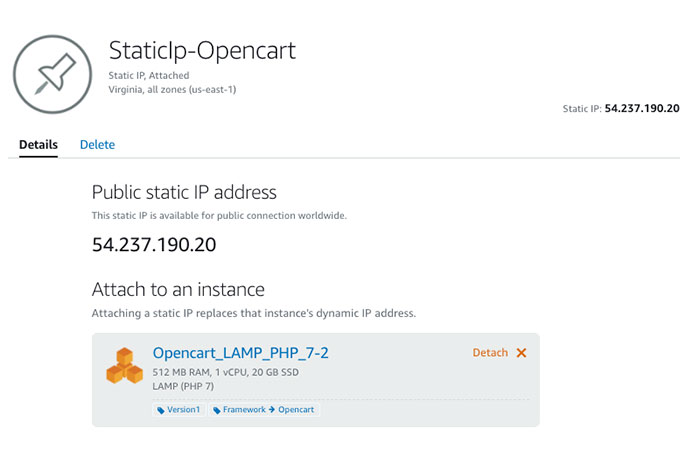
A static IP is a fixed, public IP address that you can assign and reassign to your instances. In the Static IP location, you left it default. In the Attach to an instance, select your instance, we select “Opencart_LAMP_PHP_7-2”. In the Identify your static IP, just give a unique name.
Now, your public IP as shown on the page, is 54.237.190.20. Now open the IP in the browser then you will see step 1 of the Opencart installation page.
Create DNS Zone
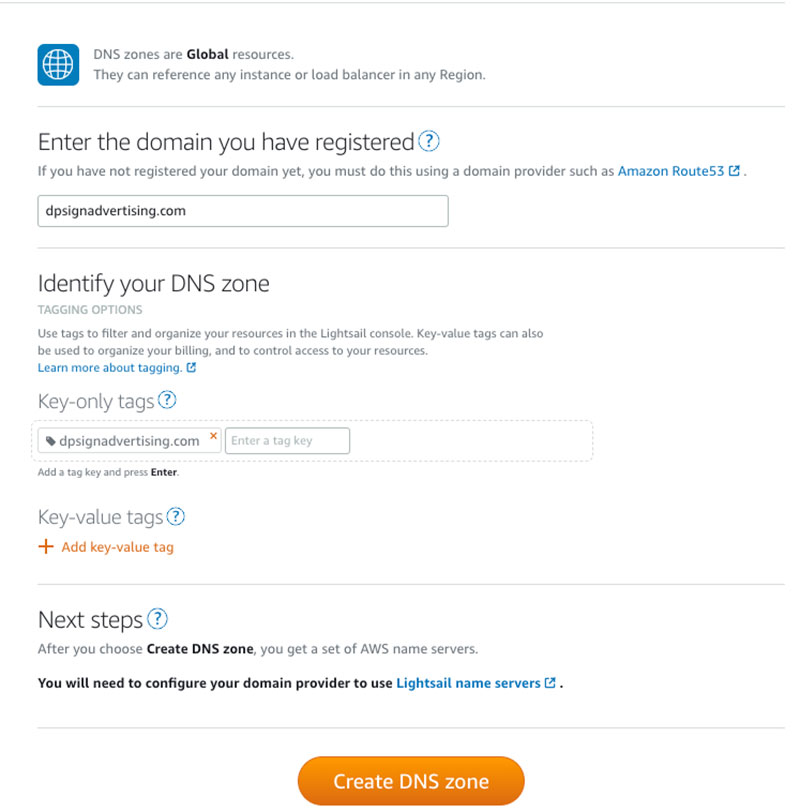
As we are using an external domain registrar than Route 53 of AWS, so we need to create the DNS zone so we can add the NS1 and NS2 in the domain. Go to the Lightsail dashboard and go to the “Networking” tab. As we already set up Static IP, you will see a button to create a DNS zone, click the button “Create DNS zone”. Enter the domain you have registered, which is dpsignadvertising.com, enter the key-only tags and key-value tags as per your requirements else leave it blank.
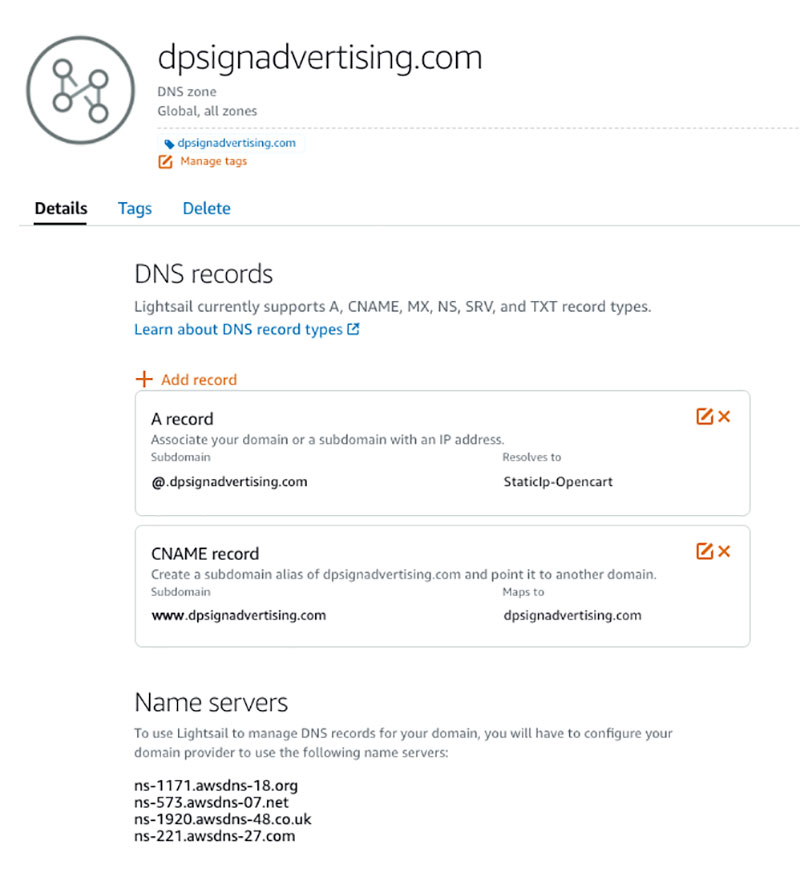
Once you submit the “Create DNS zone” then you will get the Name Servers like the below:
Click “Add record”, then select A record, and enter @ in the subdomain in “Resolves to” select Static IP, our is “StaticIp-Opencart”, then click the green tick box. Similarly, again, click “Add record”, then select CNAME record, and enter www in the subdomain and in “Maps to” enter the domain name. URL, then click the green tick box.
Add Name servers to your domain registrar
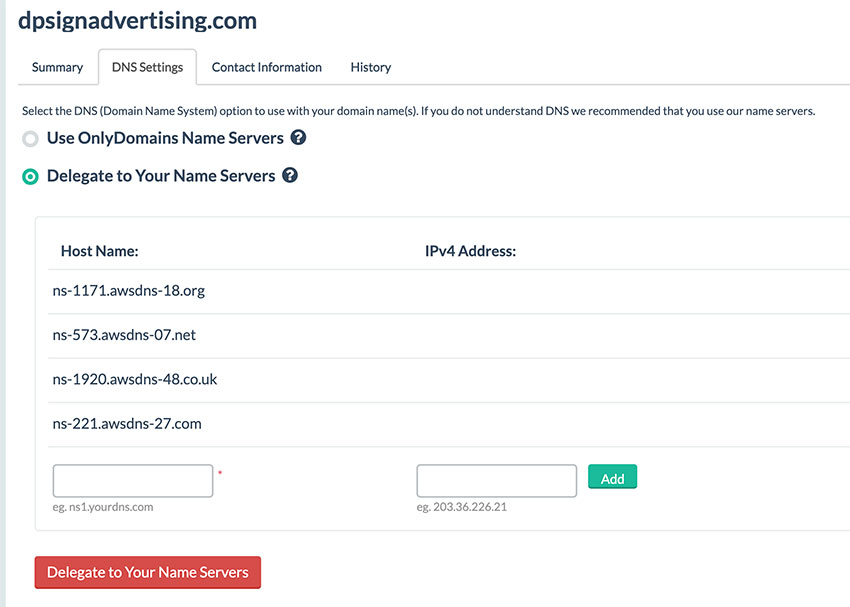
Now open your domain registrar, our is onlydomains.com, in your domain change the Name Servers details like below and delegate to your AWS nameservers.
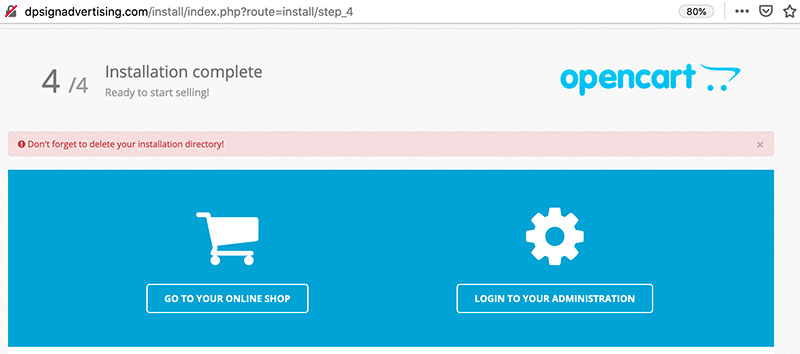
After some time go to your domain, for us, it took around 5min for DNS propagation, as we use dpsignadvertising.com for the domain so when we visit the dpsignadvertising.com, visit your URL and you will see the first page of the Opencart installation of the License agreement, click the “Continue” button.
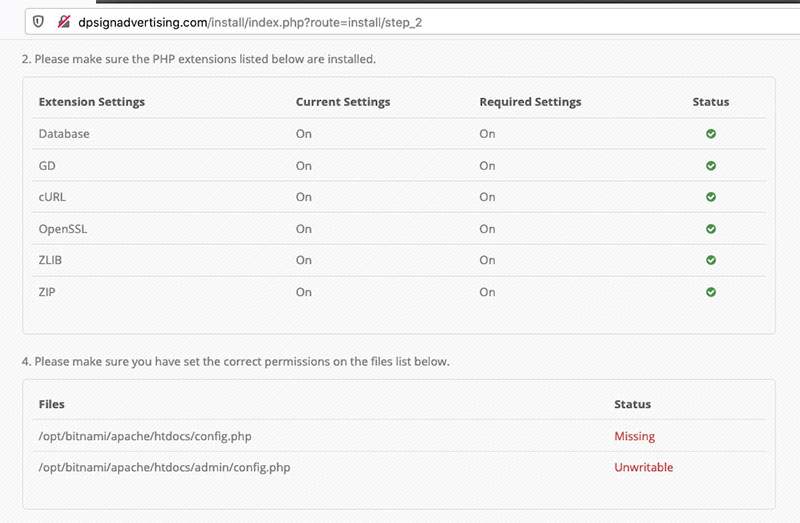
In step 2, pre-installation steps, we see all green except the config files:
So, we need to create the config.php files. You can use the following commands to change the config-dist.php to config.php
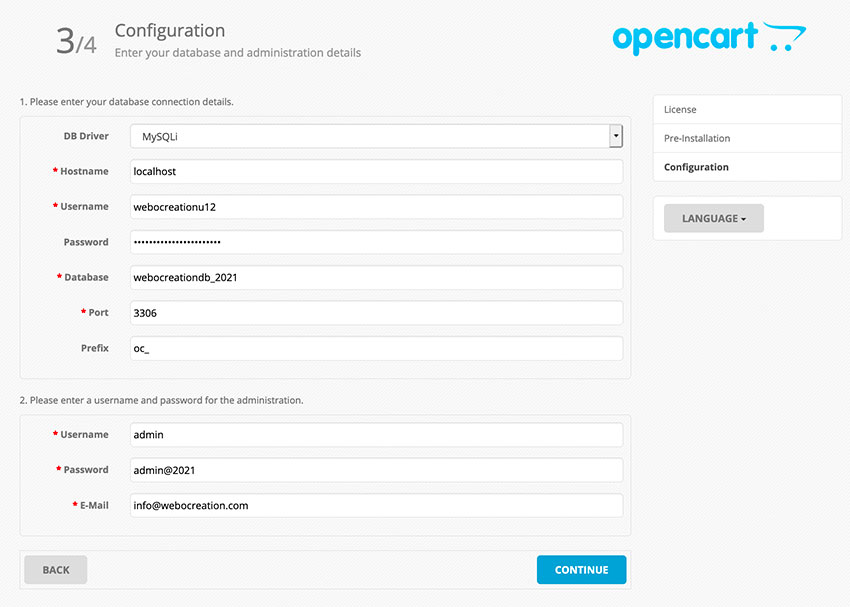
After the changes above, you can refresh the 2nd step of installation and click “Continue”. We reached the third step, where we need to enter the database and administration details.
Create a database, database user, and grant access
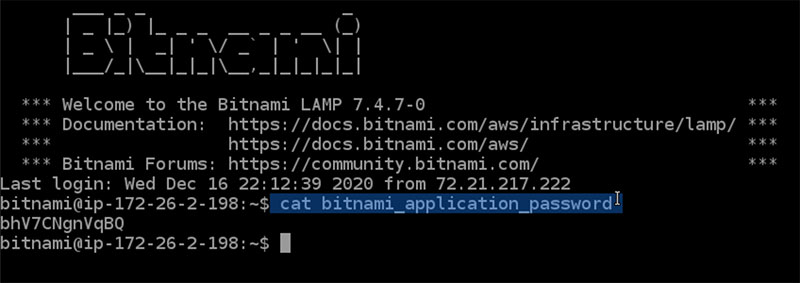
Let’s close your opened console command terminal and reconnect by clicking the “Connect using SSH” button so that you can open the new console command terminal. Then, run the command to get the root password.
cat bitnami_application_password
The root password for us is bhV7CNgnVqBQ
Now, let’s run the following command to create the new database
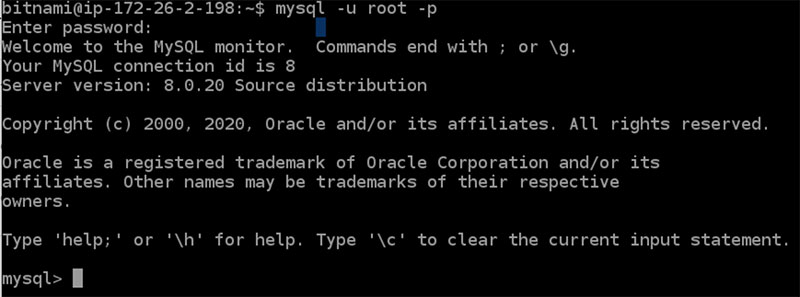
mysql -u root -p
Then enter the above password. Then you entered it into the MySQL console.
Let’s create a database, we are naming it “webocreationdb_2021”
CREATE DATABASE webocreationdb_2021;
Let’s create user “webocreationu12” with password ‘webocreation#123#dppass’ by running the command below:
CREATE USER 'webocreationu12'@'localhost' IDENTIFIED BY 'webocreation#123#dppass';
Let’s grant access to all for the user “webocreationu12” by running the command below:
GRANT ALL PRIVILEGES ON * . * TO 'webocreationu12'@'localhost';
Now, you can exit the database by typing the command exit;.
exit;
With all these, we are set for our database configuration.
DB Driver: Select MySQLi
Hostname: localhost
Username: webocreationu12
Password: webocreation#123#dppass
Database: webocreationdb_2021
Port: 3306
Prefix: oc_ or any as you need.
You can enter the username and password for the administration
Username: admin (any)
Password: admin@2021 (any)
E-mail: info@webocreation.com (any)
Once, you entered all the details then click “Continue”.
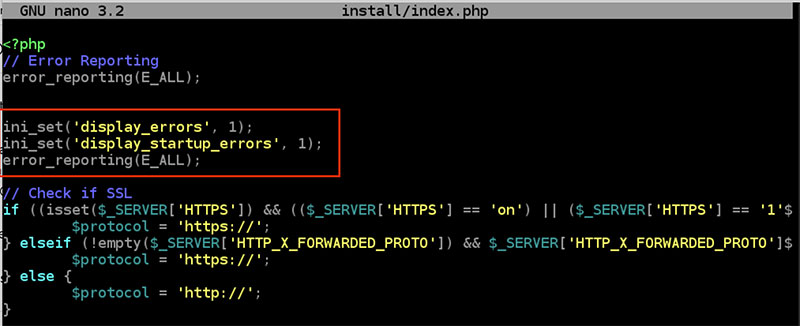
In this 3rd step, you may see the blank page. So let’s debug the error. For that, let’s run the following command:
cd /opt/bitnami/apache2/htdocs/
sudo nano install/index.php
Then, in install/index.php, add the following lines of code.
After adding the code, exit the nano by clicking Ctrl + O and then Ctrl + X. After this let’s refresh step 3 http://dpsignadvertising.com/install/index.php?route=install/step_3, then you will see error 2. Let’s fix error 2.
sudo nano install/cli_install.php
Then find the code $db->query(“SET @@session.sql_mode = ‘MYSQL40′”); and change to following:
$db->query("SET @@session.sql_mode = ''");
After the change, click Ctrl+O and Ctrl+X to exit the nano.
Similarly, do the same for install/model/install/install.php
sudo nano install/model/install/install.php
Then find the code $db->query(“SET @@session.sql_mode = ‘MYSQL40′”); and change to following:
$db->query("SET @@session.sql_mode = ''");
After the change, click Ctrl+O and Ctrl+X to exit the nano.
Now, go and refresh the URL http://dpsignadvertising.com/install/index.php?route=install/step_3 and your Opencart installation is completed.
Now, let’s delete the install folder and other files and folders which are not needed.
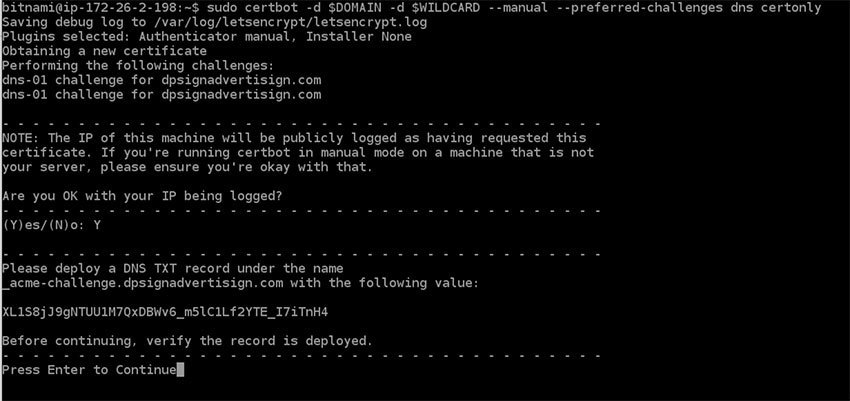
Request a Let’s Encrypt SSL wildcard certificate by running the following commands, don’t forget to replace your domain where we use dpsignadvertising.com
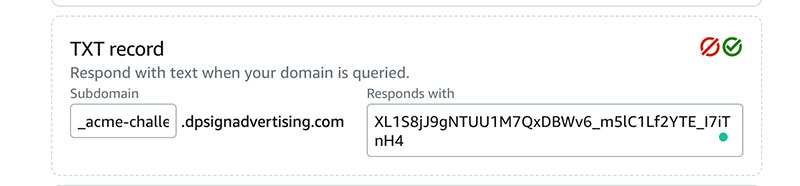
Before entering the Continue, you need to add the TXT record in the “Add record”. So, go to Lightsail dashboard >> Networking tab >> Click the DNS Zones for dpsignadvertising.com >> Click to Add record >> Select the TXT record >> in the Subdomain adds _acme-challenge >> in the “Responds with” add the value shown in console, ours is “XL1S8jJ9gNTUU1M7QxDBWv6_m5lC1Lf2YTE_I7iTnH4” and save it by clicking the green checkmark.
Please wait for some time so that it propagates, after around 10 mins we click Continue in the Console.
Sometimes, it asks to add multiple TXT records. This must be set up in addition to the previous challenges; do not remove, replace, or undo the previous challenge tasks yet. Note that you might be asked to create multiple distinct TXT records with the same name. This is permitted by DNS standards.
Create links to the Let’s Encrypt certificate files in the Apache server directory by running the following commands:
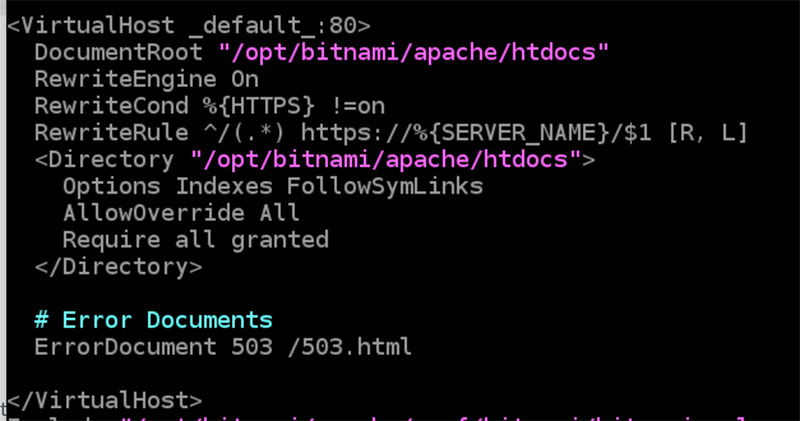
Configure HTTP to HTTPS redirection for your web application by running the following commands:
sudo vim /opt/bitnami/apache2/conf/bitnami/bitnami.conf
Add the following lines of code:
RewriteEngine On
RewriteCond %{HTTPS} !=on
RewriteRule ^/(.*) https://%{SERVER_NAME}/$1 [R,L]
After adding the code click the ESC key, and then enter:wq to save your changes, and quit Vim. Then restart the LAMP stack
sudo /opt/bitnami/ctlscript.sh restart
With these changes your SSL certificate is ready. Now you need to change a setting in Opencart admin and change the URL in the config.php and admin/config.php
cd /opt/bitnami/apache2/htdocs
sudo nano config.php
Change the define(‘HTTPS_SERVER’, ‘http://dpsignadvertising.com/’); to add https://
Exit it by pressing Ctrl + O to save and then enter, after that Ctrl + X to exit.
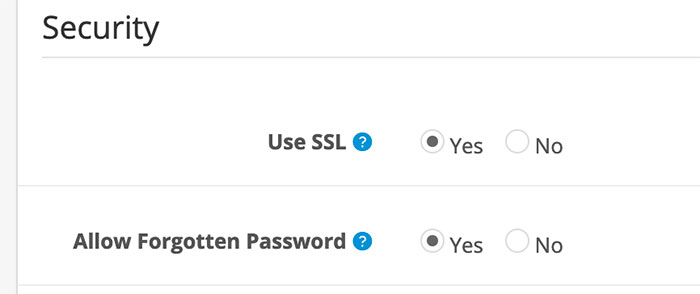
Now go to https://dpsignadvertising.com/admin and System >> Settings >> Edit the store >> go to the Server tab >> in the security section select Yes for “Use SSL”. Then click Save.
With these steps, your SSL is activated for your domain.
Rename .htaccess.txt to .htaccess
Pull the .htaccess.txt of the Opencart and rename it to .htaccess
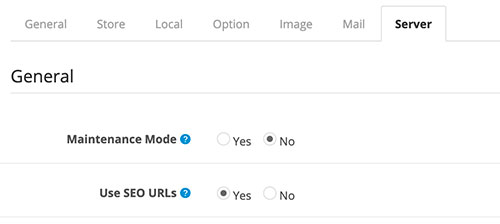
Once the .htaccess.txt is renamed to .htaccess, then we can activate the SEO URL at the admin. Go to admin >> System >> Settings >> Edit the Store >> Server tab >> Select Yes for “Use SEO URL”.
Read more for some best practices of Opencart SEO.
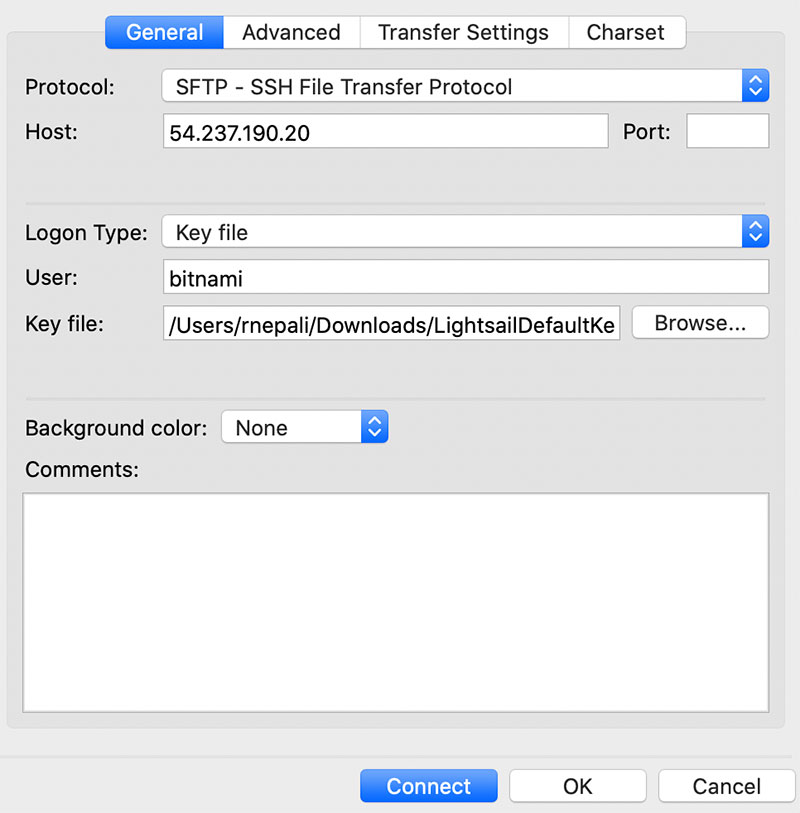
How to set up FileZilla SFTP in AWS Lightsail to transfer files?
In the Protocol field, you need to select SFTP – SSH File Transfer Protocol. The Host is your public IP. In Logon Type, you need to select the Key file. In the User field, you need to type bitnami. Finally in the Key file field, add the public key (where can you find the public key).
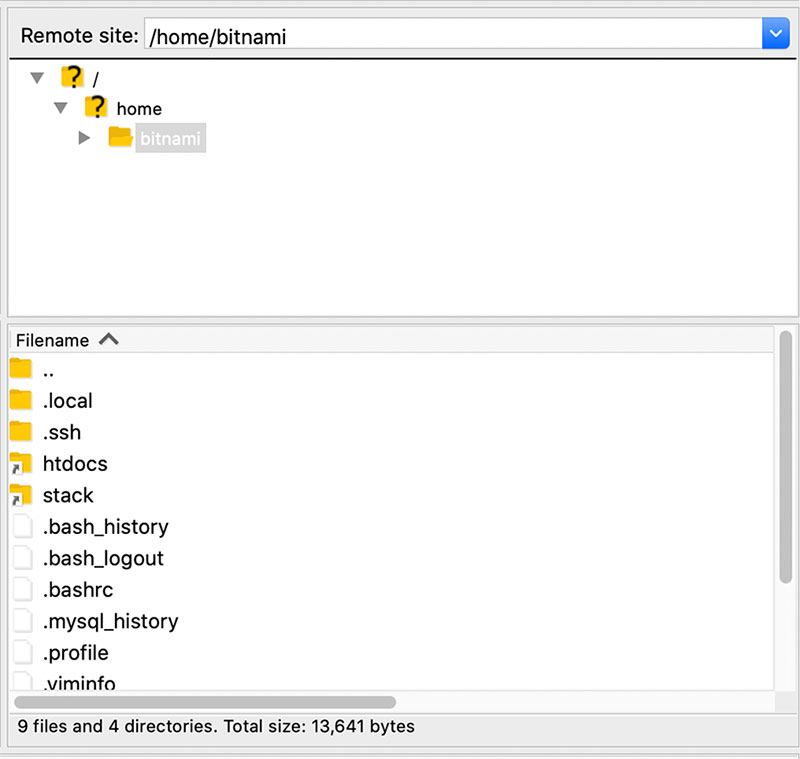
Then, click Connect button. You will get a list of folders, your code will be at htdocs.
PHPMyadmin access
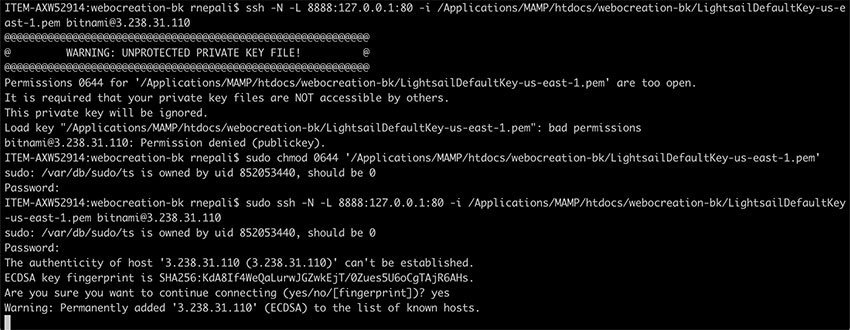
Download the Lightsail SSH public key and change its permission to 0644 and make a tunnel to connect to PHPmyadmin. First, run the following command. Change the path of the key as per yours.
Then, go to http://127.0.0.1:8888/phpmyadmin/ and you will be able to log in to the PHPMyadmin. The username is the root and you can get the password by running the following command the first time you logged in:
Where can you find the SSH public key in AWS Lightsail?
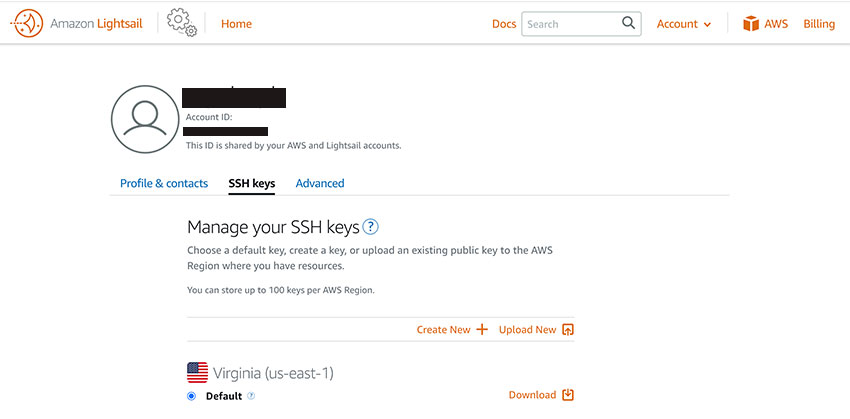
To get your SSH public key in AWS Lightsail, go to the top menu “Account“, then click on the SSH Keys tab, where you can see the lists of keys as per your region. Download the key as per your region. (How to find the region key pair of your EC2 instance?)
How to find the region key pair of your EC2 instance?
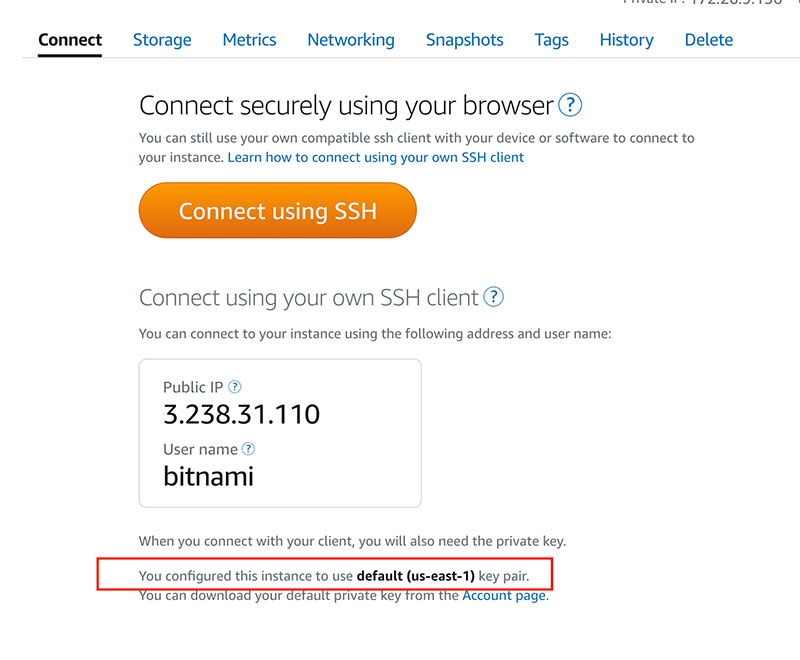
Click on the instance and go to Connect tab, then at the bottom, it shows which key pair is used for this instance.
You configured this instance to use default (us-east-1) key pair.
How to upgrade to a higher Lightsail package?
To upgrade your Lightsail plan to a larger instance, take a snapshot and then create a larger instance from the snapshot.
Setup CDN Content Distribution in AWS
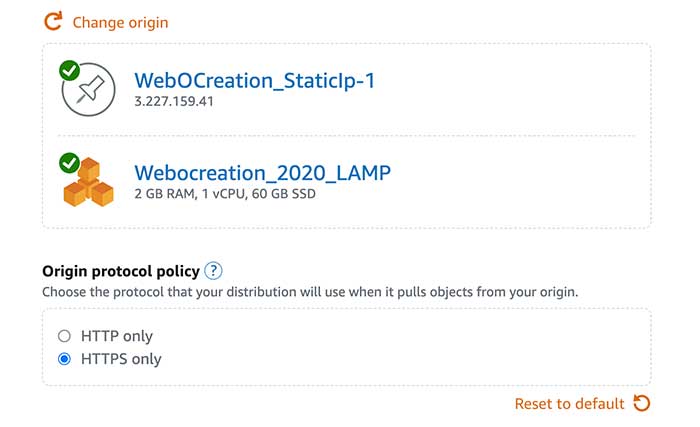
Go to Lightsail dashboard >> Networking tab >> Click the “Create distribution” button >> Then, in Choose your origin, select your Instance
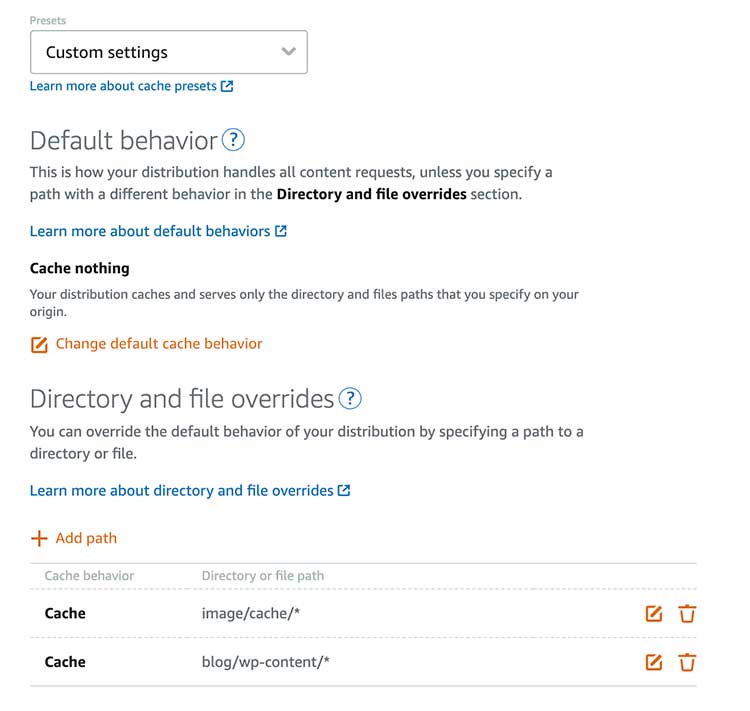
You can “Best for Dynamic Content” or Custom settings. Change the default cache behavior to cache nothing, then change the “Directory and file overrides” and give a path to the image cache.
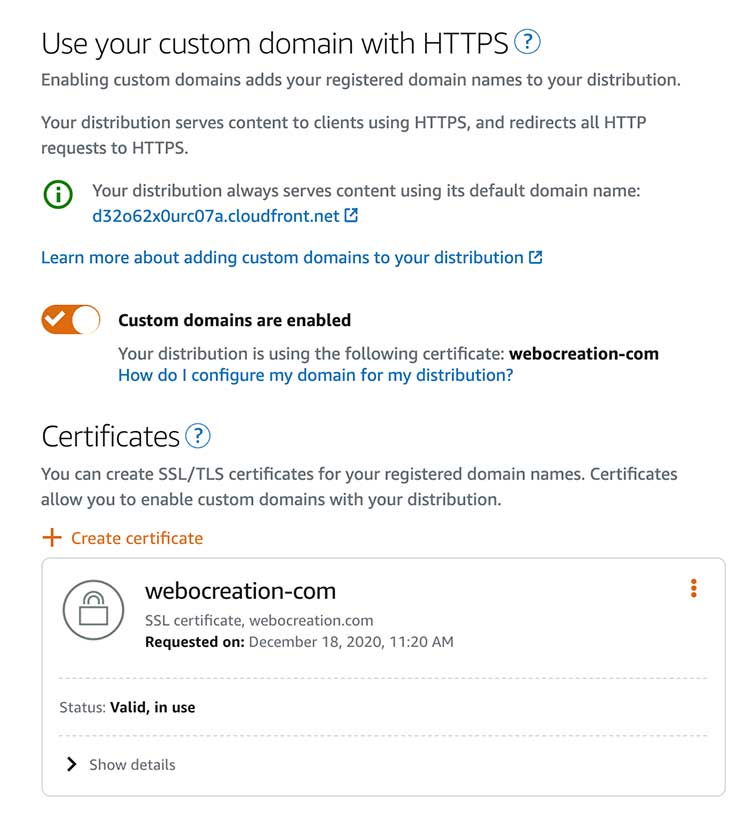
In the Custom domains, first, create the SSL certificates and then enable the custom domains.
You can leave the remaining setting as it is or change it as per your requirement and click the “Create Distribution” button and your CDN is set up.
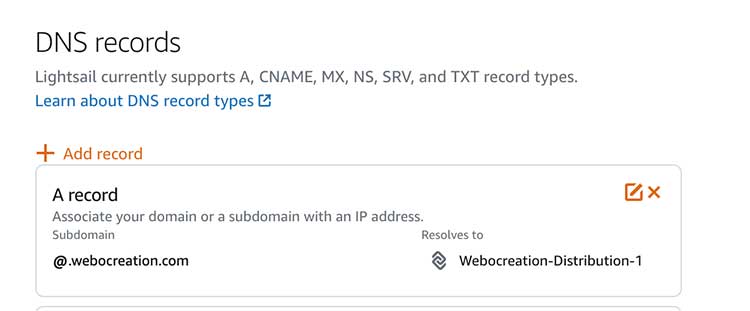
Then, change A record with the AWS Cloudfront URL by removing the Static IP.
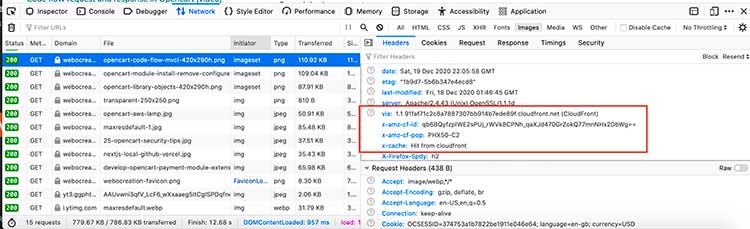
To check if the Cloudfront is working or not, just inspect the page and in the Network tab of the console, click the image and see the details. In the response, if it is serving via CloudFront URL and see the x-cache: “Hit from Cloudfront”, then CloudFront is serving the images.
Error 1: Installation error because of ownership issues
Warning: fopen(/opt/bitnami/apache/htdocs/system/storage/session//sess_bb5cfd84f55cef397e6edd17cb): failed to open stream: Permission denied in /opt/bitnami/apache/htdocs/system/library/session/file.php on line 29Warning: flock() expects parameter 1 to be resource, bool given in /opt/bitnami/apache/htdocs/system/library/session/file.php on line 31Warning: fwrite() expects parameter 1 to be resource, bool given in /opt/bitnami/apache/htdocs/system/library/session/file.php on line 33Warning: fflush() expects parameter 1 to be resource, bool given in /opt/bitnami/apache/htdocs/system/library/session/file.php on line 35Warning: flock() expects parameter 1 to be resource, bool given in /opt/bitnami/apache/htdocs/system/library/session/file.php on line 37Warning: fclose() expects parameter 1 to be resource, bool given in /opt/bitnami/apache/htdocs/system/library/session/file.php on line 39
Solution Error 1: run command ‘sudo chown daemon:daemon -R .’
Fatal error: Uncaught Exception: Error: Variable 'sql_mode' can't be set to the value of 'MYSQL40'<br />Error No: 1231<br />SET @@session.sql_mode = 'MYSQL40' in /opt/bitnami/apache/htdocs/system/library/db/mysqli.php:40 Stack trace: #0 /opt/bitnami/apache/htdocs/system/library/db.php(45): DB\MySQLi->query() #1 /opt/bitnami/apache/htdocs/install/model/install/install.php(35): DB->query() #2 /opt/bitnami/apache/htdocs/system/engine/loader.php(248): ModelInstallInstall->database() #3 /opt/bitnami/apache/htdocs/system/engine/proxy.php(47): Loader->{closure}() #4 /opt/bitnami/apache/htdocs/install/controller/install/step_3.php(11): Proxy->__call() #5 /opt/bitnami/apache/htdocs/system/engine/action.php(79): ControllerInstallStep3->index() #6 /opt/bitnami/apache/htdocs/system/engine/router.php(67): Action->execute() #7 /opt/bitnami/apache/htdocs/system/engine/router.php(56): Router->execute() #8 /opt/bitnami/apache/htdocs/system/framework.php(165): Router->dispatch() #9 /opt/bitnami/apache/htdocs/system/startup.php(104): requir in /opt/bitnami/apache/htdocs/system/library/db/mysqli.php on line 40
Solution Error 2: Remove the MYSQL40. Find the code $db->query(“SET @@session.sql_mode = ‘MYSQL40′”); and remove the MYSQL40 so that the code looks like $db->query(“SET @@session.sql_mode = ””);
Error 3: AWS LightSail 500 Internal Server Error
Internal Server Error
The server encountered an internal error or misconfiguration and was unable to complete your request.
Please contact the server administrator at you@example.com to inform them of the time this error occurred, and the actions you performed just before this error.
More information about this error may be available in the server error log.
Solution Error 3: check if the .htaccess is there and rename it to a different till you fix the .htaccess file
Error 4: WARNING: UNPROTECTED PRIVATE KEY FILE!
@@@@@@@@@@@@@@@@@@@@@@@@@@@@@@@@@@@@@@@@@@@@@@@@@@@@@@@@@@@
@         WARNING: UNPROTECTED PRIVATE KEY FILE!          @
@@@@@@@@@@@@@@@@@@@@@@@@@@@@@@@@@@@@@@@@@@@@@@@@@@@@@@@@@@@
Permissions 0644 for '/Applications/MAMP/htdocs/webocreation-bk/LightsailDefaultKey-us-east-1.pem' are too open.
It is required that your private key files are NOT accessible by others.
This private key will be ignored.
Load key "/Applications/MAMP/htdocs/webocreation-bk/LightsailDefaultKey-us-east-1.pem": bad permissions
bitnami@3.238.31.110: Permission denied (publickey).
Solution Error 4: Give permission to the key file of 0644 by running “chmod 0644 pathofkeyfile“
Error 5: Error while generating the SSL certificate
Failed authorization procedure. dpsignadvertising.com (dns-01): urn:ietf:params:acme:error:unauthorized :: The client lacks sufficient authorization :: Incorrect TXT record "oujxGkfDXUloV5IUO3__gNQA47b1wePnF4rvUcQWclM" found at _acme-challenge.dpsignadvertising.com
Solution Error 5: Check the TXT record and wait till it propagates.
Error 6: Class ‘Scssc’ not found
Fatal error: Uncaught Error: Class 'Scssc' not found in /opt/bitnami/apache/htdocs/admin/controller/startup/sass.php:9 Stack trace: #0 /opt/bitnami/apache/htdocs/system/engine/action.php(79): ControllerStartupSass->index() #1 /opt/bitnami/apache/htdocs/system/engine/router.php(67): Action->execute() #2 /opt/bitnami/apache/htdocs/system/engine/router.php(46): Router->execute() #3 /opt/bitnami/apache/htdocs/system/framework.php(165): Router->dispatch() #4 /opt/bitnami/apache/htdocs/system/startup.php(104): require_once('/opt/bitnami/ap...') #5 /opt/bitnami/apache/htdocs/admin/index.php(26): start() #6 {main} thrown in /opt/bitnami/apache/htdocs/admin/controller/startup/sass.php on line 9
Solution Error 6: Check the vendor folder and upload the right Opencart version vendor folder.
Error 7: This site can’t be reached
This site can’t be reached
dpsignadvertising.com’s server IP address could not be found.
Try:
Checking the connection
Checking the proxy, firewall, and DNS configuration
ERR_NAME_NOT_RESOLVED
Solution Error 7: Either you just make DNS changes, so better to wait up to 1-2 hours. Or the IP address given is not correct.
Warning: mysqli::__construct(): (HY000/2002): Connection refused in /opt/bitnami/apache/htdocs/system/library/db/mysqli.php on line 7Warning: DB\MySQLi::__construct(): Couldn't fetch mysqli in /opt/bitnami/apache/htdocs/system/library/db/mysqli.php on line 10Warning: DB\MySQLi::__construct(): Couldn't fetch mysqli in /opt/bitnami/apache/htdocs/system/library/db/mysqli.php on line 10
Fatal error: Uncaught Exception: Error: <br />Error No: in /opt/bitnami/apache/htdocs/system/library/db/mysqli.php:10 Stack trace: #0 /opt/bitnami/apache/htdocs/storage12/modification/system/library/db.php(35): DB\MySQLi->__construct() #1 /opt/bitnami/apache/htdocs/system/framework.php(80): DB->__construct() #2 /opt/bitnami/apache/htdocs/system/startup.php(104): require_once('/opt/bitnami/ap...') #3 /opt/bitnami/apache/htdocs/index.php(31): start() #4 {main} thrown in /opt/bitnami/apache/htdocs/system/library/db/mysqli.php on line 10
Solution Error 8: Make sure your database server is not down.
Managing product categories in OpenCart can get messy, especially as your catalog grows. Whether you’re consolidating overlapping categories or cleaning up duplicates, manually reassigning products and subcategories can be time-consuming and error-prone.
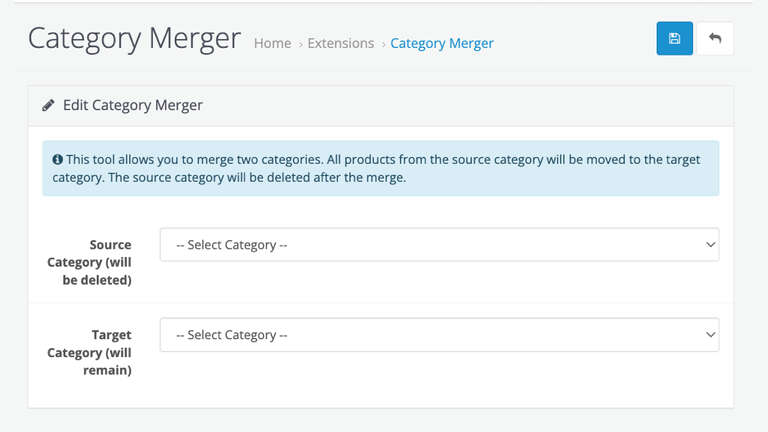
The Category Merger extension for OpenCart makes it easy to merge two categories into one, moving all products and subcategories cleanly, while deleting the source category and updating all related data.
🔧 Key Features
✅ Merge Two Categories: Seamlessly merge one category into another.
📦 Move Products Automatically: All products from the source category are reassigned to the target category.
🌿 Handle Child Categories: Subcategories of the source become subcategories of the target category.
🧹 Clean Database References: Removes all traces of the source category in the database.
🖱️ Simple UI: Admin-friendly interface with intuitive selection and confirmation prompts.
📥 Installation Guide
Installing the Category Merger extension is quick and easy:
Upload the contents of the upload folder to your OpenCart root directory.
Log in to your OpenCart admin dashboard.
Go to Extensions → Extensions.
Select Modules as the extension type.
Locate Category Merger and click Install.
🛠️ How to Use
Once installed, follow these steps to merge categories:
Navigate to Extensions → Extensions→ Modules→ Category Merger in the admin panel.
Choose the source category you want to merge (this will be deleted).
Choose the target category that will remain.
Click Merge Categories.
Confirm the action when prompted.
That’s it! All products and child categories will now belong to the target category, and the source category will be removed.
⚠️ Important Notes
🔄 Irreversible Action: Merging categories is permanent — back up your database before proceeding.
🗑️ Source Category is Deleted: Once merged, the source category and its ID will be removed.
🔗 Avoid Duplicates: If a product is assigned to both source and target categories, it will only remain in the target.
👨👩👧 Child Categories Reassigned: Subcategories are preserved and moved under the new parent.
🔄 Compatibility
This extension is fully compatible with OpenCart 3.x versions.
🆘 Support
Have questions or need help? Please contact the extension developer for support, customization, or additional functionality.
📈 Why Use Category Merger?
As your store evolves, merging categories helps:
Reduce clutter in your product catalog
Simplify navigation for customers
Improve SEO by consolidating duplicate or similar categories
Save time compared to manual reassignment
With the Category Merger Extension, you can streamline your OpenCart catalog with just a few clicks. Whether you’re cleaning up or reorganizing, this tool ensures a clean, efficient, and accurate merge process.
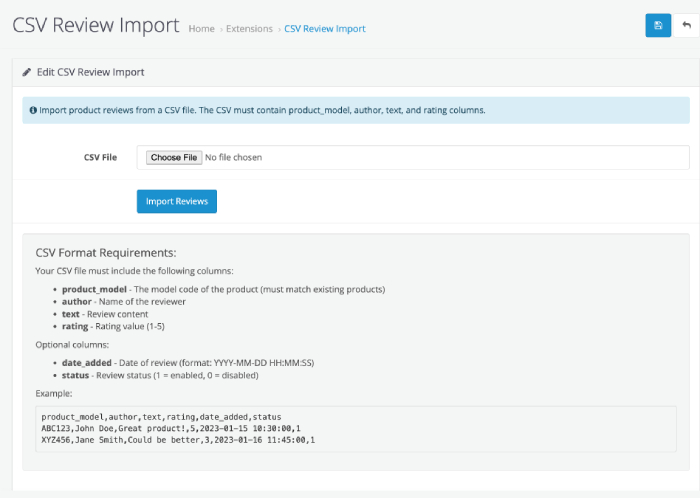
Managing product reviews in your OpenCart store just got easier. Whether you’re launching a new site, migrating from another platform, or handling large product catalogs, manual entry of product reviews can be time-consuming and error-prone. That’s where our new OpenCart extension — “CSV Review as per Product Model Import” — comes in.
This extension allows store owners to upload multiple product reviews via a single CSV file, mapped directly to products using their model codes. It’s fast, scalable, and perfect for streamlining your review management process.
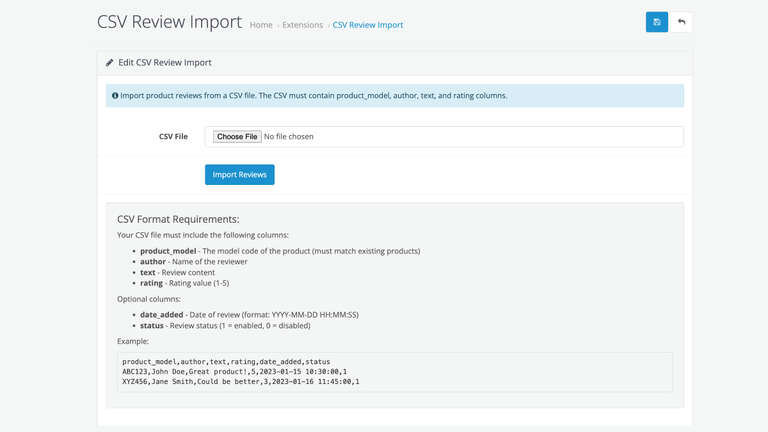
After installation, click Edit to access the module.
📥 How to Import CSV Reviews
Prepare your CSV file as per the format above.
Go to Extensions → Modules → CSV Review Import.
Click “Browse” or “Choose File” and select your CSV.
Click “Import”.
You’ll see a success message once the reviews are added.
✅ Pro tip: Make sure product models in your CSV exactly match those in your OpenCart catalog. Otherwise, reviews won’t be linked.
🔍 What is the “CSV Review as per Product Model Import” Extension?
This extension provides a user-friendly interface to import customer reviews for your OpenCart products in bulk. Instead of manually adding each review one at a time, you simply prepare a CSV file, upload it, and let the extension handle the rest.
It matches reviews to products based on the product’s model code, ensuring accurate data mapping even across large inventories.
🧾 CSV Format Requirements
To ensure compatibility, your CSV file must include the following required columns:
Column
Description
product_model
The model code of the product (must match an existing product)
author
The name of the reviewer
text
The review content
date_added
Date the review was created (Format: YYYY-MM-DD HH:MM:SS)
rating
A numerical rating (1 to 5)
status
Review status (1 = enabled, 0 = disabled)
✅ Example:
product_model,author,text,rating,date_added,status
ABC123,John Doe,Great product!,5,2023-01-15 10:30:00,1
XYZ456,Jane Smith,Could be better,3,2023-01-16 11:45:00,1
Merchants working with dropshipping or affiliate products
🎯 Final Thoughts
Product reviews play a vital role in influencing purchase decisions. Adding them quickly and accurately shouldn’t be a bottleneck. With the CSV Review as per the Product Model Import extension for OpenCart, you get a reliable, scalable solution to manage customer feedback with ease.
Understanding User Intent and Search Engine Evolution
Search engines are smarter than ever. They now prioritize content that truly helps users instead of relying on outdated tactics like keyword stuffing. This means focusing on what people want to know, not just sprinkling keywords onto a page.
Advances in AI-driven algorithms, such as semantic search and Google’s BERT update, have reshaped how search engines understand queries. These tools now assess context and meaning, making pairing users with relevant information easier. The focus has shifted from the what—specific phrases users type—to the why—the underlying reason for their searches.
For example, someone searching for “how to fix a leaky faucet” isn’t just entering keywords—they’re seeking practical, step-by-step advice. Content that aligns with these needs has a better chance of ranking well and being useful.
Matching Content to Search Intent Categories
Each search query falls into a specific intent category. By identifying this intent, you can tailor your content to give users exactly what they need. Here’s a breakdown of common search intents and how to align your content:
Informational Intent
What it is: Users want to learn about a topic.
Examples: “How does solar energy work?”, “What are the benefits of meditation?”
Content Approach: Create detailed guides, explainer articles, or FAQs. For example, a headline like “The Basics of Solar Energy Explained Simply” signals clear, helpful content.
Navigational Intent
What it is: Users are looking for a specific brand, website, or resource.
Examples: “Facebook login,” “YouTube tutorials,” “NY Times homepage.”
Content Approach: Ensure your website is optimized for branded terms and has clear landing pages to guide users quickly to their goal.
Transactional/Commercial Intent
What it is: Users are ready to take action (make a purchase, download, sign up).
Examples: “Buy noise-canceling headphones,” “Cheap flights to NYC.”
Content Approach: Use product reviews, comparisons, and CTAs (calls-to-action) to guide purchasing decisions. Content like “Top 5 Affordable Noise-Canceling Headphones in 2023” works well.
Investigative Intent
What it is: Users are comparing products, services, or researching before purchasing.
Examples: “Best laptops for video editing,” “Tesla Model 3 vs. Model Y.”
Content Approach: Include in-depth comparisons, pros-and-cons lists, or expert reviews. Make the information easy to scan with tables or bullet points.
Content mismatching user intent can frustrate visitors, increasing bounce rates and losing conversions. Businesses that succeed, like those using St George SEO, often merge intent analysis with local and industry-specific knowledge to make their content more useful and relevant.
Keyword Research with Intent at the Core
Effective keyword research goes beyond volume and competitiveness. It’s about uncovering the why behind every query. Here are some tools and strategies to pinpoint intent-driven keywords:
AnswerThePublic: Discover commonly asked questions tied to keywords.
Competitor Gap Analysis: Identify content gaps by examining competitors’ rankings. Use tools like SEMrush or Ahrefs to spot opportunities.
Look for Long-Tail Keywords
Phrases like “how to save money on groceries in winter” reveal highly specific user needs. Long-tail keywords often hint at informational or investigative intent and attract more qualified traffic.
Context Matters
Never assume intent without considering context. For example, “best restaurants” could mean affordable options to one user or luxury dining to another. Looking at location and session cues, like time of day or device type, can help refine this understanding.
Creating Content That Builds Trust, Not Just Traffic
Driving clicks is one thing; keeping users engaged is another. Thoughtful content builds authority and trust by genuinely answering questions.
Cite Credible Sources: Back up claims with links to well-known websites, studies, or expert opinions.
Use Step-by-Step Guides: Detailed instructions help users take action confidently for how-to topics.
Address Counterarguments: Acknowledge alternative viewpoints to show thorough research.
Improve Readability
Make your text easy to consume:
Write short paragraphs (2-4 lines).
Use headings and subheadings to organize sections.
Avoid technical jargon unless necessary (and explain it when used).
Example Formats That Engage Users
FAQ Sections: Anticipate and answer the most common questions.
Comparison Tables: These simplify decisions by laying out details side-by-side.
Adding Value Beyond the Search Box
Once users click on your content, value-added features can enhance their experience and encourage further engagement.
Internal Linking: Guide users to related content on your site. It increases session duration and helps visitors find more useful material.
Multimedia Enhancements: Use videos, infographics, or interactive tools to break up text and improve understanding.
Interactive Features: Calculators, quizzes, or product finders can make the experience more personalized and memorable.
Refining Through User Behavior
Analyze post-visit actions, such as:
Heatmaps: Identify which page elements users focus on.
Session Recordings: Observe how visitors interact with your site.
Update based on user activity. For example, if visitors click a button that doesn’t lead to anything useful, adjust the link or text for clarity. Keeping content evergreen—refreshing it with updated statistics or examples—ensures it remains valuable over time.
Practical Steps for Ongoing Success
To create content that continuously meets user needs, follow these core practices:
Perform quarterly intent audits to check if content matches user goals.
Regularly A/B test headlines, meta descriptions, and CTAs for better conversions.
Monitor new opportunities to appear in featured snippets or answer boxes.
Use analytics to identify underperforming pages, then refine their structure or content.
Professionals often combine nuanced intent analysis with technical know-how to create sustainable strategies that adapt to search engine updates and user behavior.
By staying proactive, content creators can position themselves for future success. The next wave of search will reward those who answer real questions at the heart of their strategy. Keep focusing on value, and results will follow.
September may not be as saturated with holidays as December or November, but it offers unique opportunities for e-commerce businesses to connect with their audience, drive engagement, and boost sales. From seasonal changes to meaningful awareness days, this month is ideal for thoughtful and creative campaigns.
In this post, we’ll break down key September holidays, their relevance to online retailers, and actionable marketing ideas you can implement.
Offer limited-time packaging or exclusive fall prints.
📣 Social Media Content Ideas
Polls & Quizzes around fall favorites
Behind the scenes of your new fall product line
Countdowns to Labor Day or Autumn
Hashtag campaigns like #FallRefresh or #PeacefulSeptember
Final Thoughts
While September might feel like a slow retail month, it’s actually a golden opportunity to set the tone for Q4. With thoughtful campaigns that align with awareness days and seasonal shifts, you can build stronger relationships with your audience and drive consistent sales.
Start planning early, align your messaging with your audience’s mindset, and don’t forget to test what works best—your September can be a quiet powerhouse.
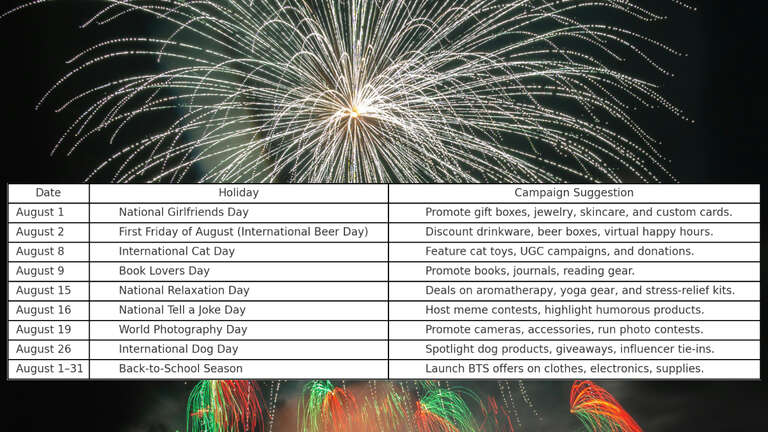
August may not have the year-end shopping frenzy. Still, it’s packed with themed holidays and observances that present golden opportunities for e-commerce businesses to engage customers, promote products, and boost conversions. Whether you’re selling school supplies, wellness products, or personalized gifts, this month offers a rich marketing calendar to align your promotions with national sentiments and consumer trends.
Why August Matters in E-commerce
While August marks the tail end of summer in many regions, it’s also the gateway to back-to-school season—a huge retail moment. According to the National Retail Federation, U.S. back-to-school spending reached over $110 billion in 2023, and this trend is expected to grow year after year. In addition, themed days like International Dog Day or National Wellness Month offer creative hooks for niche marketing campaigns.
Let’s explore the top holidays and how online retailers can leverage them effectively.
Promote gift boxes, jewelry, skincare, and custom cards. Great for upselling and gift bundles.
First Friday of August
International Beer Day
Run discounts on drinkware, bar accessories, or beer subscription boxes. Host virtual happy hours.
August 8
International Cat Day
Pet stores can feature cat-themed products, toys, and donation campaigns. Leverage user-generated content.
August 9
Book Lovers Day
Ideal for selling books, journals, and reading accessories. Promote author events or themed bundles.
August 15
National Relaxation Day
Wellness brands can offer deals on aromatherapy, self-care kits, and yoga gear. Promote stress-relief content.
August 16
National Tell a Joke Day
Engage customers with lighthearted humor. Create viral meme contests or funny product descriptions.
August 19
World Photography Day
Great for promoting cameras, accessories, photo prints, and digital courses. Launch a photo contest.
August 26
International Dog Day
Perfect for pet shops to highlight dog products, run giveaways, and collaborate with pet influencers.
All Month
Back-to-School Season
Apparel, electronics, stationary, backpacks, and home learning tools are in high demand. Launch BTS landing pages and limited-time offers.
Strategic Benefits for E-commerce Retailers
1. Niche Targeting
August holidays cover diverse interests—pets, books, wellness, and humor—allowing stores to engage segmented audiences with hyper-targeted content and promotions.
2. Content Marketing Fuel
Use these holidays to create themed blog posts, product collections, or social media challenges. For example, a post titled “Top 10 Relaxation Essentials for National Relaxation Day” can drive both traffic and conversions.
3. Social Media Engagement
Holidays like International Cat Day or Tell a Joke Day are highly shareable. Use branded hashtags, reels, and user-generated content to increase visibility and organic reach.
4. Email & SMS Campaigns
Build campaigns that align with each observance. Subject lines like “Unwind Today — It’s National Relaxation Day 🌿” or “Your Dog Deserves This Treat 🐶” create urgency and personalization.
5. Product Bundling and Upselling
Create limited-time holiday bundles such as “Relaxation Kits” or “Pet Lover Packs.” Cross-sell and upsell related items to increase average order value (AOV).
Tips for Maximizing Holiday-Based Campaigns
Plan ahead using a marketing calendar with key dates and themes.
Personalize offers based on user behavior or product interests.
Leverage influencers, especially in pet, wellness, and book niches.
Use urgency with countdown timers and “today only” messages.
Track performance and A/B test holiday-themed creatives.
Final Thoughts
August may not have traditional “peak” shopping events, but it’s a treasure trove of niche holidays that are perfect for e-commerce engagement. When used strategically, these observances offer memorable moments to connect with your audience and drive sales before the Q4 rush kicks in.
By aligning your store’s promotions with these holidays, you can stay top-of-mind, increase customer loyalty, and keep your revenue flowing through the summer slowdown.
ReflectionClass class in PHP is a way to inspect a class and get all information of the class like what is its name, what are its properties, what are its methods, attributes, constants, even doc comments, interfaces, modifiers, namespaces, parent class, static properties, trait, check if the class is abstract or interfaces, check if iterable, etc. So today we use a simple example class and get all properties of that class.
Let’s create a class called image.php which contains $image and $height properties and multiple methods which contain the following code:
<?php

class Image
{
    public int $width;
    public int $height;

    /**
     * Constructor
     *
     * @param string $file
     *
     */
    public function __construct(string $file)
    {
        if (!extension_loaded('gd')) {
            exit('Error: PHP GD is not installed!');
        }
        if (is_file($file)) {
            $this->file = $file;
            $info = getimagesize($file);
            $this->width = $info[0];
            $this->height = $info[1];
            $this->bits = isset($info['bits']) ? $info['bits'] : '';
            $this->mime = isset($info['mime']) ? $info['mime'] : '';

            if ($this->mime == 'image/gif') {
                $this->image = imagecreatefromgif($file);
            } elseif ($this->mime == 'image/png') {
                $this->image = imagecreatefrompng($file);
            } elseif ($this->mime == 'image/jpeg') {
                $this->image = imagecreatefromjpeg($file);
            } elseif ($this->mime == 'image/webp') {
                $this->image = imagecreatefromwebp($file);
            }
        } else {
            throw new \Exception('Error: Could not load image ' . $file . '!');
        }
    }

    /**
     *
     *
     * @return    int
     */
    public function getWidth(): int
    {
        return $this->width;
    }

    /**
     *
     *
     * @return    int
     */
    public function getHeight(): int
    {
        return $this->height;
    }
}
Get all properties names of a Class in PHP
Now let’s create another index.php and add the following code:
protected function methodIsPublicAndNotDefinedOnBaseClass($methodName)
{
    return collect((new \ReflectionClass($this))->getMethods(\ReflectionMethod::IS_PUBLIC))
        ->reject(function ($method) {
            // The "render" method is a special case. This method might be called by event listeners or other ways.
            if ($method === 'render') {
                return false;
            }

            return $method->class === self::class;
        })
        ->pluck('name')
        ->search($methodName) !== false;
}
In this way, ReflectionClass is used to get all properties or methods of a Class in PHP. Please let us know if you have any questions or comments so that we can add extra topics. You can follow us at our Twitter account @rupaknpl, subscribe to our YouTube channel for opencart tutorials, and click to see all PHP development.
As we move into the heart of summer, July offers countless opportunities for e-commerce brands to connect with customers through timely campaigns, themed product launches, and fun social media content. From patriotic promotions around Independence Day to playful celebrations like World Emoji Day, there’s a lot to work with.
This July 2025 E-Commerce Marketing Calendar will help your online store plan marketing content, increase engagement, and boost sales throughout the month.
Launch a playful campaign, share funny memes or bloopers
July 4
Independence Day (USA)
Patriotism & Freedom
Host a “Red, White & You” sale, feature U.S.-made products
July 6
International Kissing Day
Romance & Connection
Offer couple bundles or “Buy 1, Gift 1” promotions
July 7
World Chocolate Day
Sweet Treats
Partner with chocolate brands or run dessert-themed bundles
July 15
Give Something Away Day
Generosity & Loyalty
Run giveaways, freebies, or surprise rewards for purchases
July 17
World Emoji Day
Fun & Modern Communication
Use emojis in campaigns, launch an emoji-themed product line
July 20
Moon Day
Exploration & Imagination
Feature space/sci-fi themed products or discounts
July 24
International Self-Care Day
Wellness & Mindfulness
Promote spa kits, self-care bundles, or meditation apps
July 30
International Friendship Day
Bonds & Togetherness
BOGO deals, referral discounts, or a “Tag Your Friend” contest
All July
National Ice Cream Month (USA)
Summer Treats & Indulgence
Run a weekly ice cream-themed flash sale
All July
Summer Sales Season
Heat & Deals
Launch your mid-year clearance or site-wide seasonal sale
🗓️ Weekly Social Media Strategy for July
Week 1 (July 1–7)
Theme: Humor + Patriotism
Post Ideas:
July 1: Post a joke poll or a funny customer review
July 4: Share behind-the-scenes of your red-white-blue packaging
Week 2 (July 8–14)
Theme: Sweetness & Love
Post Ideas:
Run a “sweetest review” contest for a free product
Promote bundles for couples or friends
Week 3 (July 15–21)
Theme: Community + Creativity
Post Ideas:
Giveaway alert with Give Something Away Day
Emoji guessing game or quiz for World Emoji Day
Week 4 (July 22–31)
Theme: Self-care + Connection
Post Ideas:
Host a #SelfCareSunday series
Share user-generated content of friends using your products
🛒 Quick Campaign Ideas for Online Retailers
Flash Sales: Tie a 24-hour sale to quirky holidays (like World Chocolate Day).
UGC Contests: Encourage users to share themed content (e.g., emoji makeup looks).
Bundles: Create July-specific product bundles like “Summer Essentials” or “Friends Forever Kits.”
Referral Bonuses: Use International Friendship Day to drive referrals.
Email Campaigns: Send themed newsletters every week tied to the upcoming holiday.
💡 Pro Tips to Maximize July Promotions
Use countdown timers on your site for key holiday sales.
Collaborate with micro-influencers for themed unboxing or testimonial videos.
Leverage hashtags like #July4thSale, #WorldEmojiDay, #SelfCareSunday.
Refresh your homepage banner and hero section to match weekly themes.
📌 Final Thoughts
July is a high-energy month filled with opportunities for brands to connect with customers. Whether it’s sharing laughs on International Joke Day or celebrating love on Kissing Day, tailoring your campaigns to these holidays will make your brand feel timely, relevant, and fun.