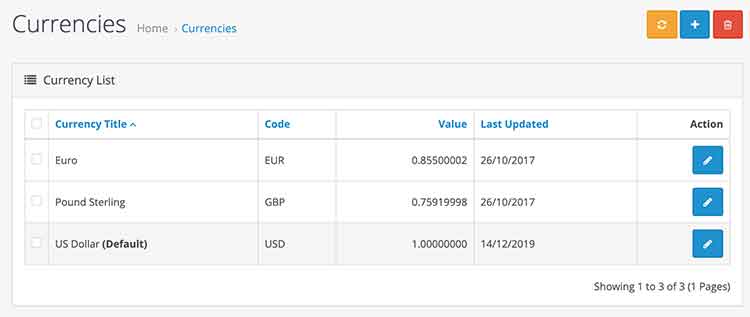
Opencart 3 and 4 support multi-currencies so with Opencart we can sell in any currency, anywhere in the world. Go to admin >> System >> Localization >> Currencies where you will see the currencies available for use in the storefront. In the store by default, there are Euro, Pound, and US dollars but only the US dollar is enabled by default.
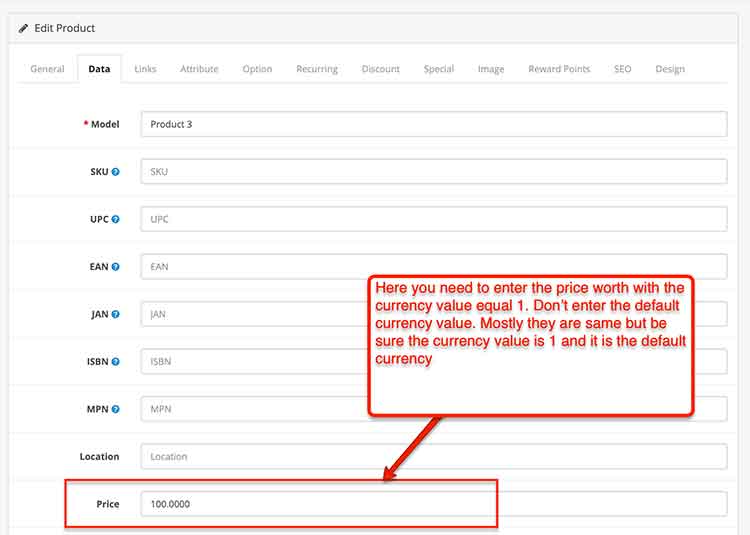
The default currency is set to a value of 1. When you enter the product’s price we need to enter it as per the default currency with value 1. Every value of the currency will be relative to this value as per the above image the value of the US Dollar is 1.0, and the Euro is calculated to be 0.85500002. The frontend price is calculated and converted as per the currency value which is 1. If Auto Update Currency is enabled then the currency is auto-updated.
Don’t confuse with default currency and value 1 of currency
Here, you need to enter the price worth with the currency value equal to 1. Don’t enter the default currency value; you need to enter the price of the currency value equal to 1. They are mostly the same, but be sure the currency value is 1 and it is the default currency.
How do we add the currency in Opencart 3 & 4?
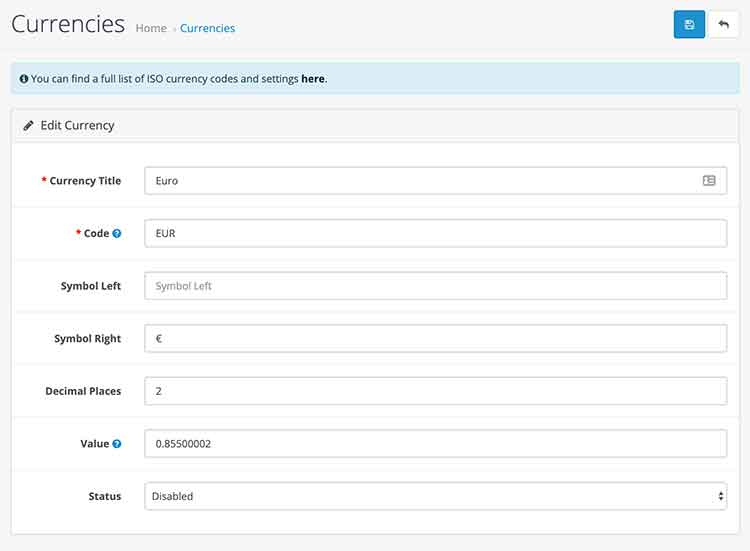
To add the currency, go to admin >> System >> Settings >> Localization >> Currencies and click the Add New blue button and you will see the form below:
Currency Title: Enter the name of the currency that you want to show in the front end. Code: The ISO currency code, you can get the currency code at https://www.ibm.com/support/knowledgecenter/en/SSZLC2_7.0.0/com.ibm.commerce.payments.developer.doc/refs/rpylerl2mst97.htm Symbol Left: You can find the currency symbol at https://www.xe.com/symbols.php and if you want to show the symbol to the left of the price of the product then add it here. Symbol Right: You can find the currency symbol at https://www.xe.com/symbols.php and if you want to show the symbol to the right of the price of the product then add it here. Decimal Places: The number of decimal places that you want to show in the front end. Value: The default currency will be set to a value of 1 and other currency will be converted value. Status: You can enable or disable the currency in the front end.
How do we change the default currency in Opencart 3 & 4?
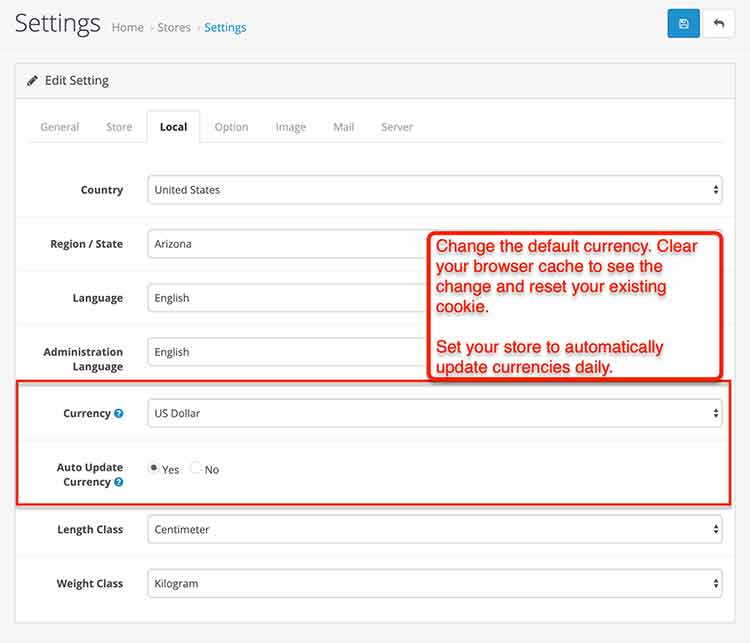
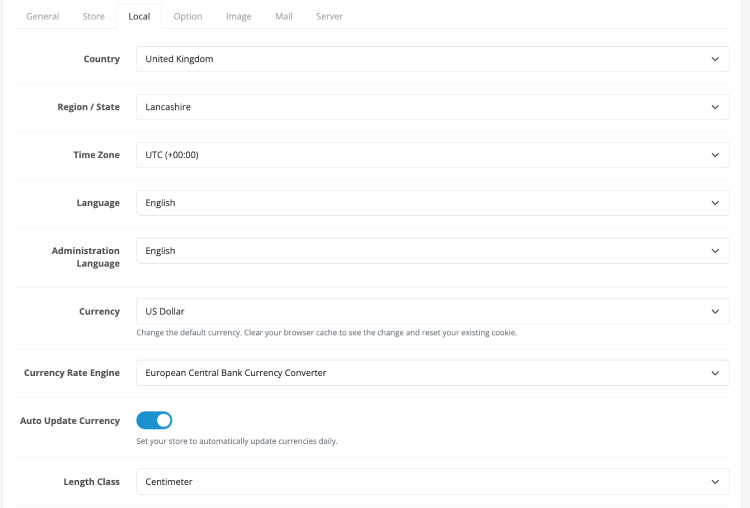
To change the default currency in Opencart 3 or 4, go to admin >> System >> Settings >> Edit the store >> then click the local tab and in the currency field change the currency that you want to make the default. Then, set your store to automatically update currencies. After that clear your browser cache to see the change and reset your existing cookies. Now your default currency in the Opencart 3 or 4 is set.
How do auto-update currency exchange rates work in Opencart 4?
In Opencart 4, by default, there are auto-update currencies as per the currency rate converter engine “European Central Bank Currency Converter”. To enable it, log in to admin >> System >> Settings >> Edit the store >> Local tab and enable Auto Update Currency field and select the Currency Rate Engine and Save. Now, your store is set to automatically update currencies daily.
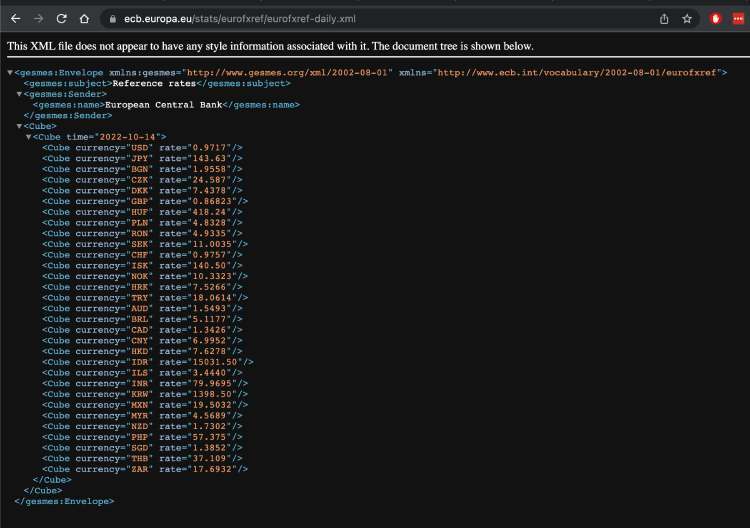
As we see Opencart is using this URL to get the currencies’ value https://www.ecb.europa.eu/stats/eurofxref/eurofxref-daily.xml, as seeing the values it supports only some currencies so auto-update currencies may not be supported for all currencies.
Fix the cron job so that it gets updated daily
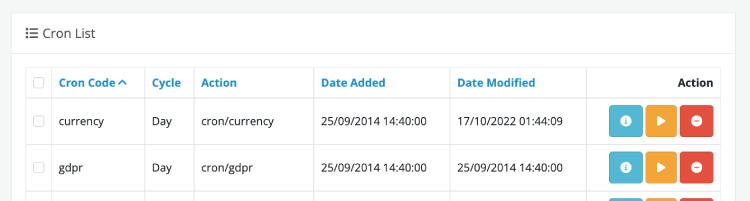
If you are seeing the auto-update is not working then your corn job is not running, make sure it is running daily. To check the status of the cron jobs, log into admin >> Extensions >> Cron Jobs and see the date modified and you can run the cron jobs from there as well.
In this way, you can manage the currencies on the Opencart store. Please don’t forget to post your questions or comments so that we can add extra topics, free modules, or opencart tutorials that we need to develop which helps to develop quality. You can follow us on our Twitter account @rupaknpl and subscribe to the YouTube user opencart tutorial.
Selecting the best eCommerce platform when establishing an online store is essential to the success of your enterprise. With so many possibilities, two prominent solutions that frequently stand out are OpenCart and Shopify. Both systems provide distinctive features catered to various customer groups and particular requirements for eCommerce development. However, the question is; how do you select the one that will be suitable for your business organization? In this post, we will help you understand OpenCart vs. Shopify and indicate the pros and cons of these tools.
What is OpenCart?
OpenCart is one of the best features that business people can use to create an online store since it is open source. Because of these attributes, it has a large number of developers and merchants with some level of technical expertise required to develop add-ons for the application.
Features of OpenCart
Open-source platform: OpenCart is an open source that can be downloaded and installed for free meaning that it will not burden any business.
Multi-store functionality: It allows you to work with multiple stores from a single pointing interface
Extensions marketplace: You have access to thousands of modules and themes that can help improve your store.
Supports multiple languages and currencies: This makes it a suitable option for businesses that conduct their operations in the global market.
Customizable: As a matter of fact, it is an open-source software that fact gives developers complete control of customization as well as design.
Advantages of Using OpenCart for E-commerce
Cost-effective: Being an open-source software, OpenCart is free to download which means you only need to incur expenses on hosting as well as the specific modules that you might consider relevant for your store.
Customizable: It can create a range of applications that are unique and provide opportunities primarily for the developers.
Multi-store management: OpenCart provides an option of running several stores through different administering panels.
SEO-friendly: It turns out that with the proper extensions, you may manage SEO for your OpenCart store.
Limitations of OpenCart
Technical expertise required: While installing and configuring OpenCart, some basic knowledge about coding is necessary, which is not suitable for everyone
Less support: While there are many developers in the OpenCart community, OpenCart does not enjoy the sort of support that comes with hosted e-commerce platforms like Shopify
Extensions dependency: Most functionalities are only available through third-party extensions that need to be purchased, making expenses grow over time.
What is Shopify?
Shopify is an open, independent eCommerce solution that includes all the tools needed to start and run an online business. This website is famous for its simple navigation and rich set of instruments intended to help users facilitate their sales through the Internet.
Key Features of Shopify
Fully hosted platform: That’s why, when using it, you do not have to worry about website hosting, security, and performance which is managed by Shopify automatically.
User-friendly interface: Shopify is easy to use regardless of the user’s level of technical knowledge; anyone can easily open and run a store.
App ecosystem: There are thousands of apps available in the Shopify App Store to increase the functionality of your store, including SEO.
Secure and reliable: Furthermore, Shopify has pre-integrated SSL certificates and secures the sites around the clock against fraudulent activities.
Mobile optimization: The Shopify template is responsive in nature and this helps in enhancing the convenience of the shoppers.
Advantages of Shopify for E-commerce
Ease of use: A very user-friendly interface with a drag-and-drop editor and a selection of ready-to-use themes helps in creating a professional-looking store without having to code.
Customer support: Some added features that came with Shopify are its accessibility for the customer to have customer support that is available 24/7 through the use of a live chat, email, or even phone in case of an emergency, especially for people with little or no technical skills
Scalability: Shopify is designed to grow with you, and therefore this platform is suitable for both small businesses and large businesses.
SEO and marketing tools: One of the critical benefits of using Shopify is that it is integrated with SEO capabilities and has numerous marketing tools to attract visitors to the store.
Fast and secure: Since Shopify is a hosted platform, it deals with many server-related problems and guarantees absolutely fast access and secure payments on the Internet.
Limitations of Shopify
Monthly fees: Like any other software, the use of Shopify requires a subscription, making it more costly than platforms such as OpenCart which are open source.
Limited customization: Shopify provides flexibility to a certain extent in terms of customization, which is comparatively lower than that offered by open-source platforms.
Transaction fees: Shopify takes transaction fees if not using Shopify Payments, which adds other costs.
OpenCart vs Shopify Comparison
Here’s the comparison image for OpenCart vs. Shopify. Now, here’s the table summarizing the key differences:
Criteria
OpenCart
Shopify
Customization
Provides almost endless variability to accommodate most specific demands, which would require strong internal IT solutions or outsourcing to third-rate developers.
It has its own framework which restricts user freedom because of this, it is less flexible compared to OpenCart.
Ease of Use
It presupposes the client has more technical skills more so with regard to installation and setup of the product.
It presupposes the client has more technical skills more so with regard to the installation and setup of the product.
Pricing
Completely free, but you will have to spend money on hosting, themes, and plug-ins
Shopify is arranged on tiers, and has add-on fees for apps and themes.
Features
More complex through extensions but very flexible and current, it has some weaker aspects of ‘ready-made’ tools that Shopify offers.
Shopify is arranged on tiers and has add-on fees for apps and themes.
Support
Relies on community support, which may not be as responsive as the 24/7 customer support offered by Shopify.
Offers Assistance for customers 24/7 making it convenient for new users especially when they encounter some software problems.
SEO & Marketing
Does not have built-in features for advanced SEO modules but the site is capable of very good optimization if this option is properly implemented.
It includes native SEO capabilities and is compatible with multiple marketing apps, thus allowing companies to handle SEO seamlessly.
Conclusion: Which Platform is Best for Your Business?
When it comes to choosing between the two options, that is OpenCart and Shopify, it is more of a case of identifying your business requirements and your IT expertise. If you work with an eCommerce development companyto work with, they tell you which platform best suits your needs in the long run and is technologically superior.
OpenCart can be recommended for businesses that need to have full control over changes happening in the store’s design and settings, as well as possess the necessary skills in working with open-source platforms. This is an affordable option, particularly for those who will be uncomfortable handling the backend of their store.
Shopify, on the other hand, is best for users who want to begin e-commerce without much IT complexity and with good support from the hosting provider. This is especially ideal for companies that require simplicity, flexibility, expandability, and rapid integration over affordability, despite the latter’s increased afterward.
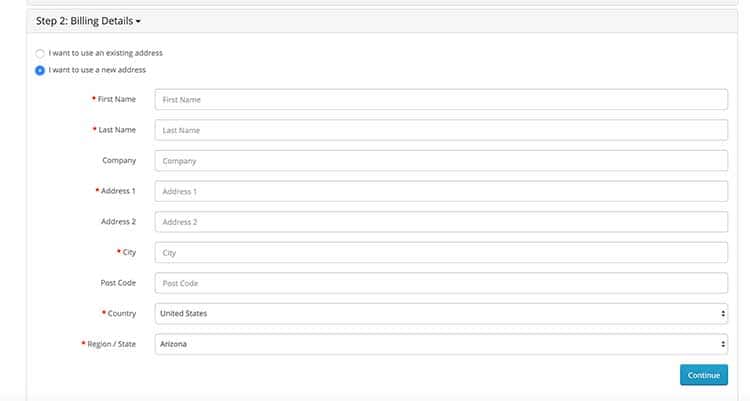
In Opencart 4 we can add countries and their zones, zones are states or regions as per country. For adding countries go to admin >> System >> Localization >> Countries and for adding countries’ zones go to admin >> System >> Localization >>Zones. These countries and zones are used in the Shipping Address and payment address, and while registering as the guest checkout to add the shipping address.
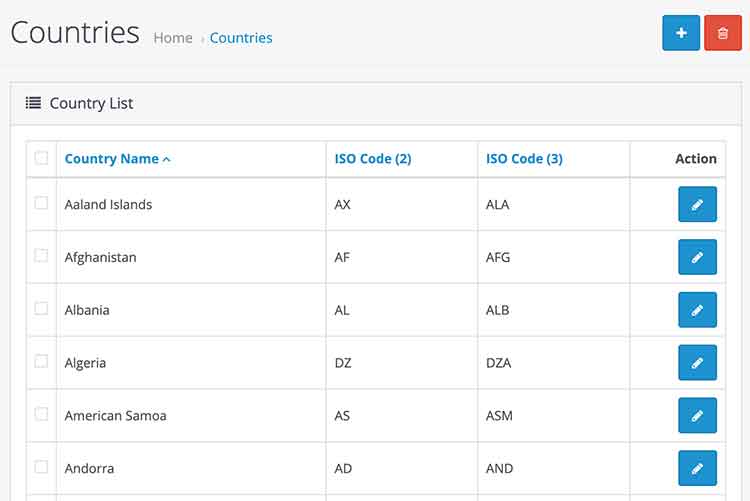
The lists of countries are available at admin >> System >> Localization >> Countries in Opencart 4.
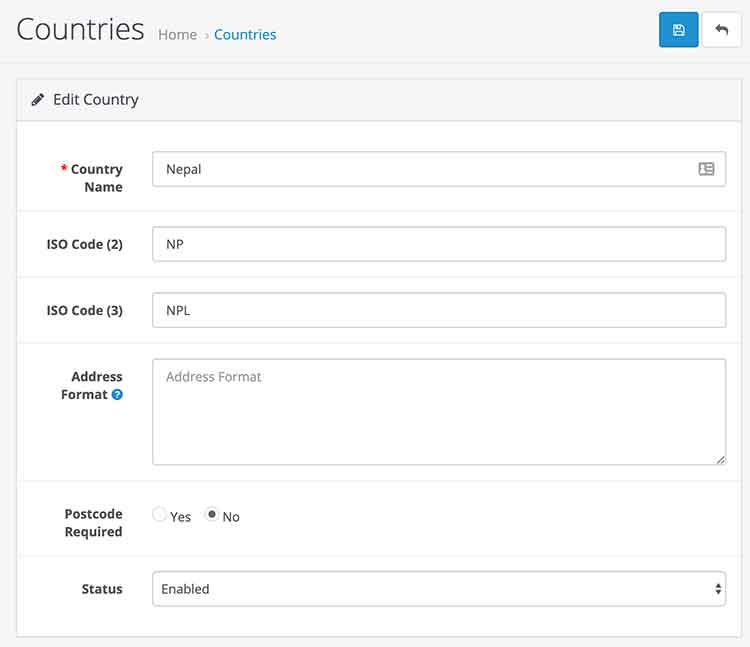
To add a new country click the “Add New” blue button and enter the details.
Address Format: You can format the address according to your needs and the country. For example, we add the following in the address format field for the “Aaland Islands” country:
First Name = {firstname}
Last Name = {lastname}
Company = {company}
Address 1 = {address_1}
Address 2 = {address_2}
City = {city}
Postcode = {postcode}
Zone = {zone}
Zone Code = {zone_code}
Country = {country}
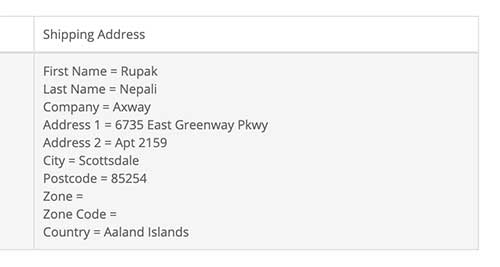
Now when we select the shipping or billing address country “Aaland Islands” then it will show like the below:
First Name = Rupak
Last Name = Nepali
Company = Axway
Address 1 = 6735 East Greenway Pkwy
Address 2 = Apt 2159
City = Scottsdale
Postcode = 85254
Zone =
Zone Code =
Country = Aaland Islands
This way, you can format the shipping and billing addresses as per the country.
Zones or Regions or States management in Opencart
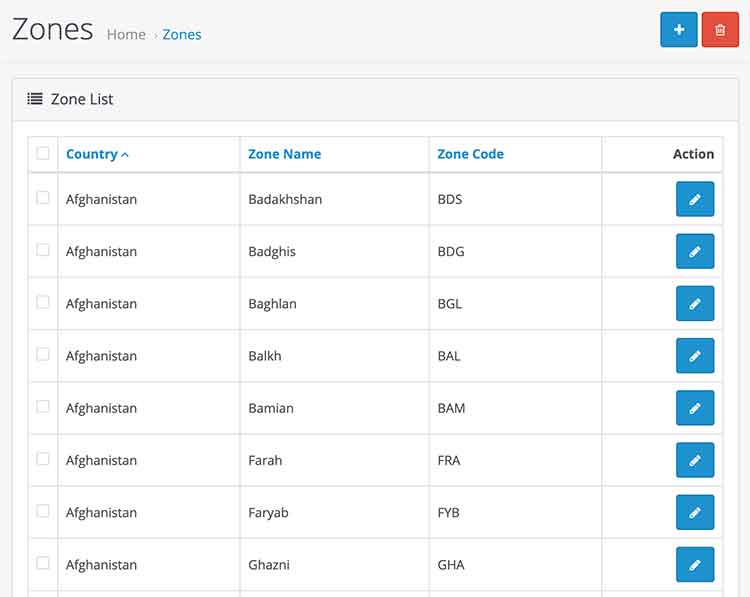
Once we enter the countries we can enter the zones of those countries. For that go to admin >> System >> Localization >>Zones where you can see the lists of zones regions or states.
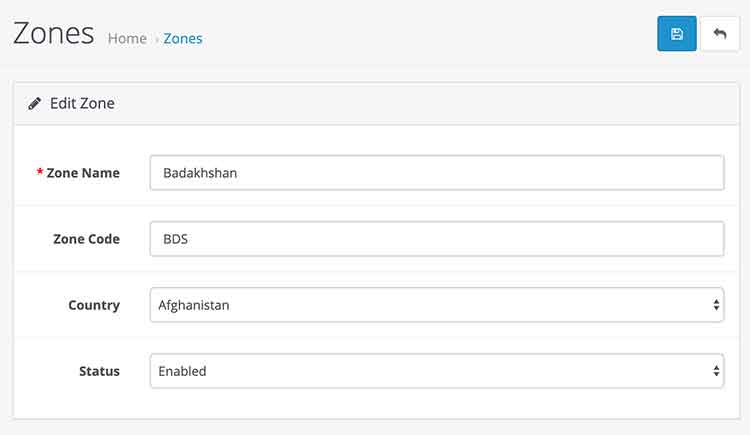
We can add a new zone as well for that click the “Add New” blue button and you will see a form similar to below:
Zone Name: Enter the zone name
Zone code: You can find the Zone code at https://www.iso.org/obp/ui/#iso:code:3166:NP, search for the country and it will give lists of zones or regions or states and you can see the Zone code.
Country: Select the country the zone is related to.
Status: Enabled it to enable and disabled it to disable.
You can see the country and state mostly at the billing address and shipping address.
In this way, we can manage the countries, zones states, or regions in Opencart 3. Please don’t forget to post your questions or comments so that we can add extra topics. You can follow us at our Twitter account @rupaknpl, subscribe to our YouTube channel for opencart tutorials, and click to see all Opencart user manuals.
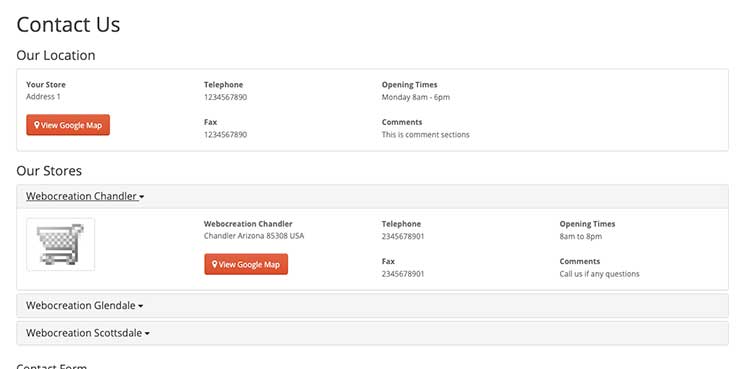
In Opencart 4 we can show multiple store locations on the contact us page, go to admin >> System >> Localization >> Store location and add the locations there and select the store locations at the System >> Settings >> Store tab and select the location, and it will show in contact us page.
Here is an example to show how to show multiple store locations on the contact us page:
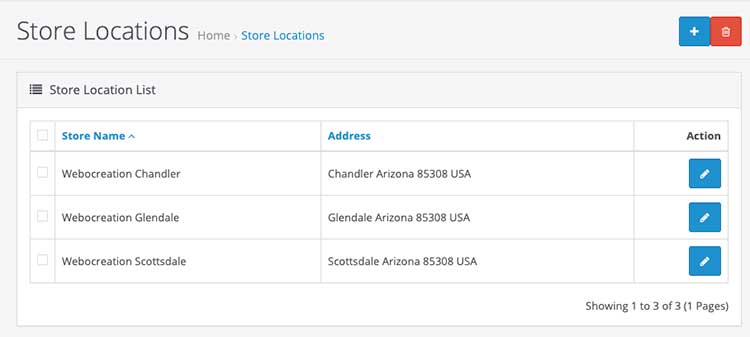
Go to admin >> System >> Localization >> Store Location, you will see the listing of store locations below image:
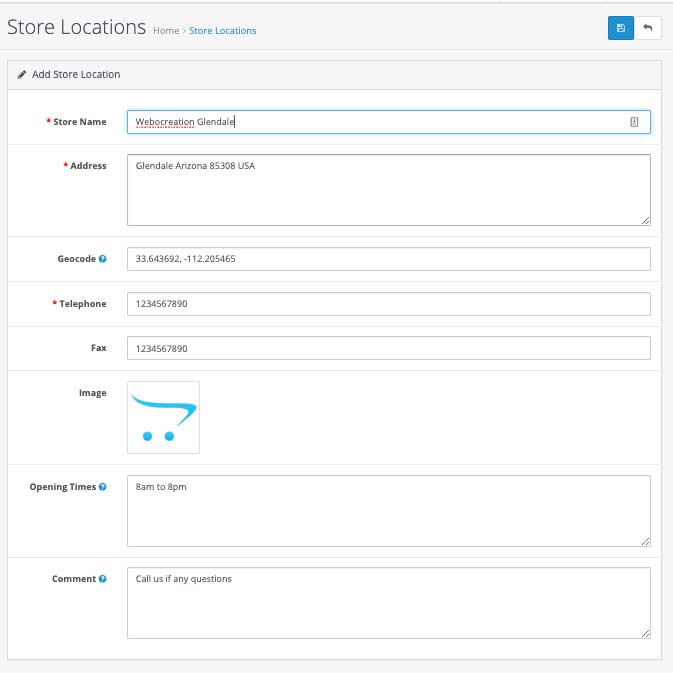
On that page, click the “Add new” blue button where you get a form to insert the location of the new store. Enter the details.
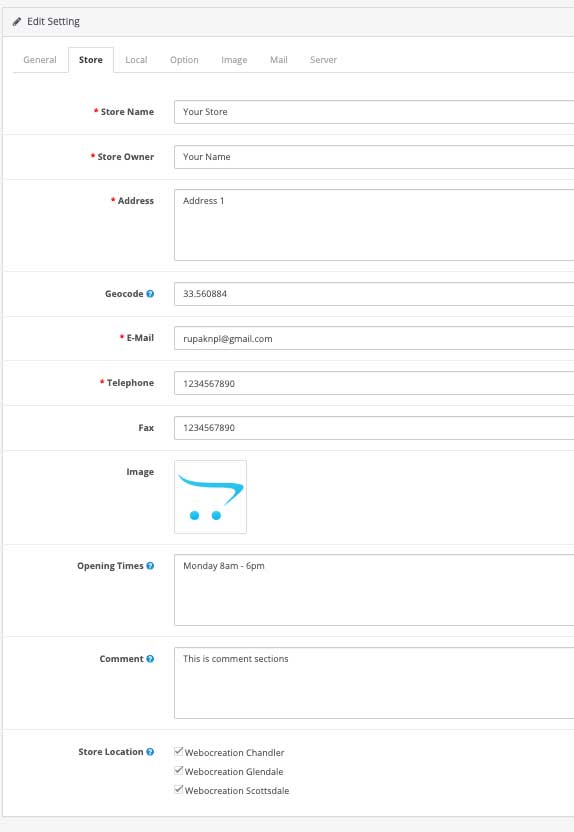
Once you entered the details, click the Save button. Enter as many stores as you have then go to admin >> System >> Settings >> Edit the store >> go to the store tab >> and at the bottom, there are store locations listed, click the checkbox which you want to show.
Now go to your contact us page in the storefront and you can see the listing below:
In this way, you can show multiple Store Locations on the contact us page of Opencart. Please don’t forget to post your questions or comments so that we can add extra topics. You can follow us at our Twitter account @rupaknpl and subscribe to our YouTube channel for opencart tutorials.
Then download the language pack, for demo purpose, we are choosing “Spanish” language. Once you clicked the download button if you are not logged then it redirects to log in page else it will show the download section. Download the right version. As we are using Opencart 3 so we download the “3.0.2.0 Spanish Translation“, you will get a zip file like “Opencart Espanol 3.0.ocmod.zip”. Now go to admin >> Extensions >> Installer >> click Upload and select the zip file just downloaded “Opencart Espanol 3.0.ocmod.zip”. After you see the upload success message, go to admin >> Extensions >> Modifications and click the refresh button at the top right corner.
How to add a new language pack in Opencart 4?
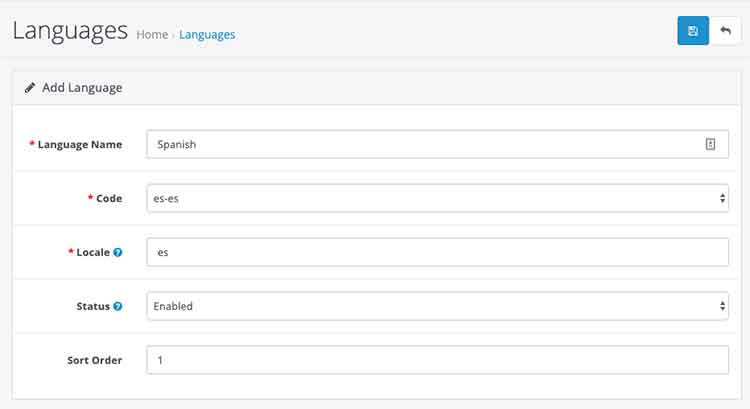
Go to admin >> System >> Localization >> Languages. The language section is to manage the languages for the store, by default it has the English language. Click the blue “Add New” button then you will see a form like below:
If your language pack is uploaded properly then it will show in the dropdown of the code. For our example it is “es-es”, so we entered the details as in the above image.
Language Name: We can give any name but better to give a lexical name as this is shown in the frontend of the store. For our example, we gave it “Spanish”.
Status: To enable the language at the front select it Enabled.
Sort Order: This the order to show the languages in front of the dropdown.
With the above settings, we can see the dropdown of languages like below image:
How to change the default language of Opencart?
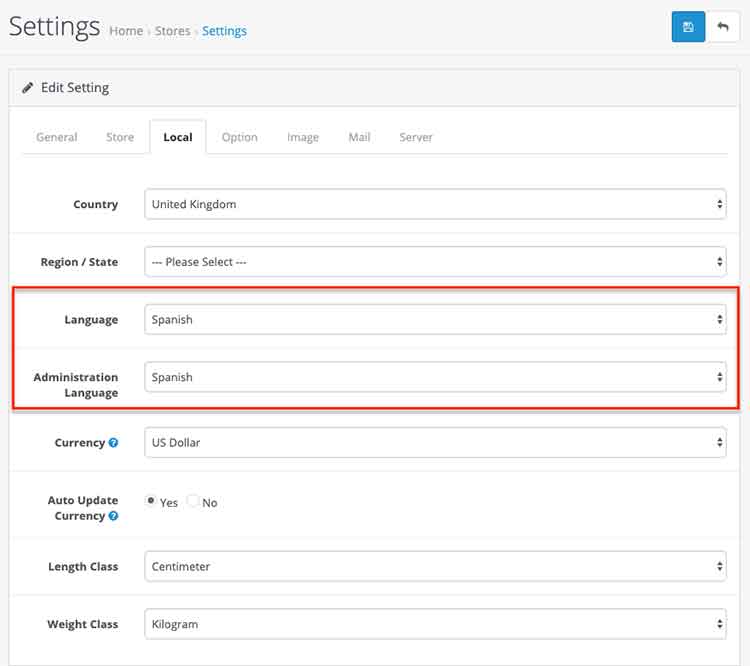
To change the default language to another language, go to admin >> System >>Settings >> Edit the store. Click the Local tab and select the Language and Administration Language to the preferred language.
In this way, we can upload a new language, install the new language in Opencart 4, show it in front of the store, set the different default languages other than English. If language is not available yet for Opencart then you need to create by yourself, we show in a blog post, How to create a custom language for Opencart 4?. Please don’t forget to post your questions or comments so that we can add extra topics, free module or opencart tutorial that we need to develop which helps to develop quality. You can follow at twitter account @rupaknpl and subscribe to YouTube user opencart tutorial.
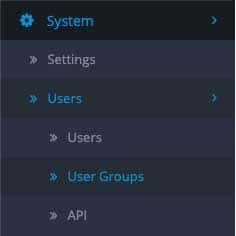
To manage the Opencart admin section, opencart can have multiple users with different users group and each user group can have different permissions for the management of Opencart stores. The powerful user group is the Administrator by default but you can change it as per your requirement. For users, user groups, and permissions management, go to Admin >> System >> Users where you will see as below in the left menu:
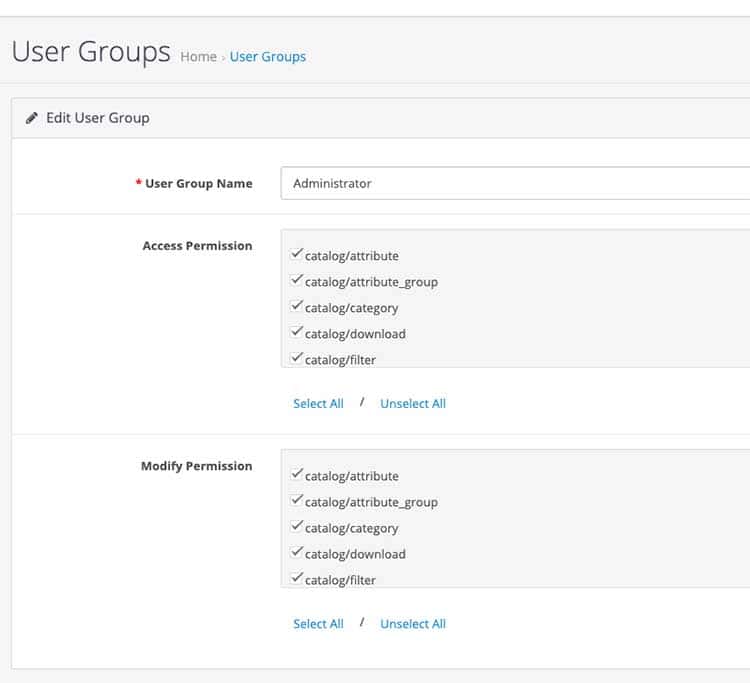
First, go to Admin >> System >> Users >> User Groups, where you can see Administrator and Demonstration, edit Administrator and you will see like below:
As the Administrator is a superuser, everything is checked. Be sure to whom you are making the Administrator user.
There are two permissions: Access Permission and Modify Permission. With Access permission, the user can see the page which is checked. With Modify permission, the user can edit the section which is checked.
How to identify the page for permission in Opencart?
In Access Permission and Modify the permission on the right side you see the checkbox which is the parts of the URL and the route of the page. Like:
In the above URL after the route= you see catalog/category which is the one you will see on the right side of the access and modify permission. So you can now find your URL and decide how to give permissions to the User groups.
Now let’s take some examples of how we can manage the users and their roles which are user groups and permissions.
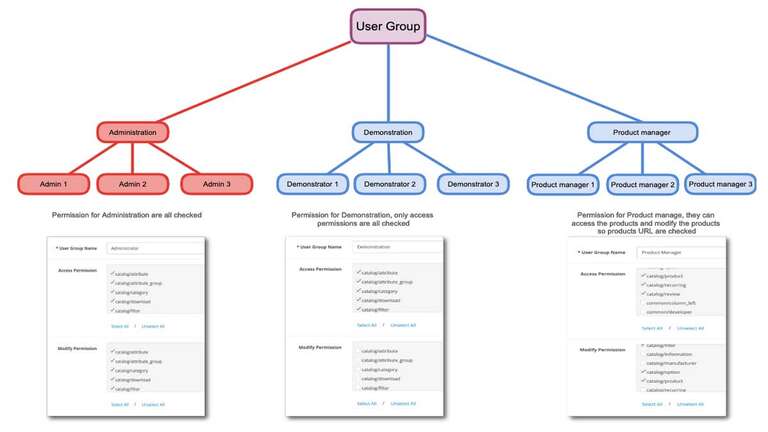
In the above image example, there are three User groups: Administration, Demonstration, and Product manager. For the Administration, all are checked for both Access permission and modification permission as they are the superuser. For Demonstration, only access permission is checked as they can demonstrate reports and analyze them that is why modifying permission is not given. A product manager, their role is to edit the products and add the products that are why they are permitted some of the Access permission and some of the modify permissions like the catalog/product, catalog/category, etc.
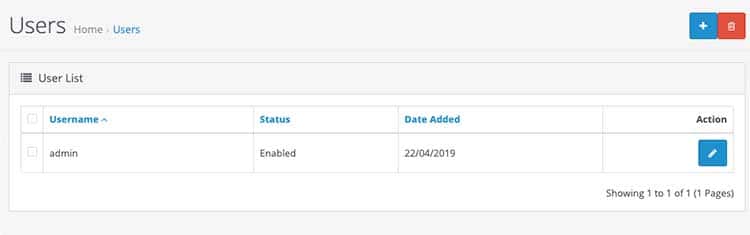
Once user groups are set up now we can add the user. To manage the user go to Admin >> System >> Users >> Users
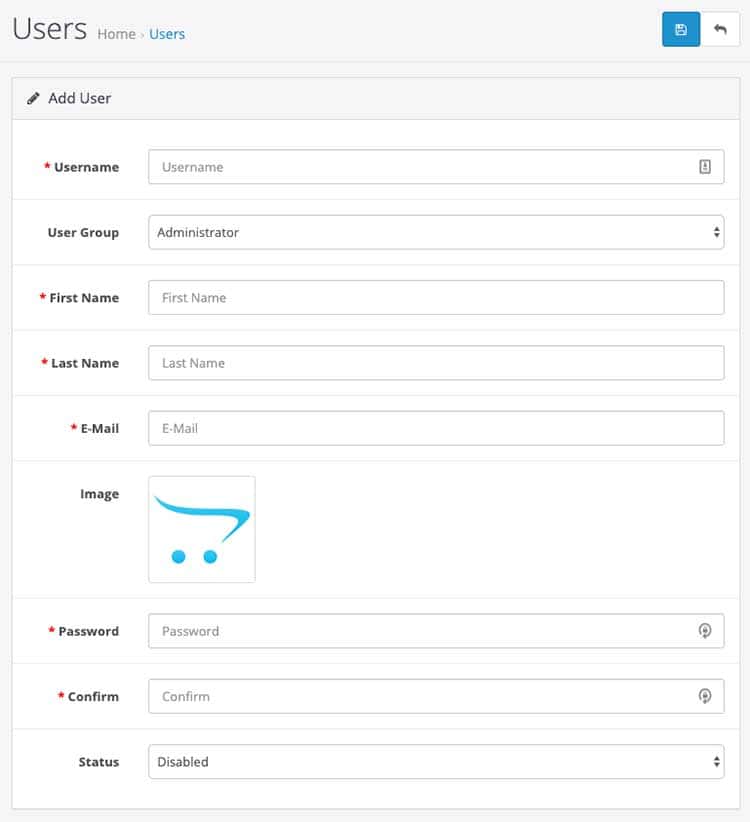
From this user listing page, you can add, delete and edit the user. Let’s add a user, for that click the blue button at the top right corner and you will see a form like below:
Enter the details like username, select User Group, first name, last name, email, image, password, confirm, and status. Then click Save and the user is added.
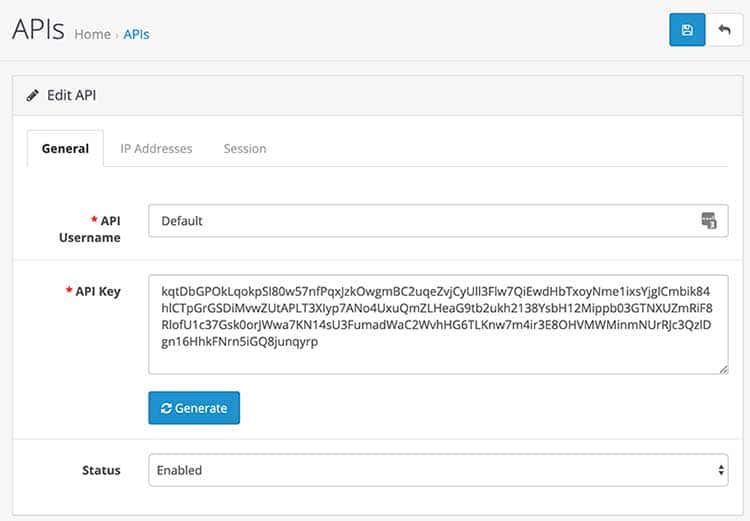
Now, let’s learn about the Opencart API user, go to Admin >> System >> Users >> API and click the blue button to add the API user, you will see the form below:
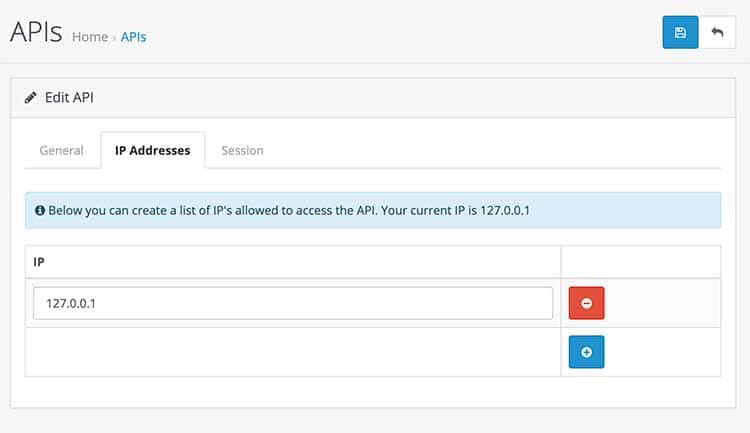
Enter the API username, and click the Generate button to generate the API key automatically, and click status to enable. Then click the IP Addresses where you need to enter the IP addresses of your server which will be accessing your API.
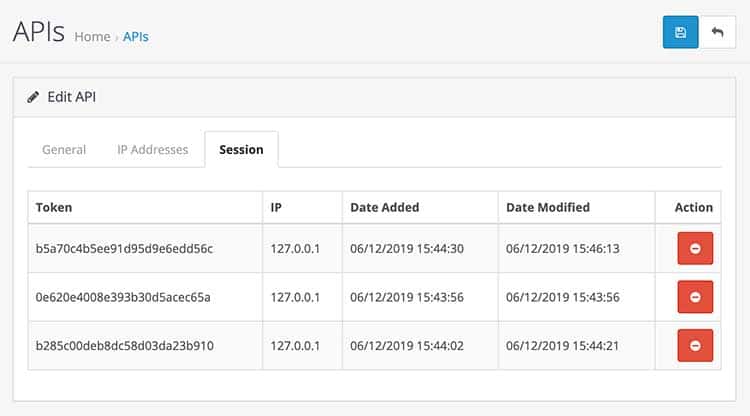
Then you can click the save button. In the Session tab, you can see the token, IP, and date when the API is called or accessed like the below image:
To use the opencart API and manage the API users you can watch this video where we defined the Opencart API:
For Opencart API detail you can check the following blog posts:
In this way, we can manage the users, user groups, access permission, modify permission, and API users in the Opencart. Please don’t forget to post your questions or comments so that we can add extra topics. You can follow us at our Twitter account @rupaknpl and subscribe to our YouTube channel for opencart tutorials. Happy learning.
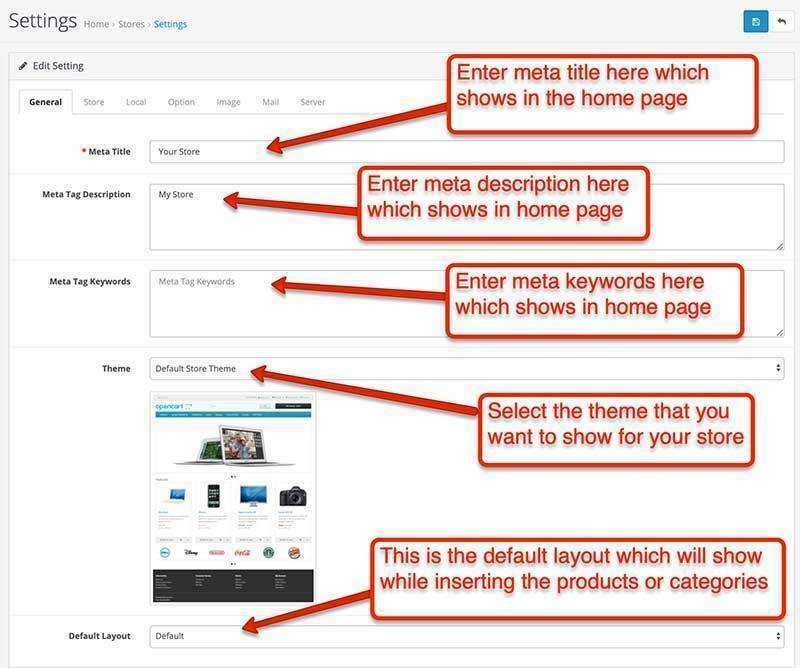
This is an Opencart guide where we are showing you the setting configuration in Opencart 4. Go to Admin >> System >> Settings and edit the store, and we will define the fields in general, store, local, option, image, mail, and server. Opencart user manual
General Tab
Store tab
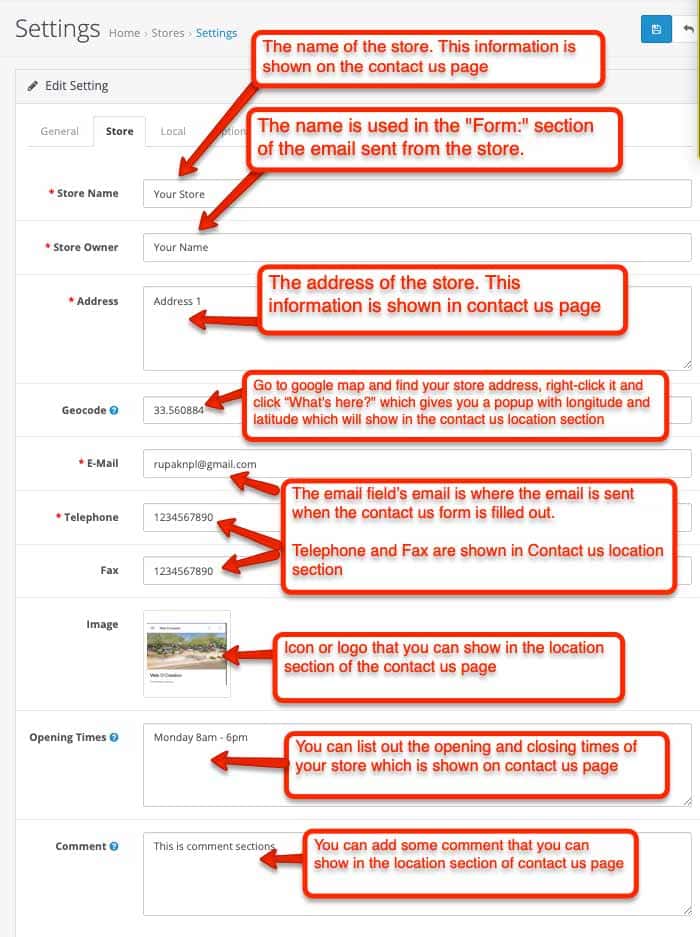
This setting tab is mostly for the contact us page email and display of information.
Store Name: The name of the store. This information is shown on the contact us page.
Store Owner: The name is used in the “Form:” section of the email sent from the store.
Address: The address of the store. This information is shown on the contact us page
Geocode: Go to google map and find your store address, right-click it and click “What’s here?” which gives you a popup with longitude and latitude which will show in the contact us location section.
Email: The email field’s email is where the email is sent when the contact us form is filled out.
Telephone and Fax: Telephone and Fax are shown in the Contact us location section
Image: Icon or logo that you can show in the location section of the contact us page
Opening Times: You can list out the opening and closing times of your store which are shown on the contact us page.
Comment: You can add some comments that you can show in the location section of the contact us page
When you entered those details then the default contacts us page will look like the below:
Local tab
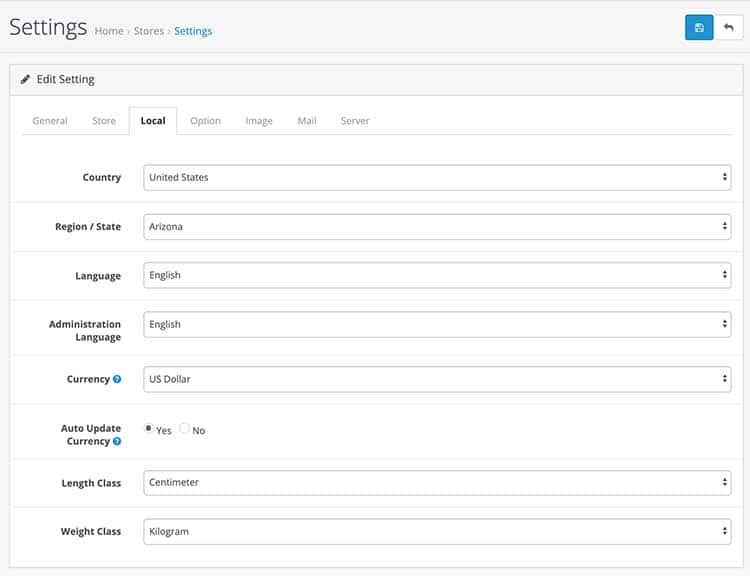
In the local setting tab, we set up localization of the store, we will enter the data of country, region, language, currency, length, and weight at the Localisation setting. Here we select default localization for the store.
Option tab
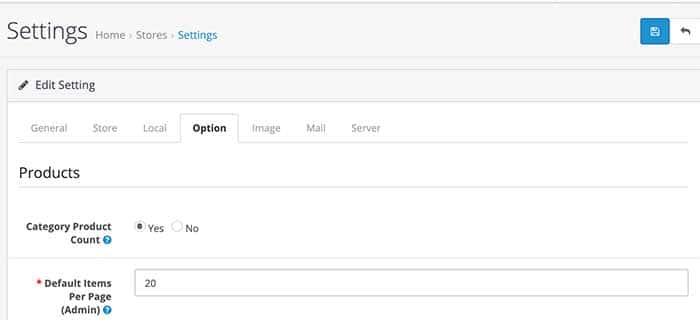
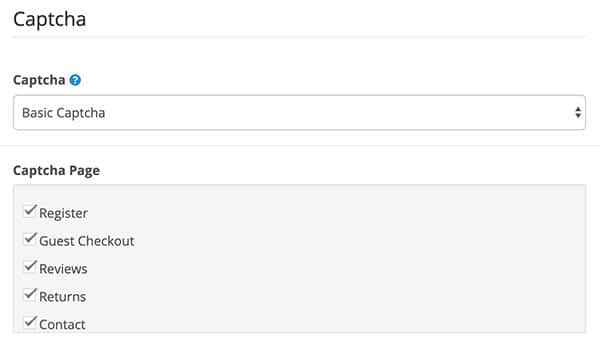
The “Option” tab in the Settings has the following setting fields: Products, Reviews, Vouchers, Taxes, Account, Checkout, Stock, Affiliates, Returns, and Captcha.
Products setting in Opencart
In Opencart 4, there are only two products settings:
Category Product Count: Show the number of products inside the subcategories in the storefront header category menu. Be warned, this will cause an extreme performance hit for stores with a lot of subcategories! We suggest selecting “No” for the performance.
Default Items Per Page (Admin): Determines how many admin items are shown per page (orders, customers, etc). After this number, it will show the pagination.
In previous versions, there used to be product numbers to show in the storefront and limit description and image sizes but it is now moved to the theme settings section at Extensions >> Extensions >> Select theme >> Edit the theme and you will find all those setting there.
Reviews settings in Opencart
On the product detail page, there is a review section, these are the settings for that review section.
Allow Reviews: Enable/Disable new review entries and display of existing reviews.
Allow Guest Reviews: Select Yes if you allow guests to post reviews for products.
Vouchers setting in Opencart
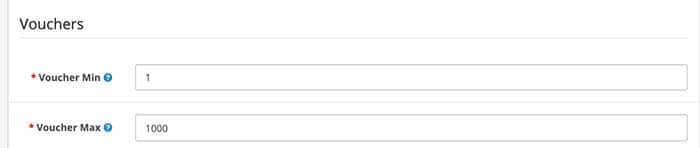
Store owners can send Gift Vouchers to customers from the admin section or store visitors can also go to store URLs like https://YOURURL/index.php?route=account/voucher and buy the gift vouchers and send them to Recipient’s email and the recipient can get the store credit of the send amount. These are the setting for the Gift Vouchers.
Voucher Min: Minimum amount a customer can purchase a voucher for.
Voucher Max: Maximum amount a customer can purchase a voucher for.
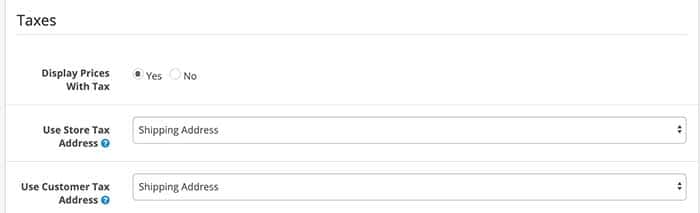
Display Prices With Tax: If this is selected as “Yes” then the price includes tax, but, if it is selected as “No” then taxes are added to the shopping cart only.
Use Store Tax Address: Use the store address to calculate taxes if the customer is not logged in. You can choose to use the store address for the customer’s shipping or payment address.
Use Customer Tax Address: Use the customer’s default address when they log in to calculate taxes. You can choose to use the default address for the customer’s shipping or payment address.
Account settings in Opencart
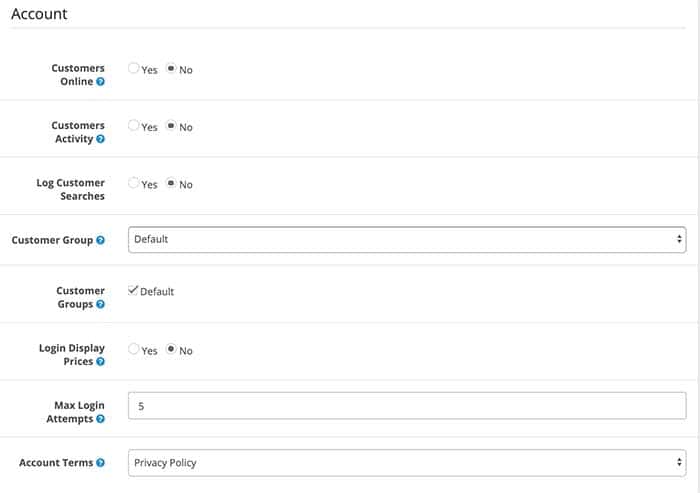
These are the settings for the accounts in Opencart:
Customers Online: If this is selected Yes then you can track customers online via the customer reports section. Go to admin >> Reports >> Who’s Online and you can see the Online Report.
Customers Activity: If this is selected Yes then you can track customers’ activity via the customer reports section. Go to admin >> Reports >> Choose the report type as “Customer Activity Report” and see the activities of the customer.
Log Customer Searches: If this is selected Yes then you can track what logged-in customers are searching on the website which may help you to add those products to featured products or make some products show decisions. Go to admin >> Reports >> Choose the report type as “Customer Searches Report”
Customer Group: Default customer group.
Customer Groups: Display customer groups that new customers can select to use such as wholesale and business when signing up.
Login Display Prices: Only show prices when a customer is logged in.
Max Login Attempts: Maximum login attempts are allowed before the account is locked for 1 hour. Customer and affiliate accounts can be unlocked on the customer or affiliate admin pages.
Account Terms: Forces people to agree to terms before an account can be created.
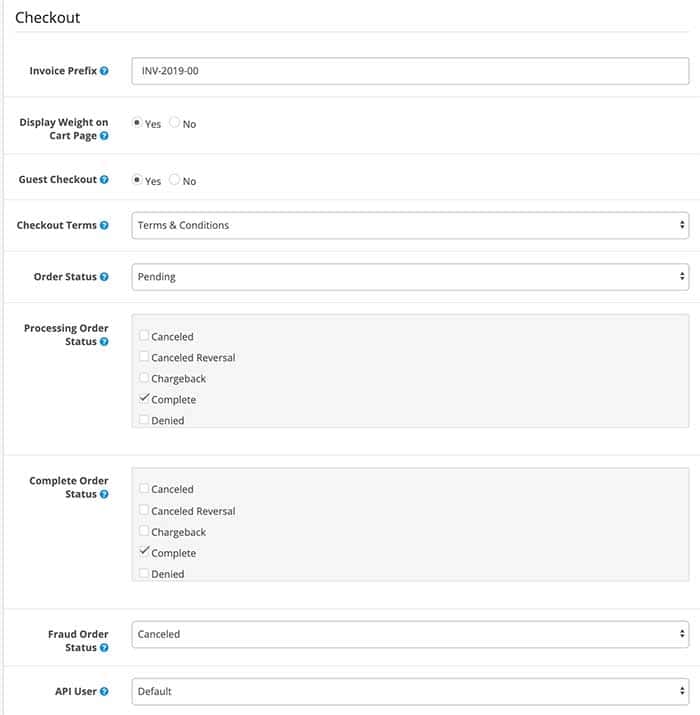
Checkout setting in Opencart:
These are the setting for checkout in Opencart:
Invoice Prefix: Set the invoice prefix (e.g. INV-2011-00). Invoice IDs will start at 1 for each unique prefix.
Display Weight on Cart Page: Show the cart weight on the cart page.
Guest Checkout: Allow customers to checkout without creating an account. This will not be available when a downloadable product is in the shopping cart.
Checkout Terms: Forces people to agree to terms before a customer can checkout.
Order Status: Set the default order status when an order is processed.
Processing Order Status: Set the order status the customer’s order must reach before the order starts stock subtraction and coupon, voucher, and rewards redemption.
Complete Order Status: Set the order status the customer’s order must reach before they are allowed to access their downloadable products and gift vouchers.
Fraud Order Status: Set the order status when a customer is suspected of trying to alter the order payment details or use a coupon, gift voucher, or reward points that have already been used.
API User: Default API user the admin should use.
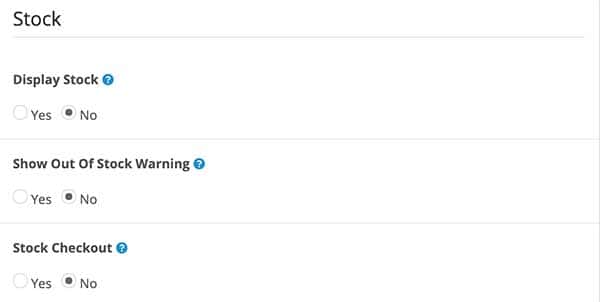
Stock settings in Opencart:
Display Stock: Display stock quantity on the product page.
Show Out Of Stock Warning: Display Out of stock message on the shopping cart page if a product is out of stock but stock checkout is yes. (Warning always shows if stock checkout is no)
Stock Checkout: If selected yes it allows customers to still check out if the products they are ordering are not in stock.
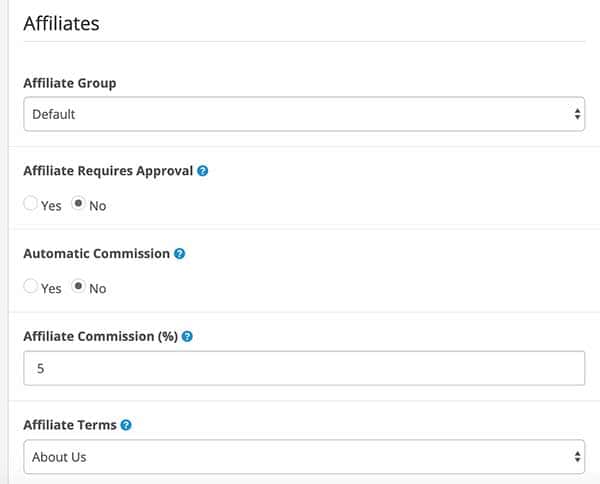
Affiliates settings in Opencart:
In Opencart 4 the affiliates are combined with customers. Here are details of affiliates in Opencart, these are the store-level setting of Affiliates in Opencart.
Affiliate Group: As customers and affiliates are managed by customers in the admin section, so the main customer groups that affiliate group is assigned if someone registered for the affiliates.
Affiliate Requires Approval: Automatically approve any new affiliates who sign up.
Automatic Commission: Automatically add commission when each order reaches the complete status.
Affiliate Commission (%): The default affiliate commission percentage.
Affiliate Terms: Forces people to agree to terms before an affiliate account can be created.
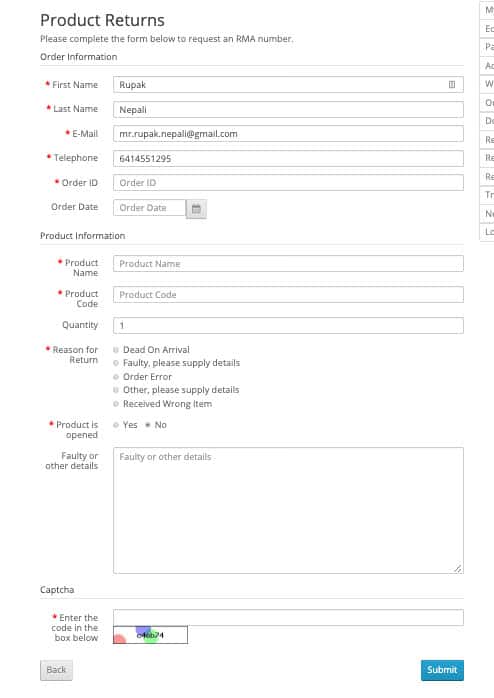
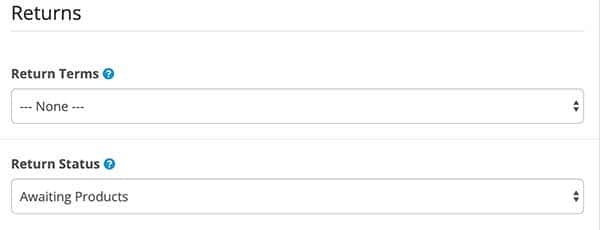
Returns settings in Opencart:
Customer can return the ordered products by filling the form athttps://YOURURL/index.php?route=account/return/add
The returns setting in Opencart are:
Return Terms: Forces people to agree to terms before a return can be created.
Return Status: Set the default return status when a return request is submitted.
In this way, you can set up the Options settings of Opencart, now let’s see the image settings.
Image setting tab in Opencart:
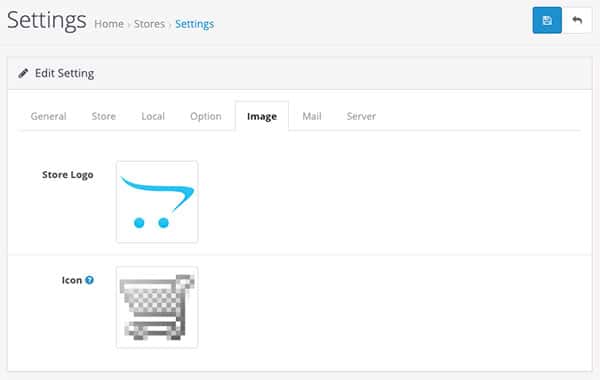
The image setting tab includes a store logo and a favicon icon to upload. In the older version, there used to be image sizes for products and categories but it is now moved to the theme settings section at Extensions >> Extensions >> Select theme >> Edit the theme and you will find all those images setting there.
Store logo: You can upload a store logo here which is shown in the header of the front store.
Icon: This is a favicon icon, you can upload your store favicon here. Mostly we use size of 32px * 32px.
FTP tab setting in the Old version
Go to the following post for the FTP settings where we show you multiple ways to connect FTP but mostly they are left blank.
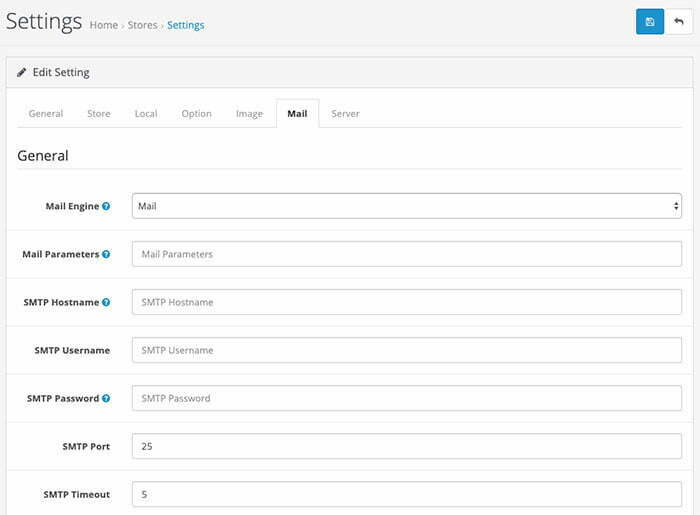
In the mail tab settings of Opencart, all email settings are done here, mostly we use the mail engine as Mail and enter the Mail Parameters as our email, and works properly. But if you want to set up SMTP then you need to choose the Mail Engine as SMTP and enter hostname, username, password, port, and timeout settings as per your SMTP provider.
Mail Engine: Only choose ‘Mail’ unless your host has disabled the PHP mail function.
Mail Parameters: When using ‘Mail’, additional mail parameters can be added here (e.g. -f email@storeaddress.com)
SMTP Hostname: Enter your SMTP hostname here. Add ‘tls://’ or ‘ssl://’ prefix if security connection is required. (e.g. tls://smtp.gmail.com, ssl://smtp.gmail.com).
SMTP Username: Enter the SMTP username provided by your email server.
SMTP Password: Enter the SMTP password provided by your email server. For Gmail, you might need to set up an application-specific password here: https://security.google.com/settings/security/apppasswords.
SMTP Port: Enter the SMTP port provided by your email server.
SMTP Timeout: Enter the SMTP timeout here.
Mail Alerts settings in Opencart:
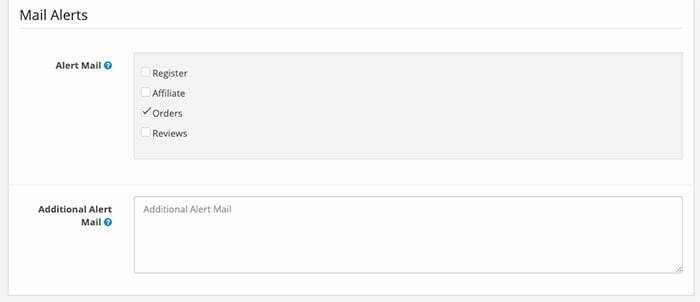
You can get an email alert when someone registered an account or apply for affiliates or order some products or someone gives reviews.
Alert Mail: Select which features you would like to receive an alert email on when a customer uses them.
Additional Alert Mail: Any additional emails you want to receive the alert email, in addition to the main store email. (comma separated).
Server settings tab in Opencart:
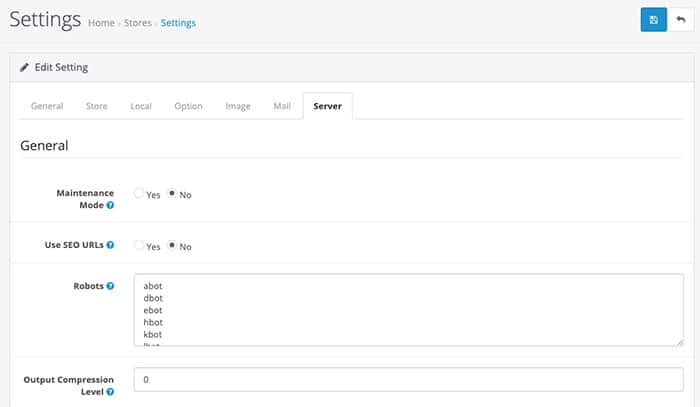
Most of the server settings are done here:
General
Maintenance Mode: Prevents customers from browsing your store. They will instead see a maintenance message. If logged in as admin, you will see the store as normal.
Robots: A list of web crawler user agents that shared sessions will not be used. Use separate lines for each user agent.
Output Compression Level: GZIP for more efficient transfer to requesting clients. The compression level must be between 0 – 9. Keep on trying between 0-9 until you get the desired output as it differs as per server. For ours, we are using 5.
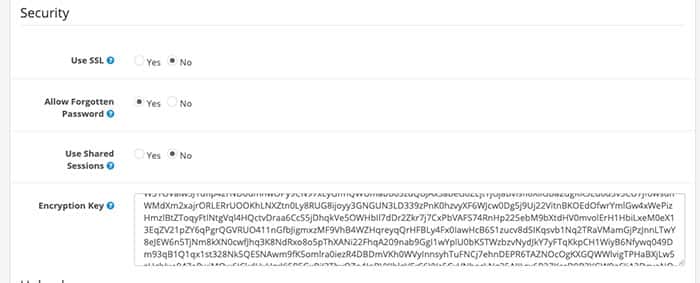
Use SSL: To use SSL check with your host if an SSL certificate is installed and add the SSL URL to the catalog and admin config files.
Allow Forgotten Password: Allow forgotten passwords to be used for the admin. This will be disabled automatically if the system detects a hack attempt.
Use Shared Sessions: Try to share the session cookie between stores so the cart can be passed between different domains.
Encryption Key: Please provide a secret key that will be used to encrypt private information when processing orders.
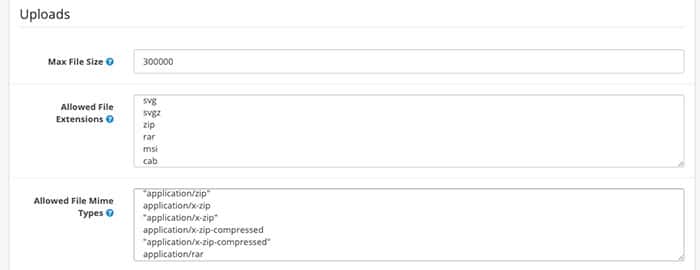
Uploads
Max File Size: The maximum image file size you can upload in Image Manager. Enter as a byte.
Allowed File Extensions: Add which file extensions are allowed to be uploaded. Use a new line for each value.
Allowed File Mime Types: Add which file mime types are allowed to be uploaded. Use a new line for each value.
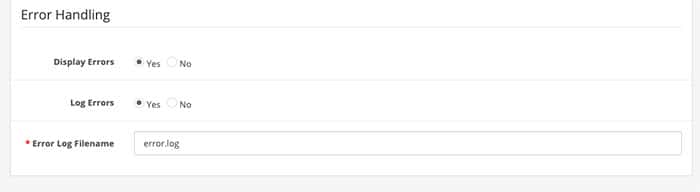
Error Handling
Display Errors: We suggest keeping it No for the live environment. For testing and development purposes keep it Yes so that you can see the PHP errors, warnings, and notices shown by the store.
Log Errors: We suggest keeping it Yes so that you can see if something is not working or producing errors.
Error Log Filename: This is the file where errors are logged. Better to name it error.log.
Enter all of the settings and finally click Save.
We hope this helps someone to go through the settings of Opencart. Please don’t forget to post your questions or comments so that we can add extra topics. You can follow us at our Twitter account @rupaknpl and subscribe to our YouTube channel for opencart video tutorials and go to the Opencart user manual.
Setting up an Opencart 4 ecommerce store involves several steps, including configuring your server, setting up FTP access, configuring email, and connecting your database. Here’s a detailed guide to help you through each step using cPanel.
Server Setup
Choosing a Hosting Provider:
Select a hosting provider that offers cPanel, cloud that meets Opencart’s system requirements.
Example: Providers like AWS, Google cloud, A2hosting, Bluehost, SiteGround, and InMotion Hosting are popular choices.
Now your server is ready now need to do some setting change in the admin dashboard.
By following these steps, you can effectively set up a server, configure FTP access, set up email accounts, and establish a database connection for your Opencart 4 store using cPanel. This comprehensive setup ensures that your ecommerce platform runs smoothly and efficiently, providing a robust foundation for your online business. Hope you liked this opencart user manual, please subscribe to our YouTube Channel for Opencart video tutorials. You can also find us on Twitter and Facebook.
Choosing the right domain name and registering it is a crucial step in establishing your ecommerce website. Here’s a comprehensive guide to help you through the process.
Choosing a Domain Name
Relevance: Ensure the domain name reflects your brand and the products or services you offer.
Example: If your store sells handmade jewelry, consider a domain name like “HandmadeJewels.com.”
Simplicity: The domain name should be easy to spell, pronounce, and remember.
Example: Avoid complex words or lengthy phrases. “EasyGifts.com” is preferable to “BestGiftsForEveryOccasion.com.”
Keywords: Incorporate relevant keywords if possible, as this can help with search engine optimization (SEO).
Example: For an online book store, “BestBooksOnline.com” is a good choice.
Uniqueness: Ensure the name is unique and not easily confused with existing brands or websites.
Example: “ShopBrite.com” should not be too similar to “ShopBright.com” to avoid confusion.
Extensions: Choose an appropriate domain extension. While “.com” is the most popular and widely recognized, other extensions like “.store,” “.shop,” or country-specific extensions (e.g., “.co.uk”) might also be suitable.
Checking Domain Availability
Domain Registrars: Use domain registrars like GoDaddy, Namecheap, or Google Domains to check if your desired domain name is available.
Example: Enter your preferred domain name in the search bar of the registrar’s website to see if it’s available.
Alternative Options: If your first choice is taken, consider variations or alternative extensions.
Example: If “BestBooksOnline.com” is taken, you might try “BestBooksOnline.net” or “BestBooksStore.com.”
Registering the Domain
Choosing a Registrar: Select a reputable domain registrar. Popular options include GoDaddy, Namecheap, Google Domains, and Bluehost.
Example: Research user reviews and compare prices and features before making a decision.
Registration Period: Decide how long you want to register the domain. Options typically range from one to ten years.
Example: Registering for a longer period can often save money and prevent the domain from expiring unexpectedly.
Privacy Protection: Consider purchasing domain privacy protection to keep your personal information hidden from the public WHOIS database.
Example: This service prevents spammers and potential attackers from accessing your contact details.
Completing the Registration: Fill out the required information, including your name, address, and payment details, to complete the registration process.
Example: Follow the registrar’s prompts to enter your details and finalize the purchase.
Managing Your Domain
DNS Settings: Configure your DNS settings to point your domain to your web hosting provider.
Example: Access the DNS management panel of your registrar and update the nameservers to those provided by your hosting provider.
Renewal: Set reminders to renew your domain before it expires. Many registrars offer automatic renewal options.
Example: Enable auto-renewal to ensure your domain registration remains active without interruption.
Transfers: If needed, you can transfer your domain to another registrar. Ensure you understand the transfer policies and any potential fees.
Example: If you find a better deal or need additional services, you might consider transferring your domain to another provider.
Additional Tips
Trademark Considerations: Check for potential trademark issues to avoid legal complications.
Example: Ensure your domain name doesn’t infringe on existing trademarks to prevent disputes.
Social Media Handles: Secure matching social media handles to maintain consistent branding across all platforms.
Example: Check if the corresponding usernames are available on platforms like Twitter, Facebook, and Instagram.
SEO Impact: Choose a domain name that is favorable for SEO, keeping it relevant to your niche and including keywords if possible.
Example: A domain name that aligns with common search terms can improve your site’s visibility in search engines.
By carefully selecting and registering your domain, you lay a strong foundation for your ecommerce website’s online presence. Ensure that your domain name aligns with your brand, is easy to remember, and is legally sound. This will help attract customers and establish a reputable online store.
Opencart is a powerful, user-friendly open-source e-commerce framework that allows businesses to create and manage their online stores with ease. It provides a comprehensive suite of features designed to streamline the process of selling products and services online. OpenCart’s flexibility, coupled with its robust set of tools, makes it an excellent choice for small and large businesses. OpenCart 4 introduces several enhancements and new features to improve usability, performance, and security. The OpenCart ecosystem includes a vibrant community of developers, designers, and store owners contributing to the platform’s continuous improvement. Additionally, the OpenCart marketplace provides a plethora of themes, extensions, and modules to enhance your online store’s functionality and aesthetics.
Unlock the Potential of OpenCart 4: Domain registration, installation, servers setup, emails, administration, promotion, tracking, APIs, SEO, security, cloudflare, OCMOD, events, and many more
Who can use OpenCart?
OpenCart is suitable for many users, including:
Small to Medium-Sized Businesses: Ideal for businesses looking for a cost-effective yet powerful e-commerce solution.
Developers and Designers: Offers a flexible platform that can be extensively customized to meet client needs.
E-Commerce Entrepreneurs: Perfect for individuals launching a new online store due to its user-friendly setup and management.
From the user’s perspective
Creating eCommerce websites
Launch store simply and faster
Save investment cost
Opencart is lightweight
Handle easier: ideal for end-users to control their Opencart stores
Catch up with eCommerce trends.
Creating Advanced eCommerce websites
Easy learning curve, Large Community, and Support
Customize the presentation layer or front end
Flexibility, Customization, and Extend the functionality
Open Source, Cost-Effective, and many more.
Key Features of OpenCart
Overview
Founded in 2008 by Daniel Kerr
Written in PHP, uses MySQL for database management
Free to download and use under the GNU General Public License
Key Features
Multi-Store Capability: Manage multiple stores from a single admin interface.
Extensive Extensions Library: Enhance your store’s functionality with thousands of available extensions.
SEO-Friendly: Optimize your store for search engines with built-in SEO tools.
User Management: Control access to various store parts with user permissions.
Customizable Themes: Personalize your store’s appearance with customizable themes.
Multi-Language and Multi-Currency Support: Cater to a global audience by offering multiple languages and currencies.
Comprehensive Reporting: Gain insights into your store’s performance with detailed reports and analytics.
Besides basic features, multi-language, multi-store, multi-layout, fully customizable, and many more with OCMOD or VqMod virtual file modification with XML and also includes an unlimited module instance system and uses popular foundations like bootstrap, font awesome, and flex slider for rapid development.
User-friendly admin panel
Multi-store functionality
Wide range of payment gateways
Shipping method integrations
Product reviews and ratings
SEO-friendly URLs
Multi-currency support
Multi-language support
Customizable themes
Extensive reporting tools
Extension Marketplace
Thousands of extensions available
Both free and paid options
Extends functionality for marketing, shipping, payment, reporting, etc.
Themes
Customizable responsive themes
Both free and premium options available
Easy to modify using the built-in theme editor
Security
Regular security updates
Built-in security features like SSL support
Password encryption
Community and Support
Active community forum
Extensive documentation
Professional support options available
Installation and Setup
Relatively easy installation process
Many web hosts offer one-click OpenCart installation
Scalability
Suitable for small to medium-sized businesses
Can handle larger catalogs with proper optimization
Performance
Generally good performance out of the box
Can be further optimized with caching extensions and server tweaks
Customization
Highly customizable through extensions and theme modifications
Developers can create custom modules and integrations
Pros
Free and open-source
Easy to use for beginners
Extensive features out of the box
Large community and marketplace
Cons
May require technical knowledge for advanced customizations
Some essential features might require paid extensions
Performance can degrade with many extensions installed
Comparison to other platforms
Generally easier to use than Magento
More flexible than hosted solutions like Shopify
May require more technical knowledge than WooCommerce
OpenCart is an excellent choice for small to medium-sized businesses looking for a flexible, feature-rich e-commerce solution. Its open-source nature and extensive marketplace make it a versatile platform capable of handling a wide range of e-commerce needs.
For the User Manual, we are covering the following topics which are listed below, we will add the links as we completed the documentation of Opencart 4:
Stock Statuses management and product availability in Opencart
Order Statuses management in Opencart
Countries and Zones States Regions management
Zones or Regions or States management in Opencart
‘Zone Shipping’ and how do we set it up
Opencart set up taxes with geocodes US tax for California residents 8.75%
Need to set up US Taxes for California residents where CA Tax is 8.75%.
Length Classes and Weight Classes management
Weight classes management in Opencart
Add length and weight for Product
Maintenance
Maintenance Mode in Opencart
Backup/Restore in Opencart
Uploads in Opencart maintenance section
Error Logs in Opencart
Upgrade
Maintenance Mode in Opencart
Backup/Restore in Opencart
Uploads in Opencart maintenance section
Error Logs in Opencart
USER MANAGEMENT
Users
OPENCART CATALOG MANAGEMENT
Categories management
Accessing the Admin Panel
Navigating to Categories Management
Creating a New Category
Editing an Existing Category
Deleting a Category
Managing Subcategories
Bulk Actions
SEO and Best Practices
Products management
Pricing psychological tactic for eCommerce website
Master Product and Variant Product in Opencart
How to add the product variant in Opencart?
How to override the variant product data?
Filters management
Navigating to Filters Management
Creating a New Filter
Editing an Existing Filter Group
Deleting a Filter Group
Assigning Filters to Products
Assigning Filters to Categories
SEO and User Experience Considerations
Attributes management
Navigating to Attributes Management
Creating a New Attribute
Creating and Managing Attribute Groups
Editing an Existing Attribute
Deleting an Attribute
Assigning Attributes to Products
Using Attributes for Filters
Best Practices for Attributes Management
Options management
Navigating to Options Management
Creating a New Option
Editing an Existing Option
Deleting an Option
Assigning Options to Products
Managing Option Types
Best Practices for Options Management
Manufacturers management
Navigating to Manufacturers Management
Creating a New Manufacturer
Editing an Existing Manufacturer
Deleting a Manufacturer
Assigning Manufacturers to Products
Manufacturer Page and SEO Considerations
Customer Navigation and User Experience
Reviews management
Navigating to Reviews Management
Viewing and Moderating Reviews
Editing a Review
Adding a New Review
Deleting a Review
Best Practices for Reviews Management
SEO and User Experience Considerations
Information pages management
Navigating to Information Pages Management
Creating a New Information Page
Editing an Existing Information Page
Deleting an Information Page
Best Practices for Information Pages
OPENCART DESIGN
Themes
Customization Options
Layouts and Modules
Visual Elements
User Experience (UX) Design
SEO and Performance
Custom Design and Development
Layouts management
Customize layouts and positions to show different modules in Opencart
How to customize the Opencart homepage?
Where can you find modules in Opencart 3?
Theme Editor
Steps to make the theme editor
Banners management
Navigating to Banner Management
Creating a New Banner
Editing an Existing Banner
Deleting a Banner
Assigning Banners to Layouts
Best Practices for Banner Management
Advanced Banner Features
Language Editor
Zipping and naming language extension
Upload a new language pack in Opencart 4
Test Your Custom Language
Change the default language of Opencart 4
Override the language texts from Admin Interface
SEO URLs management
Understanding SEO URLs
Enabling SEO URLs
Creating SEO URLs for Products, Categories, and Other Pages
Managing and Editing SEO URLs
Best Practices for SEO URLs
SEO URL for Multilingual Stores
Checking and Testing SEO URLs
Advanced SEO URL Features
SALES MANAGEMENT
Orders
Order status global setting
Order statuses at Payment gateways
Customer Order status in Order History
How do reward points work in Opencart?
Subscriptions
Setting Up Subscriptions
Creating Subscription Products
Managing Recurring Profiles
Customer Management
Payment and Billing
Reporting and Analytics
Marketing and Promotions
Legal and Compliance Considerations
Returns
Product Returns settings management:
Return Statuses:
Return Actions
Return Reasons
How does a customer submit product returns in Opencart 4?
Store administrator management of product returns
Gift Vouchers
Create or design the voucher themes
Purchase a Gift Certificate and send to someone in Opencart
How recipients redeem the gift certificate?
Management of Gift Vouchers by admin
How to set a minimum and maximum amount a customer can purchase a voucher for?
OPENCART CUSTOMER MANAGEMENT
Customer Account Management
Customers
Customers Groups
Understanding Customer Groups
Creating Customer Groups
Assigning Customers to Groups
Utilizing Customer Groups
Managing Customer Group Permissions
Customer Group Reporting and Analysis
Best Practices for Using Customer Groups
Customer Approvals
Enabling Customer Approval
Managing Pending Customer Approvals
Customization of Approval Process
Managing Approved Customers
Best Practices for Customer Approvals
Advantages of Customer Approvals
GDPR
Key GDPR Requirements
GDPR Features in Opencart 4
GDPR Compliance Extensions
Best Practices for GDPR Compliance
Custom Fields
Example of the custom field in the registration form
How do you add the custom fields in Opencart?
OPENCART MARKETING MANAGEMENT
Affiliate
How does the affiliate is registered in Opencart 3?
How do you activate the affiliate for the already registered customers?
How does the affiliate use the URL on their websites blogs or forums?
How the commission is added to the affiliate?
Marketing
Key Features for Marketing Tracking in Opencart 4
Best Practices for Marketing Tracking
Coupons
Key Features of Coupons in Opencart 4
Mail
Key Features of Mail Marketing in Opencart 4
Best Practices for Mail Marketing in Opencart 4
Automatically post new Opencart products on social media like Facebook for free
Some other Automation Tools
Benefits of Auto-Publishing via RSS
Add an Analytics extension in Opencart 4? Third-party JS free Opencart extension
Install the Opencart 4 Analytics extension
OPENCART REPORTS MANAGEMENT
Popular Reports lists
Reports
Customer Transaction Report
Customer Activity Report
Customer Orders Report
Customer Reward Points Report
Customer Searches Report
Tax Report
Shipping Report
Returns Report
Sales Report
Coupon Report
Products Viewed Report
Products Purchased Report
Who’s Online
Statistics
How to add reports in the admin dashboard of Opencart 4?
OPENCART 4 EXTENSION MANAGEMENT
Marketplace
Benefits of Using the OpenCart Marketplace
Installer
Accessing the Installer
Using the Installer
Extensions
Uploading an extension in OpenCart
FTP needs to be enabled in the settings:
Invalid file type!
Could not connect as yoursitename.com:21
The modification requires a unique ID code!
Installing a module
Uninstalling a module
Remove a module
Types of Opencart Extensions
Order total modules
Captchas
Module
Theme
Analytics:
Difference between Single Instance module and Multi-instance module
Startup
Events
Cron Jobs
OPENCART 4 THEME
Install the Opencart 4 theme
Activate Opencart 4 theme
Uninstall the Opencart 4 theme
Files and folders structure of the Opencart 4 theme
OPENCART 4 LANGUAGE MANAGEMENT
File and folder structure of custom language for Opencart 4
Prepare the Language Pack
Upload a new language pack in Opencart 4
Test Your Custom Language
Change the default language of Opencart 4
Override the language texts from Admin Interface
OPENCART 4 EVENT SYSTEM
Event Types
Using Opencart Events
Registering Events
Using Events for Customization
List of Events
Language events
Activity events
Statistics events
Theme event
Admin Currency Events
Admin Statistics Events
Translation Event
Admin Language Events
Testing Opencart Events
Challenges
Best Practices while using Opencart Events
OPENCART 4 OCMOD
Files and folder structure OCMOD extension
The Flow of OCMOD
Upload of extension with OCMOD
Installation of OCMOD extension
OCMOD developer tips
Example OCMOD code
Admin Module menu addition with OCMOD extension
Folder creation of OCMOD extension
Code of install.json file
Code of webocreation_admin_menu.ocmod.xml
OCMOD error log
Read more about OCMOD
OPENCART API DOCUMENTATION
Create API username and key
Opencart user, permissions, user group management, and API users
Authentication and Request Format of Opencart API:
Request
Request Parameters
CURL login example:
Opencart 4 API Endpoints
Postman testing of Opencart 4 endpoints
Create custom API endpoints in Opencart 4
The responding server
Error Handling
OPENCART MULTI WEBSITES OR STORE SETUP
Benefits of a Multisite Setup
Prerequisites
Example stores
Step-by-Step Guide to Setting Up Multisite in OpenCart 4
Step 1: Configure Your Domain/Subdomain
Step 2: Add New Stores in OpenCart Admin
Step 3: Configure Store Settings
Step 4: Customize Your Store
Step 5: Assign Products and Categories
Step 6: Test Your Store
OPENCART SEO BEST PRACTICES
Admin Setting section changes for the SEO
SEO-Friendly URLs
Optimize Product and Category Pages
Image Optimization
Internal Linking
Mobile Optimization
Enable the sitemap extension
Add robots.txt
Canonical URL
Social proof
Schema Markup
Site Speed and Performance
GZIP Compression
Webfont loading
Fix broken links
Add your Business to Google
301 Redirects
SSL certificates
Mobile-first approach
Regular Monitoring and Analysis
OPENCART SPEED OPTIMIZATION
Choose a better hosting provider and better cache module
Use the image sizes properly
Use the proper extension for the image:
Optimize the image properly
GZIP compression level
Speed up the repeat visit by serving static assets with an efficient cache policy
Index the database table
OPENCART SECURITY MEASURES
Use good and secure hosting
Check if the install/ folder is still there
Proper Security settings in the admin
Use HTTPS/SSL Certificate
Use the latest PHP version
Use Anti-fraud extension
Error handling setting
Monitor your admin error logs
Block bad bots
Allowed File extensions and allowed file mime type permissions
Review All Users, User Groups, and Grant the Minimum Permissions Necessary
Use a strong username and password
API security in Opencart
Always use the latest Opencart version, theme, modules, and extensions
Remove unused modules or extensions
Monitor your server logs
Use HTTP security headers
Cross-Site Scripting (XSS)
Database Security and SQL Injections
Denial of Service
Backup
Use Google Captcha or Basic Captcha
OPENCART CDN CLOUDFLARE SETUP
Create a Cloudflare account
Solve the SSL issue of Cloudflare
Cloudflare FTP issues fix
PRO TIPS AND TRICKS
How to install the Opencart 4 extension?
Files and folder structure of the Opencart 4 extension
Naming tips for custom Opencart 4 extensions
Add conversion code on the success page of Opencart
How to customize the Opencart homepage?
What is the Order total in Opencart 4? How to apply and create them?
How to set free shipping, flat rate shipping, shipping as per item, or pick from a store in Opencart?
How to set up free shipping in the Opencart store?
How to set up a flat shipping rate in the Opencart store?
How to set up free shipping for over $100 and for below it will be $5 flat-rate shipping?
How to set the shipping rate per item?
How do you can set up pick up from the store shipping in the Opencart store?
How to set up a weight-based shipping rate?
What is ‘Zone Shipping’ and how do we set it up?
COMMON ERRORS AND THEIR SOLUTIONS
Blank white pages or 500 internal server error
Headers already sent
Allowed Memory Size Exhausted
OpenCart Site Launch Checklist
What to look for OpenCart Developer for your customization and how to validate the works?
Please bear with us, we try to publish one post a day that are related to above listed topics and improved as per Opencart 4. Please let us know if you have any questions or suggestions, have a look at Opencart tutorials for developers as well. You can also find us on Twitter and Facebook.