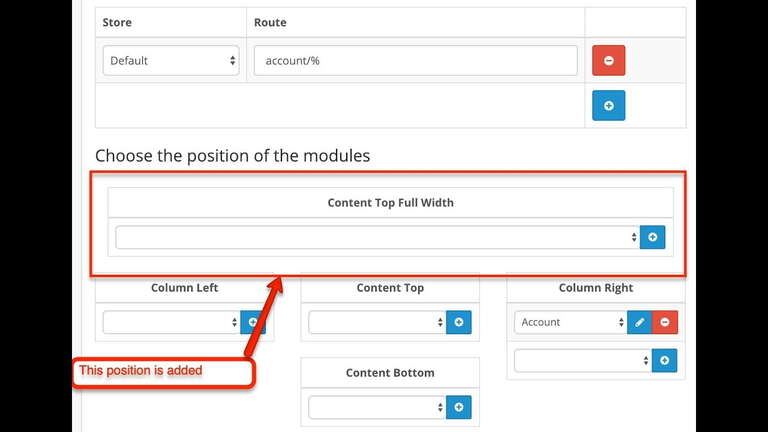
Adding a new position for different layout in OpenCart 2.2 like full width

A week early Opencart.com launched its new design and layout, and we were going through the website and found that it is using full-width layout but default OpenCart installation does not have full width in the content area. Thus we started to make the full-width position for different layout in OpenCart 2.2.

For OpenCart 3 full-width module visit below:
https://webocreation.com/opencart-free-extension-to-add-full-width-position-in-layout

Admin works

Find following code at admin/view/template/design/layout_form.tpl

<legend><?php echo $text_module; ?></legend>
<?php $module_row = 0; ?>
<div class="row">

Just below it, add the following code:

 <div class="col-lg-12 col-md-12 col-sm-12">
    <table id="module-column-full" class="table table-striped table-bordered table-hover">
        <thead>
            <tr>
                <td class="text-center">Full Width</td>
            </tr>
        </thead>
        <tbody>
            <?php foreach ($layout_modules as $layout_module) { ?>
                <?php if ($layout_module['position'] == 'column_full') { ?>
                    <tr id="module-row<?php echo $module_row; ?>">
                        <td class="text-left">
                            <div class="input-group">
                                <select name="layout_module[<?php echo $module_row; ?>][code]" class="form-control input-sm">
                                    <?php foreach ($extensions as $extension) { ?>
                                        <optgroup label="<?php echo $extension['name']; ?>">
                                            <?php if (!$extension['module']) { ?>
                                                <?php if ($extension['code'] == $layout_module['code']) { ?>
                                                    <option value="<?php echo $extension['code']; ?>" selected="selected"><?php echo $extension['name']; ?></option>
                                                <?php } else { ?>
                                                    <option value="<?php echo $extension['code']; ?>"><?php echo $extension['name']; ?></option>
                                                <?php } ?>
                                            <?php } else { ?>
                                                <?php foreach ($extension['module'] as $module) { ?>
                                                    <?php if ($module['code'] == $layout_module['code']) { ?>
                                                        <option value="<?php echo $module['code']; ?>" selected="selected"><?php echo $module['name']; ?></option>
                                                    <?php } else { ?>
                                                        <option value="<?php echo $module['code']; ?>"><?php echo $module['name']; ?></option>
                                                    <?php } ?>
                                                <?php } ?>
                                            <?php } ?>
                                        </optgroup>
                                    <?php } ?>
                                </select>
                                <input type="hidden" name="layout_module[<?php echo $module_row; ?>][position]" value="<?php echo $layout_module['position']; ?>"/>
                                <input type="hidden" name="layout_module[<?php echo $module_row; ?>][sort_order]" value="<?php echo $layout_module['sort_order']; ?>"/>
                                <div class="input-group-btn">
                                    <a href="<?php echo $layout_module['edit']; ?>" type="button" data-toggle="tooltip" title="<?php echo $button_edit; ?>" target="_blank" class="btn btn-primary btn-sm">
                                        <i class="fa fa-pencil"></i>
                                    </a>
                                    <button type="button" onclick="$('#module-row<?php echo $module_row; ?>').remove();" data-toggle="tooltip" title="<?php echo $button_remove; ?>" class="btn btn-danger btn-sm">
                                        <i class="fa fa fa-minus-circle"></i>
                                    </button>
                                </div>
                            </div>
                        </td>
                    </tr>
                    <?php $module_row++; ?>
                <?php } ?>
            <?php } ?>
        </tbody>
        <tfoot>
            <tr>
                <td class="text-left">
                    <div class="input-group">
                        <select class="form-control input-sm">
                            <?php foreach ($extensions as $extension) { ?>
                                <optgroup label="<?php echo $extension['name']; ?>">
                                    <?php if (!$extension['module']) { ?>
                                        <option value="<?php echo $extension['code']; ?>"><?php echo $extension['name']; ?></option>
                                    <?php } else { ?>
                                        <?php foreach ($extension['module'] as $module) { ?>
                                            <option value="<?php echo $module['code']; ?>"><?php echo $module['name']; ?></option>
                                        <?php } ?>
                                    <?php } ?>
                                </optgroup>
                            <?php } ?>
                        </select>
                        <div class="input-group-btn">
                            <button type="button" onclick="addModule('column-full');" data-toggle="tooltip" title="<?php echo $button_module_add; ?>" class="btn btn-primary btn-sm">
                                <i class="fa fa-plus-circle"></i>
                            </button>
                        </div>
                    </div>
                </td>
            </tr>
        </tfoot>
    </table>
</div>

Now on the same page find:

$('#module-column-left, #module-column-right, #module-content-top, #module-content-bottom

Then add #module-content-full just after that code above in two places and final JavaScript codes will look like below:

import App from './app.js';

const app = new App();

$('#module-column-left, #module-column-right, #module-content-top, #module-content-bottom, #module-content-full').delegate("select[name*='code']", 'change', function() {
  var part = this.value.split('.');
  if (!part[1]) {
    $(this)
      .parent()
      .find('a')
      .attr(
        'href',
        'index.php?route=extension/module/' +
          part[0] +
          '&token=<?php echo $token; ?>'
      );
  } else {
    $(this)
      .parent()
      .find('a')
      .attr(
        'href',
        'index.php?route=extension/module/' +
          part[0] +
          '&token=<?php echo $token; ?>&module_id=' +
          part[1]
      );
  }
});

$('#module-column-left, #module-column-right, #module-content-top, #module-content-bottom, #module-content-full').trigger('change');

Admin works completed now we have to work in front end or presentation layer.

Front end works:

First, make the content full Controller and .tpl file to show the modules:

Create a file named content_full.tpl at catalog\view\theme\default\template\common folder and place the code below:

<?php foreach ($modules as $module) { ?>
<?php echo $module; ?>
<?php } ?>

Similarly, create another file named content_full.php at catalog\controller\common folder and place the code below:

<?php
class ControllerCommonContentFull extends Controller {
 public function index() {
 $this->load->model('design/layout');

 if (isset($this->request->get['route'])) {
 $route = (string)$this->request->get['route'];
 } else {
 $route = 'common/home';
 }

 $layout_id = 0;

 if ($route == 'product/category' && isset($this->request->get['path'])) {
 $this->load->model('catalog/category');

 $path = explode('_', (string)$this->request->get['path']);

 $layout_id = $this->model_catalog_category->getCategoryLayoutId(end($path));
 }

 if ($route == 'product/product' && isset($this->request->get['product_id'])) {
 $this->load->model('catalog/product');

 $layout_id = $this->model_catalog_product->getProductLayoutId($this->request->get['product_id']);
 }

 if ($route == 'information/information' && isset($this->request->get['information_id'])) {
 $this->load->model('catalog/information');

 $layout_id = $this->model_catalog_information->getInformationLayoutId($this->request->get['information_id']);
 }

 if (!$layout_id) {
 $layout_id = $this->model_design_layout->getLayout($route);
 }

 if (!$layout_id) {
 $layout_id = $this->config->get('config_layout_id');
 }

 $this->load->model('extension/module');

 $data['modules'] = array();
 $modules = $this->model_design_layout->getLayoutModules($layout_id, 'column_full');

 foreach ($modules as $module) {
 $part = explode('.', $module['code']);

 if (isset($part[0]) && $this->config->get($part[0] . '_status')) {
 $module_data = $this->load->controller('extension/module/' . $part[0]);

 if ($module_data) {
 $data['modules'][] = $module_data;
 }
 }

 if (isset($part[1])) {
 $setting_info = $this->model_extension_module->getModule($part[1]);

 if ($setting_info && $setting_info['status']) {
 $output = $this->load->controller('extension/module/' . $part[0], $setting_info);

 if ($output) {
 $data['modules'][] = $output;
 }
 }
 }
 }
 return $this->load->view('common/content_full', $data);
 }
}

Now show this at the account/login layout

Open catalog\controller\account\login.php controller file and find the following line:

$data['column_right'] = $this->load->controller('common/column_right');

Then below it add following code:

$data['content_full'] = $this->load->controller('common/content_full');

Open catalog\view\theme\default\template\account\login.tpl file and find following code:

<?php echo $header; ?>

Below it adds the following line of code:

<?php echo $content_full; ?>

Ocmod file to add the full-width position to all layout at the front end:

<?xml version="1.0" encoding="utf-8"?>
<modification>
    <name>Full Width Module Position</name>
    <version>1.0</version>
    <author>WebOCreation</author>
    <link>https://webocreation.com</link>
    <code>Full_Width_Position_1_1</code>
    <file path="catalog/controller/*/*.php">
        <operation>
            <search><![CDATA[
		    $data['column_left'] = $this->load->controller('common/column_left');
            ]]></search>
            <add position="before"><![CDATA[
            $data['content_full'] = $this->load->controller('common/content_full');
            ]]></add>
        </operation>
    </file>
    <file path="catalog/view/theme/*/template/*/*.tpl">
        <operation>
            <search><![CDATA[
		    <?php echo $header; ?>
            ]]></search>
            <add position="after"><![CDATA[
            <?php echo $content_full; ?>
            ]]></add>
        </operation>
    </file>
</modification>

Enjoy and let me know if there is any confusion so that we can move ahead to solve the problem.

Search terms: new module positions, opencart position, module positions, opencart layout, opencart layout tutorials

10 ways to speed up the Opencart 3 and 4 – website speed optimization

In this Opencart tutorial on website speed optimization, we are showing you 10 ways to speed up Opencart 3 and 4 which you can do from the free Opencart module and tips provided below. This helps to optimize website speed in Opencart and increase opencart page load speed.

Choose a better hosting provider and better cache module

Just choose a better hosting provider for Opencart, better is always expensive so choose as per your budget. Choose a good cache module for Opencart. If you are using the shared hosting then ask them which cache are they providing and use the cache module as per it, our is using LSCache so we use the LSCache module.

Defer all the extra CSS and JS at the footer.

In the module, we just defer all the JavaScript with ‘defer=”defer”‘, with this, the script will not run until after the page has loaded, better to use only for the external scripts.

<script defer='defer' src="catalog/view/javascript/bootstrap/js/bootstrap.min.js" type="text/javascript"></script>
<script src="catalog/view/javascript/common.js" type="text/javascript"></script>

For jQuery, we load at first because it is a building block so we load at the header and without defer. The following is the Ocmod XML which makes those changes. This is done with above downloaded module and works only for the Opencart 3, for opencart 4 we will provide it soon.

<file path="catalog/controller/common/header.php">
    <operation>
      <search>
        <![CDATA[
		      $data['links'] = $this->document->getLinks();
        ]]>
      </search>
      <add position="replace">
        <![CDATA[
        $data['links'] ="";
          //$data['links'] = $this->document->getLinks();
        ]]>
      </add>
    </operation>
    <operation>
      <search><![CDATA[
		$data['styles'] = $this->document->getStyles();
]]>      </search>
      <add position="replace"><![CDATA[
      $data['styles'] ="";
  //$data['styles'] = $this->document->getStyles();
]]>      </add>
    </operation>
  </file>
  <file path="catalog/controller/common/footer.php">
    <operation>
      <search><![CDATA[
		$data['scripts'] = $this->document->getScripts('footer');
]]>      </search>
      <add position="after"><![CDATA[
    $data['links'] = $this->document->getLinks();
    $data['styles'] = $this->document->getStyles();
    //$data['scripts'] = $this->document->getScripts();
]]>      </add>
    </operation>
  </file>
  <file path="catalog/view/theme/*/template/common/header.twig">
    <operation>
      <search><![CDATA[
<script src="catalog/view/javascript/bootstrap/js/bootstrap.min.js" type="text/javascript"></script>
]]>      </search>
      <add position="replace" offset="6"><![CDATA[
<!--<script src="catalog/view/javascript/bootstrap/js/bootstrap.min.js" type="text/javascript"></script>
<link href="catalog/view/javascript/font-awesome/css/font-awesome.min.css" rel="stylesheet" type="text/css" />
<link href="//fonts.googleapis.com/css?family=Open+Sans:400,400i,300,700" rel="stylesheet" type="text/css" />
<link href="catalog/view/theme/default/stylesheet/stylesheet.css" rel="stylesheet">-->
]]>      </add>
    </operation>
    <operation>
      <search><![CDATA[
<script src="catalog/view/javascript/common.js" type="text/javascript"></script>
]]>      </search>
      <add position="replace" offset="3"><![CDATA[
<!--<script src="catalog/view/javascript/common.js" type="text/javascript"></script>-->
]]>      </add>
    </operation>
  </file>
  <file path="catalog/view/theme/*/template/common/footer.twig">
    <operation>
      <search>
        <![CDATA[{% for script in scripts %}]]>
      </search>
      <add position="before"><![CDATA[
<link href="catalog/view/javascript/bootstrap/css/bootstrap.min.css" rel="stylesheet" media="screen" />
<link href="catalog/view/javascript/font-awesome/css/font-awesome.min.css" rel="stylesheet" type="text/css" />
<link href="//fonts.googleapis.com/css?family=Open+Sans:400,400i,300,700" rel="stylesheet" type="text/css" />
<link href="catalog/view/theme/default/stylesheet/stylesheet.css" rel="stylesheet">
    
{% for style in styles %} 
<link href="{{ style.href }}" type="text/css" rel="{{ style.rel }}" media="{{ style.media }}" />
{% endfor %}
{% for link in links %}
<link href="{{ link.href }}" rel="{{ link.rel }}" />
{% endfor %}
<script defer="defer" src="catalog/view/javascript/bootstrap/js/bootstrap.min.js" type="text/javascript"></script>
<script src="catalog/view/javascript/common.js" type="text/javascript"></script>
]]>      </add>
    </operation>
  </file>

Use the image sizes properly

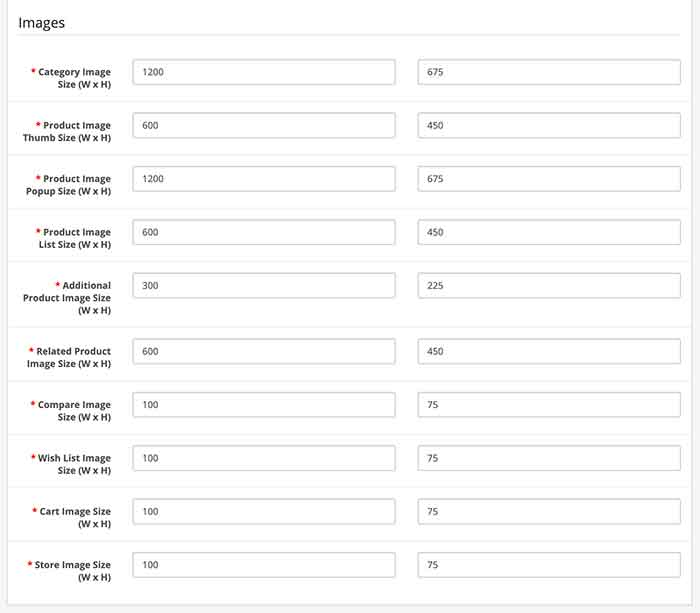
One idea to size the image is to use the ratio in all image settings. The best image ratio is 16:9. So, create images of size 1200px width and 675 px height and in all settings use a 16:9 ratio. Go to Admin >> Extensions >> Extensions >> Choose Theme as extension type >> Then edit your active theme >> Then enter the sizes for Images in the ratio of 16:9, like we are using it as:

Opencart image sizes width and height

Use the proper extension for the image:

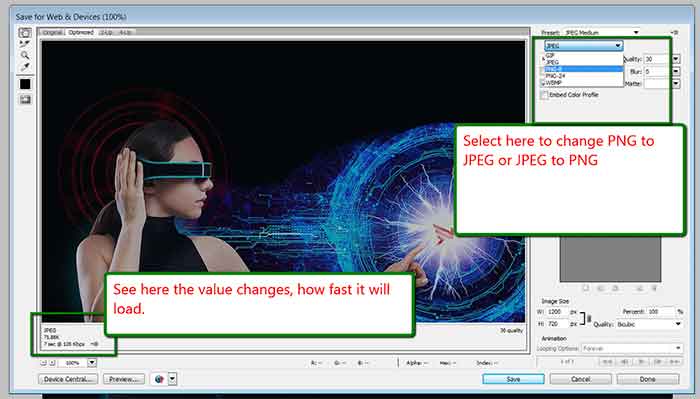
JPEGs are for photographs and realistic images. PNGs are for line art, text-heavy images, and images with few colors. See the difference

PNG vs JPEG load time

You can easily convert the PNG to jpeg or jpeg to PNG online as well as on Photoshop. Like, we use https://www.photopea.com/ online tool to convert them which is easy and fast.

Convert Jpeg to Png

Optimize the image properly

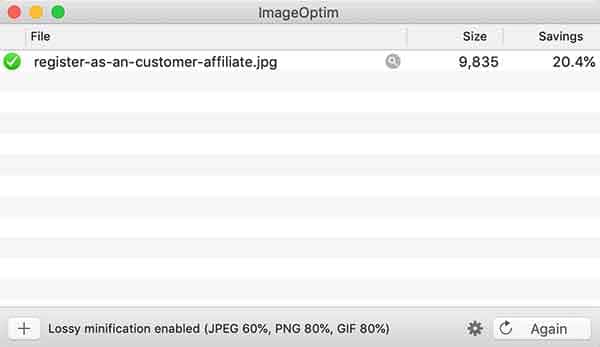
Use the ImageOptim for properly optimizing the image. It optimizes as per the page speed insight. You can download the ImageOptim here. Right-click the image and open with ImageOptim and it will optimize and replace the image with an optimized one.

image optimizer opencart

Lazy loading of images:

With just adding loading=”lazy” in the image tag it will lazy load the images.

 <img loading="lazy" src="catalog/language/en-gb/en-gb.png" alt="English" title="English">

Created one module for lazy loading of the image:

<file path="catalog/view/theme/*/*/*/*.twig|catalog/view/theme/*/template/*/*/*.twig">
    <operation>
      <search>
        <![CDATA[<img ]]>
      </search>
      <add position="replace">
        <![CDATA[<img loading="lazy"   ]]>
      </add>
    </operation>
  </file>

GZIP for more efficient transfer to requesting clients. The compression level must be between 0 – 9.

Gzip Compression is an effective way to reduce the size of files. To enable the text compression in Opencart, go to Admin >> System >> Settings >> Server tab >> Add the “Output Compression Level”. The value should be 0-9, what we find out is most of the time it works above 5 but hit and trial is the only option that we see. With these, it minimizes the byte size of network responses and fewer bytes means the page loads fast.

Speed up the repeat visit by serving static assets with an efficient cache policy 

You can serve static assets with an efficient cache policy by adding the following code in the .htaccess file, these are just our ideas, you can make changes as per your requirement and this is code to add on the .htaccess for Apache server, if you are using nginx then you can configure similarly

# Set up 1 week caching on javascript and CSS
<FilesMatch “\.(js|css)$”>
ExpiresDefault A604800
Header append Cache-Control “proxy-revalidate”
SetOutputFilter DEFLATE
</FilesMatch>
# LBROWSERCSTART Browser Caching
<IfModule mod_expires.c>
ExpiresActive On
ExpiresByType image/gif “access 1 year”
ExpiresByType image/jpg “access 1 year”
ExpiresByType image/jpeg “access 1 year”
ExpiresByType image/png “access 1 year”
ExpiresByType image/x-icon “access 1 year”
ExpiresByType text/css “access 1 month”
ExpiresByType text/javascript “access 1 month”
ExpiresByType text/html “access 1 month”
ExpiresByType application/javascript “access 1 month”
ExpiresByType application/x-javascript “access 1 month”
ExpiresByType application/xhtml-xml “access 1 month”
ExpiresByType application/pdf “access 1 month”
ExpiresByType application/x-shockwave-flash “access 1 month”
ExpiresDefault “access 1 month”
</IfModule>
# END Caching LBROWSERCEND

Compress and minify the output

<file path="system/library/response.php">
        <operation>
            <search position="replace"><![CDATA[
    public function output() {
            ]]></search>
            <add><![CDATA[
    public function output() {
        if ($this->output) {
            $this->output = preg_replace("/(\n)+/", "\n", $this->output);
            $this->output = preg_replace("/\r\n+/", "\n", $this->output);
            $this->output = preg_replace("/\n(\t)+/", "\n", $this->output);
            $this->output = preg_replace("/\n(\ )+/", "\n", $this->output);
            $this->output = preg_replace("/\>(\n)+</", '><', $this->output);
            $this->output = preg_replace("/\>\r\n</", '><', $this->output);
        }
            ]]></add>
        </operation>
    </file>

Minify your HTML, CSS, and JS

<file path="system/library/template.php">
    <operation>
      <search><![CDATA[return $this->adaptor->render($template, $cache);]]></search>
      <add position="replace"><![CDATA[
    if (strpos($template, 'template/') !== false) {
        return $this->minify($this->adaptor->render($template, $cache));
    } else {
        return $this->adaptor->render($template, $cache);
    }
            ]]>      </add>
    </operation>
    <operation>
      <search><![CDATA[private $adaptor;]]></search>
      <add position="after"><![CDATA[
    /**
	 * @param	string	$body
	 * @return	string
 	*/
	public function minify($body) {
        $search = array(
            '/\>[^\S ]+/s',     // strip whitespaces after tags, except space
            '/[^\S ]+\</s',     // strip whitespaces before tags, except space
            '/(\s)+/s',         // shorten multiple whitespace sequences
        );
        $replace = array(
            '>',
            '<',
            '\\1',
            ''
        );
        $body = preg_replace($search, $replace, $body);
        return $body;
    }
            ]]>      </add>
    </operation>
  </file>

Index the database table

First backup your database.
Download the turbo.php, upload it where Opencart is installed, run YOURSITEURL/turbo.php and click the “Add Database Indexes” button, this will index all the database tables as per column name.

https://github.com/lilalaunesau/opencart-turbo/blob/master/turbo.php

Or you can run the following SQL directly in your database:

ALTER TABLE `oc_category` ADD INDEX ( `parent_id` ) ;
ALTER TABLE `oc_category` ADD INDEX ( `top` ) ;
ALTER TABLE `oc_category` ADD INDEX ( `sort_order` ) ;
ALTER TABLE `oc_category` ADD INDEX ( `status` ) ;
ALTER TABLE `oc_category_description` ADD INDEX ( `language_id` );
ALTER TABLE `oc_category_to_store` ADD INDEX ( `store_id` );
ALTER TABLE `oc_category_path` ADD INDEX ( `path_id` );
ALTER TABLE `oc_product` ADD INDEX ( `model` ) ;
ALTER TABLE `oc_product` ADD INDEX ( `sku` ) ;
ALTER TABLE `oc_product` ADD INDEX ( `upc` ) ;
ALTER TABLE `oc_product` ADD INDEX ( `manufacturer_id` ) ;
ALTER TABLE `oc_product` ADD INDEX ( `sort_order` ) ;
ALTER TABLE `oc_product` ADD INDEX ( `status` ) ;
ALTER TABLE `oc_product_option` ADD INDEX ( `option_id` ) ;
ALTER TABLE `oc_product_option_value` ADD INDEX ( `product_option_id` ) ;
ALTER TABLE `oc_product_option_value` ADD INDEX ( `product_id` ) ;
ALTER TABLE `oc_product_option_value` ADD INDEX ( `option_id` ) ;
ALTER TABLE `oc_product_option_value` ADD INDEX ( `option_value_id` ) ;
ALTER TABLE `oc_product_to_category` ADD INDEX ( `category_id` );
ALTER TABLE `oc_product_attribute` ADD INDEX ( `attribute_id` );
ALTER TABLE `oc_product_attribute` ADD INDEX ( `language_id` );
ALTER TABLE `oc_product_description` ADD INDEX ( `language_id` );
ALTER TABLE `oc_product_to_store` ADD INDEX ( `store_id` );
ALTER TABLE `oc_option` ADD INDEX ( `sort_order` ) ;
ALTER TABLE `oc_option_description` ADD INDEX ( `name` ) ;
ALTER TABLE `oc_option_value` ADD INDEX ( `option_id` ) ;
ALTER TABLE `oc_option_value_description` ADD INDEX ( `option_id` ) ;
ALTER TABLE `oc_url_alias` ADD INDEX ( `query` ) ;
ALTER TABLE `oc_url_alias` ADD INDEX ( `keyword` ) ;
ALTER TABLE `oc_url_alias` ADD INDEX ( `url_alias_id` );

Developer or Designer tasks: Ensure text remains visible during Webfont load

Follow the idea provided at https://developers.google.com/web/updates/2016/02/font-display. Just for your information, we tried that and in our case, we used font-display: swap, and only works. Something like below:

@font-face {
font-family: ‘Arvo’;
font-display: swap;
src: local(‘Arvo’), url(https://fonts.gstatic.com/s/arvo/v9/rC7kKhY-eUDY-ucISTIf5PesZW2xOQ-xsNqO47m55DA.woff2) format(‘woff2’);
}

Look for Critical CSS: Defer unused CSS, remove all unused CSS on a page, and try to target CSS for each page.

https://developers.google.com/web/tools/lighthouse/audits/unused-css

In this way, you can perform the Opencart website speed optimization, please let us know if you have any other tips and tricks. You can visit Opencart SEO to read around 25 best practices for Opencart SEO. Let us know if you have questions or concerns so that we can help you out. Till then please subscribe to our YouTube Channel for Opencart video tutorials. You can also find us on Twitter and Facebook.

The whole code XML is below:

<?xml version="1.0" encoding="utf-8"?>
<modification>
  <name>10 ways to speed up the Opencart site</name>
  <code>webocreationpagespeed100</code>
  <version>1.0.0</version>
  <author>Rupak Nepali</author>
  <link>https://webocreation.com</link>
  <file path="catalog/view/theme/*/*/*/*.twig|catalog/view/theme/*/template/*/*/*.twig">
    <operation>
      <search>
        <![CDATA[<img ]]>
      </search>
      <add position="replace">
        <![CDATA[<img loading="lazy"  ]]>
      </add>
    </operation>
  </file>
  <file path="system/library/response.php">
    <operation>
      <search position="replace"><![CDATA[
    public function output() {
            ]]>      </search>
      <add><![CDATA[
    public function output() {
        /*source compressor*/
        if ($this->output) {
            //$this->output = preg_replace('/<!--(.|\n)*?-->/', " ", $this->output);
            $this->output = preg_replace("/(\n)+/", "\n", $this->output);
            $this->output = preg_replace("/\r\n+/", "\n", $this->output);
            $this->output = preg_replace("/\n(\t)+/", "\n", $this->output);
            $this->output = preg_replace("/\n(\ )+/", "\n", $this->output);
            $this->output = preg_replace("/\>(\n)+</", '><', $this->output);
            $this->output = preg_replace("/\>\r\n</", '><', $this->output);
        }
            ]]>      </add>
    </operation>
  </file>
  <file path="catalog/controller/common/header.php">
    <operation>
      <search>
        <![CDATA[
		      $data['links'] = $this->document->getLinks();
        ]]>
      </search>
      <add position="replace">
        <![CDATA[
        $data['links'] ="";
          //$data['links'] = $this->document->getLinks();
        ]]>
      </add>
    </operation>
    <operation>
      <search><![CDATA[
		$data['styles'] = $this->document->getStyles();
]]>      </search>
      <add position="replace"><![CDATA[
      $data['styles'] ="";
  //$data['styles'] = $this->document->getStyles();
]]>      </add>
    </operation>
  </file>
  <file path="catalog/controller/common/footer.php">
    <operation>
      <search><![CDATA[
		$data['scripts'] = $this->document->getScripts('footer');
]]>      </search>
      <add position="after"><![CDATA[
    $data['links'] = $this->document->getLinks();
    $data['styles'] = $this->document->getStyles();
    //$data['scripts'] = $this->document->getScripts();
]]>      </add>
    </operation>
  </file>
  <file path="catalog/view/theme/*/template/common/header.twig">
    <operation>
      <search><![CDATA[
<script src="catalog/view/javascript/bootstrap/js/bootstrap.min.js" type="text/javascript"></script>
]]>      </search>
      <add position="replace" offset="6"><![CDATA[
<!--<script src="catalog/view/javascript/bootstrap/js/bootstrap.min.js" type="text/javascript"></script>
<link href="catalog/view/javascript/font-awesome/css/font-awesome.min.css" rel="stylesheet" type="text/css" />
<link href="//fonts.googleapis.com/css?family=Open+Sans:400,400i,300,700" rel="stylesheet" type="text/css" />
<link href="catalog/view/theme/default/stylesheet/stylesheet.css" rel="stylesheet">-->
]]>      </add>
    </operation>
    <operation>
      <search><![CDATA[
<script src="catalog/view/javascript/common.js" type="text/javascript"></script>
]]>      </search>
      <add position="replace" offset="3"><![CDATA[
<!--<script src="catalog/view/javascript/common.js" type="text/javascript"></script>-->
]]>      </add>
    </operation>
  </file>
  <file path="catalog/view/theme/*/template/common/footer.twig">
    <operation>
      <search>
        <![CDATA[{% for script in scripts %}]]>
      </search>
      <add position="before"><![CDATA[
<link href="catalog/view/javascript/bootstrap/css/bootstrap.min.css" rel="stylesheet" media="screen" />
<link href="catalog/view/javascript/font-awesome/css/font-awesome.min.css" rel="stylesheet" type="text/css" />
<link href="//fonts.googleapis.com/css?family=Open+Sans:400,400i,300,700" rel="stylesheet" type="text/css" />
<link href="catalog/view/theme/default/stylesheet/stylesheet.css" rel="stylesheet">
{% for style in styles %} 
<link href="{{ style.href }}" type="text/css" rel="{{ style.rel }}" media="{{ style.media }}" />
{% endfor %}
{% for link in links %}
<link href="{{ link.href }}" rel="{{ link.rel }}" />
{% endfor %}
<script defer="defer" src="catalog/view/javascript/bootstrap/js/bootstrap.min.js" type="text/javascript"></script>
<script src="catalog/view/javascript/common.js" type="text/javascript"></script>
]]>      </add>
    </operation>
  </file>
  <file path="system/library/template.php">
    <operation>
      <search><![CDATA[return $this->adaptor->render($template, $cache);]]></search>
      <add position="replace"><![CDATA[
    if (strpos($template, 'template/') !== false) {
        return $this->minify($this->adaptor->render($template, $cache));
    } else {
        return $this->adaptor->render($template, $cache);
    }
            ]]>      </add>
    </operation>
    <operation>
      <search><![CDATA[private $adaptor;]]></search>
      <add position="after"><![CDATA[
    /**
	 * @param	string	$body
	 * @return	string
 	*/
	public function minify($body) {
        $search = array(
            '/\>[^\S ]+/s',     // strip whitespaces after tags, except space
            '/[^\S ]+\</s',     // strip whitespaces before tags, except space
            '/(\s)+/s',         // shorten multiple whitespace sequences
        );
        $replace = array(
            '>',
            '<',
            '\\1',
            ''
        );
        $body = preg_replace($search, $replace, $body);
        return $body;
    }
            ]]>      </add>
    </operation>
  </file>
</modification>


Administrator Theme editor in Opencart 3.0.2.0 default theme

In OpenCart version 3, we can see the theme editor features where the administrator can directly change the code in the template of the default theme from the admin dashboard. While we test on Opencart version 3.0.3.2, we were able to edit only the default template, if we activate another theme, we still keep seeing the default theme’s template files, so it looks like it is working only for the default theme. So, if you guys are using the default theme then you can make the code changes directly from the admin, with no need for FTP or SFTP configuration.

Steps to make the theme editor

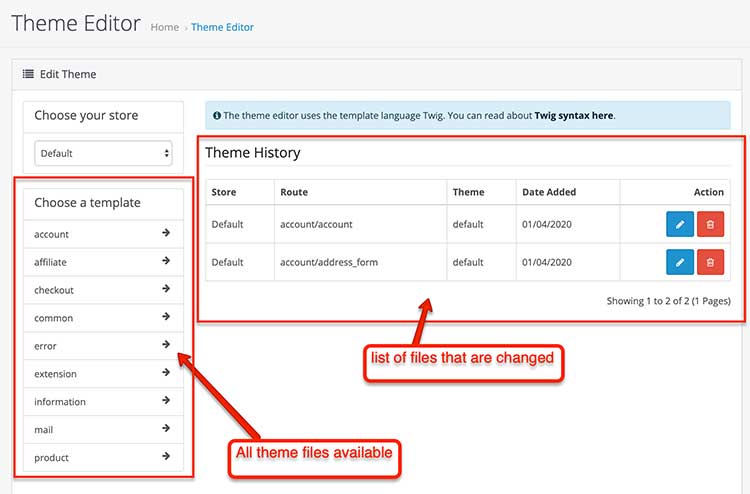
Login to the admin and then navigate to Design >> Theme Editor, where you see a dashboard like below image:

Theme Editor Opencart

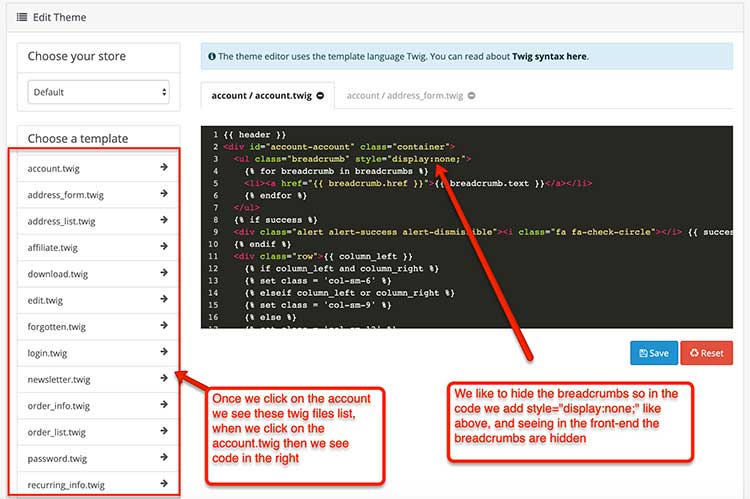
You can choose the store that you like to make changes to, here we choose the default store. You can see the theme history which lists out all the files changed. In the template section, you can select the folder and it will show the files where you can edit the file. You can get more details about the files and folders in the Opencart video. Let’s click the account, it will show lists of twig template files in that theme folder, once we click on the account we see these twig files list when we click on the account.twig then we see code on the right.

Code changes in Opencart

We like to hide the breadcrumbs so in the code we add style=”display:none;” like above, and see in the front end the breadcrumbs are hidden on the account page. If you see an error then you can click the Reset button which will change to the default code.

Opencart theme editor

In this way, you can make the code change directly from the admin section. If the code changes are not seen don’t forget to clear the theme and SASS cache from the dashboard, likewise go to Extensions >> Modifications and then click the refresh button. Please don’t forget to post your questions or comments so that we can add extra topics. You can follow us on our Twitter account @rupaknpl. Subscribe to our YouTube channel for Opencart tutorials, and click to see all Opencart user manuals.

Opencart set up taxes with geocodes US tax for California residents 8.75%

In this Opencart tutorial, we show you how to set up taxes with geocodes in Opencart for each product by giving you an example of US taxes for California residents 8.75%. Setting up taxes in OpenCart is essential to ensure compliance with local regulations and accurate pricing for your customers. With OpenCart’s geo zones feature, you can easily configure tax rates based on the geographic locations of your customers. Here’s a step-by-step guide to setting up taxes in OpenCart using geo zones.

Why Use Geo Zones for Tax Setup?

Geo zones in OpenCart allow you to apply specific tax rates based on customer location, which is especially helpful if you operate across multiple regions or countries with varying tax rules. By customizing tax rates per region, you can:

  1. Ensure Accurate Tax Calculation: Meet tax regulations based on customer locations.
  2. Simplify Tax Management: Easily manage and update tax settings as needed.
  3. Enhance Customer Experience: Provide transparency in pricing with region-specific tax rates.

Step-by-Step Guide to Setting Up Taxes with Geo Zones in OpenCart

Let’s dive into setting up taxes in OpenCart by using geo zones.

Step 1: Define Geo Zones for Target Regions

  1. Go to the OpenCart Admin Dashboard.
  2. Navigate to System > Localization > Geo Zones.
  3. Click Add New to create a geo zone.
  4. Fill in the Geo Zone Name (e.g., “US State Tax” or “EU VAT Zone”) and add a Description.
  5. Under the Geo Zone tab, click Add Geo Zone.
    • Select Country and Region/State to specify the areas this tax rate applies to.
  6. Save the geo zone.

Repeat this step for each location where you need to apply specific tax rates.

Step 2: Create Tax Classes for Different Products

Tax classes help apply tax rates to various product types. To create tax classes:

  1. Go to System > Localization > Tax Classes.
  2. Click Add New to create a tax class.
  3. Enter the Tax Class Title (e.g., “Standard Tax,” “Reduced Tax”).
  4. In the Tax Rate section, specify:
    • Priority: Set a priority level if you have multiple tax rates.
    • Geo Zone: Select the geo zone to apply to this tax rate.
  5. Save the tax class.

Step 3: Define Tax Rates

  1. Go to System > Localization > Tax Rates.
  2. Click Add New to create a new tax rate.
  3. Fill in the following:
    • Tax Name: Give it a descriptive name, like “California Sales Tax.”
    • Rate: Enter the percentage of the tax rate (e.g., “8.5”).
    • Type: Select Percentage for most tax setups.
    • Geo Zone: Choose the geo zone you created earlier.
  4. Save the tax rate.

Repeat for each tax rate that corresponds to your geo zones.

Step 4: Apply Tax Classes to Products

  1. Go to Catalog > Products in the OpenCart Admin Dashboard.
  2. Edit the product to which you want to apply the tax class.
  3. In the Data tab, locate the Tax Class dropdown.
  4. Select the appropriate tax class (e.g., “Standard Tax” or “Reduced Tax”).
  5. Save your changes.

Step 5: Configure Store Tax Settings

For OpenCart to apply the correct tax rates based on geo zones, check your tax settings:

  1. Go to System > Settings > Edit for your store.
  2. In the Options tab, set the following:
    • Display Prices With Tax: Choose Yes if you want product prices to include taxes.
    • Calculate Taxes Based On: Select the Shipping Address or Payment Address depending on your tax regulations.
    • Use Store Tax Address: Choose whether to use the store’s location for tax calculations on non-shipping orders.

Step 6: Test the Tax Setup

Place a test order to confirm that taxes are calculated correctly based on the customer’s address. Ensure that products display tax-inclusive prices (if configured), and verify that different addresses in your geo zones reflect the accurate tax rates.

Need to set up US Taxes for California residents where CA Tax is 8.75%.

  • Login to Admin
  • Go to Left Menu >> System >> Localisation >> Geo Zones >> Click Add button, then fill as in the image below:
Geo zones set up
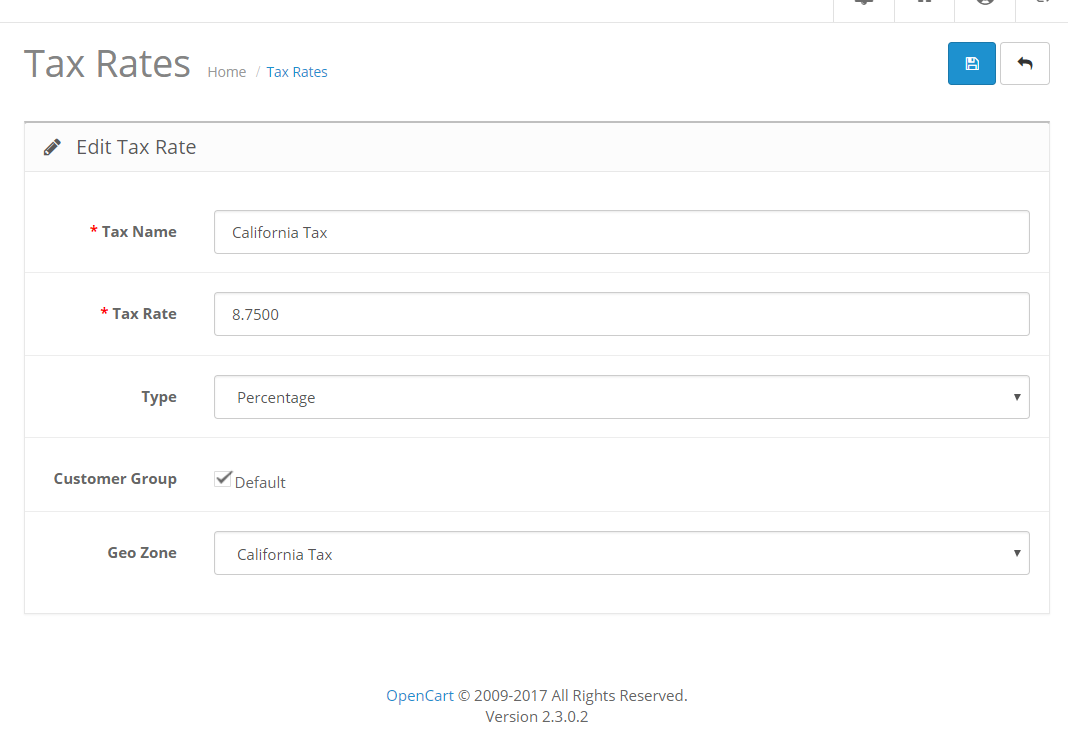
  • Go to Left Menu >> System >> Localisation >> Taxes >> Tax Rates >> Click Add button, then fill as in the image below:
Tax rates setup in Opencart
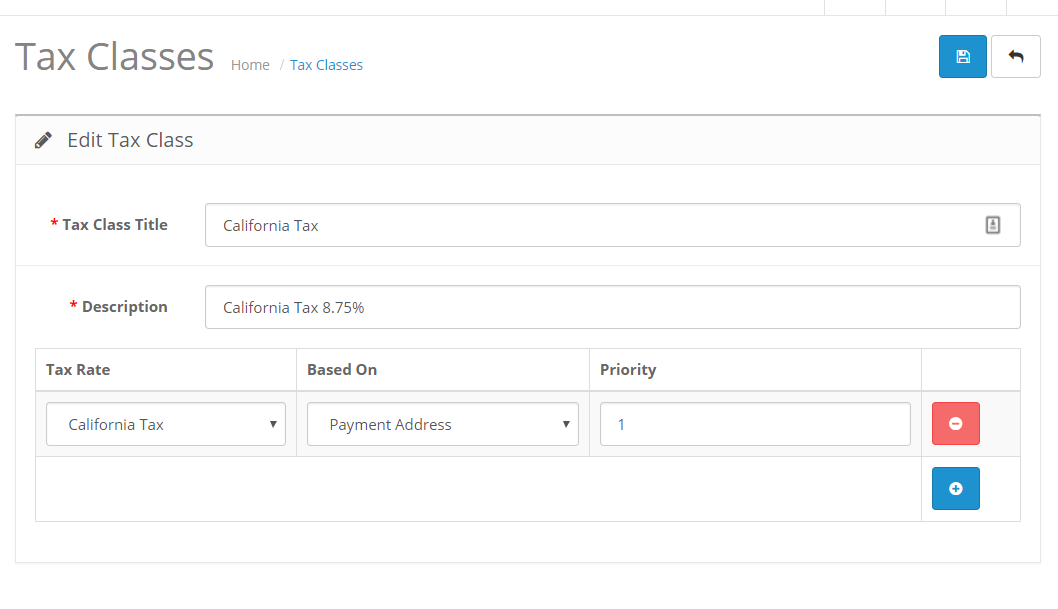
  • Go to Left Menu >> System >> Localisation >> Taxes >> Tax Classes >> Click Add button, then fill as in the image below:
Tax classes setup in Opencart
  • Please choose the Payment Address or Shipping Address as per your need.
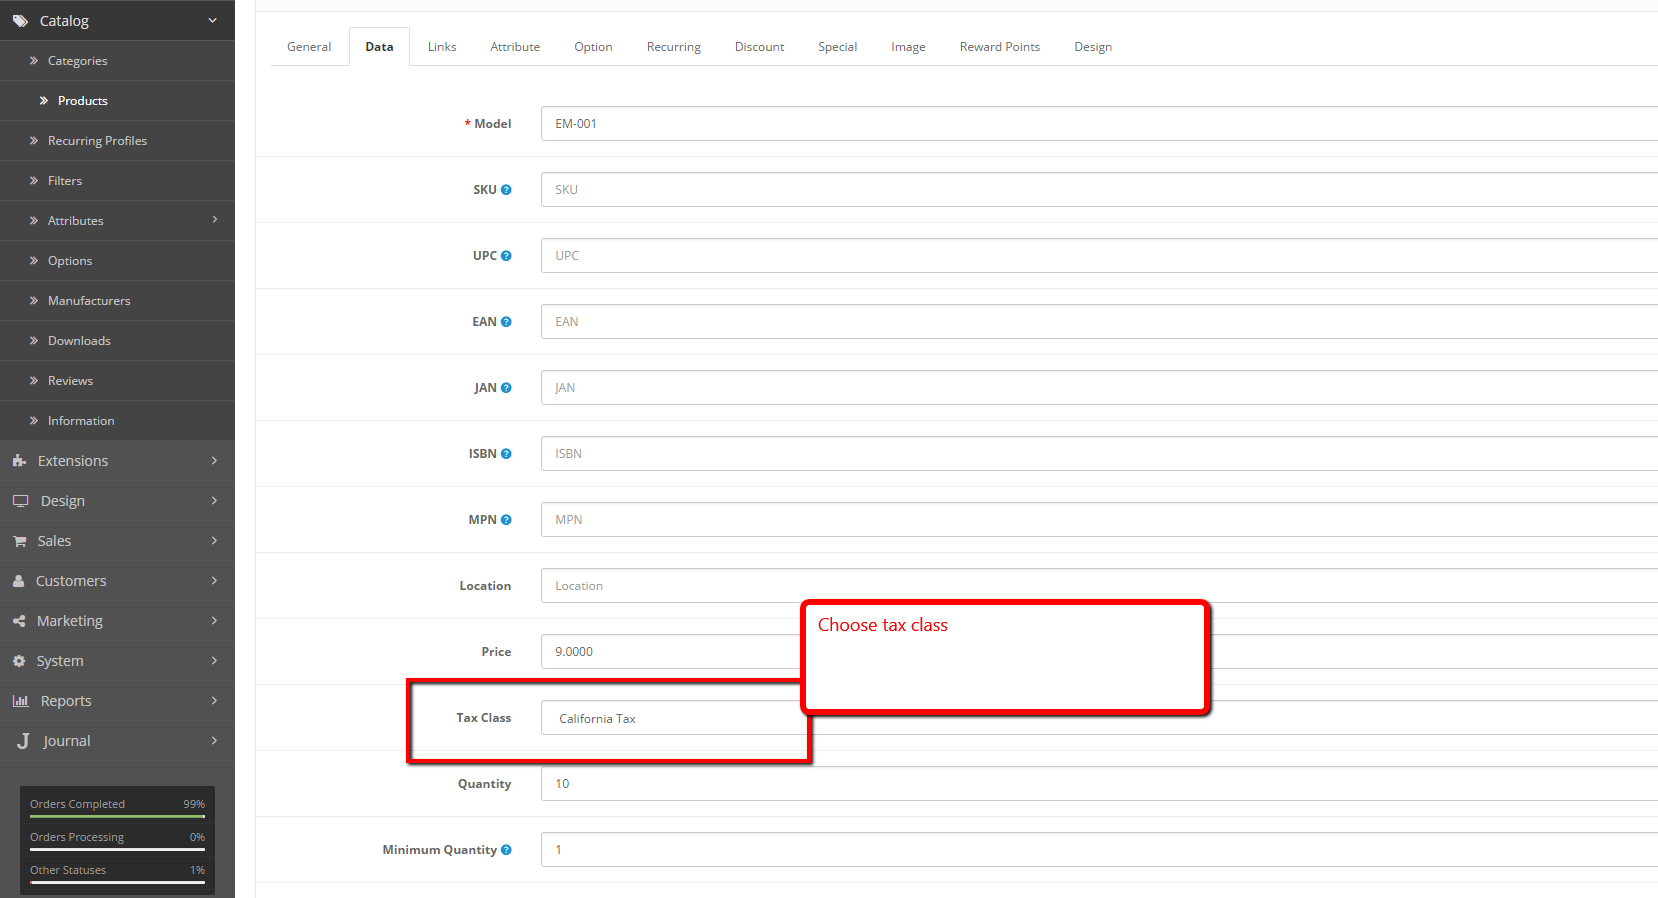
  • Now go to Catalog >> Products >> Add/Edit your product >> Choose the Tax Class:
Tax class setup for product
  • In the checkout section tax is applied when your payment address’s state is California:
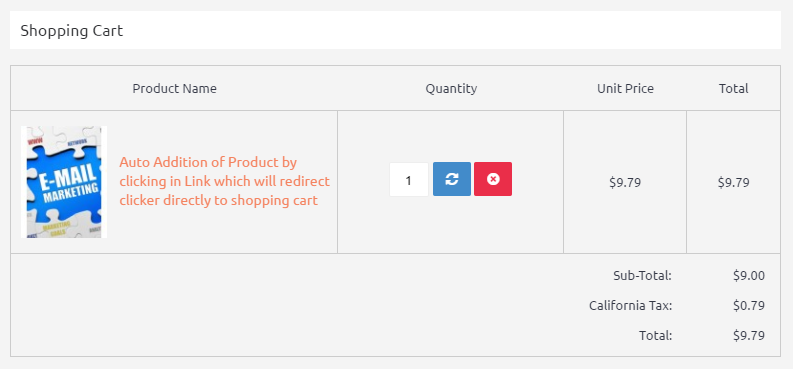
Tax in shopping cart Opencart

Conclusion

Configuring taxes in OpenCart using geo zones allows you to automate tax calculations accurately across various regions. By following this setup, you ensure compliance and transparency with customer pricing, enhancing both store management and customer experience. With OpenCart’s flexibility, you can adapt to regional tax changes easily and continue to scale your business globally. In this way, you can set up taxes with geocodes in Opencart. Let us know if need any support. Hope you liked this post, please subscribe to our YouTube Channel for Opencart video tutorials. You can also find us on Twitter and Facebook.

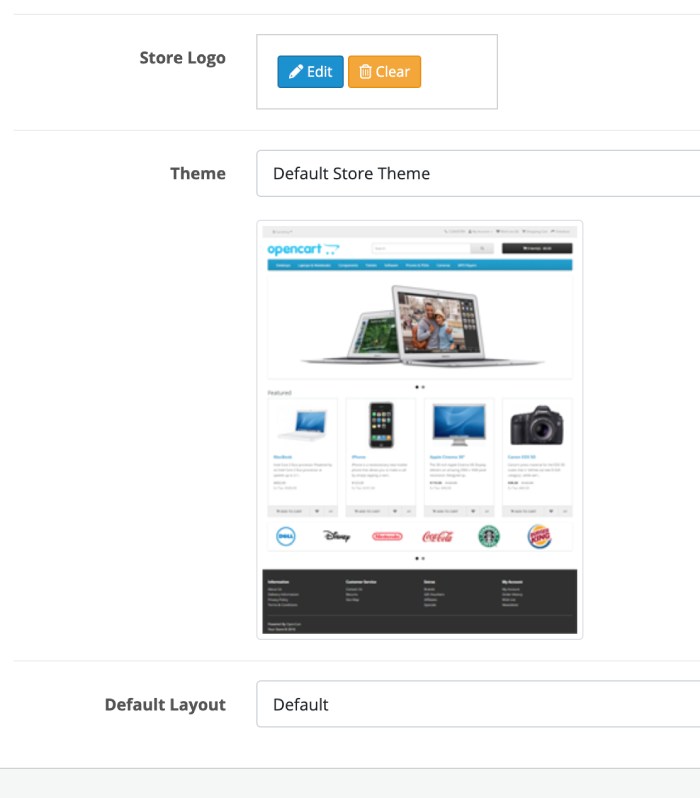
Error: A theme has not been assigned to this store! Opencart

The error “A theme has not been assigned to this store!” in OpenCart usually means that a theme is not set for the current store, often due to configuration issues after a fresh installation or update.

Opencart Theme Error

Here’s how to resolve it

Assign a Theme to the Store:

  • Go to the OpenCart Admin Dashboard.
  • Navigate to System > Settings.
  • Select the store you are configuring (e.g., Default Store).
  • Go to the Theme tab.
  • Ensure that a theme (e.g., Default or your custom theme) is selected in the “Theme Directory” dropdown.
  • Click Save to apply the settings.

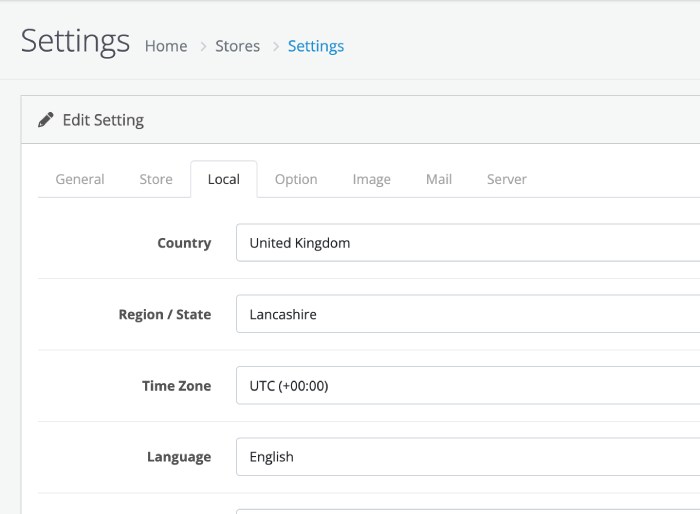
    Sometimes you will see the above theme error and when you log in to the admin section you will see an error notice like: “Notice: date_default_timezone_set(): Timezone Id is invalid”. In that case, you can just set the timezone in the local tab of settings.

    Opencart timezone invalid

    Clear the Cache:

    • Go to Dashboard > Extensions > Modifications.
    • Click on the Refresh button to clear and rebuild the modification cache.
    • Next, navigate to Dashboard > Developer Settings.
    • Under Theme and SASS, click Clear Cache.

    Verify the Theme Files:

    • Ensure that the theme files are correctly uploaded to the /catalog/view/theme/ directory.
    • If you’re using a custom theme, verify that its files are correctly installed and compatible with your OpenCart version.

    Database Check (if required):

    1. If the above steps don’t resolve the issue, you may want to check your OpenCart database.
    2. In the oc_setting table (prefix may vary), look for the key config_theme under your store’s settings, and ensure it matches the directory name of your theme in /catalog/view/theme/.

    After these steps, your store should be assigned a theme, and the error should be resolved. Let us know if you encounter any further issues! lease let us know if you have any kind of projects, you can email us at webocreation.com@gmail.com. Please subscribe to our YouTube Channel and get more Opencart free extensions and tutorials. You can also find us on Twitter and Facebook.

    How to add an Analytics extension in Opencart 4? Third-party JS free Opencart extension

    With the launch of Opencart 4 we did not find the Google Analytics Opencart 4 module that we used to have in Opencart 3, so to fulfill that requirement we created a free Opencart extension called Third Party JS extension where you can add the Javascript code provided by third-party like Google Analytics, Facebook pixel, etc and add it on this extension.

    How to install the Opencart 4 module?

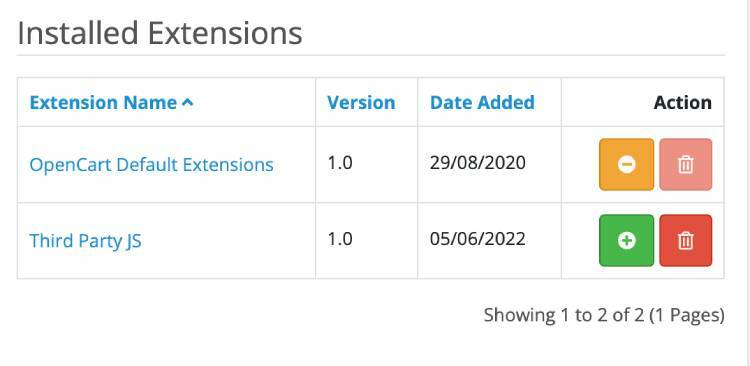
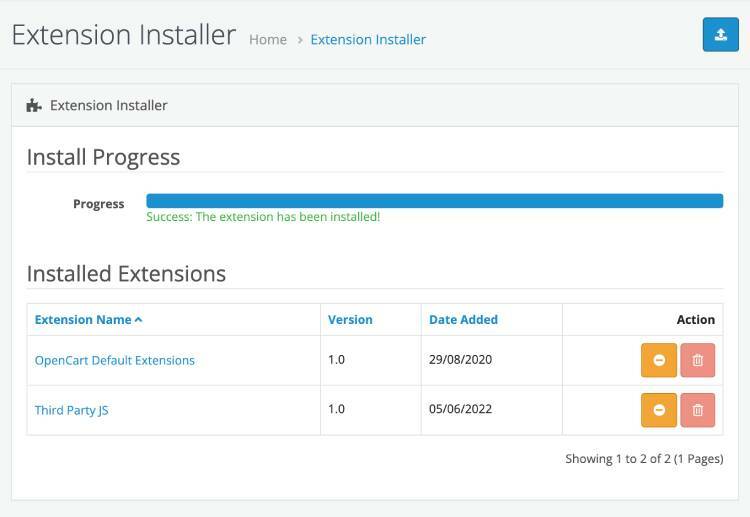
    Log in to Admin >> Extensions >> Installer >> Click the Upload button and select the file that ends with .ocmod.zip. In the above download example, it is third_party_js.ocmod.zip. Once it is installed you will see the “Third Party JS” in the installed extensions.

    Once you uploaded the zip file, you click the install green icon to install the extension.

    Installed extensions Opencart 4

    Once you clicked the install button, your extension is installed successfully

    opencart 4 extension installation success

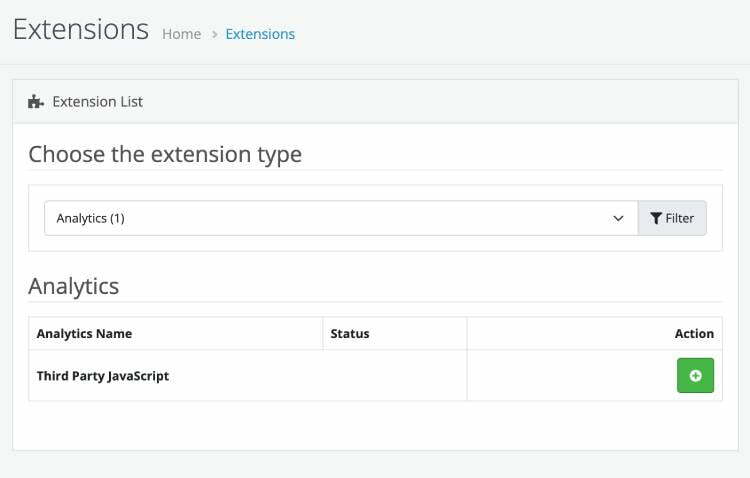
    Once you see the success message. Now you can go to Admin >> Extensions >> Extension. Then, choose the extension type “Analytics”  and click the install green install button.

    Read More: Add HTML, google analytics, tag manager, and third-party JS code in Opencart

    google analytics opencart 4

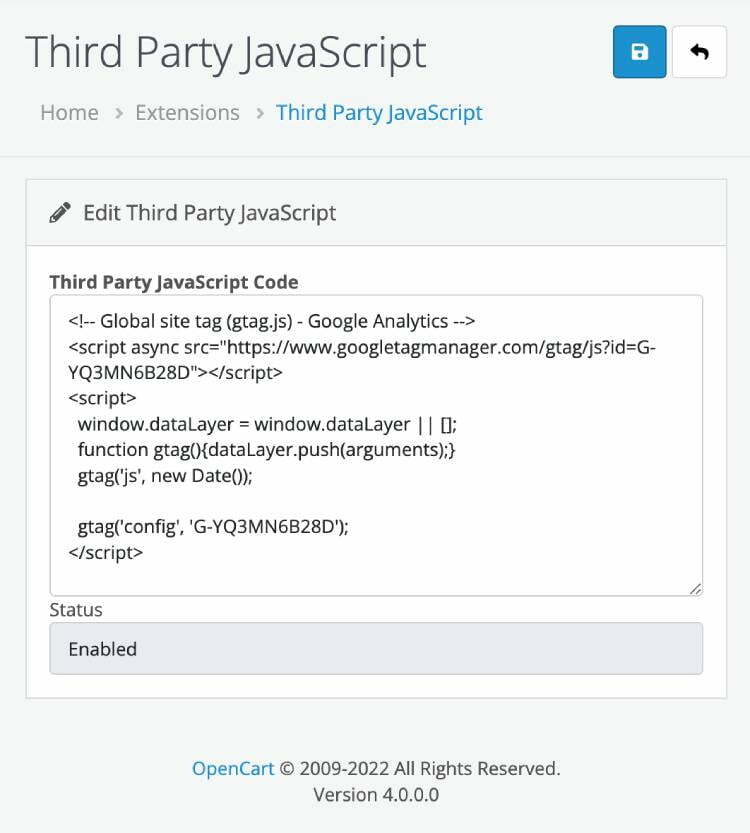
    Once you click the install button, you can edit the store and you will see a form where you can install the third-party JavaScript like below and enable the status and click the blue save button.

    Google Analytics Opencart 4 extension

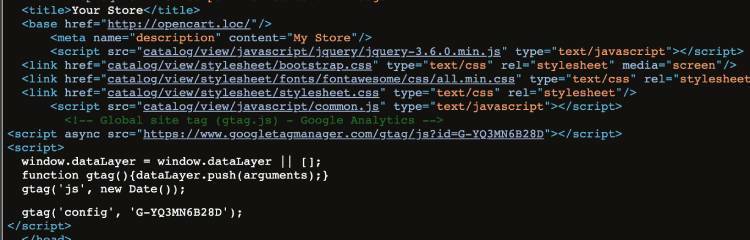
    After clicking the save, now the JavaScript code is shown at the head tag.

    code added in the header Opencart 4

    In this way, you can install the Opencart 4 extensions and use our free Opencart 4 analytics extension for your website.  Hope you liked this post, let us know if you have any questions or suggestions, please subscribe to our YouTube Channel for Opencart video tutorials. You can also find us on Twitter and Facebook. Enjoy Google Analytics Opencart 4 module!

    How to add reports in the admin dashboard of Opencart 4?

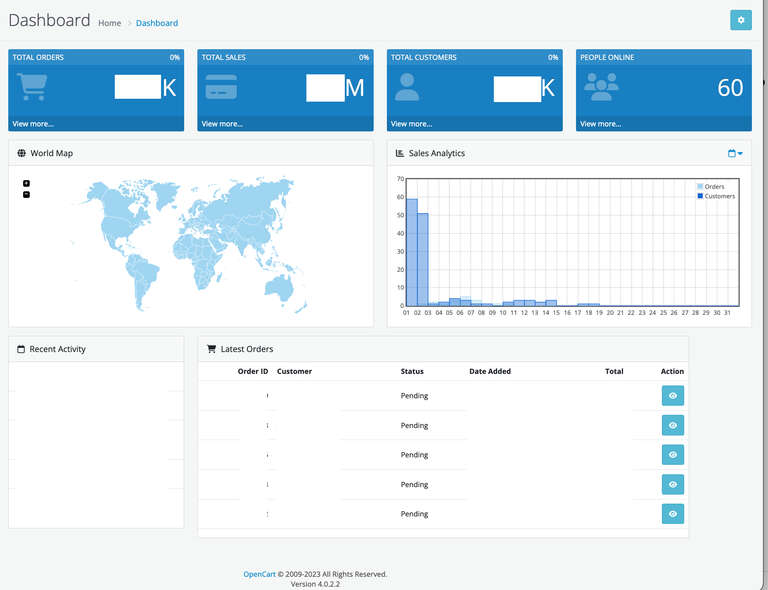
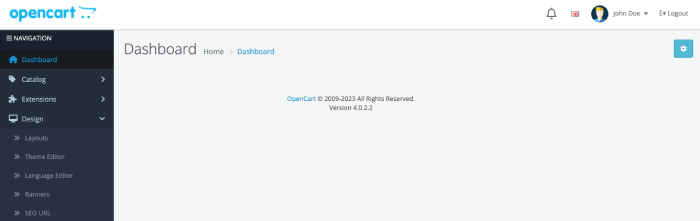
    As we were in the process of upgrading the Opencart from 3 to 4, we complete the upgrade and saw our admin dashboard reports are all gone, and it took us some time to figure out where we can enable the dashboard reports. Here is our finding which was so simple:

    Empty Dashboard:

    Empty dashboard

    Dashboard reports

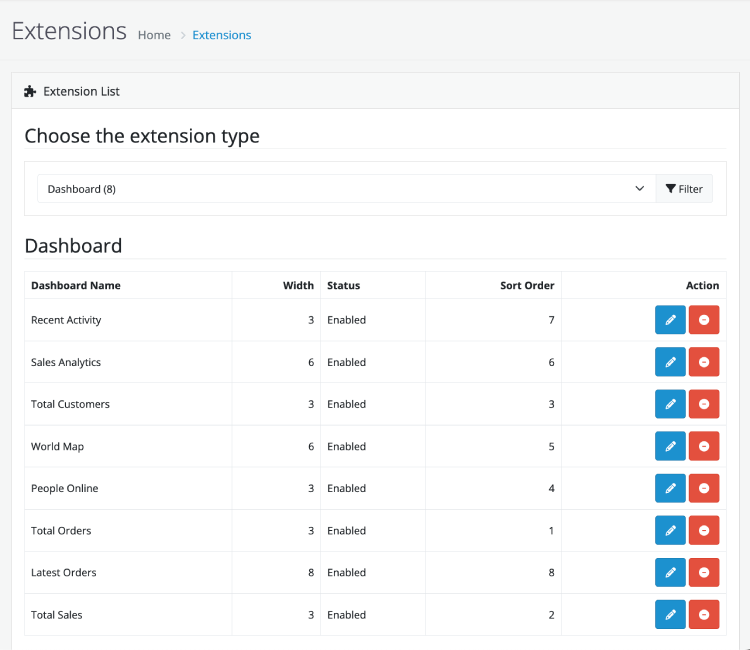
    Every report is created as the dashboard extension, so to add the reports, go to admin >> Extensions >> Extensions >> Filter out with Dashboard >> Install all the extensions needed >> Edit it >> Give the width >> Enable the status >> Add sort order where you want to show and Save. As we need all of the reports so we enable all of the Dashboard reports.

    Dashboard extensions reports

    Read More: Dashboard extensions details of Opencart 4

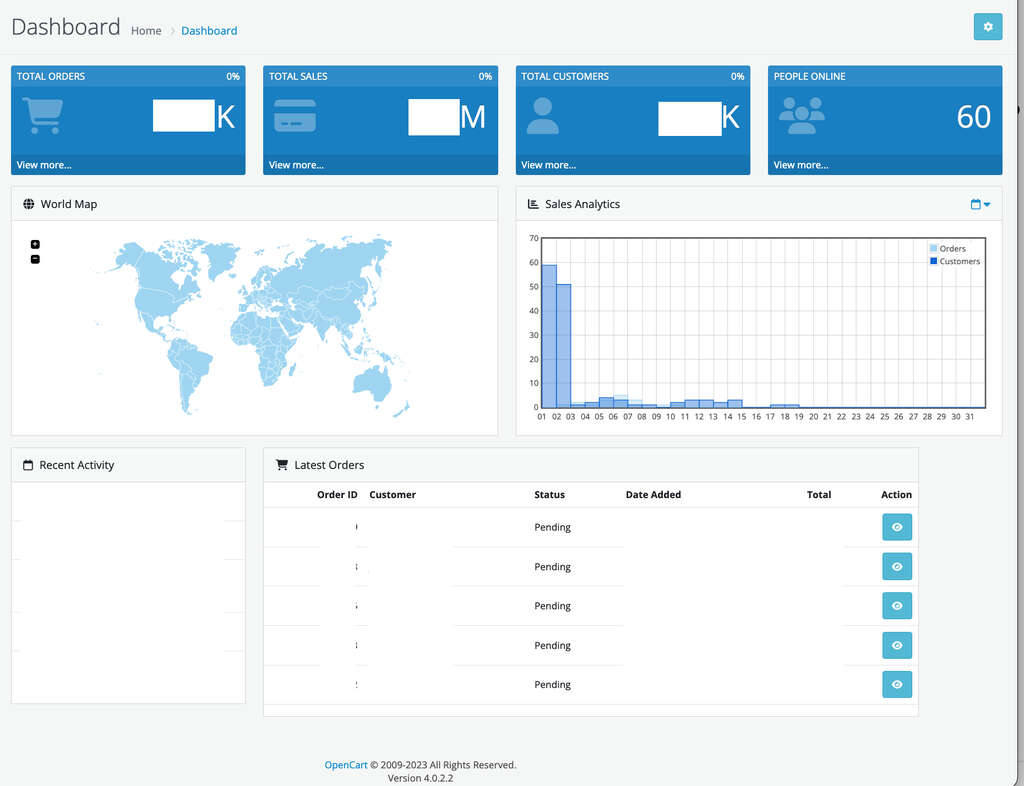
    With the above settings, you will be able to see reports like below:

    Reports admin dashboard

    In this way, you can enable or disable the required admin dashboard reports. Please don’t forget to post your questions or comments so that we can add extra topics. You can follow us at our Twitter account @rupaknpl and subscribe to our YouTube channel for opencart tutorials.

    Email is not working in Opencart – ways to solve

    As we see some Opencart users are complaining that their email is not working in Opencart and are not able to see the Contact Us form email, the order email, or other email updates. We have listed some of the ways to fix them.

    Way to fix Email Deliveries that are in Cpanel

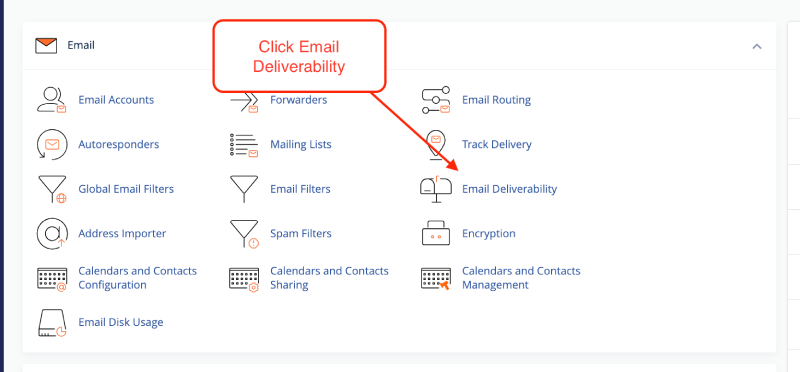
    Login to the Cpanel and see the Email section

    Opencart Email Deliverability

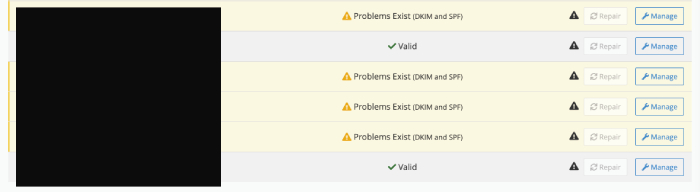
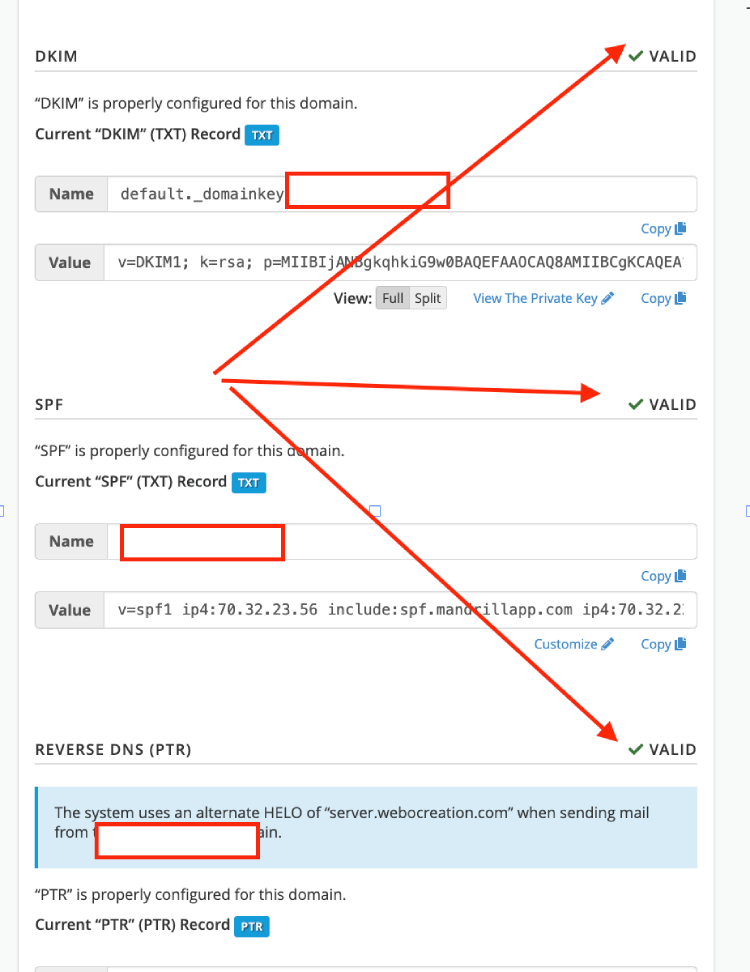
    In the Email Deliverability listing you can see if there are issues to fix or if everything is valid

    Email Deliverability issues

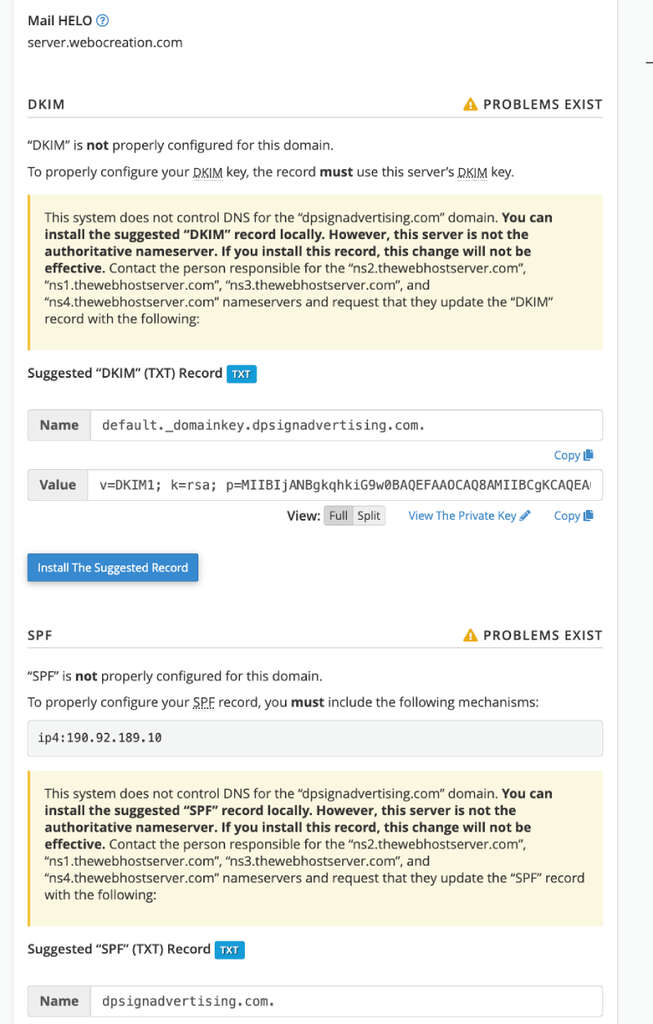
    If problems exist (DKIM and SPF) etc, then click the Manage and fix things that are shown in the lists.

    Email delivery DNS fix

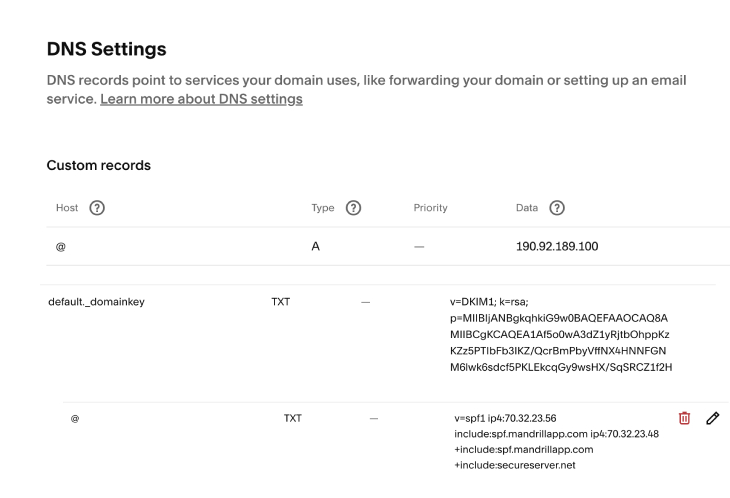
    Go to your Domain registrar and enter those values, for example:

    DNS fixes

    Then, check the Email Deliverability again and check everything is valid.

    DNS Email Valid

    With this, the email should start sending.

    Email code in Opencart

    Whenever the Mail class is instantiated like below and called the send method then you can say Opencart is sending an email. Example email code is:

    mail = new Mail($this->config->get('config_mail_engine'));
    $mail->parameter = $this->config->get('config_mail_parameter');
    $mail->smtp_hostname = $this->config->get('config_mail_smtp_hostname');
    $mail->smtp_username = $this->config->get('config_mail_smtp_username');
    $mail->smtp_password = html_entity_decode($this->config->get('config_mail_smtp_password'), ENT_QUOTES, 'UTF-8');
    $mail->smtp_port = $this->config->get('config_mail_smtp_port');
    $mail->smtp_timeout = $this->config->get('config_mail_smtp_timeout');
    
    $mail->setTo($customer_info['email']);
    $mail->setFrom($this->config->get('config_email'));
    $mail->setSender($store_name);
    $mail->setSubject($subject);
    $mail->setText($this->load->view('mail/customer_approve', $data));
    $mail->send();

    You can find these codes in admin/controller/mail/forgotten.php, catalog/controller/mail/register.php, catalog/controller/mail/order.php, catalog/controller/mail/affiliate.php, etc.

    Check the email settings again

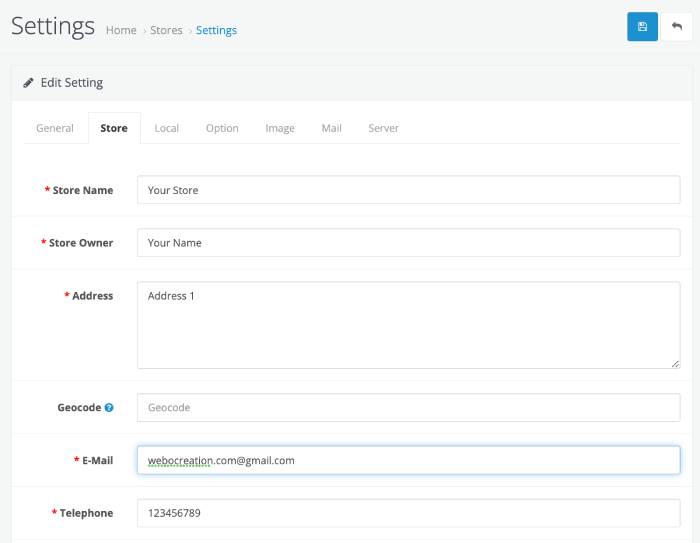
    Login to admin of Opencart >> System >> Settings >> Edit the store that email is not sending >> Click the Store tab >> Check if the email is set or not.

    Read more About other common issues in Opencart and ways to solve it

    This email is the reply-to email.

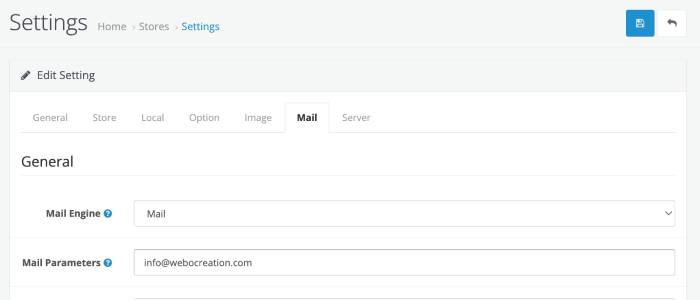
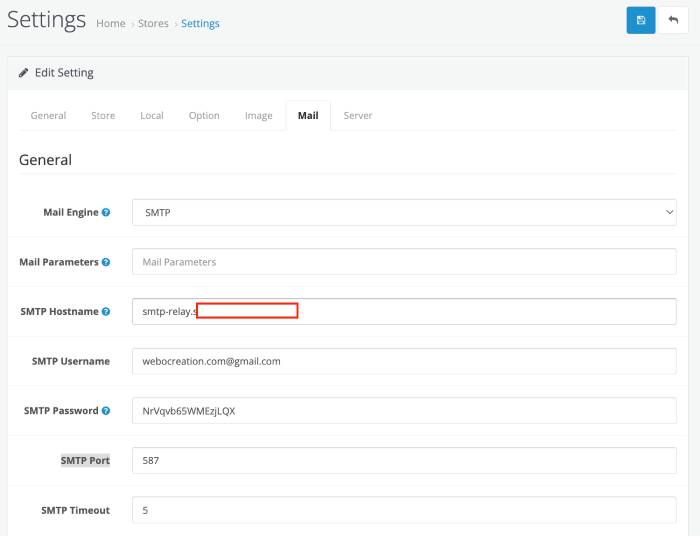
    Now, click the Mail tab, here are the settings to enter the email details. 

    Mail Engine: You can choose either Mail or SMTP in the Mail engine. Only choose ‘Mail’ unless your host has disabled the PHP mail function.

    Mail: When you choose the Mail option, enter your email in the Mail Parameters. It is always best to enter the email of your website rather than using Gmail email or other email clients. If you send emails from other emails than your website then receivers can take it as spam. Like in the example: we use info@webocreation.com. If you choose Mail then you don’t need to enter the SMTP details.

    Sometimes, you need to enter the Mail Parameters as -f info@webocreation.com

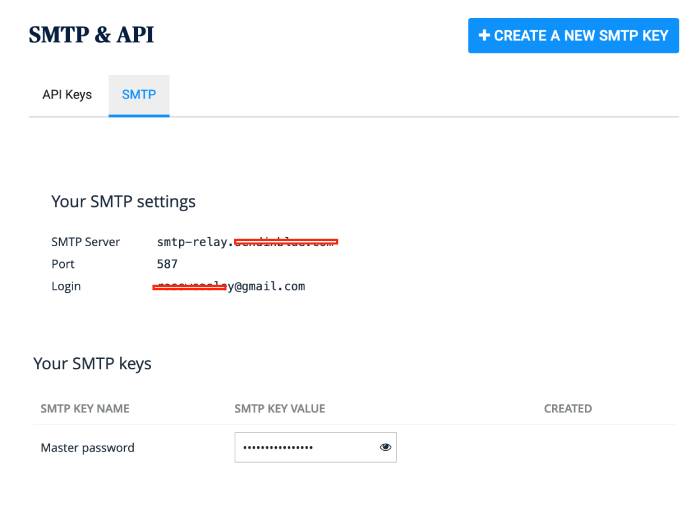
    SMTP:

    You can use third-party email services which provide SMTP to send an email. All SMTPs provide the following information

    1. SMTP Hostname
    2. SMTP Username
    3. SMTP Password
    4. SMTP Port

    Here is one example, one of the SMTP providers provides the following information:

    Enter the above SMTP settings in the Opencart by choosing the Mail engine as SMTP

    Every SMTP provider gives you the above information. The only thing is it can cost you extra.

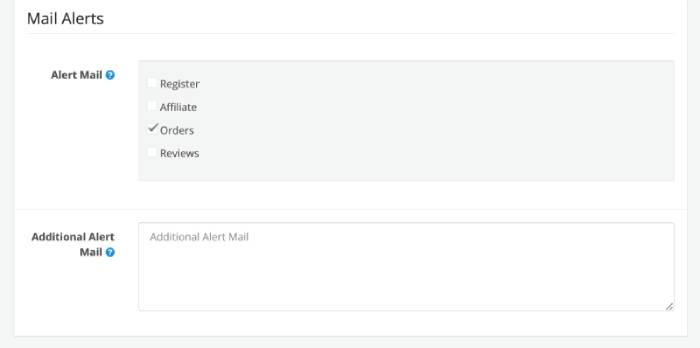
    Check Mail Alerts settings

    Go to admin >> System >> Settings >> Edit store >> Mail tab >> Mail Alerts section

    If you did not check the checkboxes for the one that you want to be alerted then these need to be checked.

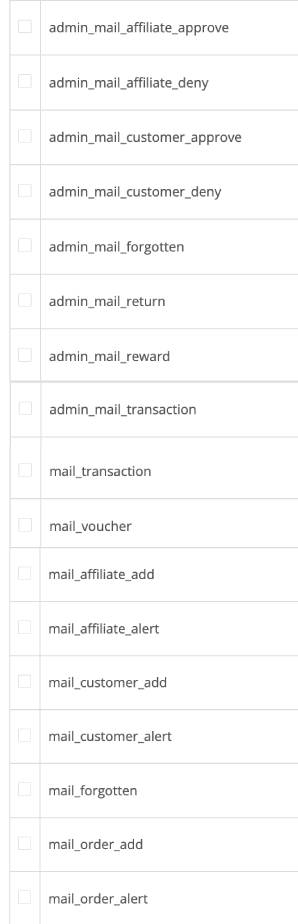
    Check all Events are set properly for Opencart 3

    From Opencart 3.0+ all mail needs to be set as Events in Opencart. Go to admin >> Extensions >> Events and check if all of the below events are added or not.

    With the above setting, an email should be sent if all servers’ settings are good.

    Read more: Maintenance (Backup/Restore, Uploads, and Error Logs) – Opencart user manual

    Server checking for email issues

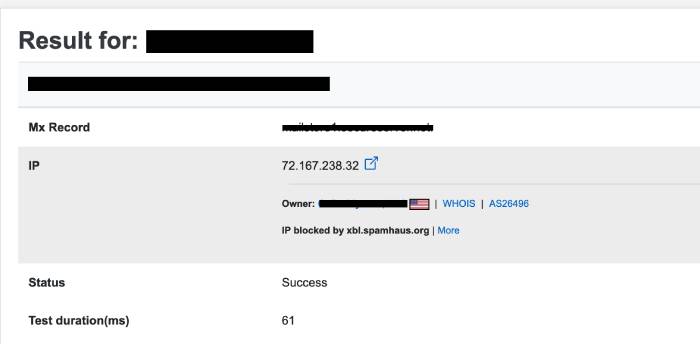
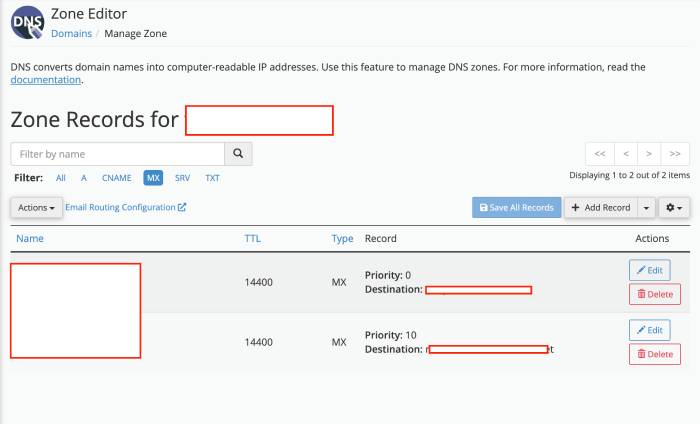
    Check for MX records:

    Check if MX records are added for your domain or not. You can look for an online tool that checks for MX records. Here is one example:

    If you did not have the MX records then you need to add them.

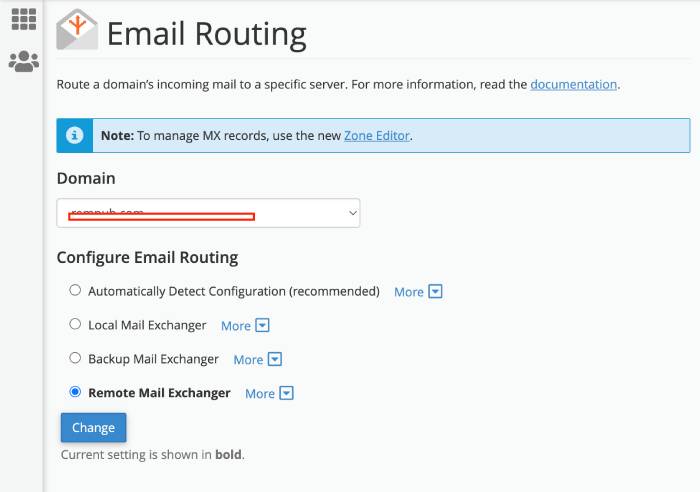
    Once your MX records are added, now is time to check for Email Routing

    If cPanel:

    If you are sending email from your server and you have chosen Mail as “Mail Engine” then check for Email Routing in the server and see whether the Email routing is configured to Local Mail Exchanger. But if you are using SMTP then the Email routing needs to be configured to Remote Mail Exchanger.

    Check the email quota of your server

    Most of the email servers have some email quota so if you reach that number they block sending the email, so verifying with the hosting provider is a way to check as well.

    Sometimes you get an email like the one below from your hosting provider.

    This message was created automatically by mail delivery software.
    A message that you sent could not be delivered to one or more of its
    recipients. This is a permanent error. The following address(es) failed:
    Domain ****.com has an outgoing mail suspension.  Message discarded.

    Check if your hosting provider blocked the email services

    Sometimes hosting providers or servers block the email services and even block the third-party services or SMTP, they need to unblock the mail services, so ask them to unblock it.

    See one example they have posted on their website:

    Upon checking the logs, I see that the email services were suspended for sending more than 1000 messages in the past 24h on November 19th, 2020 which was 2 years ago. We do have an email sending limit on our shared/reseller hosting which is 500 emails per hour, and 1000 emails per day for an account in which exceeding the limit causes email services to suspend.

    Check your mail filter settings

    If you don’t receive mail from a particular email you can whitelist it in your mail filter and check the spam folder as well.

    In this Opencart user manual, we went through email not sending issues and ways to solve them. Please don’t forget to post your questions or comments so that we can add extra topics. You can follow us at our Twitter account @rupaknpl, and subscribe to our YouTube channel for an opencart tutorial. Click to see all Opencart user manuals.

    How to create an ebook website to sell PDFs, mp3, digital products in Opencart?

    In Opencart, you can easily set up an eCommerce website to sell ebooks, pdfs, music, video, software application, or other digital products and on successful completion of order, they can download the digital products directly from the download section of Opencart. The files or zip can be uploaded to the server, assigned to the product and registered customers can order them and download the files of the product and get the instant download.

    Following are the steps to create digital products in Opencart, here we take an example of PDFs

    Add/Upload the download file

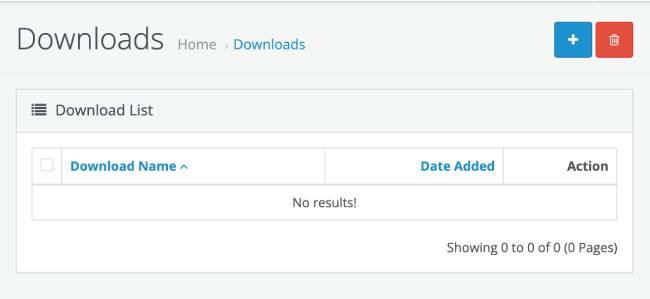
    1. Go to Admin >> Catalog >> Downloads

      Add Downloadable product
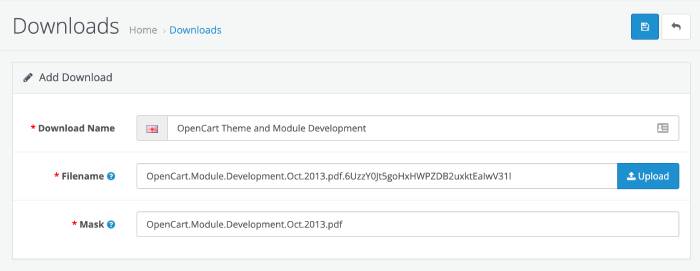
    2. Click the blue plus button, and you will see a form where you can upload your digital assets in our example it is PDF
      Opencart PDF upload
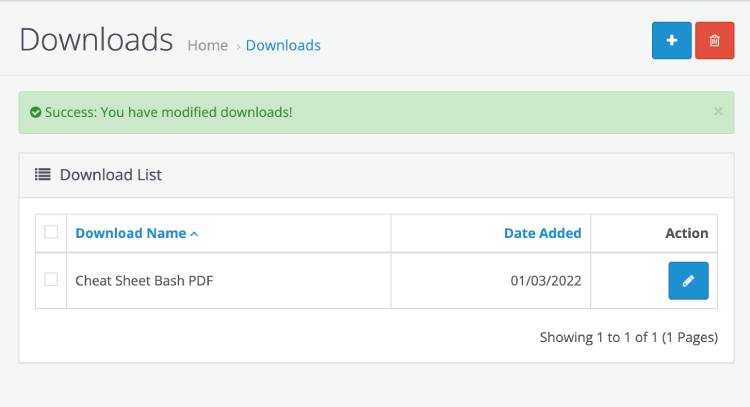
      Enter the “Download Name”. In the Filename, click the upload and upload the PDF file, a successful message is shown and the filename is auto generated. With this auto generated filename and the upload folder is outside of the access folder, it is secured for easy access. You can enter the mask name as per your requirement, better to have the extension, where in our case is “.pdf”. It is recommended that the filename and the mask are different to stop people trying to directly link to your downloads.
    1. Click Save button, with this your download is ready to assign to the product.
      Download Added

    Add product and assign the download

    • Go to admin >> Catalog >> Products >> Click add blue button 
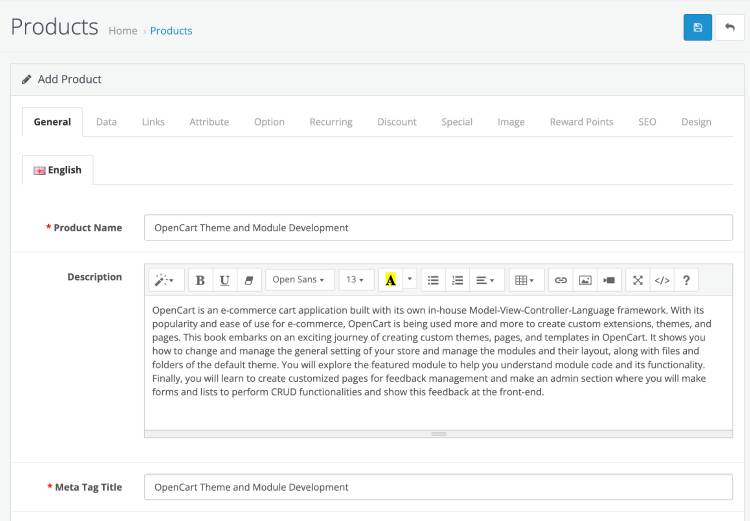
    • Enter the Product details, like Product name, Description, Meta Tag Title etc
      Product add eBook

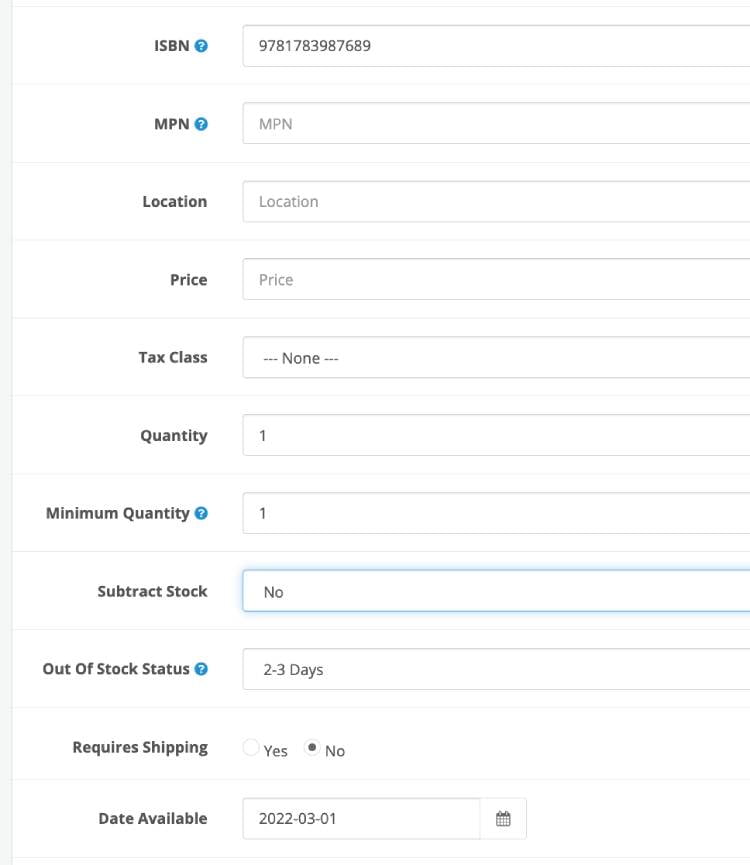
    • In the Data tab, enter more details of the book like Model, ISBM, Prices, Tax Class, Quantity can be 1, Subtract Stock to No, Requires Shipping to No.

    ** It is better to make the “Requires Shipping” to No so they don’t need to enter the shipping addresses when they order only the digital products.

    Data ISBN PDF

    Likewise, enter other details as required.

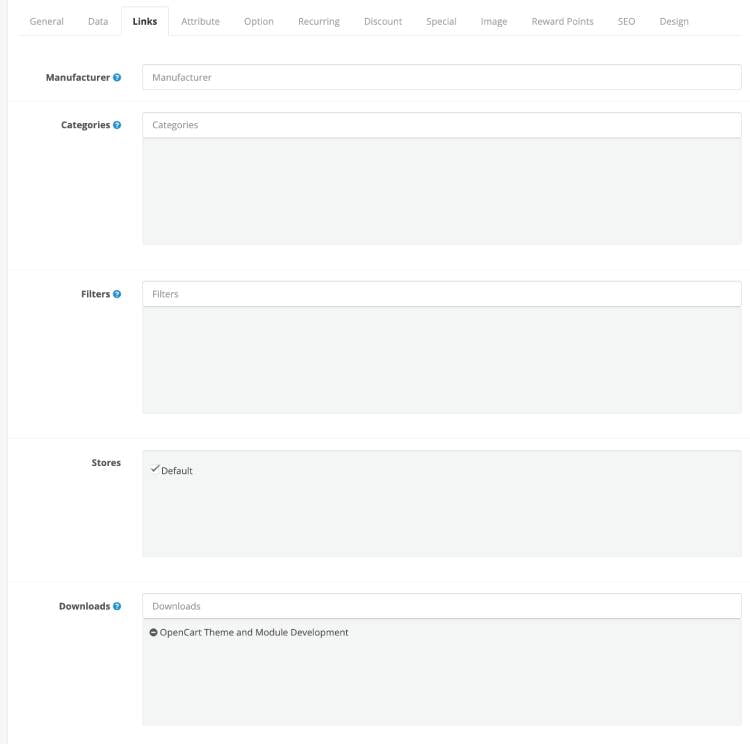
    • Now, in the Links tab, select Manufacturer, enter the Categories, Stores and the main thing is you need to add the Downloads. Start typing the downloadable product name and select the right download.
      Links Download select to sell

    You can enter the Related Products, and you can enter other details as required. You can add images etc.

    • Click Save and the Product is live. You can see the product like below:
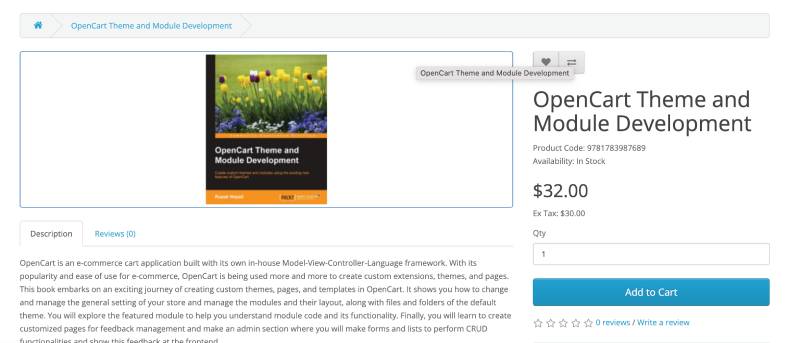
      Opencart PDF product detail

    How to make instant downloads available for digital products?

    There are two settings you need to set to make the instant downloads available once the order is successful or complete.

    Read more: Order statuses management

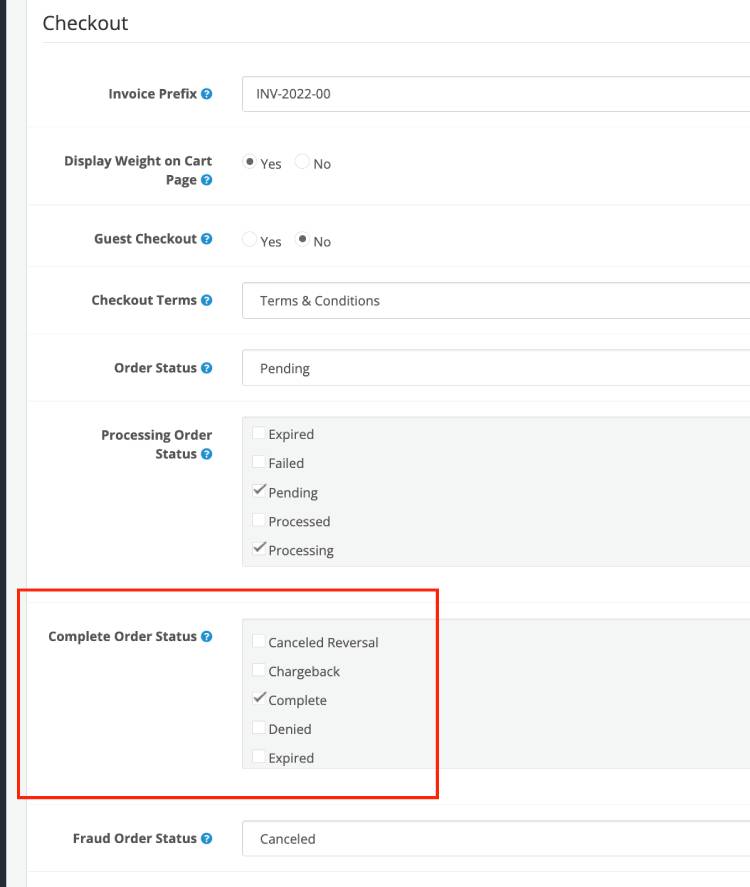
    First, go to admin >> System >> Settings >> Edit Store >> then Option tab >> scroll to the Checkout section where you will see the “Complete Order Status” field, and check the “Complete” option.

    Complete Order status instant download

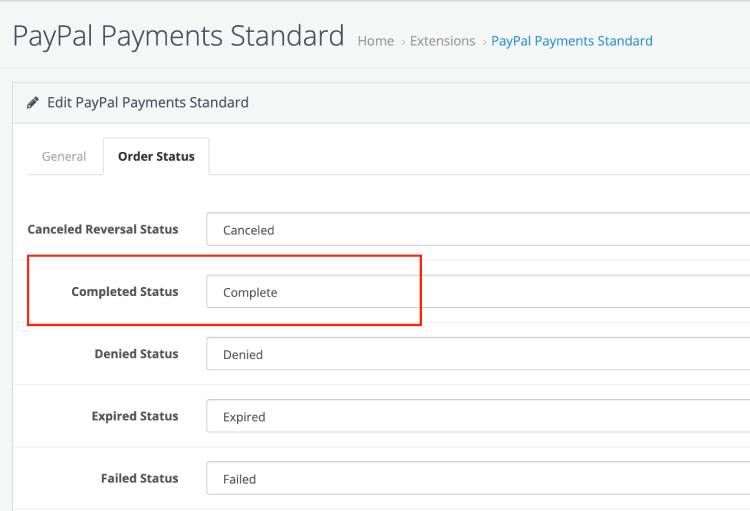
    Second thing, you need to set the complete status of the Payment module to complete.

    Here is an example of Paypal Payments Standard Order status, the Completed Status is selected to Complete.

    Learn more: Create your own Single Instance Opencart module

    Paypal Checkout Order Status

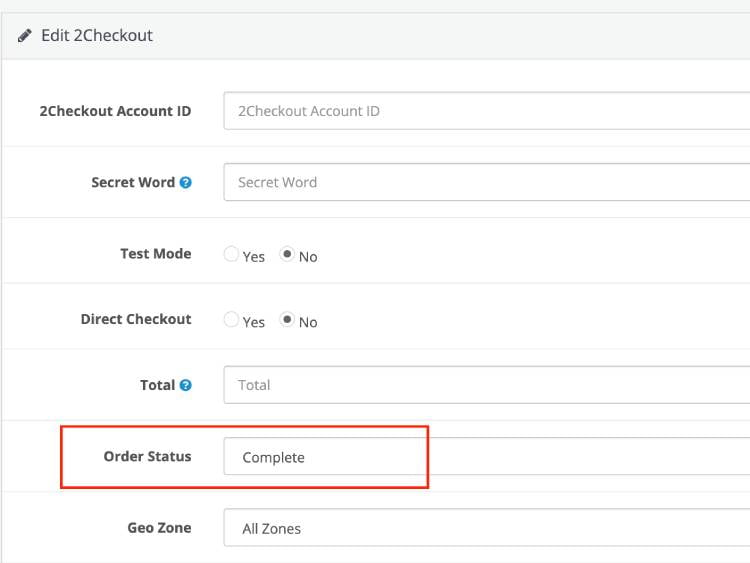
    Likewise, another example is of 2Checkout payment module, you need to select Order Status to Complete for instant download:

    2checkout instant download

    Once, these two are set to complete then when payment is successful then the download is instantly available.

    How will customers order the pdf or digital products?

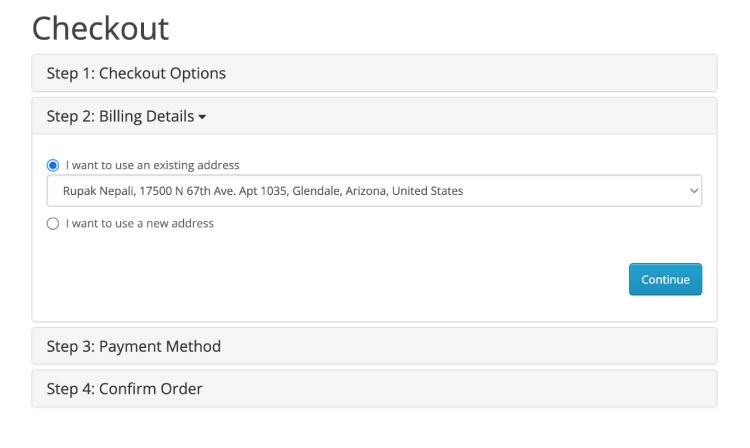
    Customers visit the product detail page, click “Add to Cart”, checkout, enter the details. As shipping is not required, the checkout steps will not show the shipping address section.

    Checkout steps for PDF purchase

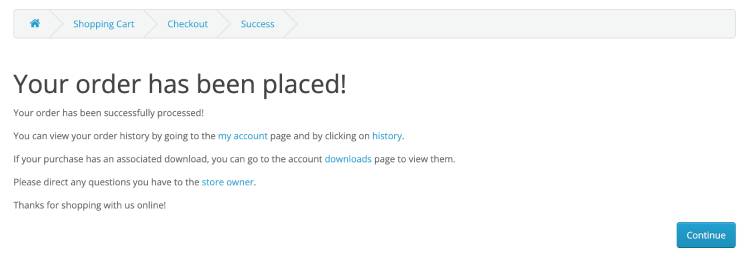
    Once you entered the billing address, select the Payment Method and confirm the order and make the payments then you will see a success message like below:

    order success

    If the store sets the order status the customer’s order must reach before they are allowed to access their downloadable products as complete and the payment successfully will create the order status as complete then the download is available instantly.

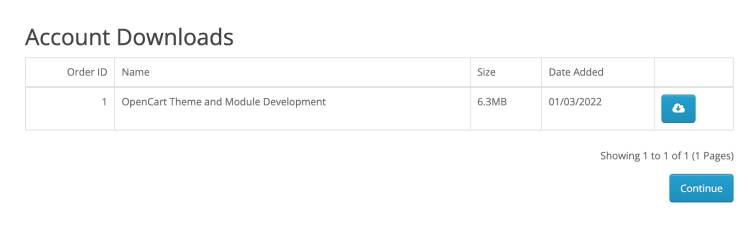
    The customer can click the downloads link on the success page, or they can click the download links in the menu or profile dashboard, and get access to their downloads.

    access downloads

    They can click the download and access the PDF instantly after the order is successful.

    Things to consider

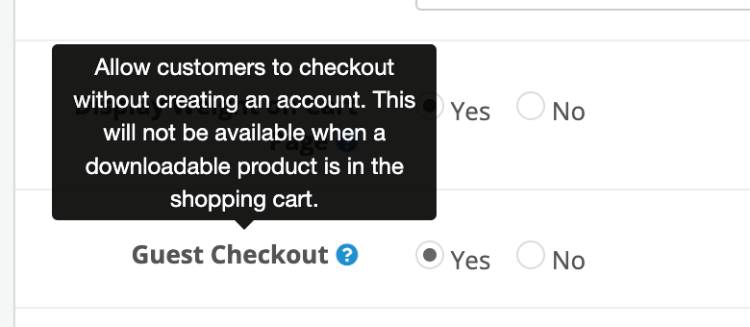
    • Guest checkout is not available for download products in Opencart. Allow customers to checkout without creating an account. This will not be available when a downloadable product is in the shopping cart.
    guest checkout download

    In this way, we can set up a digital product store in the Opencart and sell pdfs, mp3, images, zip, etc. Please don’t forget to post your questions or comments so that we can add other topics as you required. You can follow us at our Twitter account @rupaknpl and subscribe to our YouTube channel for opencart tutorials and see lists of posts for the Opencart user manual. Happy learning.

    Currencies management in the Opencart 3 and 4 version with auto-update

    Opencart 3 and 4 support multi-currencies so with Opencart we can sell in any currency, anywhere in the world. Go to admin >> System >> Localization >> Currencies where you will see the currencies available for use in the storefront. In the store by default, there are Euro, Pound, and US dollars but only the US dollar is enabled by default.

    Default currencies in Opencart

    The default currency is set to a value of 1. When you enter the product’s price we need to enter it as per the default currency with value 1. Every value of the currency will be relative to this value as per the above image the value of the US Dollar is 1.0, and the Euro is calculated to be 0.85500002. The frontend price is calculated and converted as per the currency value which is 1. If Auto Update Currency is enabled then the currency is auto-updated.

    Don’t confuse with default currency and value 1 of currency

    Here, you need to enter the price worth with the currency value equal to 1. Don’t enter the default currency value; you need to enter the price of the currency value equal to 1. They are mostly the same, but be sure the currency value is 1 and it is the default currency.

    Product price currency

    How do we add the currency in Opencart 3 & 4?

    To add the currency, go to admin >> System >> Settings >> Localization >> Currencies and click the Add New blue button and you will see the form below:

    Default currency form Opencart

    Currency Title: Enter the name of the currency that you want to show in the front end.
    Code: The ISO currency code, you can get the currency code at https://www.ibm.com/support/knowledgecenter/en/SSZLC2_7.0.0/com.ibm.commerce.payments.developer.doc/refs/rpylerl2mst97.htm
    Symbol Left: You can find the currency symbol at https://www.xe.com/symbols.php and if you want to show the symbol to the left of the price of the product then add it here.
    Symbol Right: You can find the currency symbol at https://www.xe.com/symbols.php and if you want to show the symbol to the right of the price of the product then add it here.
    Decimal Places: The number of decimal places that you want to show in the front end.
    Value: The default currency will be set to a value of 1 and other currency will be converted value.
    Status: You can enable or disable the currency in the front end.

    How do we change the default currency in Opencart 3 & 4?

    To change the default currency in Opencart 3 or 4, go to admin >> System >> Settings >> Edit the store >> then click the local tab and in the currency field change the currency that you want to make the default. Then, set your store to automatically update currencies. After that clear your browser cache to see the change and reset your existing cookies. Now your default currency in the Opencart 3 or 4 is set.

    default currency and auto update currencies of Opencart

    How do auto-update currency exchange rates work in Opencart 4?

    In Opencart 4, by default, there are auto-update currencies as per the currency rate converter engine “European Central Bank Currency Converter”. To enable it, log in to admin >> System >> Settings >> Edit the store >> Local tab and enable Auto Update Currency field and select the Currency Rate Engine and Save. Now, your store is set to automatically update currencies daily.

    Currency rate converter engine

    As we see Opencart is using this URL to get the currencies’ value https://www.ecb.europa.eu/stats/eurofxref/eurofxref-daily.xml, as seeing the values it supports only some currencies so auto-update currencies may not be supported for all currencies.

    Currencies auto update

    Fix the cron job so that it gets updated daily

    If you are seeing the auto-update is not working then your corn job is not running, make sure it is running daily. To check the status of the cron jobs, log into admin >> Extensions >> Cron Jobs and see the date modified and you can run the cron jobs from there as well.

    cron jobs opencart

    In this way, you can manage the currencies on the Opencart store. Please don’t forget to post your questions or comments so that we can add extra topics, free modules, or opencart tutorials that we need to develop which helps to develop quality. You can follow us on our Twitter account @rupaknpl and subscribe to the YouTube user opencart tutorial.