Generate Add to Calendar links for emails, and ICS files from URL parameters or a form with dynamic content

We were working with an email marketing client who was sending an event signup email to prospects and that needed to include dynamic links and content by passing the URL and the prospects’ emails. We tested multiple third-party add calendar event tools but they don’t provide support for dynamic content passing in the email link and creating the Add to Calendar links.

The calendar code will be something like the below:

<div style="margin: 0px 0px 10px0px; text-align: center; font-size: 0px">
    <a href="http://www.google.com/calendar/event?action=TEMPLATE&dates=20221005T130000/20221005T134500&ctz=America/New_York&text=this%20is%20summary&location=Online&details=This%20is%20description" title="Google" target="_blank" style="display: inline">
        <img src="https://img.icons8.com/color/344/google-logo.png" alt="Google" style="width: 45px; display: inline; padding: 40px" width="45" border="0" />
    </a>
    <a href="https://calendar.yahoo.com/?v=60&view=d&type=20&TITLE=this%20is%20summary&ST=20221005T100000&ET=20221005T104500&DESC=This%20is%20description&in_loc=Online" title="Yahoo" target="_blank" style="display: inline">
        <img src="https://cdn-icons-png.flaticon.com/512/3128/3128296.png" alt="Yahoo" style="width: 45px; display: inline; padding: 40px" width="45" border="0" />
    </a>
    <a href="https://webocreation.com/ics-file-creation-as-per-url-parameter?date_start=2017-1-16%209:00AM&date_end=2017-1-16%2010:00AM&location=%27Online%27&description=%27This%20is%20description%27&summary=%27this%20is%20summary%27&url=%27https://webocreation.com%27" title="Apple" target="_blank" style="display: inline">
        <img src="https://img.icons8.com/ios-filled/344/mac-os.png" alt="Apple"  style="width: 45px; display: inline; padding: 40px" width="45" border="0" />
    </a>
    <a href="https://webocreation.com/ics-file-creation-as-per-url-parameter?date_start=2017-1-16%209:00AM&date_end=2017-1-16%2010:00AM&location=%27Online%27&description=%27This%20is%20description%27&summary=%27this%20is%20summary%27&url=%27https://webocreation.com%27" title="Outlook" target="_blank" style="display: inline">
        <img src="https://img.icons8.com/fluency/344/microsoft-outlook-2019.png" alt="Outlook" style="width: 45px; display: inline; padding: 40px" width="45" border="0" />
    </a>
</div>

The output in the email will be like the below:

Add to email icons for add to calendar

Create an ICS file with dynamic content from the form – outlook, apple email

ICS file is used for email service providers like Outlook, Apple, and others. You can create and download the ICS file from the URL parameter or create an ICS file from a form. To create an ICS file from a form click the link below and enter the details:

Create an ICS file from URL parameters

Following are the URL parameters that you can use and create the ICS file which downloads automatically.

The main URL is:

ICS file creation as per URL parameter

date_start=2017-1-16 9:00AM
date_end=2017-1-16 10:00AM
location=’Online’
description=’This is the description’
summary=’this is summary’
url=”‘https://webocreation.com’

You can download the ICS file directly from the URL and the ICS file is downloaded. One example link is like below:

https://webocreation.com/ics-file-creation-as-per-url-parameter?date_start=2017-1-16 9:00AM&date_end=2017-1-16 10:00AM&location=’Online’&description=’This is description’&summary=’this is summary’&url=’https://webocreation.com’

Gmail/Google Calendar – Add to the Calendar link

For google calendar, you can create a link like below:

http://www.google.com/calendar/event?action=TEMPLATE&dates=20221005T130000/20221005T134500&ctz=America/New_York&text=this%20is%20summary&location=Online&details=This%20is%20description

http://www.google.com/calendar/event?action=TEMPLATE& 
dates=20221005T130000/20221005T134500& 
ctz=America/New_York& 
text=TITLE-OF-EVENT& 
location=Online& 
details=DESCRIPTION-OF-EVENT

Yahoo email Calendar – Add to the Calendar link

For the Yahoo calendar, you can create a link like below:

https://calendar.yahoo.com/?v=60&view=d&type=20&TITLE=this%20is%20summary&ST=20221005T100000&ET=20221005T104500&DESC=This%20is%20description&in_loc=Online

https://calendar.yahoo.com/?v=60& 
view=d& 
type=20& 
TITLE=this%20is%20summary& 
ST=20221005T100000& 
ET=20221005T104500& 
DESC=This%20is%20description& 
in_loc=Online

As you have a direct URL to create an ICS file, directly send values to google and yahoo, so you can pass any dynamic content on those URLs and set up your event content as per your need.

How to pass the dynamic URL from Marketo of event24 to the Add to Calendar buttons?

You can pass the event24 link in the email with the values of the lead email like below:

<div style="margin: 0px 0px 10px0px; text-align: center; font-size: 0px">
    <a href="http://www.google.com/calendar/event?action=TEMPLATE&dates=20221005T130000/20221005T134500&ctz=America/New_York&text=this%20is%20summary&location=Online&details=This%20is%20description<br><br>https%3A%2F%2Fevent.on24.com%2Fwcc%2Fr%2F395%6CF66C316A16920533CB26475D6%3Fmode%3Dlogin%26email%3D{{lead.Email Address:default=edit me}}"
        title="Google" target="_blank" style="display: inline">
        <img src="https://img.icons8.com/color/344/google-logo.png" alt="Google"
            style="width: 45px; display: inline; padding: 40px" width="45" border="0" />
    </a>
    <a href="https://calendar.yahoo.com/?v=60&view=d&type=20&TITLE=this%20is%20summary&ST=20221005T100000&ET=20221005T104500&DESC=his%20is%20description<br><br>https%3A%2F%2Fevent.on24.com%2Fwcc%2Fr%2F395%6CF66C316A16920533CB26475D6%3Fmode%3Dlogin%26email%3D{{lead.Email Address:default=edit me}}&in_loc=Online"
        title="Yahoo" target="_blank" style="display: inline">
        <img src="https://cdn-icons-png.flaticon.com/512/3128/3128296.png" alt="Yahoo"
            style="width: 45px; display: inline; padding: 40px" width="45" border="0" />
    </a>
    <a href="https://webocreation.com/ics-file-creation-as-per-url-parameter?date_start=2017-1-16%209:00AM&date_end=2017-1-16%2010:00AM&location=%27Online%27&description=%27his%20is%20description<br><br>https%3A%2F%2Fevent.on24.com%2Fwcc%2Fr%2F395%6CF66C316A16920533CB26475D6%3Fmode%3Dlogin%26email%3D{{lead.Email Address:default=edit me}}%27&summary=%27this%20is%20summary%27&url=%27https://webocreation.com%27"
        title="Apple" target="_blank" style="display: inline">
        <img src="https://img.icons8.com/ios-filled/344/mac-os.png" alt="Apple"
            style="width: 45px; display: inline; padding: 40px" width="45" border="0" />
    </a>
    <a href="https://webocreation.com/ics-file-creation-as-per-url-parameter?date_start=2017-1-16%209:00AM&date_end=2017-1-16%2010:00AM&location=%27Online%27&description=%27his%20is%20description<br><br>https%3A%2F%2Fevent.on24.com%2Fwcc%2Fr%2F395%6CF66C316A16920533CB26475D6%3Fmode%3Dlogin%26email%3D{{lead.Email Address:default=edit me}}%27&summary=%27this%20is%20summary%27&url=%27https://webocreation.com%27"
        title="Outlook" target="_blank" style="display: inline">
        <img src="https://img.icons8.com/fluency/344/microsoft-outlook-2019.png" alt="Outlook"
            style="width: 45px; display: inline; padding: 40px" width="45" border="0" />
    </a>
</div>

In this way, you can add “Add to Calendar” links to Gmail, Yahoo, Apple, and Outlook and pass the dynamic content to the calendar links. Please email us at webocretion.com@gmail.com if needed any support or help. You can look for more tips and tricks at Salesforce, Marketo, and Pardot. Let us know if you have questions or concerns so that we can help you out. Till then please subscribe to our YouTube Channel and like us on Twitter and Facebook.

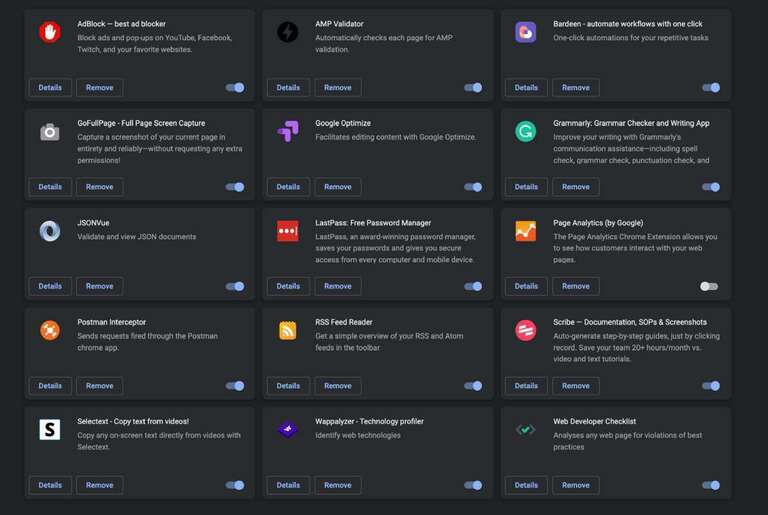
Chrome browser extensions that we use as a developer for efficiency

As web developers, we use the following 17 chrome browser extensions that make our development and testing easy, efficient, and save lots of time.

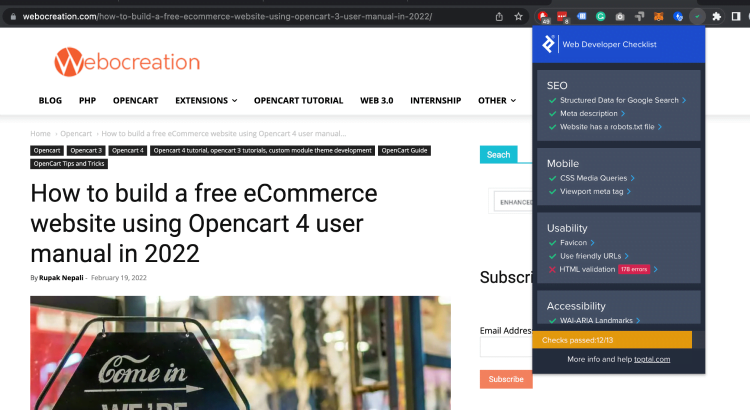
Web Developer Checklist

You can analyze the web page for violations of best practices. This extension helps web developers easily discover problem areas in websites. Once you installed it, you can click the extension icon and it gives you a list of practices of SEO, Mobile, Usability, Accessibility, Social media, and performance, which helps you easily identify the problem and fix them.

Web Developer Checklist

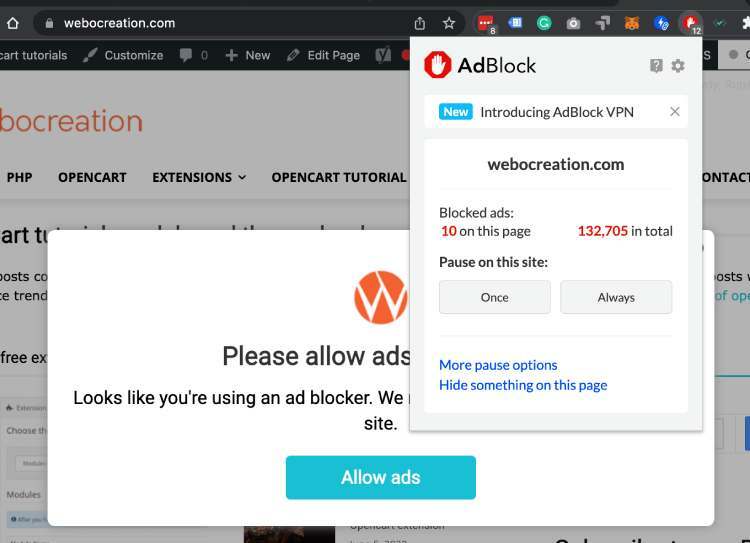
AdBlock — best ad blocker

Block ads and pop-ups on YouTube, Facebook, Twitch, and your favorite websites. AdBlock is the best ad blocker with over 60 million users, and one of the most popular Chrome extensions with over 350 million downloads!

Adblock website

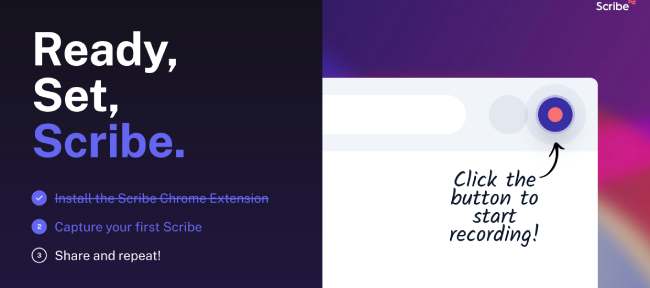
Scribe – Documentation, SOPs & Screenshots

Extension for screen recording that immediately converts any procedure into a tutorial. All you have to do is click “record” and go through the process you want to share. Scribe monitors your clicks and keystrokes to instantly create your guide. Answer questions, build SOPs, and train teammates FAST.

Scribe Docmentation

AMP Validator

The AMP validator checks the current page to see if it’s an AMP page, then runs it through the AMP validator and reports if the page passes (green) or fails (red). ) via the extension icon.

GoFullPage – Full Page Screen Capture

Take a full screenshot of your current and trusted page without asking for additional permissions! The easiest way to take a screenshot of an entire page in your current browser window. Click on the extension’s icon (or press Alt + Shift + P), see the extension capture every part of the page, and be taken to a new tab of your screenshot where you can download it as an image or PDF or even just drag it to the desktop.

Bardeen – automate workflows with one click

Stop wasting time with manual copy-pasting! It’s a no-code workflow automation app that replaces your repetitive tasks with a single shortcut. One-click automation for your repetitive tasks Stops wasting time with manual copy-pasting! Bardeen is a no-code workflow automation app that replaces your repetitive tasks with a single shortcut. Connect your favorite web apps and build custom automation in minutes.

Google Optimize

The Optimize extension allows you to test and customize your website with Google Optimize. Create a better website experience with Optimize. Once downloaded, use our visual editor to edit anything on your site (text, images, layouts, and more), then preview these new experiences and how they will look on different devices before launching your site test.

Page Analytics (by Google)

The Chrome Page Analytics extension lets you see how your customers interact with your web pages, including what they click and don’t click. Use this information to optimize your website presentation, improve user experience, and increase conversions.

Tag Assistant Legacy (by Google)

Tag Assistant helps troubleshoot the installation of various Google tags such as Google Analytics, Google Tag Manager, and more. Tag Assistant helps you check if various Google tags are installed correctly on your page. Simply navigate to any page and Tag Assistant will tell you which tags exist, report any errors found, and suggest improvements you can make to your implementation. Most Google tags are checked, including Google Analytics, Adwords conversion tracking, and Google Tag Manager.

Selectext – Copy text from videos!

Copy any on-screen text directly from videos with Selectext.

LastPass: Free Password Manager

LastPass, an award-winning password manager, saves your passwords and gives you secure access from any computer and mobile device. LastPass puts you in control of your online life, making it easy to protect and secure vital information so you can access it anytime, anywhere. Save all passwords, addresses, credit cards, etc. into your secure vault and LastPass will automatically fill in your information as you need it.

Postman Interceptor

Submit requests sent through the Chrome Postman app. Postman Interceptor helps you send requests using browser cookies through the Postman application. It can also send headers that are normally limited by Chrome but are essential for testing APIs. Interceptors make this process painless. It is now possible to achieve what previously required a proxy without any additional installation or configuration steps.

Read more: 15 extensions of VS Code for PHP developer

Print Friendly & PDF

Print Friendly and PDF any Webpage Save Paper and Ink When You Print Print Friendly removes ads, navigation, and junk before your print. Pages are optimized for the ultimate print reading experience.

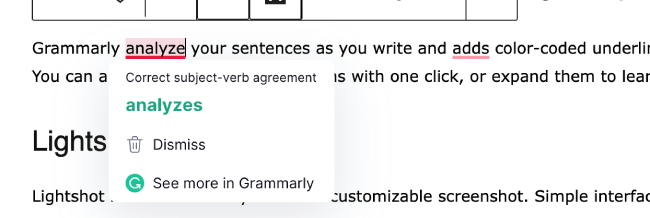
Grammarly: Grammar Checker and Writing App

Grammarly analyzes your sentences as you write and adds color-coded underlines to words and sentences so you can improve your writing. You can apply Grammarly’s suggestions with one click, or expand them to learn more.

grammarly

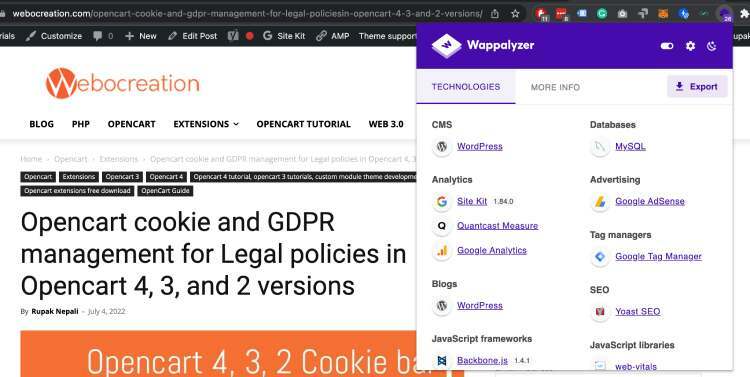
Wappalyzer – Technology profiler

Identify web technologies Wappalyzer is a technology profiler that shows you what websites are built with. Find out what CMS a website is using, as well as any framework, eCommerce platform, JavaScript libraries, and many more.

Technology Profile

RSS Feed Reader

Best RSS feed reader extension for Chrome.

  • See instantly when new posts are added to any of your RSS and Atom feeds
  • Easily subscribe to new RSS/Atom feeds by clicking the browser icon
  • Manage your streams intuitively
  • Right-clicking the pop-up menu in the context menu allows you to mark everything as read, reload the stream, and other convenient shortcuts
  • Export your streams so you can import them to another computer and/or keep them as backups to keep them safe
  • Customize your feed by choosing how many posts to show or change the title

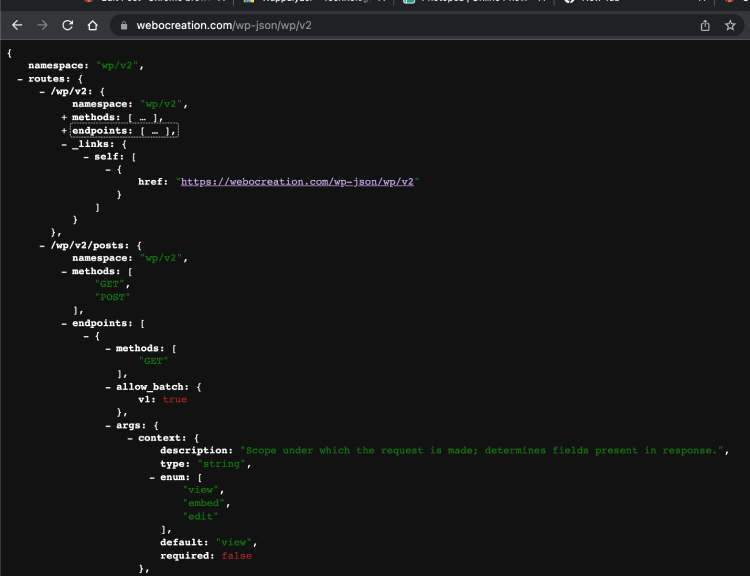
JSON Viewer

Validate and view JSON documents JSONView port for Chrome.

JSON View

These chrome browser extensions may help you as well. Please. let us know if you have any other extensions that had helped you with your development, need any support, or find any issues. Please subscribe to our YouTube Channel for Opencart video tutorials and get many other Opencart free modules. You can also find us on Twitter and Facebook

Guide to Launch an Ecommerce Business on Web3 Platform

With the latest version of Web 3.0, which is open, safe, and decentralized, technology will change everything. Since more than ten years ago, the most prominent players in e-commerce have gotten stronger.

Many people have been doing their shopping online, since the pandemic in 2020. The rise has broken all previous growth records of these eCommerce platforms.

How to Create a Virtual E-Commerce Platform on Web3

With Web3’s changes, a lot has changed, and soon the consumer will be in charge, not the big e-commerce platforms. Now is the best time to find new opportunities, since this change is just beginning. One of these changes is the growth of Web3 eCommerce platform development. Decentralized online shops can now be set up quickly for Web3 fans. This guide will explain how to set up a Web3 store. By the end of the compass, readers will be able to set up their own eCommerce platforms and know what features those platforms will have. So, let’s get started.

Online Shopping Platform With Web3 

There are currently two methods for creating an online store. The e-commerce platform must first be entirely coded from scratch, including its backend, internal page, and intelligent contracts. The second demonstrates how to use templates to quickly and more effectively duplicate an already exciting platform using a code editor. However, because the template might not have the features someone wants to add to their Web3 eCommerce platform, the second method is less flexible.

The first approach, however, is more adaptable and feels more natural. The project can be built however the user wants. The manual will emphasize the first and second methods of doing things in order to develop a special solution and will simplify the difficult parts.

Here are the things you need to know before you start the process.

  • Set up an online shopping site.
  • Create a page on the website.
  • Start a server.
  • Putting in place the back end
  • Set up a site where people can shop online.

But because it involves the blockchain and, consequently, smart contracts, the final step of the project will be trickier than the others. It is a web3 platform as a result. In this case, choosing a venue like the Moralis would be wise. It is one of the effective tools that makes it simple to index the blockchain and combine the events of intelligent contracts to create a web3 store. But the last step has one more part: adding the payments. Coders can set the prices however they want, depending on their e-commerce platform.

Here are a few things you need to do to make an online store on Web3. The Amazon clone store is used as an example in the guide. But you can use the free copies you can find on sites like GitHub. The company that makes Web3 may have to research to find a good clone code, but it will be worth it. When discussing price, it will be helpful to look at what features web3 will add to an online store.

Features of Web3 eCommerce Store and how it’s different from other eCommerce Stores

Since cryptocurrencies and the blockchain are becoming more popular and important, this could be a feature of an e-commerce store.

Give the Consumers Back Their Ownership

Web3 is about finding and building communities and making people feel like they own the things they use. In the Web3 world, smart storytelling and a focus on customer value will be used in eCommerce, and all of this will be turned into a meaningful community where experience can grow.

You could lose the loyalty of your customers if you don’t understand how important community is and how it shows up as correct brand alignment. However, eCommerce and Web3 will help brands learn more about their buyer personas. But it will be important not to “oversell” in a place where people are very aware of these techniques.

Decentralized Transactions and Network 

Online transactions and their options will only improve in the future. People making new ways to do e-commerce can think about how flexible they want their solutions to be with the help of a Web3 development company. As blockchain changes this digital frontier, e-commerce will become more flexible enough to keep up with the capabilities and standards of the industry.

Network companies will also think about decentralized finance applications and other possible solutions that work for them and their goals, in addition to how to make a Web3 eCommerce store. These changes will be made with the end user in mind. Businesses will pay more attention to how customers look at, produce, and interact with their credit card companies, banks, favorite online stores, and cloud-based work file-sharing systems. Users always build digital muscle memory, which brands can use to make the web3 experience for their customers more familiar and valuable.

Reevaluate and Improve the Customers’ Experiences.

Brands moved away from physical stores and toward online sales in many ways. This made the physical experience less important and changed how brands and customers interact with each other. In the same way, some brands later opened physical stores to keep in touch with their customers. Web3 adds a new level of depth and dimension to every interaction. Web3 e-commerce stores can figure out which interactions are important to their missions and how they want their future experiences to go.

Change The Old Functions In The Funnel Tunnel

The way people shop has changed because of e-commerce, and the technology behind it is improving. But as e-commerce solutions become more decentralized, there are more chances to change how they are made so that e-commerce platforms can be very different in the future.

Users want technology to do more than just its primary job. They want meaningful relationships, brands that stand out, and experiences that stick with them. As web3 e-commerce moves forward, brands can show off and give customers next-level e-commerce experiences. So, brands can change how people think and behave.

Transparency

How a company acts is just as important as what it sells or does. Even though people have high expectations, only 38% think that brands’ positive actions make a difference or reflect their core beliefs. The centralized system doesn’t have transparency, but web3 adds it to e-commerce.

Strategic thinking comes into play when considering how to make a Web3 eCommerce platform for big and small businesses. But if brands were open, they could make considerable money. To create an experience that fits their goals, fashion brands, in particular, will have to weigh profits against ethical practices.

Getting Used to New Payment Methods

Web3 allows new ways to pay to be used in e-commerce, an exciting chance for it to grow and change. To support the next wave of Web3, designers must be at the forefront of making new strategies that move franchises forward in a planned way. Brands will have a place to work that is more than just a logo when they use Web3. Every time someone interacts with a brand, whether by entering a password, making a sale, or using a virtual assistant, it shows what it stands for.

To do well in e-commerce, a brand must adopt the new payment methods at the most open and decentralized level. But they will affect how online stores accept payments, changing how e-commerce works for good.

Wrapping Up

As was said at the beginning of the guide, it has gone over some easy steps that anyone can use to build their web3-powered e-commerce platform like Amazon’s. But fans of Web3 should feel free to try out other clones since there are a lot of different codes out there. A few simple steps are needed to make something. These steps make the project’s basic structure and product pages. Then, a database is used to put everything together to create a full-fledged e-commerce store.

The Web3 online stores are just the beginning of what is possible. This line has a lot of other spots that haven’t been looked into yet. The next step in making the guide was to look at some things that a Web3 e-commerce store could have, like a new design, ways to pay, and being open.

Someone in the e-commerce business should also build a Web3 eCommerce platform because it has these features. As more people use web3 e-commerce, centralized e-commerce will soon break down.

Web3 is more than just a phrase this year. You can now use decentralized apps for money, art and collectibles, games, and technology on the Ethereum network. With Web3, it will be the end users, not the companies that hold the data now, who will make sure the information is correct.

Web3 in gaming is a decentralized process in which no central authority over any part of a gaming ecosystem or platform exists. This includes who owns gaming assets and makes decisions in all gaming-related areas. Get in touch with the best web3 development company in the United States if you need help launching your eCommerce business.

Laravel With React JS | The Perfect Combination for Futuristic Development

Laravel has matured into a versatile framework with a wide variety of features for developing responsive web apps. However, the framework hasn’t yet abandoned its reliance on conventional methods. Using Vue or React with a Laravel project is still doable and requires little effort.

To ensure that both Laravel developers and React.js developers can confidently go on with the project, we will step through the process of bootstrapping a new Laravel project and integrating React with it in this post.

A New Project’s Bootstrapping and Dependency Setup

So, let’s get started by creating a new Laravel project on your local device. The bootstrapping technique you use is up to you.

Laravel new guide-to-laravel-and-react

At this point, you may launch the project in your preferred integrated development environment (IDE) or text editor.  Let’s go ahead and install all these prerequisites now that you know what they are:

NPM Setup

To ensure that everything is working properly when the installation is complete, use the following command.

dev npm run

Following the execution of the npm run dev command, Laravel Mix generates the files public/js/app.js and public/css/app.css from the resources/js/app.js and resources/css/app.css, respectively.

Setting Up React and Creating Your First Component

Let’s dive in and start integrating React into the mix to see how Laravel and React.js work together. There are two new JavaScript libraries that need to be included first. You may think of them as the react and react-dom libraries. Simply run this command to accomplish your goal:

npm install --save-dev react react-dom

Those libraries will be set up and made available for use throughout development. Since you will be combining all of your JavaScript into a single file and including it with your Blade templates, it is necessary to install these dependencies as a development prerequisite.

First, copy and paste the following into a brand new file named resources/js/components/HelloReact.js:

// resources/js/components/HelloReact.js
import React from 'react';
import ReactDOM from 'react-dom';
export default function HelloReact() {
    return (
        <h1>Hello React!</h1>
    );
}
if (document.getElementById('hello-react')) {
    ReactDOM.render(<HelloReact />, document.getElementById('hello-react'));
}

You can use this React component to print “Hello React!” on the page by attaching it to an element with the id “hello-react.” Adding this to your application’s JavaScript code bundle will make it accessible throughout. To make the necessary changes, open the resources/js/app.js file and insert the new code below.

// resoureces/js/app.js
require('./bootstrap');
// React Components
require('./components/HelloReact')

So, that’s the whole thing. Incorporating the React component into the application’s JavaScript code bundle is as simple as requiring it in this file. Blade templates will need to be recompiled before using the revised code.

You’ve transitioned from writing plain old JavaScript to developing code that makes use of React. To have the React component compiled correctly, you’ll need to adjust the Laravel Mix setup. Webpack.mix.js may be found at the root of the project; open it and make the necessary changes to the code as shown below.

// webpack.mix.js
const mix = require('laravel-mix');
mix.js('resources/js/app.js', 'public/js')
    .react()
    .postCss('resources/css/app.css', 'public/css', [
        //
    ]);

In its default state, the response() method is not invoked from the configuration file. A call to this method will cause Laravel Mix to download the babel-preset-react plugin, which is needed for the compilation of React components.

Simply re-run npm run dev after making changes to Laravel Mix’s setup. It’s important to remember that now isn’t the moment for the compilation to take place. Instead, Laravel Mix will detect the absence of required libraries and replace them automatically. In order to ensure success, retry executing the npm run dev command.

You’ll need to have a blade template ready now that the part is complete. Access the welcome.blade.php file located in resources/views and make the following changes:

<!DOCTYPE html>
<html lang="en">
<head>
    <meta charset="UTF-8">
    <meta name="viewport" content="width=device-width, initial-scale=1.0">
    <meta http-equiv="X-UA-Compatible" content="ie=edge">
    <title>Laravel React</title>
    <script src="{{ asset('js/app.js') }}" defer></script>
</head>
<body>
    <div id="hello-react"></div>
</body>
</html>

Make sure the script is executed either after the closing body tag or just before it. Make that the ID you provide in the render() method of your React component corresponds to the ID of the element.

Execute PHP artisan serve to launch the local development server, and then go to http://localhost:8000. with the aid of the web browser of your choice. These are the kind of results you should get:

hello react js laravel

If there is a complete lack of output, look in the browser’s console for any problems. Find the problem, fix it, and try again.

Creating a Counter Component Using React Hooks

Okay, let’s use the state hook to create a contrasting part. Make sure the following is saved in a file called Counter.js in the resources/js folder:

// resources/js/components/Counter.js
import React, { useState } from "react";
import ReactDOM from 'react-dom';
export default function Counter() {
  // Set the initial count state to zero, 0
  const [count, setCount] = useState(0);
  // Create handleIncrement event handler
  const handleIncrement = () => {
    setCount(prevCount => prevCount + 1);
  };
  // Create handleDecrement event handler
  const handleDecrement = () => {
    setCount(prevCount => prevCount - 1);
  };
  return (
    <div>
        <button onClick={handleDecrement}>-</button>
        <span> {count} </span>
        <button onClick={handleIncrement}>+</button>
    </div>
  );
}
if (document.getElementById('counter')) {
    ReactDOM.render(<Counter />, document.getElementById('counter'));
}
if (document.getElementById('counter')) {
    ReactDOM.render(<Counter />, document.getElementById('counter'));
}

To use the file, open resources/js/app.js and require it as you would any other file. If you’re tired of constantly using npm run dev, you can save yourself some time by using the npm run watch command instead. This command will keep a check on your files and trigger a compilation whenever they’re modified.

To finish, reopen the resources/views/welcome.blade.php file and make the following changes:

<!DOCTYPE html>
<html lang="en">
<head>
    <meta charset="UTF-8">
    <meta name="viewport" content="width=device-width, initial-scale=1.0">
    <meta http-equiv="X-UA-Compatible" content="ie=edge">
    <title>Laravel React</title>
    <script src="{{ asset('js/app.js') }}" defer></script>
</head>
<body>
    <div id="hello-react"></div>
    <div id="counter"></div>
</body>
</html>

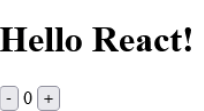
If the webpage is still open in your browser, a refresh will reveal the following:

hello react with laravel

You can watch the number alter as you try incrementing and decrementing it. You have the same freedom here as you would with any other standard React component. You may even create custom class features.

Communicating With the Back-End

You have only done front-end work up to this point in the article. Here we’ll demonstrate how you may connect your React components to the Laravel backend.

Launch your favorite text editor and go to the routes/web.php file to make the necessary changes:

<?php
// routes/web.php
use Illuminate\Http\Request;
use Illuminate\Support\Facades\Route;
Route::get('/', function () {
    return view('welcome');
});
Route::post('count', function (Request $request) {
    return response()->json([
        'message' => $request->message,
    ]);
});

The front end may send a string with the name message to this straightforward route, and it will return the string to the sender.

To make these changes, open the Counter.js file under resources and replace its existing content with the following:

// resources/js/Counter.js
import axios from "axios";
import React, { useState } from "react";
import ReactDOM from 'react-dom';

export default function Counter() {
  // Set the initial count state to zero, 0
  const [count, setCount] = useState(0);

  // Create handleIncrement event handler
  const handleIncrement = () => {
    setCount(prevCount => prevCount + 1);
    notifyServer();
  };

  // Create handleDecrement event handler
  const handleDecrement = () => {
    setCount(prevCount => prevCount - 1);
    notifyServer();
  };
// Notifies the server about the change
  const notifyServer = () => {
      axios.post('/count', {
          message: 'Counter Updated!',
      })
  }
  return (
    <div>
        <button onClick={handleDecrement}>-</button>
        <span> {count} </span>
        <button onClick={handleIncrement}>+</button>
    </div>
  );
}
if (document.getElementById('counter')) {
    ReactDOM.render(<Counter />, document.getElementById('counter'));
}

The notifyServer() method sends a message to the /count API endpoint. The handleDecrement() and handleIncrement() methods must include a call to this method. Rebuild the resources and try again. Now, before you hit the up or down arrows, make sure the Network tab is active in your browser. Now, when you hit the up or down arrow, the following POST request will appear: 

server api laravel

The server has processed the request and sent back a reply. This method of communicating with the server is universal. You should be able to connect to any of the web routes since the Axios library takes care of the CSRF token by including the XSRF-TOKEN cookie in each request.  

Alternatively, you might utilize API routes, albeit doing so would need a stateless authentication mechanism. In my view, working using web routes is the way to go when incorporating React components into blade templates. It will save you a lot of time and effort while still letting you do almost all of the same actions available through the API’s routed mechanisms.

Vendor Extraction 

The last point is the extraction of value from vendors, and this concludes the paper. However, long-term caching becomes more complicated when you combine your application-specific JavaScript code with the React framework. If you make even a little modification to your code, the browser will re-download the vendor library (in this case, React), even though it hasn’t changed.

Extracting the vendor library code to a new file is one approach to fixing this problem. Simply edit the webpack.mix.js file as shown below.

// webpack.mix.js
const mix = require('laravel-mix');
mix.js('resources/js/app.js', 'public/js')
    .react()
    .extract(['react'])
    .postCss('resources/css/app.css', 'public/css', [
        //
    ]);

With only one call to extract(), you may generate three distinct JavaScript files that include all of the vendor libraries in the array. Here are some of them:

  • public/js/manifest.js: Time of execution for Webpack manifests
  • public/js/vendor.js: That of your suppliers’ library collections
  • public/js/app.js: This is the code for your application

Access the welcome.blade.php file located in resources/views and make the following changes:

<!DOCTYPE html>
<html lang="en">
<head>
    <meta charset="UTF-8">
    <meta name="viewport" content="width=device-width, initial-scale=1.0">
    <meta http-equiv="X-UA-Compatible" content="ie=edge">
    <title>Laravel React</title>
</head>
<body>
    <div id="hello-react"></div>
    <div id="counter"></div>

    <script src="{{ asset('js/manifest.js') }}"></script>
    <script src="{{ asset('js/vendor.js') }}"></script>
    <script src="{{ asset('js/app.js') }}"></script>
</body>
</html>

Conclusion 

The scripts were simply placed at the end of the file so that they would run immediately rather than being delayed. The files must be loaded in this specific sequence.  After the vendor script, you should place any JavaScript scripts that are exclusive to your application. There will never be a second copy of the manifest. When you refresh the page, you shouldn’t notice any differences in the results. In case you are trying to experiment with this combination for your project, you can get a lot of Laravel programmers for hire in the market.

Host Opencart in google cloud for free for one year, DNS, SSL, Cloudflare, SSH

This Opencart tutorial shows how to easily host Opencart in Google cloud for free for one year, set up Cloudflare, SSH to run shell scripts and commands, install an SSL certificate and redirect all non-HTTP to HTTPS URL.

Step 1: Set up Google Cloud Platform at cloud.google.com using a free Google account or Gmail account.

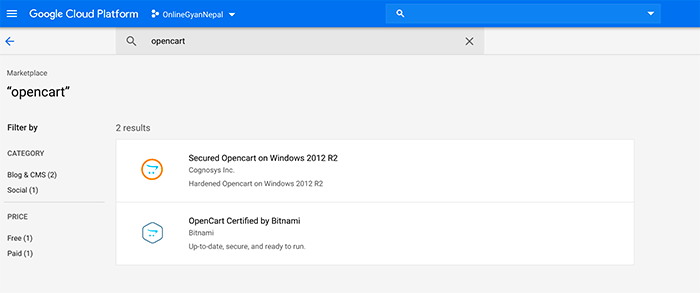
Step 2: Click on the Navigational Menu icon >> Marketplace >> Search for Solutions >> Type Opencart

Search Opencart in Google Cloud

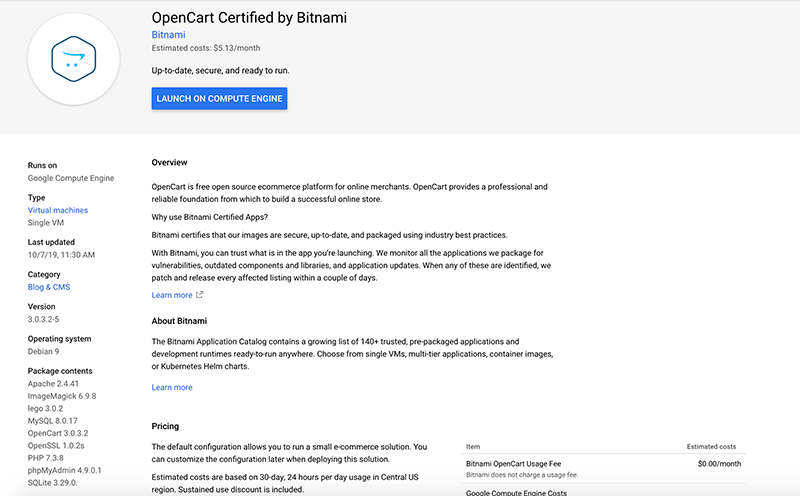
Step 3: Select the “OpenCart Certified by Bitnami”, this Google Compute Engine package contents Apache 2.4.41, ImageMagick 6.9.8, lego 3.0.2, MySQL 8.0.17, OpenCart 3.0.3.2, OpenSSL 1.0.2s, PHP 7.3.8, phpMyAdmin 4.9.0.1, and SQLite 3.29.0.

Opencart Certified by Bitnami in GCP

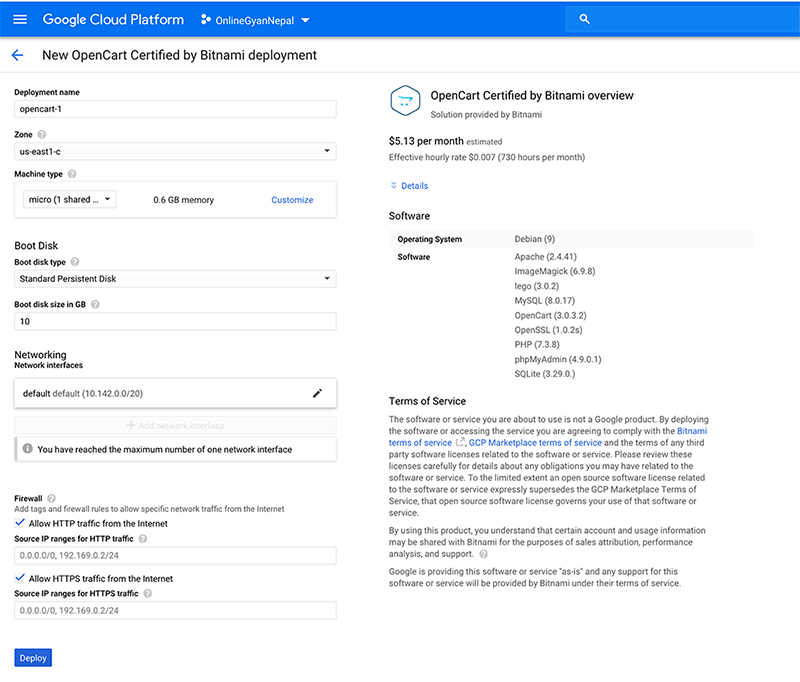
Step 4: Click “Launch on Compute Engine”. While creating be sure to use the following for the free account
1. Compute Engine Oregon: us-west1 or Iowa: us-central1 or South Carolina: us-east1
2. Machine Type: micro (1 shared vCPU) f1-micro
Get more details at https://cloud.google.com/free/docs/gcp-free-tier
Select both HTTP and HTTPS traffic and by selecting as in the image, click Deploy.

Opencart Deployment in Google Cloud platform

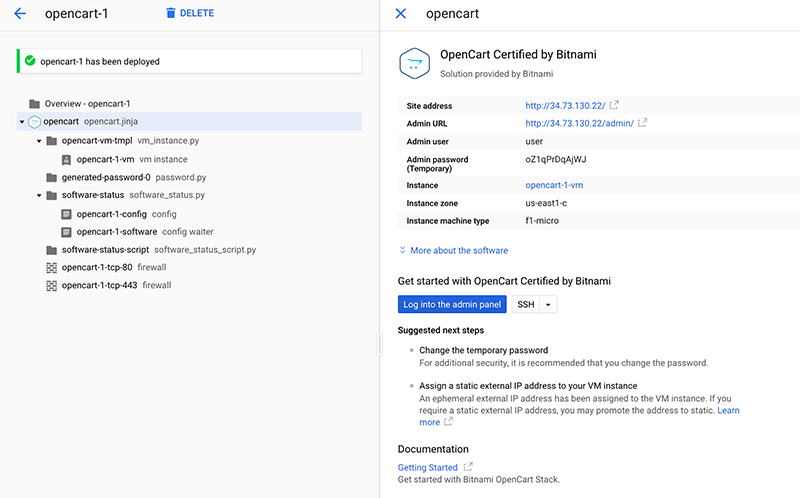
Lots of scripts run, it creates a virtual machine instance, creating a password, setting config for opencart, setting up a firewall, and so on thus it takes some minutes for the opencart deployment and you will get the Site address, Admin URL, Admin user, and Admin password.

Opencart certified by bitnami

Now you can access the website from the site address http://34.73.130.22 for our above example and the admin section is http://34.73.130.22/admin/. Some of the suggested steps to change the temporary password, for that, go to System >> Users >> Users >> Edit user and change the password.

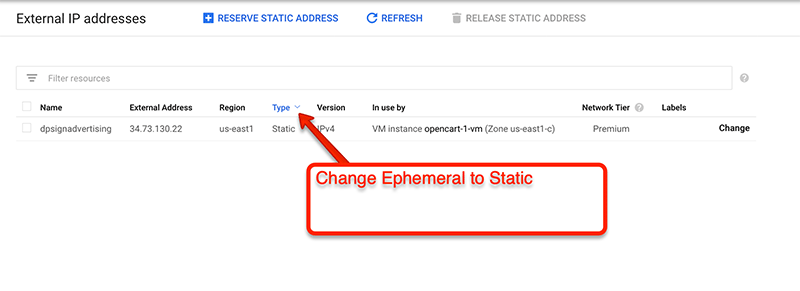
Step 5: Next suggested step is to assign a static external IP address to your VM instance, for that click on the Navigational Menu icon >> VPC network >> External IP addresses >> In the Type Column select the Static and give some name, with this Static IP address is created, now it will not change so we can set up the domain name to point to the website.

Opencart Static IP GCP

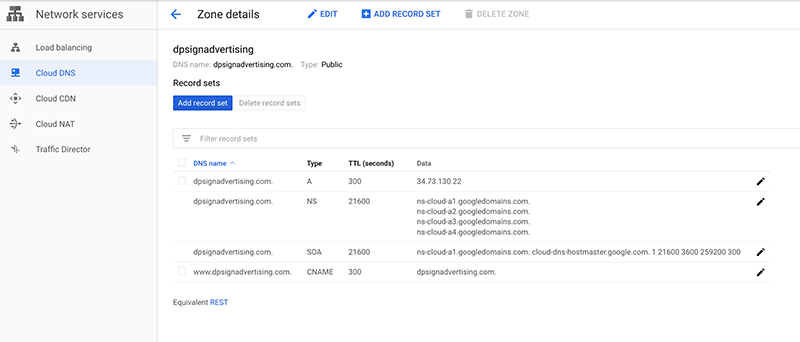
Step 6: Now time to set up a Domain Name to point to the google cloud DNS. For that click to Navigational Menu icon, >> Network Services >> Cloud DNS, this enabled the DNS API then create Zone, choose Zone type as Public, Zone name any, DNS name: use your domain name, DNSSEC you can use Off or On, then click create.

With the above steps, we have NS records. Now let’s add the A record. Click the Add record set button and then in DNS Name leave it blank, and in the Resource Record Type choose A and enter the Static IP that we get above in IPv4 Address (for us it is 34.73.130.22) then click create. Let’s add another record set for the www, click the Add record set button and then in DNS Name type www, and in the Resource Record Type choose CNAME and enter the non-www URL for the canonical name. Then click create.

Cloud DNS in GCP for Opencart

You can see the lists of the above records as in the image. Now we use the NS record to link the domain name to our website. There are four NS records for us these are the following NS:

ns-cloud-a1.googledomains.com
ns-cloud-a2.googledomains.com
ns-cloud-a3.googledomains.com
ns-cloud-a4.googledomains.com

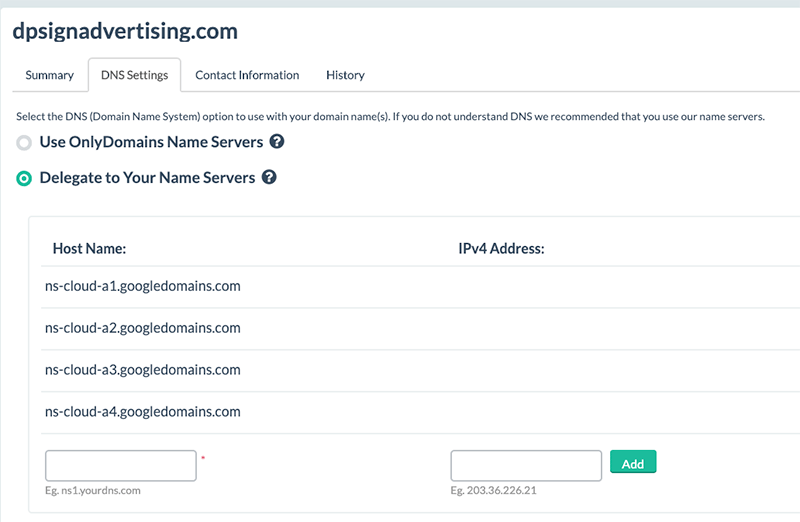
Step 7: Go to the domain name provider and change or add the NS records and delegate to Google Cloud servers. We use onlydomains.com for domain name registration so it looks like below:

Delegate google cloud nameservers

After some minutes the site in the Google Cloud is shown, sometimes it may take up to 24hours as well.

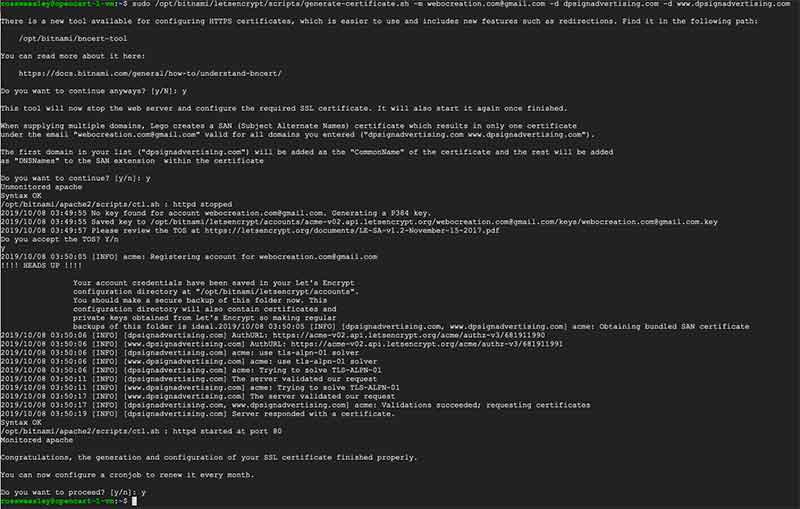
Step 8: Now let’s add an SSL Certificate and set up an SSL Certificate for the website. Go to Menu Navigation icon >> Compute Engine >> VM instances >> then click SSH and shell script window is opened and run following shell script, be sure to change to your email and to your domain name and click Y for all 🙂

sudo /opt/bitnami/letsencrypt/scripts/generate-certificate.sh -m webocreation.com@gmail.com -d dpsignadvertising.com -d www.dpsignadvertising.com
shell script to create and install ssl in google cloud for Opencart

Now redirect all HTTP to HTTPS for that let’s edit the virtual host file. Use the following script:

sudo nano /opt/bitnami/apache2/conf/bitnami/bitnami.conf

It will open the file, then paste the following code in it.

RewriteEngine On 
RewriteCond %{HTTPS} !=on 
RewriteRule ^/(.*) https://www.dpsignadvertising.com/$1 [R,L]

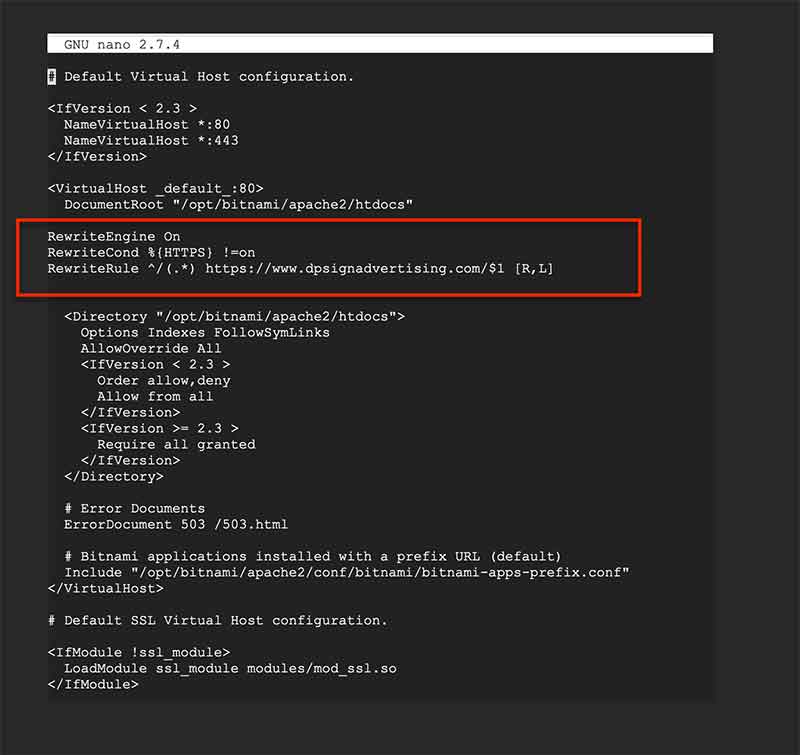
It looks like below:

rewriteengine on for Opencart

Now restart apache by the following command:

sudo /opt/bitnami/ctlscript.sh restart apache

With these steps, SSL certificates are created and all non-HTTPS are redirected to HTTPS URL.

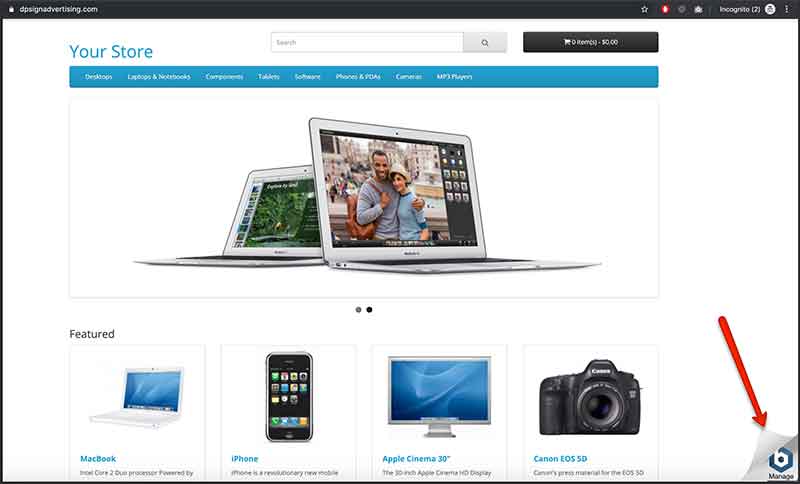
Step 9: We see the Bitnami Banner Ad at the bottom right corner, let’s remove it.

Bitnami banner remove from GCP

Run the following command in SSH

sudo /opt/bitnami/apps/opencart/bnconfig --disable_banner 1
sudo /opt/bitnami/ctlscript.sh restart apache

With these commands, the Bitnami Banner Ad is removed.

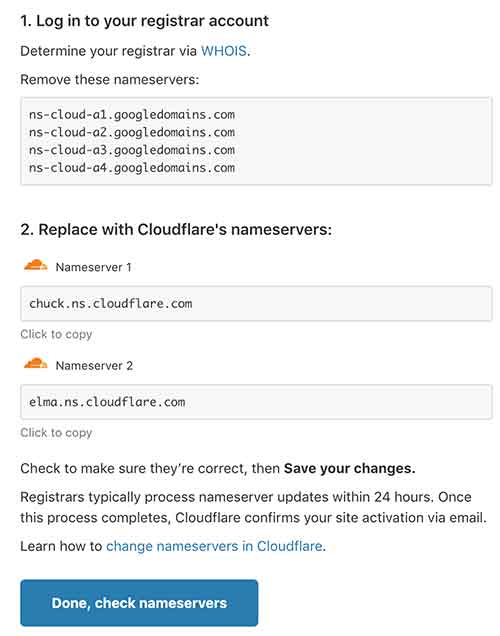
Step 10: Let’s add the Cloudflare CDN for the Opencart website to increase performance using a CDN (Content Delivery Network). Go to cloudflare.com and signup for a new account and then add the website URL and click continue and you will get new Cloudflare’s nameservers like:

opencart cloudflare setup

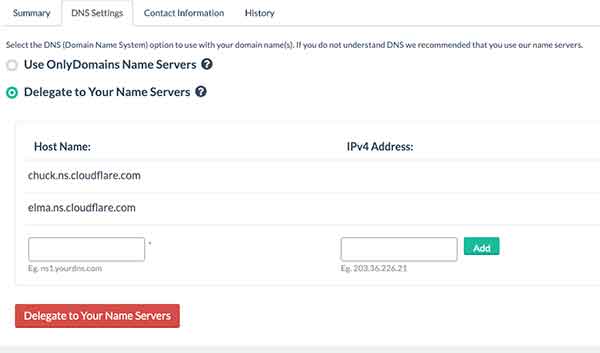
Now again need to go to the domain registrar and need to delegate to Cloudflare nameservers and remove the google cloud servers. For us it looks like below:

change the NS in domain registrar

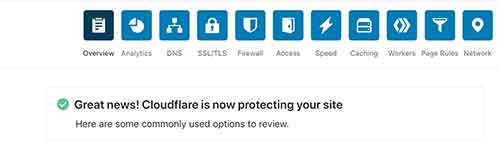
With these changes, Cloudflare will start protecting our site. Sometimes it may take up to 24hrs, but Cloudflare will notify once it is active

Cloudflare Opencart

In this way, you can easily host the Opencart website in Google Cloud Platform, setup the DNS and your website URL in google cloud DNS, log in with SSH, create an SSL certificate, install it and redirect all to HTTPS, and configure the Cloudflare for the website for better performance. Hope you liked this post, let us know if you have any questions or suggestions, please subscribe to our YouTube Channel for Opencart video tutorials. You can also find us on Twitter and Facebook. Enjoy!
Others:

Opencart 4 demo site, new features, admin changes, frontend changes, and code

We are working to get the details of the Opencart 4, set up a demo for Opencart 4, and analyze its features and functionalities both in the admin section and the frontend section. Some of the addition is – PHP 8.1+ Compatible – a New event-based extension system – Startup page – CRON job page – GDPR – Product variants. You can now choose to use create a new product variant based on a master product and link the stock quantities – Cookie accepts the policy – Admin notification system – OpenCart can now send you updates and news information directly to your OpenCart admin – Autoloader class – Telephone field now optional – Additional admin security, renaming admin folder, install directory, moving storage folder.

Work on progress content.

Opencart 4 Demo

You can check the Opencart 4 Demo by clicking this link. You can use the demo as a username and demo as a password to look into the administration section. Click here for the admin section.

Code size:

Opencart 4.0.0.0 – 35 MB – the zip size is doubled 🙂

Opencart 3.0.3.8 – 17.2 MB

For installation of Opencart 4 

Following PHP settings are required:

PHP version 8.0+, Register Globals: Off, Magic Quotes GPC: Off, File Uploads: On, Session Auto Start: Off

Following PHP extensions are required:

Database, GD, cURL, OpenSSL, ZLIB, ZIP

The following two files need to be writable while installation

Config.php and admin/config.php

| is used in the URL to represent the methods. Like

?route=design/banner|form&user_token=

Check the |form, now pipe | is used before function, previously it used to be / for all

Installation process:

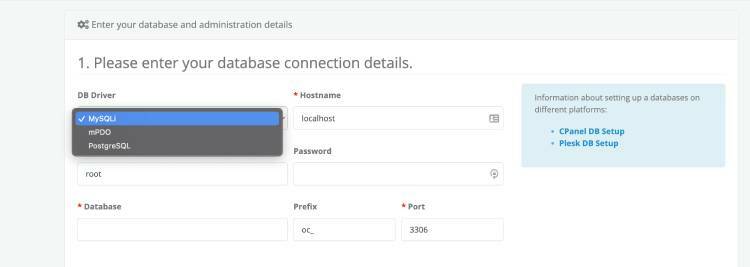
Same as 3, only noticeable design changes, other looks similar. Three DB drivers are supported on the installation: MySQLi, mPDO, and PostgreSQL.

Opencart 4 DB drivers

Design changes on the Pages

Home Page and Category Page

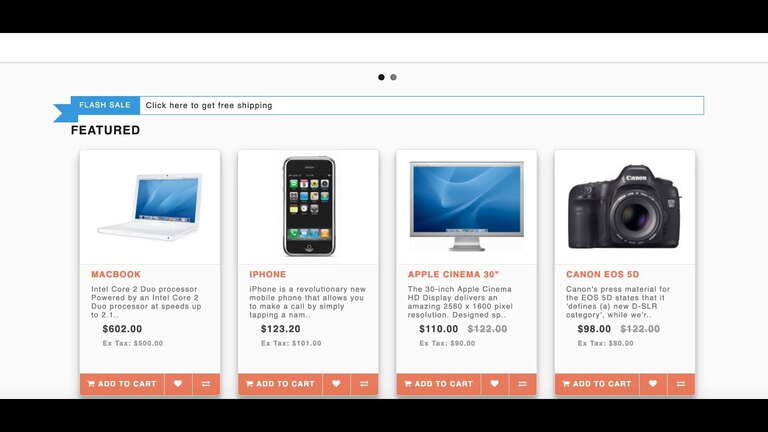
The structure has not changed on the home page. The height of the product looks adjustable as per content. The brand or manufacturer sliders are sliding to the next frame rather than each brand.
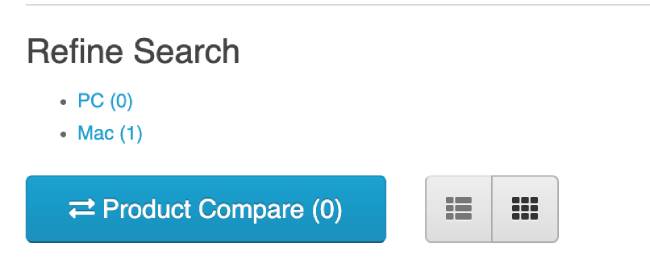
On the category page, design-wise only the Product Compare button is changed.

Product compare

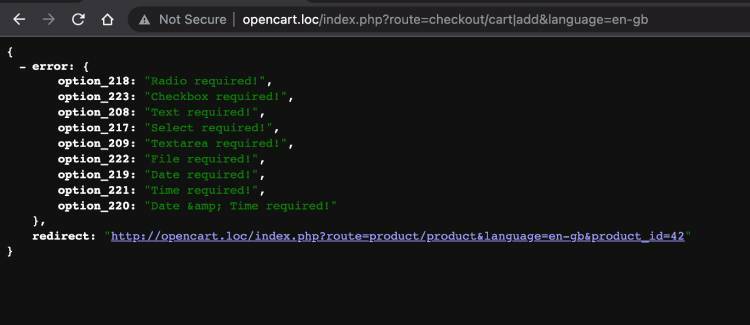
When we clicked the Add to Cart icon of products on the category page, it is redirected to JSON data, so looks like some improvement or the next version is coming soon. Or, maybe we are missing some configuration on our local environment. We will do some research and inform you guys.

Add to cart issues

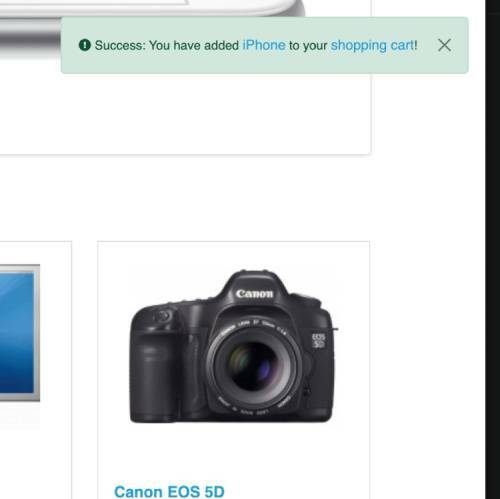
Once it is successful it shows a popup like the below:

success message

Product Page

Wishlist and Compare buttons are moved in the middle after the discount section

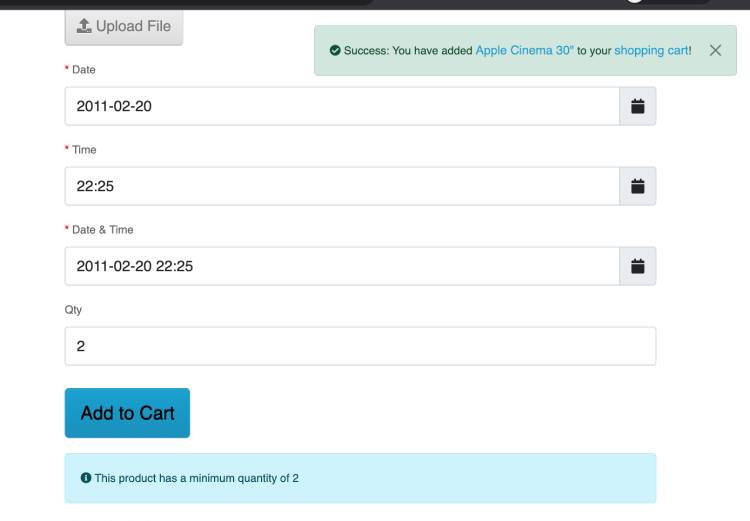
On selecting/choosing the options and clicking the “Add to Cart” button, you will see a popup of a success message, it is so smooth.
Product page add to cart

The social shares (like, tweets, etc) are removed.

Add to cart button changes

Add to cart button word is removed from each product grid and when clicked on the add to cart icon it popups the success message, previously it used to show at the top.

Cart page

Some design changes and the main change is Totals are now showing just below the Shopping cart, on previous one it used to show near the checkout button.

shopping cart page opencart 4

Checkout Page

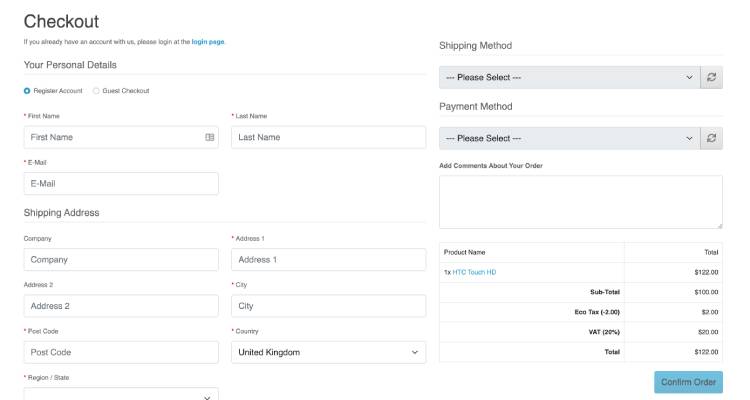
The big change is on the Checkout Page, now it is one-page checkout, this is the most awaited feature as we used to buy modules for in the previous version to do the one-page checkout. So, did a great job by the Opencart team.

Checkout page Opencart 4

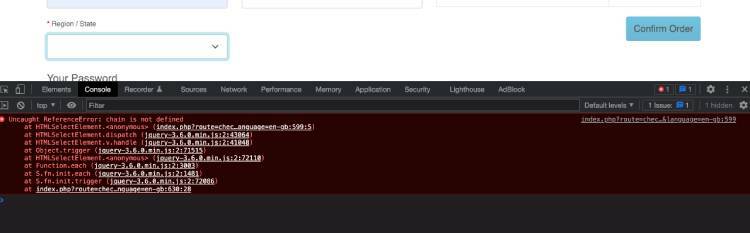
But looks like needs to improve a lot to make it fully functional. Whenever we tried to select the Region in the checkout steps, it is showing the following errors.

Checkout issues chain code
Uncaught ReferenceError: chain is not defined
    at HTMLSelectElement.<anonymous> (index.php?route=checkout/checkout&language=en-gb:599:5)
    at HTMLSelectElement.dispatch (jquery-3.6.0.min.js:2:43064)
    at HTMLSelectElement.v.handle (jquery-3.6.0.min.js:2:41048)
    at Object.trigger (jquery-3.6.0.min.js:2:71515)
    at HTMLSelectElement.<anonymous> (jquery-3.6.0.min.js:2:72110)
    at Function.each (jquery-3.6.0.min.js:2:3003)
    at S.fn.init.each (jquery-3.6.0.min.js:2:1481)
    at S.fn.init.trigger (jquery-3.6.0.min.js:2:72086)
    at index.php?route=checkout/checkout&language=en-gb:630:2

If we click the “Continue” button in the middle of the process also it is redirecting to the home page, so looks like there are lots of work to be done here.

Admin Section

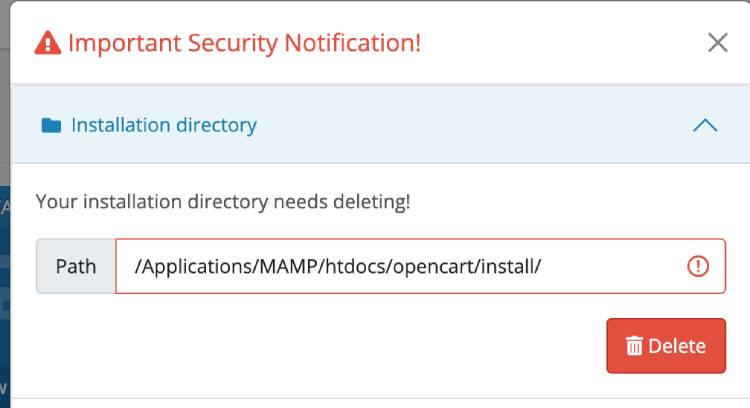
We can say some improvements on security for the normal users also. It identifies that there is an install directory and asks to delete it.

opencart 4 security improvement

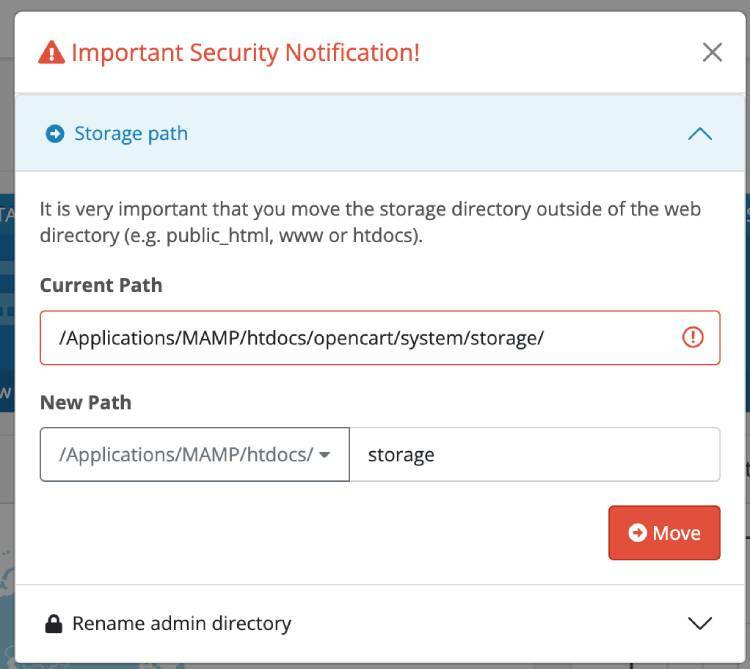
Then, ask to change the Storage path also to a more secure path

opencart storage change

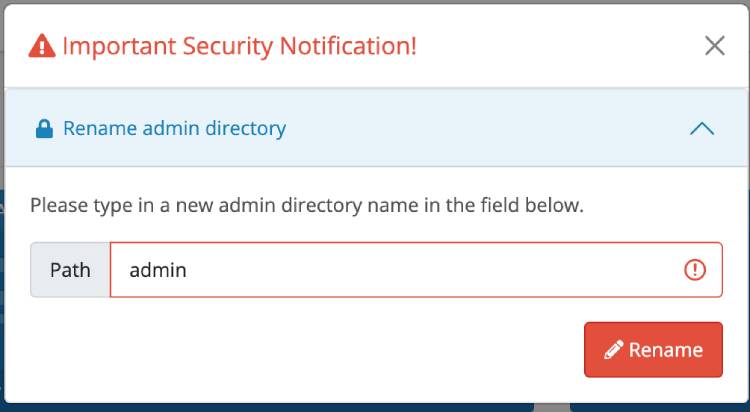
After that, it asks to “Rename admin directory”

Admin Folder rename

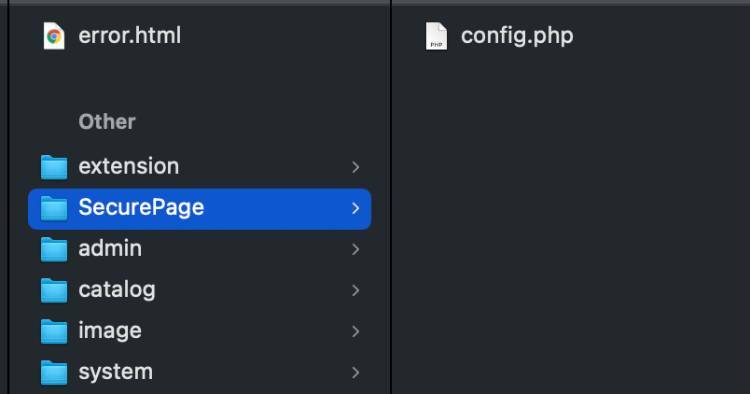
We tried multiple ways to rename it but we are not able to rename it. While checking the folder, we saw the renamed folder with only config.php, so maybe this improvement is also coming. Here we tried to rename it to “SecurePage”.

Admin folder rename

Checking the console log, it is showing a Syntax error like below, so some improvements will be coming soon.

SyntaxError: Unexpected token < in JSON at position 0 OK<b>Warning</b>: file(/Applications/MAMP/htdocs/opencart/supersec/config.php): Failed to open stream: No such file or directory in <b>/Applications/MAMP/htdocs/opencart/admin/controller/common/security.php</b> on line <b>292</b><b>Warning</b>: foreach() argument must be of type array|object, bool given in <b>/Applications/MAMP/htdocs/opencart/admin/controller/common/security.php</b> on line <b>294</b>{“redirect”:”http:\/\/opencart.loc\/\/supersec\/index.php?route=common\/security|delete&user_token=334b0bdb74d0cf8f4badafe6fa32555a”}

We are not able to rename the folder for now, as we like to explore more so we cancel it and keep on checking the left menu items.

Categories:

Now SEO URL is a required field and it checks whether is unique or not, others are just some design changes

Products

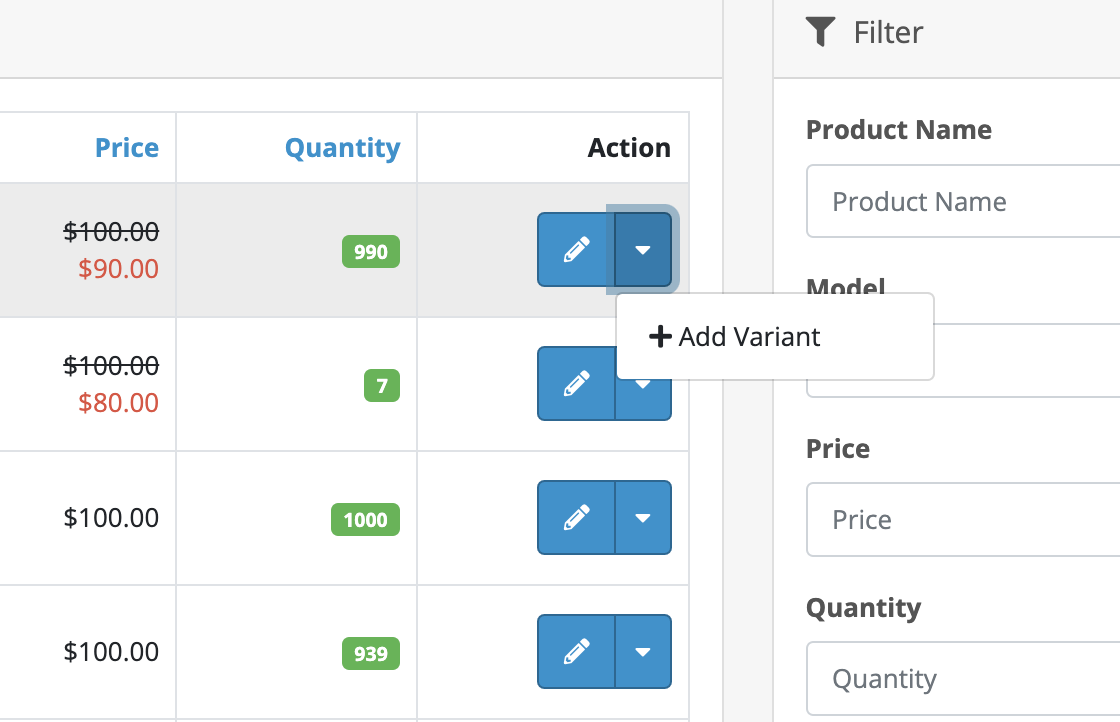
You can now Add Variant

Please note because this is a variant product you must override the master product data. Otherwise, the data will get replaced with the master product data when saved. It did one better than the other carts. The other carts only produce variants with options. With the Opencart version, you can change everything including name, description, etc.

Subscription Plan

 The Subscription Plan is added as a Recurring Profile

Settings

  • Currency Rate Engine is added, so we believe it will remove the hassles to keep on changing the exchange rate of the currencies, very very helpful for multi-currencies shop/stores
  • Timezone setting is also added, now we can set the timezone directly from the admin

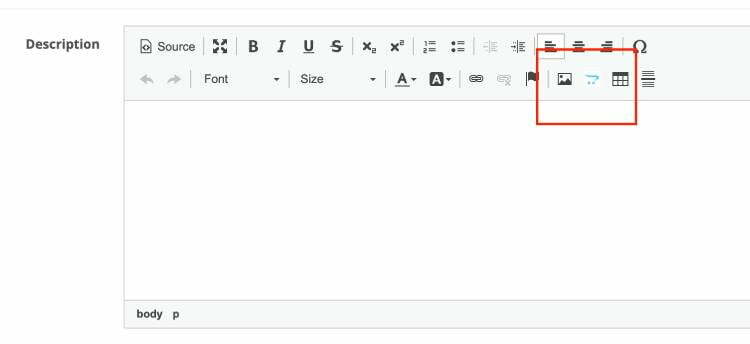
CKeditor changes

Now you can add the images that you uploaded to the Opencart. Click the Opencart icon and add images that you uploaded in the Opencart admin.

ck editor changes

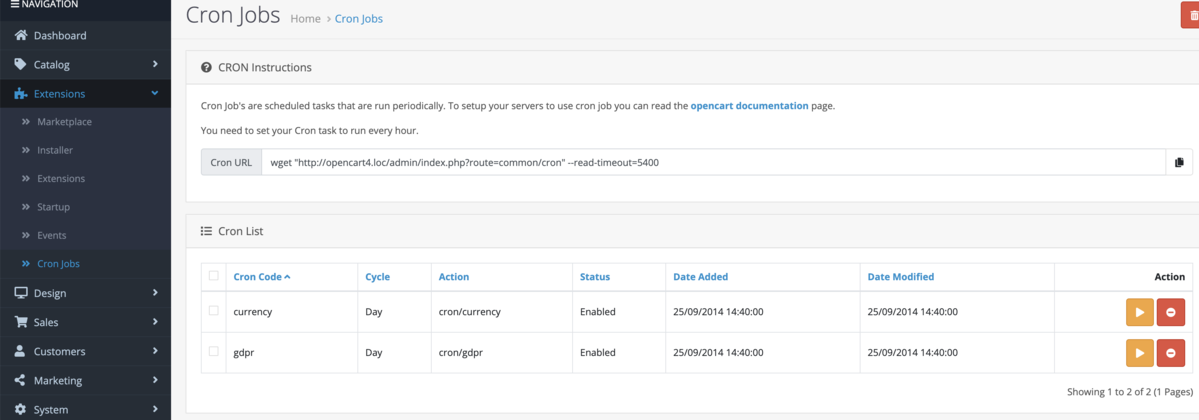
Corn Jobs

The corn Job section is added in the admin.

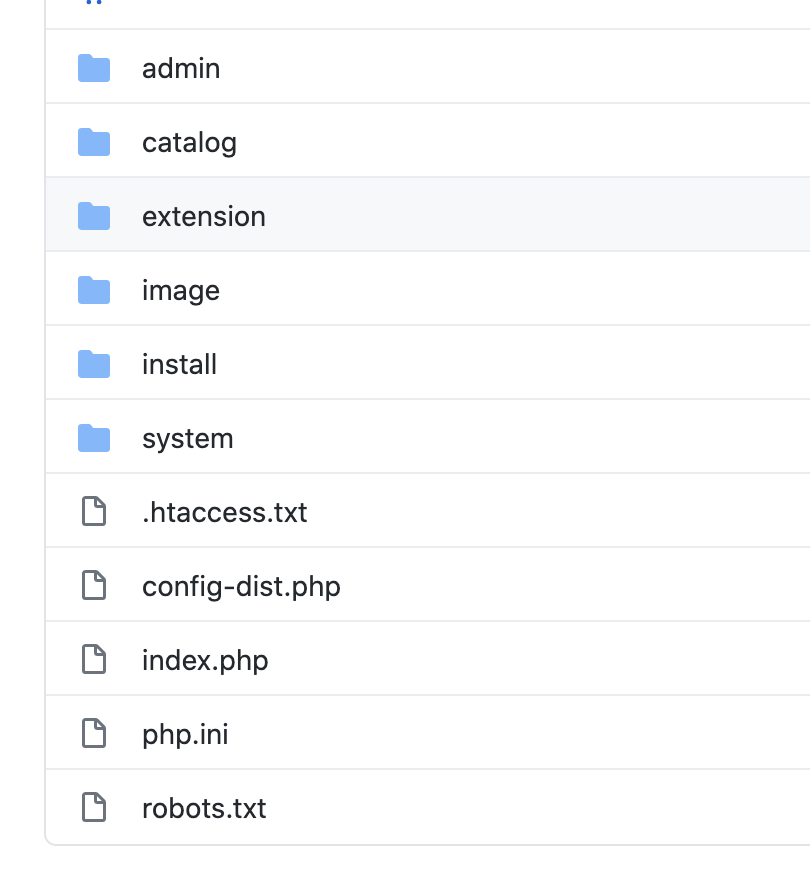
Code folder structure changed

The folder structure is changed. The extensions folder is at the root level.

The extension of both the admin and catalog folder will remain in the extension folder.

Folder Structure change in Opencart 4

Code and framework used and changed

It started using Bootstrap 5, the most popular framework for building responsive, mobile-first sites, a new event-based extension system, a CRON job page, Product variants, Cookie accept the policy, an admin notification system, a reports system, a system to download and add core extensions directly to the extension pages and many more.

Likewise using the latest jQuery version 3.6+.

Using Font Awesome Free 5.15.4

Looking at common.js

  • Chain ajax calls
  • Autocomplete
  • Upload
  • Forms submission code
  • Cookies policy
  • Terms and conditions agreed on code
  • Product grid – list or grid view 
  • Menu dropdown
  • Search input in the header
  • Currency change
  • Tooltip functionalities
  • Get URL parameters – did not see it is used anywhere but looks like a good start

For now, better don’t install Opencart 4.0 for your production website better wait for a stable release. There are a lot of changes in the module files and folder structures so if you are using a lot of external modules then wait for those plugin releases as well, as Opencart 3 or 2 version module does not support Opencart 4 as Opencart 4 doesn’t use OCMOD any more.

These are just our first glance of the Opencart 4, we are working on improving this and creating better developer and user-focused content for Opencart 4, so keep in touch with us on our Twitter account @rupaknpl and subscribe to our youtube channel Opencart tutorials. Similarly, keep on visiting my personal blog where you will find lots of free modules and in our next post we will come up with code changes in Opencart 4.

Opencart news ticker module free download – Opencart version 3.0.3.1

Newsticker is the Opencart free module that shows lines as the ticker and we can show wherever module can be shown, this is a free Opencart extension which a title/link scroller that creates nice titles showcase. Click here for Opencart 2 version

INSTALLATION:

  1. Download the module
  2. Extract the zip file or Unzip the downloaded file.
  3. Upload the admin, catalog and system folders which are inside “newsticker-opencart-3-free-module.ocmod_/” folder to your server respective folder
  4. Upload the files and folder to your OpenCart root folder.
  5. After successful upload, go to Extensions>> Modification and click the log tab and see if some errors are showing if the error shows then you have to solve it first.
  6. If no error click the refresh button
  7. You are all set.
  8. Enjoy the free module.

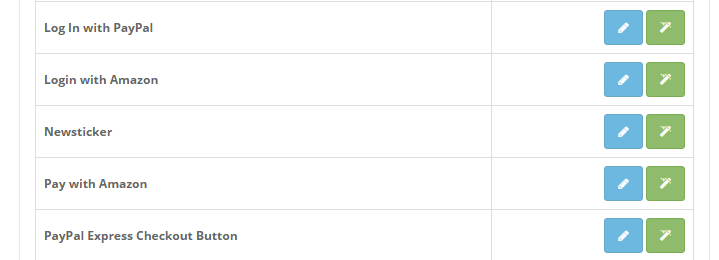
If you see the module listed then you are set, now install the module.

newsticker module listing

Another with the installation of newsticker.ocmod.xml you will see “NewsTicker” on the left menu.

newsticker module at left menu

If you see these two things then you have installed your files and folder properly.  Now time to configure the module.

First, we install the module, install the database, then insert data of newsticker, then add the module and insert data to the module and configure at layouts to show an information page.

Install the NewsTicker Module:

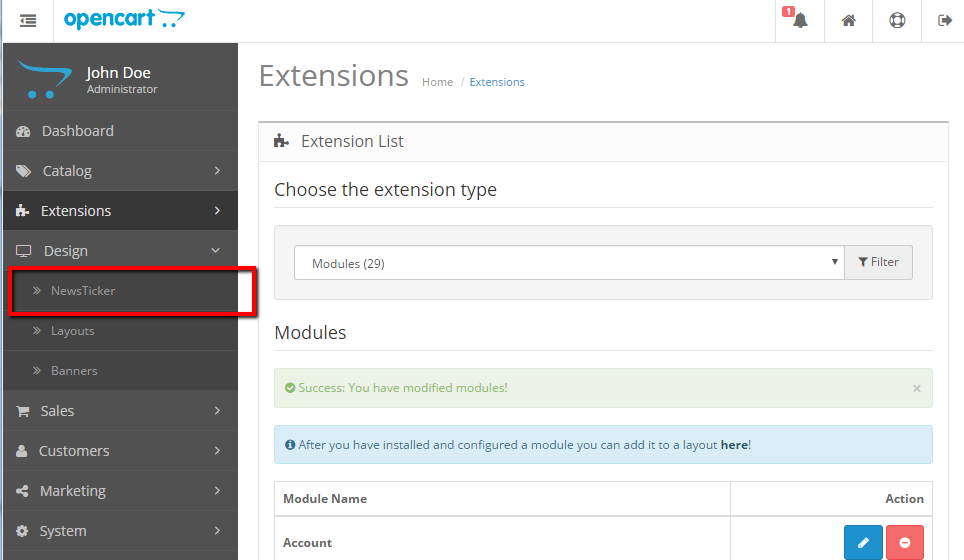
Go to Extensions >> Extensions >> Choose Modules in Extension Type >> In NewsTicker Module click Install button. Then click the edit button.

Database Installation:

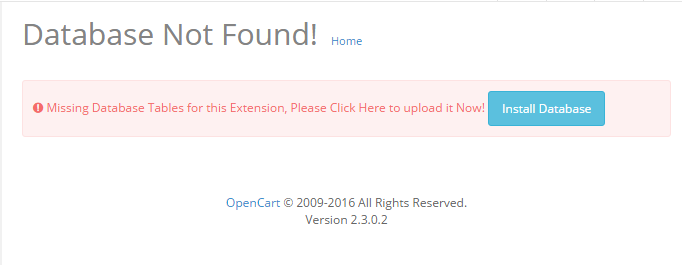
database table missing

At the start of the module edit, you will see the following instruction to install the Database.

When you clicked the Install Database then your database table is installed.

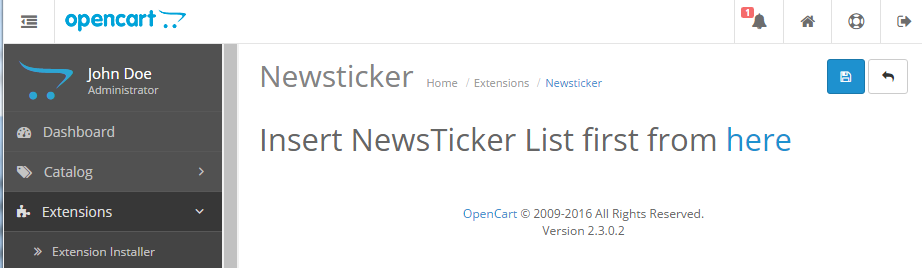
Now when you go to Extensions >> Extensions >> Choose Modules in Extension Type >> In NewsTicker Module click Edit button. Then you will see like below:

newsticker list instruction

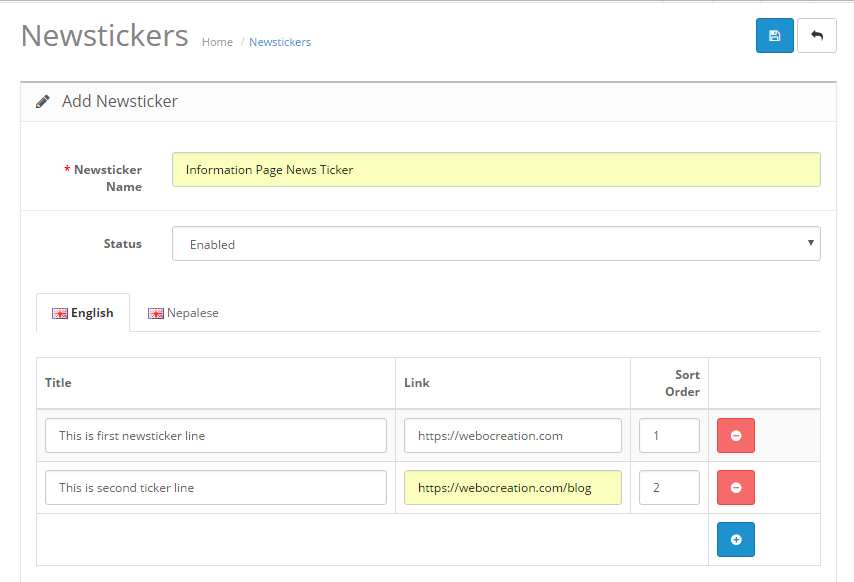
Click on the “here”. It will take you to a place to insert the news ticker. We made it like this so that we can add many news tickers to different places as needed.

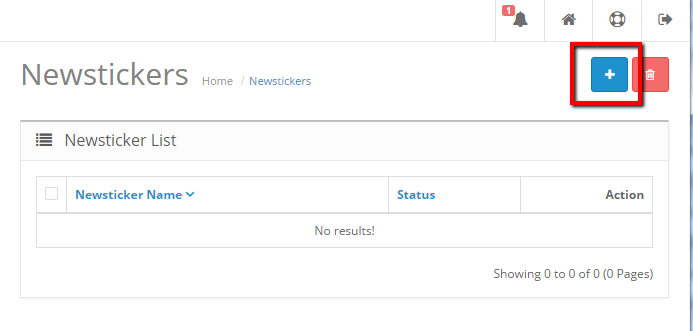
adding newsticker list

Now click on the add button.

inserting-newsticker-list

By filling out the above form click save.

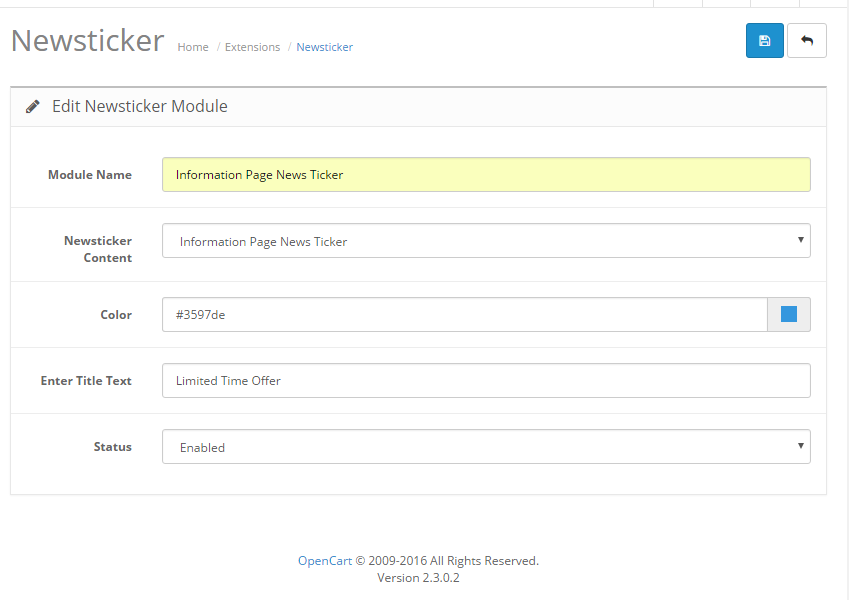
Configuration of the NewsTicker Module:

Now again go to Extensions >> Extensions >> Choose Modules in Extension Type >> In NewsTicker Module click Edit button

newsticker module configuration

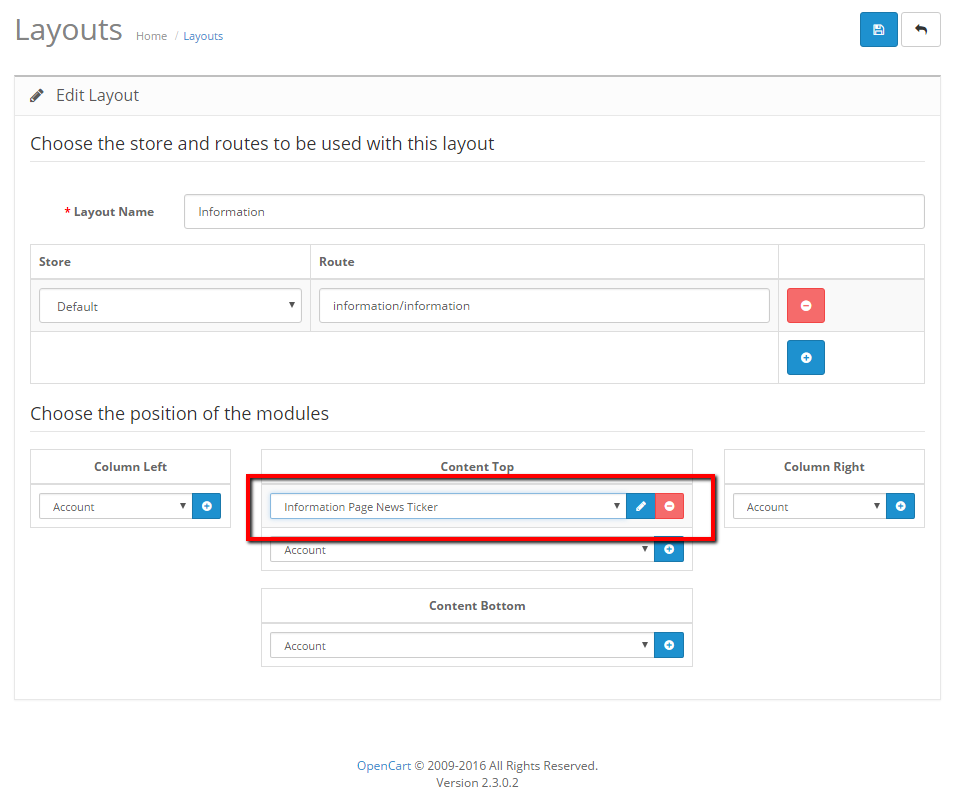
Configuring layout of NewsTicker to show at Information Page:

Go to Design >> Layouts >> Edit Information from the list >>

layout section newsticker module

Click the add button at the Content Top layout, then choose “Information Page News Ticker” from the dropdown. Then click Save.

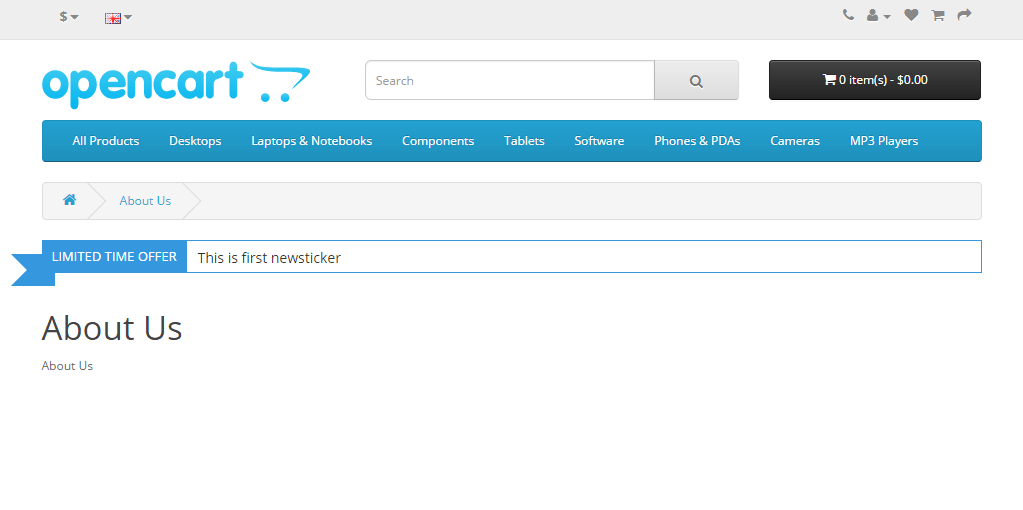
Front end or Presentation section to see the NewsTicker Module. Go to About us page of Information pages. Then you will see as follows:

newsticker opencart module free

You are set to show NewsTicker on the information page. Likewise, you can show different layouts and positions on different pages.

FEATURES:

  • Displays news ticker on any page and position.
  • All features that modules need to have.
  • Sentences or news can be inserted from the admin section.
  • Compatible with all major browsers (Firefox, IE8, Safari, Chrome, and Opera).
  • Tested with the Opencart version 2.3.0.1 only with the default theme.
  • Easy installation I think.
  • OCOMD / vQmod support

Demo:

https://webocreation.com/nepalbuddha/

How to insert the news or sentence?

Go to Admin >> Design >> NewsTicker and you can insert or edit the existing one. Click plus button to insert the new line you want to show at the NewsTicker module.

Permission Denied!

You do not have permission to access this page, please refer to your system administrator.

Go to the System >> Users >> User Groups and edit the Top Administrator and then check both design/newsticker and extension/module/newsticker in both Access Permission and Modify Permission:

Permission Denied!

Then you are set.

Enjoy the free OpenCart modules!

Search terms:

scroll text module in opencart, show text at the top on opencart, jquery web ticker module for opencart, jquery marquee module in opencart, jquery scroller module for opencart,

Cookie bar for OpenCart Store Free Module for Version 2.3.0.2 and 3.0.3.8

OpenCart cookiefy module is another free module from webocreation.com where it will show the cookie bar when the site loads for the first time and if selected yes, then it will not show, if selected none or no then it keeps on showing. As the EU Cookie law states, site owners have to inform visitors about their usage of cookies. It was created to save and protect the privacy of site visitors. I have tested this module only for 2.3.0.2 and 3.0.3.8

Steps to install “Cookiefy” Opencart module for free:

  • Download the module
    Download OpenCart Version 2.3.0.2 Cookiefy Module
    Download Opencart Version 3.0.3.8 Cookiefy Module

    For Opencart 2
  • Extract the zip file.
  • Upload the admin folder which is inside the “Upload” folder to your server “admin” folder

    Opencart 3
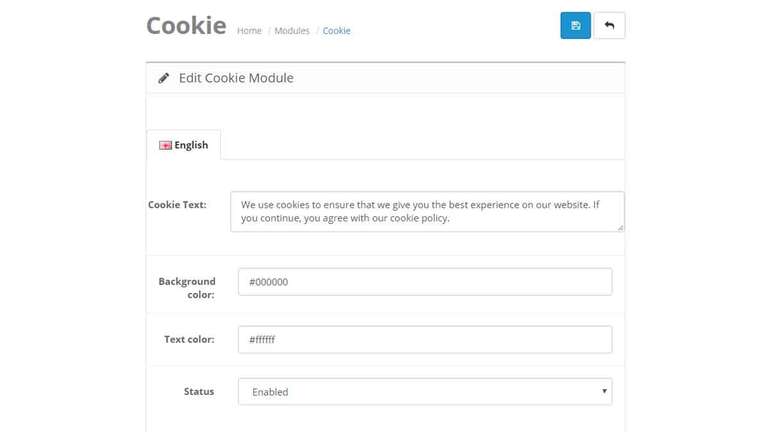
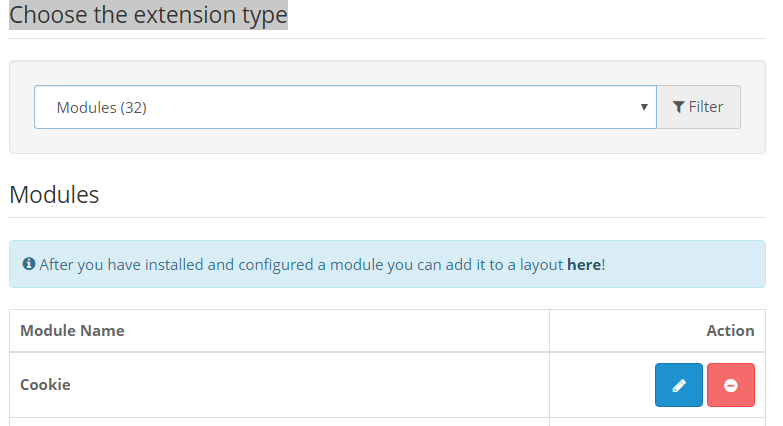
  • Now login to admin section then go to Extensions>> Extensions >> Choose the extension type >> Modules >> Then install the Cookie Module
    Cookie in Opencart
  • After installation, edit the Cookie Module and then enter your preferences:
  • Save it.
  • Go to Extensions >> Extension Installer >> where you upload the cookiefy.install.ocmod.xml if you see any error then see how to solve the Ocmod installation error.
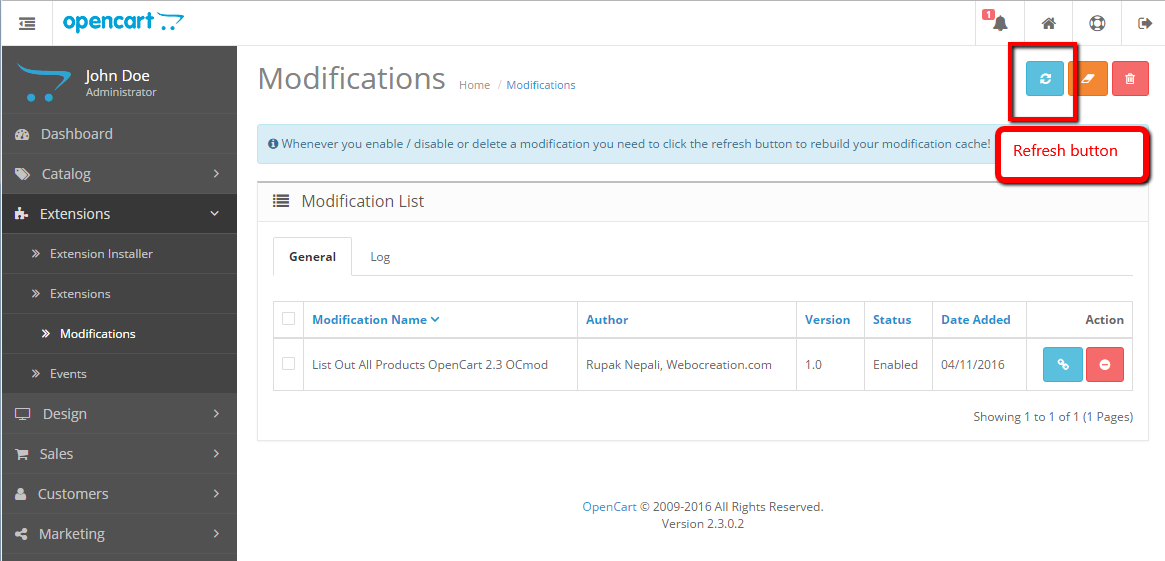
  • After successful installation, go to Extensions>> Modification and click the log tab and see if some errors are showing, if the error shows then you have to solve it first.
  • If no error click the refresh button
  • You are all set.
  • If you have multiple languages then you have to translate the admin/language/en-gb/extension/module/cookie.php and place it into admin/language/YOURLANGUAGEFOLDER/extension/module
  • Enjoy the free module.

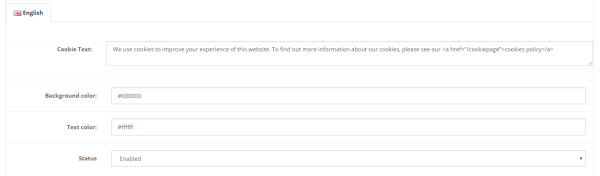
If you want to add the link to the cookie text then use some <a href=”YourLink”>Text</a>

Opencart Cookie

That output is as below:

Cookie bar in Opencart

Benefits of using jquery.cookiefy

  • Simple to understand.
  • Easy to customize.
  • Lightweight: just 4 kb in total.
  • Create and customize your EU cookie law warning in just a few minutes.

What is jquery.cookiefy?

If you are using cookies on your website, you have to inform them about your usage of cookies. jquery.cookiefy helps you fulfill the restrictions of the new EU cookie law. You only have to adust the predefined parameters to your custom needs.
All JavaScript credits go to https://kmarryo.github.io/jquery.cookiefy/

Try it, let me your experience and your suggestions to improve it. Hope you liked this post, let us know if you have any questions or suggestions, please subscribe to our YouTube Channel for Opencart video tutorials and get more Opencart free extensions. You can also find us on Twitter and Facebook. Enjoy!

Copy active URL to the clipboard in 2022 using the clipboard, without execCommand

Simple JavaScript functionality OnClick event to copy a current link by clicking the image or icon and show the tooltips message saying “Link copied”.

As the document.execCommand(‘copy’); is depreciated, its replacement is navigator.clipboard.writeText, so you can copy the current URL to clipboard with following JavaScript:

navigator.clipboard.writeText(window.location.href);

How to show the message “Link Copied” after the click?

The simple JavaScript code to show the Link Copied message after the click is:

navigator.clipboard.writeText(window.location.href);this.insertAdjacentHTML('afterend', '<div class=linktooltips-container>Link copied</div>');setTimeout(() => { document.querySelectorAll('.linktooltips-container').forEach(el => el.remove()); }, 3000);
Link Copied

How do you copy a URL on a button click?

Full code with HTML CSS and JavaScript for copying the URL on a button click is something like below, here we use SVG icon as the button:

<style>
   .copylink-containter{
       position: absolute;
       top: 50vh;
       padding: 20px;
       z-index: 999999999;
   }
   .linktooltips-container{
       background-color: #030303;
       color: #ffffff;
       padding: 5px 30px;
       border-radius: 10px;
 
   }
</style>
<div class="copylink-containter">
   <a onclick="navigator.clipboard.writeText(window.location.href);this.insertAdjacentHTML('afterend', '<div class=linktooltips-container>Link copied</div>');setTimeout(() => { document.querySelectorAll('.linktooltips-container').forEach(el => el.remove()); }, 3000);" target="_blank">
       <svg width="20" height="20" xmlns="http://www.w3.org/2000/svg" viewBox="0 0 640 512"><path d="M172.5 131.1C228.1 75.51 320.5 75.51 376.1 131.1C426.1 181.1 433.5 260.8 392.4 318.3L391.3 319.9C381 334.2 361 337.6 346.7 327.3C332.3 317 328.9 297 339.2 282.7L340.3 281.1C363.2 249 359.6 205.1 331.7 177.2C300.3 145.8 249.2 145.8 217.7 177.2L105.5 289.5C73.99 320.1 73.99 372 105.5 403.5C133.3 431.4 177.3 435 209.3 412.1L210.9 410.1C225.3 400.7 245.3 404 255.5 418.4C265.8 432.8 262.5 452.8 248.1 463.1L246.5 464.2C188.1 505.3 110.2 498.7 60.21 448.8C3.741 392.3 3.741 300.7 60.21 244.3L172.5 131.1zM467.5 380C411 436.5 319.5 436.5 263 380C213 330 206.5 251.2 247.6 193.7L248.7 192.1C258.1 177.8 278.1 174.4 293.3 184.7C307.7 194.1 311.1 214.1 300.8 229.3L299.7 230.9C276.8 262.1 280.4 306.9 308.3 334.8C339.7 366.2 390.8 366.2 422.3 334.8L534.5 222.5C566 191 566 139.1 534.5 108.5C506.7 80.63 462.7 76.99 430.7 99.9L429.1 101C414.7 111.3 394.7 107.1 384.5 93.58C374.2 79.2 377.5 59.21 391.9 48.94L393.5 47.82C451 6.731 529.8 13.25 579.8 63.24C636.3 119.7 636.3 211.3 579.8 267.7L467.5 380z"/></svg>
   </a>
</div>

In this way, you can copy the active URL on click, as well as please post your questions or comments, or any other easy way that you guys are using. You can follow us at our Twitter account @rupaknpl Facebook page @Webocreation. Subscribe to our YouTube channel for Opencart tutorials, and click to see other eCommerce tips and tricks.

Display all products opencart module for free version 3.0, 3.0.1.1, 3.0.1.2,3.0.1.3

This free Opencart 3.0 module provides the ability to display all products on a page. Download the module, install it, and you will see All Products link in the category top menu at the end.

Steps to install “All Products Show in One Page” opencart 3.0, 3.0.1.1, 3.0.1.2, 3.0.1.3 module free:

Show all products Opencart free module

The folder structure of display all products free OpenCart module:

Files and folders of Show all Products module

To show the “Show All Products” menu and link it to the all products page from the top of the frontend category menu, we set up an Ocmod file (install.xml):

<?xml version="1.0" encoding="utf-8"?>
<modification>
    <name>All Product Show</name>
    <version>3.0</version>
    <author>Rupak Nepali</author>
    <link>https://webocreation.com</link>
    <code>webocreation_all_products_show</code>
    <description>Show all Products in a Page frontend</description>
    <file path="catalog/view/theme/*/template/common/menu.twig">
        <operation>
            <search><![CDATA[{% for category in categories %}]]></search>
            <add position="before"><![CDATA[
                <li><a href="{{ allproductsurl }}">{{ text_heading_title }}</a></li>
            ]]></add>
        </operation>
    </file>
    <file path="catalog/controller/common/menu.php">
        <operation>
            <search><![CDATA[$data['categories'] = array();]]></search>
            <add position="before"><![CDATA[
                $data['allproductsurl']=$this->url->link('product/allproduct');
                $this->load->language('product/allproduct');
                $data['text_heading_title']=$this->language->get('text_heading_title');
            ]]></add>
        </operation>
    </file>
</modification>

Controller of Show all products free module catalog\controller\product\allproduct.php

<?php
class ControllerProductAllproduct extends Controller
{
  public function index()
  {
    $this->load->language('product/allproduct');
    $this->load->model('catalog/product');
    $this->load->model('tool/image');
    if (isset($this->request->get['filter'])) {
      $filter = $this->request->get['filter'];
    } else {
      $filter = '';
    }
    if (isset($this->request->get['sort'])) {
      $sort = $this->request->get['sort'];
    } else {
      $sort = 'p.sort_order';
    }
    if (isset($this->request->get['order'])) {
      $order = $this->request->get['order'];
    } else {
      $order = 'ASC';
    }
    if (isset($this->request->get['page'])) {
      $page = $this->request->get['page'];
    } else {
      $page = 1;
    }
    if (isset($this->request->get['limit'])) {
      $limit = (int) $this->request->get['limit'];
    } else {
      $limit = $this->config->get('theme_' . $this->config->get('config_theme') . '_product_limit');
    }
    $data['breadcrumbs'] = array();
    $data['breadcrumbs'][] = array(
      'text' => $this->language->get('text_home'),
      'href' => $this->url->link('common/home')
    );
    $this->document->setTitle($this->language->get('text_title'));
    $this->document->setDescription($this->language->get('text_description'));
    $this->document->setKeywords($this->language->get('text_keywords'));
    $data['heading_title'] = $this->language->get('text_heading_title');
    $data['text_compare'] = sprintf($this->language->get('text_compare'), (isset($this->session->data['compare']) ? count($this->session->data['compare']) : 0));
    // Set the last allproduct breadcrumb
    $data['breadcrumbs'][] = array(
      'text' => 'Show All Products',
      'href' => $this->url->link('product/allproduct')
    );
    $data['compare'] = $this->url->link('product/compare');
    $url = '';
    if (isset($this->request->get['filter'])) {
      $url .= '&filter=' . $this->request->get['filter'];
    }
    if (isset($this->request->get['sort'])) {
      $url .= '&sort=' . $this->request->get['sort'];
    }
    if (isset($this->request->get['order'])) {
      $url .= '&order=' . $this->request->get['order'];
    }
    if (isset($this->request->get['limit'])) {
      $url .= '&limit=' . $this->request->get['limit'];
    }
    $data['products'] = array();
    $filter_data = array(
      'filter_filter'      => $filter,
      'sort'               => $sort,
      'order'              => $order,
      'start'              => ($page - 1) * $limit,
      'limit'              => $limit
    );
    $product_total = $this->model_catalog_product->getTotalProducts($filter_data);
    $results = $this->model_catalog_product->getProducts($filter_data);
    foreach ($results as $result) {
      if ($result['image']) {
        $image = $this->model_tool_image->resize($result['image'], $this->config->get('theme_' . $this->config->get('config_theme') . '_image_product_width'), $this->config->get('theme_' . $this->config->get('config_theme') . '_image_product_height'));
      } else {
        $image = $this->model_tool_image->resize('placeholder.png', $this->config->get('theme_' . $this->config->get('config_theme') . '_image_product_width'), $this->config->get('theme_' . $this->config->get('config_theme') . '_image_product_height'));
      }
      if ($this->customer->isLogged() || !$this->config->get('config_customer_price')) {
        $price = $this->currency->format($this->tax->calculate($result['price'], $result['tax_class_id'], $this->config->get('config_tax')), $this->session->data['currency']);
      } else {
        $price = false;
      }
      if ((float) $result['special']) {
        $special = $this->currency->format($this->tax->calculate($result['special'], $result['tax_class_id'], $this->config->get('config_tax')), $this->session->data['currency']);
      } else {
        $special = false;
      }
      if ($this->config->get('config_tax')) {
        $tax = $this->currency->format((float) $result['special'] ? $result['special'] : $result['price'], $this->session->data['currency']);
      } else {
        $tax = false;
      }
      if ($this->config->get('config_review_status')) {
        $rating = (int) $result['rating'];
      } else {
        $rating = false;
      }
      $data['products'][] = array(
        'product_id'  => $result['product_id'],
        'thumb'       => $image,
        'name'        => $result['name'],
        'description' => utf8_substr(trim(strip_tags(html_entity_decode($result['description'], ENT_QUOTES, 'UTF-8'))), 0, $this->config->get('theme_' . $this->config->get('config_theme') . '_product_description_length')) . '..',
        'price'       => $price,
        'special'     => $special,
        'tax'         => $tax,
        'minimum'     => $result['minimum'] > 0 ? $result['minimum'] : 1,
        'rating'      => $result['rating'],
        'href'        => $this->url->link('product/product', '&product_id=' . $result['product_id'] . $url)
      );
    }
    $url = '';
    if (isset($this->request->get['filter'])) {
      $url .= '&filter=' . $this->request->get['filter'];
    }
    if (isset($this->request->get['limit'])) {
      $url .= '&limit=' . $this->request->get['limit'];
    }
    $data['sorts'] = array();
    $data['sorts'][] = array(
      'text'  => $this->language->get('text_default'),
      'value' => 'p.sort_order-ASC',
      'href'  => $this->url->link('product/allproduct',  '&sort=p.sort_order&order=ASC' . $url)
    );
    $data['sorts'][] = array(
      'text'  => $this->language->get('text_name_asc'),
      'value' => 'pd.name-ASC',
      'href'  => $this->url->link('product/allproduct',  '&sort=pd.name&order=ASC' . $url)
    );
    $data['sorts'][] = array(
      'text'  => $this->language->get('text_name_desc'),
      'value' => 'pd.name-DESC',
      'href'  => $this->url->link('product/allproduct',  '&sort=pd.name&order=DESC' . $url)
    );
    $data['sorts'][] = array(
      'text'  => $this->language->get('text_price_asc'),
      'value' => 'p.price-ASC',
      'href'  => $this->url->link('product/allproduct',  '&sort=p.price&order=ASC' . $url)
    );
    $data['sorts'][] = array(
      'text'  => $this->language->get('text_price_desc'),
      'value' => 'p.price-DESC',
      'href'  => $this->url->link('product/allproduct',  '&sort=p.price&order=DESC' . $url)
    );
    if ($this->config->get('config_review_status')) {
      $data['sorts'][] = array(
        'text'  => $this->language->get('text_rating_desc'),
        'value' => 'rating-DESC',
        'href'  => $this->url->link('product/allproduct',  '&sort=rating&order=DESC' . $url)
      );
      $data['sorts'][] = array(
        'text'  => $this->language->get('text_rating_asc'),
        'value' => 'rating-ASC',
        'href'  => $this->url->link('product/allproduct',  '&sort=rating&order=ASC' . $url)
      );
    }
    $data['sorts'][] = array(
      'text'  => $this->language->get('text_model_asc'),
      'value' => 'p.model-ASC',
      'href'  => $this->url->link('product/allproduct',  '&sort=p.model&order=ASC' . $url)
    );
    $data['sorts'][] = array(
      'text'  => $this->language->get('text_model_desc'),
      'value' => 'p.model-DESC',
      'href'  => $this->url->link('product/allproduct',  '&sort=p.model&order=DESC' . $url)
    );
    $url = '';
    if (isset($this->request->get['filter'])) {
      $url .= '&filter=' . $this->request->get['filter'];
    }
    if (isset($this->request->get['sort'])) {
      $url .= '&sort=' . $this->request->get['sort'];
    }
    if (isset($this->request->get['order'])) {
      $url .= '&order=' . $this->request->get['order'];
    }
    $data['limits'] = array();
    $limits = array_unique(array($this->config->get('theme_' . $this->config->get('config_theme') . '_product_limit'), 25, 50, 75, 100));
    sort($limits);
    foreach ($limits as $value) {
      $data['limits'][] = array(
        'text'  => $value,
        'value' => $value,
        'href'  => $this->url->link('product/allproduct',  $url . '&limit=' . $value)
      );
    }
    $url = '';
    if (isset($this->request->get['filter'])) {
      $url .= '&filter=' . $this->request->get['filter'];
    }
    if (isset($this->request->get['sort'])) {
      $url .= '&sort=' . $this->request->get['sort'];
    }
    if (isset($this->request->get['order'])) {
      $url .= '&order=' . $this->request->get['order'];
    }
    if (isset($this->request->get['limit'])) {
      $url .= '&limit=' . $this->request->get['limit'];
    }
    $pagination = new Pagination();
    $pagination->total = $product_total;
    $pagination->page = $page;
    $pagination->limit = $limit;
    $pagination->url = $this->url->link('product/allproduct',  $url . '&page={page}');
    $data['pagination'] = $pagination->render();
    $data['results'] = sprintf($this->language->get('text_pagination'), ($product_total) ? (($page - 1) * $limit) + 1 : 0, ((($page - 1) * $limit) > ($product_total - $limit)) ? $product_total : ((($page - 1) * $limit) + $limit), $product_total, ceil($product_total / $limit));
    // http://googlewebmastercentral.blogspot.com/2011/09/pagination-with-relnext-and-relprev.html
    if ($page == 1) {
      $this->document->addLink($this->url->link('product/allproduct'), 'canonical');
    } else {
      $this->document->addLink($this->url->link('product/allproduct', '&page=' . $page), 'canonical');
    }
    if ($page > 1) {
      $this->document->addLink($this->url->link('product/allproduct', (($page - 2) ? '&page=' . ($page - 1) : '')), 'prev');
    }
    if ($limit && ceil($product_total / $limit) > $page) {
      $this->document->addLink($this->url->link('product/allproduct', '&page=' . ($page + 1)), 'next');
    }
    $data['sort'] = $sort;
    $data['order'] = $order;
    $data['limit'] = $limit;
    $data['continue'] = $this->url->link('common/home');
    $data['column_left'] = $this->load->controller('common/column_left');
    $data['column_right'] = $this->load->controller('common/column_right');
    $data['content_top'] = $this->load->controller('common/content_top');
    $data['content_bottom'] = $this->load->controller('common/content_bottom');
    $data['footer'] = $this->load->controller('common/footer');
    $data['header'] = $this->load->controller('common/header');
    $this->response->setOutput($this->load->view('product/allproduct', $data));
  }
}

Language file of the show all products module OpenCart version 3.0.*.*. If you want to change text or words then you can change here.

<?php
// Text
$_['text_refine']       = 'Refine Search';
$_['text_product']      = 'Products';
$_['text_error']        = 'Category not found!';
$_['text_empty']        = 'There are no products to list in this category.';
$_['text_quantity']     = 'Qty:';
$_['text_manufacturer'] = 'Brand:';
$_['text_model']        = 'Product Code:';
$_['text_points']       = 'Reward Points:';
$_['text_price']        = 'Price:';
$_['text_tax']          = 'Ex Tax:';
$_['text_compare']      = 'Product Compare (%s)';
$_['text_sort']         = 'Sort By:';
$_['text_default']      = 'Default';
$_['text_name_asc']     = 'Name (A - Z)';
$_['text_name_desc']    = 'Name (Z - A)';
$_['text_price_asc']    = 'Price (Low > High)';
$_['text_price_desc']   = 'Price (High > Low)';
$_['text_rating_asc']   = 'Rating (Lowest)';
$_['text_rating_desc']  = 'Rating (Highest)';
$_['text_model_asc']    = 'Model (A - Z)';
$_['text_model_desc']   = 'Model (Z - A)';
$_['text_limit']        = 'Show:';
$_['text_title']        = 'Show All Products';
$_['text_description']  = 'Show All Products';
$_['text_keywords']     = 'Show All Products';
$_['text_heading_title']= 'Show All Products';

View file of show all products module OpenCart version 3.0 catalog\view\theme\default\template\product\allproduct.twig

{{ header }}
<div id="product-category" class="container">
  <ul class="breadcrumb">
    {% for breadcrumb in breadcrumbs %}
    <li><a href="{{ breadcrumb.href }}">{{ breadcrumb.text }}</a></li>
    {% endfor %}
  </ul>
  <div class="row">{{ column_left }}
    {% if column_left and column_right %}
    {% set class = 'col-sm-6' %}
    {% elseif column_left or column_right %}
    {% set class = 'col-sm-9' %}
    {% else %}
    {% set class = 'col-sm-12' %}
    {% endif %}
    <div id="content" class="{{ class }}">{{ content_top }}
      <h2>{{ heading_title }}</h2>
      {% if thumb or description %}
      <div class="row"> {% if thumb %}
        <div class="col-sm-2"><img src="{{ thumb }}" alt="{{ heading_title }}" title="{{ heading_title }}" class="img-thumbnail" /></div>
        {% endif %}
        {% if description %}
        <div class="col-sm-10">{{ description }}</div>
        {% endif %} </div>
      <hr>
      {% endif %}
      {% if categories %}
      <h3>{{ text_refine }}</h3>
      {% if categories|length <= 5 %}
      <div class="row">
        <div class="col-sm-3">
          <ul>
            {% for category in categories %}
            <li><a href="{{ category.href }}">{{ category.name }}</a></li>
            {% endfor %}
          </ul>
        </div>
      </div>
      {% else %}
      <div class="row"> {% for category in categories|batch((categories|length / 4)|round(1, 'ceil')) %}
        <div class="col-sm-3">
          <ul>
            {% for category in categories %}
            <li><a href="{{ category.href }}">{{ category.name }}</a></li>
            {% endfor %}
          </ul>
        </div>
        {% endfor %} </div>
      <br />
      {% endif %}
      {% endif %}
      {% if products %}
      <div class="row">
        <div class="col-md-2 col-sm-6 hidden-xs">
          <div class="btn-group btn-group-sm">
            <button type="button" id="list-view" class="btn btn-default" data-toggle="tooltip" title="{{ button_list }}"><i class="fa fa-th-list"></i></button>
            <button type="button" id="grid-view" class="btn btn-default" data-toggle="tooltip" title="{{ button_grid }}"><i class="fa fa-th"></i></button>
          </div>
        </div>
        <div class="col-md-3 col-sm-6">
          <div class="form-group"><a href="{{ compare }}" id="compare-total" class="btn btn-link">{{ text_compare }}</a></div>
        </div>
        <div class="col-md-4 col-xs-6">
          <div class="form-group input-group input-group-sm">
            <label class="input-group-addon" for="input-sort">{{ text_sort }}</label>
            <select id="input-sort" class="form-control" onchange="location = this.value;">
              {% for sorts in sorts %}
              {% if sorts.value == '%s-%s'|format(sort, order) %}
              <option value="{{ sorts.href }}" selected="selected">{{ sorts.text }}</option>
              {% else %}
              <option value="{{ sorts.href }}">{{ sorts.text }}</option>
              {% endif %}
              {% endfor %}
            </select>
          </div>
        </div>
        <div class="col-md-3 col-xs-6">
          <div class="form-group input-group input-group-sm">
            <label class="input-group-addon" for="input-limit">{{ text_limit }}</label>
            <select id="input-limit" class="form-control" onchange="location = this.value;">
              {% for limits in limits %}
              {% if limits.value == limit %}
              <option value="{{ limits.href }}" selected="selected">{{ limits.text }}</option>
              {% else %}
              <option value="{{ limits.href }}">{{ limits.text }}</option>
              {% endif %}
              {% endfor %}
            </select>
          </div>
        </div>
      </div>
      <div class="row"> {% for product in products %}
        <div class="product-layout product-list col-xs-12">
          <div class="product-thumb">
            <div class="image"><a href="{{ product.href }}"><img src="{{ product.thumb }}" alt="{{ product.name }}" title="{{ product.name }}" class="img-responsive" /></a></div>
            <div>
              <div class="caption">
                <h4><a href="{{ product.href }}">{{ product.name }}</a></h4>
                <p>{{ product.description }}</p>
                {% if product.price %}
                <p class="price"> {% if not product.special %}
                  {{ product.price }}
                  {% else %} <span class="price-new">{{ product.special }}</span> <span class="price-old">{{ product.price }}</span> {% endif %}
                  {% if product.tax %} <span class="price-tax">{{ text_tax }} {{ product.tax }}</span> {% endif %} </p>
                {% endif %}
                {% if product.rating %}
                <div class="rating"> {% for i in 1..5 %}
                  {% if product.rating < i %} <span class="fa fa-stack"><i class="fa fa-star-o fa-stack-2x"></i></span> {% else %} <span class="fa fa-stack"><i class="fa fa-star fa-stack-2x"></i><i class="fa fa-star-o fa-stack-2x"></i></span>{% endif %}
                  {% endfor %} </div>
                {% endif %} </div>
              <div class="button-group">
                <button type="button" onclick="cart.add('{{ product.product_id }}', '{{ product.minimum }}');"><i class="fa fa-shopping-cart"></i> <span class="hidden-xs hidden-sm hidden-md">{{ button_cart }}</span></button>
                <button type="button" data-toggle="tooltip" title="{{ button_wishlist }}" onclick="wishlist.add('{{ product.product_id }}');"><i class="fa fa-heart"></i></button>
                <button type="button" data-toggle="tooltip" title="{{ button_compare }}" onclick="compare.add('{{ product.product_id }}');"><i class="fa fa-exchange"></i></button>
              </div>
            </div>
          </div>
        </div>
        {% endfor %} </div>
      <div class="row">
        <div class="col-sm-6 text-left">{{ pagination }}</div>
        <div class="col-sm-6 text-right">{{ results }}</div>
      </div>
      {% endif %}
      {% if not categories and not products %}
      <p>{{ text_empty }}</p>
      <div class="buttons">
        <div class="pull-right"><a href="{{ continue }}" class="btn btn-primary">{{ button_continue }}</a></div>
      </div>
      {% endif %}
      {{ content_bottom }}</div>
    {{ column_right }}</div>
</div>
{{ footer }} 


In this way, we create an Opencart 3 testimonial module’s frontend and show the setting that we entered in the multi-instance module admin section. Similarly, we make a slider of the testimonial module. Hope you liked this post, let us know if you have any questions or suggestions, please subscribe to our YouTube Channel for Opencart video tutorials. You can also find us on Twitter and Facebook. Enjoy!