In this tutorial, we set up Cloudflare CDN for eCommerce websites like Opencart, three steps are: first create a Cloudflare account, add a website domain in the Cloudflare dashboard, and change the DNS records of your domain. We show you how to fix the SSL issues that we face in Cloudflare, how to connect FTP after Cloudflare is set up, and finally how to log the real visitors’ IP than the Cloudflare IP.
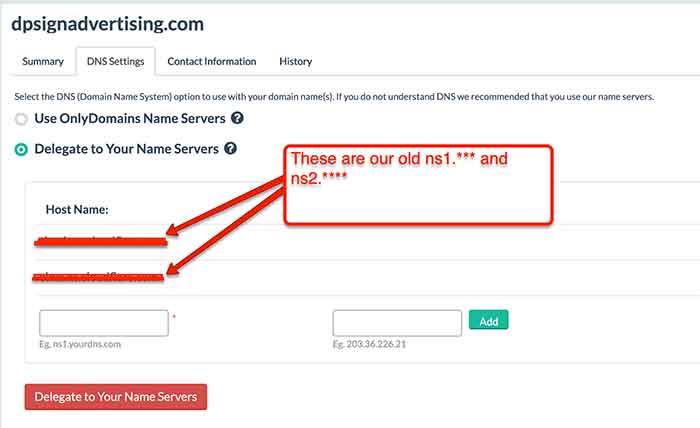
Let’s take an example of https://dpsignadvertising.com where we install Opencart, register this domain at onlydomains.com, and delegate to name servers:
It is similar in your DNS settings also, mostly we point to servers ns1 and ns2.
If you were following the steps while registering an account then it will directly take you to add the site.
Log in to your Cloudflare account.
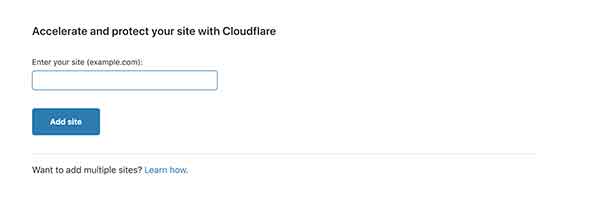
Click on Add Site from the top navigation bar.
Enter your website URL and then click “Add Site”.
Then you need to select the plan as per your need, we are using a free plan, select the free plan and click “Confirm plan”
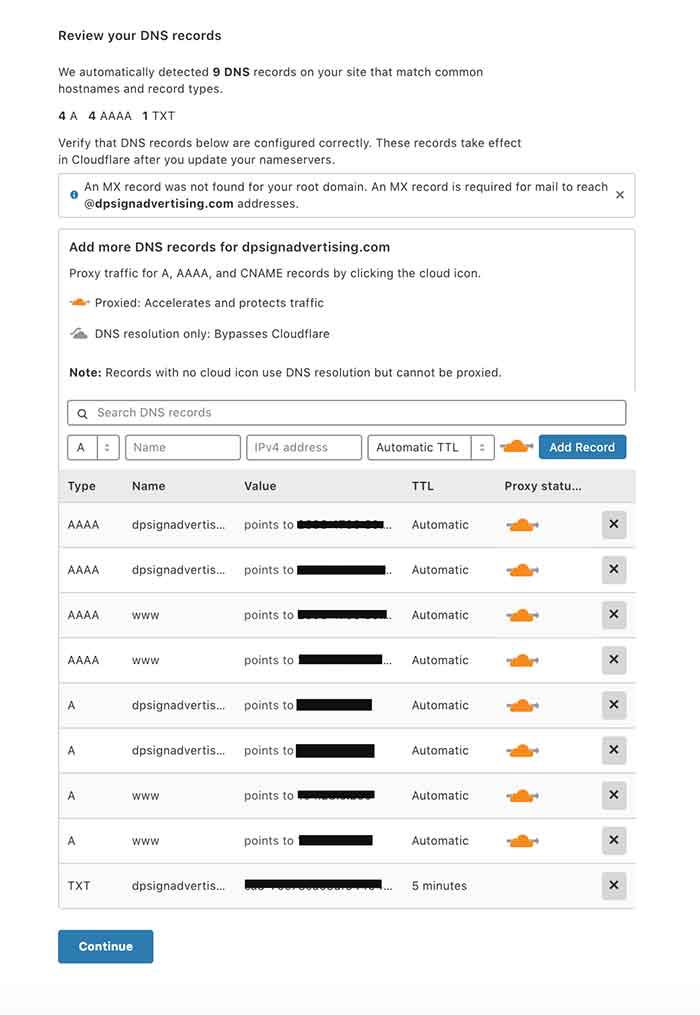
Now Cloudflare attempts to automatically identify your DNS records and shows lists of DNS results, for dpsignadvertising.com it is showing as in the image: Be careful and check for missing DNS records, mostly MX records if you have setup. Then, click Continue.
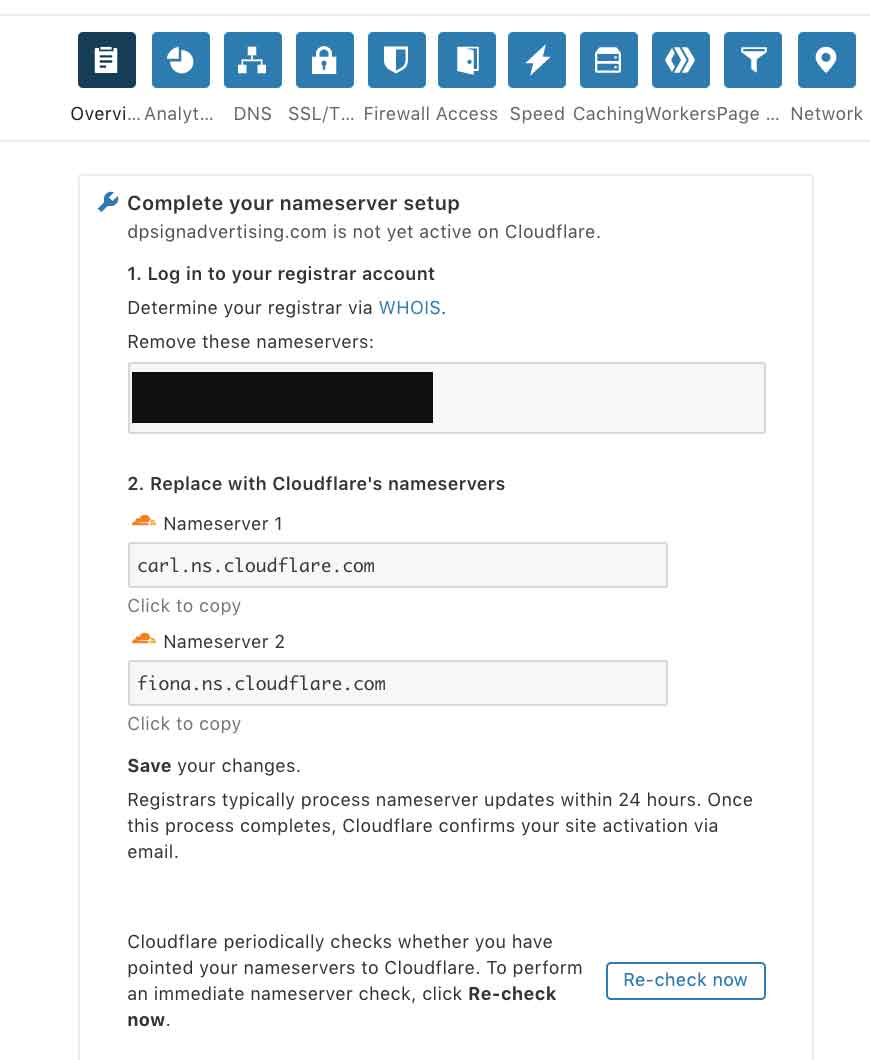
Now you will see like NS records of Cloudflare:
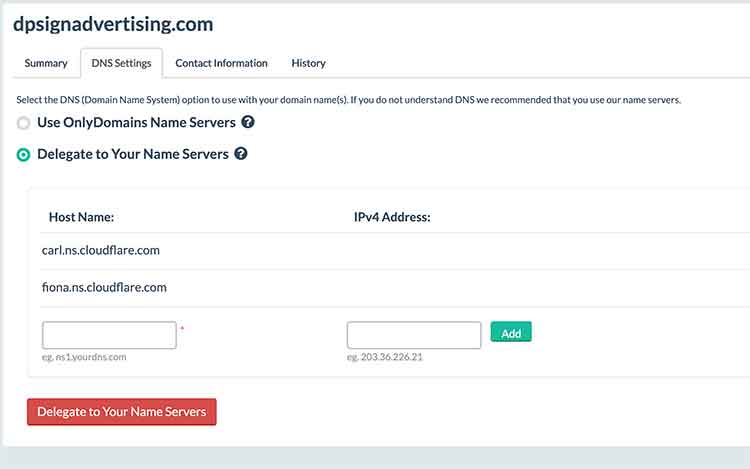
Now login to the domain registrar, in our case is onlydomains.com and we change the NS1 and NS2, now it looks like in the image below:
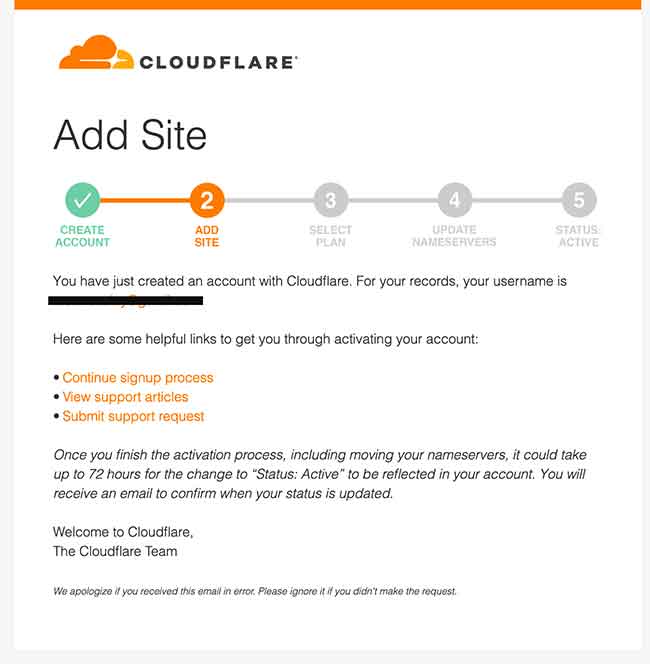
Once you click “Delegate to your Name Servers”, sometimes it takes up to 24hrs to 48hrs, in our case, it was done within 10mins and we receive an email like below:
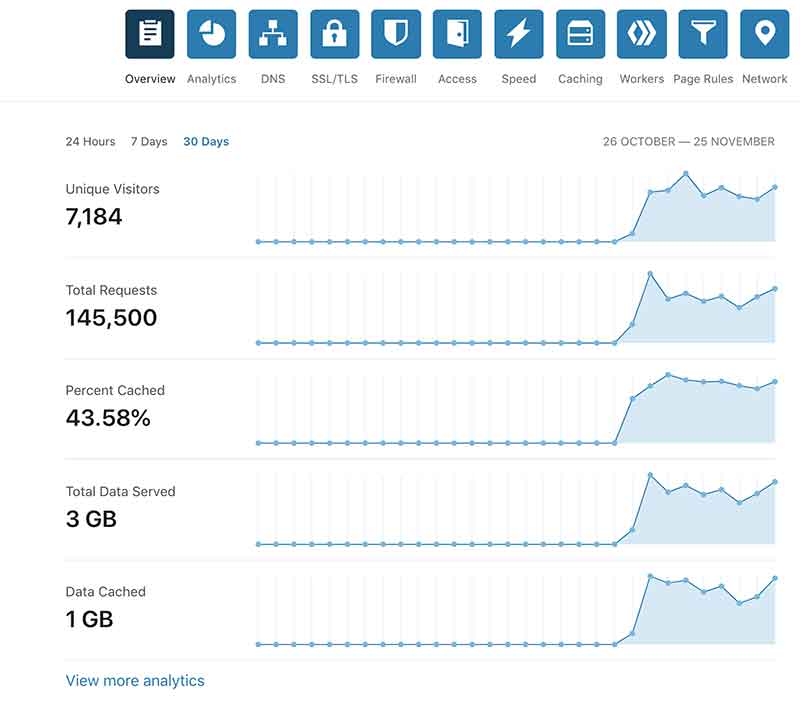
Once you got an email your Cloudflare is active and you can see the active status in the Cloudflare admin. Similarly, you can see the analytics that it is serving.
How to solve the SSL issue of Cloudflare?
Go to Cloudflare Dashboard >> Click SSL/TLS >> Edge Certificates >> Then toggle to ON for “Always Use HTTPS”
Then the SSL issues are resolved.
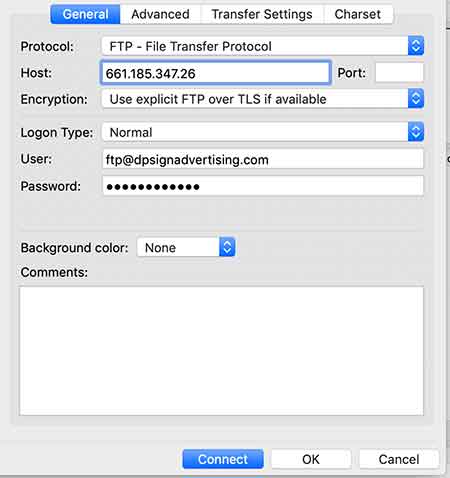
Cloudflare FTP issues?
The solution to FTP Cloudflare issues: With Cloudflare set up, you will not be able to connect to your FTP with the domain name so you need to use the IP of your server. You can find the Cloudflare Dashboard >> DNS >> Then find the FTP IP or your website URL IP.
Get the actual visitors’ IP address than the Cloudflare IP address in Opencart
If you are using Google Analytics then you may see the same Cloudflare IP address that the visitor’s IP address as all IPs are proxied by Cloudflare. Sometimes, the Payment gateway may block all the payments as well as it will see the same IP ordering the products which may create suspicious activities, so to fix that you need to add the following code at top of index.php
if (isset($_SERVER["HTTP_CF_CONNECTING_IP"])) {
  $_SERVER['REMOTE_ADDR'] = $_SERVER["HTTP_CF_CONNECTING_IP"];
}
Cloudflare can be used on any website so it does not stick to Opencart, with the above you can enable Cloudflare on any website. It is the same case for the Opencart, we also installed Cloudflare in our webocreation.com blog and see a good improvement in site speed. You can hire us directly or can hire the top 3% of Freelance Cloudflare Experts.
We hope this helps someone to set up Cloudflare properly and easily in Opencart. Please don’t forget to post your questions or comments so that we can add extra topics. You can follow us at our Twitter account @rupaknpl and subscribe to our YouTube channel for opencart tutorials.
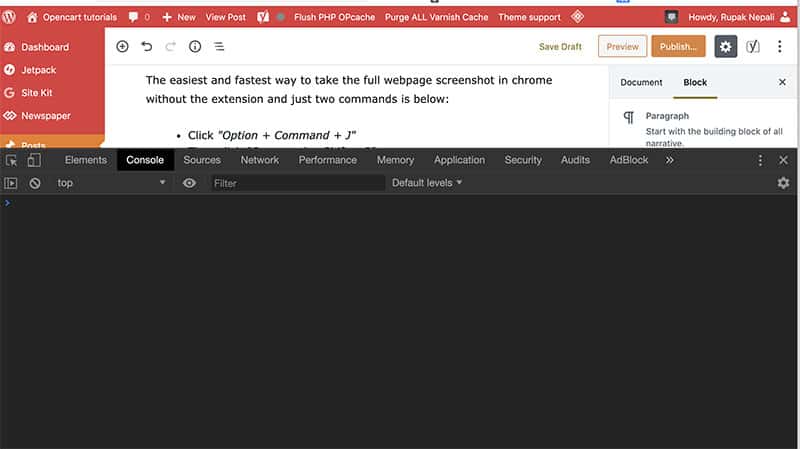
The easiest and fastest way to take the full webpage screenshot in chrome without the extension and just two commands is below:
Click “Option + Command + J”
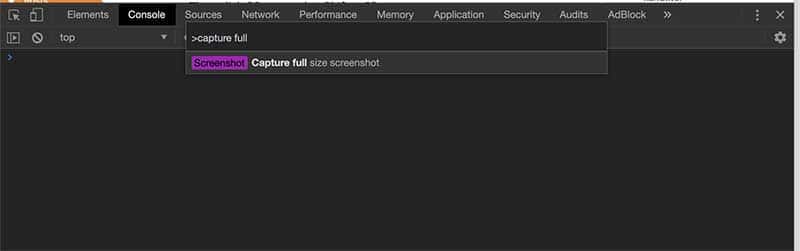
Then click “Command + Shift + P”
Type “Capture full-size screenshot” and click it, your full screenshot will be captured and downloaded
Above is the Mac command, in Windows, it is similar just use Ctrl instead of Command and Alt instead of Option.
When you click the “Option + Command + J” it opens developer console:
Then click “Command + Shift + P” to open the input box and start to type full size to run command and you will see like below:
Click it and your fullscreen webpage is captured and downloaded.
We hope this help someone to take the full page screen capture in chrome easily. Please don’t forget to post your questions or comments so that we can add extra topics. You can follow us at our twitter account @rupaknpl and subscribe to our YouTube channel for opencart tutorials.
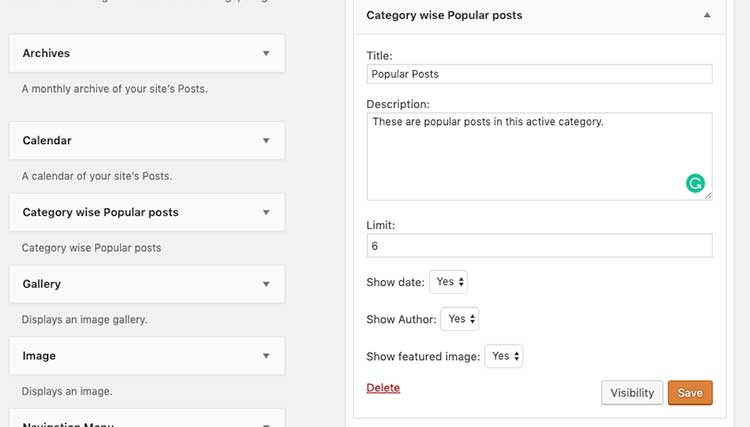
This WordPress plugin “Category Popular Posts” is to show category wise top popular posts in a widget. The widget has options to add a description, limit the number of posts, an option to show date or not, an option to show the author or not, and an option to show the featured image or not.
Download from the above link and got to WordPress admin >> Plugins >> Add Plugin and upload the downloaded zip file “category-popular-posts.zip“.
Then go to Appearance >> Widgets >> Add the “Category wise Popular posts” widgets to the widgets places like in the sidebar.
Settings:
Enter title, if needed description, number of posts to show here in our example it is 6, choose an option Yes or no to show date, author and featured image, click save and done.
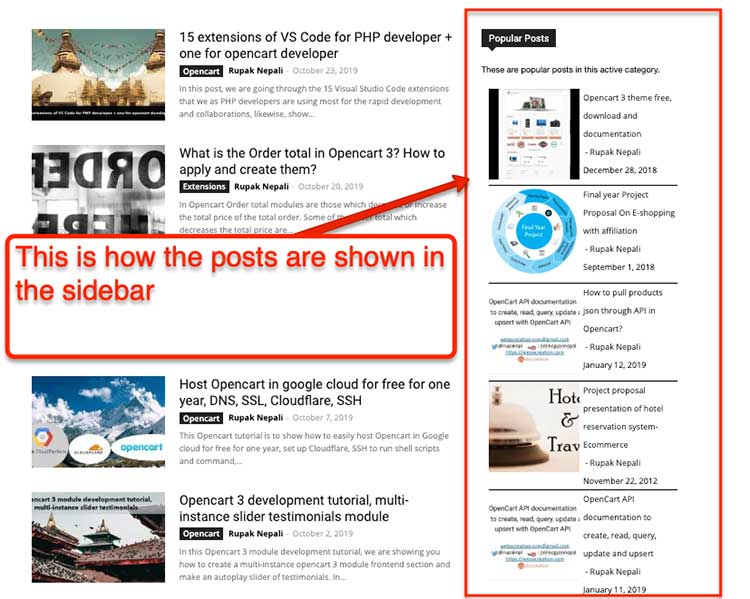
Frontend view:
It displays popular posts of the category in the categories pages, and on the posts page, it displays the popular posts of the active post’s category posts.
CSS change:
You can make the CSS changes for the following CSS classes to match your theme design:
In this post, we are going through the 15 Visual Studio Code extensions that we as PHP developers are using most for the rapid development and collaborations, likewise, show you how to use the Opencart code snippets for rapid development of the Opencart module and themes.
PHP Language Basics
In the extension, search for “@builtin PHP” and enable the “PHP Language Basics” extension. This is the VS Code built-in extension.
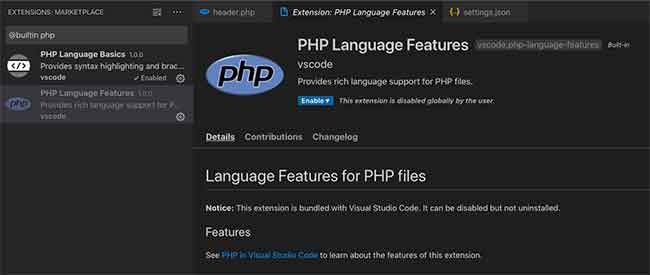
PHP Intelephense
Intelephense is a high-performance PHP language server packed full of essential features for productive PHP development.
To avoid double suggestions better to disable the VS code’s built-in PHP Intellisense by setting:
"php.suggest.basic": false
Or in the extension search for “@builtin PHP” and disable the “PHP Language Features” extension.
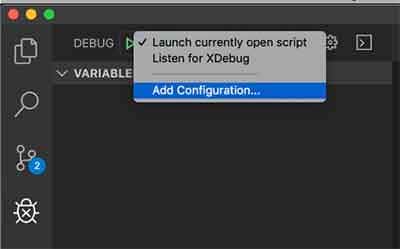
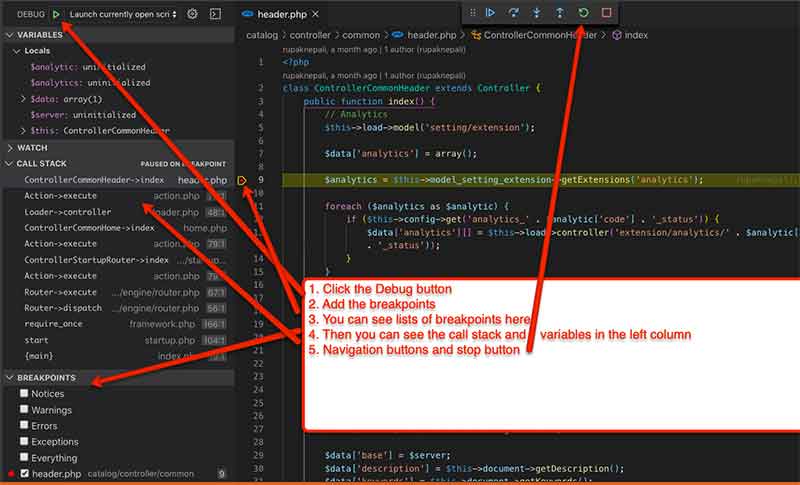
While debugging, first click the debug button in VS Code, add the breakpoints, you will see lists of breakpoints in the bottom of the left column then enter the URL in your browser then you will see the call stack and variables in the left column. You can move into different steps using the navigation buttons and perform the debug and you can stop by clicking the stop button.
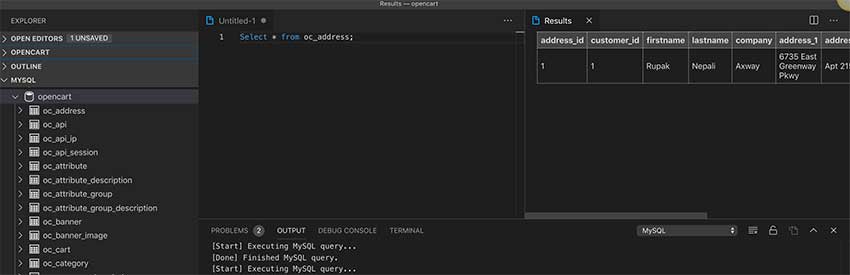
After installing this extension you can easily run queries and test your queries directly from VS Code. Right-click the database and click “New Query” then type your query, right-click and run the query, which will show the results in the side.
EditorConfig helps maintain consistent coding styles for multiple developers working on the same project across various editors and IDEs. Install the extensions and right-click in the project and click “Generate .editorconfig” which will create the .editorconfig file by which all indent style, indent size trim trailing whitespace will be same for all developers. This will remove the formatting issues for different developers.
In this Opencart tutorial, we are listing out to create opencart theme development from scratch for the designer, we are trying to show how to integrate HTML into the Opencart theme. We would like to introduce the OpenCart theme development course and make the OpenCart theme from scratch.
Right now OpenCart version is 3 and we are desperately waiting for OpenCart version 4 and hope it will be launched soon. We are using Opencart 3.0.2 for demo purposes. Before going through the theme development please watch the following videos playlist which describes OpenCart programming knowledge:
An OpenCart theme is a collection of the images, stylesheet and template, files and folders which is found in the view folder. Let’s see the default theme folder structure:
See the template folder they are separated into multiple folders as per needs. In Opencart 2, those template folders contain TPL files but in Opencart 3 they consist of Twig files, they are the section we use for regular HTML markup interspersed by PHP code for the functionality.
Hope you liked this post, we will come up with part II soon, till then let us know if you have any questions or suggestions, please subscribe to our YouTube Channel for Opencart video tutorials. You can also find us on Twitter and Facebook. Enjoy!
We launched another Opencart 3 free module Out Of Stock label and out of stock button, or you can take it as sold out also, these will get active when this module is installed and activated and quantity is zero. You can customize or add CSS as per your need in this module.
Then go to admin >> Extensions >> Modifications >> Clear the cache by clicking the refresh button at the top right.
Now to admin >> Extensions >> Extensions >> Choose Modules >> Find Out of Stock >> Then click the install button
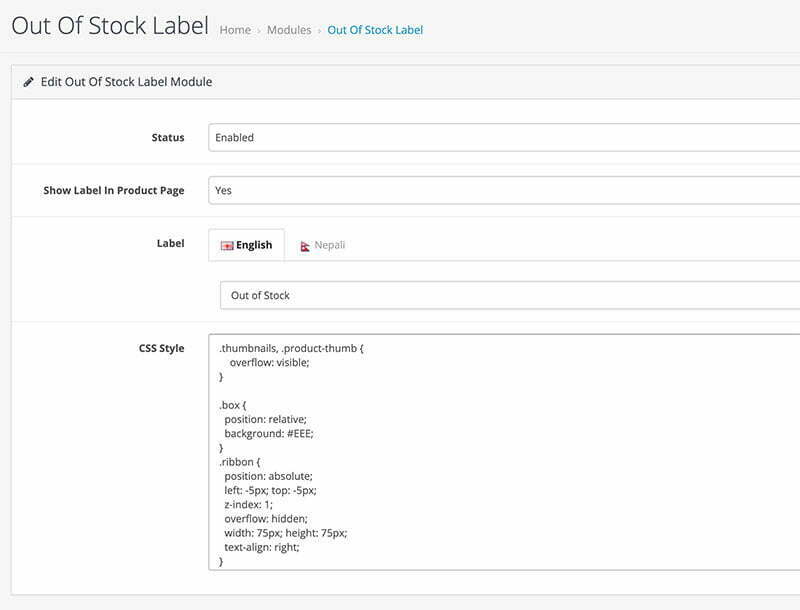
Then edit it and you will see admin settings for Out of Stock like below:
Now select the Status to Enabled
Show Label in the Product page to Yes
Enter your required label like “Out of Stock” or “Sold Out”, if your site is multi-language then enter words for all language.
Then click Save blue button.
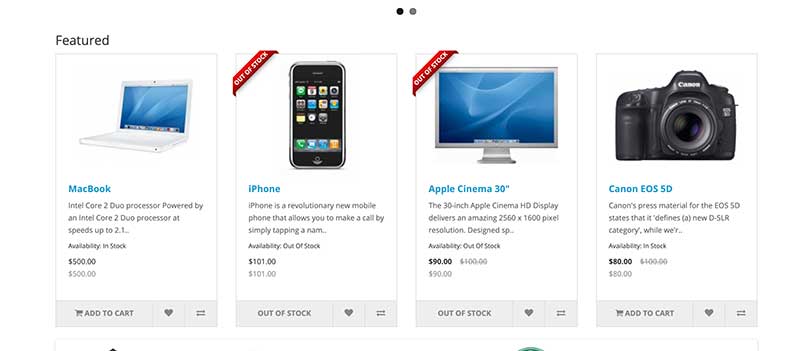
Now go to the front end and you can see the red label with Out of Stock ribbon if the product quantity is zero, similarly, the button becomes Out Of Stock and disabled. Like for featured products module, it will be seen as below:
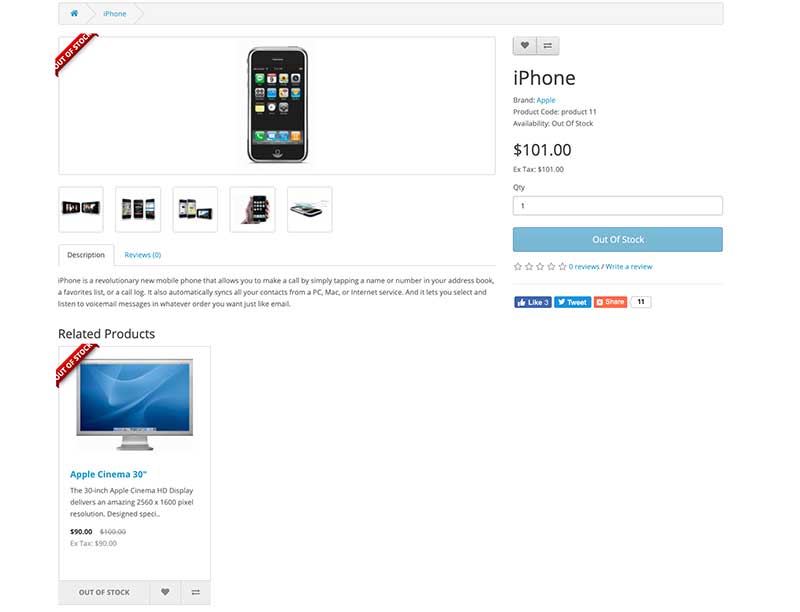
For the product page, it is like below:
Modules and pages these gets activated as per the install.xml we created are the following:
Pages:
Product Page
Special page
Search page
Category page
Manufacturer info page
Modules:
Bestseller
Latest
Special
Featured
It works 100% with the default OpenCart 3 theme but it may not work in custom theme because of the OCMOD code target. Some customization may be needed for the custom theme, but we tried to adjust code matching as much as possible.
You can study and make changes to OCMOD install.xml as per your requirement
You can make the ribbon as per your requirement from here https://www.cssportal.com/css-ribbon-generator/ and paste the CSS into the admin settings.
Please don’t forget to post your questions or comments so that we can add extra topics, free module or opencart tutorial that we need to develop which helps to develop quality. You can follow at twitter account rupaknpl and subscribe YouTube user opencart tutorial. Thanks a lot.
If it is model then check the class name of the model, for our example it should be like below:
class ModelExtensionModuleOutOfStock extends Model
{
Once you correct the class name then the proxy issue will be removed.
The main method is at system/engine/proxy.php
public function __call($key, $args) {
	$arg_data = array();

	$args = func_get_args();

	foreach ($args as $arg) {
		if ($arg instanceof Ref) {
			$arg_data[] =& $arg->getRef();
		} else {
			$arg_data[] =& $arg;
		}
	}

	if (isset($this->{$key})) {
		return call_user_func_array($this->{$key}, $arg_data);
	} else {
		$trace = debug_backtrace();

		exit('<b>Notice</b>:  Undefined property: Proxy::' . $key . ' in <b>' . $trace[1]['file'] . '</b> on line <b>' . $trace[1]['line'] . '</b>');
	}
}
Hope this helps someone, let us know if you have any questions or issues so that we try to solve it. We have listed out errors that you may get in Opencart and their solutions at:
In this Opencart tutorial, we will show you easy localization, and how to make the language pack in OpenCart 4. We will use “Nepalese” or “Nepali” as a new language as there is no language pack for Nepali. Once we created the language pack then we will add and activate in the OpenCart.
Time needed: 1 hour
Localization or globalization is done by making the Opencart language pack. Here are the steps to make the language pack:
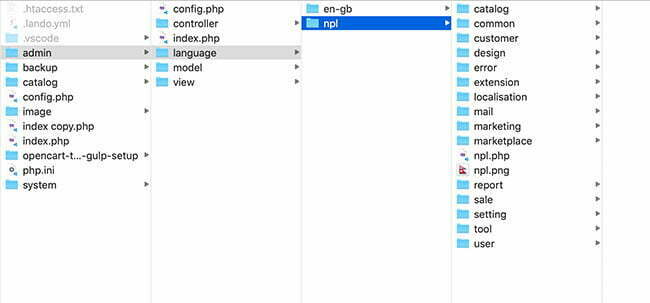
Create a language folder in admin/ folder
Go to admin/language then copy en-gb/ folder and paste it and change the folder name to your language name. In our example, we name it “ne”.
Change the flag and main language name file
Find the flag for your language, preferable transparent png with 16*16 size. Go to admin/language/ne and then place there with the same name as code. In Nepali, it is “ne” so we make it ne.png Change the filename admin/language/ne/en-gb.php to admin/language/ne/ne.php
Change code name to your language
Find your language code, for Nepali, it is “ne”, now open admin/language/ne/ne.php, and change Locale code. Like:
$_[‘code’] = ‘ne’;
You can find the lists of ISO 639-1 Language Codes at W3Schools.
Change others as per your language like direction, date format short, date format long, time format, decimal point, thousand points.
Now start adding your language text
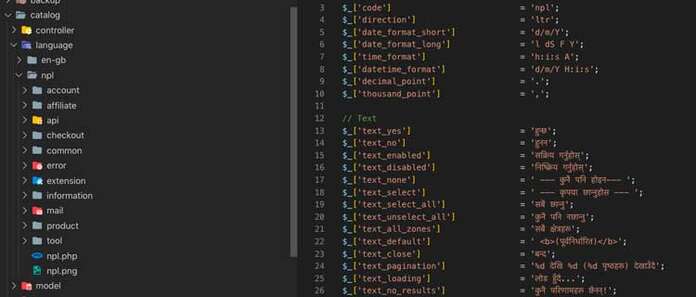
Open each and every ***.php and change English text to your language text except the variable in $_[‘DONTCHANGE’]. For example, if you open admin/language/ne/ne.php then you need to change the
$_[‘text_yes’] = ‘Yes’; to $_[‘text_yes’] = ‘हुन्छ’;
Just change values after the equal sign. Do the same for all of the others then your admin language is ready to install.
Similarly, we need to do the same thing in the catalog/ folder, so the first step, create a language folder in the catalog/language folder
Go to catalog/language then copy the en-gb and paste it and change the name to your language. In our example, we name it “ne”.
Change the filename to language name and flag name to language name in catalog/ folder
Go to catalog/language/ne and add the flag related to the country and name it as per the language code. In our example, we named it ne.png. Previously in Opencart 2.0, they had collections of flags, but now they removed in 3.0, if you still need lists of small flags collection then you can download from download small flags. Then, rename the en-gb.php to ne.php
Replace code name to your language in catalog/ folder also
Open catalog/language/ne/ne.php and change $_[‘code’]= ‘en’; to
$_[‘code’] = ‘ne‘;
Similarly if needed change other Locale as per language needs.
Start changing English text to your language text in catalog/language/ne folder
Open each and every ***.php and change English text to your language text except the variable in $_[‘DONTCHANGE’]. For example, if you open catalog/language/ne/ne.php then you need to change the
$_[‘text_yes’] = ‘Yes’; to $_[‘text_yes’] = ‘हुन्छ’;
Now make a ***.ocmod.zip
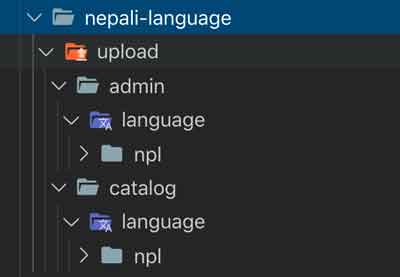
Create upload/ folder and add the admin/ and catalog/ folder and inside the admin/ folder create language/ folder and then copy the translated folder. Here we copy the ne/ folder. Then, make zip and name ****.ocmod.zip. Your extension is ready to add.
How to add the language in Opencart?
Go to Extensions >> Installer and upload the ***.ocmod.zip
Go to Extensions >> Modifications and Refresh it
Go to System >> Localisation >> Languages
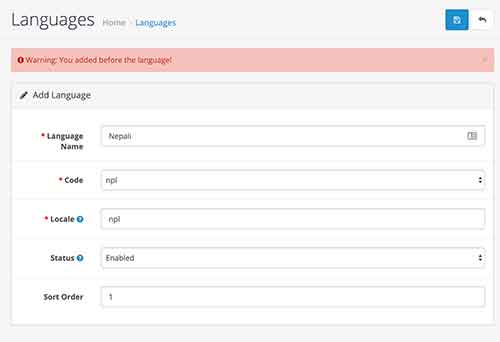
Then add the language, in our Nepali case it is something like below:
Select the folder of your language at Code select box.
If you see “Warning: You added before the language!” then ignore for the first time and save again.
Your language is active.
Please don’t forget to post your questions or comments so that we can add extra topics, free modules, or Opencart tutorials that we need to develop which helps to develop quality. You can follow our Twitter account @rupaknpl and subscribe to the YouTube user Opencart tutorial. Thanks a lot.
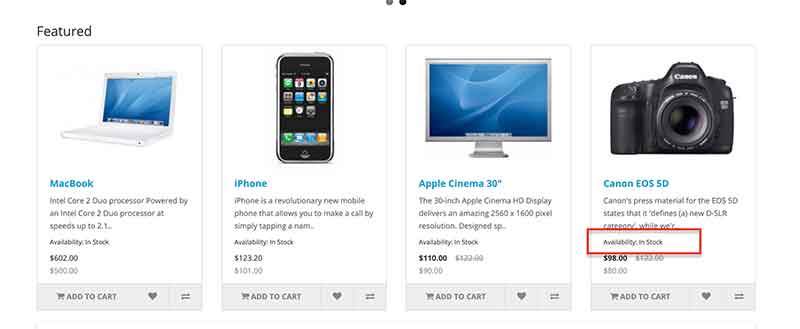
This Opencart free Ocmod module will show product availability on categories pages and in the featured module, bestseller module, lastest module and in special module. By default when the product quantity is greater than zero, it will show Availability: In Stock, if the product quantity is zero then it will show the product status assigned while entering the products.
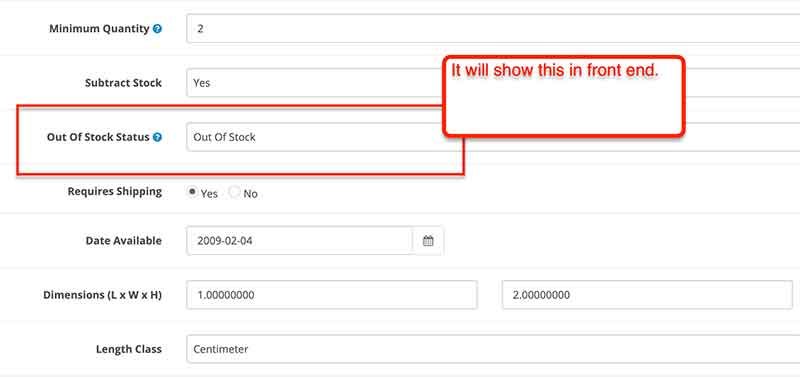
Status is shown when a product is out of stock the one selected below. The default options are: In Stock, Pre-Order, Out Of Stock, and 2-3 Days:
Download the module by clicking the below button and go to admin >> Extensions >> Installer >> then upload the downloaded product-availability.ocmod.zip. If you are having an installation problem then watch this video
Likewise, you can see the availability in categories pages like below:
Please don’t forget to post your questions or comments so that we can add extra topics, free modules, or opencart tutorials that we need to develop which helps to develop quality. You can follow at the Twitter account @rupaknpl and subscribe to the YouTube user opencart tutorial. Thanks a lot.
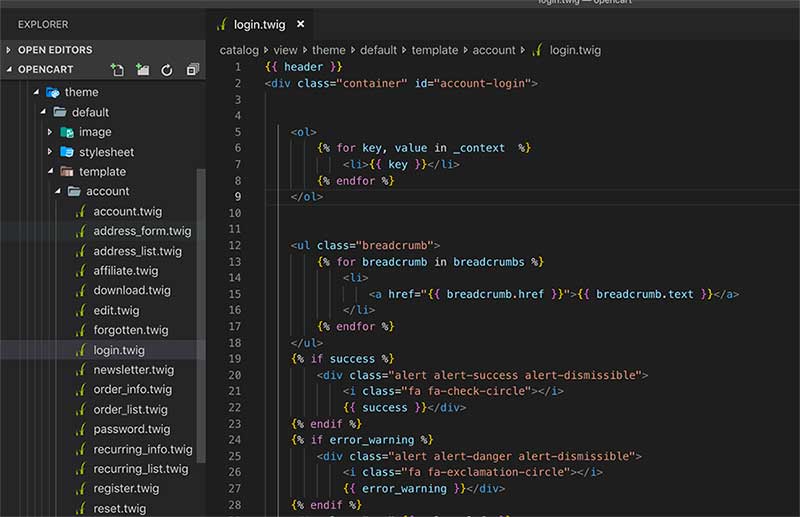
In Opencart, we can see all the variables that are available in the twig template by just adding the following code in twig page.
<ol>
    {% for key, value in _context  %}
      <li>{{ key }}</li>
    {% endfor %}
</ol>
For e.g., if we want to see all the variables that are on the account login page, then open to catalog/view/theme/default/template/account.twig and paste above code now it will be like below:
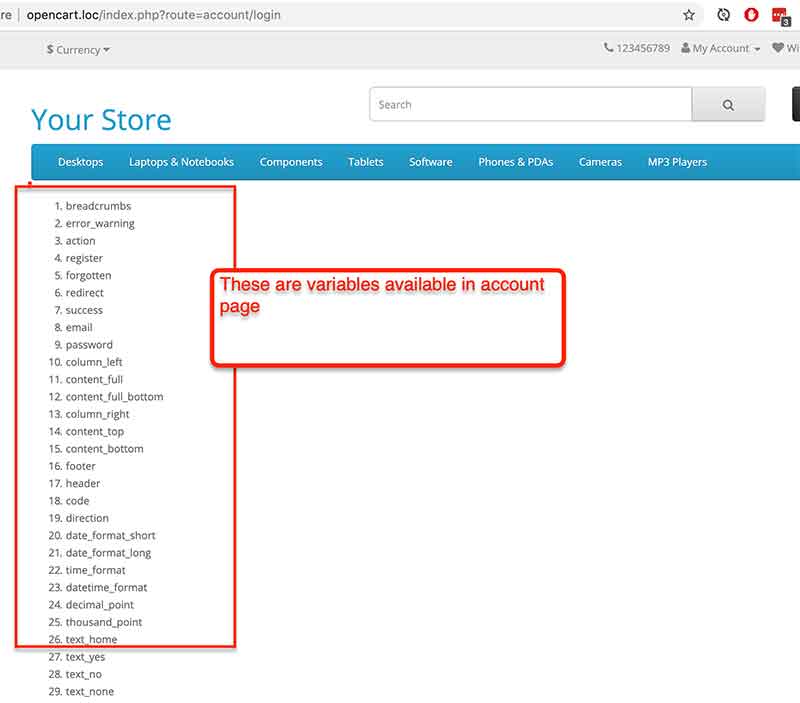
Now the output will be like below:
Here are the variables available in the account login page.
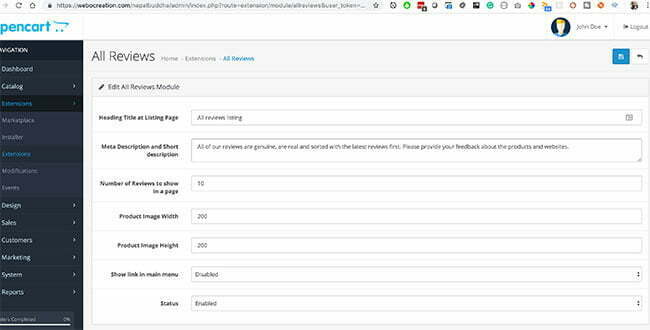
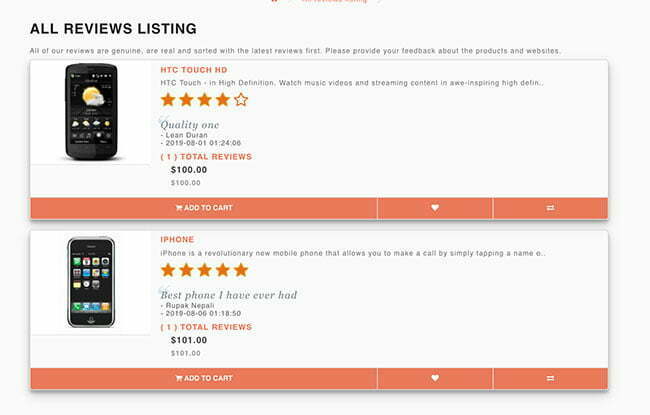
This Opencart 3 free module or extension is to list out or display all reviews of products on a page. This is one instance module. It lists out the product name, small description of the product, star rating given to the product and the details of the review and the reviewer name and date with the totals reviews for that product and link to it and products add to cart button, wishlist button, and compare button.
First, download the module by clicking the button below
Then, go to Admin >> Extensions >> Extensions >> Choose Modules >> Install the All reviews module then edit it. If you need more details on how to install extensions then watch it.
Admin section setting
You will see the admin setting for All reviews module like below:
Enter the details.
Heading Title at Listing Page
Meta Description and Short description
Number of Reviews to show in a page
Product Image Width
Product Image Height
Show link in the main menu
Status
Frontend
Then in the browser go to https://YOURURL/index.php?route=extension/product/allreviews,
See the demo here: https://webocreation.com/nepalbuddha/index.php?route=extension/product/allreviews
Please don’t forget to post your questions or comments so that we can add extra topics, free module or opencart tutorial that we need to develop which helps to develop ourselves and quality. You can follow at twitter account @rupaknpl and subscribe to YouTube user opencart tutorial. Thanks a lot. Enjoy!
In this Opencart tutorial, we are setting up the OpenCart theme development environment with a gulp, package.json, yarn or NPM, create files and folder structure for development with the use of SCSS and custom JS and with gulp watch we output them in normal OpenCart theme.
We set up the automation tools for custom themes development, it may not be required for simple development but better to have them for continuous development. Steps for setting up the Opencart theme development environment and its automation can be below:
Go to catalog/view/theme, paste this folder, unzip and rename the folder opencart-theme-development-gulp-setup to your theme name.
Then in terminal go to catalog/view/theme/YOURTHEME/dev and run ‘npm install‘
After all npm packages installed, open dev/gulpfile.js and change the proxy URL “opencart.loc” to your localhost URL
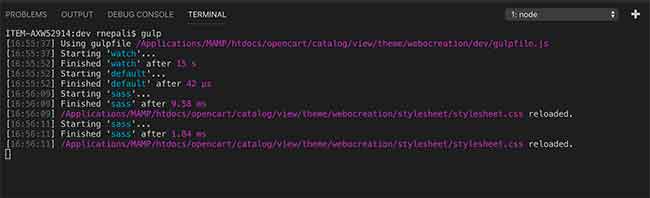
Then in terminal go to catalog/view/theme/YOURTHEME/dev and run “gulp” and then “gulp watch”
Now make changes in the YOURTHEME/dev/scss files or YOURTHEME/dev/js files or YOURTHEME/dev/image or YOURTHEME/dev/fonts, now you will see the changes.
Now you can start the customization
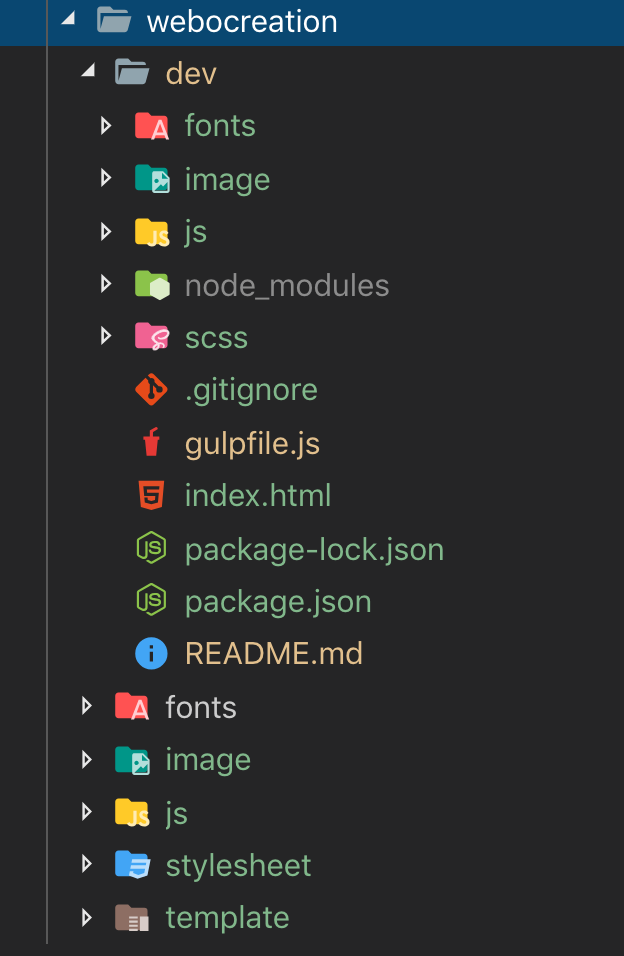
The following are the files and folders structure.
If someone needs more details about the setup then the following steps can help you to set up from the beginning of the Opencart theme development, here we will install node, npm, gulp packages, npm packages as needed and run the gulp to minify CSS and JS and convert the ES6 JS with babel
Download and Install the Node.js
Go to https://nodejs.org and download the latest version and install it
Install Gulp with npm
npm install gulp-cli -g
Set up gulpfile.js
Navigate to your custom theme directory and create dev/ folder then inside it create a JavaScript file named gulpfile.js and paste the following code in it
These folders hold files where we make changes the changes and the gulp will compile and create files and folders outside of dev/ folder
Set up the package manager
Type ‘npm init‘ in your terminal from the dev folder as created in step 3. Enter the details that init asked.
Install Dependencies that are needed for gulp.js
Type ‘npm install –save-dev <packagename> in your terminal, which will download gulp files and its associated dependencies and will create a folder ‘node_modules’. For ours we need:
In this Opencart tutorial, we will show how to create a custom Opencart 3 theme. We will go through the default theme files and folders and then clone default theme to custom theme, install the custom theme, activate it and change the CSS of the custom theme.
First, let’s go through the default core theme files and folders of OpenCart:
In the admin section following are the theme files:
admin/controller/extension/theme/default.php
admin/language/en-gb/extension/theme/default.php
admin/view/template/theme/default.twig
In the catalog section, all the files and folders inside the catalog/view/theme/default are of the default theme.
Now, let’s clone the default theme to a custom theme, for that let’s do the following:
We are going to create a “webocreation” theme, you can name is anything. Let’s start cloning the files:
Go to admin/controller/extension/theme/ and copy default.php and paste it and rename it to webocreation.php, then open it in your editor.
Now find the default word and replace it with webocreation.
Next, go to admin/language/en-gb/extension/theme/ and copy default.php and paste it and rename it to webocreation.php, then open it in your editor.
Do the same, find the default word, and replace it with webocreation.
Next, go to admin/view/template/extension/theme/ and copy default.twig and paste it and rename it to webocreation.php, then open it in your editor.
Do the same, find the default word, and replace it with webocreation.
Now go to catalog/view/theme and copy the whole default folder and paste it and rename the folder to webocreation.
Go to catalog/view/theme/webocreation/image and copy default.png and paste it and rename it to webocreation.png
Finally go to catalog/view/theme/webocreation/template/common/ and open header.twig and then find default and replace it with webocreation.
With this, our webocreation opencart theme is created.
Now let’s activate the webocreation Opencart theme.
Log in to the Admin section and in the left menu, navigate to Extensions >> Extensions >> Then choose the Themes in extension type.
You will see the themes list, where we will see our Webocreation Store Theme also
Click the Install button
Then edit it
In the Theme Directory choose the “webocreation”
Choose Status to Enabled
Then enter the details as per your requirement, enter the width and height of images, then click save.
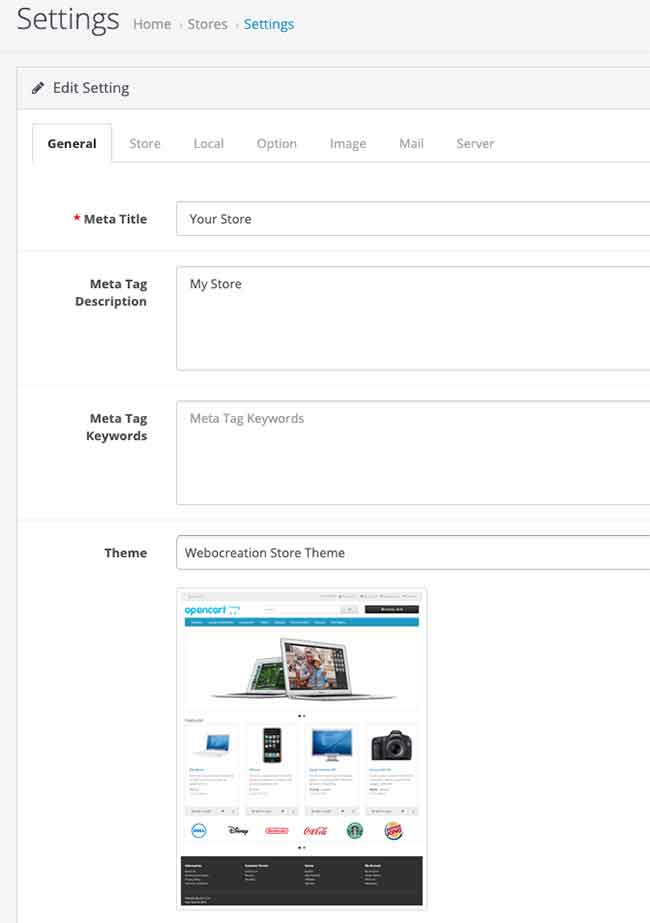
Now navigate to System >> Settings >> Edit your store >> and in General tab >> Theme >> select the “Webocreation Store Theme”
Your webocreation theme is activated.
Let’s see a demo if really webocreation theme is active
Go to catalog/view/theme/webocreation/stylesheet/ and open stylesheet.css and change the color of heading, find the following code:
h1, h2, h3, h4, h5, h6 {
	color: #444;
}
Replace the above code with the following:
h1, h2, h3, h4, h5, h6 {
	color: #64ccc9;
}
If everything is ok then you will see changes in the heading titles, now you can perform any changes you like in the CSS and make it different than the default OpenCart theme.
This Opencart tutorial is to show you how to install OpenCart on a CentOS-7 64bit which is an Enterprise-class Linux Distribution VPS (Virtual Private Servers), we install Apache, PHP, MySQL, other PHP packages as needed by Opencart and setup virtual host
Login to your VPS
ssh root@IPPROVIDED
Then enter the password.
Now update your system before installing the applications, by updating your server using the command below
sudo yum update
Now install the apache web server by running the command, if it is already installed then you can skip this step as mostly there are installed
sudo yum install httpd
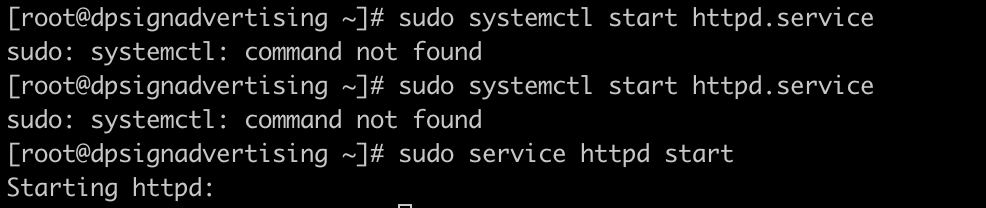
Now start the apache service, which you can do it by the following command as per your system
sudo service httpd start
Till now you can check by typing the IP address provided, you will see the Apache page, mine IP http://178.33.153.139/ and it shows like below:
Better to activate Apache to start after system boot which we can do by the following command:
chkconfig httpd on
Next, install the MySQL server using the following command:
sudo yum install mysql-server
Tell it which run levels to start on:
sudo /sbin/chkconfig --levels 235 mysqld on
Then start the MYSQL server
sudo service mysqld start
To improve the security of your MySQL server, it is recommended to run the interactive security script. You can do that by using the following command:
sudo mysql_secure_installation
Then it asks multiple questions to set the username and password for the database. Once you remove the anonymous users, then disallowing root login remotely, removing test database and reloading privileges on test database then your MySQL installation should be secure.
Like we did for Apache let’s run the MySQL on reboot by the following command:
chkconfig mysqld on
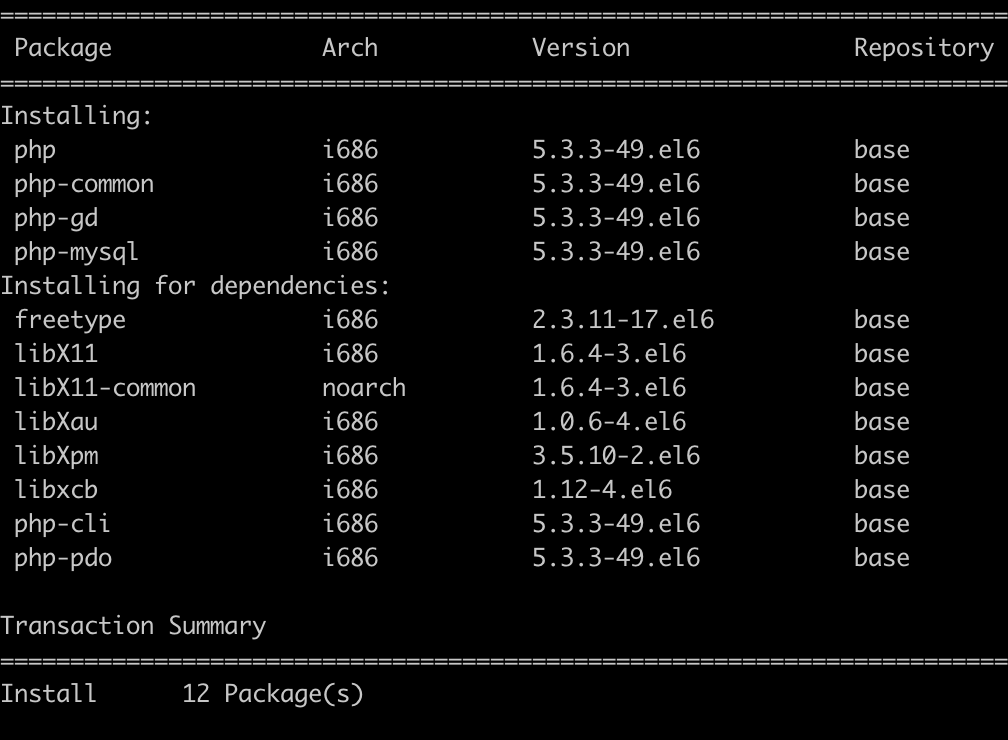
Now let’s install PHP and the other requirements that are needed for the OpenCart, you need to run the command:
Once all those PHP packages are installed, our server is almost ready. Next, let’s download and configure OpenCart on your VPS by using the commands below:
In this Opencart 3 tutorial we are showing how to create Opencart 3 custom modules or extensions, this tutorial is for the developer and to add the custom functionalities in the Opencart. Check our hello world workflow.
Before you start, watch the following videos tutorial
OpenCart 3 Library Global objects Methods With this video tutorial you will get where you can find the existing methods and functions to use while writing the code.
Then start to work in the admin folder for module management For Opencart 2 follow this post: How to create the controller for the Opencart custom module? For Opencart 3, it is similar to Opencart 2 with some changes in the view section, which we are showing below.
To create the Controller in OpenCart 3, we need to understand at least four methods (index, install, validate and uninstall)
To create the language file in OpenCart 3, we need to understand how to create variable and how we can load it in the controller and how it automatically get variable access to view.
To create the view in Opencart 3, we need to know twig templating.
Then start to work in the catalog for module show in front or presentation
It also needed three files language, controller and view
Before starting, things to consider while creating the modules are as per Daniel are:
You are not allowed to modify any core DB tables. If you need to store any data for your extension you need to create a new table and use joins. But you can insert it into the setting table as the configuration are added to it
You are not allowed to overwrite any files.
All files are only allowed to be written in extension folders, except templates which of course go under the template folder.
All extension should have an admin page that allows configuration
Extensions are now prefixed by their category. so paypal_status would become payment_paypal_status
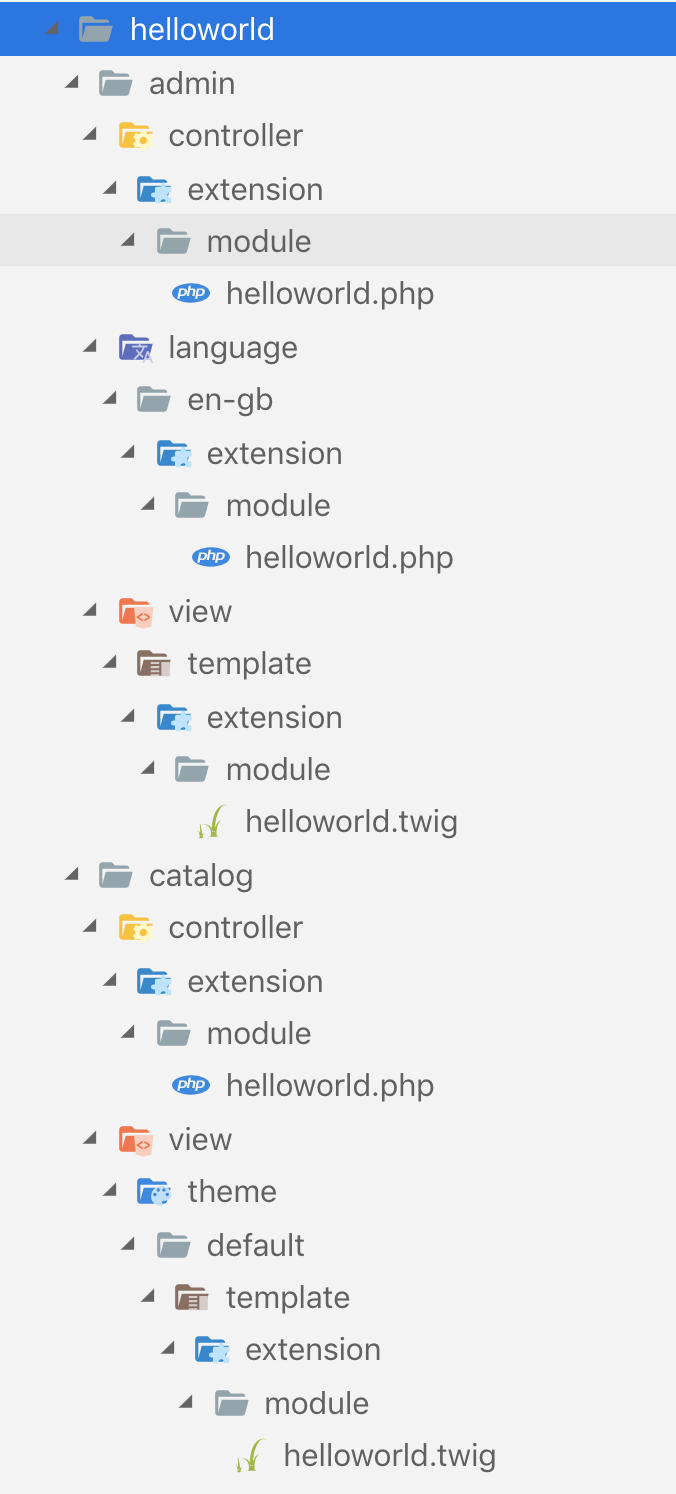
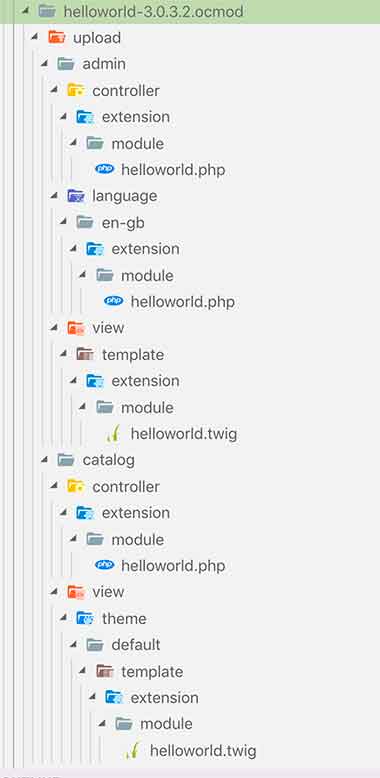
Here is the files and folders structure of Hello World module
OpenCart identifies existing modules automatically, simply by reading the admin/controller/extension/module folder. Any modules existing in this folder will automatically be shown on the Modules listing page, and on the User Permissions page.
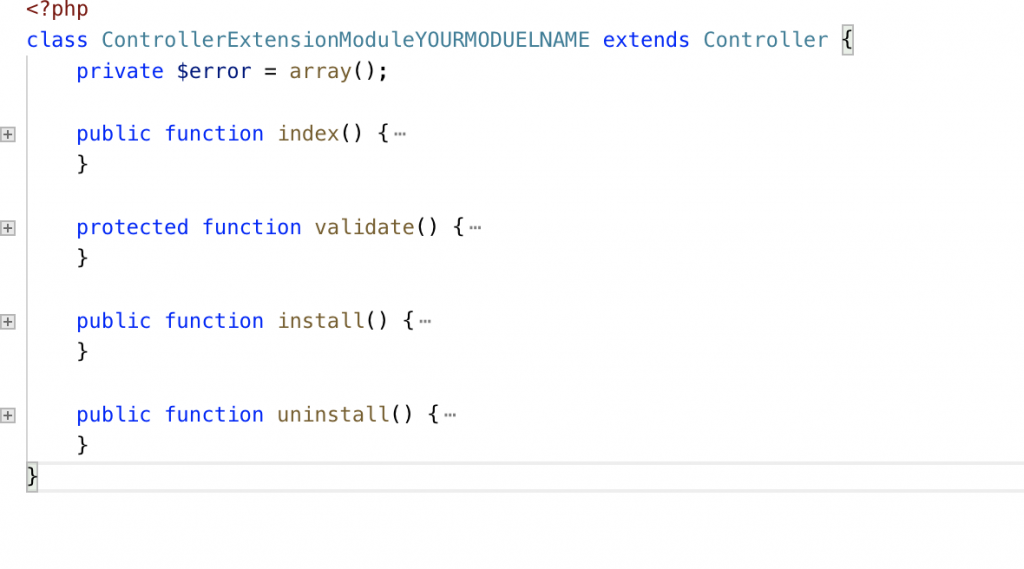
The file to create is helloworld.php and it should be inside admin/controller/extensions/module/ and start with the following boilerplate code:
<?php
class ControllerExtensionModuleHelloworld extends Controller
{
	private $error = array();
	public function index()
	{ }
	protected function validate()
	{ }
	public function install()
	{ }
	public function uninstall()
	{ }
}
In OpenCart, Every class name of the module should start with ControllerExtensionModule, here in the hello world module, our folder structure is controller >> extension >> module >> helloworld.php so the class name is ControllerExtensionModuleHelloworld then extends the class with the base class controller. Better to have all the four methods index() will run when the controller is loaded or someone clicks the edit button, validate() checks for the admin access and other data validation, install() method runs when we click the install button on the module list page, and uninstall() method runs when we click the uninstall button.
private $error = array(); $error is just a private array which will hold the values if some error occurs, we assign error if users don’t have access, or submitted data are not valid.
Installation method:
This method is called when someone clicks the install + button
public function install()
{
	$this->load->model('setting/setting');
	$this->model_setting_setting->editSetting('module_helloworld', ['module_helloworld_status' => 1]);
}
Here we load the setting model, you can see the editSetting() method at controller >> model >> setting >> setting.php. When the install button is clicked then it deletes all the settings it had with the same code and installs the all values again. While passing the values don’t forget to include the extension in front of the name. Like here our extension is module and name is HelloWorld so it becomes module_helloworld and the same for the variables you are going to save, we are saving the status so module_helloworld_status which need to pass as an array. Let see the setting database table, and you will see how values are stored.
The convention is to add module_ or payment_ or shipping_ or report_ or dashboard_ etc as per your extensions type so it is supported in the cloud base as well.
After installation, we click the edit blue button, which calls the index method whose full code is below which we will describe afterward:
This is to load the language file admin >> language >> en-gb (or active language) >> extension >> module >> helloworld.php. Let’s create the language file and add some variables needed:
<?php
// Heading
$_['heading_title']     = 'Hello World Content';
// Text
$_['text_extension']    = 'Extensions';
$_['text_success']      = 'Success: You have modified Hello World Content module!';
$_['text_edit']         = 'Edit Hello World Content Module';
// Entry
$_['entry_name']        = 'Module Name';
$_['entry_title']       = 'Heading Title';
$_['entry_status']      = 'Status';
// Error
$_['error_permission']  = 'Warning: You do not have permission to modify Hello World Content module!';
$_['error_name']        = 'Module Name must be between 3 and 64 characters!';
Now to get access to heading_title in the controller we do like below:
$this->language->get('heading_title')
To assign that heading_title as Title of the page we pass the $this->document->setTitle, click to know all of the objects’ methods of opencart
In the code above we use $this->language->get(‘text_home’) so you may got confused how we got text_home variable although we don’t define in admin >> language >> en-gb >> extension >> module >> helloworld.php, so the trick is we can get access to all variables of admin >> language >> en-gb >> en-gb.php we don’t need to load like other language file. So the breadcrumb here is to create the breadcrumbs array then assign the Home and dashboard URL, then added another link Extension and URL to module page. Then we check if the module is an edited or a new module and show the title and link of respective modules.
Now let’s move to another part of the code, the below part of the code is to create the action URL when someone submits or save the form. Here it checks if it is an active module or not and if it is an active module then it passes module_id in the URL
In OpenCart module setting mostly, they have to save button and cancel button so below is the link when someone is redirected when they click the cancel button.
The below code is to set the data of the fields to pass to the view. Here we check if the module name is set or module description and the status like below if nothing is set then we assign the empty.
This below code is to pass the languages to the view, as OpenCart supports multi-language so we are showing you how module_description and status can be set as per the language.
When someone submits the form it validates the data with the validate() method as we call it in index() method like $this->validate(), in validate method we mostly check for the permission and define any other validation needed.
protected function validate()
{
	if (!$this->user->hasPermission('modify', 'extension/module/helloworld')) {
		$this->error['warning'] = $this->language->get('error_permission');
	}

	if ((utf8_strlen($this->request->post['name']) < 3) || (utf8_strlen($this->request->post['name']) > 64)) {
		$this->error['name'] = $this->language->get('error_name');
	}

	return !$this->error;
}
Now the last part of the controller is the uninstall method, it uninstalls and removes all the data when someone clicks the uninstall red button.
public function uninstall()
{
	$this->load->model('setting/setting');
	$this->model_setting_setting->deleteSetting('module_helloworld');
}
Now our last part of admin View or presentation part, as opencart started to use the twig templating so here is the full code of the view part:
The variable we passed from the controller can be accessible in template file which we can show easily with {{variable_name}}, so we can show header, column left and footer like below:
{{ header }}{{ column_left }}{{ footer }}
All other codes are simple in the view part only thing little complicate is the language for loop section and how we add form field name which will be saved in the database. Here heading title and status are language-specific.
Now the front end part so let’s start to create a file in catalog/ folder, go to catalog >> controller >> extension >> module and create helloworld.php and paste the following code:
<?php
class ControllerExtensionModuleHelloworld extends Controller
{
	public function index($setting)
	{
		if (isset($setting['name'][$this->config->get('config_language_id')])) {
			$data['html'] = html_entity_decode($setting['module_description'][$this->config->get('config_language_id')]['title'], ENT_QUOTES, 'UTF-8');
			return $this->load->view('extension/module/helloworld', $data);
		}
	}
}
Mostly same conventions to follow as for the admin controller as we define above, here we need to pass the $setting in the index method and all values and data of module is available for your in $setting, if you are confused just do the print_r($setting) and you will get all the details data of the module. Here we check if the module is active and just show the title that we entered in the backend.
View section is also pretty simple in the frontend. Go to catalog >> view >> theme >> default >> template >> extension >> module >> helloworld.twig and enter the code below:
<div>
  {% if html %}
      <h2>{{ html }}</h2>
  {% endif %}
</div>
It check if the html is not empty and if not empty then show the html content.
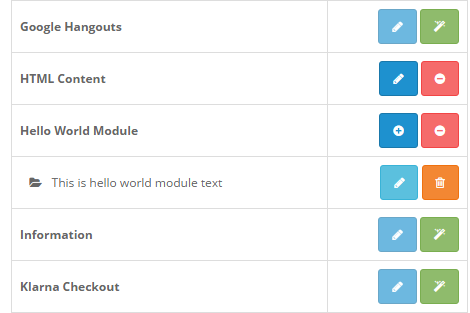
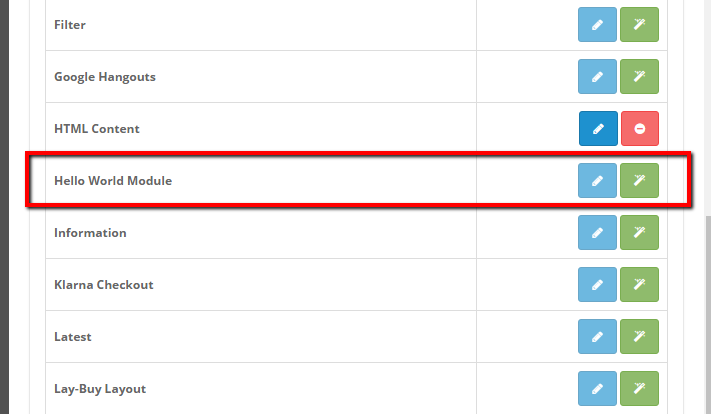
When we created the hello world module then it will be like as shown below:
Hello World Module in Extension’s Module
Installing Hello World Module
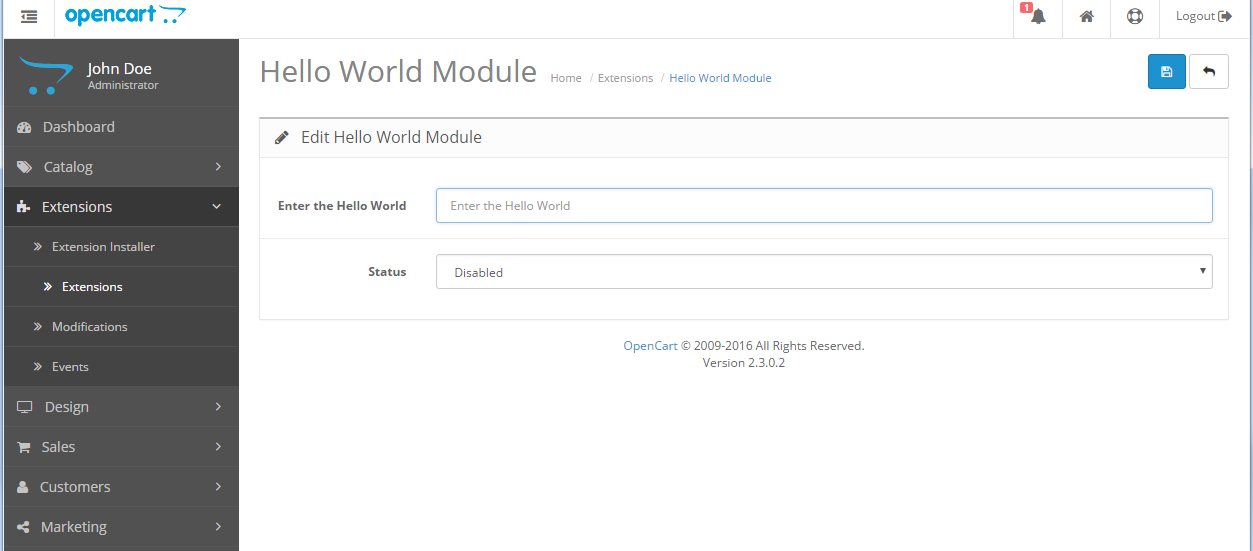
Click on the green (install) button, then click edit blue button. You will see a form to insert the hello world text.
Hello World Module form
Enter the hello world text and select the status to enabled and click the save button. As Opencart can have unlimited module instance, so we can have multiple instances of the hello world
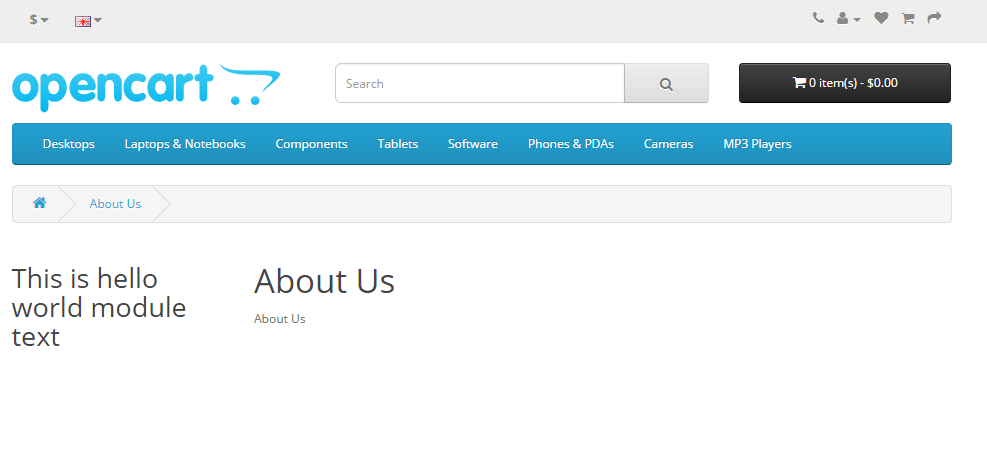
Set up layout and position for Hello World Module
To setup layout and position, go to Design >> Layout, edit Information layout then add the hello world module to the column left.
Show up in Front/Presentation side
As we added to the column left of the information page, let’s go to the front page about us page URL. /index.php?route=information/information&information_id=4
Files and folder creation
Making language file in admin/ for Hello World Module
Making the controller file in admin/ for Hello World Module
Making view file in admin/ for Hello World Module
Making language file in catalog/ for Hello World Module
Making the controller file in catalog/ for Hello World Module
Making view file in catalog/ for Hello World Module
Now go to full details to create a hello world module in OpenCart
In this tutorial, we are showing you how to write code in OCMOD and modify the core files of OpenCart. Here we will show the flows that happened when someone uploads the ***.ocmod.zip file, then create an install.xml file to show the module link in the left column and give you details of Ocmod documentation in Opencart 3. For Opencart 4 OCMOD tutorial click here
As per the core code when you upload the ***.ocmod.zip folder from Extensions >> Installer, the following things will happen:
Check if the user has permission. You will get an error like: “Warning: You do not have permission to modify modifications!”
Check if there is an install temporary folder zip already there.
If it found the file and the file created time is less than 5 seconds then it tries to unlink or remove the file, if it cannot remove the file then it throws an error saying: “Extension installation taking place please wait a few seconds before trying to install!”
It checks whether the uploaded zip file ends with .ocmod.zip
It checks if there are any other file uploading errors, UPLOAD_ERR_OK: Value: 0; There is no error, and the file uploaded with success. If there is any error it will show errors like: “File could not be uploaded!”
If everything is good then it creates a .tmp file and performs function move_uploaded_file.
Then it adds the logs in the database table oc_extension_install with the name ***.ocmod.zip and the extension download id. “oc_” is the database prefix.
Then it starts the installation, from the controller “ControllerMarketplaceInstall”, it makes sure the file name is stored in the session. If the file is not in that session then it shows an error like this: “File could not be found!”
Then it starts unzipping the ***.ocmod.zip and if it cannot unzip the ocmod.zip file then it shows an error like: “Zip file could not be opened!”
After unzipping it checks whether the unzip folder contains “upload/” or not, likewise, it checks for the allowed directories to be written or not. Opencart allows the following directories only:
So while creating a custom opencart module better to work on these folders only. If you put it in another folder then it may give you the following error: “The directory %s is not allowed to be written to!”
It checks for the directory structure of the zip and whether it matches with the Opencart directory structure.
Then it will insert in the database table oc_extension_path with extension install id.
Then it will start installing the /install.xml, if an XML file exists then it is put into the database. It checks for the “code” name in the XML and checks if the values already exist in the database. If everything is good then it inserts into the database table oc_modification with extension_install_id, name, code, author, version, link, XML, status, and date_added.
Then it unlinks or removes the temporary folder.
Finally, it gives the success message.
With the flow steps above the folder structure for the ocmod.zip is install.xml and upload. Inside the upload/ folder put the OpenCart folder and files.
In the install.xml it should be something like where the ******* is your custom thing.
Now check out the previous blog posts where we have listed all the documentation of OCMOD.
While zipping the folder zip the install.xml and upload/ folder, not the main folder. install.xml is not mandatory.
If you are trying to create a table or insert data in the table then you need to create the install method in your controller. Like:
In the install method, you can implement logic as needed for your module when it is installed.
//Check it in admin/controller/extension/extension/module.php install method.
// Call install method if it exists
$this->load->controller('extension/module/' . $this->request->get['extension'] . '/install');
Similarly, you can implement the logic for the uninstalling method when it is uninstalled.
<?xml version="1.0" encoding="utf-8"?>
<modification>
    <name>Show Module Link At Left Menu</name>
    <version>3.0</version>
    <author>Rupak Nepali</author>
    <link>https://webocreation.com</link>
    <code>webocreation_show_module_link_at_left_menu</code>
    <description>Show module link at left menu</description>
    <file path="admin/controller/common/column_left.php">
        <operation>
            <search><![CDATA[ if ($this->user->hasPermission('access', 'marketplace/extension')) { ]]></search>
            <add position="after"><![CDATA[
                $marketplace[] = array(
                    'name'     => "Modules",
                    'href'     => $this->url->link('marketplace/extension&type=module', 'user_token=' . $this->session->data['user_token'], true),
                    'children' => array()
                );
            ]]></add>
        </operation>
    </file>
</modification>
Steps for making changes to the core files of OpenCart
In your local make the changes in the core of the files and keep track of the files
Then create the install.xml and add those changes in install.xml
Then remove the changes of the core files that you make the changes.
Then zip it with ***.ocmod.zip and upload in Extensions >> Installer
Then clear the cache in Extensions >> Modifications
You are set.
Testing Tips for the Developer
Testing is hard for OCMOD changes if you have to change in XML, zip, upload from the installer, and clear in modifications. So the tip for developers is they can place the install.xml in the system/ folder (not sure if it is supported in Opencart version 3.0.3.2), then make changes in the install.xml and you don’t need to zip and upload, you can clear in modifications and you can check the changes. If you don’t want to clear the cache in modifications then you can go through this blog Opencart cache clear.
If their search code is not found then it shows an error like the below in the Ocmod log:
MOD:
FILE: admin/controller/common/column_left.php
CODE: if ($this->user('access', 'marketplace/modification')) {
NOT FOUND - OPERATIONS ABORTED!
The Search Code provides the following attributes:
We are publishing another free Opencart module “Sidebar Search module” and we made this for OpenCart version 2.0.3.1. No files are overridden, you can enable it and disable it whenever you like from the admin section.
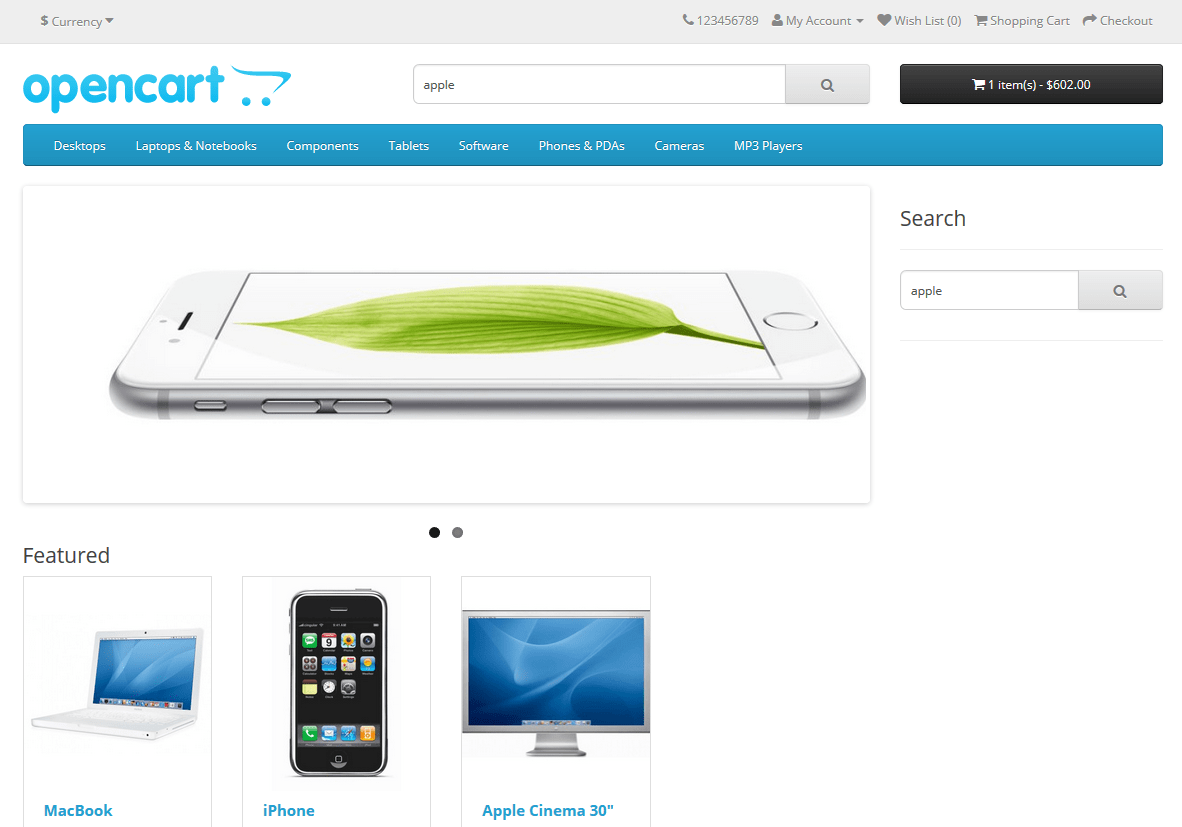
Output after installing the module in the home page’s right column is shown as in the image below:
sidebar search opencart module free
Although the search is available at the header section so it is useless to use at default theme but you can use it for the customized theme and I will make another search module soon which will include all search functionality as the main search page. For now, enjoy this normal search opencart free module. You can see how I copied the header search section and show it as a module in the side search box. You can show anywhere you like as this is a module so you can show in the left column, right column or top content or bottom content.
Download Sidebar shopping cart free module from the link below:
Upload the files in the root folder to your server, no file is overwritten.
Then activate the Search module.
Activating the Sidebar Search module:
After uploading files to servers, it’s time to install Sidebar search module
We are showing the sidebar search at the right column but you can show it wherever you like as this acts as the normal module.
Go to Admin section
Then click on Extensions on the left menu
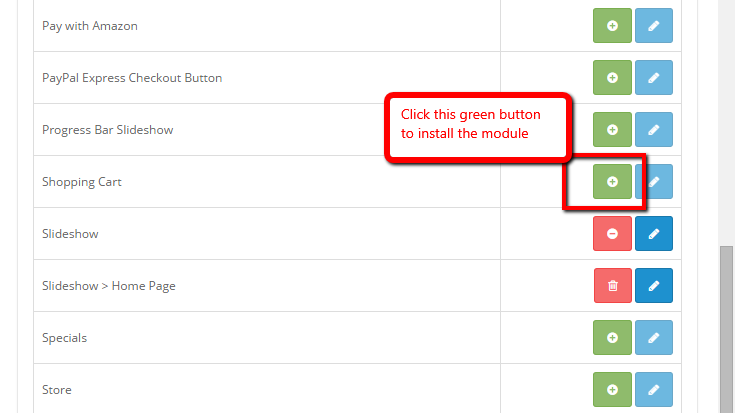
After that Click Modules and go to “Search” in the modules list
Then click the green button to install the module (see the image below)
installation_of_module
Then click the blue edit button After that, you will see the form which has the status field, select “Enabled” and then click the Save button. Your module is active and is ready to use in the layout.
Setup layout for the sidebar search module at home page:
From the admin section go to System >> Design >> Layouts.
You will see a list of layouts, from which edit the “Home” layout.
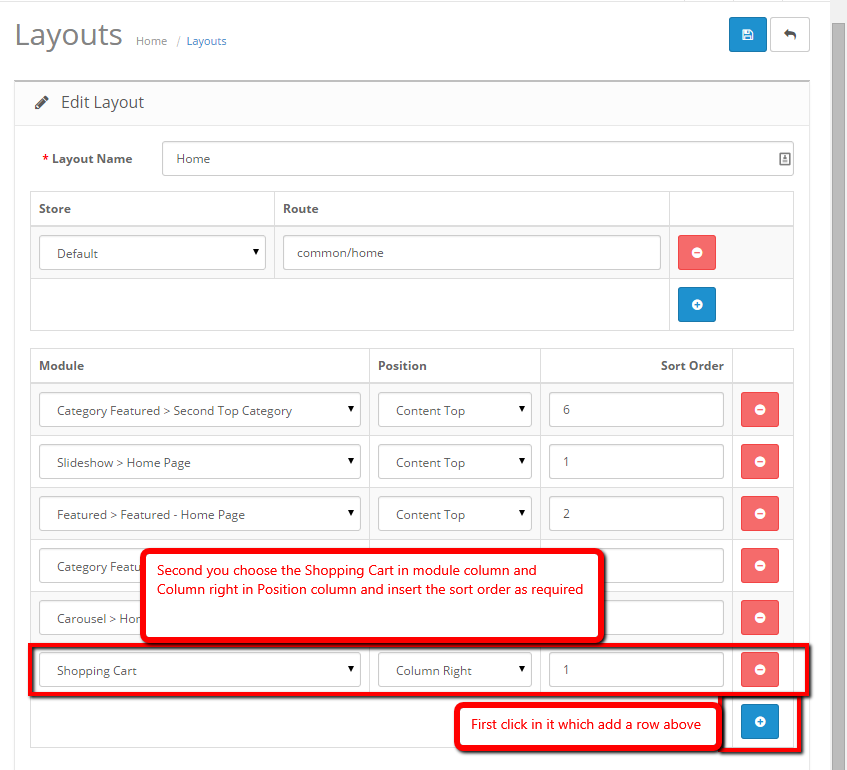
Then click Blue add the button to add rows at module section which is shown in the image below:
siderbar_shopping_cart_installation
Second, you choose the Search in module column and Column right in the Position column and insert the sort order as required. Then click save button
Your custom sidebar search module is showing in the right column of the homepage. Likewise, you can show in many other layouts and pages.
Codes in search modules controller:
<?php
class ControllerModuleSearch extends Controller {
    public function index() {
        $this->load->language('module/search');
        $data['heading_title'] = $this->language->get('heading_title');

        $data['search'] = $this->load->controller('common/search');

        if (file_exists(DIR_TEMPLATE . $this->config->get('config_template') . '/template/module/search.tpl')) {
            return $this->load->view($this->config->get('config_template') . '/template/module/search.tpl', $data);
        } else {
            return $this->load->view('default/template/module/search.tpl', $data);
        }
    }
}
While playing around with OpenCart 3.0.0.0 we were trying to create a new OpenCart 3.0 theme and for that, we copy the default theme and named “Webocreation” and was doing the following setting but got an error: “Warning: You do not have permission to modify the default store theme!”
So make the following changes to solve the problem:
The above error says we don’t have permission to modify so we tried to give permission as follows:
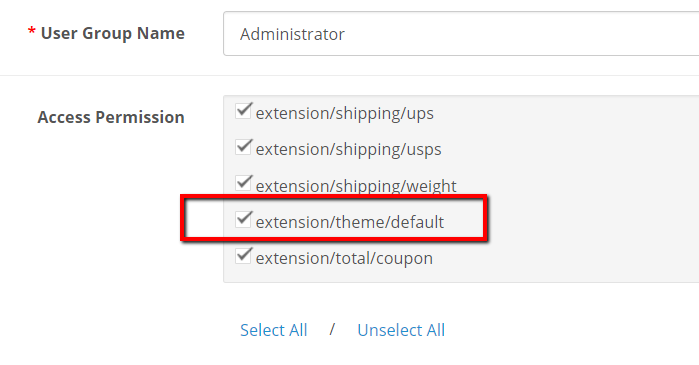
Admin >> System >> Users >> User Groups >> Edit the Administrator >> clicked “Select All” for both access permission and modify permission, then clicked save.
With the above permission, we should be able to get access but still got the same errors so we checked the code and found some glitch.
We checked admin\controller\extension\theme\default.php in OpenCart 3.0 and found following permission check at validate() method.
if (!$this->user->hasPermission('modify', 'extension/theme/theme_default')) {
    $this->error['warning'] = $this->language->get('error_permission');
}
But when we check at the User group permission it is extension/theme/default
So above code need to change to the following:
if (!$this->user->hasPermission('modify', 'extension/theme/default')) {
    $this->error['warning'] = $this->language->get('error_permission');
}
With this change, we are able to save, but still, we are not able to retrieve the save theme setting so we checked the code again and found the following:
Then, it all starts to work. If you are also getting such an error, we hope it will help you to solve the problem. Enjoy and let us know if you are getting any kind of errors.
Once we added the above code then we can see the images of the sub-categories.
This way we can show the sub-categories image on the category page. Let us know if need any support. Hope you liked this post, please subscribe to our YouTube Channel for Opencart video tutorials. You can also find us on Twitter and Facebook.