What To Do When Your Social Media Account Is Hacked?

As our online lives and social media usage grow, so does the threat of hackers compromising our accounts. Getting hacked can allow impersonation, stolen data, and account havoc. If you encounter the unfortunate situation of a hacked social media account, acting quickly is critical. This guide covers what to do first, who to contact, how hackers gain access, and the methods available in 2023 to recover control.

What Happens If You Get Hacked On Social Media?

Being a victim of social media hacking is both distressing and exasperating. Personal data, photos, friend conversations, and more reside within your account. If a hacker breaches this space, the consequences could involve identity impersonation, sharing humiliating or damaging content, contacting your connections, or even erasing your account altogether.

The magnitude of harm varies with the account type and the extent of the hacker’s access. On platforms like Facebook or Instagram, hackers might alter your profile details, post updates, erase content, or communicate with your contacts. Meanwhile, on Twitter, they could send tweets or direct messages, creating a deceptive appearance of your involvement.

Hackers can sometimes exploit shared login details to infiltrate linked accounts when the same credentials are used across multiple sites. Thus, an intrusion on one social platform could cascade into breaches on multiple accounts. 

Apart from posing as you or sharing content, hackers could potentially access personal data like email, phone numbers, photos, private messages, and even location details. This could result in identity theft or the hacker targeting you and your contacts with harassment. 

To protect your privacy and security, be cautious about the information you share online and consider using security measures like encryption tools or VPNs, especially when accessing sensitive platforms or visiting potentially risky websites, such as a forbidden Telegram channel.

What Is The First Thing You Do When You Get Hacked?

In the event of discovering a hacked social media account, maintain composure and take swift action. Here are the initial steps to follow:

  • Log out from All Accounts: Immediately sign out of the compromised account and all linked ones using the same credentials. This remote logout denies the hacker access. Ensure you log out from every device, including mobile and desktop, then change your password.
  • Activate Two-Factor Authentication: If not already in use, enable two-factor authentication promptly. This dual-layer security demands a password and verification code for login, bolstering your account’s defense against future breaches.
  • Contact Social Media Support: Most platforms offer account recovery or reporting procedures. Reach out to their support through help pages or email. Share hacking details, actions taken by the hacker, and associated username/email to expedite investigation and restoration.
  • Reset Your Password: Alongside enabling two-factor authentication, reset your password immediately. Craft a strong, distinct password unused elsewhere. Password managers aid in generating and storing secure passwords. A new password prevents reentry even if the hacker bypasses two-factor authentication. Avoid reusing old passwords moving forward.

Who To Contact When Social Media Is Hacked?

Each social media platform has its own account security team you’ll need to contact for hacking issues. Here are the key teams for major platforms:

  • Facebook: Contact Facebook directly through the Facebook Help Center. You can report a hacked account and submit an appeal.
  • Instagram: Instagram’s Help Center allows you to report hacked accounts by submitting a form. You’ll need to provide details and proof of ownership.
  • Twitter: Twitter’s online form allows you to report compromised accounts and reset passwords. Submit details through their Help Center.
  • LinkedIn: LinkedIn has a hacked account reporting form in their Help Center. Submit details so their security team can investigate.
  • TikTok: You can report hacked TikTok accounts by submitting an email to TikTok’s support team at feedback@tiktok.com.
  • YouTube: YouTube allows you to recover hacked channels through Google Account recovery. Submit details via their account recovery form.
  • Snapchat: You can contact Snapchat Support to report a hacked account. Recover access by submitting the form on their Support site.

For other sites, check the platform’s help documentation or contact page to find their hacked account reporting process. The faster you contact them, the quicker they can secure your account.

Can We Recover Hacked Instagram Account?

It is possible to recover a hacked Instagram account, but the process depends on how much access the hacker gained and whether they changed key account details like the email, username, or phone number. Here are the steps to recovering a hacked Instagram account:

  • If you can still access your account, enable 2-factor authentication immediately. This will stop the hacker from accessing your account again. Then change your password.
  • If you can’t access your account, use Instagram’s hacked account form to report the issue. Provide your username and any details about the hack.
  • To prove ownership, Instagram will ask for verification info like your email address or phone number originally associated with the account. Provide as many details as possible.
  • Instagram will email you if they can recover your account. Follow the instructions to reset your password and take back control.
  • If the hacker changes critical account details like your email, it becomes much harder to recover the account. Keep contacting Instagram support.
  • As a last resort, you may need to create a new account and notify your followers that your old account was compromised. Enable 2FA from the start to stay secure.

With quick action and by providing Instagram with verification details, there’s a good chance of recovering access to a hacked account. But hackers can make accounts difficult to retrieve if they modify key information. 

It’s essential to maintain strong security practices and consider using two-factor authentication to prevent unauthorized access. Additionally, always be cautious about the websites you visit and the content you interact with online, especially when dealing with potentially illegal platforms, like Is Soap2Day illegal, to avoid compromising your accounts in the first place.

How Do Hackers Get Passwords?

Hackers employ a range of clever and malicious tactics to obtain people’s passwords. Some of the most common methods include:

  • Phishing: Crafty phishing emails are designed to trick users into inputting their usernames and passwords into fake login pages that hackers control.
  • Spyware: Downloading malware or otherwise inadvertently installing spyware can allow hackers to covertly monitor what you type and capture passwords.
  • Data Breaches: When websites suffer data breaches, login credentials are often exposed and then get circulated on the dark web for criminals to abuse.
  • Password Guessing: Hackers can use brute force password guessing, trying common passwords and variations to crack accounts.
  • Keyloggers: Physical or remote keylogger malware can record real keystrokes to capture passwords as they are typed.
  • Social Engineering: Manipulating or tricking users via social engineering to share their passwords or other sensitive information.
  • SIM Swapping: Porting your phone number to a SIM card they control, allowing hackers to intercept 2FA codes sent via text.
  • Shoulder Surfing: Physically watch over your shoulder as you type in your password at a public place like a cafe.

The most important defenses are using strong unique passwords for each account, installing anti-malware tools, avoiding phishing links, and enabling two-factor authentication wherever possible.

Can You Recover A Hacked Instagram Account 2023?

In 2023, it is still possible to recover a hacked Instagram account through Instagram’s account recovery process. Here are tips for recovering a hacked Instagram account as of 2023:

  • Use Instagram’s hacked account form and provide as many details as possible – your username, email/phone number, photos you’ve shared, etc. Details help Instagram verify you own the account.
  • If the hacker changes the email or phone number on your Instagram account, recovery becomes much harder. But keep contacting Instagram support and provide old emails or numbers associated with the account in the past.
  • Share specific dates, captions, and locations of photos you uploaded. Any details about past account activity could help Instagram confirm you are the legitimate account owner.
  • If you previously connected your Instagram to Facebook or any other social platforms, mention these connections.
  • Request a photo or video selfie verification via Instagram’s form to prove your identity.
  • Note any unusual IP addresses that accessed your account without your consent – Instagram can check the logs.
  • Be patient and persistent in contacting Instagram. The security team manually reviews hacked accounts to return them to their rightful owners.

While hackers are getting more sophisticated, Instagram still has processes in place to recover accounts through proof of ownership. Supplying as many historical account details as possible is key to regaining access in 2023 and beyond.

How Do I Know If My Social Media Account Is Hacked?

Unusual posts, messages, friend requests, sudden changes in settings, or being locked out are signs of a hacked account. Monitor your account for any unusual activity.

How Can I Prevent Future Hacks?

Use strong, unique passwords, enable two-factor authentication, and be cautious of phishing attempts. Regularly review your account activity and settings for any anomalies.

Conclusion 

In the face of a social media hack, swift action is vital. Changing passwords, alerting contacts, and promptly reporting the breach to the platform can mitigate damage. Vigilance and adopting robust security practices help shield against future threats.

What Is A STEP File? What Programs Can Open A Step File?

A STEP file is a widely used format in Computer-Aided Design (CAD) for exchanging 3D models and product data. 

It allows seamless collaboration and data sharing between different CAD software applications. Several programs can open a STEP file, ensuring compatibility across various platforms. 

Some of the programs that can open a STEP file include Autodesk Fusion 360, SolidWorks, Siemens NX, CATIA, and PTC Creo. 

These programs offer import functionality for STEP files, enabling designers and engineers to work with shared 3D models efficiently.

What Is A STEP File In Engineering?

A STEP file, in engineering, refers to a standardized format used for exchanging 3D models and product data between different computer-aided design (CAD) software applications. 

It is a basic file format that facilitates collaboration and interoperability among engineers and designers on various projects. 

The STEP file contains comprehensive information about the geometry, topology, and attributes of the 3D model, allowing seamless data exchange across different CAD platforms. 

In engineering, professionals often use programs like Autodesk Fusion 360 to insert step files, which provides the functionality to import STEP files. 

This enables engineers to insert STEP files into their design environment, ensuring they can view, modify, and work with the 3D models effectively, promoting efficient collaboration and design iteration.

What Is A STEP File?

A STEP file, also known as a Standard for the Exchange of Product Data files, is a widely used format for 3D CAD (computer-aided design) data exchange. 

It provides a standardized way to share 3D models and product information across different CAD software programs. A STEP file contains the geometric and semantic information of a 3D model, including its shape, dimensions, materials, and other design details. 

It serves as a versatile and neutral file format that ensures compatibility and interoperability among various CAD applications. 

Many popular CAD programs, such as Autodesk Fusion 360, SolidWorks, Siemens NX, and CATIA, can open and work with STEP files, allowing engineers, designers, and manufacturers to collaborate seamlessly and exchange 3D data effectively.

Can You Open A STEP File In AutoCAD?

Yes, AutoCAD can open STEP (Standard for the Exchange of Product Data) files. STEP is a widely used file format for 3D CAD data exchange, and AutoCAD supports it as one of its import options. To open a STEP file in AutoCAD, you can follow these steps:

  • Launch AutoCAD.
  • Go to the “Insert” tab in the ribbon.
  • Click on the “Import” option.
  • Choose the STEP file you want to open from your computer and click “Open.”

AutoCAD will then import the STEP file, allowing you to view and work with the 3D geometry within the software.

If you need to collaborate on webtech-related projects, AutoCAD’s compatibility with STEP files can be advantageous for integrating 3D design data into your webtech workflows seamlessly.

What Is STEP File Viewer?

A STEP file viewer is a software tool designed to open and view STEP files. STEP (Standard for the Exchange of Product Data) files are a common format used for sharing 3D models and product data between different CAD systems. 

A STEP file viewer allows users to visually inspect and navigate through the contents of a STEP file without the need for complex CAD software. 

It provides a user-friendly interface that enables zooming, panning, rotating, and measuring dimensions of the 3D model. 

STEP file viewers are particularly useful when collaborating with stakeholders who don’t have access to specialized CAD software but need to review or validate the design. 

They offer a convenient way to share and communicate 3D models with clients, suppliers, or team members who simply need to view the content of a STEP file.

How Do You Open A STEP File On Android?

To open a STEP file on Android, you can use various programs designed to handle CAD files. One such program is “CAD Assistant.” CAD Assistant is a popular CAD viewer and editor available on the Google Play Store. 

It supports a wide range of file formats, including STEP files. Once you have installed CAD Assistant on your Android device, you can simply launch the application and navigate to the location where your STEP file is stored. 

You can select the STEP file from there and open it within the CAD Assistant app. This allows you to view, analyze, and manipulate the 3D model contained in the STEP file directly on your Android device. 

CAD Assistant offers features such as zooming, rotating, measuring, and even making annotations on the model. 

It provides a convenient way to access and work with STEP files while on the go, making it a valuable tool for engineers, designers, and anyone involved in the CAD workflow.

Conclusion

A STEP file, also known as a Standard for the Exchange of Product Data files, is a common format used in the engineering and manufacturing industries to exchange 3D CAD (Computer-Aided Design) data. 

It stores information about the geometry, structure, and attributes of a 3D model. Many CAD programs and software applications can open STEP files, including popular programs like AutoCAD, Fusion 360, SolidWorks, and CATIA. 

These programs provide the necessary tools and functionality to view, edit, and work with the 3D models contained in STEP files.

Simplify product distribution with the Products RSS Feed for Opencart 4 free

In today’s digital age, product distribution is a critical aspect of reaching your target audience effectively. Whether you’re an e-commerce store owner, or content marketer, finding efficient ways to share your products or content updates is essential. This is where the Products RSS Feed Opencart module comes into play, offering a seamless solution for disseminating your product information. In this article, we’ll explore the benefits of this module and how it can enhance your content distribution strategy.

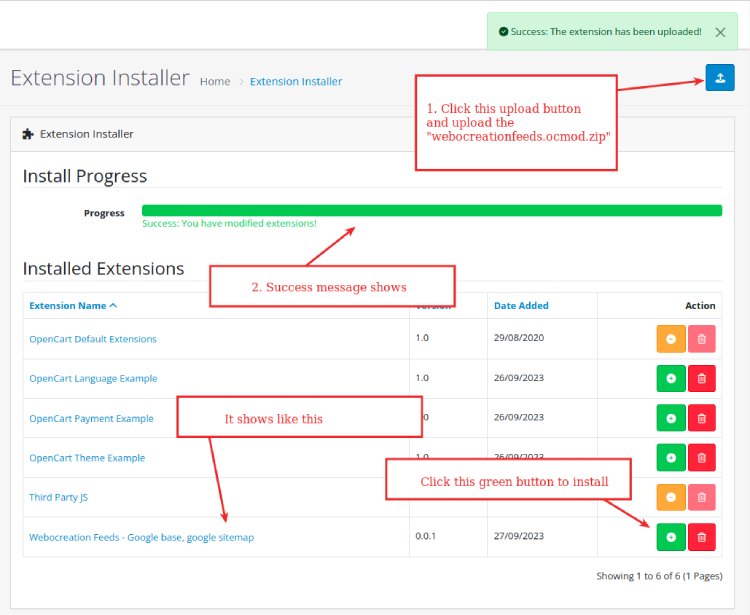
Click the above button to download the Google Base feed module, the file downloaded is webocreationproductsfeed.ocmod.zip. Now go to the Opencart admin >> Extensions >> Installer >> Then upload the file webocreationproductsfeed.ocmod.zip

Opencart extension installation

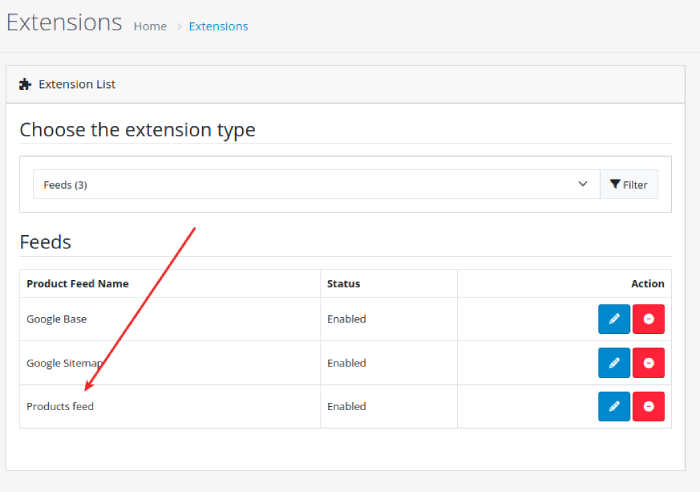
Once it is uploaded and installed. Go to Extensions >> Extensions and filter out to feed.

Products feed Opencart

Click the install button and then click the edit button.

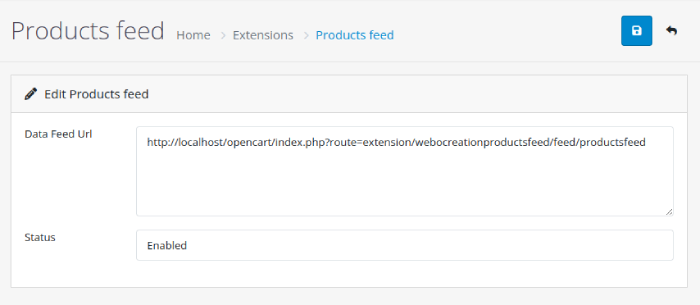
Product feed Opencart 4

Now, select Enabled and click Save.

Now go to the URL below:

https://YOURURL/opencart/index.php?route=extension/webocreationproductsfeed/feed/productsfeed

You will see XML of products ordered by date descendingly.

The Power of RSS Feeds

Before diving into the module, let’s understand the significance of RSS feeds:

1. Real-time Updates: RSS (Really Simple Syndication) feeds provide real-time updates about your website’s content. When you publish a new product or blog post, the RSS feed automatically includes this information.

2. Wider Reach: RSS feeds can be read by feed readers, and aggregators, and even integrated into other websites. This means your content can reach a broader audience beyond your website.

3. User Convenience: Subscribers can receive updates without having to visit your website regularly. This convenience encourages user engagement and loyalty.

Introducing the Products RSS Feed Opencart 4 module

Now, let’s explore how the Products RSS Feed Opencart 4 extension simplifies content distribution:

1. Automated Feeds: The extension automates the process of generating RSS feeds for your products. You no longer need to manually create and update feeds.

2. Customization Options: You have complete control over how your feeds are structured. Customize the feed title, description, and the number of items to display.

3. Multiple Feeds: Create multiple feeds for different types of content. For instance, you can have separate feeds for new products, blog posts, or specific product categories.

4. User-Friendly URLs: The extension generates user-friendly URLs for your feeds, making it easy for subscribers to access and subscribe to them.

5. Enhanced SEO: By providing RSS feeds, you’re also enhancing your website’s SEO performance. Search engines value regularly updated content, and feeds facilitate this.

6. Increased Reach: RSS feeds can be integrated into email campaigns, allowing you to reach subscribers directly in their inboxes with the latest updates.

7. User Engagement: Subscribers can stay up-to-date with your content effortlessly, increasing user engagement and encouraging repeat visits to your website.

Conclusion

The Products RSS Feed for Opencart 4 module simplifies content distribution by automating the generation of RSS feeds for your products. It’s a valuable tool for enhancing user engagement, expanding your content’s reach, and improving your website’s SEO performance.

By offering real-time updates through RSS feeds, you’re not only providing convenience to your audience but also staying competitive in the digital landscape. So, consider integrating the Products RSS Feed Opencart 4 module into your product distribution strategy and watch your audience engagement soar.

A Complete Guide to the UI Design Process, with an example of e-commerce checkout

Did you know that 88% of users will never use an app or site again after one bad experience? From this, you can see how vital UI design is. UI design goes far beyond aesthetics and has a decisive impact on user experience. In the guide below, we’ll tell you everything you need to know when designing user interfaces, from what UI is, to key elements, and the latest UI trends for 2022 and beyond.

What is UI design?

UI design, short for User Interface Design, refers to the process of creating the graphic layout of a digital product to support the final look and feel of the application. It includes images, animations, sliders, text fields, buttons, and various other elements that users interact with. Good UI design services lead to a friendly user experience, which is why UI design should be part of the software development process. Now let’s take a look at the elements you can use when designing your interface.

UI elements that designers should know

There are various UI elements in user interface design, which can be grouped into three categories:

Input element

Input elements are the most popular category. In the input element, the user provides various required information, such as age and reason for purchase. Input can be in a variety of formats, including text, graphics, and audio, but input elements can take the following formats:

  • dropdown
  • combo box
  • button
  • Toggle
  • text/password field
  • date picker
  • Checkbox
  • Radio button
  • Confirmation dialog

Output element

Output elements are the result of actions you take on input elements. It displays alerts, warnings, completions, errors, etc., and is never neutral. For example, if you upload an image in an unsupported format, you’ll see an “Unsupported Image” message, letting you know right away that you’ll need to submit an image in a different format.

Helper element

The third category is a general term for all elements that cannot be classified into the output or input categories. As the name suggests, it helps users understand what the site is about and how to use the interface. Helper elements are further divided into three subcategories:

Navigation: This helps you navigate the interface. Examples include menus, breadcrumbs, links lists, etc.

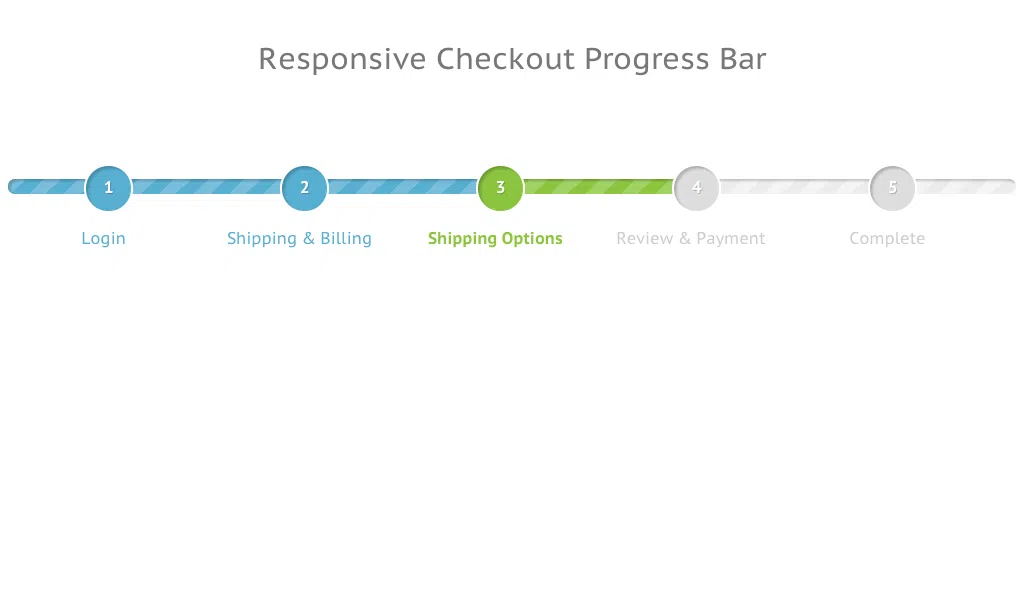
Information: Tells the user what step they are currently in or what process the website is currently performing. Examples include progress bars, icons, toolbars, etc.

Responsive checkout progress bar design

Container/Group: A container that holds various UI components together. These elements often come in the form of popups, sidebars, and widgets. For example, a newsletter sign-up box like the one pictured below is a good example.

Subscribe box best practice

 The importance of understanding the differences between UI design elements

As you can see from the three groups above, each element (output, input, and helper) has a different purpose, but UI designers must also distinguish between elements within the same group. Let me give you an example, you are trying to add a filter to an online supermarket page. You want to display only “vegan” products in search results. From a UI perspective, you’ll find several input elements.

Radio button list: Tap the correct option

List: Find the matching element and click “Vegan”

Dropdown: Scroll and tap the relevant product tag (selections are typically listed alphabetically)

Checkbox: Select not only “vegan” but also other elements such as “sugar-free” and “fair trade”

To see which elements to choose in terms of UI, you have to understand the user’s purpose and make it as simple and useful as possible to fulfill it! Speaking of simplifying user intent and interaction, this brings me to the next topic.

 Best principles of UI design

What is UI design? To make life easier for users. That is the main principle that leads to the success of UI design. By putting users at the center of your ongoing UI UX development company process, you’ll better engage and retain them. This means reading your users’ minds and using data to understand their behavior. The result is a more sophisticated product that meets user needs and expectations.

And there are high expectations for it. Users are spending more and more time online and are becoming more demanding than ever before. Even if you don’t realize it, or even if you don’t call it “UI design,” you know what kind of interface is good.

After all, what happens when users struggle to navigate an app or site?

I’ll stop using it. I’ll uninstall it. So applying the right principles to simplify the user journey is critical for your business. To get started, please do the following:

1. Minimize actions and steps per screen

Users want to get where they want to go with as few clicks and taps as possible. Especially when designing user interfaces for devices with small screen sizes, space is limited and navigation techniques need to be big, thick, and thumb-friendly.

UI UX best practice to minimize actions and steps

Keep your design focused both aesthetically and intentionally. It should be clear what the page or screen is, what the user needs to know, and what they need to do. For example, think of Amazon’s checkout page. Focused on product and price, auto-populated with details and shipping options, all you have to do is hit ‘buy’. Time is precious. With so many companies trying to capture the attention of their users, they can’t afford to risk “losing” to their competitors by not streamlining their tasks and actions.

2. Reducing cognitive load

Remember the Million Dollar Homepage? This is an order-of-magnitude example of cognitive overload. The bright colors and barely legible clusters of letters are eye-catching. You might be able to spot a business, like a casino or a small retail store, but before that, you’ll see another flashy pixel ad and forget everything that came before that. Cognitive load is the amount of information occupied in the brain. With that in mind, when designing an interface, your goal is to remove the clutter that users don’t need and make it easy for them to get the information they need back and forth. A common example is to toggle the color of links that the user has already clicked. You can see where you went at a glance without having to remember which page you visited. Her great UI design means users don’t have to think. It’s intuitive, and tasks are completed without you having to worry about your unsung design skills.

3. Make sure the dialog ends

Think about the last time you purchased something online. There was a three-part story there. The first part is to look for products. Part 2: Choose your product and proceed to checkout. The third part, receive your order confirmation. feel well. “If you do this, it will happen” is the simplest rule in the world, so it enters our brains. Throw this ball against a wall and it bounces back, R2D2 has the blueprint so Luke can destroy the Death Star, clicking “Buy” will notify you that the item is in your basket, and so on. Add “three parts” to user actions and feedback such as “added” notifications at each step.

4. Provide clear and easy-to-understand next steps

Have you ever scrolled through a web page and found yourself in a barren space like Arrakis? You’ll have to suddenly stop what you’re doing and have no choice but to scroll up, click back, or close the tab.

Please be very careful to prevent this from happening on your app or site. You’ve got the user where you want to go, what next?

At the core of UI design is guiding the user through the process. Subtly (or explicitly) tell them where to go and what to do next. Think about the location and function of your call-to-action ( CTA ) button. Use data to focus on user intent and placement to maximize engagement. For more information, check out our Guide: Basic Principles of User Interface Design.

Direction process path UI UX

A Hands-On Guide to Mobile-First Responsive Design

A method of UI design called “mobile-first design” puts the experience on small screens first.

It makes sense to build a variety of arrangements for your consumers since different devices require different layouts depending on their screen size and orientation. This post will demonstrate how to develop a product prototype for mobile devices first and then adapt it for tablet and desktop screens.

In UXPin, you can easily create your own responsive or adaptive variants. In UI UX design services, a sophisticated prototype tools, creates a mobile-first design and scales it up for tablet and desktop viewing. Create a free trial now and continue reading below.

What is the Mobile-First Approach?

Designing on the smallest screen first and working your way up is the mobile-first strategy. It is among the greatest methods for producing responsive or adaptive designs.

The mobile-first strategy is one of the tenets of progressive improvement. The idea is that since mobile design is the most difficult, it should be finished first. Designing for other devices will be simpler once the concerns around mobile design have been resolved. What it all comes down to is that the simplest designs will only include the most important elements, therefore you have already created the core of your UX.

The other strategy is gentle deterioration. This integrates all of the complexity from the beginning and eventually simplifies it for smaller devices. The issue with graceful degradation is that when you start with an all-inclusive design, the core and auxiliary components combine and become more difficult to tell apart. Since you’re “cutting down” the experience, the entire strategy runs the danger of considering mobile design as more of an afterthought.

Along with others, we highly advise adopting a mobile-first strategy for progressive development. In this post, we’ll go over several tips and tricks before concluding with a practical lesson in which we design a fictitious website using the mobile-first methodology.

Mobile-First = Content-First

Your website will perform better across all devices if it is user-friendly on mobile. The fact that a mobile-first strategy also puts content first is more significant. Mobile has the most restrictions, including those related to screen size and bandwidth, thus designing for it pushes you to prioritize content harshly.

The mobile-first strategy naturally produces designs that are more user- and content-focused. Users visit the site primarily for its content, which is its beating heart.

With that said, mobile users occasionally need different materials than desktop users. Context may be used to determine what your user would value more in a certain circumstance and place when determining device-specific content. Making user scenarios is the most effective technique to prepare in advance for this.

The ability of the small-screen breakpoints to better accommodate the information surrounding them is another benefit of the mobile-first strategy. Again, the poorest option is trying to fit an existing large design into a little framework. However, when using a mobile-first strategy, the breakpoints organically form around the content, eliminating the need for unpleasant modifications.

The Mobile-First Design Process

We’ll outline a procedure that benefits UXPin’s designers.

Wireframing is always advised as the first stage in order to arrange your layout as effectively as possible. We utilize the responsive breakpoint menu to speed up switching between different screen sizes, starting with the smallest, when wireframing or prototyping.

These settings lay out the ideal screen size for you, allowing you to wireframe while focusing solely on the information.

Our procedure follows these steps:

1. Content Inventory 

This is a spreadsheet or other document that has all the components you wish to be present.

2. Visual Hierarchy 

Determine how to present the most crucial components prominently by giving the content inventory’s components a priority.

3. Create the lowest breakpoints possible before scaling them up.

Utilize the mobile wireframe as a model for bigger breakpoints after constructing the mobile wireframe. When there is no more room on the screen, expand it.

4. Enlarge touch targets 

Fingers require larger components to tap on since they are broader than pixel-accurate mouse cursors. Apple now that touch targets are 44 pixels square (learn more about mobile design for iOS and Android). Make sure there is adequate space around all the interactive components, give hyperlinks enough room, slightly increase buttons, and give links plenty of room.

5. Don’t count on hovers

Although it should almost go without saying, hover and mouseover effects are frequently used by designers in their interactive work. Avoid doing that if you’re thinking of becoming mobile-friendly.

6. Think “app”

Users of mobile devices are used to the movement and some degree of control in their experiences. Consider expanding widgets, AJAX calls, off-canvas navigation, and other items on the page that visitors may interact with without needing to refresh the page.

7. Avoid large graphics 

Landscape photographs and intricate graphics don’t look good on a screen that is only a few inches wide. Images that can be read on portable screens should be targeted at mobile consumers.

8. Test it in a real device

There is nothing better than determining for oneself how usable (or not) a website is. Put your product on an actual phone or tablet instead of your desktop or laptop computer. Slide the pages. Is it simple to navigate the site? Is the loading speed fast enough? Are the images and text simple to read?

A Mobile-First Design Tutorial

Set your content priorities

In contrast to “desktop-first,” the “mobile-first approach” adds information to each increasingly bigger layout rather than removing it as we build smaller ones. Information is not to be eliminated when thinking mobile. Sorting data into primary, secondary, and tertiary content is what it signifies.

In this case, we already know that the home page has to include the name of the business and links to its products. It wouldn’t hurt to write a blog entry. But as we’ve already mentioned, not everything will fit into a smartphone view, so we prioritized what would help the site’s main objective—selling bikes—be achieved.

1. The newest model bike

2. The best-selling bike

3. “Find your perfect ride” CTA

4. Company name and hero image

5. Navigation

6. Search

7. The second-best-selling bike

8. Gift certificates

9. A testimonial

10. The latest blog post

Smartphone View

What quantity do consumers need?

Thinking mobile-first compels us to consider what matters most. Can we leave other things, UI/UX design services company such as gift certificates, a less popular model, and the most recent news, for interior pages in this smartphone view where the best-selling bike and the newest model will directly drive to sales? The last call to action is very clear and simple to activate with a single finger press.

Tablet View

We are better equipped to provide ancillary information like extra items (like “The Capacitor”) since we build for a tablet-sized display. We may also include more information that stimulates purchases without actually generating them, such as testimonials, and enlarge the navigation bar at the top of the page.

This may often be even more challenging than choosing what to put in a smartphone UI because there are more alternatives accessible. The line separating secondary from tertiary parts is hazy, and the desire to incorporate everything is great.

Defy the desire. Use the list of the sorted content. Space remains an issue, much with cell phones

Desktop View.

Finally, the desktop view may accommodate any amount of data you deem significant. The home page may now accommodate whatever information you deem appropriate, whether or not it does so. Take note of a few of the additions we made:

Gift cards Testimonials from clients

Examining the newest Lightning Bolt bike in a blog post

Design device-appropriate layouts yourself

It’s quite simple to design several layouts for these views if you’re using UXPin.

  • Open a UXPin prototype.
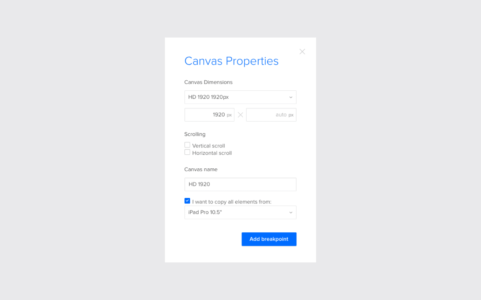
  • Tap “Add new adaptive version” at the bottom right of the UXPin editor
  • Select a predetermined size or insert your own measurements.
  • You don’t have to recreate everything from scratch. Select a size to copy your design’s components.

The end of that. By pressing the various canvas sizes above it, you may toggle between breakpoints and change each one to fit your needs. You are welcome to experiment with mobile-first prototyping yourself. Sign up for a free trial of UXPin.

How is the disruption of 2023 changing the way organizations manage their supply chains?

Disruption in the supply chain

The supply chain encompasses all stages from the time the customer generates the order for a product until it is delivered and charged, covering phases such as the supply chain of goods for its manufacture or quality control. Any variation throughout this process can cause inefficiencies or, ultimately, breach the objective of the supply chain: that the merchandise reaches the final customer with the required quality and in the agreed time and place.

It is understood as disruption in the supply chain, therefore, the alteration of any phase of the supply chain caused by agents external to the product: climatology, changes in legislation or cyberattacks, among others.

We can classify the different disruptions according to their origin:

Natural: These are nature-related catastrophes, such as earthquakes, tsunamis, or volcanic eruptions.

Biological: originate from epidemics or pandemics, such as coronavirus or Ebola. Given the globalization and internationalization of an increasing number of companies, a good prevention policy in the supply chain will be crucial to prevent its spread.

Policies: derive from government decisions or supranational institutions that directly influence the proper functioning of the supply chain. This is the case of the trade war between the United States and China or the 1973 oil crisis.

Technological: from errors or malicious use of certain technologies ( global server drops, data leaks, cyberattacks, etc ).

How to prevent risks in the supply chain

Although there are unexpected disruptions that can alter industrial activity, prevention is key to avoid or mitigate the effects of such alterations.

To that end, organizations should analyze each phase of the product supply chain and identify possible risks related to its operation: excessive dependence on a supplier, tight room for maneuver due to errors in the management of the last mile or excessive seasonality of a product, among others.

What is the solution then? Beyond knowing the product and determining possible threats, today there are tools to monitor and analyze the performance of all parts that make up the supply chain, in addition to how to apply continuous improvement projects to increase the productivity of its operations.

How to manage a disruption: logistical action plan

As part of the process of preventing a disruption, every company must, based on an examination of the threats present in its supply chain, develop an action plan to alleviate or nullify the effects of a catastrophe on your premises.
Thus, any action plan must follow the following guidelines:

Analyze the causes and consequences that disruption causes in the production, storage or transportation of merchandise to the end customer.

Prioritize by importance, to guarantee the safety of personnel and those who may be exposed to the effects of the catastrophe. Once this is checked, the stored material, raw materials and installation must be secured.

Listen to all the participants of the supply chain: An action plan should not be limited to information specific to the company’s activity, but should also integrate that of other participants in the supply chain. After all, this is the only way to ensure correct traceability on the product.

Collaborate with external agents: either with other logistics companies, such as 3PL ― have more knowledge on the ground ―, with other links in the supply chain mangement or the relevant authorities.
Once the guidelines that any action plan must contain to be effective in the face of supply chain risks have been described, its execution must be prepared. The consultant PwC points out the following phases: prepare ― the planning we just saw, which is to assess the main threats and how to mitigate their effect ―, answer ― execute the agreed lines of action to reduce the impact on the company’s productivity ― and, finally, recover and collect information on what impact the disruption has had ― and thus interpret how the plan has worked and what aspects need to be improved in the event of a possible repetition ―.

Examples of disaster risk management

Any company specialized in the design and construction of infrastructures must take into account not only the materials and the land destined to build, but also the weather conditions, in addition to seismic risk or the presence of volcanoes in the area, etc.

Thus, when Mecalux develops self-supporting warehouse projects, in which the shelves form the structure itself, bearing the weight of the complex, company engineers also assess the impact of all external variables: wind force, snow overload, type of terrain, etc.

These are some of our projects where risk management played a crucial role:

Iron Mountain

Five months before the devastating 8.8 earthquake on the Richter scale that devastated Chile in 2010, the documentary registration company Iron Mountain had hired Mecalux to build one of its many warehouses in the South American country. After the earthquake, the company lost seven of its facilities, but Mecalux resisted.


Big data and analytics

Macrodata, analytics, and automation are enabling organizations to mitigate shocks through agile and digital management of the supply chain. The implementation of predictive and prescriptive analyzes, as well as advances in big data, algorithms and robotics, will have far-reaching effects. Organizations that harness the power of these solutions will benefit from increased synchronized visibility, planning and execution, data-driven decision making, predictability, agility, and profitability.
2. Digital supply chains

Digital supply chains will continue to be essential elements of many trends on this list, such as risk, resilience and security. Successfully digitizing supply chains requires large-scale sensor deployment over the Internet of Things; digital twins; shared internal and external interfaces, as cloud-based networks; and automation and process verification. The best organizations will embrace the capabilities of the digital supply chain or lag behind more agile and more efficient competitors.

3. Supply chain risk and resilience

Risk and resilience of the supply chain require collaboration between global networks that are very complex and highly interconnected. Key strategies include supplier diversification, production capacities, and transportation processes, as well as searching for alternative materials and non-traditional partnerships. Many supply chains will become more compact and localized. Resilient supply chain design will also be critical to mitigating adverse events faster than competition, offer excellent customer service and generate value and market share.

4. Artificial intelligence and machine learning

Artificial intelligence and machine learning, key components of many trends on this list, are becoming a driving force to maximize and enable systems thanks to interoperability in various business scenarios. They are essential for integrating people, processes and systems into a wide range of operating environments. The evolution driven by technology towards industry 5.0 -which implies a more collaborative approach-, as well as between humans and robots, will have a significant impact on numerous functions of the supply chain.

5. Robotics

Labor shortages, supply disruptions and increases in demand are forcing organizations to resort to robotics and, as a result, Smart robotics is transforming supply chains by transforming supply chains. Driven by rapid technological and affordable advancements, mobile and fixed robots will assist workers in the tasks of last mile storage, transportation and delivery. Safer, more efficient warehouses, with fewer staff, will reduce costs. Although the initial capital investment will be high, the cost savings will be spectacular.

6. Data security and cybersecurity

The more digital supply chains become, the more vulnerable their global networks are to cyber attacks. This interconnectedness means that supply chain actors can unintentionally expose themselves and their customers to privacy violations, identity theft, and worse. Greater collaboration is to be expected in protecting networks, devices, people and programs.

Smart Selling Strategies: Programming, E-commerce, and the Art of Budgeting

Success isn’t just about what you sell. It’s about how you sell it. At the core of your business lies smart selling strategies, directing your journey toward profitability. A well-crafted sales strategy has the capacity to pinpoint your target audience, gain insight into their requirements, and present your products or services in a manner that resonates with them. It constitutes the distinction between mere sales and the art of selling with finesse.

Making the Most of Smart Selling Strategies

Smart selling, often referred to as strategic selling or consultative selling, represents an evolution in the world of sales. Diverging from conventional sales methods, it adopts a more forward-thinking and customer-centric approach to marketing products or services.

Here are the key principles and characteristics of smart selling:

Customer-Centric Approach

Smart selling begins by delving into the customer’s requirements, identifying their pain points, and understanding their objectives. It entails actively listening to the customer, posing insightful questions, and focusing on how your product or service can effectively address their distinct challenges.

Remember, it’s not merely about sealing a one-time deal; it’s about building enduring, trust-based relationships with your customers. Smart sellers aim for repeat business and referrals by providing exceptional value and service.

Data-Driven Problem Solving and Insights

Smart selling focuses on solving problems and adding value. Sellers actively look for ways their offerings can address specific challenges or opportunities for the customer. It often incorporates data and analytics to understand customer behavior, track sales trends, and make informed decisions about strategy and approach.

Long-Term Scalability and Adaptability

The modern sales landscape is dynamic, so you must become adaptable to be a smart seller. Smart selling looks beyond immediate sales quotas. It considers the long-term impact of each sale on the customer’s business and the potential for ongoing business growth. Thus, you will need to pivot your approach and strategies as market conditions and customer needs change.

The Role of Employees in Smart Selling Strategies

Your team constitutes the essential foundation of your business. Achieving success requires more than just a skilled workforce; it demands a team that is motivated and fully engaged. Strategizing work schedules is a powerful tool to boost productivity and engagement. 

Empower your employees by offering flexible work arrangements, advocating for a harmonious work-life balance, and creating avenues for skill enhancement. When your team is motivated and fully engaged, they are more inclined to exert the additional effort needed to drive your business towards success.

Adapting Smart Selling Strategies to Your Business

The best smart selling strategies can vary depending on your industry, target audience, and specific business goals. However, some core smart selling strategies are universally effective.

Smart Selling for Programming

Whether you’re selling software, coding services, or tech solutions, you need a deep understanding of your target audience and the unique challenges they face in the tech industry. Here are some smart selling strategies tailored to programming:

  • Targeted Niche Marketing: Identify a specific niche or industry where your programming services or solutions excel. Tailor your marketing efforts to address the pain points and needs of that niche.
  • Demonstrate Technical Expertise: Showcase your technical knowledge and expertise in programming languages, frameworks, and tools. Prospective clients are more likely to trust you if they see you as a technical authority.
  • Custom Software Development: If you offer custom software development, emphasize the benefits of tailored solutions. Highlight how your programming team can create software that aligns precisely with the client’s requirements.

E-commerce Excellence: The Digital Frontier

The digital world is where businesses thrive today. Regardless of whether you’re an experienced e-commerce expert or embarking on your journey, mastering the art of e-commerce is non-negotiable. It revolves around crafting a seamless online shopping experience that entices customers to return for more. Below, you’ll discover a set of strategies designed to guide you in achieving your sales objectives:

  • User-Friendly Website: Your website is your virtual storefront. Make sure that it is user-friendly, visually appealing, and easy to navigate.
  • Optimize Online Presence: Use SEO and social media to increase your online visibility. Reach more potential customers where they spend their time.
  • Efficient Fulfillment: Streamline order fulfillment to provide quick and reliable service. Satisfied customers are repeat customers.

Additionally, for an e-commerce business, the quality of your products can make or break your reputation. Investing in inventory quality control is essential to ensure your products meet the highest standards. By rigorously inspecting and testing your inventory, you can minimize defects and reduce product returns. Not only does this save you money, but it also enhances customer satisfaction and loyalty.

Budget Like a Pro

Every dollar counts, and in the ever-evolving landscape of business, mastering the art of budgeting is the key to financial stability and growth. Effective budgeting doesn’t just involve knowing where your money goes; it’s about allocating resources strategically to maximize ROI. Master this art by doing the following:

  • Create a Detailed Budget: Break down expenses, revenue streams, and goals. A detailed budget is your financial GPS.
  • Prioritize Spending: Allocate resources where they’ll yield the most significant return on investment. Trim unnecessary expenses and invest in growth.
  • Regularly Review and Adjust: A budget is a dynamic tool. Regularly review it and make adjustments as needed to stay on course.

The Bottom Line

Smart selling revolves around the recognition that successful sales aren’t solely about imposing products on customers, but rather aiding them in accomplishing their objectives. It involves cultivating mutually beneficial relationships, centering on the customer’s requirements, and providing substantial value. It is a continuous journey of acquiring knowledge, adjusting to changing circumstances, and delivering solutions that ultimately culminate in enduring success in sales.

Opencart tutorial – how to code single and multi-instance module?

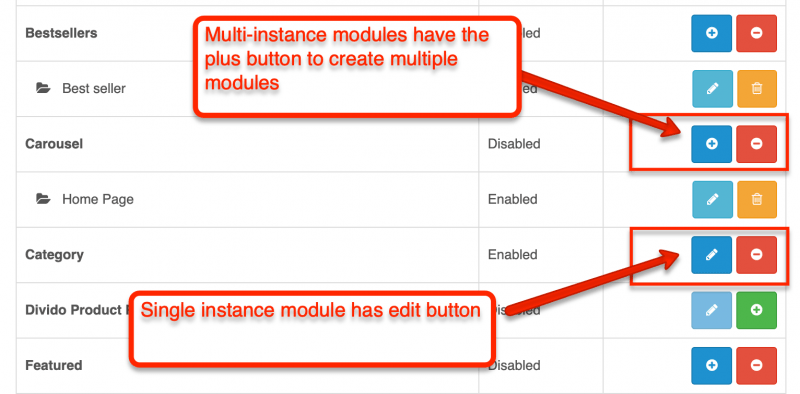
In this Opencart tutorial, we are showing you the difference between the coding structure of a single instance Opencart module and an Opencart multi-instance module both in the admin section and the catalog section. In a single instance module, you install and can create only one setting and can use it in multiple places, but everything will be the same. In the multi-instance module, you install and can create multiple modules and can add different settings and can use them in multiple places with different content.

Single Instance Opencart moduleMulti-Instance Opencart module
After installation, it will create only one moduleAfter installation, it can create many modules as many as needed
Single vs Multi instance opencart module
Example of core available only one instance Opencart module are: Account module, Category module, Information module, etcThe name of the form field can be any
Admin section code change
$this->load->model(‘setting/setting’);$this->load->model(‘setting/module’);
$this->model_setting_setting->editSetting(‘module_login’, $this->request->post);if (!isset($this->request->get[‘module_id’])) {
his->model_setting_module->addModule(‘bestseller’, $this->request->post);
} else {
$this->model_setting_module->editModule($this->request->get[‘module_id’], $this->request->post);
}
Name of the form field should start with the extension initials, for the module, it is like name=”module_*****”, for the shipping extension, it is like name=”shipping_***”, for payment extension name=”payment_***” etc.Data are saved in the oc_module database table
Some other extra codes for multi-instance opencart module are:
– Form action link needs to be if-else as per module id
– Last Breadcrumbs link need to link to module id link
Extra code:
if (isset($this->request->get[‘module_id’]) && ($this->request->server[‘REQUEST_METHOD’] != ‘POST’)) {
    $module_info = $this->model_setting_module->getModule($this->request->get[‘module_id’]);
}
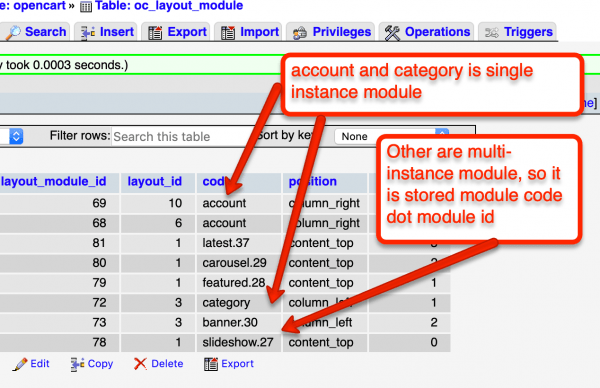
In the oc_layout database table, the code dot module id is stored in the code column
Catalog section code change
The code difference in the controller is at the index method.
public function index() {
public function index($setting) {
Data are saved in the oc_setting database tableIn the oc_layout database table, the cod will be stored in the code column
Opencart database layout
Some other extra codes for multi-instance opencart module are:
– Form action link needs to be if-else as per module id
– Last Breadcrumbs link needs to link to the module id link
Extra code:
if (isset($this->request->get[‘module_id’]) && ($this->request->server[‘REQUEST_METHOD’] != ‘POST’)) {
    $module_info = $this->model_setting_module->getModule($this->request->get[‘module_id’]);
}

These are the differences between a single-instance module and a multi-instance module of Opencart. If you are looking for an Opencart module development tutorial, here are the two videos and four posts that will help you understand the code and flow of Opencart modules.

Please let us know if you have any questions or suggestions, please subscribe to our YouTube Channel for Opencart video tutorials and you can see more at Opencart tutorial category. You can also find us on Twitter and Facebook. Enjoy!

Import youtube videos as WordPress posts – free WordPress plugin

Free WordPress plugin to import youtube videos as WordPress posts, it imports youtube titles, youtube descriptions, and youtube date and assigns them to the selected author and category. Video content has become increasingly popular, and YouTube remains the go-to platform for sharing and consuming videos. If you have a WordPress website and want to import YouTube videos as WordPress Posts into your content strategy, then you can download and use this free WordPress plugin. Click below to download:

Introducing the Youtube Video Importer Plugin:

The “YouTube Video Importer” plugin helps to import YouTube videos as WordPress posts. To import you need to create a JSON file and upload it to the plugin. Download the plugin by clicking the above button and it seamlessly integrates with WordPress and makes it easy to import YouTube videos directly as posts. The plugin offers various customization and you can import it to any specified category and assign it to specific authors as well.

Install the Youtube Video Importer Plugin

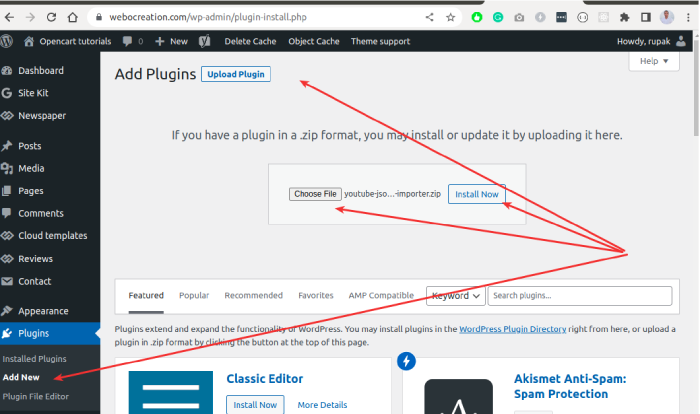
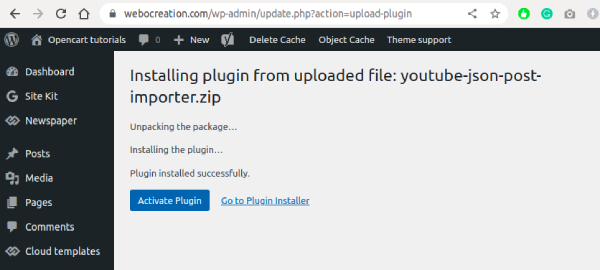
Download the plugin by clicking the above button and go to the word press admin >> plugins>>add new>> upload plugin>> install now >> activate the plugin.

Upload youtube import plugins
Activate youtube JSON post plugin

Create Google Cloud Youtube API V3 API key:

Now you need to create an API key in Google Cloud to get the JSON file. For that follow the following steps:

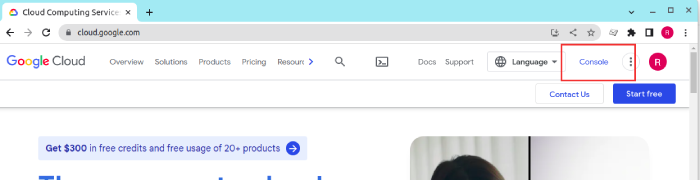
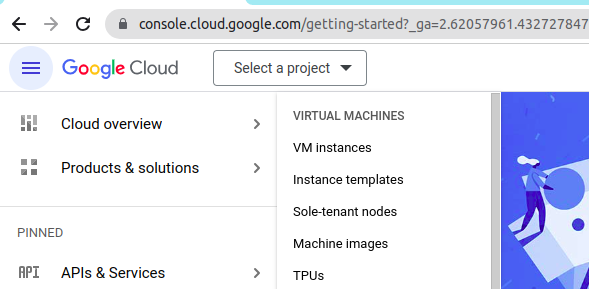
Go to https://cloud.google.com and log in with your Gmail account and click on the “Console”

Google Console

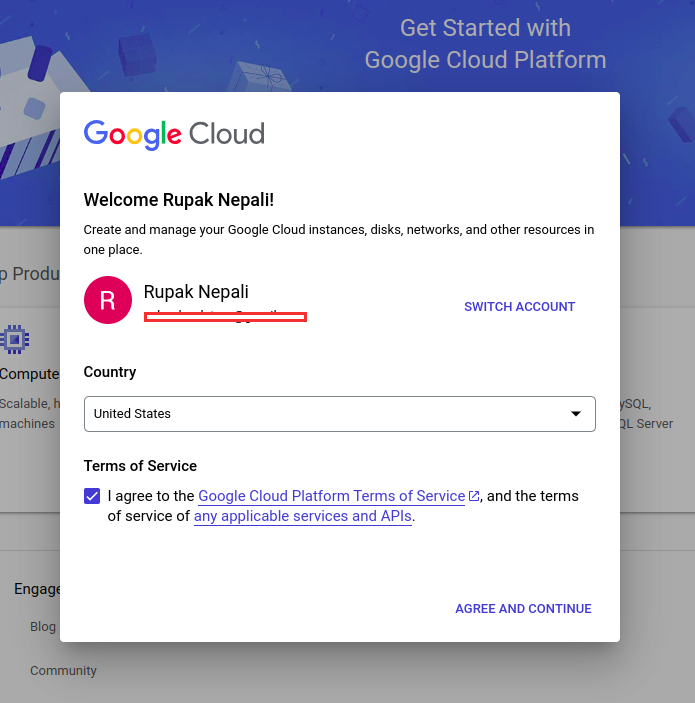
Now agree to the “Terms of Service” and click “Agree and Continue“.

Google Cloud Terms of Services

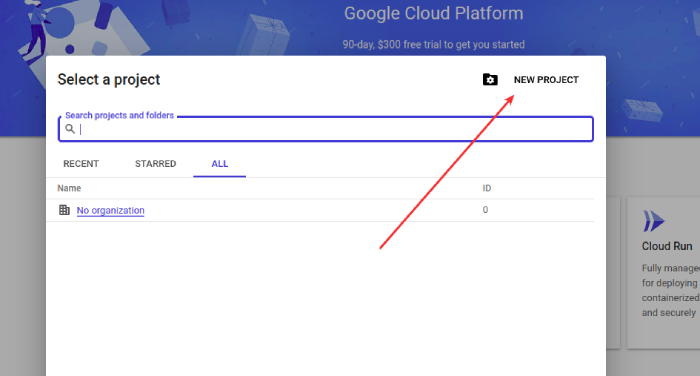
After that, click the “Select a project”

Click “NEW PROJECT”

New Project Google Cloud

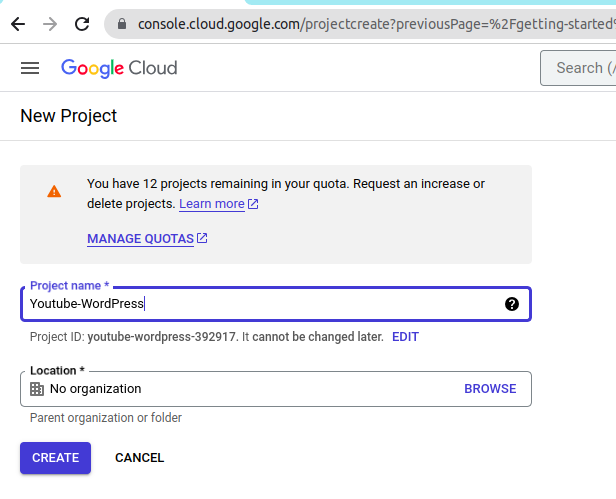
Enter the “Project name” and click “Create”

New Project creation

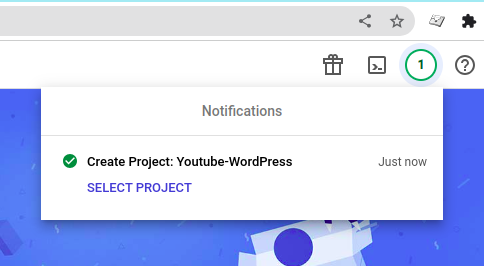
Once you click the create, it will take some time to create the Project. Once it is created, select the project.

Select project youtube wordpress

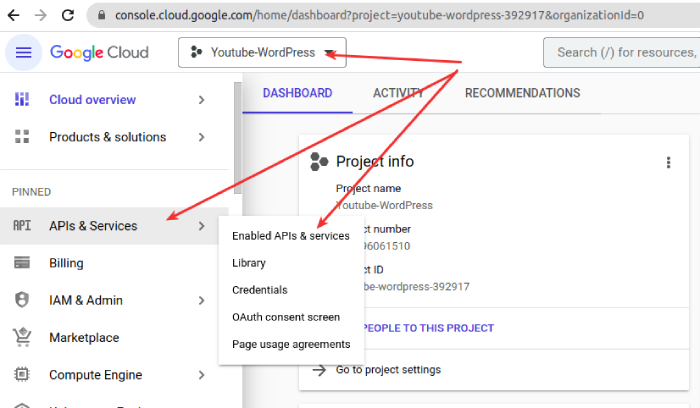
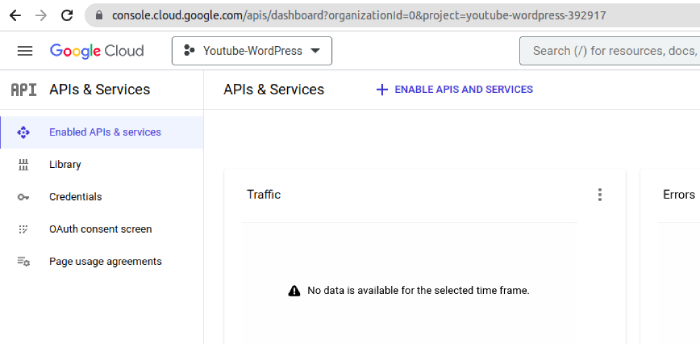
Once you select the project, in the left menu select the “APIs & Services” >> “Enabled APIs & services”

Youtube WordPress APIs service setup

Now click the “+ ENABLE APIS AND SERVICES”

Enabled Youtube API V3

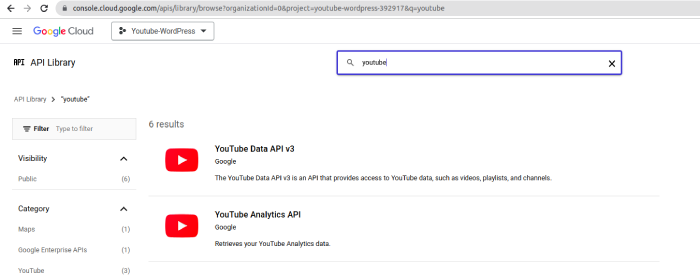
Search for “Youtube” and select “Youtube Data API v3”

Youtube Data API v3

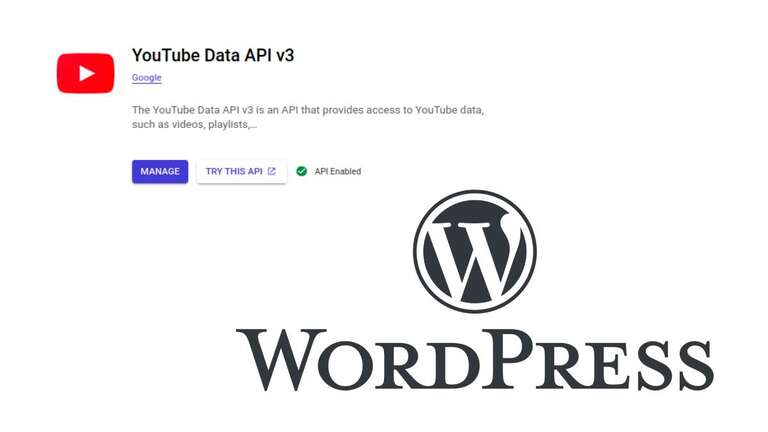
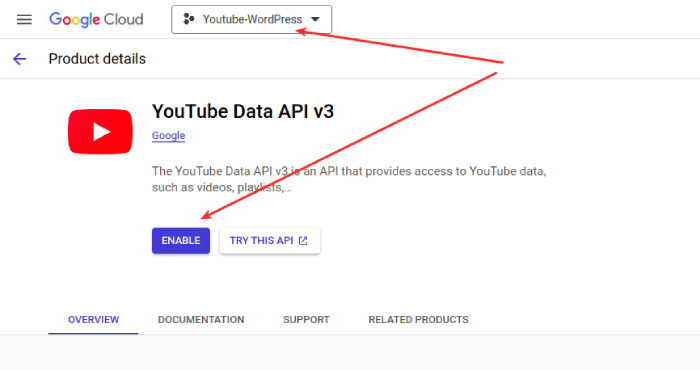
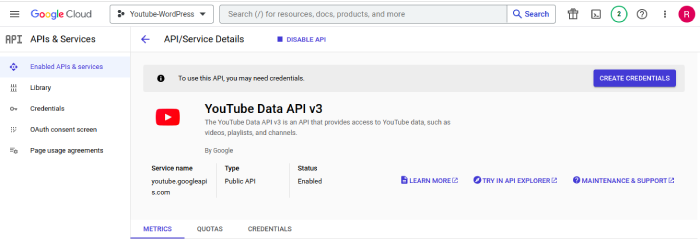
Once you selected the YouTube Data API v3, you will see like below, click the “ENABLE” button to activate the YouTube Data API v3.

Youtube data API v3 Enable

Once you enabled the Youtube Data API v3, you need to create the credentials. To create the credentials, click the “CREATE CREDENTIALS”

Youtube Credentials API key

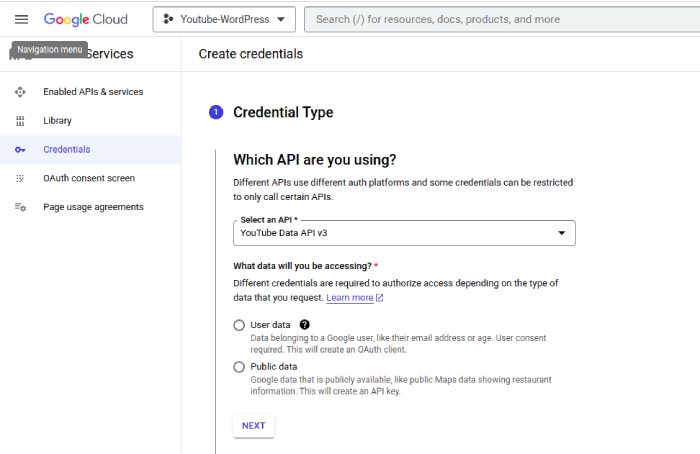
Once you click the Create Credentials, you will fill out the form below, select the “Youtube Data API v3” select “Public data” and click “NEXT”.

API public Data activate

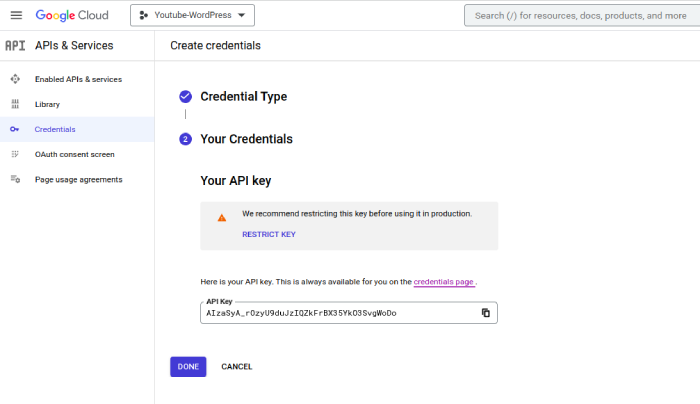
You will see the API Key like below:

API key

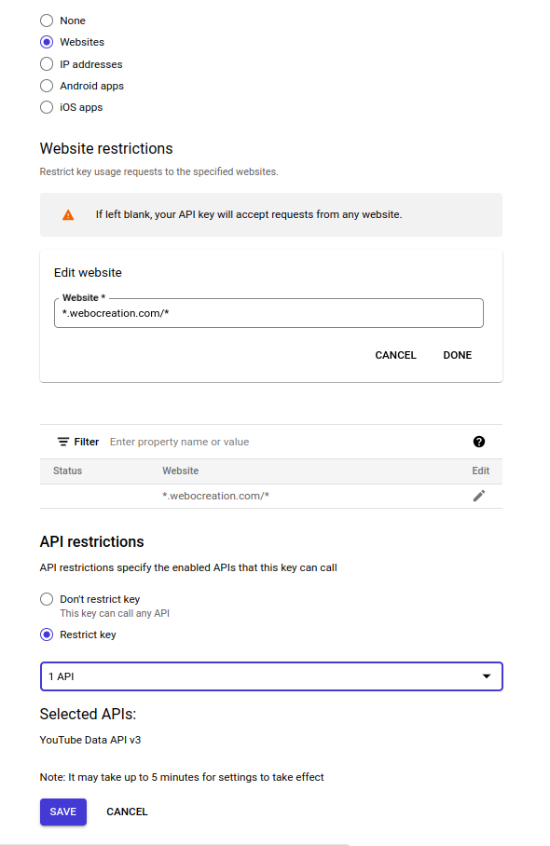
Click the “RESTRICT KEY” and add your website or IP and assign to the API key.

Restrict Key API

Now your API key is generated. You copy that key, save it, and click DONE. Here is the API key that is generated for our website AIzaSyA_rOzyU9duJzIQZkFrBX35YkO3SvgWoDo

How to find the Youtube Channel ID?

You can find the Youtube channel ID from the URL as well, for example, if you find the URL like https://www.youtube.com/channel/UCVsTBiG6oCFg0LyrF5l37Hw then the channel ID is UCVsTBiG6oCFg0LyrF5l37Hw But sometimes you will find username at the URL like https://www.youtube.com/@OnlineGyanNepal so you can get the channel ID by entering the name in the following input field and get the channel ID.

[youtube_channel]

Get the JSON file of the Youtube videos

Now the full URL is like below where the channel ID is the channel ID of your youtube and the key is the API key that you created in the Google Cloud console.

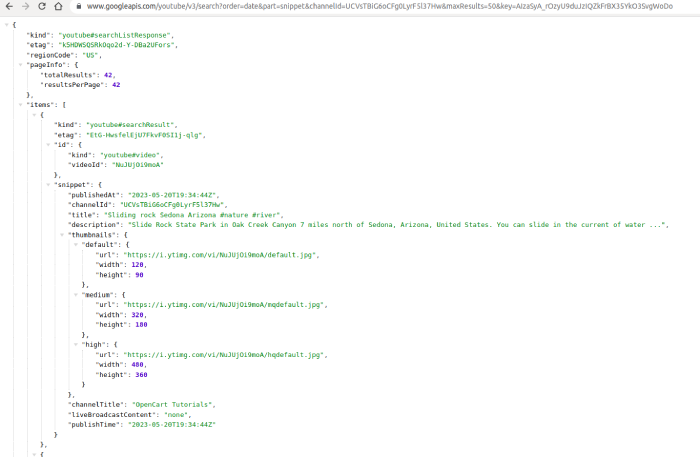
https://www.googleapis.com/youtube/v3/search?order=date&part=snippet&channelId=UCVsTBiG6oCFg0LyrF5l37Hw&maxResults=50&key=AIzaSyA_rOzyU9duJzIQZkFrBX35YkO3SvgWoDo

Change the above URL with your channel id and key and open it and you will find the JSON for youtube video data. So, save it as a .json file and your file is ready to upload in the Youtube JSON importer as a Post plugin.

Youtube JSON

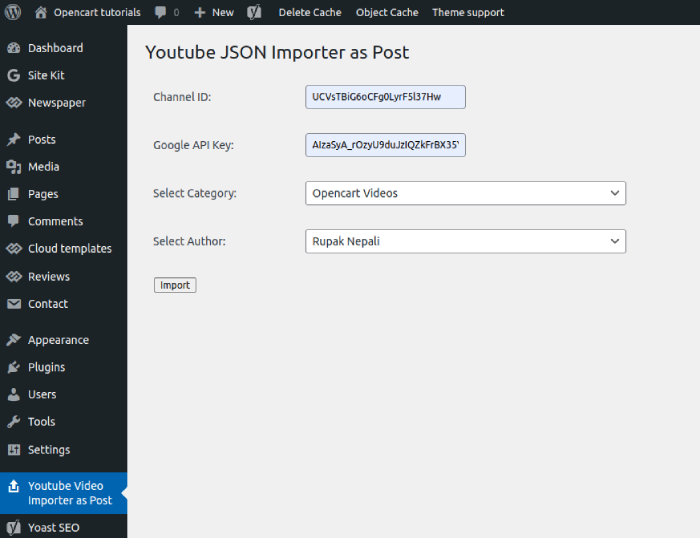
Now, upload the saved JSON file to the “Youtube JSON Importer as Post” plugin, and select the category, and author that you assigned to the videos.

Youtube video Import as wordpress post

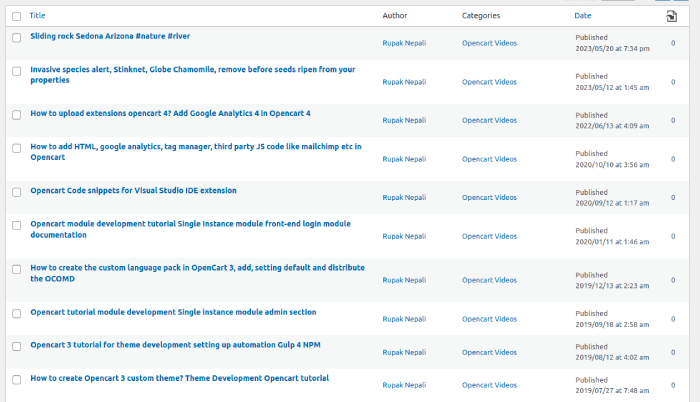
Once the import is completed, you will see the posts in the selected category:

Youtube Video imported as Posts

Conclusion:

The “Youtube JSON Importer as Post” plugin helps to import youtube videos as WordPress posts, it imports youtube titles, youtube descriptions, and youtube date and assign them to the selected author and category. Hope you liked this post, please let us know if you have any questions or suggestions, please subscribe to our YouTube Channel for Opencart video tutorials. You can also find us on Twitter and Facebook. Enjoy a free WordPress plugin to import Youtube Videos as WordPress posts.

Free Opencart module to show WordPress blog posts in Opencart 4

Another free Opencart 4 module by the Webocreation team to show WordPress blog posts in Opencart. In the WordPress blog posts show extension you will have the option to add a custom title, change the WordPress URL, add a number of blog posts, and module status. Download the module for free from the link below:

Installation:

Go to Opencart Admin

Left menu >> Extensions >> Installer

Opencart WordPress

Once installed, you can go to Extensions >> Extensions >>Choose the extension type “Modules” and in the list of modules, you will see the new module called “Show WordPress Posts“, click the install button and the installation is complete.

Configuring the “Show WordPress Posts” module

Go to Extensions >> Extensions >> Choose the extension type “Modules” and in the list of modules, go to “Show WordPress Posts” and then click Edit, and you will see the form below and start adding the details.

Opencart WordPress setting

Frontend Blog Title: This is the title that will show at the top of the blog posts.

WordPress Full URL: This module uses the WordPress REST API endpoints to fetch the posts. You just need to enter the full URL of the WordPress blog. If the blog is installed in the sub-folder then you need to enter the full URL, like https://rempub.com/blog/ or similar.

Number of Posts to Show: This will pull the number of posts to show in the front end where the module is added to the layout.

Status: Enable the status.

In this way, you can configure this WordPress Opencart module.

Add WordPress Opencart module to Layout

Once you install and configure the module, now you need to add to the layout to show at the front end. We are showing you to show on the home page, so we will add it to the home layout. To do that, go to admin >> Design >> Layout >> edit the Home and add the module and select “Show WordPress posts”. In the below screenshot, we added the module at the Content Top and Save.

WordPress Opencart layout

Frontend view of WordPress Opencart blog posts show

Here is how the WordPress blog posts are shown in the Opencart 4.

Opencart WordPress blog post show

Conclusion

In this way, you can show WordPress blog posts in Opencart with this free Opencart module. Please let us know if you need any support or find any issues with this Opencart extension. Please subscribe to our YouTube Channel for Opencart video tutorials and get many other Opencart free modules. You can also find us on Twitter and Facebook