Hubspot tutorial to add a custom field in the Hubspot blog post template and show them on the blog detail page and listing page. For example: we want to add different content and change the summary or description on the listing page of the blog, like on the author page, blog page, tag page, etc. First, we find what template is in use, find if we need to create the child theme, create or edit the blog post template, create or edit the blog listing template, and show a different summary than the existing truncated body content.
Find which template is used in the Hubspot blog
To find the template and theme used in the Hubspot blog, follow the following steps:
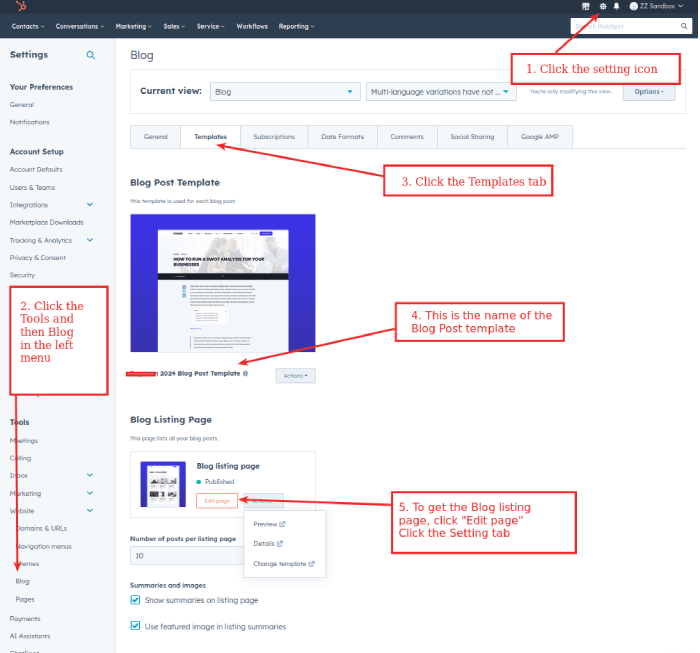
- Click on the setting icon at the top right corner
- Then in the Left menu, find Tools >> Website >> Blog
- Then, click the Templates tab
- Now, you can see the Blog Post Template name, here the name is “2024 Blog Post Template”, this is the blog or article detail page
- To get the blog listing page, click the “Edit page” in the Blog Listing Page section, then the Settings tab, and then in the Advanced options, you can see the template name.
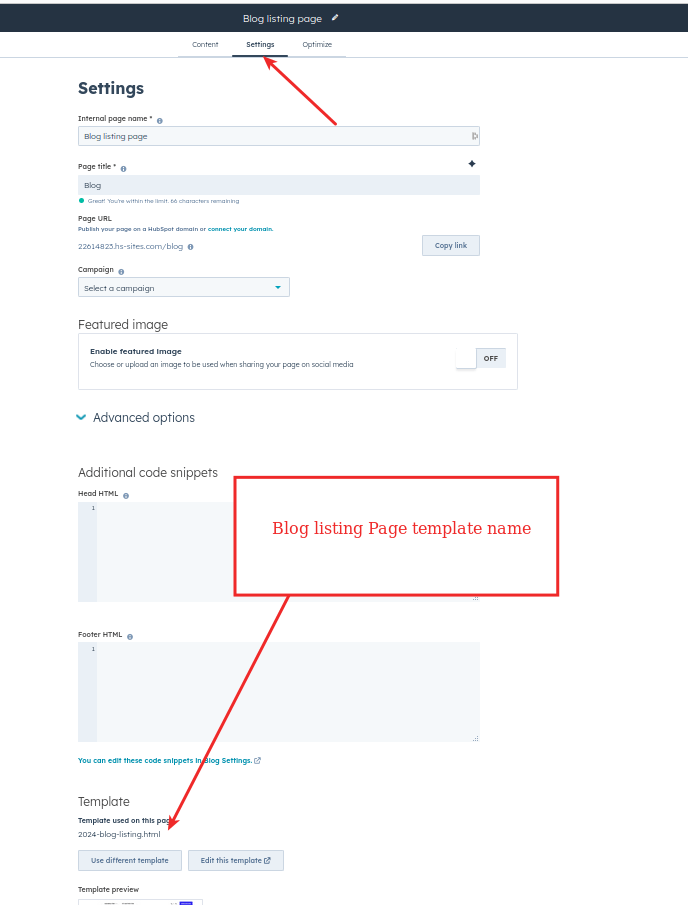
There are two templates for the Hubspot blog, one blog listing page, and the individual blog posts. With the above steps, you can now know which file is used for the blog listing and post templates. Now you need to find the files on the Design Tools.
Blog Post Template code
To get the Blog Post Template, go to Settings >> Tools >> Website >> Blog >> Templates tab and see the Blog Post template >> click the Actions >> Click edit.
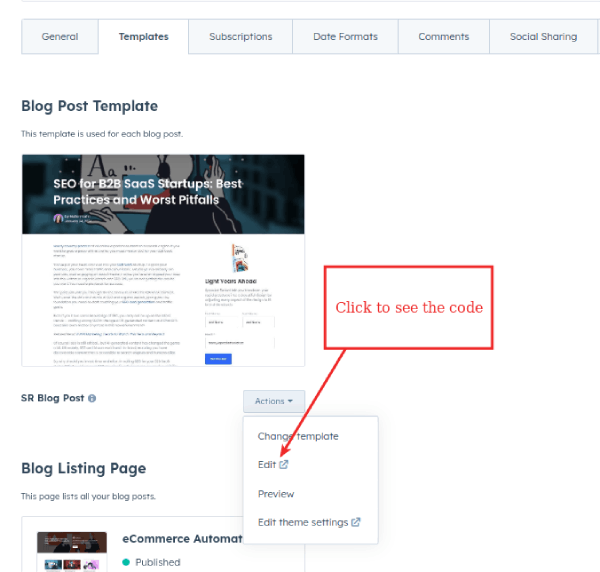
You will see similar codes below:
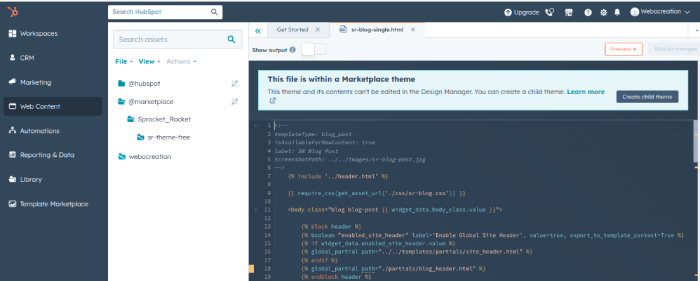
If you see “Create child theme“, then you need to create a theme file in your child theme. We are not discussing that part as in this tutorial we are showing how to add the custom field in the blog post, so either you need to create the Blog Post Template or find it in the active theme. Once you find the file you can verify the name label and template type as blog_post. It is something like below at the top of the code section
<!--
  templateType: blog_post
  isAvailableForNewContent: true
  label: 2024 Blog Post Template
-->
Add custom field code in Hubspot Post Template
As planned we wanted to add the text field to add the custom summary, so for that, we need to add the text module and the code is like below:
<div class="blog_custom_summary">
            {% module "blog_custom_summary" path="@hubspot/text", label="Enter Blog Custom Summary", value="" %}
</div>
You don’t need to add export_to_template_context=True on the above code, if you add it, it will not show in the blog.
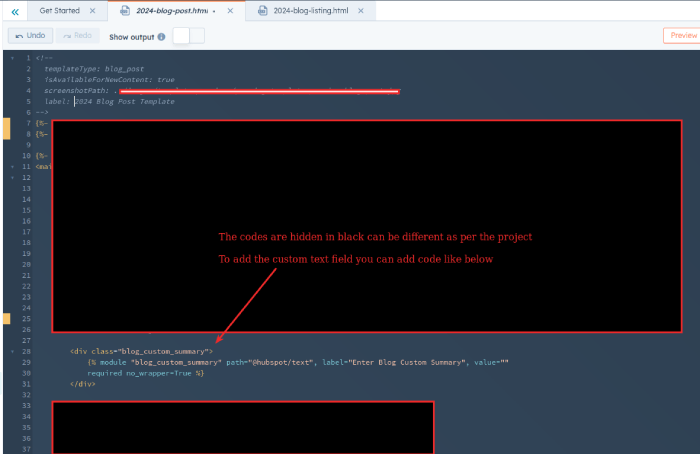
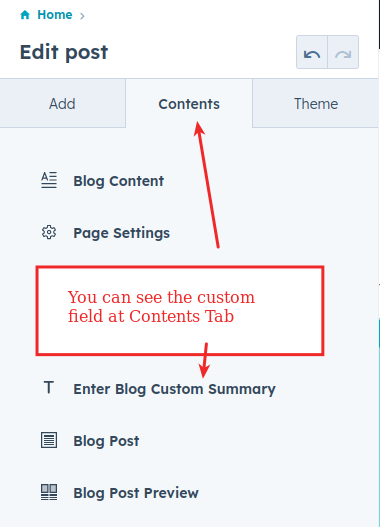
With this code when you add or edit the blog post, then you will able to see the field in the Contents tab, and you can see the “Enter Blog Custom Summary”
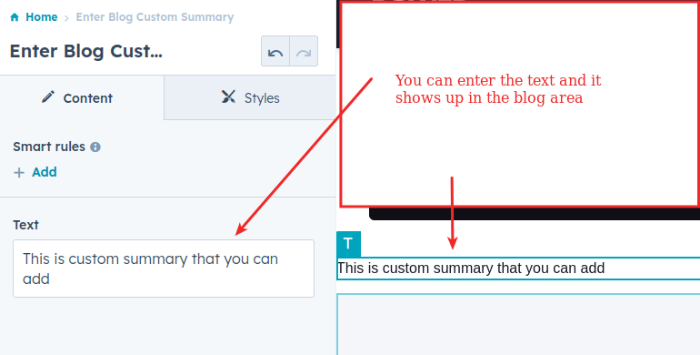
Click the “Enter Blog Custom Summary”, and you will see the input box below, where you can enter the text which will show up in blog area as well.
Blog listing page template code change to show the custom field
Now, we want to show this custom summary on the blog listing page as well, so go to Settings >> Left column >> Tools >> Website >> Blog >> Templates tab >> Blog Listing Page section >> Edit Page >> Settings tab >> Advanced Options >> Template section >> Edit this template. To verify the blog listing page, you can see the code below at the top of the page.
<!--
  templateType: blog_listing
  isAvailableForNewContent: true
  label: 2024 Blog Post Template
-->
In this code page, you can add the following code to show the custom summary where it is needed.
{{ content.widgets.blog_custom_summary.body.value }}You can implement it as per your needs and add it where it is needed.

We did something like below to show the custom summary just below the post title.
{%- if content.widgets.blog_custom_summary.body.value -%}
    {{ content.widgets.blog_custom_summary.body.value|safe|striptags|truncate(theme.blog.blog_listing.truncate_at|default(90))}}
{%- else -%}
    {%- set summary = content.post_summary|safe|striptags -%}
    {%- if theme.blog.blog_listing.summary == 'meta' -%}
    {%- set summary = content.meta_description|safe|striptags -%}
    {%- endif -%}
    {%- if theme.blog.blog_listing.truncate -%}
    {{ summary|truncate(theme.blog.blog_listing.truncate_at|default(90)) }}
    {%- else -%}
    {{ summary }}
    {%- endif -%}
{%- endif -%}
Conclusion
In this way, you can add custom fields in the Hubspot blog post template and Hubspot blog listing template and show them in the front end. In this Hubspot tutorial, we added a custom field in the Hubspot blog post template and showed it on the blog detail page and listing page. Hope you liked this HubSpot tutorial, please subscribe to our YouTube Channel. You can also find us on Webocreation Twitter and Webocreation Facebook. Please let us know if you have any questions or concerns. You can see more HubSpot tutorials here. We are HubSpot-certified developers based in Phoenix Arizona USA, so if you have any projects about HubSpot please let us know or you can email us directly at webocreation.com@gmail.com. Please have a look at our other Salesforce, Marketo, Pardot, and Hubspot articles


