USD to bitcoin, bitcoin exchange rate – Php code

Convert USD to bitcoin or get the latest value of bitcoin. The easiest way to get the bitcoin exchange rate

<?php
$amount=100;
$curl = curl_init();
curl_setopt_array($curl, array(
    CURLOPT_URL => "https://blockchain.info/tobtc?currency=USD&value=" . $amount,
    CURLOPT_RETURNTRANSFER => true,
    CURLOPT_ENCODING => "",
    CURLOPT_MAXREDIRS => 10,
    CURLOPT_TIMEOUT => 30,
    CURLOPT_HTTP_VERSION => CURL_HTTP_VERSION_1_1,
    CURLOPT_CUSTOMREQUEST => "GET",
    CURLOPT_HTTPHEADER => array(
        "cache-control: no-cache",
        "postman-token: fc62ebce-6d0b-ef4f-ba02-fcb05e284a02"
    ),
));
$response = curl_exec($curl);
$err = curl_error($curl);
curl_close($curl);
echo $amount = json_decode($response);
?>

Above is programmatic code that you can use in your server but if you want to see in the browser then just do

https://blockchain.info/tobtc?currency=USD&value=100

Parameters
  • currency – A currency code. See the list above.
  • value – Value to convert.

Returns the value in BTC.

How to redirect Add to Cart button in opencart to the cart page directly

In this tutorial, we will show you how to redirect “Add to cart” button in Opencart version 1.4+, version 1.5+, version 2.0+ and version 3.0+ and take you directly to the shopping cart page.

For Opencart 1.4+ versions

For Opencart 1.4 versions it’s easy we can do it through the admin section
In Extensions->Modules under “Cart” you can disable ajax

For Opencart 1.5+ versions

But in Opencart 1.5+ there are no options to do those things so we have to edit in the codes.

Open the javascript file at catalog/view/javascript/common.js

Find the code below :

if (json['success']) {
    $('#notification').html('<div style="display: none;">' + json['success'] + '<img src="catalog/view/theme/default/image/close.png" alt="" /></div>');
    $('.attention').fadeIn('slow');
    $('#cart_total').html(json['total']);
    $('html, body').animate({ scrollTop: 0 }, 'slow');
}

Replace with

if (json['success']) {
    window.location.href='index.php?route=checkout/cart';
}

For OpenCart 2.3.0.2+ and Opencart 3.0+ follow following steps:

Find following code at catalog\view\javascript\common.js

var cart = { 'add': function(product_id, quantity) {

Inside that find success method:

success: function(json) {    $('.alert, .text-danger').remove();

Just below it add following code:

json['redirect']='index.php?route=checkout/cart';

Now open another file catalog\view\theme\ACTIVETHEME\template\product\product.tpl

Find following code:

<script type="text/javascript"><!-- $('#button-cart').on('click', function() {

Inside that find success method:

if (json['success']) {

Just below it add following code:

window.location.href='index.php?route=checkout/cart';

All is set now when someone add to cart then it directly redirect to cart page

Free Automated Testing and monitoring of Opencart functionalities and sites

We are showing how to do automated testing of opencart functionalities and keep on monitoring your sites and also freely available. Uptimerobot.com and ghostinspector.com are two websites that I am using right now which are great and free

How to set up https://uptimerobot.com in OpenCart?

Hi,

Thanks for registering Uptime Robot, the free website monitoring service.
In order to start monitoring your websites, please activate your account by clicking here.

Cheers From Uptime Robot,
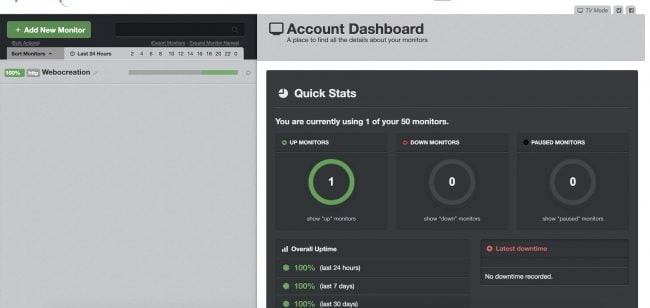
  • Clicking the activation link, you will be taken to the Dashboard after login.
    opencart monitoring
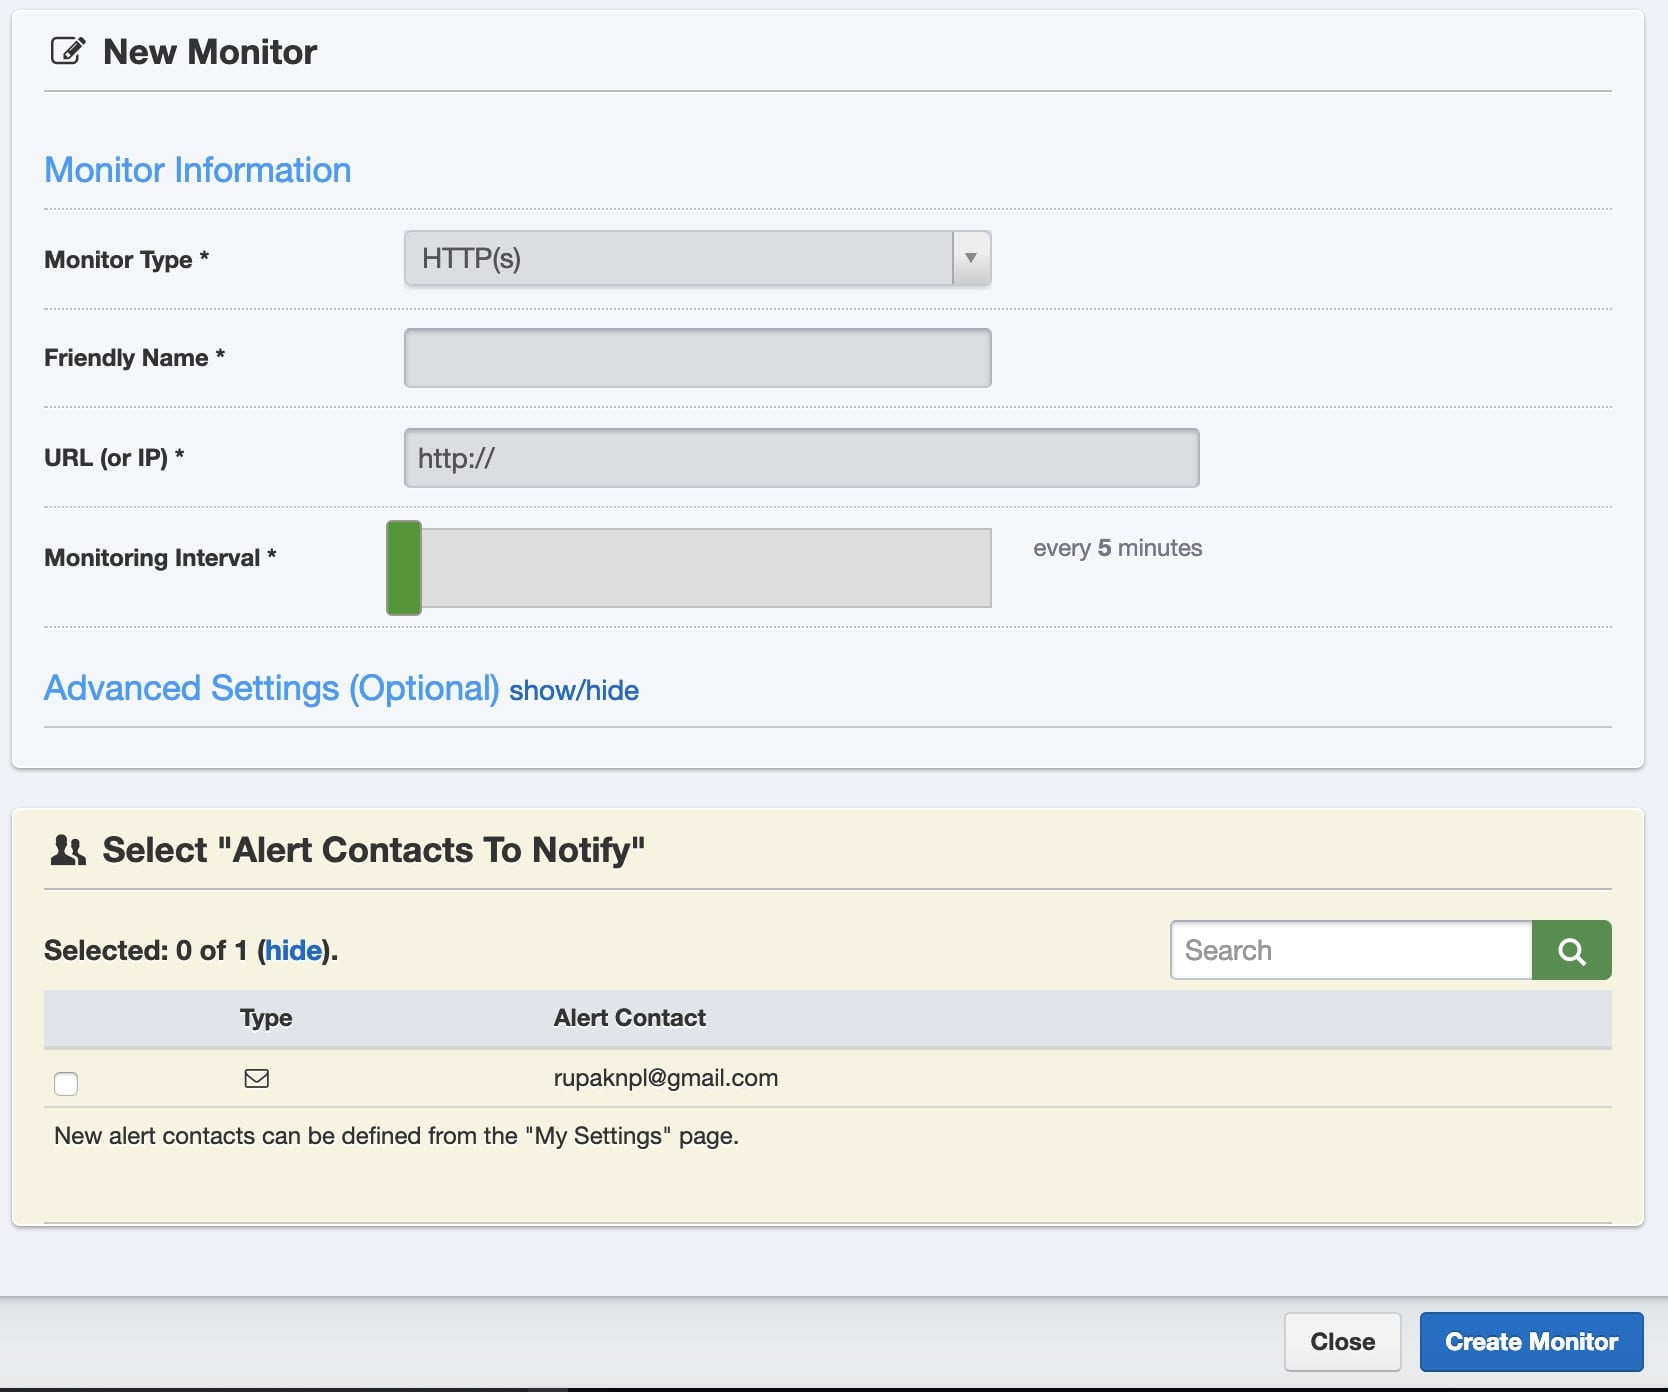
  • Click Add New Monitor button
    Add monitoring on the Opencart
  • Choose Monitor Type as HTTPs, then enter your URL then click monitor by checking the alert contact.
  • You are all set to monitor your Opencart site.

Read More: A/B testing on Opencart with Google optimize for free

How to setup ghostinspector.com in Opencart?

With this setup, you will get automated End-to-end Testing, UI testing, Browser testing, Visual testing easily. So you can catch website bugs and regressions before they cost you.

  1. Add Ghost Inspector Extension: Simply install the extension in your Chrome or Firefox web browser. Click the toolbar icon on your website to start recording a test scenario.
  2. Record in your Browser: The extension records all your interactions. You can then set assertions that will be checked to determine if the test has passed
  3. Run Tests Continuously: Once saved, your browser tests can be run continuously on a schedule or triggered via their API. They track results and even compare screenshots.
  4. Set Custom Notifications: Get notified when tests fail via email or 3rd party integrations.

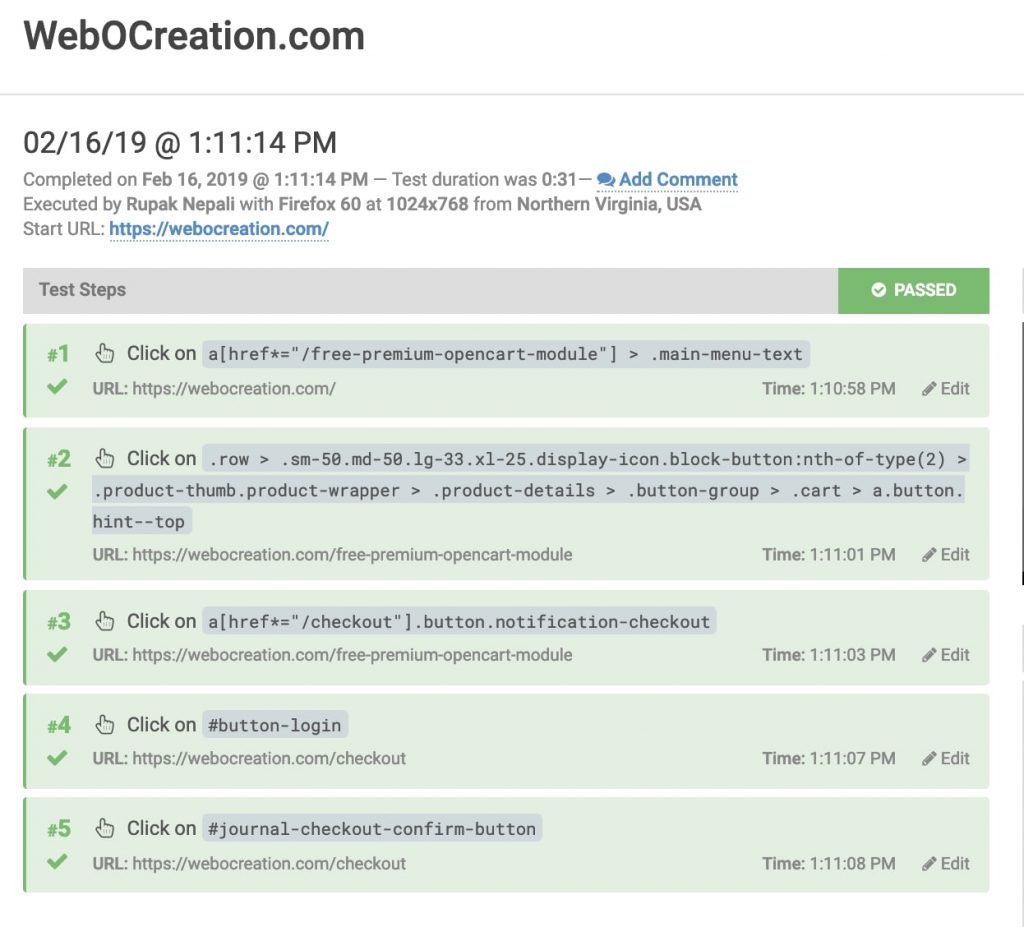
It checks UI like below:

Automate Test and flow Setup

The only limit is 100 tests for a month for free users, for my site it is ok as I just test 3 times a day so it reaches around 100 in a month.

Some pros and cons to consider are the following as I found online:

Pros

  • Low-Cost Tool
  • Browser Compatibility Testing
  • Choice of Language
  • Multiple Testing Frameworks
  • Easy to Integrate With Testing Ecosystem
  • Open for Enhancement
  • Test-Driven Development
  • Useful for Comprehensive Testing

Cons

  • Problems While Testing
  • Issues with finding Locators
  • Limitation in Browser Support
  • Manual Scripts Not Allowed
  • Slow Performance

Don’t try to automate everything in the OpenCart site but it is good to have some. Always be clear with your strategy what you are automating the test and it does not take too much time as we think but it will be beneficial in the long run as none like the down site and especially eCommerce sites where every second is money.

Similarly, another testing, has lots of features of automation testing, automated testing tools, automated web UI testing, automated browser testing so use it and you know issues before customers report it.

Enjoy your automated testing and monitoring of the Opencart website, let us know how you are monitoring your eCommerce website.

Change email send to the administrator of the opencart store when they get an order

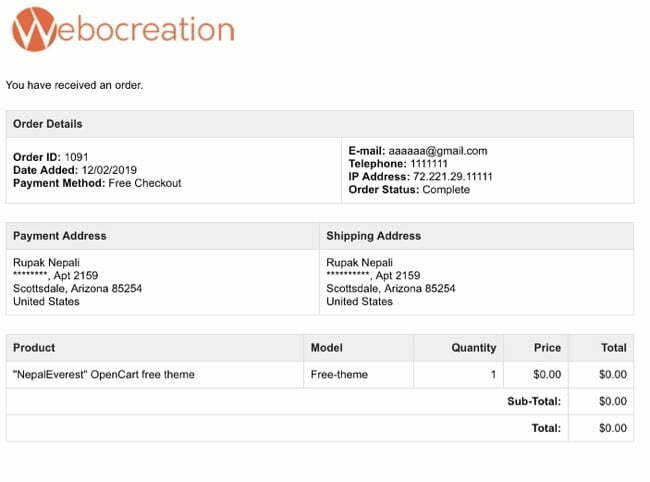
This Opencart tutorial shows how to change and customize emails send out to the store administrator when they get the new order in the OpenCart store. Normally Opencart just sends an email with fewer details like below:

You have received an order.

Order ID: 1088
Date Added: 11/02/2019
Order Status: Complete

Products
1x .... $0.00

Order Totals
Sub-Total: $0.00
Total: $0.00

Let’s change that email to send full details like the one that customers get.

Change admin order alert email

Open catalog/controller/mail/order.php and remove the alert method and replace it with the below alert method.

// Admin Alert Mail
public function alert(&$route, &$args) {
    if (isset($args[0])) {
        $order_id = $args[0];
    } else {
        $order_id = 0;
    }
    
    if (isset($args[1])) {
        $order_status_id = $args[1];
    } else {
        $order_status_id = 0;
    }	
    
    if (isset($args[2])) {
        $comment = $args[2];
    } else {
        $comment = '';
    }
    
    if (isset($args[3])) {
        $notify = $args[3];
    } else {
        $notify = '';
    }

    $order_info = $this->model_checkout_order->getOrder($order_id);
    
    if ($order_info && !$order_info['order_status_id'] && $order_status_id && in_array('order', (array)$this->config->get('config_mail_alert'))) {	

        // Check for any downloadable products
    $download_status = false;

    $order_products = $this->model_checkout_order->getOrderProducts($order_info['order_id']);
    
    foreach ($order_products as $order_product) {
        // Check if there are any linked downloads
        $product_download_query = $this->db->query("SELECT COUNT(*) AS total FROM `" . DB_PREFIX . "product_to_download` WHERE product_id = '" . (int)$order_product['product_id'] . "'");

        if ($product_download_query->row['total']) {
            $download_status = true;
        }
    }
    
    // Load the language for any mails that might be required to be sent out
    $language = new Language($order_info['language_code']);
    $language->load($order_info['language_code']);
    $language->load('mail/order_add');
$this->load->language('mail/order_alert');

    // HTML Mail
    $data['title'] = sprintf($language->get('text_subject'), $order_info['store_name'], $order_info['order_id']);

    $data['text_greeting'] = sprintf($language->get('text_greeting'), $order_info['store_name']);
    $data['text_link'] = $language->get('text_link');
    $data['text_download'] = $language->get('text_download');
    $data['text_order_detail'] = $language->get('text_order_detail');
    $data['text_instruction'] = $language->get('text_instruction');
    $data['text_order_id'] = $language->get('text_order_id');
    $data['text_date_added'] = $language->get('text_date_added');
    $data['text_payment_method'] = $language->get('text_payment_method');
    $data['text_shipping_method'] = $language->get('text_shipping_method');
    $data['text_email'] = $language->get('text_email');
    $data['text_telephone'] = $language->get('text_telephone');
    $data['text_ip'] = $language->get('text_ip');
    $data['text_order_status'] = $language->get('text_order_status');
    $data['text_payment_address'] = $language->get('text_payment_address');
    $data['text_shipping_address'] = $language->get('text_shipping_address');
    $data['text_product'] = $language->get('text_product');
    $data['text_model'] = $language->get('text_model');
    $data['text_quantity'] = $language->get('text_quantity');
    $data['text_price'] = $language->get('text_price');
    $data['text_total'] = $language->get('text_total');
    $data['text_footer'] = $language->get('text_footer');

    $data['logo'] = $order_info['store_url'] . 'image/' . $this->config->get('config_logo');
    $data['store_name'] = $order_info['store_name'];
    $data['store_url'] = $order_info['store_url'];
    $data['customer_id'] = $order_info['customer_id'];
    $data['link'] = $order_info['store_url'] . 'index.php?route=account/order/info&order_id=' . $order_info['order_id'];

    if ($download_status) {
        $data['download'] = $order_info['store_url'] . 'index.php?route=account/download';
    } else {
        $data['download'] = '';
    }

    $data['order_id'] = $order_info['order_id'];
    $data['date_added'] = date($language->get('date_format_short'), strtotime($order_info['date_added']));
    $data['payment_method'] = $order_info['payment_method'];
    $data['shipping_method'] = $order_info['shipping_method'];
    $data['email'] = $order_info['email'];
    $data['telephone'] = $order_info['telephone'];
    $data['ip'] = $order_info['ip'];

    $order_status_query = $this->db->query("SELECT * FROM " . DB_PREFIX . "order_status WHERE order_status_id = '" . (int)$order_status_id . "' AND language_id = '" . (int)$order_info['language_id'] . "'");

    if ($order_status_query->num_rows) {
        $data['order_status'] = $order_status_query->row['name'];
    } else {
        $data['order_status'] = '';
    }

    if ($comment && $notify) {
        $data['comment'] = nl2br($comment);
    } else {
        $data['comment'] = '';
    }

    if ($order_info['payment_address_format']) {
        $format = $order_info['payment_address_format'];
    } else {
        $format = '{firstname} {lastname}' . "\n" . '{company}' . "\n" . '{address_1}' . "\n" . '{address_2}' . "\n" . '{city} {postcode}' . "\n" . '{zone}' . "\n" . '{country}';
    }

    $find = array(
        '{firstname}',
        '{lastname}',
        '{company}',
        '{address_1}',
        '{address_2}',
        '{city}',
        '{postcode}',
        '{zone}',
        '{zone_code}',
        '{country}'
    );

    $replace = array(
        'firstname' => $order_info['payment_firstname'],
        'lastname'  => $order_info['payment_lastname'],
        'company'   => $order_info['payment_company'],
        'address_1' => $order_info['payment_address_1'],
        'address_2' => $order_info['payment_address_2'],
        'city'      => $order_info['payment_city'],
        'postcode'  => $order_info['payment_postcode'],
        'zone'      => $order_info['payment_zone'],
        'zone_code' => $order_info['payment_zone_code'],
        'country'   => $order_info['payment_country']
    );

    $data['payment_address'] = str_replace(array("\r\n", "\r", "\n"), '<br />', preg_replace(array("/\s\s+/", "/\r\r+/", "/\n\n+/"), '<br />', trim(str_replace($find, $replace, $format))));

    if ($order_info['shipping_address_format']) {
        $format = $order_info['shipping_address_format'];
    } else {
        $format = '{firstname} {lastname}' . "\n" . '{company}' . "\n" . '{address_1}' . "\n" . '{address_2}' . "\n" . '{city} {postcode}' . "\n" . '{zone}' . "\n" . '{country}';
    }

    $find = array(
        '{firstname}',
        '{lastname}',
        '{company}',
        '{address_1}',
        '{address_2}',
        '{city}',
        '{postcode}',
        '{zone}',
        '{zone_code}',
        '{country}'
    );

    $replace = array(
        'firstname' => $order_info['shipping_firstname'],
        'lastname'  => $order_info['shipping_lastname'],
        'company'   => $order_info['shipping_company'],
        'address_1' => $order_info['shipping_address_1'],
        'address_2' => $order_info['shipping_address_2'],
        'city'      => $order_info['shipping_city'],
        'postcode'  => $order_info['shipping_postcode'],
        'zone'      => $order_info['shipping_zone'],
        'zone_code' => $order_info['shipping_zone_code'],
        'country'   => $order_info['shipping_country']
    );

    $data['shipping_address'] = str_replace(array("\r\n", "\r", "\n"), '<br />', preg_replace(array("/\s\s+/", "/\r\r+/", "/\n\n+/"), '<br />', trim(str_replace($find, $replace, $format))));

    $this->load->model('tool/upload');

    // Products
    $data['products'] = array();

    foreach ($order_products as $order_product) {
        $option_data = array();

        $order_options = $this->model_checkout_order->getOrderOptions($order_info['order_id'], $order_product['order_product_id']);

        foreach ($order_options as $order_option) {
            if ($order_option['type'] != 'file') {
                $value = $order_option['value'];
            } else {
                $upload_info = $this->model_tool_upload->getUploadByCode($order_option['value']);

                if ($upload_info) {
                    $value = $upload_info['name'];
                } else {
                    $value = '';
                }
            }

            $option_data[] = array(
                'name'  => $order_option['name'],
                'value' => (utf8_strlen($value) > 20 ? utf8_substr($value, 0, 20) . '..' : $value)
            );
        }

        $data['products'][] = array(
            'name'     => $order_product['name'],
            'model'    => $order_product['model'],
            'option'   => $option_data,
            'quantity' => $order_product['quantity'],
            'price'    => $this->currency->format($order_product['price'] + ($this->config->get('config_tax') ? $order_product['tax'] : 0), $order_info['currency_code'], $order_info['currency_value']),
            'total'    => $this->currency->format($order_product['total'] + ($this->config->get('config_tax') ? ($order_product['tax'] * $order_product['quantity']) : 0), $order_info['currency_code'], $order_info['currency_value'])
        );
    }

    // Vouchers
    $data['vouchers'] = array();

    $order_vouchers = $this->model_checkout_order->getOrderVouchers($order_info['order_id']);

    foreach ($order_vouchers as $order_voucher) {
        $data['vouchers'][] = array(
            'description' => $order_voucher['description'],
            'amount'      => $this->currency->format($order_voucher['amount'], $order_info['currency_code'], $order_info['currency_value']),
        );
    }

    // Order Totals
    $data['totals'] = array();
    
    $order_totals = $this->model_checkout_order->getOrderTotals($order_info['order_id']);

    foreach ($order_totals as $order_total) {
        $data['totals'][] = array(
            'title' => $order_total['title'],
            'text'  => $this->currency->format($order_total['value'], $order_info['currency_code'], $order_info['currency_value']),
        );
    }

    $this->load->model('setting/setting');
    
    $from = $this->model_setting_setting->getSettingValue('config_email', $order_info['store_id']);
    
    if (!$from) {
        $from = $this->config->get('config_email');
    }


        $mail = new Mail($this->config->get('config_mail_engine'));
        $mail->parameter = $this->config->get('config_mail_parameter');
        $mail->smtp_hostname = $this->config->get('config_mail_smtp_hostname');
        $mail->smtp_username = $this->config->get('config_mail_smtp_username');
        $mail->smtp_password = html_entity_decode($this->config->get('config_mail_smtp_password'), ENT_QUOTES, 'UTF-8');
        $mail->smtp_port = $this->config->get('config_mail_smtp_port');
        $mail->smtp_timeout = $this->config->get('config_mail_smtp_timeout');

        $mail->setTo($this->config->get('config_email'));
        $mail->setFrom($this->config->get('config_email'));
        $mail->setSender(html_entity_decode($order_info['store_name'], ENT_QUOTES, 'UTF-8'));
        $mail->setSubject(html_entity_decode(sprintf($this->language->get('text_subject'), $this->config->get('config_name'), $order_info['order_id']), ENT_QUOTES, 'UTF-8'));
        $mail->setHtml($this->load->view('mail/order_alert', $data));
        $mail->send();

        // Send to additional alert emails
        $emails = explode(',', $this->config->get('config_mail_alert_email'));

        foreach ($emails as $email) {
            if ($email && filter_var($email, FILTER_VALIDATE_EMAIL)) {
                $mail->setTo($email);
                $mail->send();
            }
        }
    }
}

Then go to catalog/view/theme/YOUR_THEME/template/mail/order_mail.twig and remove all the code and replace with the following codes:

<!DOCTYPE html PUBLIC "-//W3C//DTD HTML 4.01//EN" "http://www.w3.org/TR/1999/REC-html401-19991224/strict.dtd">
<html>
<head>
<meta http-equiv="Content-Type" content="text/html; charset=utf-8">
<title>{{ title }}</title>
</head>
<body style="font-family: Arial, Helvetica, sans-serif; font-size: 12px; color: #000000;">
<div style="width: 680px;"><a href="{{ store_url }}" title="{{ store_name }}"><img src="{{ logo }}" alt="{{ store_name }}" style="margin-bottom: 20px; border: none;" /></a>
  <p style="margin-top: 0px; margin-bottom: 20px;">{{ text_greeting }}</p>
  
  {% if download %}
  <p style="margin-top: 0px; margin-bottom: 20px;">{{ text_download }}</p>
  <p style="margin-top: 0px; margin-bottom: 20px;"><a href="{{ download }}">{{ download }}</a></p>
  <{% endif %}
  <table style="border-collapse: collapse; width: 100%; border-top: 1px solid #DDDDDD; border-left: 1px solid #DDDDDD; margin-bottom: 20px;">
    <thead>
      <tr>
        <td style="font-size: 12px; border-right: 1px solid #DDDDDD; border-bottom: 1px solid #DDDDDD; background-color: #EFEFEF; font-weight: bold; text-align: left; padding: 7px; color: #222222;" colspan="2">{{ text_order_detail }}</td>
      </tr>
    </thead>
    <tbody>
      <tr>
        <td style="font-size: 12px;	border-right: 1px solid #DDDDDD; border-bottom: 1px solid #DDDDDD; text-align: left; padding: 7px;"><b>{{ text_order_id }}</b> {{ order_id }}<br />
          <b>{{ text_date_added }}</b> {{ date_added }}<br />
          <b>{{ text_payment_method }}</b> {{ payment_method }}<br />
          {% if shipping_method %} <b>{{ text_shipping_method }}</b> {{ shipping_method }}
          {% endif %}</td>
        <td style="font-size: 12px;	border-right: 1px solid #DDDDDD; border-bottom: 1px solid #DDDDDD; text-align: left; padding: 7px;"><b>{{ text_email }}</b> {{ email }}<br />
          <b>{{ text_telephone }}</b> {{ telephone }}<br />
          <b>{{ text_ip }}</b> {{ ip }}<br />
          <b>{{ text_order_status }}</b> {{ order_status }}<br /></td>
      </tr>
    </tbody>
  </table>
  {% if comment %}
  <table style="border-collapse: collapse; width: 100%; border-top: 1px solid #DDDDDD; border-left: 1px solid #DDDDDD; margin-bottom: 20px;">
    <thead>
      <tr>
        <td style="font-size: 12px; border-right: 1px solid #DDDDDD; border-bottom: 1px solid #DDDDDD; background-color: #EFEFEF; font-weight: bold; text-align: left; padding: 7px; color: #222222;">{{ text_instruction }}</td>
      </tr>
    </thead>
    <tbody>
      <tr>
        <td style="font-size: 12px;	border-right: 1px solid #DDDDDD; border-bottom: 1px solid #DDDDDD; text-align: left; padding: 7px;">{{ comment }}</td>
      </tr>
    </tbody>
  </table>
  {% endif %}
  <table style="border-collapse: collapse; width: 100%; border-top: 1px solid #DDDDDD; border-left: 1px solid #DDDDDD; margin-bottom: 20px;">
    <thead>
      <tr>
        <td style="font-size: 12px; border-right: 1px solid #DDDDDD; border-bottom: 1px solid #DDDDDD; background-color: #EFEFEF; font-weight: bold; text-align: left; padding: 7px; color: #222222;">{{ text_payment_address }}</td>
        {% if shipping_address %}
        <td style="font-size: 12px; border-right: 1px solid #DDDDDD; border-bottom: 1px solid #DDDDDD; background-color: #EFEFEF; font-weight: bold; text-align: left; padding: 7px; color: #222222;">{{ text_shipping_address }}</td>
        {% endif %} </tr>
    </thead>
    <tbody>
      <tr>
        <td style="font-size: 12px;	border-right: 1px solid #DDDDDD; border-bottom: 1px solid #DDDDDD; text-align: left; padding: 7px;">{{ payment_address }}</td>
        {% if shipping_address %}
        <td style="font-size: 12px;	border-right: 1px solid #DDDDDD; border-bottom: 1px solid #DDDDDD; text-align: left; padding: 7px;">{{ shipping_address }}</td>
        {% endif %} </tr>
    </tbody>
  </table>
  <table style="border-collapse: collapse; width: 100%; border-top: 1px solid #DDDDDD; border-left: 1px solid #DDDDDD; margin-bottom: 20px;">
    <thead>
      <tr>
        <td style="font-size: 12px; border-right: 1px solid #DDDDDD; border-bottom: 1px solid #DDDDDD; background-color: #EFEFEF; font-weight: bold; text-align: left; padding: 7px; color: #222222;">{{ text_product }}</td>
        <td style="font-size: 12px; border-right: 1px solid #DDDDDD; border-bottom: 1px solid #DDDDDD; background-color: #EFEFEF; font-weight: bold; text-align: left; padding: 7px; color: #222222;">{{ text_model }}</td>
        <td style="font-size: 12px; border-right: 1px solid #DDDDDD; border-bottom: 1px solid #DDDDDD; background-color: #EFEFEF; font-weight: bold; text-align: right; padding: 7px; color: #222222;">{{ text_quantity }}</td>
        <td style="font-size: 12px; border-right: 1px solid #DDDDDD; border-bottom: 1px solid #DDDDDD; background-color: #EFEFEF; font-weight: bold; text-align: right; padding: 7px; color: #222222;">{{ text_price }}</td>
        <td style="font-size: 12px; border-right: 1px solid #DDDDDD; border-bottom: 1px solid #DDDDDD; background-color: #EFEFEF; font-weight: bold; text-align: right; padding: 7px; color: #222222;">{{ text_total }}</td>
      </tr>
    </thead>
    <tbody>
    
    {% for product in products %}
    <tr>
      <td style="font-size: 12px; border-right: 1px solid #DDDDDD; border-bottom: 1px solid #DDDDDD; text-align: left; padding: 7px;">{{ product.name }}
        {% for option in product.option %}<br />
         <small> - {{ option.name }}: {{ option.value }}</small>{% endfor %}</td>
      <td style="font-size: 12px; border-right: 1px solid #DDDDDD; border-bottom: 1px solid #DDDDDD; text-align: left; padding: 7px;">{{ product.model }}</td>
      <td style="font-size: 12px;	border-right: 1px solid #DDDDDD; border-bottom: 1px solid #DDDDDD; text-align: right; padding: 7px;">{{ product.quantity }}</td>
      <td style="font-size: 12px;	border-right: 1px solid #DDDDDD; border-bottom: 1px solid #DDDDDD; text-align: right; padding: 7px;">{{ product.price }}</td>
      <td style="font-size: 12px;	border-right: 1px solid #DDDDDD; border-bottom: 1px solid #DDDDDD; text-align: right; padding: 7px;">{{ product.total }}</td>
    </tr>
    {% endfor %}
    {% for voucher in vouchers %}
    <tr>
      <td style="font-size: 12px;	border-right: 1px solid #DDDDDD; border-bottom: 1px solid #DDDDDD; text-align: left; padding: 7px;">{{ voucher.description }}</td>
      <td style="font-size: 12px;	border-right: 1px solid #DDDDDD; border-bottom: 1px solid #DDDDDD; text-align: left; padding: 7px;"></td>
      <td style="font-size: 12px;	border-right: 1px solid #DDDDDD; border-bottom: 1px solid #DDDDDD; text-align: right; padding: 7px;">1</td>
      <td style="font-size: 12px;	border-right: 1px solid #DDDDDD; border-bottom: 1px solid #DDDDDD; text-align: right; padding: 7px;">{{ voucher.amount }}</td>
      <td style="font-size: 12px;	border-right: 1px solid #DDDDDD; border-bottom: 1px solid #DDDDDD; text-align: right; padding: 7px;">{{ voucher.amount }}</td>
    </tr>
    {% endfor %}
      </tbody>
    
    <tfoot>
    
    {% for total in totals %}
    <tr>
      <td style="font-size: 12px;	border-right: 1px solid #DDDDDD; border-bottom: 1px solid #DDDDDD; text-align: right; padding: 7px;" colspan="4"><b>{{ total.title }}:</b></td>
      <td style="font-size: 12px;	border-right: 1px solid #DDDDDD; border-bottom: 1px solid #DDDDDD; text-align: right; padding: 7px;">{{ total.text }}</td>
    </tr>
    {% endfor %}
      </tfoot>
    
  </table>
  <p style="margin-top: 0px; margin-bottom: 20px;">{{ text_footer }}</p>
</div>
</body>
</html>

With these changes, you can get the customized full detail email for Admin as well.

If you want to change the email design for the affiliate alert, affiliate welcome email, forgotten password email, order notification to the customer, order alert to store administrator, edit order alert, register alert, register notification to the customer, transaction alert, voucher alert, you can change them at catalog/view/theme/YOUR_TEME/template/mail where you can change your design as per your need.

Let us know if you find any difficulties or need any help from us. Likewise, you can see other Opencart tips and tricks.

How can we remove index.php?route= in OpenCart for contact, home and other

This simple Opencart OCMod file will remove the index.php?route= in Opencart and shorten the URL of OpenCart for contact us page, common home, checkout, cart, voucher, account, log in, manufacturer, affiliate login, password forget URL, and others.

Once you download the above, you will get seo-url.ocmod_.zip extract it and rename it to seo-url.ocmod.zip, then go to admin >> Extensions >> Installer then upload the seo-url.ocmod.zip. Then download the following SEO-URL.sql

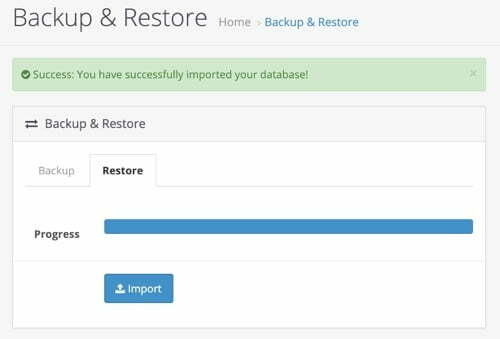
Once you download the above you will get seo-url-add.sql_.zip, extract it, you will get seo-url-add.sql. Then go to admin >> System >> Maintenance >> Backup & Restore, and click the Restore tab and click Import, and select seo-url-add.sql.

Backp and Restore Opencart

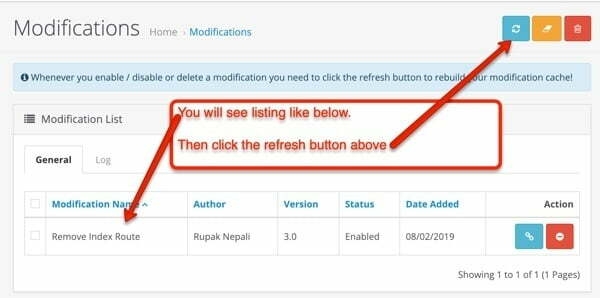
Once this is successful then go to admin >> Extensions >> Modifications >> then click refresh buttone

Modifications lists of extension Opencart

Then you are all set.

If you are still seeing issues then check if you complete all of the below:

  • Don’t forget to refresh your modifications.
  • Your SEO URL need to be active
  • If you are running your store in sub-folder then don’t forget to add it in .htaccess.

Read more: 25 SEO best practices for Opencart 3 with 3 free SEO Opencart 3 module

For those who are developer:

The developer can do the following to make more changes as needed. Open catalog/controller/startup/seo_url.php and in the public function rewrite($link) method add below code after parse_str($url_info[‘query’], $data);

if ($data['route'] == 'common/home'){
    $url .= '/';
}
if ($data['route'] == 'information/contact'){
    $url .= '/contact';
}
if ($data['route'] == 'account/return/add'){
    $url .= '/returnadd';
}
if ($data['route'] == 'information/sitemap'){
    $url .= '/sitemap';
}
if ($data['route'] == 'product/manufacturer'){
    $url .= '/manufacturer';
}
if ($data['route'] == 'account/voucher'){
    $url .= '/voucher';
}
if ($data['route'] == 'affiliate/login'){
    $url .= '/affiliatelogin';
}
if ($data['route'] == 'product/special'){
    $url .= '/special';
}
if ($data['route'] == 'account/login'){
    $url .= '/login';
}
if ($data['route'] == 'checkout/cart'){
    $url .= '/cart';
}

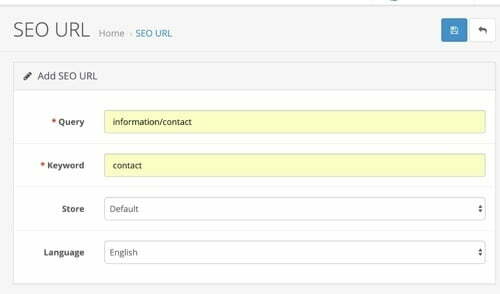
Add as many URLs as you want in here and it’s rewrite URL. Then go to admin >> Design >> SEO URL and add them each except for the home page. Like for contact us page

SEO URL opencart

So you need to insert for all, then you will see the changes or you can directly import the following seo-url.sql file at admin >> System >> Maintenance >> Backup/Restore. Download it. Check the database table prefix if it is different than oc_ if yes then need to change in the SQL file.

Or run the following SQL in your database

INSERT INTO `oc_seo_url` (`seo_url_id`, `store_id`, `language_id`, `query`, `keyword`) VALUES (NULL, '0', '1', 'checkout/cart', 'cart');
INSERT INTO `oc_seo_url` (`seo_url_id`, `store_id`, `language_id`, `query`, `keyword`) VALUES (NULL, '0', '1', 'account/login', 'login');
INSERT INTO `oc_seo_url` (`seo_url_id`, `store_id`, `language_id`, `query`, `keyword`) VALUES (NULL, '0', '1', 'affiliate/login', 'affiliatelogin');
INSERT INTO `oc_seo_url` (`seo_url_id`, `store_id`, `language_id`, `query`, `keyword`) VALUES (NULL, '0', '1', 'account/voucher', 'voucher');
INSERT INTO `oc_seo_url` (`seo_url_id`, `store_id`, `language_id`, `query`, `keyword`) VALUES (NULL, '0', '1', 'product/manufacturer', 'manufacturer');
INSERT INTO `oc_seo_url` (`seo_url_id`, `store_id`, `language_id`, `query`, `keyword`) VALUES (NULL, '0', '1', 'information/sitemap', 'sitemap');
INSERT INTO `oc_seo_url` (`seo_url_id`, `store_id`, `language_id`, `query`, `keyword`) VALUES (NULL, '0', '1', 'account/return/add', 'returnadd');
INSERT INTO `oc_seo_url` (`seo_url_id`, `store_id`, `language_id`, `query`, `keyword`) VALUES (NULL, '0', '1', 'information/contact', 'contact');
INSERT INTO `oc_seo_url` (`seo_url_id`, `store_id`, `language_id`, `query`, `keyword`) VALUES (NULL, '0', '1', 'checkout/checkout', 'checkout');
INSERT INTO `oc_seo_url` (`seo_url_id`, `store_id`, `language_id`, `query`, `keyword`) VALUES (NULL, '0', '1', 'product/special', 'special');

You can add other URLs as per your need. You can keep on customizing and let us know tips and tricks to improve it.

In this way, you can improve your URL and be SEO-friendly in Opencart. Let us know if need any support. Please subscribe to our YouTube Channel for Opencart video tutorials and get lots of other Opencart free modules. You can also find us on Twitter and Facebook.

Show only subcategories on category page OpenCart 2.0 free module

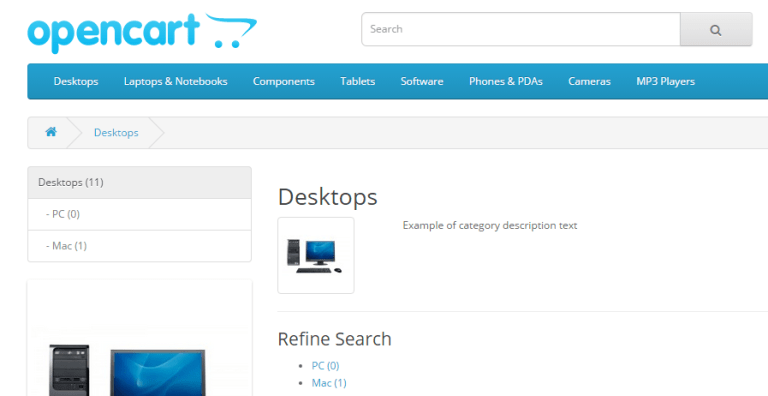
We make another free module today “Show only subcategories on category page OpenCart 2.0 free module” when enabled to category page then you will be able to see sub-categories of the active Category as a heading.

Download “Show only subcategories on category page OpenCart 2.0 free module” from the link below:
Download Show only subcategories on category page OpenCart 2.0 free module
Download Show only subcategories on category page OpenCart 2.2 free module

The module will look like below:

Only Sub Categories at Product Page

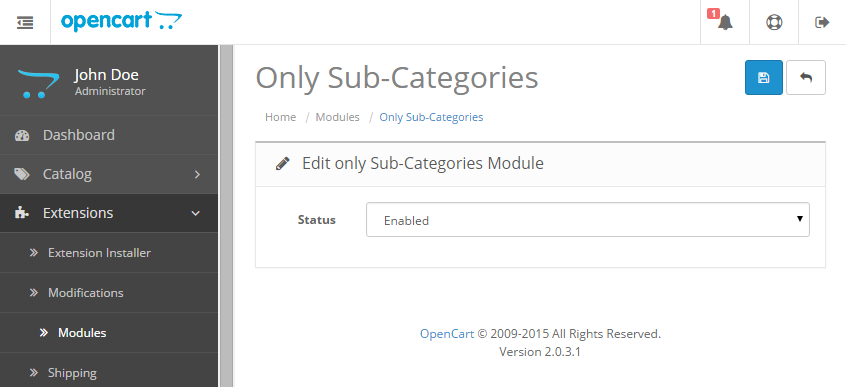
Admin section will look like:

Only Sub Categories at Category Page admin

This is an extension for opencart 2.0 and 2.2 that I modify the Category module so it only displays the current top-level category page’s sub-categories. For example, if I am on the “Laptops & Desktops” category page, the sidebar module would only list the sub-categories associated with “Laptops & Desktops” category, such as “Macs” and “PCs” with the main heading “Laptops & Desktops” (And not list or show any of the other top-level categories).

Installation:

  1. Unzip the downloaded folder.
  2. Upload the files in the root folder to your server, no file is overwritten.
  3. Then activate the Only Sub-Categories module.

Activating the Only Sub-Categories module:

  1. After uploading files to servers, it’s time to install Only Sub-Categories module
  2. We are showing the Only Sub-Categories module at the right or left column of the Category page (Category Layout).
  3. Go to Admin section
  4. Then click on Extensions on the left menu
  5. After that Click Modules and go to Only Sub-Categories in the modules list
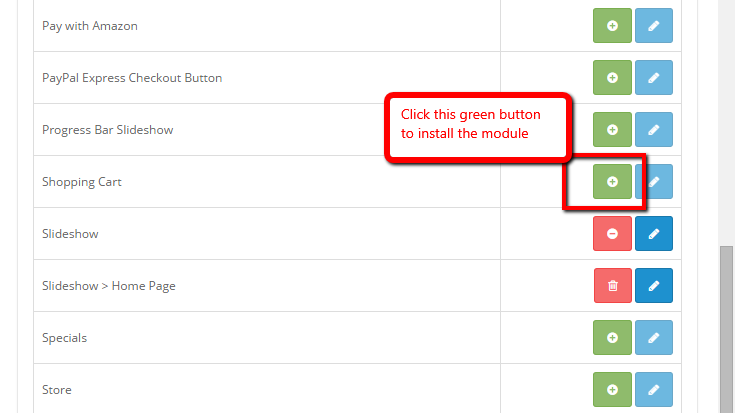
  6. Then click the Green button for the Only Sub-Categories to install the module (see the image below)
  7. Then click blue edit button
  8. After that, you will see the form which has the status field, select Enabled and then click the Save button.
  9. Your module is active and is ready to use in the layout.

Setup layout for the sidebar Only Sub-Categories module at the left column of category page:

  1. From the admin section go to System >> Design >> Layouts.
  2. You will see a list of layouts, from which edit the Category layout.
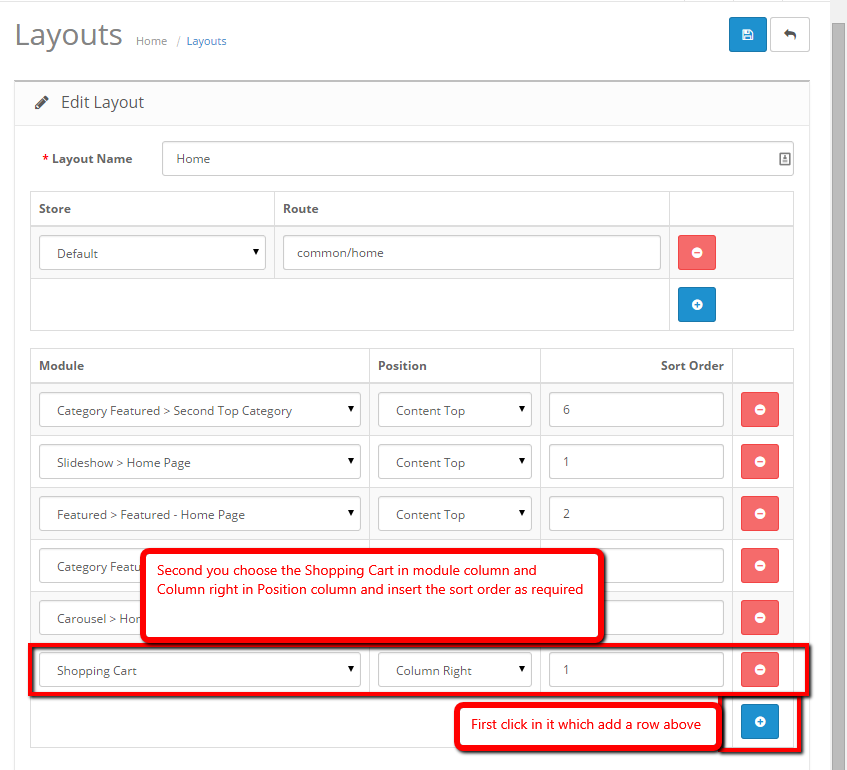
  3. Then click Blue add the button to add rows at the module section which is shown in the image below:
  4. Second, you choose the Only Sub-Categories in module column and Column left in the Position column and insert the sort order as required.
  5. Then click save button

Your custom category page is ready with the Only Sub-Categories module in the left column.

Regex to find the four sequential characters in PHP

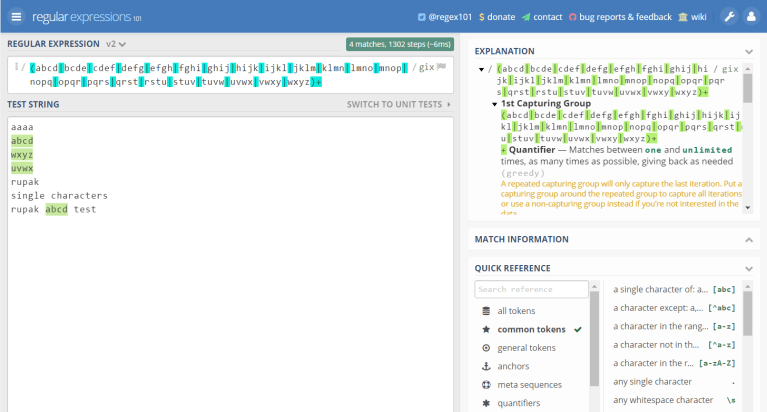
Need to check if a string contains four sequential characters or consecutive characters/strings or identical letters/numbers/string/characters in PHP then following regex and code can be useful for you. I tested it with following code and regex is generated from

<?php
$re = '/(abcd|bcde|cdef|defg|efgh|fghi|ghij|hijk|ijkl|jklm|klmn|lmno|mnop|nopq|opqr|pqrs|qrst|rstu|stuv|tuvw|uvwx|vwxy|wxyz)+/xi';
$str = 'rupakabcd test';
if(preg_match_all($re, $str, $matches)){
  echo "Contains sequential characters";
}else{
  echo "Does not contain sequential characters";
}

If you wanted to check case sensitive then remove ‘i’ from $re variable at the end.

Comment if you find any easy way to make it works.

Regex to find identical characters:

(\w)(\1+){3}

$re = '/(\w)(\1+){3}/i';
$str = 'aaaa
rrrr
rupak
rupakaaaaarrr';

preg_match_all($re, $str, $matches);

// Print the entire match result
print_r($matches);

Regex to find identical numbers:
(\d)\1{3,}

$re = '/(\d)\1{3,}/';
$str = '123452222222222222
1234
1111
12345
654128
45721111572000004520
aaaa
rupak
';

preg_match_all($re, $str, $matches);

// Print the entire match result
print_r($matches);

Regex to find five sequential numbers:

(?: 0(?=1|\b)| 1(?=2|\b)| 2(?=3|\b)|  3(?=4|\b)|  4(?=5|\b)|  5(?=6|\b)|  6(?=7|\b)|  7(?=8|\b)|  8(?=9|\b)|  9\b  ){5}

$re = '/(?: 0(?=1|\b)| 1(?=2|\b)| 2(?=3|\b)|  3(?=4|\b)|  4(?=5|\b)|  5(?=6|\b)|  
6(?=7|\b)|  7(?=8|\b)|  8(?=9|\b)|  9\b  ){5}/x';
$str = '123 321 56789 890123 321098 134 333 421 12345 6789 
15246
1234567890
67890
12345
23456
34567
456789
56789
';

preg_match_all($re, $str, $matches);

// Print the entire match result
print_r($matches);

Dropdown Quantity of Product in Cart Page Opencart 2.2

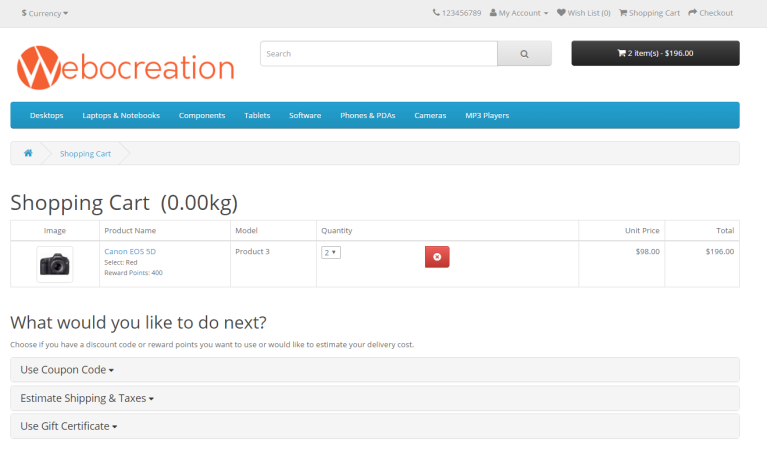
This is an Opencart guide to create a dropdown of the quantity field of product in Cart Page Opencart 2.2.

Download Dropdown Quantity of Product in Cart Page Opencart 2.2

Features:

  • Instead of the textbox, select box shows in the quantity field of Cart.
  • When you change quantity options then the cart will update automatically.
  • Also, have a delete button.

First, open system\library\cart\cart.php and find the following lines of code:

$product_data[] = array(
					'cart_id'         => $cart['cart_id'],
					'product_id'      => $product_query->row['product_id'],

Below these lines of code add the following line:

'product_quantity'           => $product_query->row['quantity'],

Second open controller catalog\controller\checkout\cart.php and find the following lines of code:

$data['products'][] = array(
					'cart_id'   => $product['cart_id'],

Below these lines of codes add the following line:

'product_quantity'=>$product['product_quantity'],

At last find following lines of code at catalog/view/theme/YOUR_ACTIVATED_THEME/template/checkout/cart.tpl

<td class="text-left">
                      <div class="input-group btn-block" style="max-width: 200px;">
                          <input type="text" name="quantity[<?php echo $product['cart_id']; ?>]"
                                 value="<?php echo $product['quantity']; ?>" size="1" class="form-control"/>
                    <span class="input-group-btn">
                    <button type="submit" data-toggle="tooltip" title="<?php echo $button_update; ?>"
                            class="btn btn-primary"><i class="fa fa-refresh"></i></button>
                    <button type="button" data-toggle="tooltip" title="<?php echo $button_remove; ?>"
                            class="btn btn-danger" onclick="cart.remove('<?php echo $product['cart_id']; ?>');"><i
                                class="fa fa-times-circle"></i></button>
                    </span></div>
                  </td>

Replace with the following code:

  <!--Changes done-->
                  <td class="text-left">
                      <div class="input-group btn-block" style="max-width: 200px;">
                          <select name="quantity[<?php echo $product['cart_id']; ?>]"
                                  onchange='this.form.submit()'>
                              <?php for($cp=1; $cp<=$product['product_quantity']; $cp++){ ?>
                              <option
                              <?php if($product['quantity']==$cp){ echo "selected"; } ?>
                              value="<?php echo $cp; ?>"><?php echo $cp; ?></option>
                              <?php } ?>
                          </select>
        <span class="input-group-btn">
        <button type="button" data-toggle="tooltip" title="<?php echo $button_remove; ?>"
                class="btn btn-danger" onclick="cart.remove('<?php echo $product['cart_id']; ?>');"><i
                    class="fa fa-times-circle"></i></button>
        </span>
                      </div>
                  </td>
                  <!--End of Changes done-->

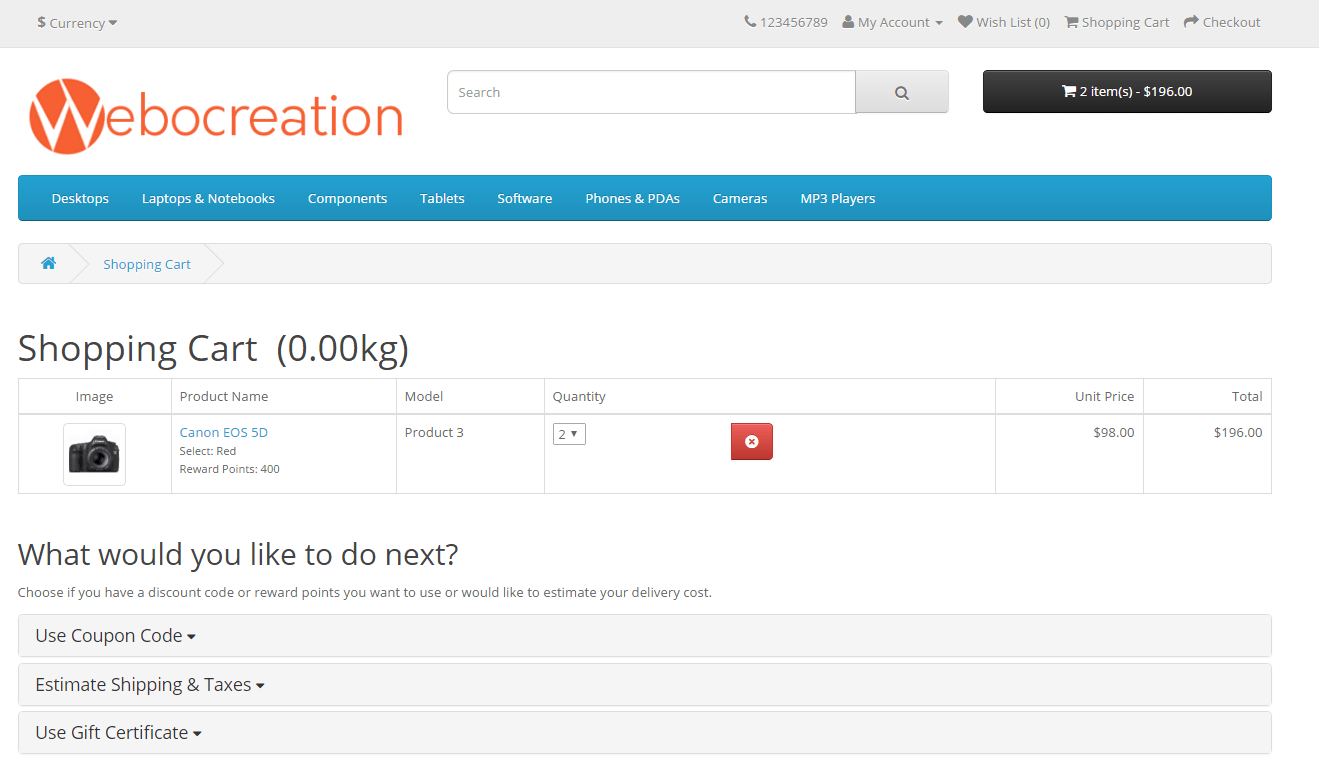
Output:

dropdown_in_cart

Please bear with that CSS and hope you will make changes to that CSS as per your theme.
Similarly, we would have provided OCMOD, but because of laziness, we always go through logics :).

Enjoy it, hope we will soon launch OCMOD for all of you.

Thanks
Rupak Nepali

Special Characters are not stored properly in Opencart- Ecommerce

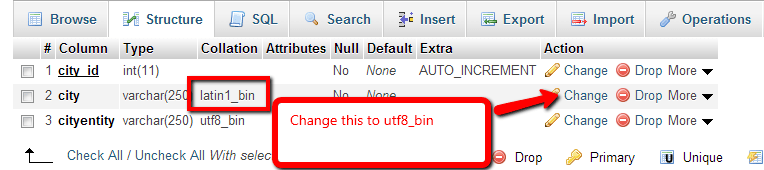
Today something went wrong with encoding in opencart – we cannot save the city with special language characters, like raga, but found out that it is a database field error.

When we try to insert raga, it is inserted as R?ga. ? marks in place of special characters

So we have to find out why this is happening, we check the code all working fine and at last, saw the database table field have a collation of latin1_bin so we change it to utf8_bin and the special character is saved on the database and the same are shown correctly.

So while making the database table keep these things into mind, if you have to save multi-language then utf8_bin is to be set on the collation

special character in opencart

 Let us know if you have questions or concerns so that we can help you out, similarly, let us know if there are another best solutions. Till then please subscribe to our YouTube Channel for Opencart video tutorials. You can also find us on Twitter and Facebook.

The directory catalog/controller/product is not allowed to be written to – Opencart error

Opencart error directory not allowed

When you are installing the extension, you go to admin >> extensions >> installer and click the upload button and select the extension ocmod.zip file but you got the following error like “The directory catalog/controller/product is not allowed to be written to – Opencart error”. The way to solve it is to add the path at admin\controller\marketplace\install.php

Here in the example, the path is catalog/controller/product/ so we needed to add at

// A list of allowed directories to be written to
$allowed = array(
   'admin/controller/extension/',
   'admin/language/',
   'admin/model/extension/',
   'admin/view/image/',
   'admin/view/javascript/',
   'admin/view/stylesheet/',
   'admin/view/template/extension/',
   'catalog/controller/extension/',
   'catalog/language/',
   'catalog/model/extension/',
   'catalog/view/javascript/',
   'catalog/view/theme/',
   'system/config/',
   'system/library/',
   'image/catalog/',
   'catalog/controller/product/' 
);

Whatever error path you get, you need to add here to install successfully. But the best practice is to stick to the provided folders only if you need to manage multiple folders than manage subfolders within them.

Thanks
Rupak Nepali