In this internship final report sample, we are showing you the full report, with a background of the study, objectives of the study, Limitations of the Study, Selection Method of Data Collection and the whole report body.
CHAPTER 1
Introduction
1.1 Background of the study
The internship program has become the bridge for those who want to enter to corporate level from the college life, through an internship I got to know the real working environment which was very much different from my course study.
The internship has developed a kind of confidence in me that now I can do something different from new employees and I can work as an employee. The main things I learned from the internship are the value of time and the importance of punctuality and rules and regulations that we have to follow as an employee.
1.2 Objectives of the study
The general objective of this report is to partially fulfill the requirements for the degree of BCIS. However, the specific objectives are as follows:
- To find the use of Websites in today’s society.
- To develop the Management Skills, Personality, and Teamwork.
- To develop interpersonal skills, conceptual as well as technical skills.
- Tips and techniques to design and program websites.
- The technique to earn online.
1.4 Limitations of the Study:
Major limitations of internship report are as follows:
- Lack of proper research and detailed information about the company and its operating activities.
- The time frame to perform an internship was short.
- Lack of knowledge to run programs and software used by DP Sign.
- Object-oriented based programming and use of different programming languages in DP Sign stopped me to learn more.
1.5 Selection Method of Data Collection
There are two major approaches to gathering information in my internship about the situation, person, problems or phenomenon and software in DP Sign.
- Internal information
- External Information
This information was collected with the help of both primary and secondary resources.
- Primary Data: They are collected by me on the concerned topic, which is original. While studying I have come across sources such as direct interviews with the supervisor, opinion of the different employees, informal talks with the employees, etc.
- Secondary Data: They are collected by me on the basis of the study of networking in organizations. For preparing this report on networking and data communication I have collected information through Nepal Bank, internet, books, teachers, and some previous records.
CHAPTER 2
Report Body
2.1 Introduction of DP Sign
D.P. Sign
- stands for Digital
- stands for Printed
The sign stands for different kinds of signs.
Registered Name: D.P. Sign
Address: New Baneshwore, Shankhamool-125/28, KTM.
Phone: 01-4783309
Website: https://webocreation.com
E-mail: webocreation.com@gmail.com
DP SIGN is a global IT services company providing IT consulting, technology and outsourcing services. Using our enhanced global delivery model, innovative platforming approach and industry expertise, we provide cost‐effective services that enable our clients to use IT to enhance business performance, accelerate time‐to‐market, increase productivity and improve customer service.
DP SIGN provides value to its customers through innovation, accomplishment, trust, and long‐term relationships through its unique service portfolio and expertise.
DP SIGN brings quality services and products to its customers on time and at the most competitive prices. DP SIGN has very strong software engineering processes for software design and development activities. These strengths enable DP SIGN to smoothly adapt to the rapid enhancements in the technological domain while maintaining constant focus on the ever-changing business needs of its clients. With the vision of becoming the best IT service provider of the nation, DP SIGN has been a trailblazer in various domains of software engineering in Nepal.
Embedded system programming, Quality assurance techniques and process-oriented approach towards the design and development are those where DP SIGN has become a pioneer in the local context. Again, sustained quality delivery on time, post‐delivery services, corporate culture, documented knowledge acquisition, and continuous learning environments are the critical success factors of DP SIGN to achieve its vision.
2.2 Corporate Goal of the Company
The three pillars on which the DP Sign has its corporate structure are:
- Continuous improvement
- Customer’s satisfaction
- Quality of product and system
All these pillars are the pillars of the quality system which the organization owns in order to satisfy its customers. Continuous improvement means the process of quality is not still at a certain point, it continuously moving towards the improvement and can’t be still to some location, and the sole objective of this continuous improvement is to satisfy the customer’s need by giving the customer the quality products.
2.3 Mission Statement of the company
“Our mission is to offer advanced, convenient, and money-saving digitally printing things in Monitors or papers with the implementation of distinctive ideas and expertise. Our foundation of survival is based on providing valued clients a convenient and affordable source for digitalizing the world“.
In a clear sense, our motto is to be “A strategic partner of our clients, not a mere vendor.”
2.4 D.P. Sign’s spirit is infused into every component
D.P. Sign doesn’t simply just make and sell products; we are also deeply concerned with a number of issues, such as quality products, quick service, after-sale services and what type of services would be ideal for the clients. This enables us to refine existing work procedures and technologies. Every work is done and processed with the clients in our minds.
2.5 Services
DP SIGN offers a broad range of printing, IT consulting, custom programming services and online earning training. We have significant experience satisfying the most special technical needs of our customers. We understand the importance of a balanced technical design. We apply the appropriate level of technology to each project, keeping smaller projects simple and larger projects robust.
Our clients represent a broad cross‐section of businesses. We are very proud of the relationships we have built, and we have earned them through listening, learning, and communicating with our clients.
The categories below summarize our most common tasks.
2.5.1 Web Development
- Web Services
- Content Management
- E‐business solution (CMS, E‐auction, E‐catalogs, etc)
- Search Engine optimization
- E‐commerce and portals
- E‐Learning Management System
2.5.2 Web-based application design and development
- Business workflow management
- CRM
- MIS
2.5.3 Generic/custom software solutions (in different platforms/domains)
- Auto
- Pharmaceuticals
- Mortgage
2.5.4 Embedded software solutions
2.5.5 Online Earning Training
2.6 Engagement Models
2.6.1. Fixed price turnkey model
This model is applicable for projects where requirement specifications and timelines are clearly defined and frozen. This helps clients if they have a fixed budget for development and are clear about their requirements. We work with our client to define expected deliverables to determine a mutually agreed fixed price.
2.6.2. Per resource model
This model offers clients the flexibility to alter requirement specification, team size and timeline of projects based on market trends and feedback. This model suits best for most of the projects due to a software development project’s inherent need for altering specifications throughout the development life cycle. The client pays a monthly fee per resource (development, QA or management).
2.6.3. Offshore model
Our core expertise lies in establishing Offshore Development Centers for its clients. Through this model we serve our clients with highly experienced professionals with varied skill sets, resources, flexibility and time & cost‐to‐market advantages, allowing them to enjoy the long term gains of offshore outsourcing. DP SIGN operates as an extension to clients’ existing software engineering business. The secret of its success can be attributed to the fact that this model gives an opportunity to the client to make direct communication with DP SIGN through the onsite center and at the same time gives them the chance of enjoying the benefits of offshore development. Round the clock development is seamlessly done with this model. In this model, the client pays an offshore center on a per month basis.
2.7 Delivery Model
A proper combination of synthesis motivates every engagement, enabling us to deliver technology solutions that give our clients a decisive competitive advantage. The client can decide among one of the following delivery models
- Full offshore development
- Full Onsite development with our developers and QA resource deployed at the client’s site
- Hybrid model when the majority of the team is offshore and the few members are onsite to help gather business requirements and help in deliverables.
Above mentioned models cater to the different requirements of clients like augmenting their development or QA teams, forming a new and complete project team, getting architects and designers for new technology development. However, more onsite involvement increases the total cost of development. DP SIGN management team works with the client to help them choose the best model that fits into their business requirements.
2.8 Process and Standards
The following standards summarize the commitment of DP SIGN towards the international best practices.
2.8.1 Project management standards
At DP SIGN, we believe that project management is the key to the success of any project, more so for IT projects. We closely follow the PMBOK as set by the Project Management Institute (PMI) standards.
2.8.2 CMMI: The process improvement initiatives
We have initiated the development of process standards in‐house with the implementation of CMMI (Capability Maturity Model Integration). This process improvement approach will provide our organization with the essential elements of effective processes. CMMI can be used to:
- guide process improvement across a project or throughout an entire organization
- integrate traditionally separate organizational functions
- set process improvement priorities and goals
Processes being the pivot of the realization of products/services, DP SIGN ensures that every pertinent activity comports with the defined processes. The following sequence features the processes that are executed during the entire development lifecycle
2.8.3.1. The offshore team-building process
This process primarily focuses on the team-building approach and deals with both onshore and offshore development centers. The following phases and activities summarize this process
Phase: Project team creation
Activities:
- Defining and signing off the scope agreement
- Identification of key team members for the project
- Signing off the related agreements
Phase: Onsite to Offsite knowledge transition
Activities:
- Offshore Team Building Process
- Project Outsourcing Process
- Project Management Process
Phase: Offshore process definition
Activities:
- Tailoring standard methodology to comply with the client’s requirements
Phase: Offshore simulation
Activities:
- Simulation of a client’s environment at an offshore development center
- Review and comply with service level agreements
- Establishment of required infrastructure
- Setting up the offshore team structure
- Training the ODC team for client’s requirements
Phase: Offshore project execution
Activities:
- Define and review the different phases of the project
- Establishment of project plans for each phase
- Execution of the project in a phase‐wise manner in adherence to the corresponding project plan.
- “Project outsourcing process” continues hereafter.
- Review of the project plan as and when required
Phase: Review of ODC team and infrastructure
Activities:
- Establishment of metrics to identify the client’s satisfaction level in
- Terms of team structure/communication, infrastructure, and any other relevant issues
- Implementation of feedback from the client
2.8.3.2 Project outsourcing process
This process comprises of the following phases, activities, and deliverables related to the project execution.
Phase: Analysis of requirements
Activities:
- Requirement capture
- Describing the old architecture
- Identification of critical issues
- Identification/assessment of client risk and mitigation measures
- Establishment of project scope
Phase: Creation of Design Documents
Activities:
- Development of system design schema
- Creation of detailed project plan
Deliverables:
- Design documents
- Hardware and system architecture
Phase: Development/Unit testing
Activities:
- Modules coding
- Unit testing
- Test case design and documentation
Deliverables:
- Test Plan
- Issue tracking log
- Code walkthrough review
- System test cases
Phase: System Integration/Testing
Activities:
- Execution of test cases
- Fixing bugs
- Change request review
- Update test cases
- Update design documents
Deliverables:
- Test plan and Test cases
- Test log sheet
- Approved changed request
- Updated design documents
Phase: Acceptance/ release to production
Activities:
- Verification of acceptance criteria
- Fixing bugs
- Review of Change request
- User training
- Development of user manuals
Deliverables:
- Sign off on acceptance
- Detail QA reports
- User manual
- Installation/release notes
2.8.3.3 Project management process
Phase: Initial Project Plan
Activities:
- Estimation of effort and development time with the support of lead developer and QA manager
- Resource allocation for each task
Phase: Project tracking/visibility (recurring step till the delivery of project)
Activities:
- Preparation of weekly status by the project manager (For some clients there will be daily Scrum).
- Discussion on project status with the client in the defined period
- Readjustment of resource as required
- Updating the project plan in accordance with the change request issued by the client
Phase: Project plan for the next phase (recurring step till the delivery of project)
Activities:
- Generation of the project plan for the next phase
- Tracking of next phase
2.9 Domain Profile
DP SIGN offers its skills/services in two different segments i.e. System level programming and application-level programming.
2.9.1 System Level Programming
DP SIGN has been doing various projects related to embedded system development. It is basically developing systems in C. We have good expertise in working on the Linux platform as well as on Windows. Our work involves working in different protocols related to the network. We have also been working with media formats like MPEG4. Following is the summary of Tools and Technology we use at DP SIGN at the System Programming unit:
| System Programming unit | Software |
| Development IDE | Eclipse CDT |
| Compilers | gcc and g++ |
| Debugging and Profiling tools | gdb, GPROF, Strace, Mtrace, Linux trace toolkit |
| Testing Tools | CUnit, CGreen |
| Bug Tracking System | Bugzilla |
| Version Control System | Subversion |
| Platform | Montavista Linux 4.1, Red Hat Enterprise Linux |
| Protocols for Network | Real-Time Streaming Protocol(RTSP), Session Description Protocol(SDP), Real‐Time Transport Protocol(RTP), UDP, TCP |
| Media Format | Mpeg4 |
Tab: 2.1 System units and its Software
2.9.2 Application Level Programming
We provide specialized services to cater to the specific web requirements that are by practice defined by the client. In this context, we concentrate more on the implementation approach for the customer defined requirements coupled with the right technologies to deliver a high-quality web solution. Our expertise is distributed but not limited to the client-server solution, thin client-based application, and web-based application development. We have been working with our clients mostly in the area of E‐commerce solutions, CRM solutions, and third party web integration.
Here is a list of technologies and platforms that we use to bring you the best, most efficient and cost‐effective solution.
| Technology | Platform |
| Operating System | Linux, Windows2000/ XP, WinNT |
| Web Page Design Scripting Technology | AJAX, HTML/DHTML, XML, JavaScript, PHP, Perl / CGI, .NET, ASP |
| Database | Mysql, MSSQL, MS Access, Oracle |
| Graphics Design Tools | Adobe Photoshop, Adobe Illustrator, CorelDraw, GNOME Imaging Software |
| Web Development Tools | Ultradev Dreamweaver, DeamweaverMX, PHP Editor, Microsoft Visual Basics, Microsoft Visual Studio.NET, Macromedia Flash |
| Programming Languages | PHP, ASP, VB, C/C++, C# |
| Testing Tools | Test Track, Track+, Cpp‐Unit, N‐Unit, Win Runner, Load Runner |
| Bug Tracking System | Bugzilla |
| Version Control System: | Subversion, CVS |
| Content Management System | Joomla, Mambo, Droople, PHPNuke |
| Ecommerce | Oscommerce, Creloaded, Zencart, XCart, OscMax |
| Design and PM tools | MS‐Project, MS‐Visio, Rational Rose |
Tab: 2.2 List of technology with a platform
2.10 Competitive Advantage of DP Sign
DP SIGN maintains working hours with Time‐match/Time‐overlap facility. This way, our Japanese and American clients get complete visibility and interaction with the development team. DP SIGN possesses a strong team of architects, DBA, Programmers, QA personals and support staff with graduation in computer science from reputed universities. Not only that, it maintains formal tie‐up with reputed universities for the interrupted supply of trained human resource
- Compelling cost arbitrage advantage (better than India and the Philippines)
- Reduces time‐to‐market and provides a frequent delivery and support model
- In‐house Training facility for the project members depending upon the nature of the project
- Developers possess sound oral and written communication in English and are further trained by the American Language Center
- Defined Software process with state of the art tools/techniques involved in all phases of complete life‐cycle
2.11 Physical Infrastructure
- 8000 sq feet Software Development Centre capable of accommodating more than 100 resources (Can be extended as and when required)
- 24 hour guarded premises (guarded by internationally acclaimed “Group 4 Falk) at the heart of Kathmandu.
- Multi‐skilled resource pool
- A strong team of architects/DBA/Programmers/QA personals and support staff
- Networked workstations running Linux, embedded Linux and Windows NT/2000/XP
- Dedicated server room with high security and standard network and server equipment
- Hardware firewall (Sonic Wall) protected development environment
- Uninterrupted Power Supply
- Ergonomically designed workspaces
- Backup placed at multiple locations (in multiple buildings)
- Multiple leases and broad‐band internet connection extendable to 1Mbps of connectivity.
- Dedicated conference room
2.12 Organizational Hierarchy Chart
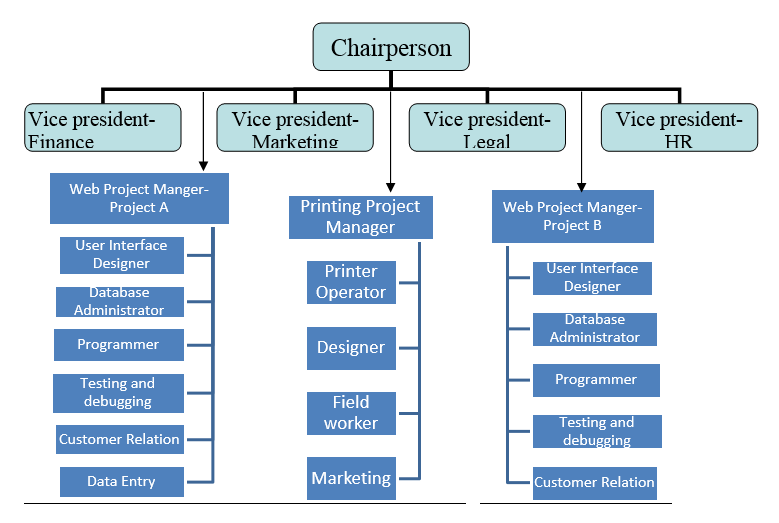
Fig-2.1: Organization Structure
2.13 Number of employees
| Printing | Web site and online earnings |
| Technician- 12 J. Technician- 8 Designer- 2 Printer Operator- 2 Administration- 4 Marketing- 3 | Designer 7 Database designer 3 Marketing 10 Customer Relation (Callers) 10 Data Entry 14 Teachers Programmers 6+ 10 |
Tab: 2.3 Number of employees
2.14 Introduction of Departments I have worked
2.14.2 Website development Department
Web site development in DP Sign is done in two ways, either it is built in-house or it is bought.
2.14.2.1 In-House Development
2.14.2.1.1 Design the application architecture
Application architecture defines the technologies to be used by one or more or all information systems in terms of their data, processes, interfaces and network components. In DP Sign database like MySQL, SQL, Oracle, MySQL, etc were in use, I use MySQL. They use .net and PHP as the programming language and I prefer to use PHP language in website programming.
The physical data flow diagram is used to establish physical processes and location issues.
2.14.2.1.2 Design the database(s)
The purpose of this task is to prepare technical design specifications for a database that will be adaptable to future requirements and expansion. System analyst also participates in the database modeling and the system designers are responsible for the completion of the activity as databases are shared resource.
The database schema is also structured.
2.14.2.1.3 Design the system interface
In this, the system designer works with the system to develop input, output and dialogue specifications. For output, the terminal screen or the printed papers were used and for input, the data capture method is used.
System designers are responsible for the task and can use GUI (graphical user interface). For this, I have used Macromedia Dreamweaver and Phpmyadmin.
2.14.2.1.4 Package Design Specifications
The final design task involves packaging all the specifications from the previous design tasks into a set of specifications that will guide the computer programmer’s activities during the construction phase of the systems development methodology.
2.14.2.1.5 Update the Project Plan
Revaluation of the project is done. The project manager in conjunction with system owners and the entire team facilitates this tas
2.14.2.2 Buy Solution
If the DP Sign is willing to buy the website from the outsider then following is done:
2.14.2.2.1 Identify and Research Specific Products
In this task, we research technical alternatives. The requirements specify the functionality, features and critical performance parameters for our new website. Research and information are collected from internal standards, information services, trade newspapers, and periodicals offer. System Designer with the help of a project manager is responsible to complete the task
2.14.2.2.2 Solicit Proposals or Quotes from Vendors
The solicitation task requires the preparation of RFQ (Request for Quotations) and RFP (Request for proposal). Request for Quotations is a formal document that communicates business, technical and support requirements for the application software package to a single vendor that has been determined as being able to supply that application package and services.
Request for proposal is also a formal document that communicates business, technical and support requirements for an application software package to vendors that may wish to compete for the sale of that application package and services,
2.14.2.2.3 Select and recommend the best vendor.
The purpose of this task is to validate requests for proposals and/or quotations received from vendors. Designer involves in data and database administrators, network administrators and application administrators. The key outputs of this task are those vendor proposals that proved to be validated proposals or claims and others whose claims were not validated.
2.14.2.2.4 Contract with the awarded vendor to obtain the product
Having ranked the vendor proposals the next activity usually includes presenting a recommendation to management for final approval. Salesmanship and communication skills are important. The purpose of this activity is to negotiate a contract with the vendor who supplied the winning proposal and to debrief the vendors that submitted losing proposals. A contract will be produced to the winning vendors.
2.14.2 Online Earning Department
2.14.2.1 Online Earning Training:
In this training, we were taught how we can earn money online without investing money. This training lasts for 15 days for normal computer operator and for advance the time period is less. Online earning can be done by different means in this global market. Some of them are:
2.14.2.1.1 Online earning through blogging:
Blog or Weblog is nothing but a personal website where you can express your personal views, ideas, feelings, etc. There are many sites such as Blogger, Typepad, Soul cast who provide blog services. You can earn online through Adsense. Here you have to place Adsense ads on your blog. You will earn whenever viewers click on the ads.
2.14.2.1.2 Online earning through Ad Typing:
Online earning by Ad typing is another unique job opportunity. All you have to need to post Ads on various Free Ad sites. There are tons of sites that provide Ad Typing jobs. Typeinternational is a very popular site. Typeinternational is providing nine different homes based earnings opportunities.
2.14.2.1.3 Online earning through Medical Transcription:
Medical Transcription is the fastest-growing field in health care. It is the process where you need accurately and swiftly transcribes medical records dictated by doctors and others, including medical history and physical reports, X-ray reports and pathology reports, etc. Good English pronunciation, typing skill and acquaintance with medical terminology are the basic need of the job. You can earn lots of money through Medical Transcription.
2.14.2.1.4 Online earning through the filling of Market Survey Forms:
Filling of Market Survey Forms is another popular online job opportunity. Thousands of consumer products are fighting to get a pie of the billions of consumers worldwide. You can earn by simply filling up of forms regarding a particular product of a company.
2.14.2.1.5 Top Pay per click (PPC) Business Sites
| Some of the sites that pay per click are: Name of sites | Name of sites |
| www.google.com/adsense www.yahoo.com/overtrue www.publisher.yahoo.com www.search123.com www.lycos.com | www.click-share.com www.income-machine.com www.bidvertiser.com www.typeinternational.com www.daily-payday.com |
Tab: 2.4 Collection of PPC sites
2.14.2.1.6 Earn money by blog posting:
We are paid from these sites on posting our comments or posts. Some of the sites are:
| SN | Name of sites |
| 1 2 3 4 5 | www.technorati.com www.digg.com www.netscape.com www.reddit.com www.tailrank.com |
2.15 Some of our major Clients:
| SN | Name of Client | SN | Name of Client |
| 1. | Laxmi Bank | 2. | Siddhartha Bank |
| 3. | Jyoti Bikash Bank | 4. | Kathmandu Medical College |
| 5. | Advanced Imaging & Diagnostic Centre | 6. | Beijing Duck Restaurant |
| 7. | Institute of Professional Excellence | 8. | Bok Choy |
| 9. | Oral Dental Home | 10. | Glamour |
| 11. | South Asia Commodities & Brokerage | 12 | Cosmopolitan |
| 13 | Axis Broking Solution |
Tab: 2.5 List of major clients
2.16 Business Volume:
DP Sign was founded in 2007. So it is a newly entered company in the corporate world. But its sales figures are outstanding. The company has sales of over 10 million Nepali rupees in the financial year 2008-2009.
The overall sales volume is generated from three areas domestic, commercial and International. The prices of the products of the company range from Rs. 350(Domestic) to Rs. 1.5 million.
The Major portion of the revenue of DP Sign is Flex Printing, Online earning training, and website designing and programming.
The partition of sales to total sales graph is given below:
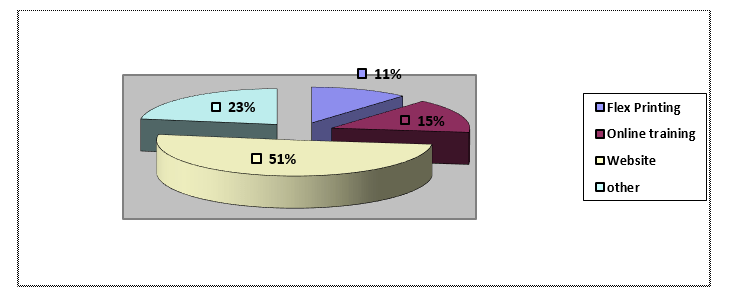
Fig: 2.2 Business volume of DP Sign
According to the figures company’s 52% sales of Revenue is earned through website designing and programming, 11% of revenue is from online training, and 15% and 22% from online training and other sources respectively
Although DP Sign was founded in 2007 it remained successful in getting its share in the market in a very short time (2007-2009) and through it’s loyal, devoted, professional and hardworking management it is expected that the company will expand its sales to about 4 million during 2010-2011.
Besides that company has also earned impressive goodwill in the market through its quality services.
2.17 Products offered by DP Sign
2.17.1 Printing Services
| SN | Material Type | Rate | Remarks |
| 1 | Printed backlit with box & light with fitting at site | 199.00p.sq.ft. | Without vat |
| 2 | Vinyl sticker cutting & pasting on backlit with box & light with fitting at site | 221.00p.sq.ft. | Without vat |
| 3 | Flex/ Frame & fitting at site | 38.00p.sq.ft. | Without vat |
| 4 | Mimaki Soljet print Normal vinyl | 50.00p.sq.ft. | Without Vat |
| 5 | Soljet vinyl print & pasting on forex sheet | 95.00p.sq.ft. | Without vat |
Tab: 2.6 Printing product of DP Sign
2.17.2 Web services
| SN | Web Service Type | Rate |
| 1. | Domain Registration | Rs. 1000+ |
| 2. | Web space | As per space requirement |
| 3. | .np domain registration | Free |
| 4. | Website design and development | As per design and requirement |
| 5. | Open Source CMS (joomla, word press, durpal, umbraco, tomato, mambo, hippo, nuxeo) | As per design and requirement |
| 6. | Search Engine Optimization(twitter marketing, social marketing, facebook marketing, affiliation program) | As per the design and requirement |
| 7. | Online Earning Training | Rs 1500+ |
Tab: 2.7 Web services providing by DP Sign
2.18 Time Frame of Internship
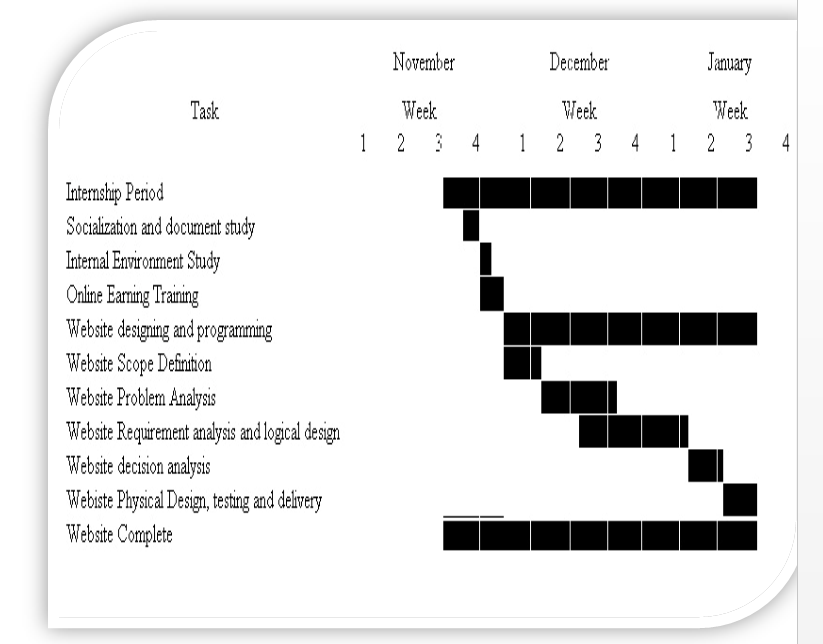
Fig: 2.3 Time frame representation in Gantt chart
Chapter 3
Analysis
3.1 Strategic Business Unit’s Analysis
DP Sign has different strategic business units and management as DP Sign is well aware that how to use these units strategically. In order to fully analyze the business units of DP Sign that are web development, online earning training, and printing, I have used different analysis which not only gives the true picture of the company’s different unit but it also gives the depiction of the overall industry analysis in which company is currently working. There are four types of Analysis which I have performed in order to explore the working of the organization.
3.1.1Web Development department Analysis
3.1.2 Online Earning department Analysis
3.1.3 PEST Analysis
3.1.4 SWOT Analysis
3.1.5 Five S’s of Workplace Organization.
All these analyses have been performed by getting data from real-time industry situation as well as the organization. Research articles, news articles, internship reports, manuals are being used in order to effectively analyze the working of the organization. The historical data for the analysis has been taken or a maximum of 5-7 years back while current data until 2009 has been used.
3.1.1 Web Development department Analysis
Present status of Website development in DP Sign
Though the Website development in Nepal is developing and every year many companies are being registered but a professional person is lacking in our country. DP Sign is also facing the same problem so it is hiring professionals from other countries. Like other companies in Nepal, DP Sign is also lacking local customers as our country is lacking the knowledge to use technology and computers.
But the use of technology and website in Nepal is also increasing thus DP Sign also has to focus on the local customers. Even personal websites are taking a market so DP Sign should focus on this site by reducing the costs but increase the volume of sale which ultimately leads to an increase in the profit.
Schools, colleges, institutions, shopping center are increasing thus DP Sign should focus in this sector also. One of the lackings of the DP Sign is that it lacks advertisement.
DP Sign has to face competition from:
- Strong local market
- New entrants in the international market
- Competition from existing customers
- Economic recession
From a strong local market, the competition has been arising from a few companies. These companies are well renowned not only locally but also internationally. In these local companies, DP Sign has been facing competition at website development. At locally and internationally DP Sign is facing the competition as the number of companies is increasing. As economic recession is a period of recession and throughout the global world is suffering from the economic crisis, in such a scenario, there is an effect on website development also.
In the context of DP Sign, the market capture internationally is very low in the context of other website company so the company should focus on maintaining international customers.
3.1.2 Online Earning department Analysis
In the context of DP Sign Online Earning, training generates about 15% of the Revenue. So this is also one of the most important departments of DP Sign but DP Sign is not focusing on it.
The Internet in Nepal is increasing. Some businesses and people are eager to earn online by sitting at home and being bosses of themselves so online earning has also a potential market to earn.
But DP Sign is not focusing on this sector and I suggest them to make a website to unite their team and the exchange of click can be done so that everyone can get benefits.
3.1.3 PEST Analysis
PEST analysis is the analysis which we tend to perform in order to analyze the external as well as the internal environment in which the organization is currently working. PEST analysis revolves around four things.
- Political Environment
- Economic Environment
- Social Environment
- Technological Environment
Political Factors
There are many factors, which entice the organization with the Government.
- Tax policy
- Quota
- Cyber Laws
- Online transactions law
- Labor policy
Economic Environment
Recession, devaluation of the currency and the policy of the government have an adverse effect on the economy.
Social Factors
Due to an increase in the education and technology sector, the educational power of the customers is increasing at a speedy rate. They are becoming aware of the brands and the latest technology. Due to this, they are demanding a high technological website at a low price in the international market.
Technological Factors
Technology is also a key sector in terms of the external environment for website development. The technology is working as a substitute for manpower with more efficiency. DP Sign has to focus on following
- Error reduction
- Less labor cost
DP Sign should have to focus on maintaining the harmony between the factors of PEST analysis so that it can progress in its life cycle.
3.1.4 SWOT Analysis
Performing SWOT analysis involves the generation and recording of the strengths, weaknesses, opportunities, and threats in relation to a particular task or objective.
Strengths
- Strong and Prominent International Image
- Latest Technology
- Competitive Workforce
- Creativity and Innovation
- Management Information System
- ISO Certified Company
- Locally Working(Expenses in NRs but earning in Dollars)
Weaknesses
- Individualism
- Low Production capacity
- No opportunity for Training and Development
- Lack of teamwork
- Lack of continuity of Policies
- Too much Specialized Jobs
Opportunities
- New Emerging Markets
- Bright Local Market
- New Cyber laws and Policies
- Implementation of technology and websites in government sector
Threats
- Non-supportive government
- Government Policies
- Growing Competition
- Political uncertainties
3.1.5 5 S’s of Workplace Organization.
I recommend the DP Sign to follow the 5 S’s techniques to promote workplace organization, ensure adherence to standards and foster the spirit of continues improvement.
- The 1st S: Sort
To get rid of unwanted items, things should be in the right place so that it can be gain ant the right time. Decide what is needed to be kept, and what is not needed and to be discarded.
- The 2nd S: Set Location and Limits
To locate a specific place for specific items of a specific quantity, where needed. Determine addresses for materials and equipment. Put them in that place and keep them there.
- The 3rd S: Shine and Sweep
Shine and sweep mean to use cleaning to identify abnormalities and areas for improvement. Clean the workplace and at the same time visually sweep for abnormalities or out or control conditions.
- The 4th S: Standardize
To consolidate the first 3 S’s by establishing standard procedures. Determine the best work practices and find ways of ensuring everyone does it the same “best” way.
- The 5th S: Sustain
Sustain improvements and make further improvements by encouraging effective use of the ‘Check-Act-Plan-Do’ cycles. Keep all current improvements in place and develop an environment for future improvements.
3.2 What I would improve or do differently if I had the opportunity:
- I could be better organized, especially with regards to the paperwork required for capital purchases and expense reporting for business travel.
- I could learn to manage my time better, planning parallel execution of some short-duration activities when long-running operational activities are occurring.
- This would reduce personal idle time when waiting for long-duration activities to complete.
Chapter 4
Recommendations
There are few things which can be implemented and improvements can be made.
- There must be a career development opportunity for the employees so that they can work energetically in the organization as there is high turnover due to lack of information in the related sector.
- Remuneration System must help in motivation as a better remuneration package can do more in this highly competitive environment.
- The work environment at DP Sign is such that it does not encourage the staff to work effectively and I recommend that jobs should be such that the worker really enjoys what they are really doing.
- The staff as an individual is good but as a team is very bad, this thing should be overcome by promoting the team-based culture by the company.
- What I feel while working in DP Sign was that the top management is taking HRD as an expense rather than an investment as in the future the real capital or asset will be in the form of the workforce rather than monetary capital.
- In DP Sign there are uses of advance technology so the employee outside the world cannot cope easily with the internal environment so the socialization process should perform while recruiting the new employee.
- I suggest DP Sign to make a website to unite their online earning team and the exchange of click can be done so that everyone can get benefits.
- There are problems in web hosting services as the mail is sent to the scams sector so it should be maintained and the reliable up to date time is 98% only so the web hosting services should be changed.
Chapter 5
Conclusion
During my internship training at DP Sign, I have learned a lot and my vision and practical exposure have broadened very much from my three months internship. In the website development and online earning sector, DP Sign is contributing a lot and is using modern technology to take the company to new horizons and is moving as per its slogan “A strategic partner of our clients, not a mere vendor”.
I have carried out my responsibilities and duties in the field of website designing and online earning by which I am capable to design and program website and started to earn online.
After doing my internship it becomes clear to me that books are only dealing with the ideal situation while in the real world it is not so, and you have to face many problems particularly in programming and designing field in which you are dealing with codes and the behavior of software to handle them. Besides this, I just came across with abstract and the concepts developed with thorough study able to make a vague mental image while working in a real scenario.
Further, I also concluded that 100 percent concentration, full care, analytical, descriptive, knowledge and communication skills are the key prerequisites for working in the real world.
Anyhow, precisely speaking this internship of three months is a memorable period for me during which I availed the opportunity to flourish my communication skills, polish my capabilities and abilities, upgrade my knowledge about the latest technology and application tools and broaden my vision and exposure towards practical life.
This internship proves better for me in two way, on one side it helps to develop a personality in me which exactly match the professionalism in web development and secondly it helps to strengthen my decision about the specialization in web technology as my personality exactly match the nature of the job.
Chapter 6
PROGRAM WORKPLACE RELATIONSHIP
This project has proved to be very useful in putting the theoretical knowledge learned in college into practical knowledge. Through this project, the various subjects learned by us such as the principle of management, system analysis, and design, C programming, web technologies, Object-oriented languages, organizational behavior, and other programming have been put into use practically.
The subject matter of system analysis and design and other programming languages and web technologies learned theoretically were put into use in this project. Planning of the assignment, locating information sources, collecting and analyzing data, presenting charts and tables, programming, website designing and programming, understanding system and software as well as re-engineering them, etc. which are already studied by us in books was very helpful in putting it into practical experiences and preparing this project. The theoretical knowledge of web technologies, programming languages and managerial courses were helpful in carrying out the SWOT analysis, PEST analysis, and other analysis.
This program is very helpful in putting our theoretical knowledge into practical knowledge. All the subject matter studied by us in the previous semester was put into use while carrying out this project. Studying books is a different thing and going through all the things studied is different. This program has provided a platform to undergo real-life problems and experiences of business which will be fruitful to us in the coming years.
Bibliography
- Book References:
- Annual Report of DP Sign
- Operating Manuals of the DP Sign
- Publications of the DP Sign
- System Analysis and Design Methods, McGraw-Hill Companies
- Internship Report Management Information System, Prentice Hall
- Software Project Management by E.M. Bennaton Second Edition.
- Website References:
- dpsign.com.np
- google.com and other search engines to search
- scribd.com
- esnipps.com
- wikipedia.com (The encyclopedia)
APPENDICES
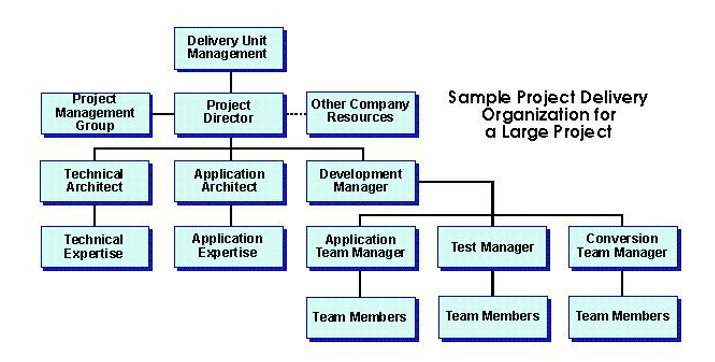
Fig: Sample Project Delivery Organization for a large project in DP Sign
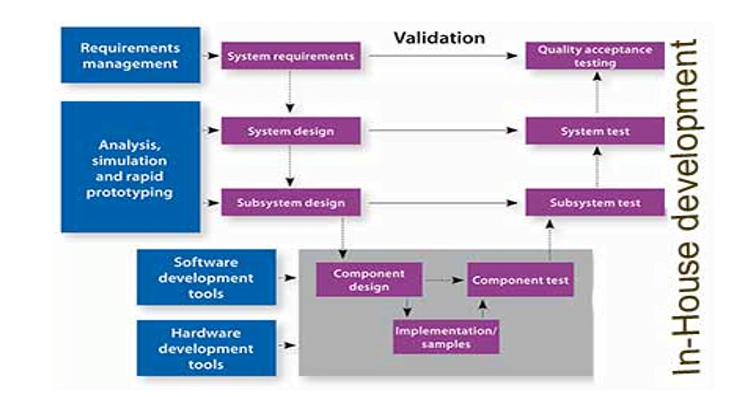
Fig: In-House Development process in DP SIGN
Like this, we are complete the full internship report to submit to the college.