

With the launch of Opencart 4 and lots of changes, today we are showing how we can install the Opencart 4 theme and how to create the Opencart 4 theme admin section. How to install is the Opencart user manual, and we will go through all the code for the developer guide. For demo purposes we are showing you the admin section in this tutorial and in the next upcoming Opencart 4 tutorial, we will go through Opencart frontend settings and codes.
How to install the Opencart 4 theme?
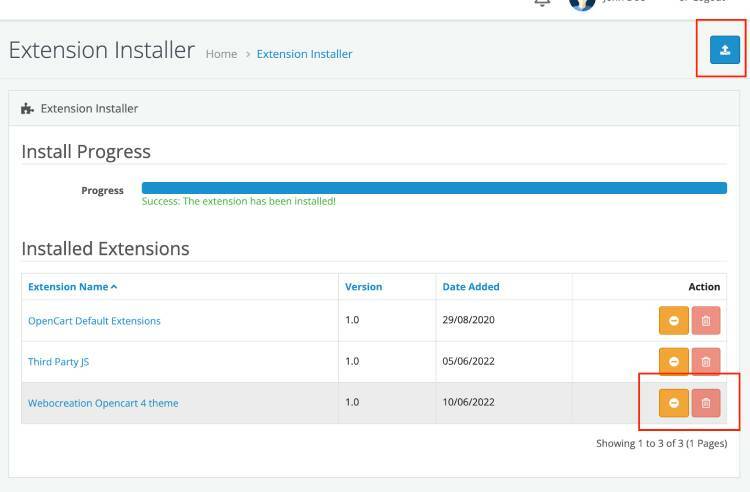
Once you download the above, you will get a zip file named webocreation4.ocmod.zip, then go to Opencart admin >> Extensions >> Installer >> Click the blue upload button. Once the upload is completed, it will list in the Installed Extensions, when you can click the install green button.
Now, go to Extensions >> Extensions >> Choose the extension type >> Themes

Click the green install button on the new theme, and you can uninstall the old one. Then, click the blue edit button and change the status to enable, and click Save.
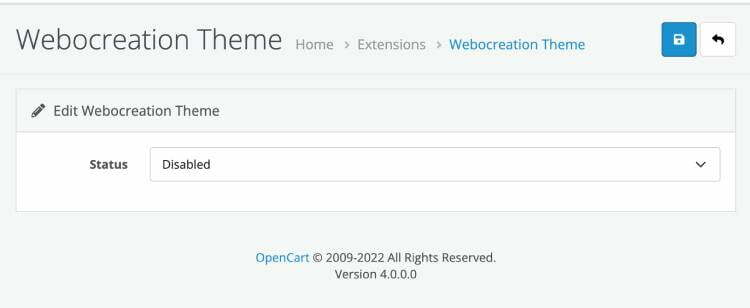
With these, your new Opencart 4 theme is active.
How to uninstall the Opencart 4 theme?
Login into Opencart admin, then Extensions >> Installer >> Find the theme and click Uninstall. If you totally want to remove it then you can delete it.
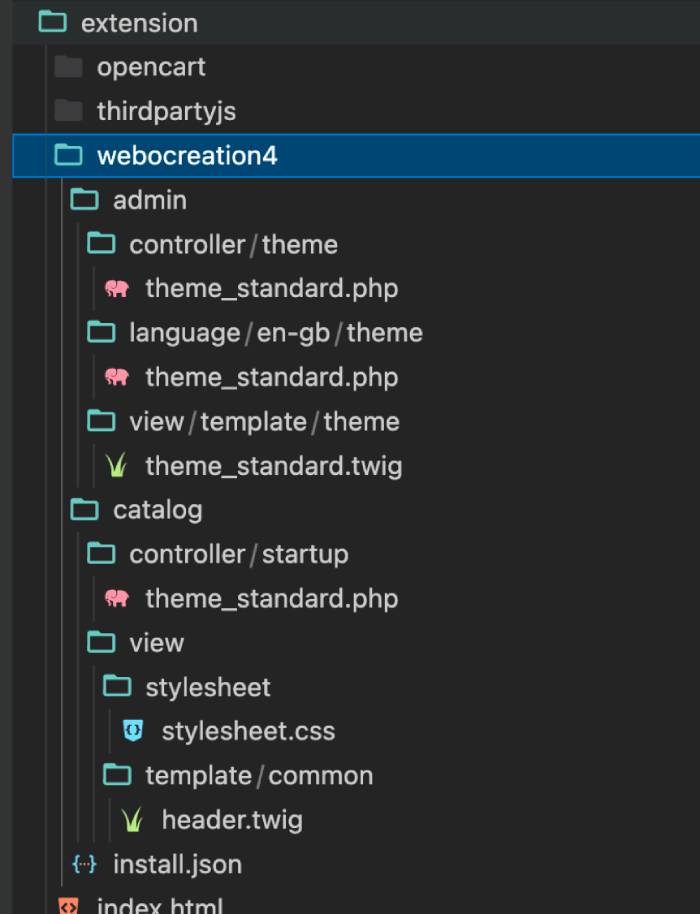
File and folders structure of the Opencart 4 theme
Now all theme files and folders also reside in the extension folder. The theme folder should be inside the theme folder. Here is one example of how the admin files and folders reside, overall our main theme folder is named “webocreation4” and all the files are named as standard.***. You can name them as you like.
Admin Language of custom Opencart 4 theme
Let’s start by creating the language file for the Opencart 4 theme. Create files and fodlers like extension >> webocreation4 >> admin >> language >> en-gb >> theme >> theme_standard.php. Here is one simple example of texts added for our custom theme.
<?php
// Heading
$_['heading_title'] = 'Webocreation Theme';
// Text
$_['text_extension'] = 'Extensions';
$_['text_success'] = 'Success: You have modified the Webocreation theme!';
$_['text_edit'] = 'Edit Webocreation Theme';
// Entry
$_['entry_status'] = 'Status';
// Error
$_['error_permission'] = 'Warning: You do not have permission to modify the Webocreation theme!';
Admin View of custom Opencart 4 theme
Create a new file at extension >> webocreation4 >> admin >> view >> template >> theme and create theme_standard.twig. Paste following code. Most of the code are similar to other modules.
“Check the Select field name, which is name=”theme_standard_status” the name of all settings for theme should start with theme_ and then with the file name, as our file name is standard.php so each field name should start with theme_standard_
{{ header }}{{ column_left }}
<div id="content">
  <div class="page-header">
    <div class="container-fluid">
      <div class="float-end">
        <button type="submit" form="form-theme" data-bs-toggle="tooltip" title="{{ button_save }}" class="btn btn-primary"><i class="fas fa-save"></i></button>
        <a href="{{ back }}" data-bs-toggle="tooltip" title="{{ button_back }}" class="btn btn-light"><i class="fas fa-reply"></i></a></div>
      <h1>{{ heading_title }}</h1>
      <ol class="breadcrumb">
        {% for breadcrumb in breadcrumbs %}
          <li class="breadcrumb-item"><a href="{{ breadcrumb.href }}">{{ breadcrumb.text }}</a></li>
        {% endfor %}
      </ol>
    </div>
  </div>
  <div class="container-fluid">
    <div class="card">
      <div class="card-header"><i class="fas fa-pencil-alt"></i> {{ text_edit }}</div>
      <div class="card-body">
        <form id="form-theme" action="{{ save }}" method="post" data-oc-toggle="ajax">
          <div class="row mb-3">
            <label for="input-status" class="col-sm-2 col-form-label">{{ entry_status }}</label>
            <div class="col-sm-10">
              <div class="form-check form-switch form-switch-lg">
                <input type="checkbox" name="theme_theme_standard_status" value="1" id="input-status" class="form-check-input"{% if theme_example_status %} checked{% endif %}/>
              </div>
            </div>
          </div>
        </form>
      </div>
    </div>
  </div>
</div>
{{ footer }}
Only we need to make sure that the field names start with theme_standard_, others are similar to other module codes.
Admin Controller of custom Opencart 4 theme
Now, let’s create a controller file and folders like extension >> webocreation4 >> admin >> controller >> theme >> theme_standard.php. Now you can add following code, we are describing some important code below:
<?php
namespace Opencart\Admin\Controller\Extension\Webocreation4\Theme;

class ThemeStandard extends \Opencart\System\Engine\Controller
{
    public function index(): void
    {

        $this->load->language('extension/webocreation4/theme/theme_standard');

        $this->document->setTitle($this->language->get('heading_title'));

        $data['breadcrumbs'] = [];

        $data['breadcrumbs'][] = [
            'text' => $this->language->get('text_home'),
            'href' => $this->url->link('common/dashboard', 'user_token=' . $this->session->data['user_token']),
        ];

        $data['breadcrumbs'][] = [
            'text' => $this->language->get('text_extension'),
            'href' => $this->url->link('marketplace/extension', 'user_token=' . $this->session->data['user_token'] . '&type=theme'),
        ];

        $data['breadcrumbs'][] = [
            'text' => $this->language->get('heading_title'),
            'href' => $this->url->link('extension/webocreation4/theme/theme_standard', 'user_token=' . $this->session->data['user_token'] . '&store_id=' . $this->request->get['store_id']),
        ];

        $data['save'] = $this->url->link('extension/webocreation4/theme/theme_standard|save', 'user_token=' . $this->session->data['user_token'] . '&store_id=' . $this->request->get['store_id']);
        $data['back'] = $this->url->link('marketplace/extension', 'user_token=' . $this->session->data['user_token'] . '&type=theme');

        if (isset($this->request->get['store_id'])) {
            $this->load->model('setting/setting');

            $setting_info = $this->model_setting_setting->getSetting('theme_theme_standard', $this->request->get['store_id']);
        }

        if (isset($setting_info['theme_theme_standard_status'])) {
            $data['theme_theme_standard_status'] = $setting_info['theme_theme_standard_status'];
        } else {
            $data['theme_theme_standard_status'] = '';
        }

        $data['header'] = $this->load->controller('common/header');
        $data['column_left'] = $this->load->controller('common/column_left');
        $data['footer'] = $this->load->controller('common/footer');

        $this->response->setOutput($this->load->view('extension/webocreation4/theme/theme_standard', $data));
    }

    public function save(): void
    {
        $this->load->language('extension/webocreation4/theme/theme_standard');

        $json = [];

        if (!$this->user->hasPermission('modify', 'extension/webocreation4/theme/theme_standard')) {
            $json['error'] = $this->language->get('error_permission');
        }

        if (!$json) {
            $this->load->model('setting/setting');

            $this->model_setting_setting->editSetting('theme_theme_standard_status', $this->request->post, $this->request->get['store_id']);

            $json['success'] = $this->language->get('text_success');
        }

        $this->response->addHeader('Content-Type: application/json');
        $this->response->setOutput(json_encode($json));
    }
    public function install(): void
    {
        if ($this->user->hasPermission('modify', 'extension/webocreation4/theme/theme_standard')) {
            $this->load->model('setting/startup');
            $this->model_setting_startup->addStartup('theme_theme_standard', 'catalog/extension/webocreation4/startup/theme_standard', 1, 2);

        }
    }

    public function uninstall(): void
    {
        if ($this->user->hasPermission('modify', 'extension/webocreation4/theme/theme_standard')) {
            $this->load->model('setting/startup');

            $this->model_setting_startup->deleteStartupByCode('theme_theme_standard');
        }
    }
}
Now Opencart 4 starts using namespace a powerful concept that provides a way to organize code into groups that allow you to create reusable components that can be reused across multiple projects. So, each Opencart modules, theme, and all extensions now start with a namespace. As we are creating a theme so at the end it is Theme, if you are creating a module, it will be Module, if you are creating an analytics extension then it will be Analytics.
namespace Opencart\Admin\Controller\Extension\Webocreation4\Theme;Now, in the second line, we create the class with the name same as the file, as our file name is standard.php, so we name the class as Standard and inherits the main Opencart controller.
class ThemeStandard extends \Opencart\System\Engine\ControllerNow, we create an index method and add the return type
public function index(): voidIn the index method, all other codes are similar to other modules and extensions, one line of code that you need to look at is below where you add the theme_standard as the first parameter. This first parameter and each field name of the form should start with the same so here in our example is theme_standard
$setting_info = $this->model_setting_setting->getSetting('theme_standard', $this->request->get['store_id']);Another code to look into is below, right now we have one field so it is like below, you need to do similar for each field that you will add. $setting_info holds all the setting that is given by the above getSetting method.
if (isset($setting_info['theme_standard_status'])) {
    $data['theme_standard_status'] = $setting_info['theme_standard_status'];
} else {
    $data['theme_standard_status'] = '';
}
Another is the save method:
public function save(): voidIn the same method, look into one main line of code which is like below:
$this->model_setting_setting->editSetting('theme_standard', $this->request->post, $this->request->get['store_id']);The first parameter of editSetting method should be theme_standard.
Above is the main code that we need to check and change, other similar to all other Opencart 4 modules or extensions or themes.
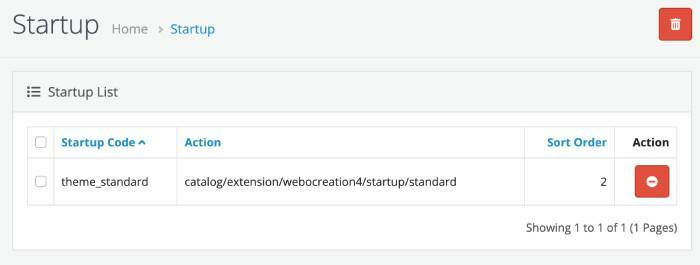
public function install(): void
{
    if ($this->user->hasPermission('modify', 'extension/webocreation4/theme/standard')) {
        $this->load->model('setting/startup');
        $this->model_setting_startup->addStartup('theme_standard', 'catalog/extension/webocreation4/startup/standard', 1, 2);

    }
}
The above code will add the Startup like below which we will be using in the catalog code, which we will show in the next upcoming post.
Likewise, we add the uninstall code like below so that all rows are removed from the database
public function uninstall(): void
{
    if ($this->user->hasPermission('modify', 'extension/webocreation4/theme/standard')) {
        $this->load->model('setting/startup');
        $this->model_setting_startup->deleteStartupByCode('theme_standard');
    }
}
In this way, you can install and create a new custom Opencart 4 theme and create the form in the admin section where you can add the setting for the custom theme. Hope you liked this article, please subscribe to our YouTube Channel for Opencart video tutorials. You can also find us on Webocreation Twitter and Webocreation Facebook. Please let us know if you have any questions or concerns. In our next upcoming tutorial, we will go through how to show in the frontend, as now everything is events based so there will be a lot of changes for the new frontend changes of the Opencart 4 custom theme. Please let us know if you have any questions or concerns.
Hi Rupak
I cannot get the Webconcreation Theme enabled.
The page does not display the same view as per your tutorial with the selection option of “Disable/Enable”. There is just a ‘Status’ header with an on and off toggle button. If i switch it to the ‘On’ position where it turns blue, save it and return to the Theme, it still remains Disabled and the default Theme Enabled.
If I set the default theme to Disable, save and try to enable the Webocreation, it still does not respond.
Hi Mornay,
Fixed all the codes, those were because of my last-minute changes and lack of extensive testing, please download again and test, now it should work.
Please let me know if it does not and I will look more into it.
I found a solution.
The reson of this is it tryeing to find value of a key with name “theme_theme_example_status” in oc_setting but it named simply as theme_example_status.
just go to phpmyadmin -> your store db -> oc_setting and change “theme_example_status” to “theme_theme_example_status” 🙂 hope it helps
I have the same problem, any thoughts? Please!
I download your zip file (webocreation4.ocmod.zip) and when installing it inside >> Opencart admin >> Extensions >> Installer >> I get an error saying file “install.json” could not be found, and then when I try again, it says “file already exist” but I cannot see the new theme inside >> Extensions >> Themes. Some people are telling me that this theme is NOT compatible with Opencart Version 4.0.1.1, do you have an idea what is going on?
Hi Luis,
had the same issue. It’s because inside the zip-archive there’s an extra folder which is not needed. Here’s how I fixed it:
Unzip the webocreation4.ocmod.zip file. Open the webocreation4-folder an make a new zip-archive using the loose folders and files (WITHOUT the “webocreation4” folder).
Then go to your opencart installation and navigate to system -> storage -> marketplace and delete the old webocreation4 zip archives.
Hi Rupak Nepali,
I’m still unable to enable the theme. If I try to enable the theme I get a “permission denied” page.
please advice.
how to override catalog>language>en-gb>product>product.php language file in opencart4 theme developement please provide solution
Change “install” function in article to array as in your example in ZIP archive
My startup is empty?