
Two ways to integrate Pardot into the website through form and form handler.
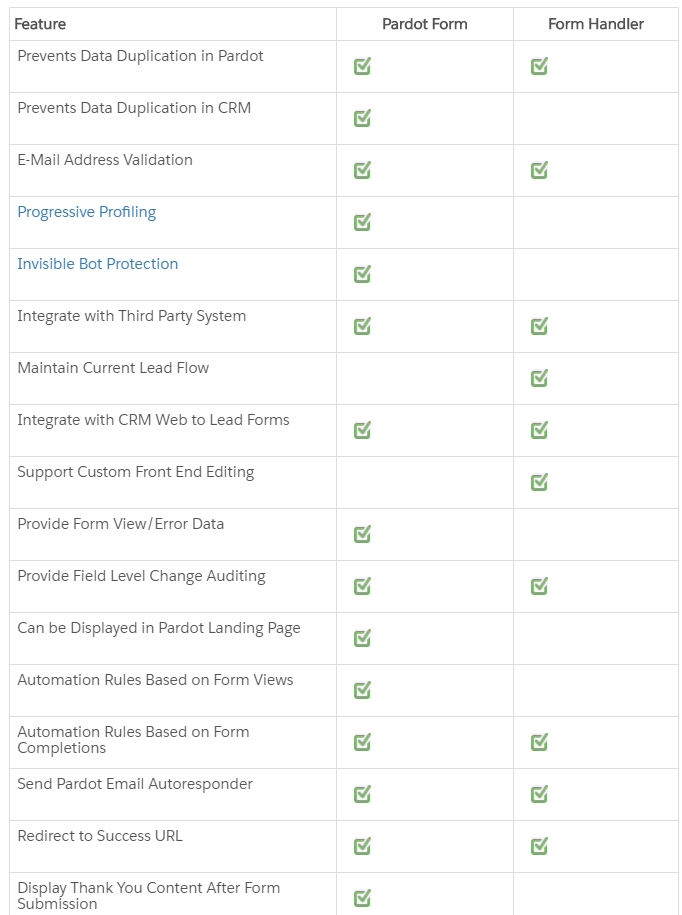
Let’s see the difference first:
Source: http://help.pardot.com/customer/portal/articles/2126763-form-handlers-versus-pardot-forms-overview
You can use Pardot forms on your website to collect information about visitors and turn anonymous visitors into identified prospects. But you will lack the main two points:
- Maintain Current Lead Flow
- Support Custom Front End Editing
If you use Pardot forms handler then you can gain all features but you have to manage in your end. Following is the description of how to integrate the Pardot form handler on the website.
Things to do on the website while integrating Pardot
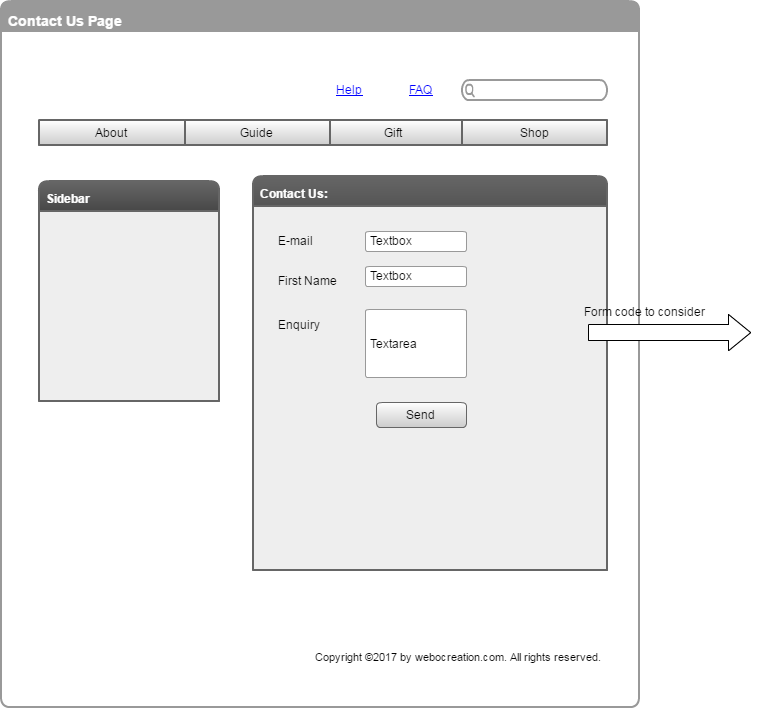
Create a form of your own design and template (HTML and CSS) then let the visitors fill the form and click the submit button. Our example code uses bootstrap and has three fields name, email and inquiry field. Just take into mind what name you have given for fields, as in the example:
- For name field: name
- For email field: email
- For the enquiry field: inquiry
Add your own kinds of form validation and spam checker, if you want you can add captcha to prevent spam and add another extra field to analyze more as per your need.
<link rel="stylesheet" href="https://maxcdn.bootstrapcdn.com/bootstrap/3.3.7/css/bootstrap.min.css"
      integrity="sha384-BVYiiSIFeK1dGmJRAkycuHAHRg32OmUcww7on3RYdg4Va+PmSTsz/K68vbdEjh4u" crossorigin="anonymous">

<div class="container">
    <div class="row">
        <form method="post"
              enctype="multipart/form-data" class="form-horizontal">
            <fieldset>
                <legend>Contact Form</legend>
                <div class="form-group required">
                    <label class="col-sm-2 control-label" for="input-name">Your Name</label>
                    <div class="col-sm-10">
                        <input type="text" name="name" value="" id="input-name" class="form-control"/>
                    </div>
                </div>
                <div class="form-group required">
                    <label class="col-sm-2 control-label" for="input-email">E-Mail Address</label>
                    <div class="col-sm-10">
                        <input type="text" name="email" value="" id="input-email" class="form-control"/>
                    </div>
                </div>
                <div class="form-group required">
                    <label class="col-sm-2 control-label" for="input-enquiry">Enquiry</label>
                    <div class="col-sm-10">
                        <textarea name="enquiry" rows="10" id="input-enquiry" class="form-control"></textarea>
                    </div>
                </div>
            </fieldset>
            <div class="buttons">
                <div class="pull-right">
                    <input class="btn btn-primary" type="submit" value="Submit"/>
                </div>
            </div>
        </form>
    </div>
</div>
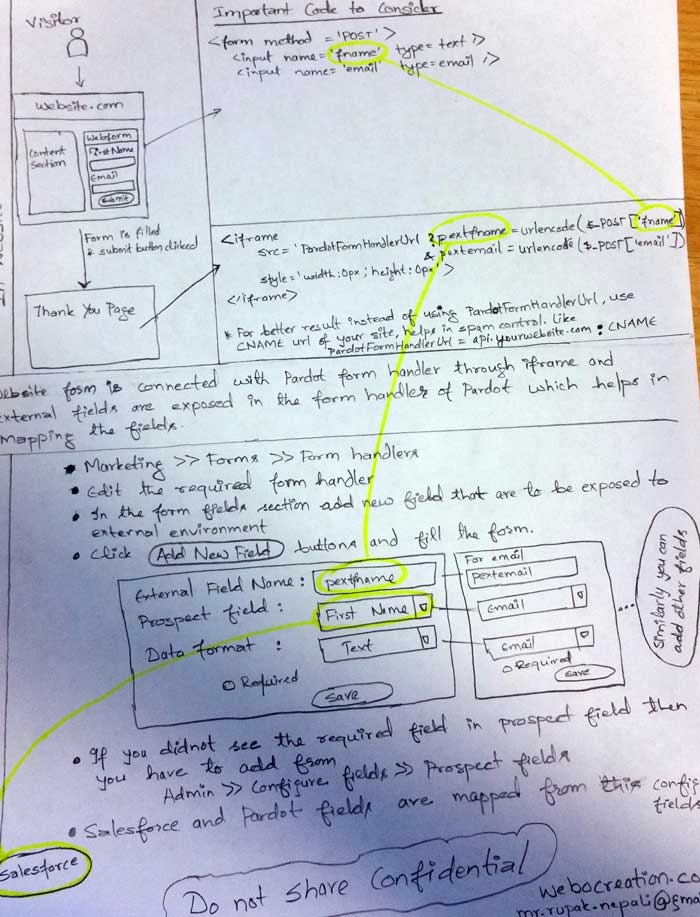
When form is submitted then you can process the form data, you can insert into the database, send email and perform other actions to the form data. Then in this page you have to insert the iframe with source of Pardot form handler url which passes data to the pardot. PHP Example is shown in the code. In the iframe code fname='<?php echo $_POST[‘name’]; ?>’ fname is from pardot and name is from form.
PARDOT_URL_TAKEN_FROM_FORMHANDLER is the Endpoint URL you get from the form handler summary at Pardot. Better to use https one.
For the best result instead of using the Endpoint URL, use CNAME alias URL of your website, as it helps in spam control. http://help.pardot.com/customer/portal/articles/2128543-setting-up-tracker-subdomain-cname-

//form processing codes
<p>Thanking you for contacting us.</p>
<iframe src="PARDOT_URL_TAKEN_FROM_FORMHANDLER?fname='<?php echo $_POST['name']; ?>'
&email='<?php echo $_POST['email']; ?>'
&comment='<?php echo $_POST['enquiry']; ?>'
width='0' height='0' type='text/html' frameborder='0' allowTransparency='true' style='border: 0'>
</iframe>

//** For better result instead of using PardotFormHandlerUrl, use CNAM url of your site, helps in spam control.
// Like pardotFormhandlerUrl = api.yourwebsite.com: CNAME
Website form is connected with Pardot form handler through iframe and external fields are exposed in the form handler of Pardot which maps the fields.
Things to do in Pardot while integrating Pardot into the website
Create the form handler:
- Navigate to Marketing > Forms > Form Handlers.
- Click + Add Form Handler.
- Enter a Name.
- Choose Folder.
- Optional: Add Tags.
- Choose a Campaign.
- Optional: enable Kiosk/Data Entry Mode.
- Mark Enable data forwarding to success location if the data from the target form is to be forwarded to another service other than Pardot.
- Optional: mark Disable Visitor Activity throttling and send auto-responder emails after every submission.
- In the Success Location dropdown, select Specific URL* or Referring URL.**
- In the Error Location dropdown, select either ‘Referring URL’ or ‘Specific URL’ as the location where the visitor should be redirected if there is an error with the form. Note:
- If you select the ‘Referring URL’, then you cannot enter a specific error location.
- If you select the ‘Specific URL’ then you will need type in the URL of where you want the visitor redirected if the form field values are incorrect. This is only available for error locations set to a ‘Specific URL.’
- Optional: add Completion Actions.
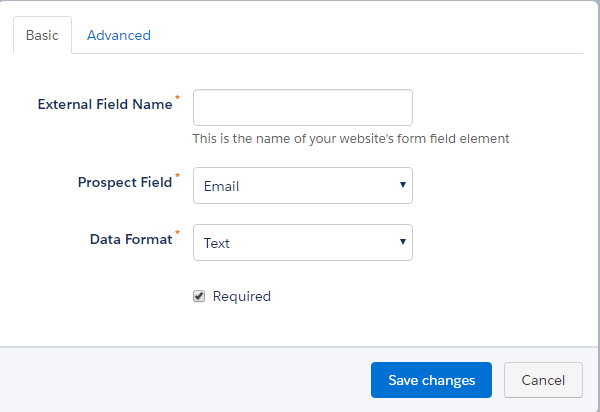
- Add and map your form handler fields.
- Click Add New Field.
- Enter External Field Name with the exact name of the form field as it appears on your form. This is specified by the ‘name=’ attribute of the input tag in the HTML of your original form. Note: external field names are case-sensitive.
- Select the Pardot Prospect Field the external field names should map to.
- Edit Data Format as needed.
- Optional: in the Advanced tab, enter an Error Message.
- Optional: in the Advanced tab, mark Maintain the initial value upon subsequent form submissions if necessary. Note: Marking this will prevent Pardot from updating an existing value in the prospect’s record.
- Click Save changes.
- If you did not see the required field in prospect field then you have to add from
Admin>> Configure fields >> Prospect fields - Salesforce and Pardot fields are mapped form this configure fields.
- Click Create form handler to save.
http://help.pardot.com/customer/en/portal/articles/2125979-creating-form-handlers?b_id=11139
Like this, we can integrate Pardot on the website and enjoy Pardot B2B marketing.
If you have any questions or issues then please let us know and we can debug to solve it.
Contact us at webocreation.com@gmail.com
Twitter: rupaknpl
Image to show it 🙂
Need help updating a Pardot landing page then let us know we will help you set up everything, contact us at webocreation.com@gmail.com
Thanks
Rupak Nepali
Other posts about Pardot: