
In this Opencart tutorial, we will show how to create a custom Opencart 3 theme. We will go through the default theme files and folders and then clone default theme to custom theme, install the custom theme, activate it and change the CSS of the custom theme.
First, let’s go through the default core theme files and folders of OpenCart:
In the admin section following are the theme files:
- admin/controller/extension/theme/default.php
- admin/language/en-gb/extension/theme/default.php
- admin/view/template/theme/default.twig
In the catalog section, all the files and folders inside the catalog/view/theme/default are of the default theme.
Now, let’s clone the default theme to a custom theme, for that let’s do the following:

We are going to create a “webocreation” theme, you can name is anything. Let’s start cloning the files:
- Go to admin/controller/extension/theme/ and copy default.php and paste it and rename it to webocreation.php, then open it in your editor.
- Now find the default word and replace it with webocreation.
- Next, go to admin/language/en-gb/extension/theme/ and copy default.php and paste it and rename it to webocreation.php, then open it in your editor.
- Do the same, find the default word, and replace it with webocreation.
- Next, go to admin/view/template/extension/theme/ and copy default.twig and paste it and rename it to webocreation.php, then open it in your editor.
- Do the same, find the default word, and replace it with webocreation.
- Now go to catalog/view/theme and copy the whole default folder and paste it and rename the folder to webocreation.
- Go to catalog/view/theme/webocreation/image and copy default.png and paste it and rename it to webocreation.png
- Finally go to catalog/view/theme/webocreation/template/common/ and open header.twig and then find default and replace it with webocreation.
- With this, our webocreation opencart theme is created.
Now let’s activate the webocreation Opencart theme.
- Log in to the Admin section and in the left menu, navigate to Extensions >> Extensions >> Then choose the Themes in extension type.
- You will see the themes list, where we will see our Webocreation Store Theme also
- Click the Install button
- Then edit it
- In the Theme Directory choose the “webocreation”
- Choose Status to Enabled
- Then enter the details as per your requirement, enter the width and height of images, then click save.
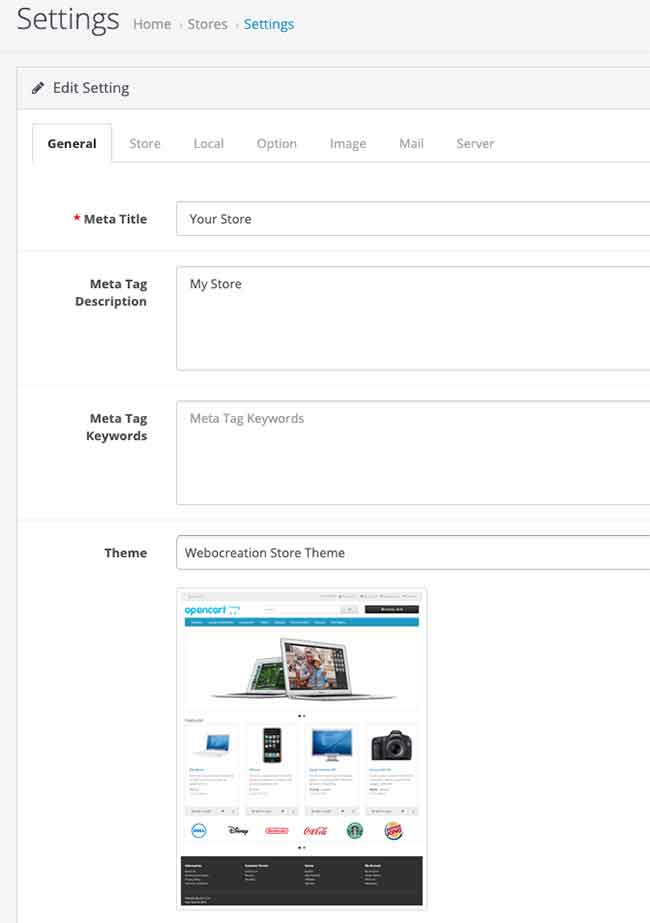
- Now navigate to System >> Settings >> Edit your store >> and in General tab >> Theme >> select the “Webocreation Store Theme”
- Your webocreation theme is activated.
Let’s see a demo if really webocreation theme is active
- Go to catalog/view/theme/webocreation/stylesheet/ and open stylesheet.css and change the color of heading, find the following code:
h1, h2, h3, h4, h5, h6 {
	color: #444;
}
Replace the above code with the following:
h1, h2, h3, h4, h5, h6 {
	color: #64ccc9;
}
If everything is ok then you will see changes in the heading titles, now you can perform any changes you like in the CSS and make it different than the default OpenCart theme.
Let us know if you have any questions or suggestions. In the next post, we will set up a local development environment and setup gulp, package.json, yarn, or NPM and be ready to use the SCSS, minification, and optimization for rapid theme development.

")


")
I have a strange command, delete the entire contents of the “stylesheet.css” file on the root of
“catalog /view / theme / default / stylesheet “and nothing has changed on the home page.
https://www.tjrebah.com/1.png
https://www.tjrebah.com/2.JPG
Please clear the cache. I hope that will solve the issues.
https://webocreation.com/blog/twig-cache-removing-while-developing-theme-or-module-developer-tips/