
Opencart multiple websites. It can handle multiple stores with one Opencart installation. Creating a Multi-Store Opencart allows for multi-store management using only one installation. If you have installed Opencart into at least one store, you can add multiple stores to your admin panel without having to repeat the installation process. To add a new store you must first create a subdomain in your cPanel, then add the store in the Settings section of the admin panel.
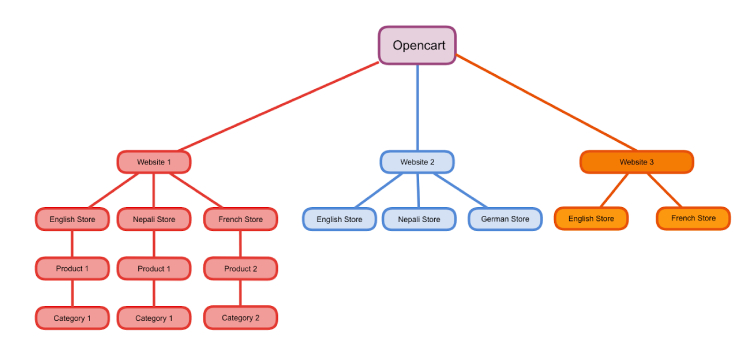
OpenCart 4 allows you to manage multiple online stores from a single admin interface. This multi-site capability is particularly useful for businesses that operate in different regions, sell various product lines, or want to create separate storefronts for different customer segments. Setting up multiple sites in OpenCart is straightforward and provides a centralized way to control and monitor all your stores.
Benefits of a Multisite Setup
- Centralized Management: Manage multiple stores from a single admin dashboard. One admin management with one log in for products, categories, customers, orders, design, etc
- Shared Resources: Use the same product catalog, customer database, and settings across multiple stores. You can configure each product to show on which store and can set different prices for the same product
- Customized Storefronts: Tailor the appearance and functionality of each store to target specific audiences. Although having one admin management, you can have different layouts and different themes for different stores
- Cost-Effective: Save on infrastructure and maintenance costs by running multiple stores on the same installation.
- Customer easiness: Customers can have a single sign-on for different stores that are managed on multiple.
Prerequisites
Before setting up multiple stores, ensure you have the following:
- A working installation of OpenCart 4 on the server (In our example we are using demo.webocreation.com)
- Administrative access to the OpenCart admin panel.
- Domain names or subdomains for each store, both the server and
- DNS Domain name server settings
- You use the addon domain in cpanel to add the 2nd domain to your hosting account. Then change the document root in that 2nd domain to be the same as your first store – the folder opencart is installed in. Add the store to opencart settings and done.
- Point their A records to the IP of your server.
- Associate them with that hosting account which can be done in cPanel via “Aliases” which used to be called “Parked Domains” if I remember correctly.
Example stores
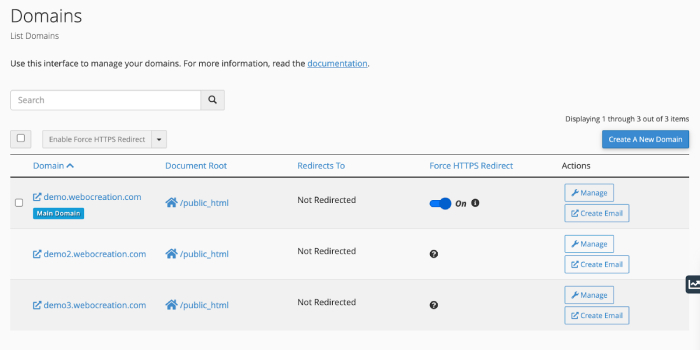
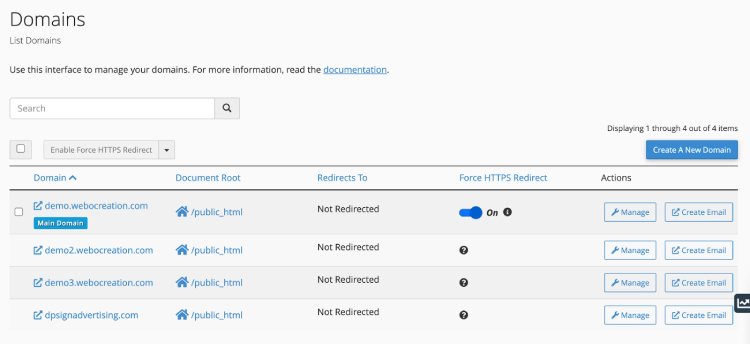
Main store: https://demo.webocreation.com
First Store 1: https://demo2.webocreation.com
Second Store 2: https://demo3.webocreation.com
Third Store 3: https://dpsignadvertising.com
Step-by-Step Guide to Setting Up Multisite in OpenCart 4
Step 1: Configure Your Domain/Subdomain
First, set up your additional domains or subdomains. This process will vary depending on your hosting provider but generally involves the following steps:
- DNS management: Access to domain registrar admin section so you can point domain A records to the server. In this example, we are using Cloudflare DNS so we added the A records like below, as in this example we are using sub-domain demo2.webocreation.com and demo3.webocreation.com, so pointed the A record to the IP address.
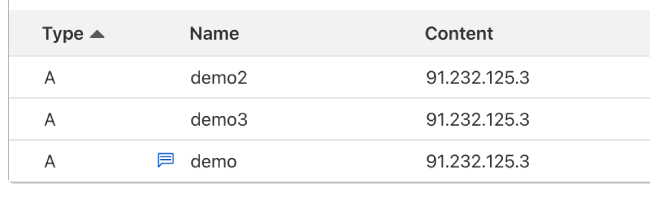
Fig: 2
For main domains like dpsignadvertising.com, you need to delegate the same name server that you are using for the opencart installed server, here is https://demo.webocreation.com, so for dpsignadvertising.com, we add the same ns1 and ns2 as demo.webocreation.com
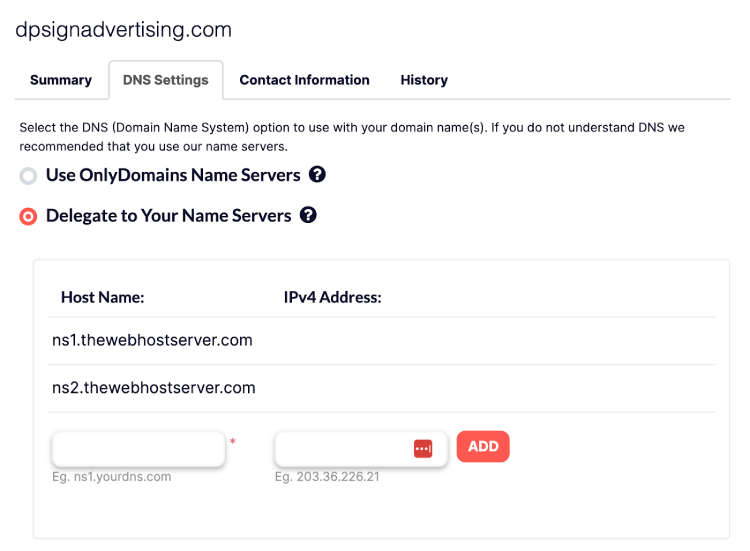
Fig: 12.3
- Subdomains: Create subdomains (e.g., store1.yourdomain.com, store2.yourdomain.com) and point them to the OpenCart installation directory.
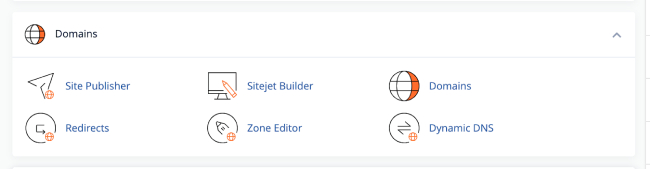
Fig: 12.4
Then click “Create a New Domain” enter the domain URL and submit, here we entered demo3.webocreation.com
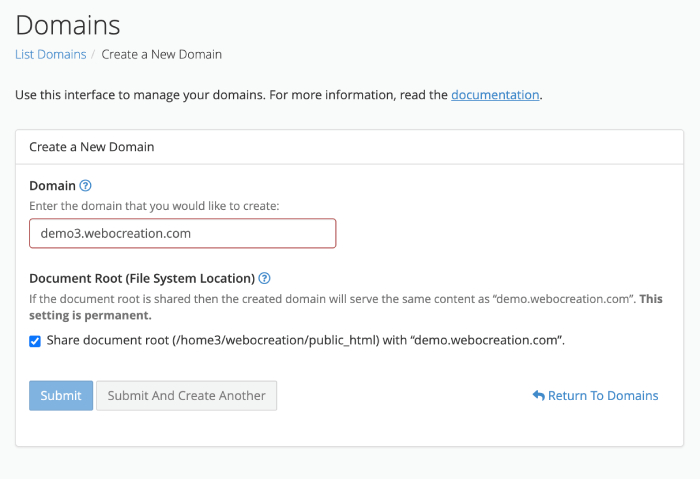
Similarly, you can enter as many domains as needed.
- Domains: Same as sub-domains, point each domain to the root directory of your OpenCart installation. We are using the cPanel so we find the domain section, for us here is an example, click in the Domains and enter the domains.
2: Add New Stores in OpenCart Admin
- Log in to Admin Panel: Log in to your OpenCart admin dashboard.
- Navigate to Store Settings: Go to System -> Settings.
- Add New Store:
- Click the “+” button to add a new store.
- Store Name: Enter the name of the new store.
- Store URL: Enter the URL of the new store, including the trailing slashLog in., https://dpsignadvertising.com/).
If you forget the trailing slash multi-store will not work
3: Configure Store Settings
- General Settings: Configure general settings such as store name, owner, address, email, and phone number. You can select different themes, logos, and layouts for each store
- Local Settings: Set local settings like country, region, language, and currency for the new store.
- Option Settings: Set all settings like products, legal, etc for the new store.
- Image Settings: Enter the image sizes
4: Customize Your Store
- Themes: Go to Design -> Themes and select a theme for your new store. You can choose to use the same theme as your main store or a different one.
- Layouts: Customize the layouts for your new store by navigating to Design -> Layouts. Adjust the positions and modules according to your requirements.
- Banners and Sliders: Set up banners and sliders specific to the new store under Design -> Banners.
5: Assign Products and Categories
- Products: Navigate to Catalog -> Products and edit each product to assign it to the new store. Use the “Stores” tab to select the stores where the product should be visible.
- Categories: Go to Catalog -> Categories and assign categories to the new store using the “Stores” tab.
6: Test Your Store
- Access the Store URL: Open a web browser and navigate to the URL of your new store.
- Verify Functionality: Ensure that all links, images, and functionalities are working correctly.
- Place a Test Order: Complete a test purchase to verify that the checkout process is functioning correctly.
Setting up a multisite environment in OpenCart 4 is an efficient way to manage multiple online stores from a single admin interface. By following the steps outlined above, you can configure and customize each store to meet the needs of different markets or customer segments. This powerful feature of OpenCart helps streamline operations, reduce costs, and expand your business reach effectively.


")