
This is an Opencart guide where we are showing you the setting configuration in Opencart 4. Go to Admin >> System >> Settings and edit the store, and we will define the fields in general, store, local, option, image, mail, and server. Opencart user manual
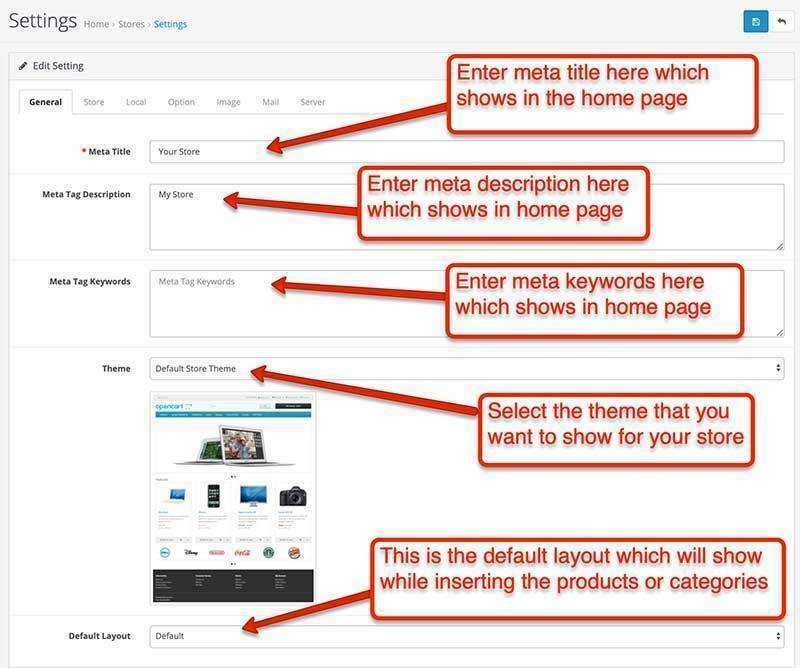
General Tab
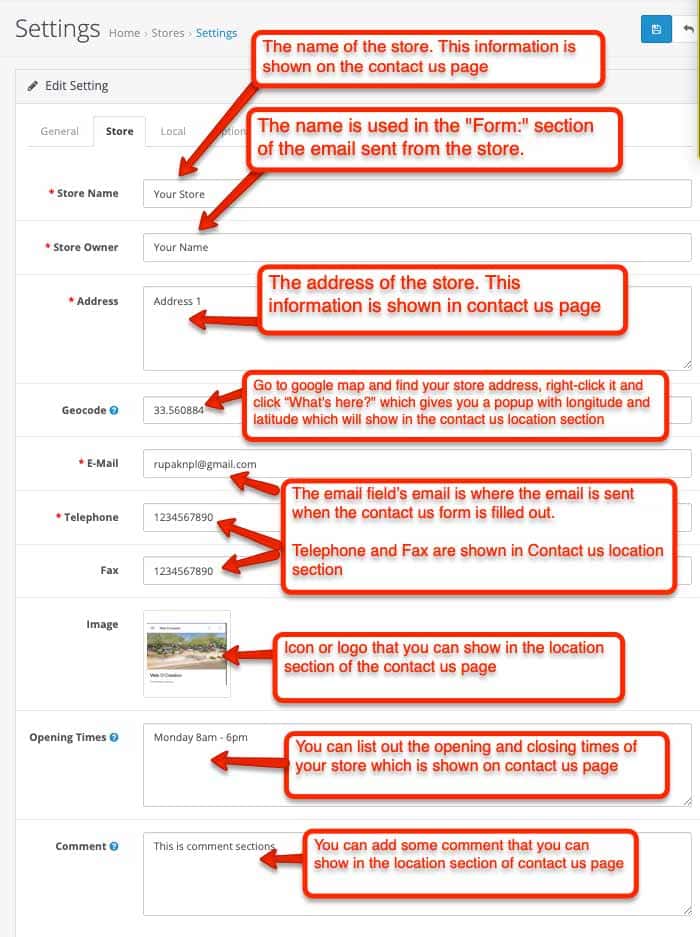
Store tab
This setting tab is mostly for the contact us page email and display of information.
- Store Name: The name of the store. This information is shown on the contact us page.
- Store Owner: The name is used in the “Form:” section of the email sent from the store.
- Address: The address of the store. This information is shown on the contact us page
- Geocode: Go to google map and find your store address, right-click it and click “What’s here?” which gives you a popup with longitude and latitude which will show in the contact us location section.
- Email: The email field’s email is where the email is sent when the contact us form is filled out.
- Telephone and Fax: Telephone and Fax are shown in the Contact us location section
- Image: Icon or logo that you can show in the location section of the contact us page
- Opening Times: You can list out the opening and closing times of your store which are shown on the contact us page.
- Comment: You can add some comments that you can show in the location section of the contact us page
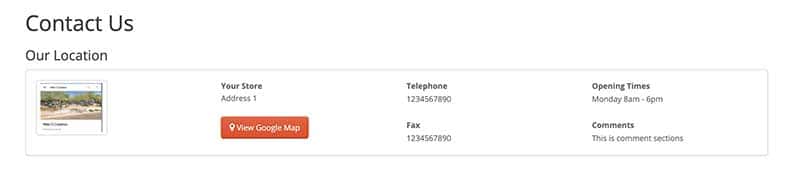
When you entered those details then the default contacts us page will look like the below:
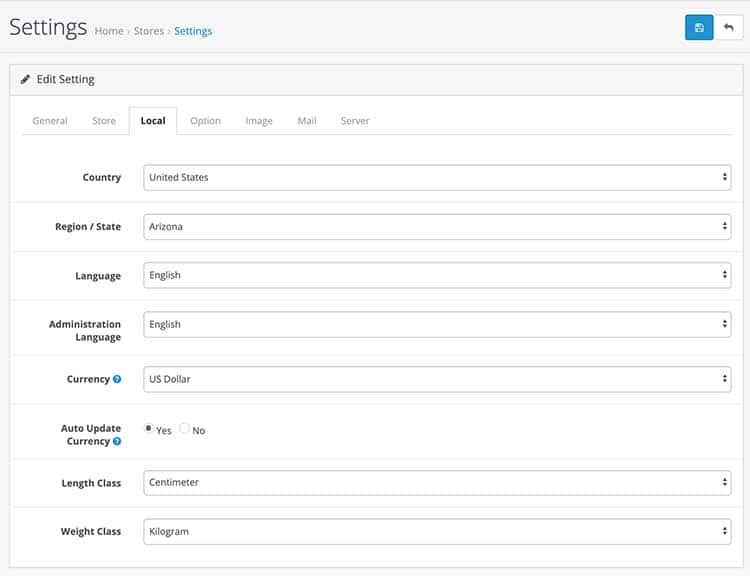
Local tab
In the local setting tab, we set up localization of the store, we will enter the data of country, region, language, currency, length, and weight at the Localisation setting. Here we select default localization for the store.
Option tab
The “Option” tab in the Settings has the following setting fields: Products, Reviews, Vouchers, Taxes, Account, Checkout, Stock, Affiliates, Returns, and Captcha.
Products setting in Opencart
In Opencart 4, there are only two products settings:
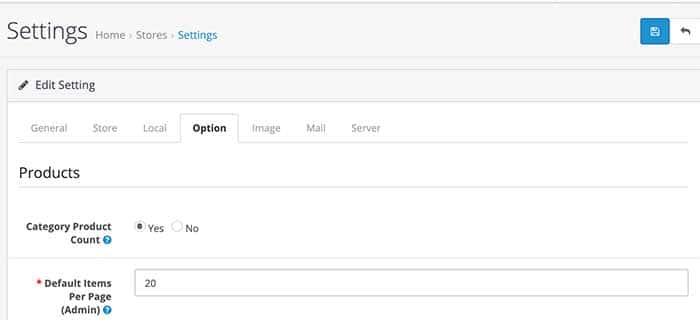
Category Product Count: Show the number of products inside the subcategories in the storefront header category menu. Be warned, this will cause an extreme performance hit for stores with a lot of subcategories! We suggest selecting “No” for the performance.
Default Items Per Page (Admin): Determines how many admin items are shown per page (orders, customers, etc). After this number, it will show the pagination.
In previous versions, there used to be product numbers to show in the storefront and limit description and image sizes but it is now moved to the theme settings section at Extensions >> Extensions >> Select theme >> Edit the theme and you will find all those setting there.
Reviews settings in Opencart
On the product detail page, there is a review section, these are the settings for that review section.
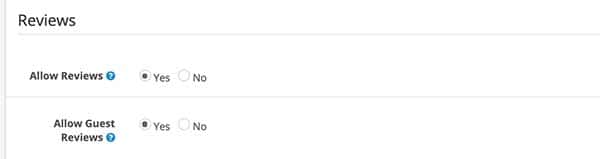
Allow Reviews: Enable/Disable new review entries and display of existing reviews.
Allow Guest Reviews: Select Yes if you allow guests to post reviews for products.
Vouchers setting in Opencart
Store owners can send Gift Vouchers to customers from the admin section or store visitors can also go to store URLs like https://YOURURL/index.php?route=account/voucher and buy the gift vouchers and send them to Recipient’s email and the recipient can get the store credit of the send amount. These are the setting for the Gift Vouchers.
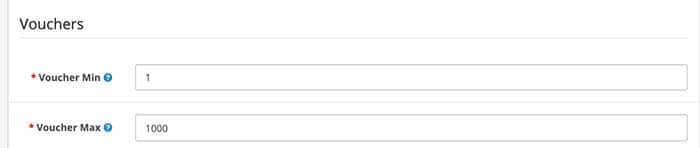
Voucher Min: Minimum amount a customer can purchase a voucher for.
Voucher Max: Maximum amount a customer can purchase a voucher for.
Taxes settings in Opencart:
We can set up taxes for each Geo zones in Opencart, these are the settings for taxes.
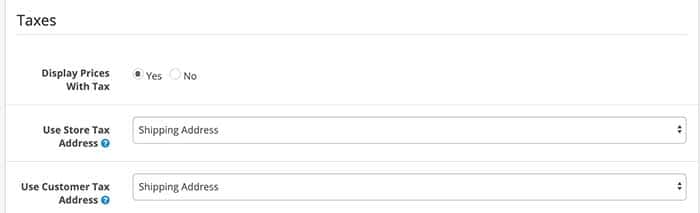
Display Prices With Tax: If this is selected as “Yes” then the price includes tax, but, if it is selected as “No” then taxes are added to the shopping cart only.
Use Store Tax Address: Use the store address to calculate taxes if the customer is not logged in. You can choose to use the store address for the customer’s shipping or payment address.
Use Customer Tax Address: Use the customer’s default address when they log in to calculate taxes. You can choose to use the default address for the customer’s shipping or payment address.
Account settings in Opencart
These are the settings for the accounts in Opencart:
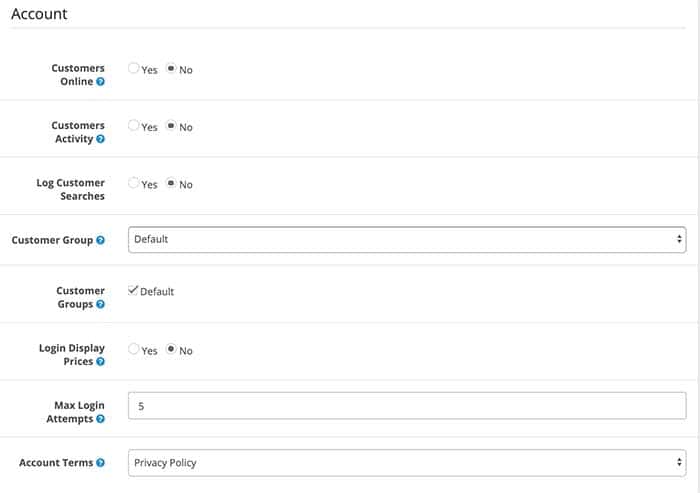
Customers Online: If this is selected Yes then you can track customers online via the customer reports section. Go to admin >> Reports >> Who’s Online and you can see the Online Report.
Customers Activity: If this is selected Yes then you can track customers’ activity via the customer reports section. Go to admin >> Reports >> Choose the report type as “Customer Activity Report” and see the activities of the customer.
Log Customer Searches: If this is selected Yes then you can track what logged-in customers are searching on the website which may help you to add those products to featured products or make some products show decisions. Go to admin >> Reports >> Choose the report type as “Customer Searches Report”
Customer Group: Default customer group.
Customer Groups: Display customer groups that new customers can select to use such as wholesale and business when signing up.
Login Display Prices: Only show prices when a customer is logged in.
Max Login Attempts: Maximum login attempts are allowed before the account is locked for 1 hour. Customer and affiliate accounts can be unlocked on the customer or affiliate admin pages.
Account Terms: Forces people to agree to terms before an account can be created.
Checkout setting in Opencart:
These are the setting for checkout in Opencart:
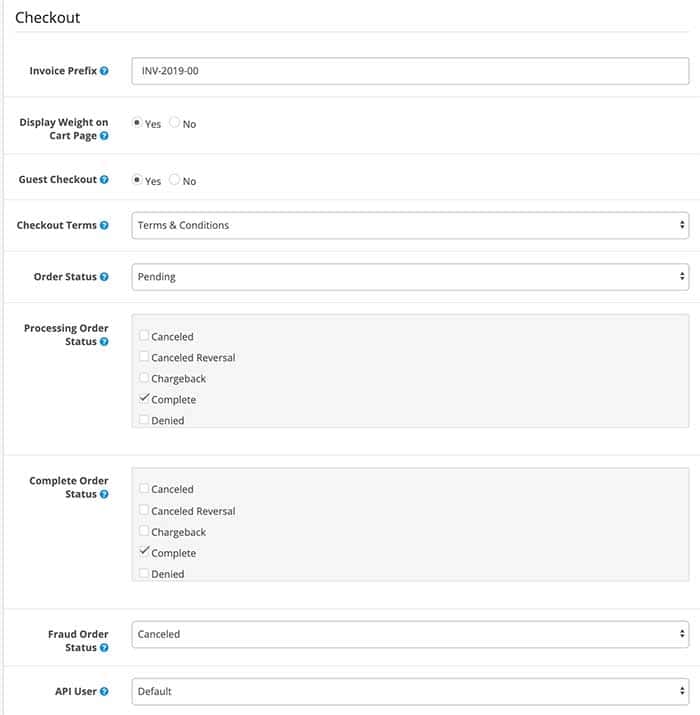
Invoice Prefix: Set the invoice prefix (e.g. INV-2011-00). Invoice IDs will start at 1 for each unique prefix.
Display Weight on Cart Page: Show the cart weight on the cart page.
Guest Checkout: Allow customers to checkout without creating an account. This will not be available when a downloadable product is in the shopping cart.
Checkout Terms: Forces people to agree to terms before a customer can checkout.
Order Status: Set the default order status when an order is processed.
Processing Order Status: Set the order status the customer’s order must reach before the order starts stock subtraction and coupon, voucher, and rewards redemption.
Complete Order Status: Set the order status the customer’s order must reach before they are allowed to access their downloadable products and gift vouchers.
Fraud Order Status: Set the order status when a customer is suspected of trying to alter the order payment details or use a coupon, gift voucher, or reward points that have already been used.
API User: Default API user the admin should use.
Stock settings in Opencart:
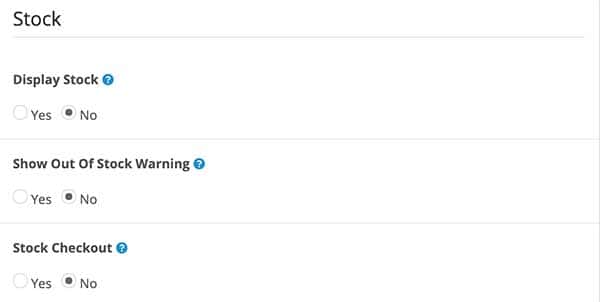
Display Stock: Display stock quantity on the product page.
Show Out Of Stock Warning: Display Out of stock message on the shopping cart page if a product is out of stock but stock checkout is yes. (Warning always shows if stock checkout is no)
Stock Checkout: If selected yes it allows customers to still check out if the products they are ordering are not in stock.
Affiliates settings in Opencart:
In Opencart 4 the affiliates are combined with customers. Here are details of affiliates in Opencart, these are the store-level setting of Affiliates in Opencart.
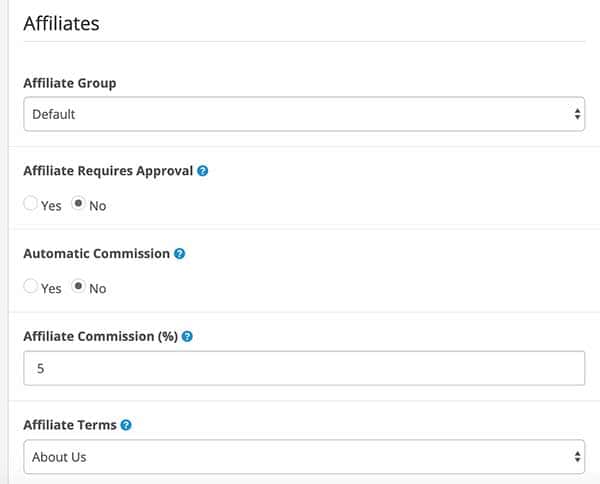
Affiliate Group: As customers and affiliates are managed by customers in the admin section, so the main customer groups that affiliate group is assigned if someone registered for the affiliates.
Affiliate Requires Approval: Automatically approve any new affiliates who sign up.
Automatic Commission: Automatically add commission when each order reaches the complete status.
Affiliate Commission (%): The default affiliate commission percentage.
Affiliate Terms: Forces people to agree to terms before an affiliate account can be created.
Returns settings in Opencart:
Customer can return the ordered products by filling the form athttps://YOURURL/index.php?route=account/return/add
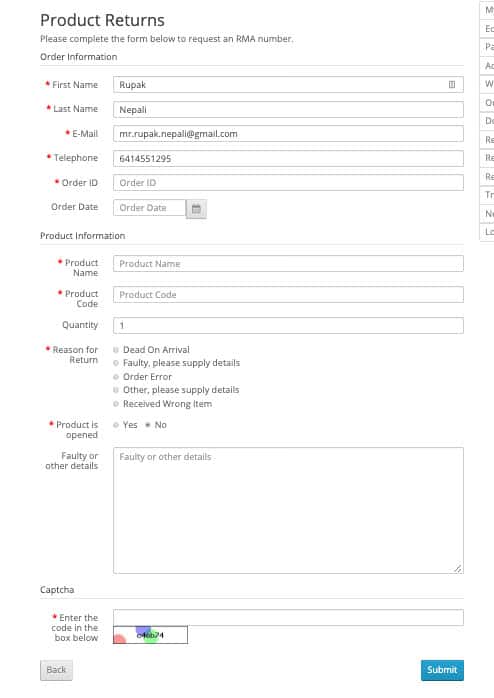
The returns setting in Opencart are:
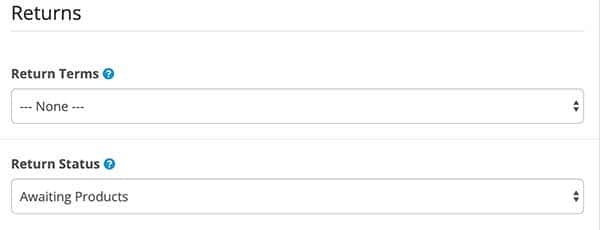
Return Terms: Forces people to agree to terms before a return can be created.
Return Status: Set the default return status when a return request is submitted.
Captcha settings in Opencart
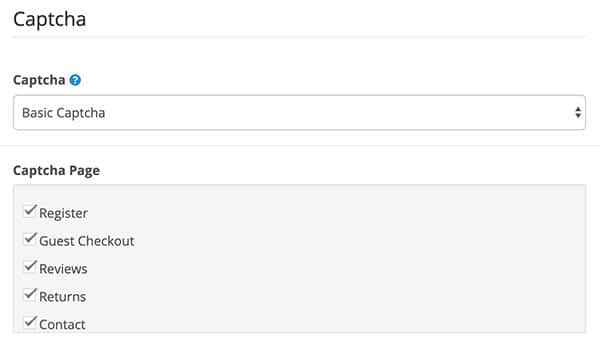
Go to the post below which will show details of how to set up a captcha in opencart
In this way, you can set up the Options settings of Opencart, now let’s see the image settings.
Image setting tab in Opencart:
The image setting tab includes a store logo and a favicon icon to upload. In the older version, there used to be image sizes for products and categories but it is now moved to the theme settings section at Extensions >> Extensions >> Select theme >> Edit the theme and you will find all those images setting there.
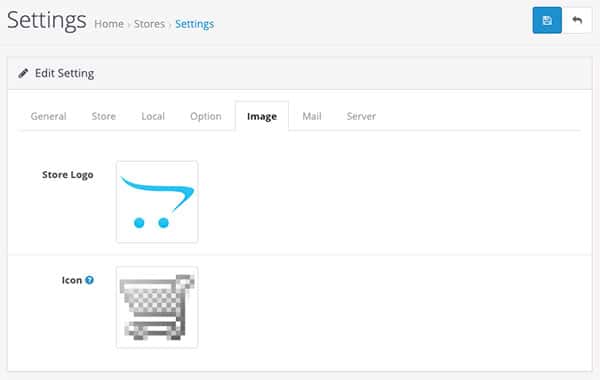
Store logo: You can upload a store logo here which is shown in the header of the front store.
Icon: This is a favicon icon, you can upload your store favicon here. Mostly we use size of 32px * 32px.
FTP tab setting in the Old version
Go to the following post for the FTP settings where we show you multiple ways to connect FTP but mostly they are left blank.
Mail tab settings of Opencart:
In the mail tab settings of Opencart, all email settings are done here, mostly we use the mail engine as Mail and enter the Mail Parameters as our email, and works properly. But if you want to set up SMTP then you need to choose the Mail Engine as SMTP and enter hostname, username, password, port, and timeout settings as per your SMTP provider.
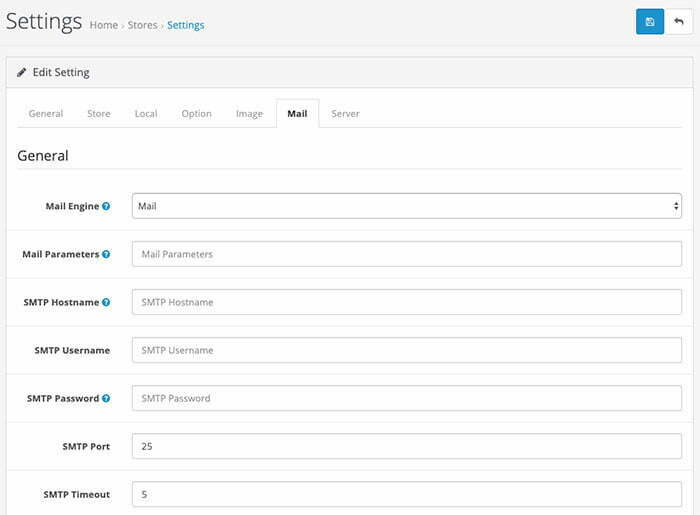
Mail Engine: Only choose ‘Mail’ unless your host has disabled the PHP mail function.
Mail Parameters: When using ‘Mail’, additional mail parameters can be added here (e.g. -f email@storeaddress.com)
SMTP Hostname: Enter your SMTP hostname here. Add ‘tls://’ or ‘ssl://’ prefix if security connection is required. (e.g. tls://smtp.gmail.com, ssl://smtp.gmail.com).
SMTP Username: Enter the SMTP username provided by your email server.
SMTP Password: Enter the SMTP password provided by your email server. For Gmail, you might need to set up an application-specific password here: https://security.google.com/settings/security/apppasswords.
SMTP Port: Enter the SMTP port provided by your email server.
SMTP Timeout: Enter the SMTP timeout here.
Mail Alerts settings in Opencart:
You can get an email alert when someone registered an account or apply for affiliates or order some products or someone gives reviews.
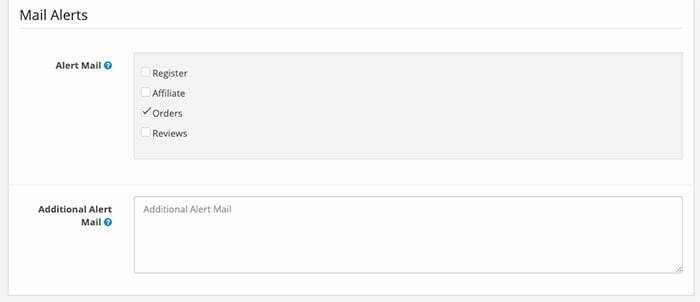
Alert Mail: Select which features you would like to receive an alert email on when a customer uses them.
Additional Alert Mail: Any additional emails you want to receive the alert email, in addition to the main store email. (comma separated).
Server settings tab in Opencart:
Most of the server settings are done here:
General
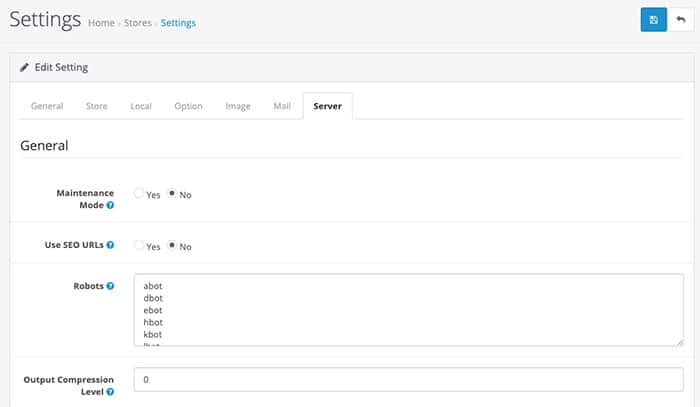
Maintenance Mode: Prevents customers from browsing your store. They will instead see a maintenance message. If logged in as admin, you will see the store as normal.
Use SEO URLs: To use SEO URLs, the apache module mod-rewrite must be installed and you need to rename the htaccess.txt to .htaccess.
See also to get 25 SEO best practices for Opencart 4 with 3 free SEO Opencart 4 module
Robots: A list of web crawler user agents that shared sessions will not be used. Use separate lines for each user agent.
Output Compression Level: GZIP for more efficient transfer to requesting clients. The compression level must be between 0 – 9. Keep on trying between 0-9 until you get the desired output as it differs as per server. For ours, we are using 5.
Security
These are settings for the Opencart security section.
See: How to set up SSL in Opencart?
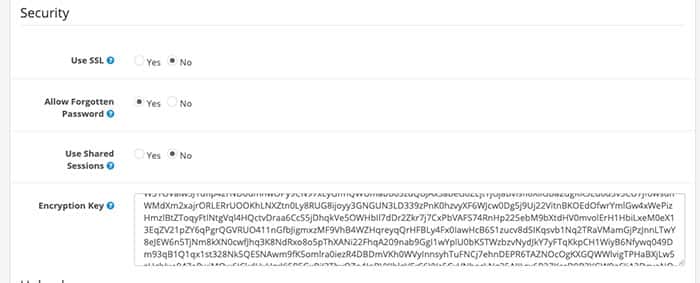
Use SSL: To use SSL check with your host if an SSL certificate is installed and add the SSL URL to the catalog and admin config files.
Allow Forgotten Password: Allow forgotten passwords to be used for the admin. This will be disabled automatically if the system detects a hack attempt.
Use Shared Sessions: Try to share the session cookie between stores so the cart can be passed between different domains.
Encryption Key: Please provide a secret key that will be used to encrypt private information when processing orders.
Uploads
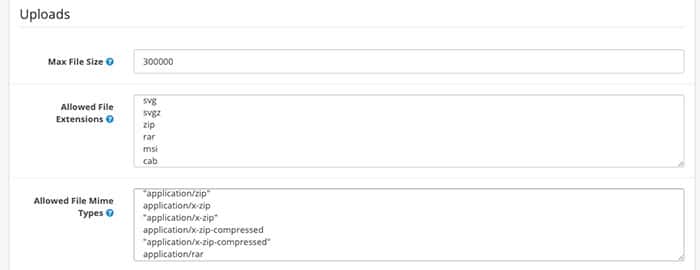
Max File Size: The maximum image file size you can upload in Image Manager. Enter as a byte.
Allowed File Extensions: Add which file extensions are allowed to be uploaded. Use a new line for each value.
Allowed File Mime Types: Add which file mime types are allowed to be uploaded. Use a new line for each value.
Error Handling
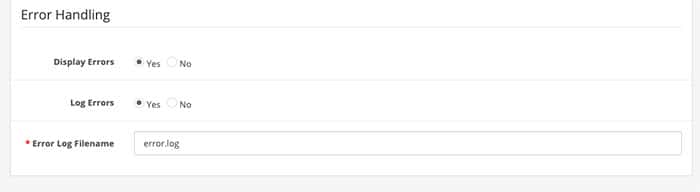
Display Errors: We suggest keeping it No for the live environment. For testing and development purposes keep it Yes so that you can see the PHP errors, warnings, and notices shown by the store.
Log Errors: We suggest keeping it Yes so that you can see if something is not working or producing errors.
Error Log Filename: This is the file where errors are logged. Better to name it error.log.
Enter all of the settings and finally click Save.
We hope this helps someone to go through the settings of Opencart. Please don’t forget to post your questions or comments so that we can add extra topics. You can follow us at our Twitter account @rupaknpl and subscribe to our YouTube channel for opencart video tutorials and go to the Opencart user manual.
 Design: Trends and Perspectives")


