
This Opencart tutorial is to learn about the single instance and multi-instance module and create admin section for single instance by creating the form in the admin, validate the form data and submit, edit or add data to the database. In our last two posts, we show the hello world module workflow and the basic hello world module in OpenCart, now we are showing how to create the form, validate it and submit it to the database.
We show you the way to show the simple text in our previous hello world module in Opencart. Now, let’s start with the normal flow that happens from frontend to backend:
- User logged into the Admin section
- They go to Admin >> Extensions >> Extensions >> Choose Modules >> Then edit the module
- After clicking the edit they will see a form
- They enter the data and click save or cancel button.
- If clicked cancel button then returns to the module listing page
- If clicked save button then first it will validate the permission of the user if they can have modified permission
- Then we check the data if it is POST or not and if it is POST then we save into database.
- While saving the module data in the database, there are two ways as Opencart support two modules way:
- One way is a single instance
- Another way is multi-instance
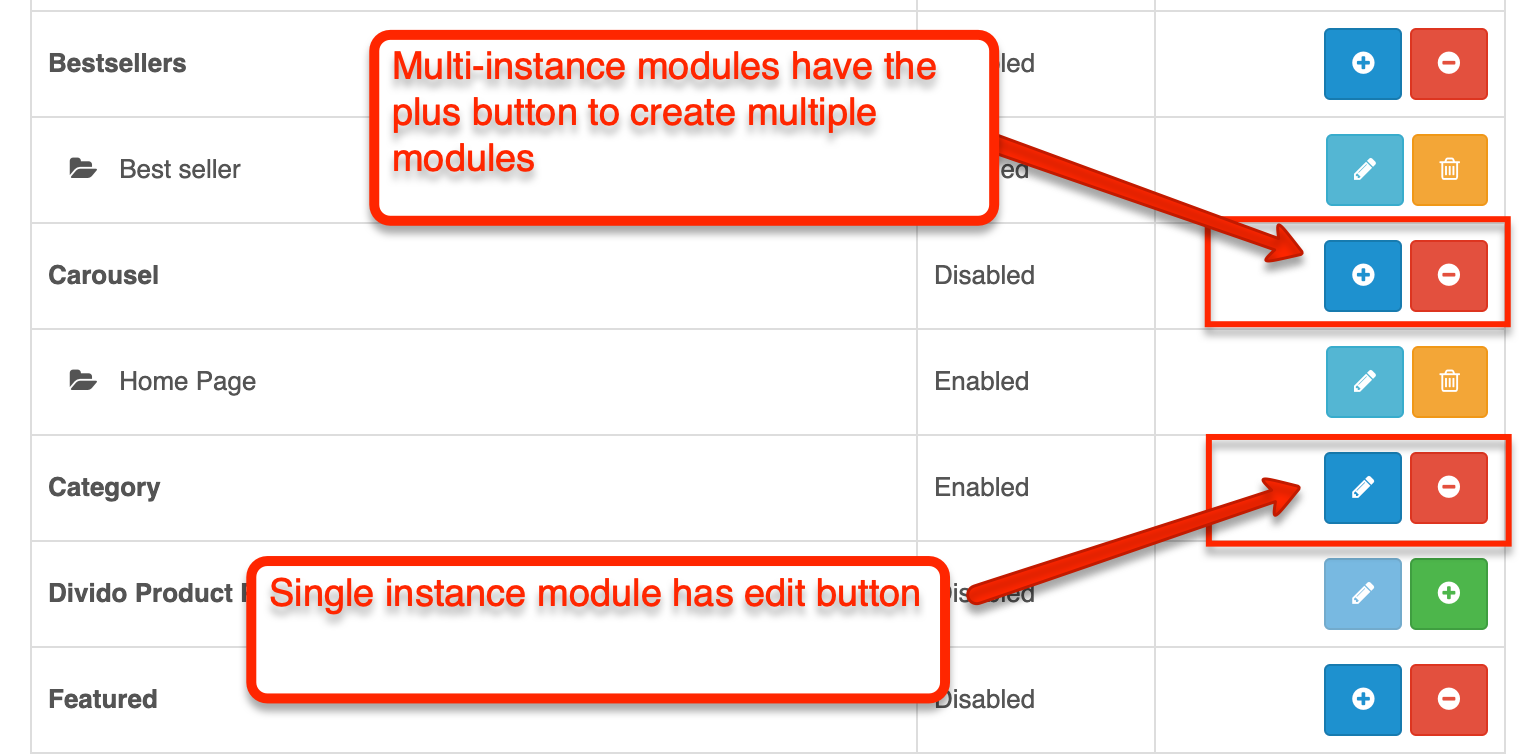
- Single instance module means it has one module only, install, edit and save the same module and use the same module in different layouts. It will not create another instance of modules. Example of core available only one instance Opencart module are: Account module, Category module, Information module, etc
- Multi-instance module created multiple instances. Each is taken as a different module instance and can be used different in layouts. Example of core available multi-instance Opencart modules is: Banner module, Bestsellers module, Carousel module, Featured module, latest module, a slideshow module, special module, etc.
- Once we save the data to the database and then add them to the layout and they are ready to show in the frontend.
In this blog post, we show you how to create a single instance Opencart module admin section and in the upcoming post, we will show you the frontend or catalog code of login module. Let’s create a module that shows the login form in the layout of the frontend.
Following are the files that we need to create:
- admin/language/en-gb/extension/module/login.php
- admin/controller/extension/module/login.php
- admin/view/template/extension/module/login.twig
- catalog/controller/extension/module/login.php
- catalog/language/en-gb/extension/module/login.php
- catalog/view/theme/default/template/extension/module/login.twig
First, let’s work on Language file admin/language/en-gb/extension/module/login.php, let’s define some variables which are useful for module: https://github.com/rupaknepali/Opencart-free-modules/blob/master/login-module/upload/admin/language/en-gb/extension/module/login.php
<?php
// Heading
$_['heading_title']    = 'Login';
// Text
$_['text_extension']   = 'Extensions';
$_['text_success']     = 'Success: You have modified Login module!';
$_['text_edit']        = 'Edit Login Module';
// Entry
$_['entry_status']     = 'Status';
// Error
$_['error_permission'] = 'Warning: You do not have permission to modify Login module!';
These are normal variables we defined, you can define as much as you can as per your need.
Second, open admin/controller/extension/module/login.php, you can see the code at this GitHub link: https://github.com/rupaknepali/Opencart-free-modules/blob/master/login-module/upload/admin/controller/extension/module/login.php We are defining the code below:
<?php
//As our file is login.php so Class name is ControllerExtensionModuleLogin which extends the Controller base classclass ControllerExtensionModuleLogin extends Controller {
//Declaration of the private property ‘error’ so that we can get check if any error occurs in the whole class.private $error = array();
//Create an index method. The index method is called automatically if no parameters are passed, check this video tutorial for details https://www.youtube.com/watch?v=X6bsMmReT-4
public function index() {
//Loads the language file by which the variables of language file are accessible in twig files
$this->load->language('extension/module/login');
//Set the Document title
$this->document->setTitle($this->language->get('heading_title'));
//Loads the model admin/model/setting/setting.php so that we can use the methods defined there.
$this->load->model('setting/setting');
//This is how we check if it is form submit. When we submit the form then this block of code also runs. Then it also validates the modify permission and other validation.
if (($this->request->server['REQUEST_METHOD'] == 'POST') && $this->validate()) {
//Look at this line of code, this is the code section which distinguish from Single Instance to Multi Instance. If it is multi instance then it will look like below instead of editSetting it will be addModule and editModule and setting module model is called above.
// if (!isset($this->request->get[‘module_id’])) {
// $this->model_setting_module->addModule(‘bestseller’, $this->request->post);
// } else {
// $this->model_setting_module->editModule($this->request->get[‘module_id’], $this->request->post);
// }
//This editSetting save the data to oc_setting database table, see module_ is important else it will not be saved. If you are //creating shipping extension then it should be shipping_, for payment extension it should be payment_
$this->model_setting_setting->editSetting('module_login', $this->request->post);
//This set the success message in the session.
$this->session->data['success'] = $this->language->get('text_success');
//This is to redirect to the extensions page.
$this->response->redirect($this->url->link('marketplace/extension', 'user_token=' . $this->session->data['user_token'] . '&type=module', true));}
//This is to check if there are any warnings
if (isset($this->error['warning'])) {
 $data['error_warning'] = $this->error['warning'];
 } else {
 $data['error_warning'] = '';
 }
//Following are for breadcrumbs$data['breadcrumbs'] = array();
$data['breadcrumbs'][] = array(
'text' => $this->language->get('text_home'),
'href' => $this->url->link('common/dashboard', 'user_token=' . $this->session->data['user_token'], true)
);
$data['breadcrumbs'][] = array(
'text' => $this->language->get('text_extension'),
'href' => $this->url->link('marketplace/extension', 'user_token=' . $this->session->data['user_token'] . '&type=module', true)
);
$data['breadcrumbs'][] = array(
'text' => $this->language->get('heading_title'),
'href' => $this->url->link('extension/module/login', 'user_token=' . $this->session->data['user_token'], true)
);
//Form action URL
$data['action'] = $this->url->link('extension/module/login', 'user_token=' . $this->session->data['user_token'], true);
//Form cancel URL
$data['cancel'] = $this->url->link('marketplace/extension', 'user_token=' . $this->session->data['user_token'] . '&type=module', true);
//This is to check what we fill out in the form, whether the status is Enabled or Disabled. If it is the loading time then it gets the //config value which we store in the oc_setting database table.
if (isset($this->request->post['module_login_status'])) {
 $data['module_login_status'] = $this->request->post['module_login_status'];
 } else {
 $data['module_login_status'] = $this->config->get('module_login_status');
 }
//This is how we load the header, column left and footer $data['header'] = $this->load->controller('common/header');
$data['column_left'] = $this->load->controller('common/column_left');
$data['footer'] = $this->load->controller('common/footer');
//This is to set output data variables to the view or twig files and twig file is loaded and HTML rendering is done with it.
$this->response->setOutput($this->load->view('extension/module/login', $data));
 }
//This is how validation is done, we check whether the user has permission to modify or not.
//If you want to validate the form data then you can check it here as well.
//If there is error then $this->error[‘warning’] is set and warning are shown.
protected function validate() {
 if (!$this->user->hasPermission('modify', 'extension/module/login')) {
 $this->error['warning'] = $this->language->get('error_permission');
 }
 return !$this->error;
}
//Closing of the Class }
Like this way we write the code in the controller, so distinguishing difference for single instance and multi-instance is how it saves data in the database, for single instance it uses model setting setting and editSetting method and save data at oc_setting database table.
Third, open admin/view/template/extension/module/login.twig and have a look at the following code, here we create the form and other layouts. https://github.com/rupaknepali/Opencart-free-modules/blob/master/login-module/upload/admin/view/template/extension/module/login.twig
{{ header }}{{ column_left }}
<div id="content">
    <div class="page-header">
        <div class="container-fluid">
            <div class="pull-right">
                <button type="submit" form="form-module" data-toggle="tooltip" title="{{ button_save }}" class="btn btn-primary">
                    <i class="fa fa-save"></i>
                </button>
                <a href="{{ cancel }}" data-toggle="tooltip" title="{{ button_cancel }}" class="btn btn-default">
                    <i class="fa fa-reply"></i>
                </a>
            </div>
            <h1>{{ heading_title }}</h1>
            <ul class="breadcrumb">
                {% for breadcrumb in breadcrumbs %}
                    <li>
                        <a href="{{ breadcrumb.href }}">{{ breadcrumb.text }}</a>
                    </li>
                {% endfor %}
            </ul>
        </div>
    </div>
    <div class="container-fluid">
        {% if error_warning %}
            <div class="alert alert-danger alert-dismissible">
                <i class="fa fa-exclamation-circle"></i>
                {{ error_warning }}
                <button type="button" class="close" data-dismiss="alert">×</button>
            </div>
        {% endif %}
        <div class="panel panel-default">
            <div class="panel-heading">
                <h3 class="panel-title">
                    <i class="fa fa-pencil"></i>
                    {{ text_edit }}</h3>
            </div>
            <div class="panel-body">
                <form action="{{ action }}" method="post" enctype="multipart/form-data" id="form-module" class="form-horizontal">
                    <div class="form-group">
                        <label class="col-sm-2 control-label" for="input-status">{{ entry_status }}</label>
                        <div class="col-sm-10">
                            <select name="module_login_status" id="input-status" class="form-control">
                                {% if module_login_status %}
                                    <option value="1" selected="selected">{{ text_enabled }}</option>
                                    <option value="0">{{ text_disabled }}</option>
                                {% else %}
                                    <option value="1">{{ text_enabled }}</option>
                                    <option value="0" selected="selected">{{ text_disabled }}</option>
                                {% endif %}
                            </select>
                        </div>
                    </div>
                </form>
            </div>
        </div>
    </div>
</div>
{{ footer }}
All others are similar, check <select name="module_login_status" the name you are using for the field should start with module_ for the single instance module.
Like this way, you can create the form in the admin section, validate the form data, validate the permission, and save the data to the database in the setting database table. Hope you liked this article, please subscribe to our YouTube Channel for Opencart video tutorials. You can also find us on Twitter and Facebook.


 for Your Business")


